2010 MERCEDES-BENZ S65AMG center console
[x] Cancel search: center consolePage 215 of 548

XChanging air volume: Slide ZVÆ or rotate
cVd.
or
XSwitching back to automatic mode:
Rotate cVd and select AUTO.
XExiting menu: Press W, back button
% in the center console (Y page 77) or
slide XVY.
The setting is saved.
Central climate control menu via
COMAND
The central climate control menu is in the
center of the climate control settings. When
the climate control is activated, you will see
AC in the central menu. The following
functions can only be operated in the central
climate control menu via COMAND:
RDeactivating cooling (Æ) (Y page 213)
RCentral climate control (Mono)
(Y page 214)
RFootwell temperature (Y page 214)
RAir flow from air vents (Y page 215)
XSelect climate control settings Q Central
menu.
Activating/deactivating air
conditioning
The air conditioning is operational while the
engine is running and cools the interior air to
the temperature set by the operator. In
addition, the air conditioning dehumidifies
the interior air and helps prevent window
fogging.
iCondensation may drip out from
underneath the vehicle. This is normal and
not an indication of a malfunction.
GWarning!
If you deactivate the air conditioning, the
vehicle will not be cooled when weather
conditions are warm. The windows can fog up
more quickly. Window fogging may impair
visibility and endanger you and others.
XSelect climate control settings Q Central
climate control menu.
XSelecting Æ: Slide ZVÆ or rotate
cVd.
XConfirming selection: Press W.
A checkmark appears when the cooling is
deactivated.
Æ appears in the central menu of the
climate control settings.
COMAND automatic climate control213Control systems221_AKB; 6; 20, en-USd2ugruen,Version: 2.11.8.12009-09-24T13:28:17+02:00 - Seite 213Z
Page 216 of 548
! If the air conditioning cannot be activated
again, this indicates that the air
conditioning is losing refrigerant. The
compressor has turned off.
Have the air conditioning checked at the
nearest authorized Mercedes-Benz Center.
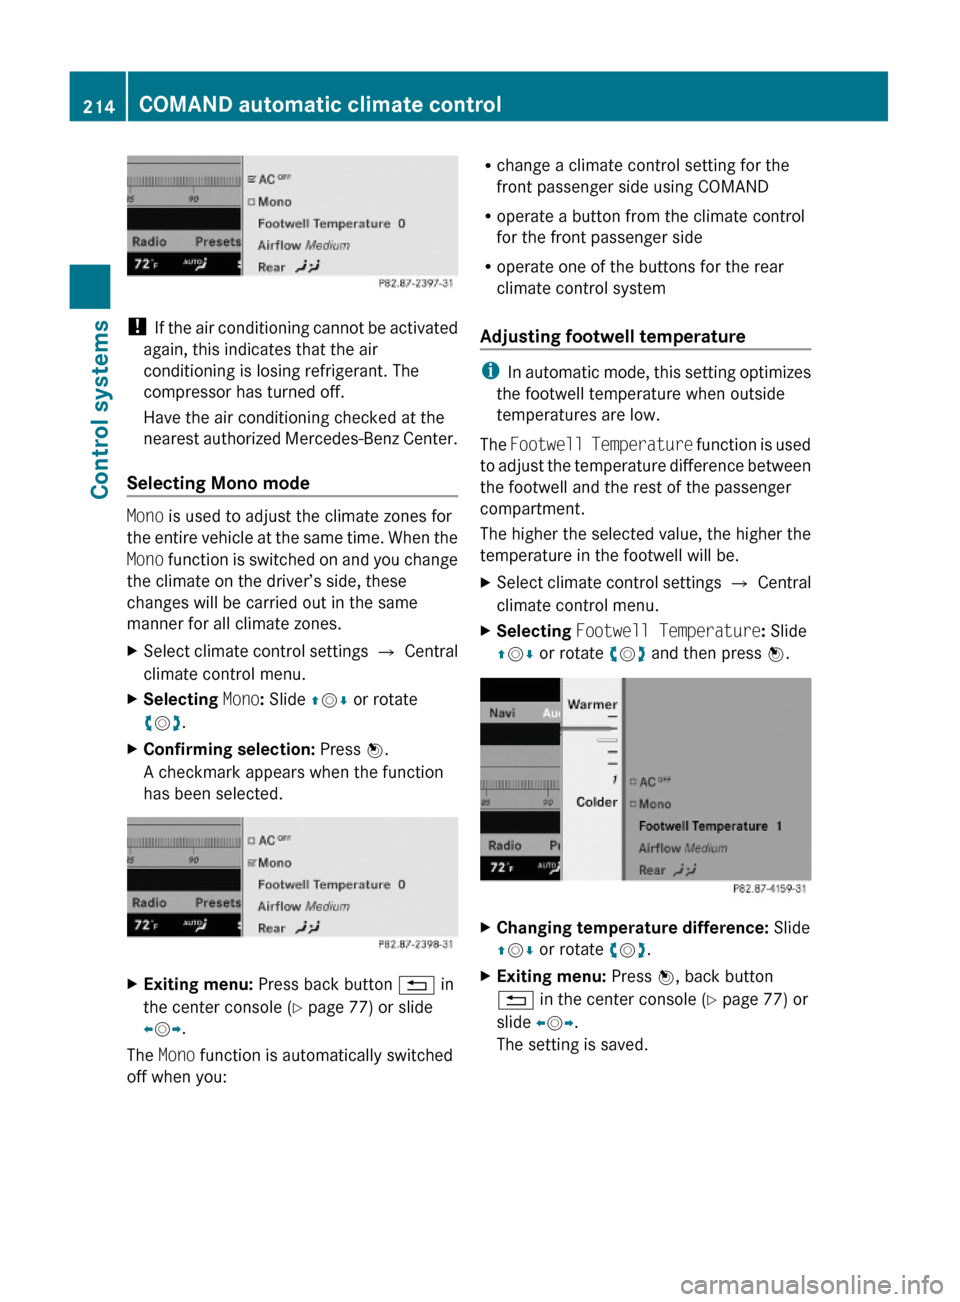
Selecting Mono mode
Mono is used to adjust the climate zones for
the entire vehicle at the same time. When the
Mono function is switched on and you change
the climate on the driver’s side, these
changes will be carried out in the same
manner for all climate zones.
XSelect climate control settings Q Central
climate control menu.
XSelecting Mono: Slide ZVÆ or rotate
cVd.
XConfirming selection: Press W.
A checkmark appears when the function
has been selected.
XExiting menu: Press back button % in
the center console (Y page 77) or slide
XVY.
The Mono function is automatically switched
off when you:
Rchange a climate control setting for the
front passenger side using COMAND
Roperate a button from the climate control
for the front passenger side
Roperate one of the buttons for the rear
climate control system
Adjusting footwell temperature
iIn automatic mode, this setting optimizes
the footwell temperature when outside
temperatures are low.
The Footwell Temperature function is used
to adjust the temperature difference between
the footwell and the rest of the passenger
compartment.
The higher the selected value, the higher the
temperature in the footwell will be.
XSelect climate control settings Q Central
climate control menu.
XSelecting Footwell Temperature: Slide
ZVÆ or rotate cVd and then press W.
XChanging temperature difference: Slide
ZVÆ or rotate cVd.
XExiting menu: Press W, back button
% in the center console (Y page 77) or
slide XVY.
The setting is saved.
214COMAND automatic climate controlControl systems
221_AKB; 6; 20, en-USd2ugruen,Version: 2.11.8.12009-09-24T13:28:17+02:00 - Seite 214
Page 241 of 548
Starting the dialog with the Voice
Control System
XSwitch on the ignition (Y page 284).XPress button ? on the multifunction
steering wheel.
An acoustic signal sounds. The dialog is
started.
XSpeak a command.
Pausing and resuming a dialog
Pausing
You can pause the dialog when a selection list
is displayed in COMAND.
XSpeak the command “Pause”.
Continue With Push-to-talk appears
at the top of the selection list. You can
select an entry using the COMAND
controller.
Resuming
XPress button ? on the multifunction
steering wheel.
The dialog is resumed.
Aborting dialog
XPress button % on the multifunction
steering wheel.
or
XSpeak one of the commands “Stop”, “Quit”,
“Abort”, “Terminate”, “Cancel” or “Exit”.
This does not apply when entering voice
names or during the individualization
process.
or
XPress any COMAND button.
Setting volume level
XActivate the Voice Control System.XSpeak a command, for example “Help”.XPress button W or X. The volume is
increased or decreased during voice
output.
or
XSet volume for voice output using the
COMAND volume thumbwheel on the lower
part of the front center console
(Y page 88).
iYou can also set the text reader speed
(Y page 91).
Displays
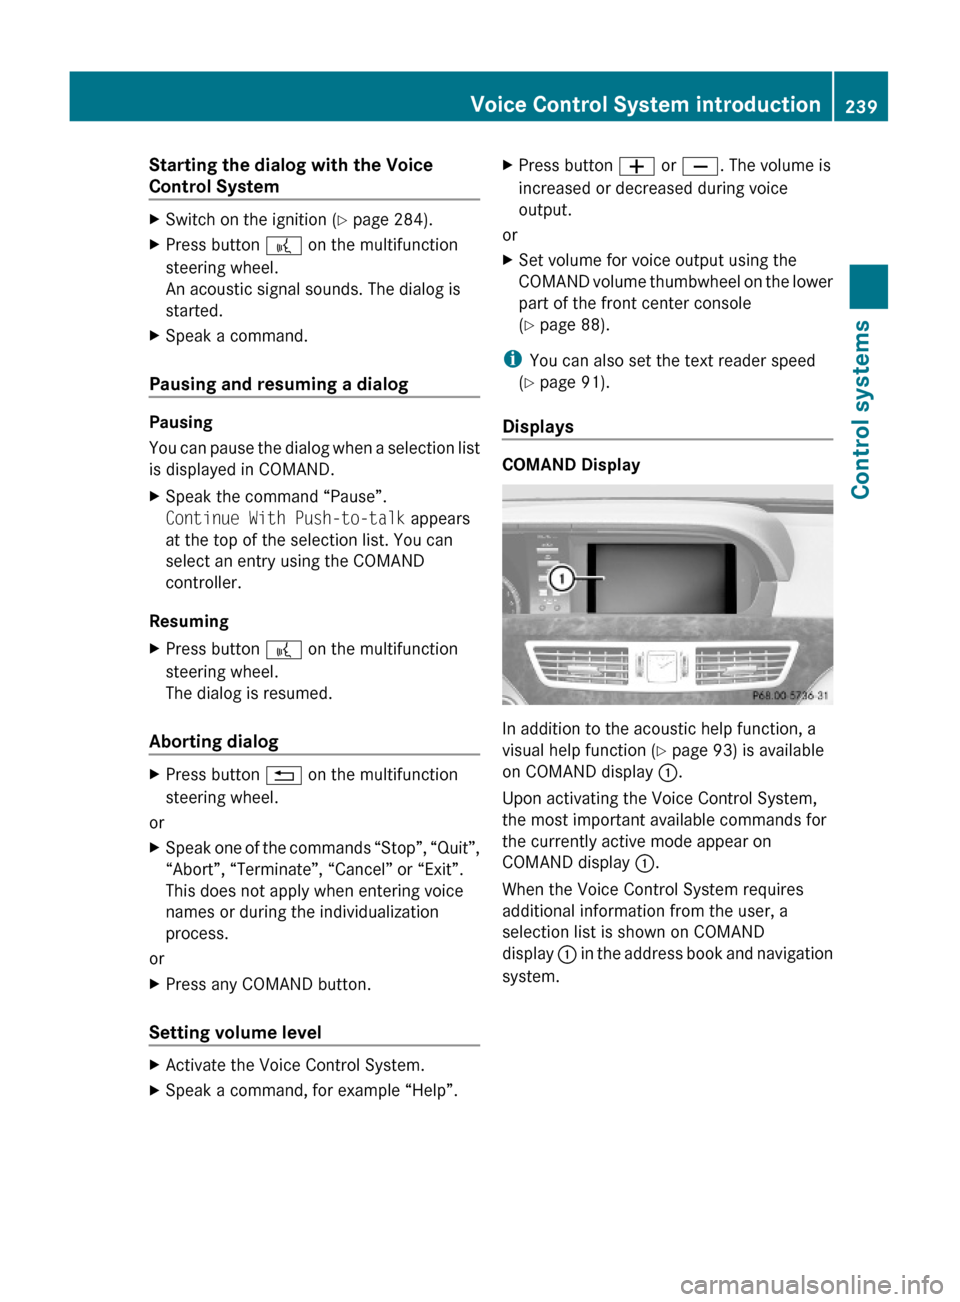
COMAND Display
In addition to the acoustic help function, a
visual help function (Y page 93) is available
on COMAND display :.
Upon activating the Voice Control System,
the most important available commands for
the currently active mode appear on
COMAND display :.
When the Voice Control System requires
additional information from the user, a
selection list is shown on COMAND
display : in the address book and navigation
system.
Voice Control System introduction239Control systems221_AKB; 6; 20, en-USd2ugruen,Version: 2.11.8.12009-09-24T13:28:17+02:00 - Seite 239Z
Page 293 of 548
GWarning!
Make sure the rear seat head restraints
engage when placing them upright manually.
Otherwise their protective function cannot be
ensured.
The back of the head will not be supported in
the event of a collision. That could cause
serious or even fatal injuries. Rear seat
occupants can be seriously injured or killed.
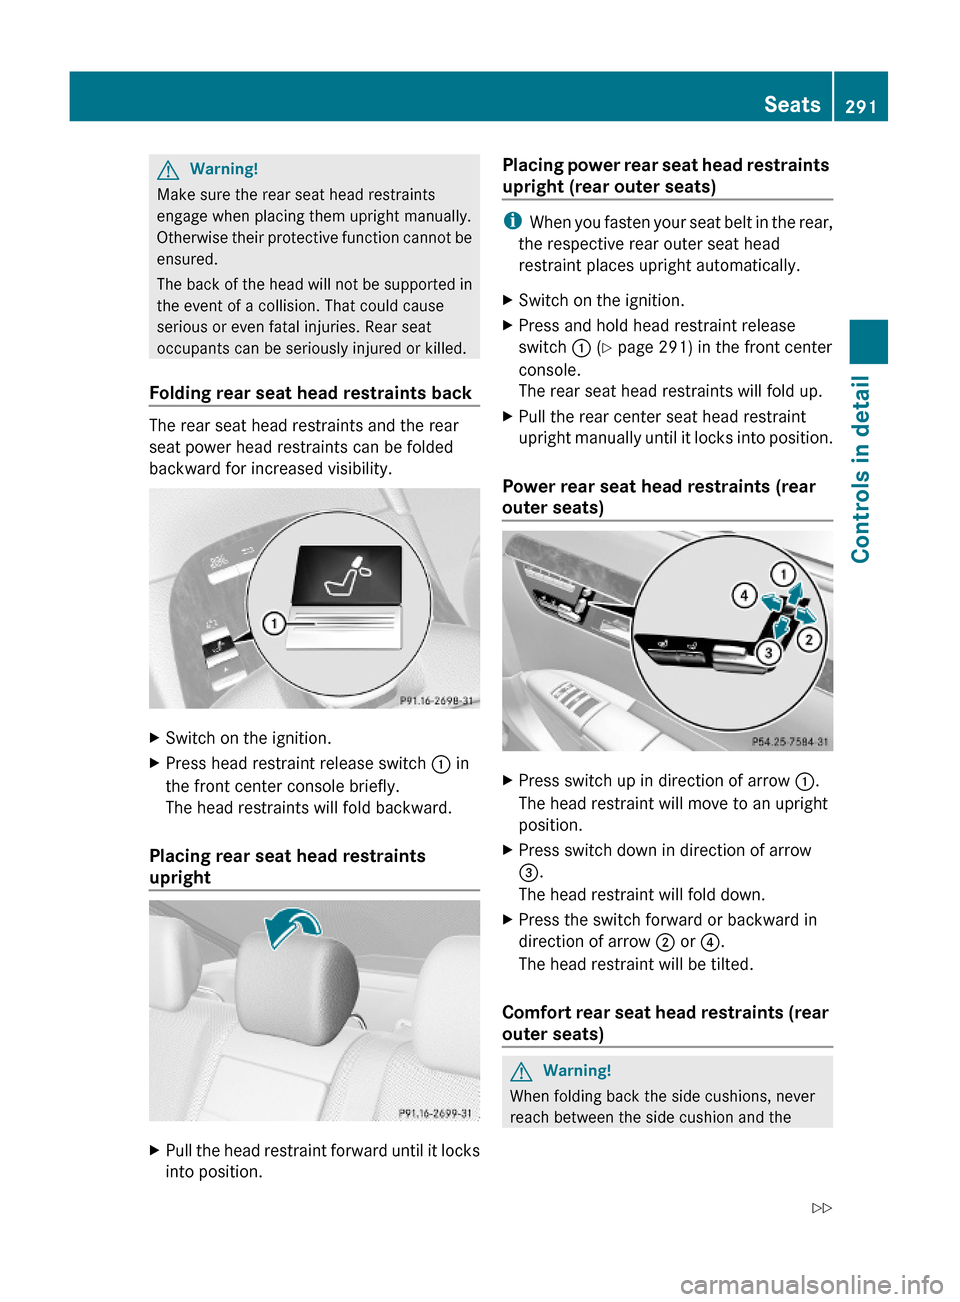
Folding rear seat head restraints back
The rear seat head restraints and the rear
seat power head restraints can be folded
backward for increased visibility.
XSwitch on the ignition.XPress head restraint release switch : in
the front center console briefly.
The head restraints will fold backward.
Placing rear seat head restraints
upright
XPull the head restraint forward until it locks
into position.
Placing power rear seat head restraints
upright (rear outer seats)
iWhen you fasten your seat belt in the rear,
the respective rear outer seat head
restraint places upright automatically.
XSwitch on the ignition.XPress and hold head restraint release
switch : (Y page 291) in the front center
console.
The rear seat head restraints will fold up.
XPull the rear center seat head restraint
upright manually until it locks into position.
Power rear seat head restraints (rear
outer seats)
XPress switch up in direction of arrow :.
The head restraint will move to an upright
position.
XPress switch down in direction of arrow
=.
The head restraint will fold down.
XPress the switch forward or backward in
direction of arrow ; or ?.
The head restraint will be tilted.
Comfort rear seat head restraints (rear
outer seats)
GWarning!
When folding back the side cushions, never
reach between the side cushion and the
Seats291Controls in detail221_AKB; 6; 20, en-USd2ugruen,Version: 2.11.8.12009-09-24T13:28:17+02:00 - Seite 291Z
Page 295 of 548
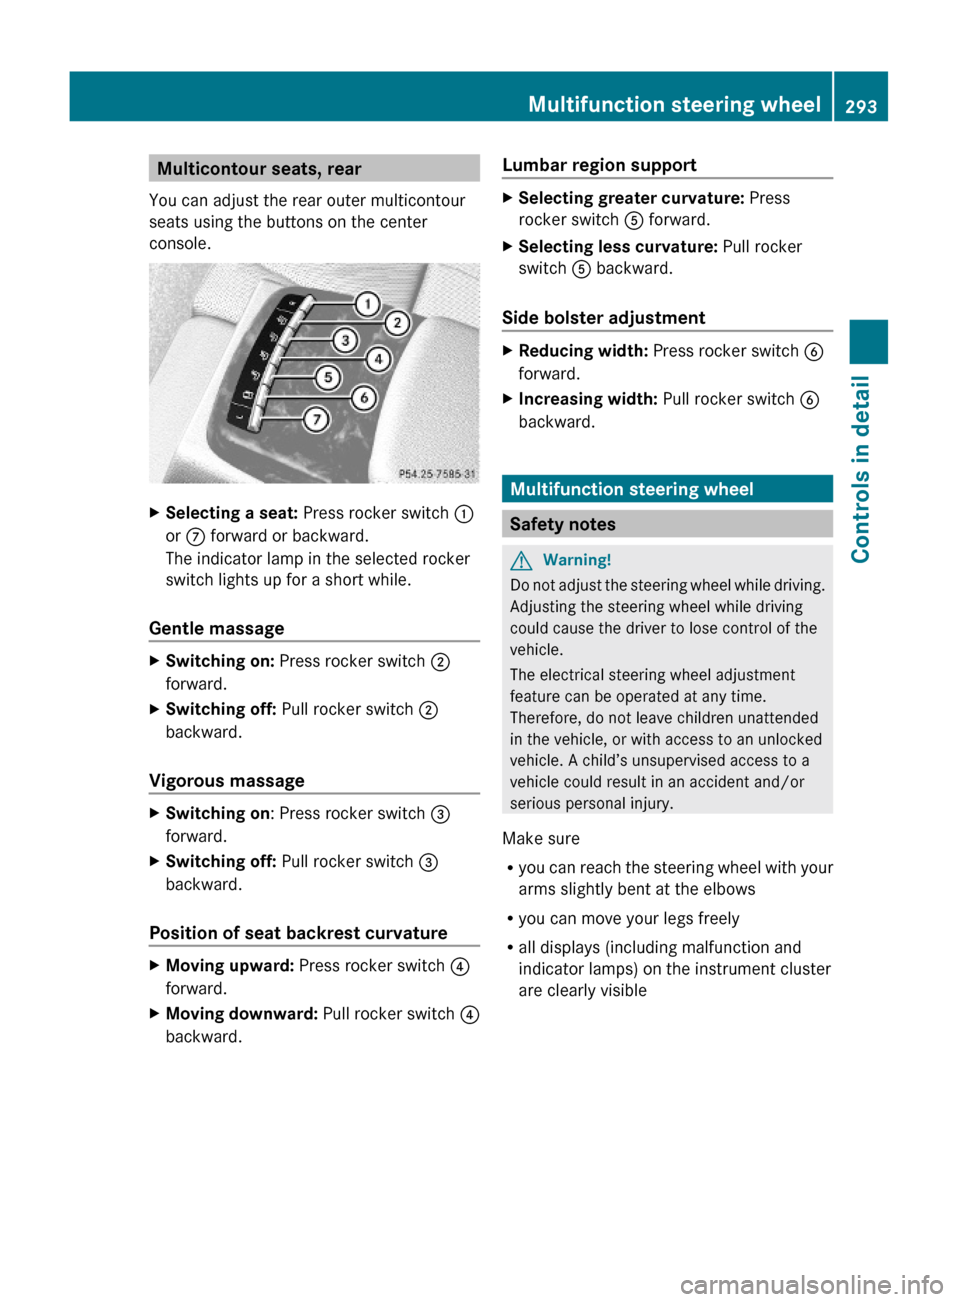
Multicontour seats, rear
You can adjust the rear outer multicontour
seats using the buttons on the center
console.
XSelecting a seat: Press rocker switch :
or C forward or backward.
The indicator lamp in the selected rocker
switch lights up for a short while.
Gentle massage
XSwitching on: Press rocker switch ;
forward.
XSwitching off: Pull rocker switch ;
backward.
Vigorous massage
XSwitching on: Press rocker switch =
forward.
XSwitching off: Pull rocker switch =
backward.
Position of seat backrest curvature
XMoving upward: Press rocker switch ?
forward.
XMoving downward: Pull rocker switch ?
backward.
Lumbar region supportXSelecting greater curvature: Press
rocker switch A forward.
XSelecting less curvature: Pull rocker
switch A backward.
Side bolster adjustment
XReducing width: Press rocker switch B
forward.
XIncreasing width: Pull rocker switch B
backward.
Multifunction steering wheel
Safety notes
GWarning!
Do not adjust the steering wheel while driving.
Adjusting the steering wheel while driving
could cause the driver to lose control of the
vehicle.
The electrical steering wheel adjustment
feature can be operated at any time.
Therefore, do not leave children unattended
in the vehicle, or with access to an unlocked
vehicle. A child’s unsupervised access to a
vehicle could result in an accident and/or
serious personal injury.
Make sure
Ryou can reach the steering wheel with your
arms slightly bent at the elbows
Ryou can move your legs freely
Rall displays (including malfunction and
indicator lamps) on the instrument cluster
are clearly visible
Multifunction steering wheel293Controls in detail221_AKB; 6; 20, en-USd2ugruen,Version: 2.11.8.12009-09-24T13:28:17+02:00 - Seite 293Z
Page 371 of 548
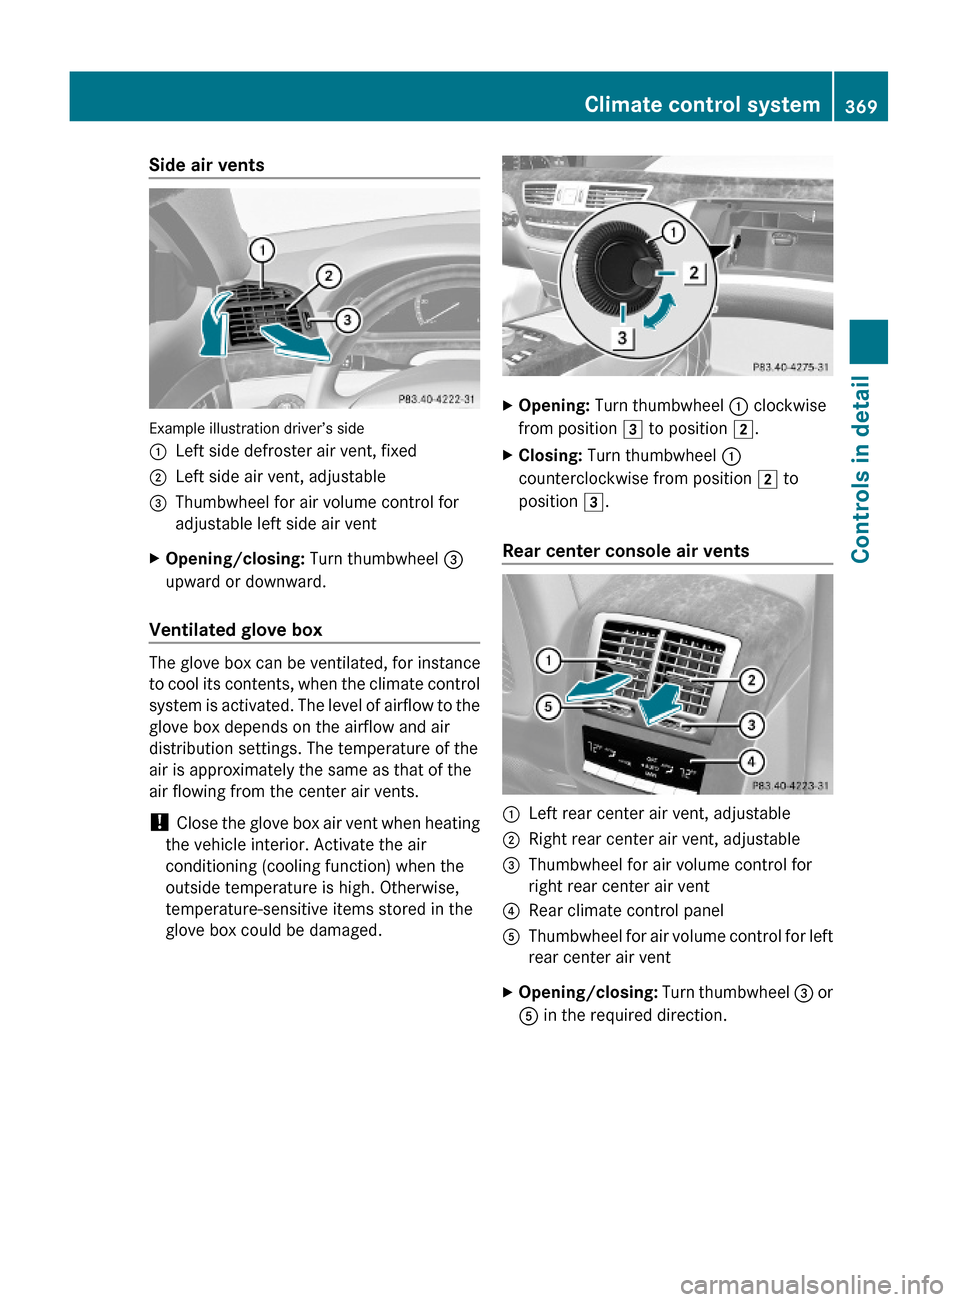
Side air vents
Example illustration driver’s side
:Left side defroster air vent, fixed;Left side air vent, adjustable=Thumbwheel for air volume control for
adjustable left side air vent
XOpening/closing: Turn thumbwheel =
upward or downward.
Ventilated glove box
The glove box can be ventilated, for instance
to cool its contents, when the climate control
system is activated. The level of airflow to the
glove box depends on the airflow and air
distribution settings. The temperature of the
air is approximately the same as that of the
air flowing from the center air vents.
! Close the glove box air vent when heating
the vehicle interior. Activate the air
conditioning (cooling function) when the
outside temperature is high. Otherwise,
temperature-sensitive items stored in the
glove box could be damaged.
XOpening: Turn thumbwheel : clockwise
from position 3 to position 2.
XClosing: Turn thumbwheel :
counterclockwise from position 2 to
position 3.
Rear center console air vents
:Left rear center air vent, adjustable;Right rear center air vent, adjustable=Thumbwheel for air volume control for
right rear center air vent
?Rear climate control panelAThumbwheel for air volume control for left
rear center air vent
XOpening/closing: Turn thumbwheel = or
A in the required direction.
Climate control system369Controls in detail221_AKB; 6; 20, en-USd2ugruen,Version: 2.11.8.12009-09-24T13:28:17+02:00 - Seite 369Z
Page 387 of 548
damage not covered by the Mercedes-Benz
Limited Warranty.
When not in use, keep the cup holder closed.
An open cup holder may cause injury to you
or others when contacted during braking,
vehicle maneuvers, or in an accident.
Keep in mind that objects placed in the cup
holder may come loose during braking,
vehicle maneuvers, or in an accident and be
thrown around in the vehicle interior. Objects
thrown around in the vehicle interior may
cause an accident and/or serious personal
injury.
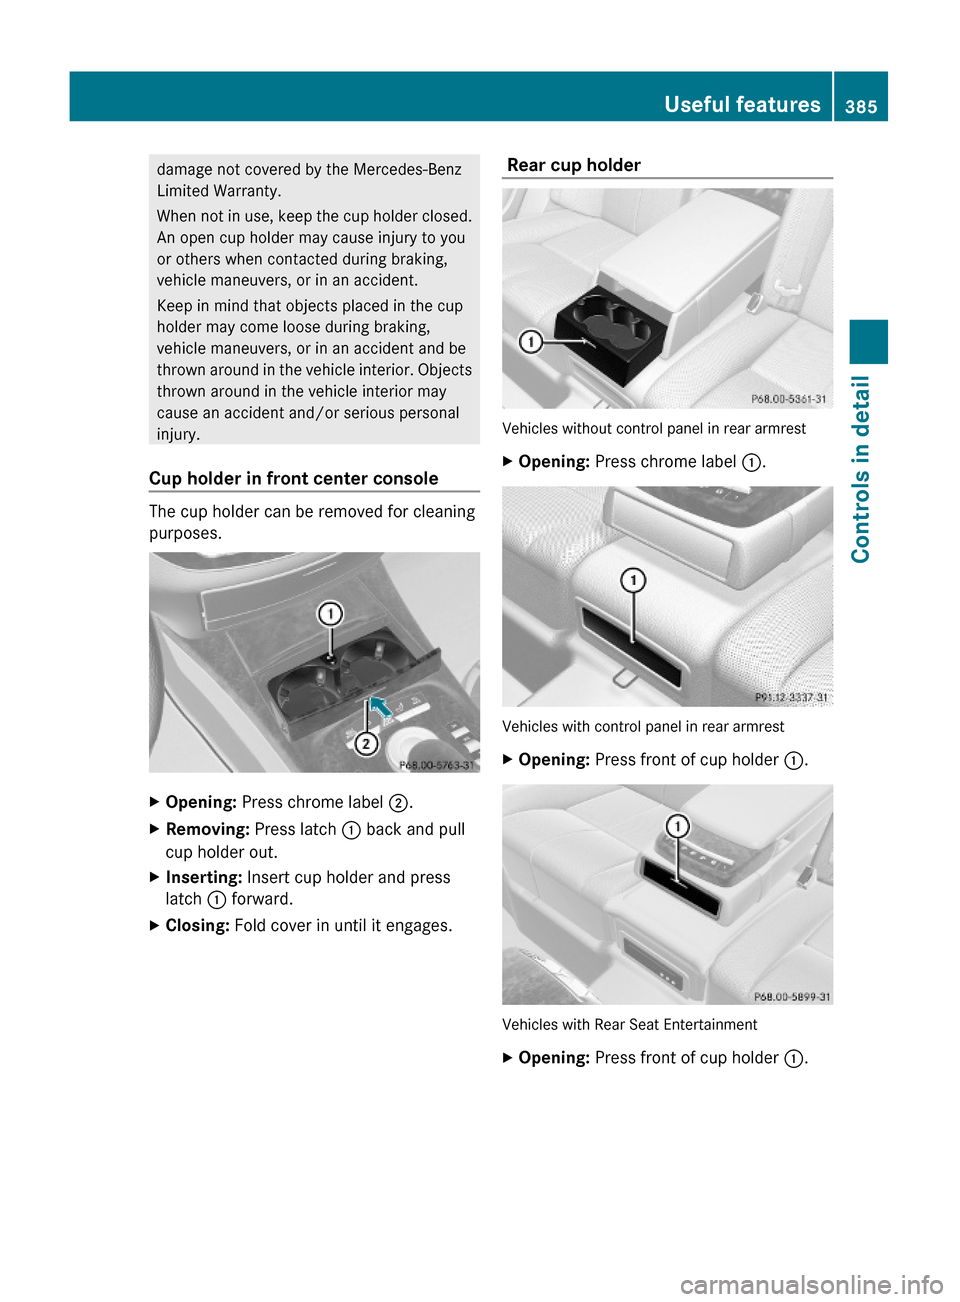
Cup holder in front center console
The cup holder can be removed for cleaning
purposes.
XOpening: Press chrome label ;.XRemoving: Press latch : back and pull
cup holder out.
XInserting: Insert cup holder and press
latch : forward.
XClosing: Fold cover in until it engages. Rear cup holder
Vehicles without control panel in rear armrest
XOpening: Press chrome label :.
Vehicles with control panel in rear armrest
XOpening: Press front of cup holder :.
Vehicles with Rear Seat Entertainment
XOpening: Press front of cup holder :.Useful features385Controls in detail221_AKB; 6; 20, en-USd2ugruen,Version: 2.11.8.12009-09-24T13:28:17+02:00 - Seite 385Z
Page 389 of 548
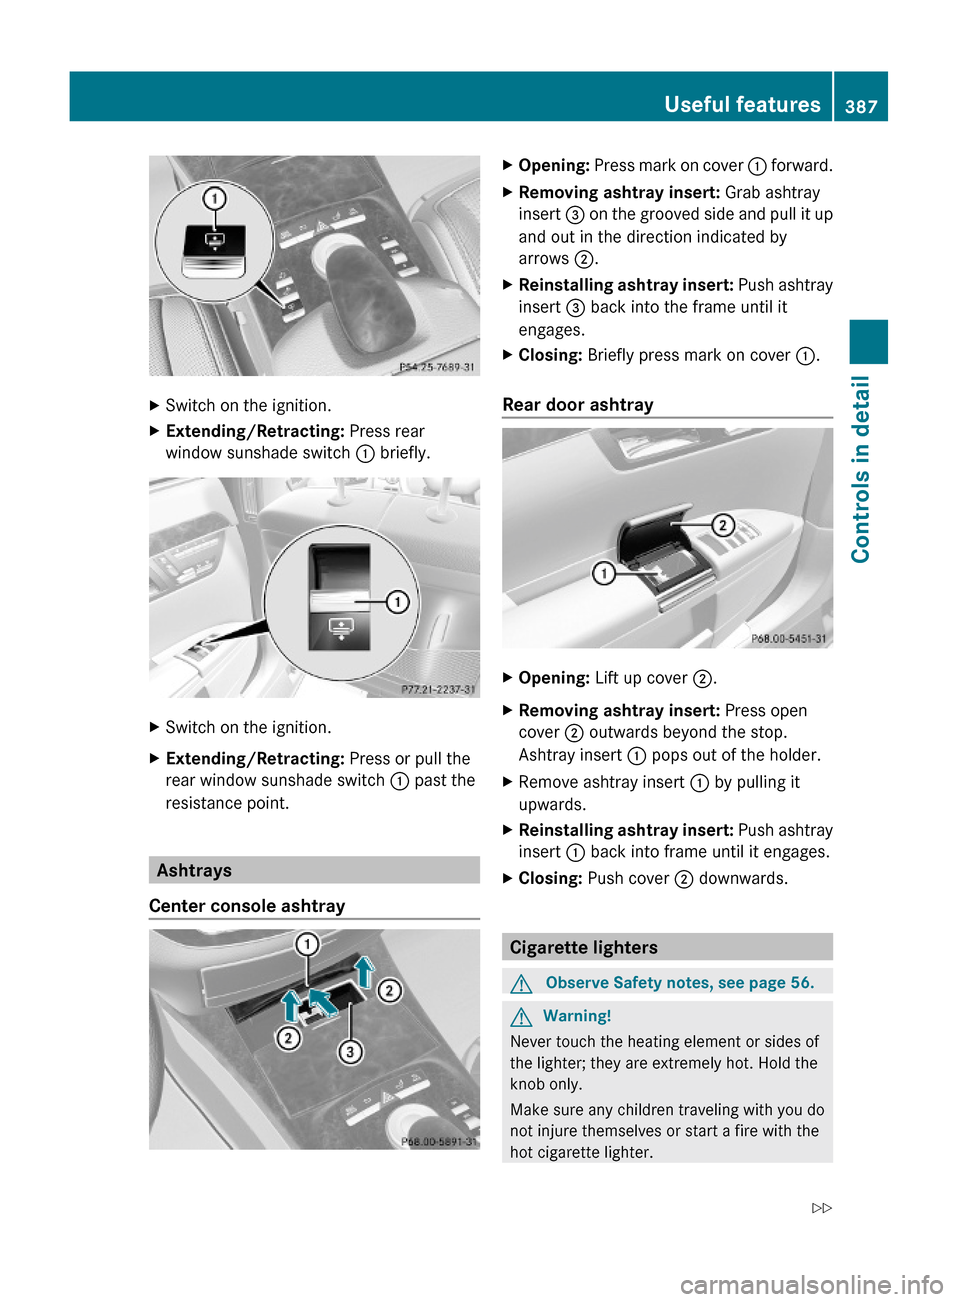
XSwitch on the ignition.XExtending/Retracting: Press rear
window sunshade switch : briefly.
XSwitch on the ignition.XExtending/Retracting: Press or pull the
rear window sunshade switch : past the
resistance point.
Ashtrays
Center console ashtray
XOpening: Press mark on cover : forward.XRemoving ashtray insert: Grab ashtray
insert = on the grooved side and pull it up
and out in the direction indicated by
arrows ;.
XReinstalling ashtray insert: Push ashtray
insert = back into the frame until it
engages.
XClosing: Briefly press mark on cover :.
Rear door ashtray
XOpening: Lift up cover ;.XRemoving ashtray insert: Press open
cover ; outwards beyond the stop.
Ashtray insert : pops out of the holder.
XRemove ashtray insert : by pulling it
upwards.
XReinstalling ashtray insert: Push ashtray
insert : back into frame until it engages.
XClosing: Push cover ; downwards.
Cigarette lighters
GObserve Safety notes, see page 56.GWarning!
Never touch the heating element or sides of
the lighter; they are extremely hot. Hold the
knob only.
Make sure any children traveling with you do
not injure themselves or start a fire with the
hot cigarette lighter.
Useful features387Controls in detail221_AKB; 6; 20, en-USd2ugruen,Version: 2.11.8.12009-09-24T13:28:17+02:00 - Seite 387Z