2010 MERCEDES-BENZ S65AMG center console
[x] Cancel search: center consolePage 161 of 548
Calling an additional party
You can call another party during an active
call. The active call is put on hold.
XSelect NEW from the telephone menu and
press W.
or
XPress button 6 on the telephone
keypad in the center console.
XEnter the number to call manually
(Y page 156) or from the phone book
(Y page 162).
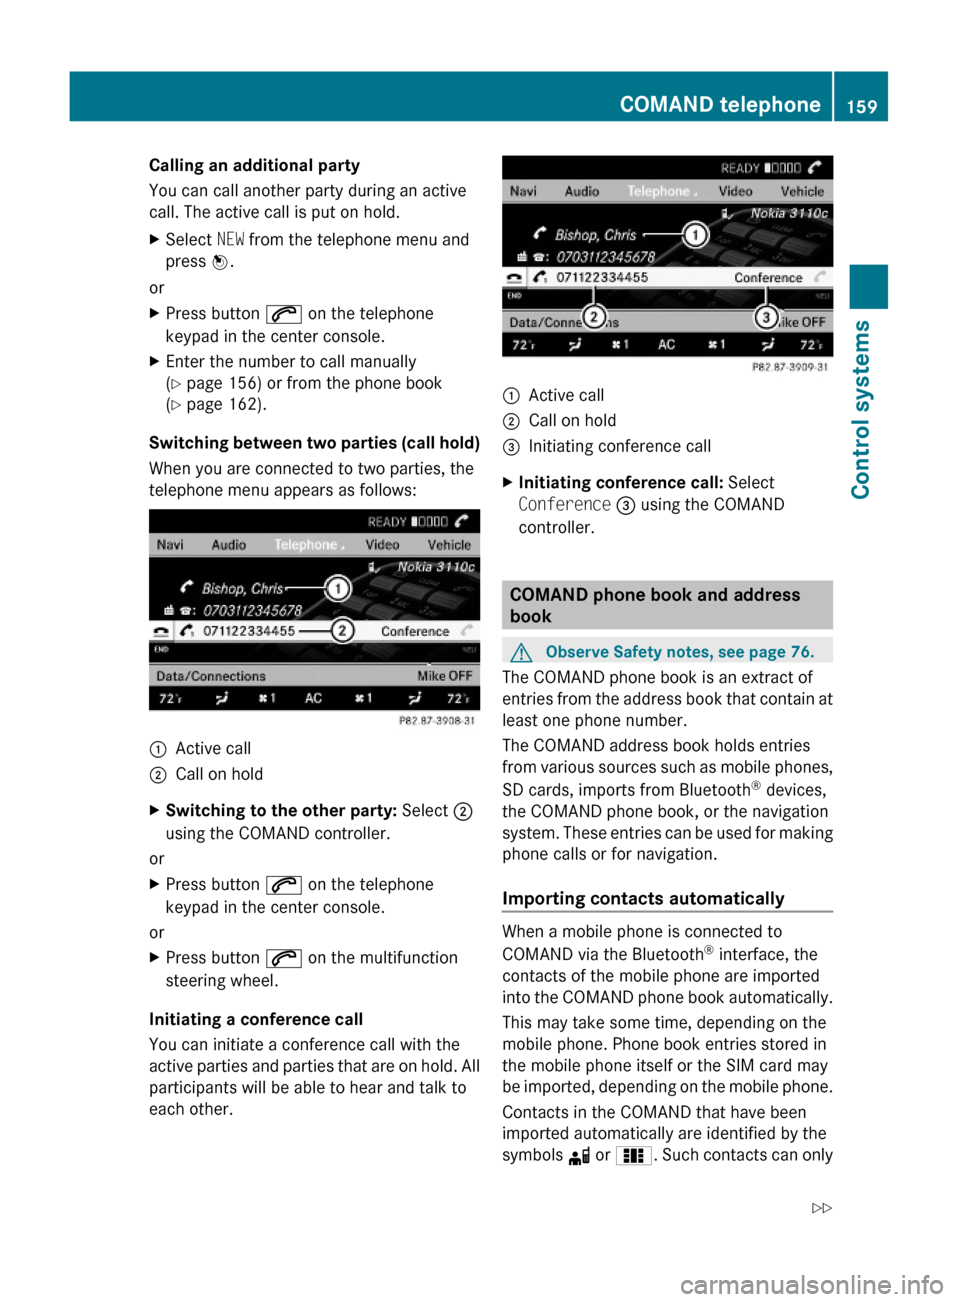
Switching between two parties (call hold)
When you are connected to two parties, the
telephone menu appears as follows:
:Active call;Call on holdXSwitching to the other party: Select ;
using the COMAND controller.
or
XPress button 6 on the telephone
keypad in the center console.
or
XPress button 6 on the multifunction
steering wheel.
Initiating a conference call
You can initiate a conference call with the
active parties and parties that are on hold. All
participants will be able to hear and talk to
each other.
:Active call;Call on hold=Initiating conference callXInitiating conference call: Select
Conference = using the COMAND
controller.
COMAND phone book and address
book
GObserve Safety notes, see page 76.
The COMAND phone book is an extract of
entries from the address book that contain at
least one phone number.
The COMAND address book holds entries
from various sources such as mobile phones,
SD cards, imports from Bluetooth® devices,
the COMAND phone book, or the navigation
system. These entries can be used for making
phone calls or for navigation.
Importing contacts automatically
When a mobile phone is connected to
COMAND via the Bluetooth® interface, the
contacts of the mobile phone are imported
into the COMAND phone book automatically.
This may take some time, depending on the
mobile phone. Phone book entries stored in
the mobile phone itself or the SIM card may
be imported, depending on the mobile phone.
Contacts in the COMAND that have been
imported automatically are identified by the
symbols d or 0. Such contacts can only
COMAND telephone159Control systems221_AKB; 6; 20, en-USd2ugruen,Version: 2.11.8.12009-09-24T13:28:17+02:00 - Seite 159Z
Page 163 of 548

¯ Memory card entryG Entry containing multiple phone
numbers
;Two-row predictive spellerB Changing predictive speller
language
p Changing character setF Deleting selection¬ Confirming selection% Back
Selecting contacts from list
XPhone book: Select Name.XAddress book: Select Data/Connections
Q Address Book.
XChanging from predictive speller to
list: Press ZV until the predictive speller
disappears.
or
XSelect ¬.XSelecting contact: Slide ZVÆ or rotate
cVd and press W.
Selecting contacts via predictive speller
XPhone book: Select Name.XAddress book: Select Data/Connections
Q Address Book.
XChanging from list to predictive
speller: Select Back from the list.
or
XPress %.XSelecting character: Slide ZVÆ or XVY
and press W. Repeat this procedure until
COMAND changes to the list automatically.
The first character you enter determines
the first letter of the entry you are
searching. When similar entries exist, the
next character that is different is
highlighted and thus offered for selection.
iYou can also enter the characters via the
telephone keypad in the center console.
Displaying contact detailsXSelect Options Q Details.
The contact details appear.
XBack to list: Slide XVY until the list is
highlighted.
Creating/editing contacts
iThis function is not available at a vehicle
speed of above approximately 3 mph
(5 km/h). When the vehicle speed is below
approximately 2 mph (3 km/h), the
function is available again.
iYou can create address data in the
address book directly. When you save
phone numbers to the phone book, they are
created in the address book. When you
save a destination for navigation, COMAND
creates an address book entry that
contains the entire data usable for route
guidance.
XSelect the contact23 (Y page 160).XSelect Options Q New Entry or
Change.
The input menu with the data fields
appears.
23For changing contact only.COMAND telephone161Control systems221_AKB; 6; 20, en-USd2ugruen,Version: 2.11.8.12009-09-24T13:28:17+02:00 - Seite 161Z
Page 164 of 548
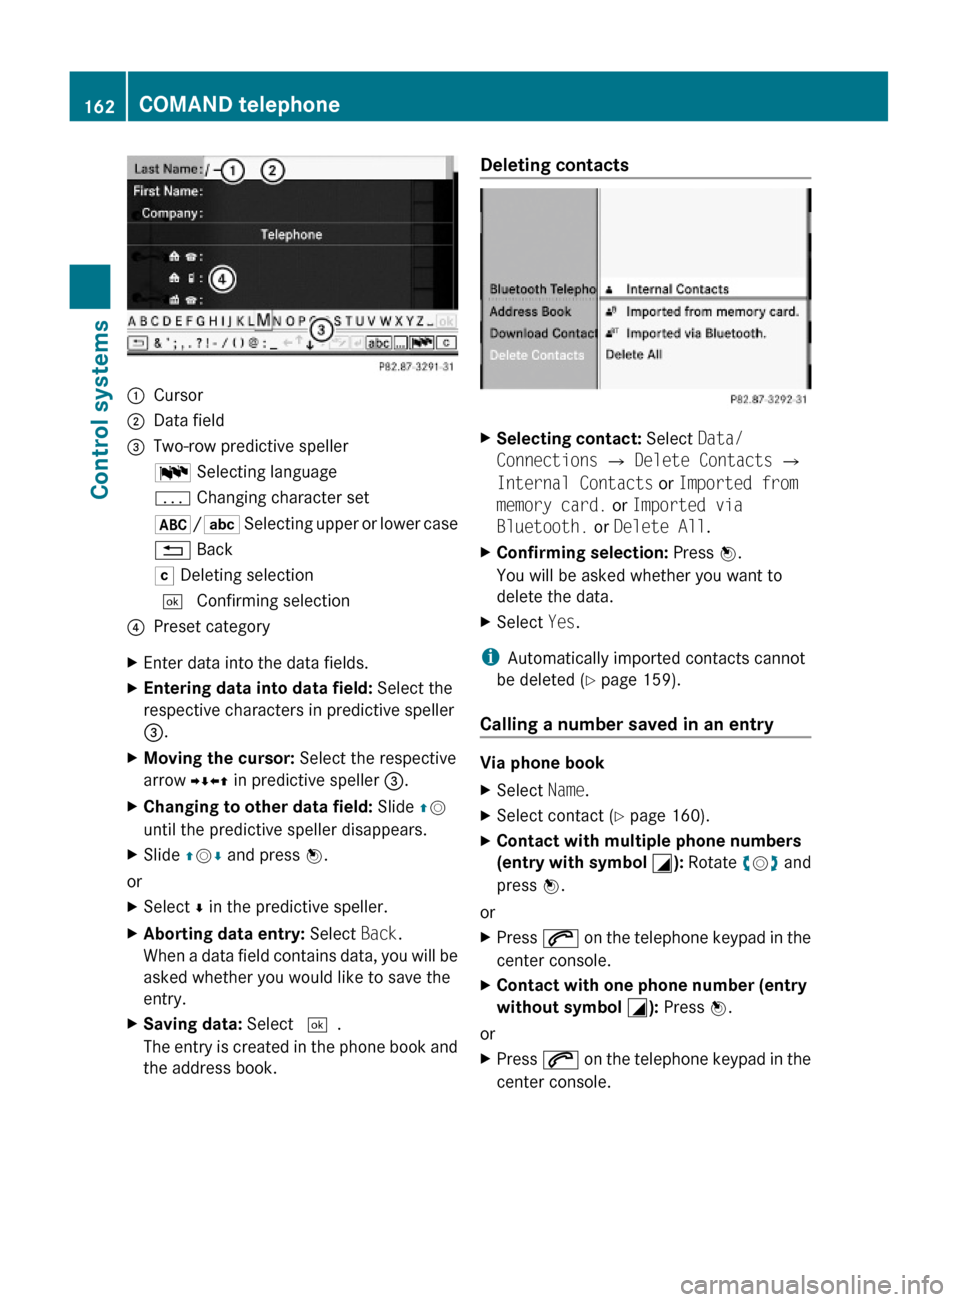
:Cursor;Data field=Two-row predictive spellerB Selecting languagep Changing character set*/E Selecting upper or lower case% BackF Deleting selection¬ Confirming selection?Preset categoryXEnter data into the data fields.XEntering data into data field: Select the
respective characters in predictive speller
=.
XMoving the cursor: Select the respective
arrow YÆXZ in predictive speller =.
XChanging to other data field: Slide ZV
until the predictive speller disappears.
XSlide ZVÆ and press W.
or
XSelect Æ in the predictive speller.XAborting data entry: Select Back.
When a data field contains data, you will be
asked whether you would like to save the
entry.
XSaving data: Select ¬.
The entry is created in the phone book and
the address book.
Deleting contacts XSelecting contact: Select Data/
Connections Q Delete Contacts Q
Internal Contacts or Imported from
memory card. or Imported via
Bluetooth. or Delete All.
XConfirming selection: Press W.
You will be asked whether you want to
delete the data.
XSelect Yes.
iAutomatically imported contacts cannot
be deleted (Y page 159).
Calling a number saved in an entry
Via phone book
XSelect Name.XSelect contact (Y page 160).XContact with multiple phone numbers
(entry with symbol G): Rotate cVd and
press W.
or
XPress 6 on the telephone keypad in the
center console.
XContact with one phone number (entry
without symbol G): Press W.
or
XPress 6 on the telephone keypad in the
center console.
162COMAND telephoneControl systems
221_AKB; 6; 20, en-USd2ugruen,Version: 2.11.8.12009-09-24T13:28:17+02:00 - Seite 162
Page 170 of 548
Selecting stations/channels using the
search functionXSlide XV Y or rotate cV d when the main
area is selected.
Depending on the direction in which the
controller is being slid or rotated, the
system searches upward or downward and
stops at the next receivable station/
channel.
or
XPress and hold button 9 or : on the
multifunction steering wheel 24
.
Selecting stations using station presets
i This function is not available for Weather
Band.
XSelect Audio Q FM/AM Radio Q FM or
AM .XSelect Presets .
or
XPress W when the main area is selected.
The preset menu appears. The dot # in
front of a preset position indicates that the
currently selected station is saved there.XSelect station preset by rotating cV d or
sliding ZV Æ and press W.
or
XEnter a position number with the telephone
keypad using buttons ´ - Ã
( Y page 79).
or
XPress button 9 or : on the
multifunction steering wheel briefly 24
.
i Vehicles with rear multicontour seats:
Rear occupants can also select a station
using the buttons on the rear armrest
( Y page 80).
Selecting stations by entering the
frequency manually
i This function is not available for Weather
Band.
XSelect Audio Q FM/AM Radio Q FM or
AM .
Entering the frequency using the
COMAND controller
XSelect Radio Q Enter Frequency .
The menu for manual frequency entry
appears.XExiting menu without making an entry:
Press back button % in the center
console ( Y page 87).XIncreasing or decreasing number: Slide
Z V Æ or rotate cV d.
i
You can only select available frequencies.
XSelecting the next number: Slide VY.XConfirming frequency entry: Press W.
COMAND tunes in to the frequency
entered.
i If you enter a frequency which is outside
the frequency range, COMAND tunes in to
the next lowest frequency.
Entering the frequency using the
telephone keypad
XPress button à on the telephone
keypad ( Y page 79).XEnter frequency using buttons Å -
à .
COMAND tunes in to the frequency
entered.
Selecting channels using the WB
channel
i This function is only available for Weather
Band.
24 Function is only available if the Audio menu is selected in the instrument cluster.168COMAND FM/AM radioControl systems
221_AKB; 6; 20, en-USd2ugruen,Version: 2.11.8.12009-09-24T13:28:17+02:00 - Seite 168
Page 176 of 548
XSelect station preset and briefly press W.
or
XEnter a position number with the telephone
keypad using buttons ´ - Ã
( Y page 79).
COMAND tunes in the corresponding
channel as long as it is included in your
subscription and is still available.
i Vehicles with rear multicontour seats:
Rear occupants can also select a channel
using the buttons on the rear armrest
( Y page 80).
If the channel is not included in your
subscription, you will see the message
described in the section “Satellite radio
service is not activated” ( Y page 171).
If the channel is no longer available, you will
see the message Invalid Channel .
XClosing message: Press W.
Tuning in channels using manual
channel number entry
i If you try to tune in a channel when the
satellite radio service is not activated, you
will see the screen described in the section
“Satellite radio service is not activated”
( Y page 171).
Entering the channel number using the
COMAND controller
XSelect Audio Q Audio Q Sat. Radio
Q Sat. Radio Q Channel Entry .
The menu for manual channel number entry
appears.XExiting menu without making an entry:
Press back button % in the center
console ( Y page 87).XIncrease or decreasing number: Slide
Z V Æ or rotate cV d.XSelecting next number: Slide XV Y.XConfirming channel entry: Press W.
Further operation depends on whether the
selected channel number is valid or if the
channel is included in your subscription.
Entering the channel number using the
telephone keypad
XPress button à on the telephone
keypad ( Y page 79).XEnter channel number using buttons Å
- Ã .
Further operation depends on whether the
selected channel number is valid or if the
channel is included in your subscription.
Channel number is valid and channel is
included in subscription
COMAND tunes in the channel entered.
Channel number is invalid
You will see the message Invalid Channel.
XClosing message: Press W.
Channel number is valid but channel is
not included in subscription
You will see the screen described in the
section “Satellite radio service is not
activated” ( Y page 171).
XClosing display: Press W.
Tuning in channels using the channel
list
XSelect Audio Q Audio Q Sat. Radio
Q Sat. Radio Q Channel List .
The channel list appears. The dot # in
front of a list entry indicates the currently
selected channel.XSelect channel by rotating cV d or sliding
Z V Æ and press W.
i
The contents of the channel list depends
on which channels are included in your
subscription and which program category
you have selected (Y page 173). If satellite
174COMAND satellite radioControl systems
221_AKB; 6; 20, en-USd2ugruen,Version: 2.11.8.12009-09-24T13:28:17+02:00 - Seite 174
Page 197 of 548
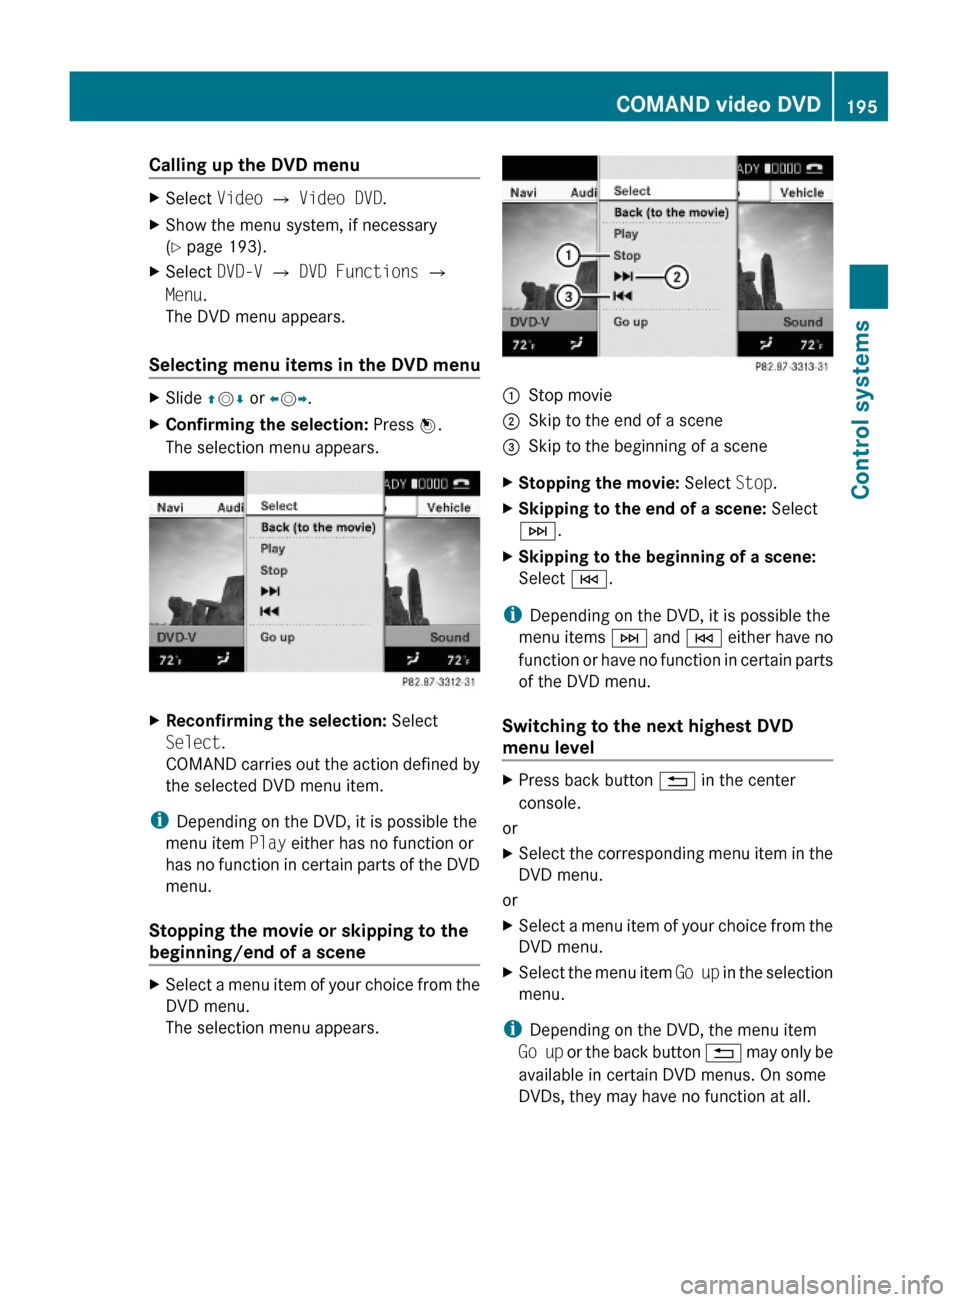
Calling up the DVD menuXSelect Video Q Video DVD.XShow the menu system, if necessary
(Y page 193).
XSelect DVD-V Q DVD Functions Q
Menu.
The DVD menu appears.
Selecting menu items in the DVD menu
XSlide ZVÆ or XVY.XConfirming the selection: Press W.
The selection menu appears.
XReconfirming the selection: Select
Select.
COMAND carries out the action defined by
the selected DVD menu item.
iDepending on the DVD, it is possible the
menu item Play either has no function or
has no function in certain parts of the DVD
menu.
Stopping the movie or skipping to the
beginning/end of a scene
XSelect a menu item of your choice from the
DVD menu.
The selection menu appears.
:Stop movie;Skip to the end of a scene=Skip to the beginning of a sceneXStopping the movie: Select Stop.XSkipping to the end of a scene: Select
F.
XSkipping to the beginning of a scene:
Select E.
iDepending on the DVD, it is possible the
menu items F and E either have no
function or have no function in certain parts
of the DVD menu.
Switching to the next highest DVD
menu level
XPress back button % in the center
console.
or
XSelect the corresponding menu item in the
DVD menu.
or
XSelect a menu item of your choice from the
DVD menu.
XSelect the menu item Go up in the selection
menu.
iDepending on the DVD, the menu item
Go up or the back button % may only be
available in certain DVD menus. On some
DVDs, they may have no function at all.
COMAND video DVD195Control systems221_AKB; 6; 20, en-USd2ugruen,Version: 2.11.8.12009-09-24T13:28:17+02:00 - Seite 195Z
Page 213 of 548
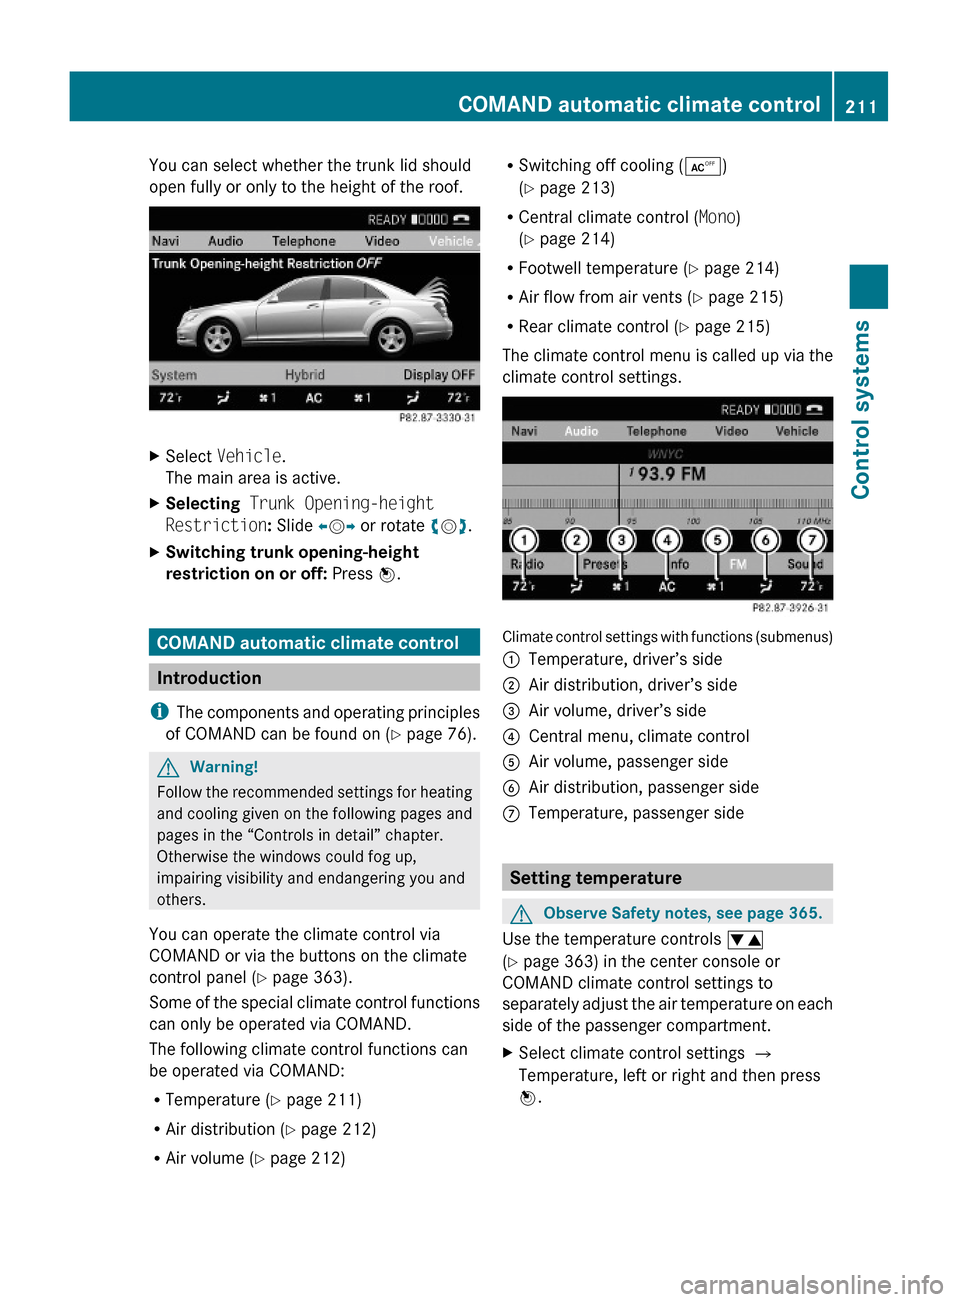
You can select whether the trunk lid should
open fully or only to the height of the roof.
XSelect Vehicle.
The main area is active.
XSelecting Trunk Opening-height
Restriction: Slide XVY or rotate cVd.
XSwitching trunk opening-height
restriction on or off: Press W.
COMAND automatic climate control
Introduction
iThe components and operating principles
of COMAND can be found on (Y page 76).
GWarning!
Follow the recommended settings for heating
and cooling given on the following pages and
pages in the “Controls in detail” chapter.
Otherwise the windows could fog up,
impairing visibility and endangering you and
others.
You can operate the climate control via
COMAND or via the buttons on the climate
control panel (Y page 363).
Some of the special climate control functions
can only be operated via COMAND.
The following climate control functions can
be operated via COMAND:
RTemperature (Y page 211)
RAir distribution (Y page 212)
RAir volume (Y page 212)
RSwitching off cooling (Æ)
(Y page 213)
RCentral climate control (Mono)
(Y page 214)
RFootwell temperature (Y page 214)
RAir flow from air vents (Y page 215)
RRear climate control (Y page 215)
The climate control menu is called up via the
climate control settings.
Climate control settings with functions (submenus)
:Temperature, driver’s side;Air distribution, driver’s side=Air volume, driver’s side?Central menu, climate controlAAir volume, passenger sideBAir distribution, passenger sideCTemperature, passenger side
Setting temperature
GObserve Safety notes, see page 365.
Use the temperature controls w
(Y page 363) in the center console or
COMAND climate control settings to
separately adjust the air temperature on each
side of the passenger compartment.
XSelect climate control settings Q
Temperature, left or right and then press
W.
COMAND automatic climate control211Control systems221_AKB; 6; 20, en-USd2ugruen,Version: 2.11.8.12009-09-24T13:28:17+02:00 - Seite 211Z
Page 214 of 548
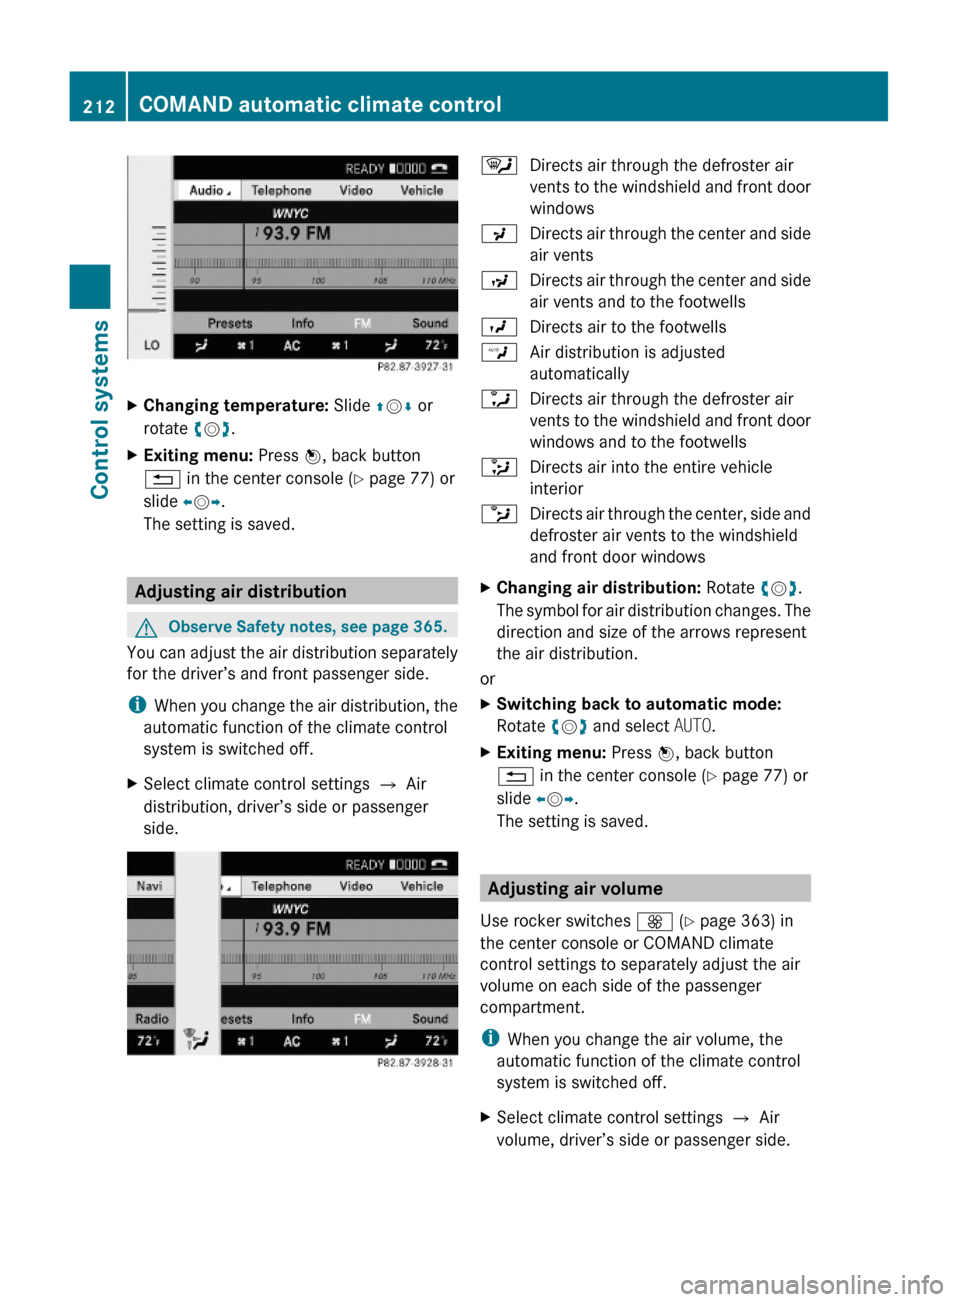
XChanging temperature: Slide ZVÆ or
rotate cVd.
XExiting menu: Press W, back button
% in the center console (Y page 77) or
slide XVY.
The setting is saved.
Adjusting air distribution
GObserve Safety notes, see page 365.
You can adjust the air distribution separately
for the driver’s and front passenger side.
iWhen you change the air distribution, the
automatic function of the climate control
system is switched off.
XSelect climate control settings Q Air
distribution, driver’s side or passenger
side.
¯Directs air through the defroster air
vents to the windshield and front door
windows
PDirects air through the center and side
air vents
NDirects air through the center and side
air vents and to the footwells
ODirects air to the footwellsWAir distribution is adjusted
automatically
aDirects air through the defroster air
vents to the windshield and front door
windows and to the footwells
_Directs air into the entire vehicle
interior
bDirects air through the center, side and
defroster air vents to the windshield
and front door windows
XChanging air distribution: Rotate cVd.
The symbol for air distribution changes. The
direction and size of the arrows represent
the air distribution.
or
XSwitching back to automatic mode:
Rotate cVd and select AUTO.
XExiting menu: Press W, back button
% in the center console (Y page 77) or
slide XVY.
The setting is saved.
Adjusting air volume
Use rocker switches K (Y page 363) in
the center console or COMAND climate
control settings to separately adjust the air
volume on each side of the passenger
compartment.
iWhen you change the air volume, the
automatic function of the climate control
system is switched off.
XSelect climate control settings Q Air
volume, driver’s side or passenger side.
212COMAND automatic climate controlControl systems
221_AKB; 6; 20, en-USd2ugruen,Version: 2.11.8.12009-09-24T13:28:17+02:00 - Seite 212