2010 MERCEDES-BENZ S550 4MATIC sd card
[x] Cancel search: sd cardPage 259 of 548
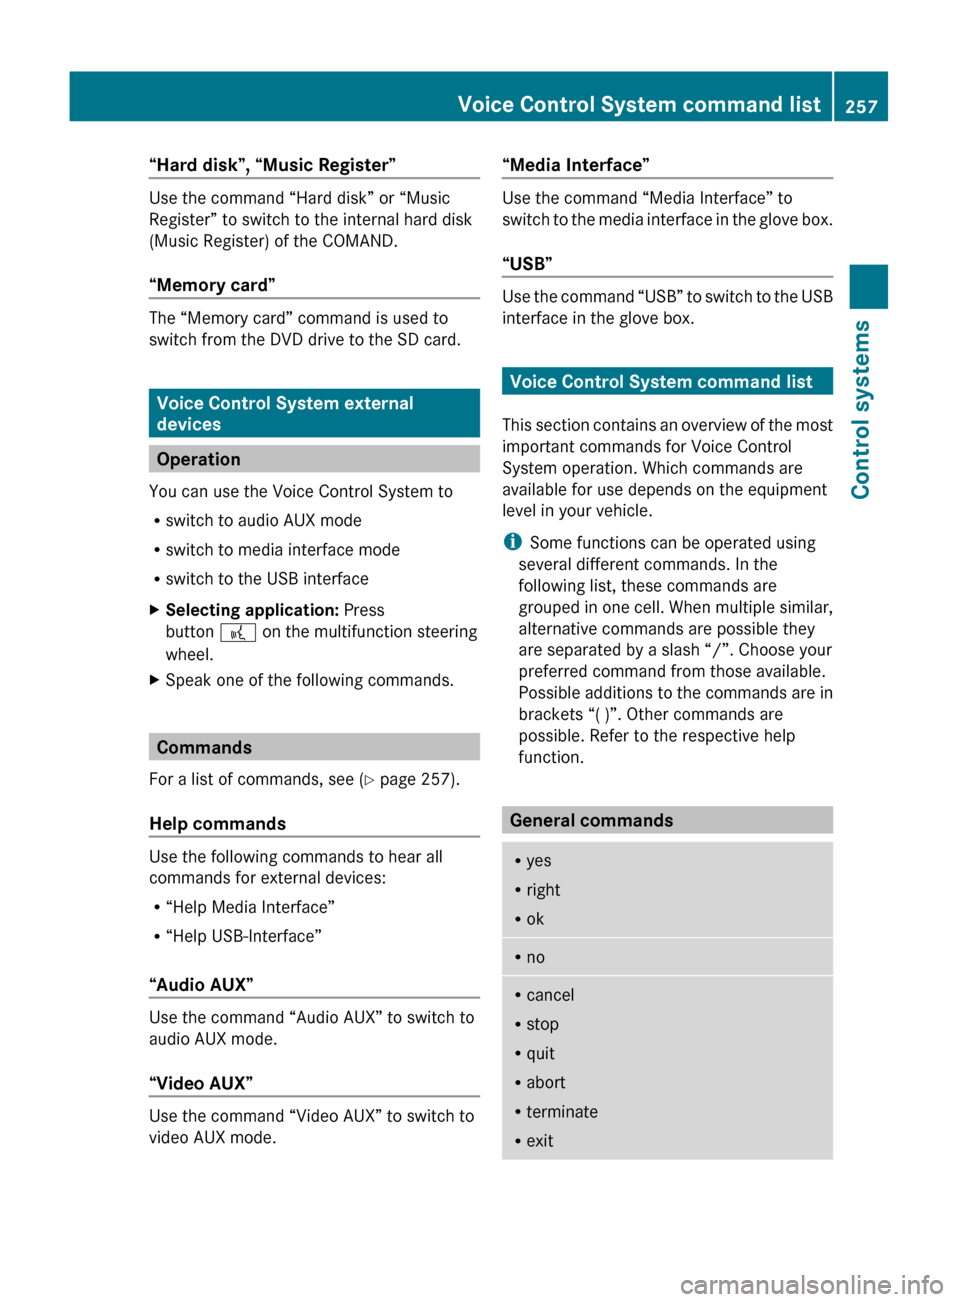
“Hard disk”, “Music Register”
Use the command “Hard disk” or “Music
Register” to switch to the internal hard disk
(Music Register) of the COMAND.
“Memory card”
The “Memory card” command is used to
switch from the DVD drive to the SD card.
Voice Control System external
devices
Operation
You can use the Voice Control System to
R switch to audio AUX mode
R switch to media interface mode
R switch to the USB interface
XSelecting application: Press
button ? on the multifunction steering
wheel.XSpeak one of the following commands.
Commands
For a list of commands, see ( Y page 257).
Help commands
Use the following commands to hear all
commands for external devices:
R “Help Media Interface”
R “Help USB-Interface”
“Audio AUX”
Use the command “Audio AUX” to switch to
audio AUX mode.
“Video AUX”
Use the command “Video AUX” to switch to
video AUX mode.
“Media Interface”
Use the command “Media Interface” to
switch to the media interface in the glove box.
“USB”
Use the command “USB” to switch to the USB
interface in the glove box.
Voice Control System command list
This section contains an overview of the most
important commands for Voice Control
System operation. Which commands are
available for use depends on the equipment
level in your vehicle.
i Some functions can be operated using
several different commands. In the
following list, these commands are
grouped in one cell. When multiple similar,
alternative commands are possible they
are separated by a slash “/”. Choose your
preferred command from those available.
Possible additions to the commands are in
brackets “( )”. Other commands are
possible. Refer to the respective help
function.
General commands
R yes
R right
R okRnoRcancel
R stop
R quit
R abort
R terminate
R exitVoice Control System command list257Control systems221_AKB; 6; 20, en-USd2ugruen,Version: 2.11.8.12009-09-24T13:28:17+02:00 - Seite 257Z
Page 261 of 548
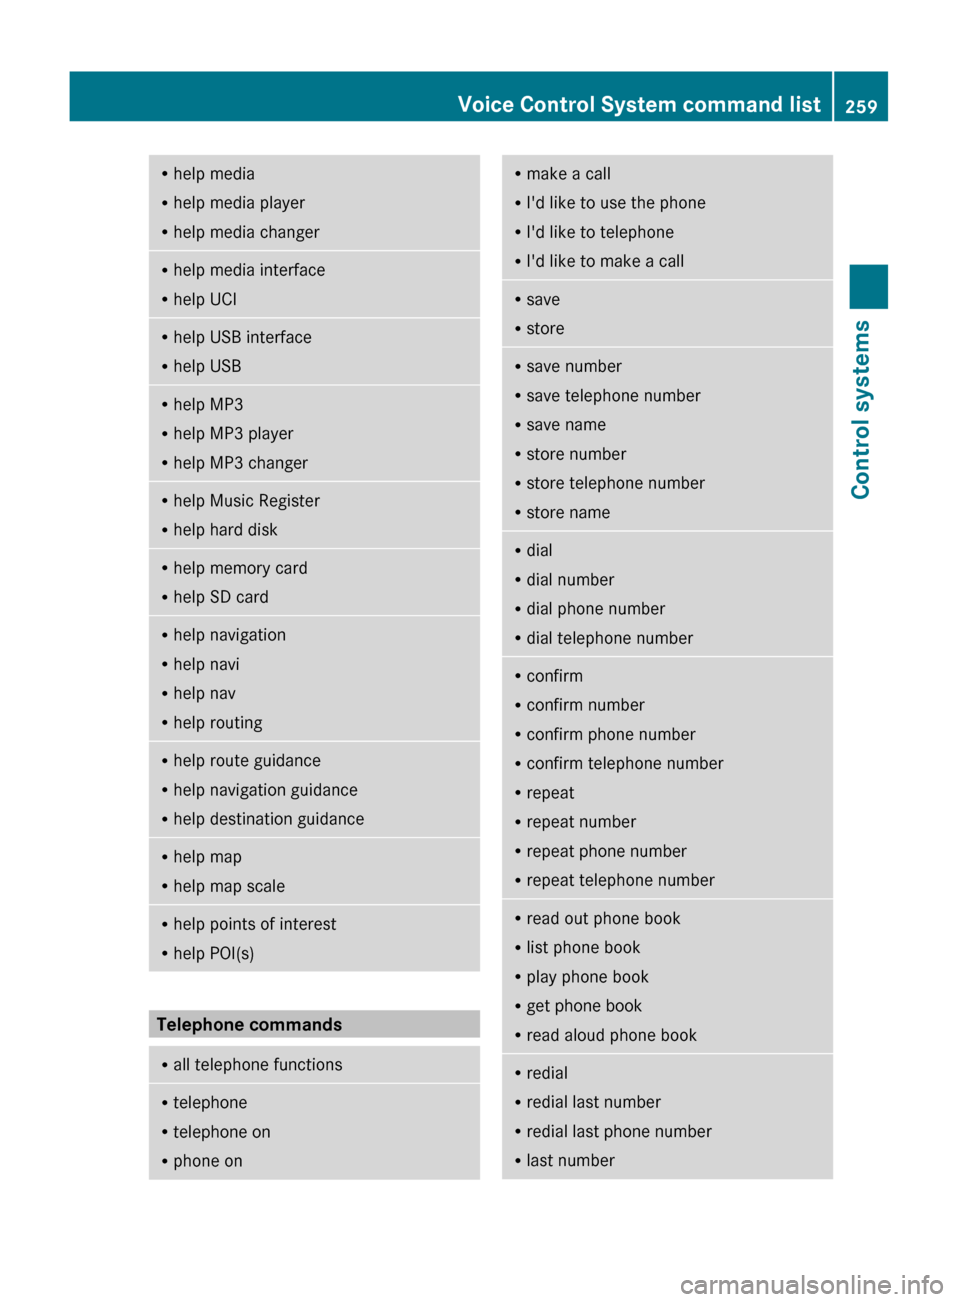
Rhelp media
R help media player
R help media changerRhelp media interface
R help UCIRhelp USB interface
R help USBRhelp MP3
R help MP3 player
R help MP3 changerRhelp Music Register
R help hard diskRhelp memory card
R help SD cardRhelp navigation
R help navi
R help nav
R help routingRhelp route guidance
R help navigation guidance
R help destination guidanceRhelp map
R help map scaleRhelp points of interest
R help POI(s)
Telephone commands
R
all telephone functionsRtelephone
R telephone on
R phone onRmake a call
R I'd like to use the phone
R I'd like to telephone
R I'd like to make a callRsave
R storeRsave number
R save telephone number
R save name
R store number
R store telephone number
R store nameRdial
R dial number
R dial phone number
R dial telephone numberRconfirm
R confirm number
R confirm phone number
R confirm telephone number
R repeat
R repeat number
R repeat phone number
R repeat telephone numberRread out phone book
R list phone book
R play phone book
R get phone book
R read aloud phone bookR
redial
R redial last number
R redial last phone number
R last numberVoice Control System command list259Control systems221_AKB; 6; 20, en-USd2ugruen,Version: 2.11.8.12009-09-24T13:28:17+02:00 - Seite 259Z
Page 269 of 548
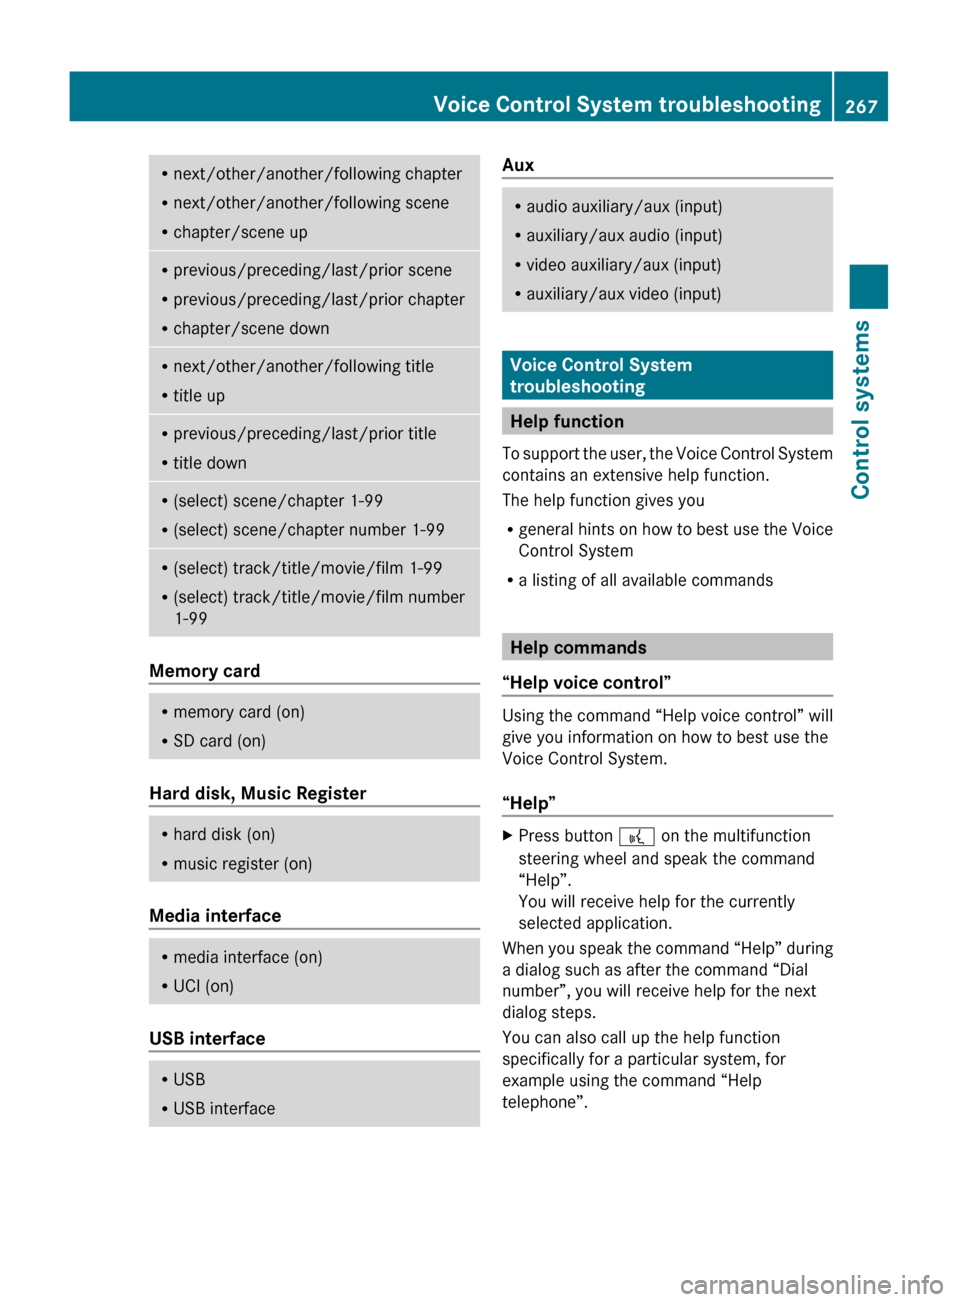
Rnext/other/another/following chapter
R next/other/another/following scene
R chapter/scene upRprevious/preceding/last/prior scene
R previous/preceding/last/prior chapter
R chapter/scene downRnext/other/another/following title
R title upRprevious/preceding/last/prior title
R title downR(select) scene/chapter 1-99
R (select) scene/chapter number 1-99R(select) track/title/movie/film 1-99
R (select) track/title/movie/film number
1-99
Memory card
R memory card (on)
R SD card (on)
Hard disk, Music Register
R
hard disk (on)
R music register (on)
Media interface
R
media interface (on)
R UCI (on)
USB interface
R
USB
R USB interfaceAuxRaudio auxiliary/aux (input)
R auxiliary/aux audio (input)
R video auxiliary/aux (input)
R auxiliary/aux video (input)
Voice Control System
troubleshooting
Help function
To support the user, the Voice Control System
contains an extensive help function.
The help function gives you
R general hints on how to best use the Voice
Control System
R a listing of all available commands
Help commands
“Help voice control”
Using the command “Help voice control” will
give you information on how to best use the
Voice Control System.
“Help”
XPress button ? on the multifunction
steering wheel and speak the command
“Help”.
You will receive help for the currently
selected application.
When you speak the command “Help” during
a dialog such as after the command “Dial
number”, you will receive help for the next
dialog steps.
You can also call up the help function
specifically for a particular system, for
example using the command “Help
telephone”.
Voice Control System troubleshooting267Control systems221_AKB; 6; 20, en-USd2ugruen,Version: 2.11.8.12009-09-24T13:28:17+02:00 - Seite 267Z
Page 280 of 548
XHave the SmartKey deactivated by an
authorized Mercedes-Benz Center.
XReport the loss of the SmartKey or the
mechanical key to your car insurance
company immediately.
XHave the mechanical lock replaced if
necessary.
Any authorized Mercedes-Benz Center will be
glad to supply you with a replacement. For
information on replacing the SmartKey, see
“Replacing the SmartKey” (Y page 278).
Replacing the SmartKey
Only you, or someone authorized by you can
order a replacement key from any Mercedes-
Benz Center. In order to do so, the Mercedes-
Benz Center will require proof of identity and
vehicle ownership with original documents,
including the following:
If you are the current owner of the vehicle:
Rthe vehicle’s current state registration
Ra current identity card, passport, or drivers
license
If you are an authorized person:
Rthe vehicle’s current state registration
Ra current identity card, passport, or drivers
license for the authorized individual
Rsigned and dated authorization from the
owner of the vehicle for which the key is
being requested
iDuplicated or photocopied
documentation will not be accepted.
Activating the key
Once you, or an authorized person, has
provided the appropriate documents, the
Mercedes-Benz Center will need to
synchronize the key to your vehicle before it
can be used. In order to do so, the Mercedes-
Benz Center need access to your vehicle.
Opening the doors from the inside
You can open a door from the inside even
when it is locked unless it is secured with the
child safety lock (Y page 61).
Open door only when conditions are safe to
do so.
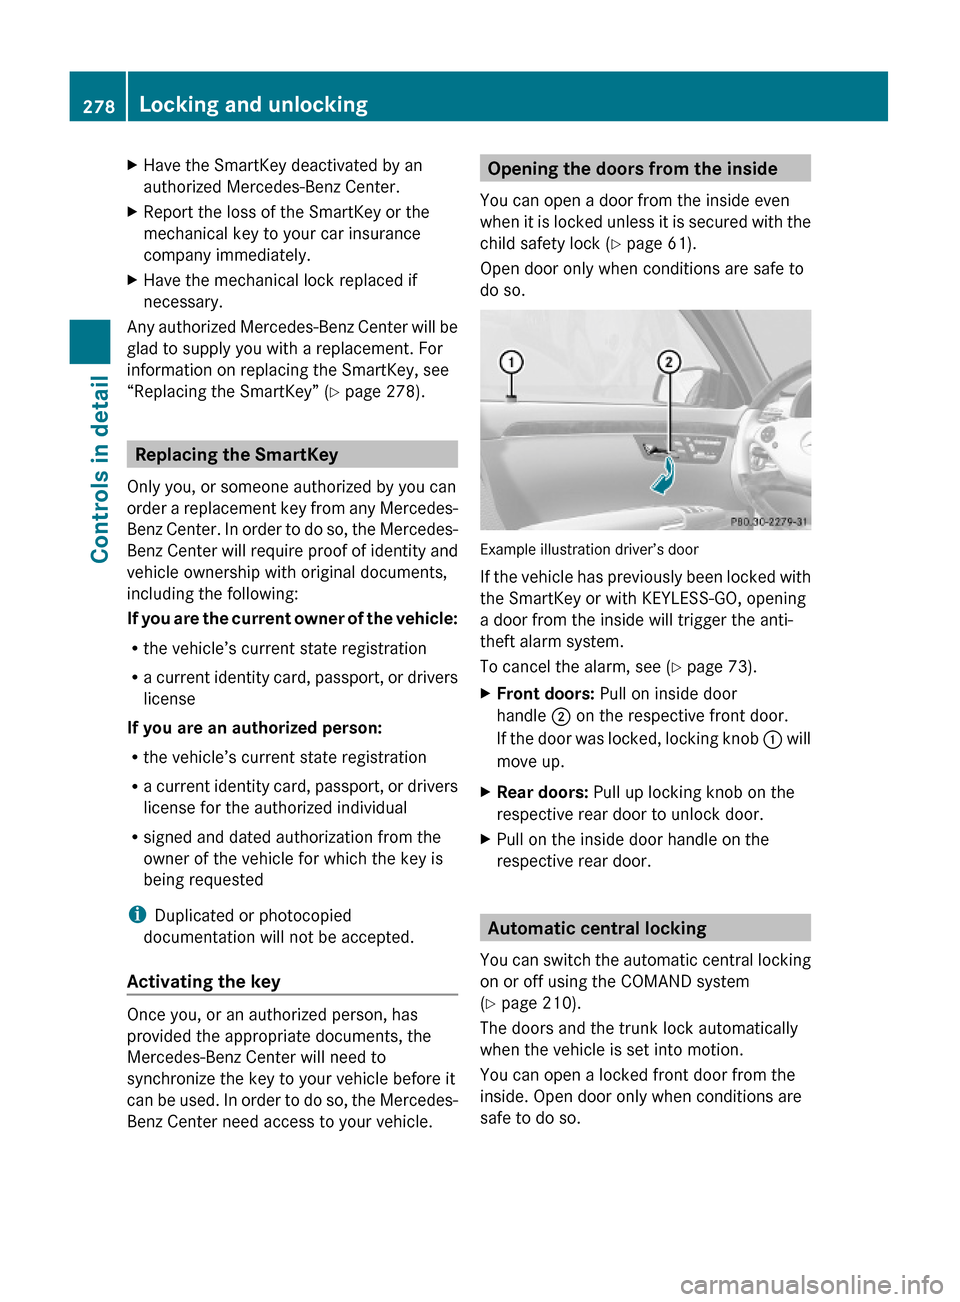
Example illustration driver’s door
If the vehicle has previously been locked with
the SmartKey or with KEYLESS-GO, opening
a door from the inside will trigger the anti-
theft alarm system.
To cancel the alarm, see (Y page 73).
XFront doors: Pull on inside door
handle ; on the respective front door.
If the door was locked, locking knob : will
move up.
XRear doors: Pull up locking knob on the
respective rear door to unlock door.
XPull on the inside door handle on the
respective rear door.
Automatic central locking
You can switch the automatic central locking
on or off using the COMAND system
(Y page 210).
The doors and the trunk lock automatically
when the vehicle is set into motion.
You can open a locked front door from the
inside. Open door only when conditions are
safe to do so.
278Locking and unlockingControls in detail
221_AKB; 6; 20, en-USd2ugruen,Version: 2.11.8.12009-09-24T13:28:17+02:00 - Seite 278
Page 381 of 548
panel could otherwise lock-up in the open
position.
If the tilt/sliding panel cannot be closed or
synchronized, contact an authorized
Mercedes-Benz Center or call Roadside
Assistance.
Tilt/sliding panel and front roller
sunblindXSwitch on the ignition.XPull and hold the roof panel switch several
times in direction of arrow =
( Y page 375) until the tilt/sliding panel is
fully closed.XKeep holding the roof panel switch in
direction of arrow = for approximately
1 second.XPull and hold the roof panel switch several
times in direction of arrow = until the front
roller sunblind is fully extended.XKeep holding the roof panel switch in
direction of arrow = for approximately
1 second.XCheck the express operation feature of the
front roller sunblind.
If the front roller sunblind retracts
completely, the front roller sunblind is
synchronized. Otherwise repeat the above
steps.XCheck the express operation feature of the
tilt/sliding panel ( Y page 377).
If the tilt/sliding panel opens completely,
the tilt/sliding panel is synchronized.
Otherwise repeat the above steps.
Rear roller sunblind
XSwitch on the ignition.XPull roller sunblind switch :
( Y page 376) in the rear door control panel
several times until the rear roller sunblind
is fully extended.XKeep holding roller sunblind switch : for
approximately 1 second.XCheck the express operation feature of the
front roller sunblind.
If the rear roller sunblind retracts
completely, the rear roller sunblind is
synchronized. Otherwise repeat the above
steps.
Loading and storing
Loading instructions
GWarning!
Always fasten items being carried as securely
as possible using cargo tie-down hooks and
fastening materials appropriate for the weight
and size of the load.
In an accident, during hard braking or sudden
maneuvers, loose items will be thrown around
inside the vehicle. This can cause injury to
vehicle occupants unless the items are
securely fastened in the vehicle.
To help avoid personal injury during a collision
or sudden maneuver, exercise care when
transporting cargo. Do not pile luggage or
cargo higher than the seat backrests.
The trunk is the preferred place to carry
objects. Always use cargo tie-down hooks
when transporting cargo. Do not place
anything on the rear-window shelf.
Never drive a vehicle with the trunk open.
Deadly carbon monoxide (CO) gases may
enter vehicle interior resulting in
unconsciousness and death.
Load distribution
The total load weight including vehicle
occupants and luggage/cargo should not
exceed the total load limit indicated on the
corresponding Tire and Loading Information
placard located on the driver’s door B-pillar
( Y page 418).
The handling characteristics of a fully loaded
vehicle depends greatly on the load
Loading and storing379Controls in detail221_AKB; 6; 20, en-USd2ugruen,Version: 2.11.8.12009-09-24T13:28:17+02:00 - Seite 379Z
Page 388 of 548
Sun visorsGWarning!
Do not use the vanity mirror while driving.
Keep the vanity mirrors in the sun visors
closed while vehicle is in motion. Reflected
glare can endanger you and others.
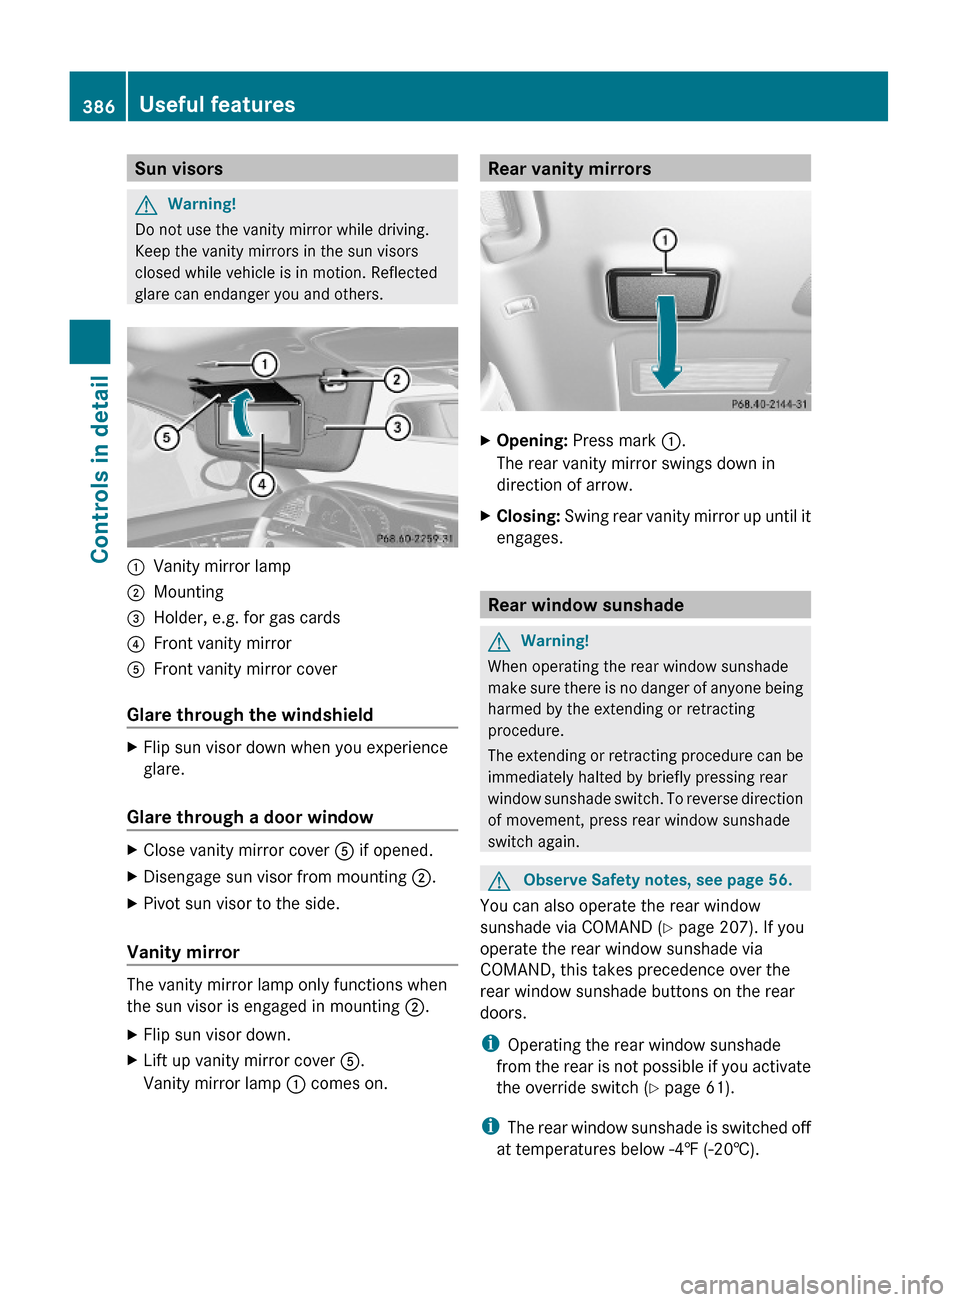
:Vanity mirror lamp;Mounting=Holder, e.g. for gas cards?Front vanity mirrorAFront vanity mirror cover
Glare through the windshield
XFlip sun visor down when you experience
glare.
Glare through a door window
XClose vanity mirror cover A if opened.XDisengage sun visor from mounting ;.XPivot sun visor to the side.
Vanity mirror
The vanity mirror lamp only functions when
the sun visor is engaged in mounting ;.
XFlip sun visor down.XLift up vanity mirror cover A.
Vanity mirror lamp : comes on.Rear vanity mirrorsXOpening: Press mark :.
The rear vanity mirror swings down in
direction of arrow.
XClosing: Swing rear vanity mirror up until it
engages.
Rear window sunshade
GWarning!
When operating the rear window sunshade
make sure there is no danger of anyone being
harmed by the extending or retracting
procedure.
The extending or retracting procedure can be
immediately halted by briefly pressing rear
window sunshade switch. To reverse direction
of movement, press rear window sunshade
switch again.
GObserve Safety notes, see page 56.
You can also operate the rear window
sunshade via COMAND (Y page 207). If you
operate the rear window sunshade via
COMAND, this takes precedence over the
rear window sunshade buttons on the rear
doors.
iOperating the rear window sunshade
from the rear is not possible if you activate
the override switch (Y page 61).
iThe rear window sunshade is switched off
at temperatures below -4‡ (-20†).
386Useful featuresControls in detail
221_AKB; 6; 20, en-USd2ugruen,Version: 2.11.8.12009-09-24T13:28:17+02:00 - Seite 386
Page 413 of 548
inflation pressure loss and damage to the
tire beads.
R If the vehicle is heavily loaded, check tire
inflation pressure and correct as required.
R Do not allow your tires to wear down too
far. Adhesion properties on wet roads are
sharply reduced at tread depths of less
than 1
/ 8 in (3 mm).
R When replacing individual tires, you should
mount new tires on the front wheels first
(on vehicles with same-sized wheels all
around).
Recommended tire inflation pressure
GWarning!
Follow recommended tire inflation pressures.
Do not underinflate tires. Underinflated tires
wear excessively and/or unevenly, adversely
affect handling and fuel economy, and are
more likely to fail from being overheated.
Do not overinflate tires. Overinflated tires can
adversely affect handling and ride comfort,
wear unevenly, increase stopping distance,
and result in sudden deflation (blowout)
because they are more likely to become
punctured or damaged by road debris,
potholes etc.
Do not overload the tires by exceeding the
specified load limit as indicated on the Tire
and Loading Information placard on the
driver’s door B-pillar. Overloading the tires
can overheat them, possibly causing a
blowout. Overloading the tires can also result
in handling or steering problems, or brake
failure.
Your vehicle is equipped with the Tire and
Loading Information placard located on the
driver’s door B-pillar ( Y page 418).
The tire inflation pressure should be checked
regularly. Only adjust the tire inflation
pressure on cold tires. The tires can be
considered cold if the vehicle has been
parked for at least 3 hours or driven less than
1 mile (1.6 km). Depending on the ambient
temperature, the driving speed and the tire
load, the tire temperature changes. When the
tire temperature changes by 18 ‡ (10†), the
tire inflation pressure will change by
approximately 1.5 psi (0.1 bar). Keep this in
mind when checking tire inflation pressure on
warm tires and adjust the tire pressure only
if the tire inflation pressure is too low for the
current operating conditions. If you check the
tire inflation pressure when the tires are
warm, the reading will be higher than the cold
reading. This is normal. Do not let air out to
match the specified cold tire inflation
pressure. Otherwise, the tire will be
underinflated.
Follow recommended cold tire inflation
pressures listed on Tire and Loading
Information placard on the driver’s door
B-pillar.
Keeping the tires properly inflated provides
the best handling, tread life and riding
comfort.
In addition to the Tire and Loading
Information placard on the driver’s door
B-pillar, also consult the tire inflation
pressure label on the inside of the filler flap
for any additional information pertaining to
special driving situations. For more
information, see “Important notes on tire
inflation pressure” ( Y page 412).
i Data shown on Tire and Loading
Information placard example are for
illustration purposes only. Tire data are
specific to each vehicle and may vary from
data shown in the following illustration.
Refer to Tire and Loading Information
placard on vehicle for actual data specific
to your vehicle.Tires and wheels411Operation221_AKB; 6; 20, en-USd2ugruen,Version: 2.11.8.12009-09-24T13:28:17+02:00 - Seite 411Z
Page 414 of 548
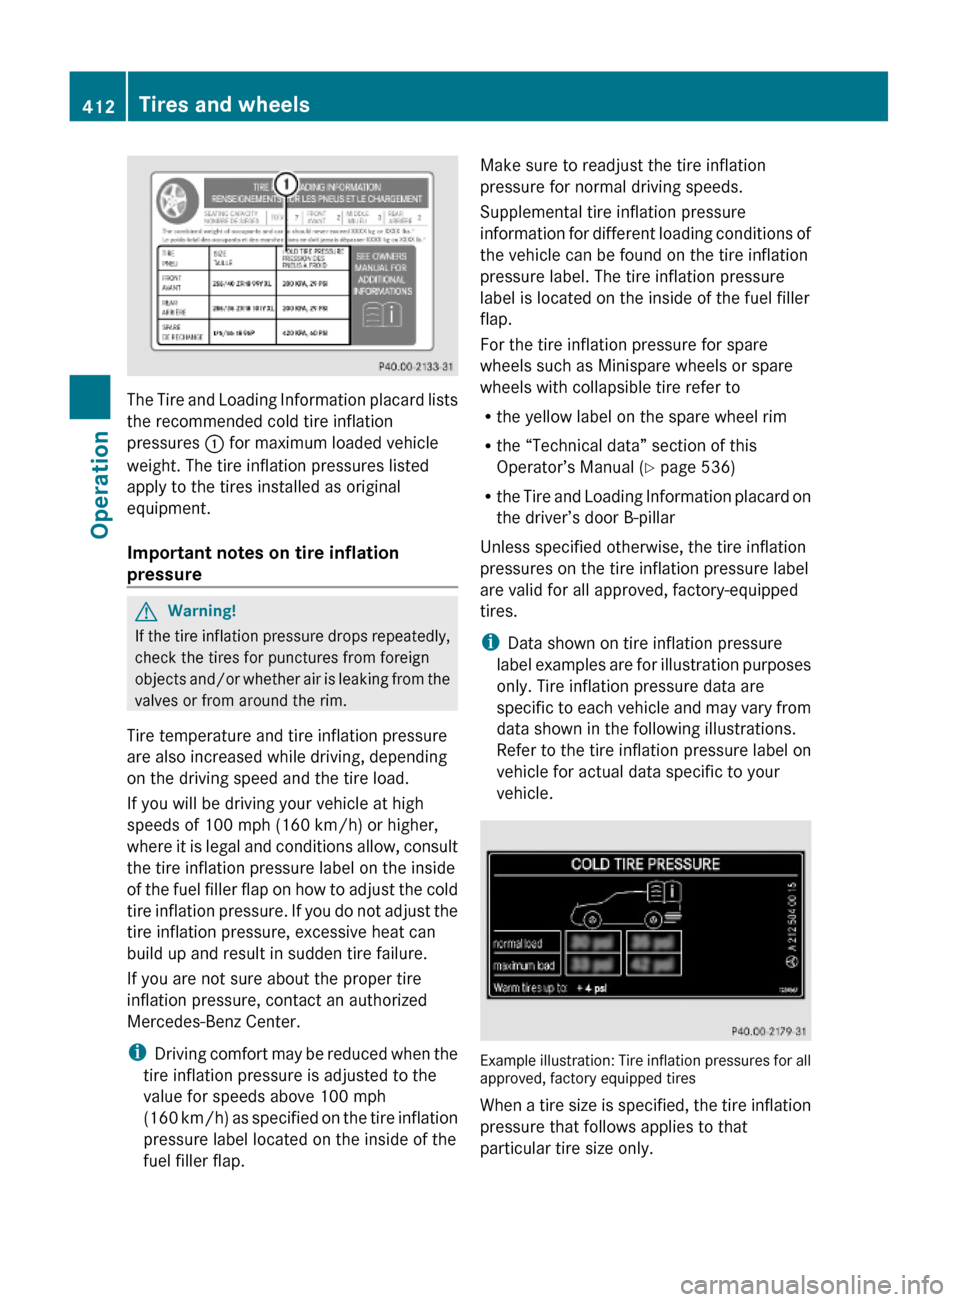
The Tire and Loading Information placard lists
the recommended cold tire inflation
pressures : for maximum loaded vehicle
weight. The tire inflation pressures listed
apply to the tires installed as original
equipment.
Important notes on tire inflation
pressure
GWarning!
If the tire inflation pressure drops repeatedly,
check the tires for punctures from foreign
objects and/or whether air is leaking from the
valves or from around the rim.
Tire temperature and tire inflation pressure
are also increased while driving, depending
on the driving speed and the tire load.
If you will be driving your vehicle at high
speeds of 100 mph (160 km/h) or higher,
where it is legal and conditions allow, consult
the tire inflation pressure label on the inside
of the fuel filler flap on how to adjust the cold
tire inflation pressure. If you do not adjust the
tire inflation pressure, excessive heat can
build up and result in sudden tire failure.
If you are not sure about the proper tire
inflation pressure, contact an authorized
Mercedes-Benz Center.
iDriving comfort may be reduced when the
tire inflation pressure is adjusted to the
value for speeds above 100 mph
(160 km/h) as specified on the tire inflation
pressure label located on the inside of the
fuel filler flap.
Make sure to readjust the tire inflation
pressure for normal driving speeds.
Supplemental tire inflation pressure
information for different loading conditions of
the vehicle can be found on the tire inflation
pressure label. The tire inflation pressure
label is located on the inside of the fuel filler
flap.
For the tire inflation pressure for spare
wheels such as Minispare wheels or spare
wheels with collapsible tire refer to
Rthe yellow label on the spare wheel rim
Rthe “Technical data” section of this
Operator’s Manual (Y page 536)
Rthe Tire and Loading Information placard on
the driver’s door B-pillar
Unless specified otherwise, the tire inflation
pressures on the tire inflation pressure label
are valid for all approved, factory-equipped
tires.
iData shown on tire inflation pressure
label examples are for illustration purposes
only. Tire inflation pressure data are
specific to each vehicle and may vary from
data shown in the following illustrations.
Refer to the tire inflation pressure label on
vehicle for actual data specific to your
vehicle.
Example illustration: Tire inflation pressures for allapproved, factory equipped tires
When a tire size is specified, the tire inflation
pressure that follows applies to that
particular tire size only.
412Tires and wheelsOperation
221_AKB; 6; 20, en-USd2ugruen,Version: 2.11.8.12009-09-24T13:28:17+02:00 - Seite 412