2010 MERCEDES-BENZ S550 4MATIC sd card
[x] Cancel search: sd cardPage 152 of 548
outgoing call, the No Service message will
appear for a short while.
RThe SIM card is not inserted in GSM type
phone.
RWhen you remove the SmartKey from the
starter switch during a call in hand-free
mode, the call will be maintained for up to
30 minutes. It will then be terminated.
Switch to “Private Mode” on the mobile
phone before switching off COMAND to
maintain the call beyond that time limit.
Refer to the operating instructions of your
mobile phone.
RWhen you want to switch off COMAND
during a call in hands-free mode, the
message You cannot shut off COMAND
until you have finished your
telephone call. appears.
Activating telephone mode
XSelect Telephone.
or
XPress button 6 on telephone keypad.
or
XPress shortcut button S once or twice.
iThe number of times you have to press
shortcut button S depends on the
operating mode currently selected.
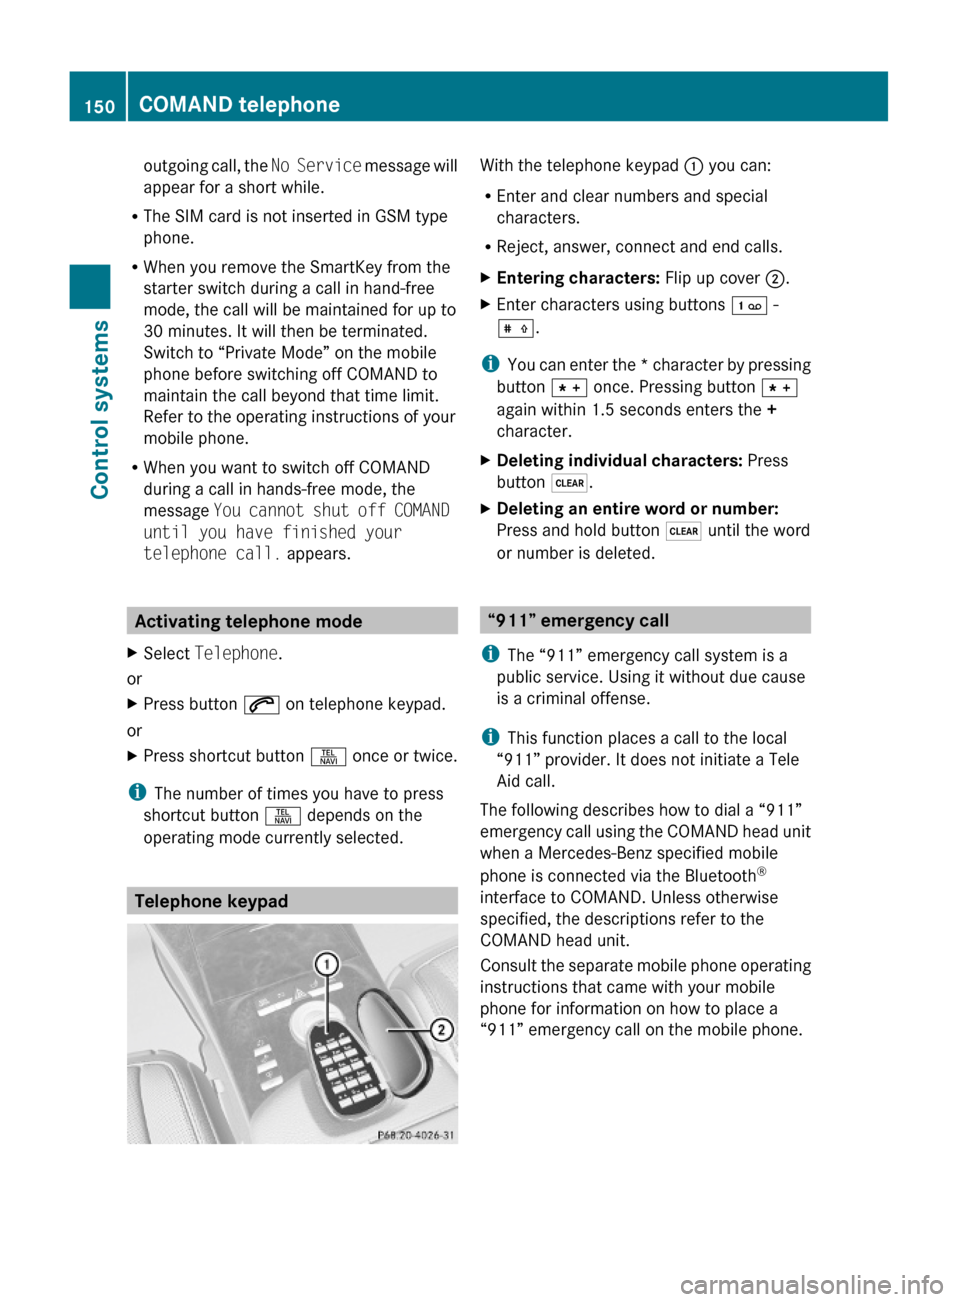
Telephone keypad
With the telephone keypad : you can:
REnter and clear numbers and special
characters.
RReject, answer, connect and end calls.
XEntering characters: Flip up cover ;.XEnter characters using buttons ´ -
Æ.
iYou can enter the * character by pressing
button à once. Pressing button Ã
again within 1.5 seconds enters the +
character.
XDeleting individual characters: Press
button $.
XDeleting an entire word or number:
Press and hold button $ until the word
or number is deleted.
“911” emergency call
iThe “911” emergency call system is a
public service. Using it without due cause
is a criminal offense.
iThis function places a call to the local
“911” provider. It does not initiate a Tele
Aid call.
The following describes how to dial a “911”
emergency call using the COMAND head unit
when a Mercedes-Benz specified mobile
phone is connected via the Bluetooth®
interface to COMAND. Unless otherwise
specified, the descriptions refer to the
COMAND head unit.
Consult the separate mobile phone operating
instructions that came with your mobile
phone for information on how to place a
“911” emergency call on the mobile phone.
150COMAND telephoneControl systems
221_AKB; 6; 20, en-USd2ugruen,Version: 2.11.8.12009-09-24T13:28:17+02:00 - Seite 150
Page 153 of 548

The following conditions must be met for a
“911” emergency call via COMAND:
RMobile phone must be switched on.
RThe corresponding mobile
communications network must be
available.
iEmergency calls may not be possible with
all telephone networks or if certain network
services and/or telephone functions are
active. Check with your local service
providers.
If you cannot make an emergency call, you
will have to initiate rescue measures yourself.
Placing a “911” emergency call using
COMAND with the mobile phone
unlocked
XPress button S to switch to telephone
mode.
XEnter 911 using the telephone keypad in
the center console.
XPress button 6 on the telephone
keypad in the center console.
or
XSelect 6 in the COMAND display and
press W for dialing to begin.
Connecting call… appears in the
COMAND display while the mobile phone
establishes the connection.
XWait until the emergency call center
answers, then describe the emergency.
iDepending on the phone type, if no SIM
card is inserted in a GSM mobile phone or
if there is no service on a CDMA mobile
phone, NO SERVICE may appear in the
COMAND display. In that case, you only can
make an emergency call on the mobile
phone itself, without the use of COMAND.
Placing a “911” emergency call with the
mobile phone locked
iIf the mobile phone is locked, you only can
make an emergency call on the mobile
phone itself, without the use of COMAND.
Bluetooth interface
Bluetooth® is a technology for wireless
exchange of data over short distances of up
to approximately 33 feet (10 m). You can
connect your mobile phone to COMAND or
exchange vCards using Bluetooth®.
Activating and deactivating Bluetooth®
XSelect Vehicle Q System Q
Bluetooth Q Bluetooth activated.
Bluetooth® is activated when the check box
is checked.
Mobile phone prerequisites
A Bluetooth®-compatible mobile phone is
required for telephony via the COMAND using
the Bluetooth® interface.
iFor further information on suitable mobile
phones and connecting Bluetooth®-
enabled mobile phones to COMAND
Rvisit www.mbusa-mobile.com
Rcall the Mercedes-Benz Customer
Assistance Center at
COMAND telephone151Control systems221_AKB; 6; 20, en-USd2ugruen,Version: 2.11.8.12009-09-24T13:28:17+02:00 - Seite 151Z
Page 159 of 548

XDeleting entire number: Press and hold
$ on the telephone keypad in the center
console until the number is deleted.
or
XSelect r via the telephone menu and
press and hold W until the number is
deleted.
XConnecting call: Press button 6 on the
multifunction steering wheel or on the
telephone keypad in the center console.
or
XSelect 6 via the telephone menu
Redial
XGo to the telephone menu.XPress 6 on the telephone keypad in the
center console.
or
XSelect SEND from the telephone menu and
press W.
The list of previously dialed number
appears. The last number you have called
at the top of the list.
XSelecting number and connecting call:
Slide ZVÆ and press W to select a number
or press 6 on the telephone keypad in
the center console.
Calling voice mail15
Your voice mail number must be stored on the
SIM card of your mobile phone and be
assigned to key 4 on the mobile phone
keypad.
XPress and hold ´ on the telephone
keypad in the center console.
Functions during a single party call
(non-conference calls) :Called or calling party;6 Active call=NEW Connect to more parties16?Switching hands-free microphone on/offAEnable touch-tone dialing17BEnding call
Switching hands-free microphone on or
off
This function is available during an active call.
XSwitching off: Select Mike OFF in the
telephone menu.
Symbol Q appears and the message The
microphone is turned OFF. is displayed
briefly.
XSwitching on: Select Mike ON in the
telephone menu.
Symbol Q goes out. The message The
microphone is turned ON. appears
briefly.
Touch-tone dialing17
You can use touch-tone dialing to control
answering machines and other devices for
remote inquiry.
When you want to check your answering
machine for example, dial the respective
number.
15Function only available when supported by the respective network provider.16Function only available when the mobile phone supports HFP 1.5 or higher.17Not available on all mobile phones.
COMAND telephone157Control systems221_AKB; 6; 20, en-USd2ugruen,Version: 2.11.8.12009-09-24T13:28:17+02:00 - Seite 157Z
Page 161 of 548
Calling an additional party
You can call another party during an active
call. The active call is put on hold.
XSelect NEW from the telephone menu and
press W.
or
XPress button 6 on the telephone
keypad in the center console.
XEnter the number to call manually
(Y page 156) or from the phone book
(Y page 162).
Switching between two parties (call hold)
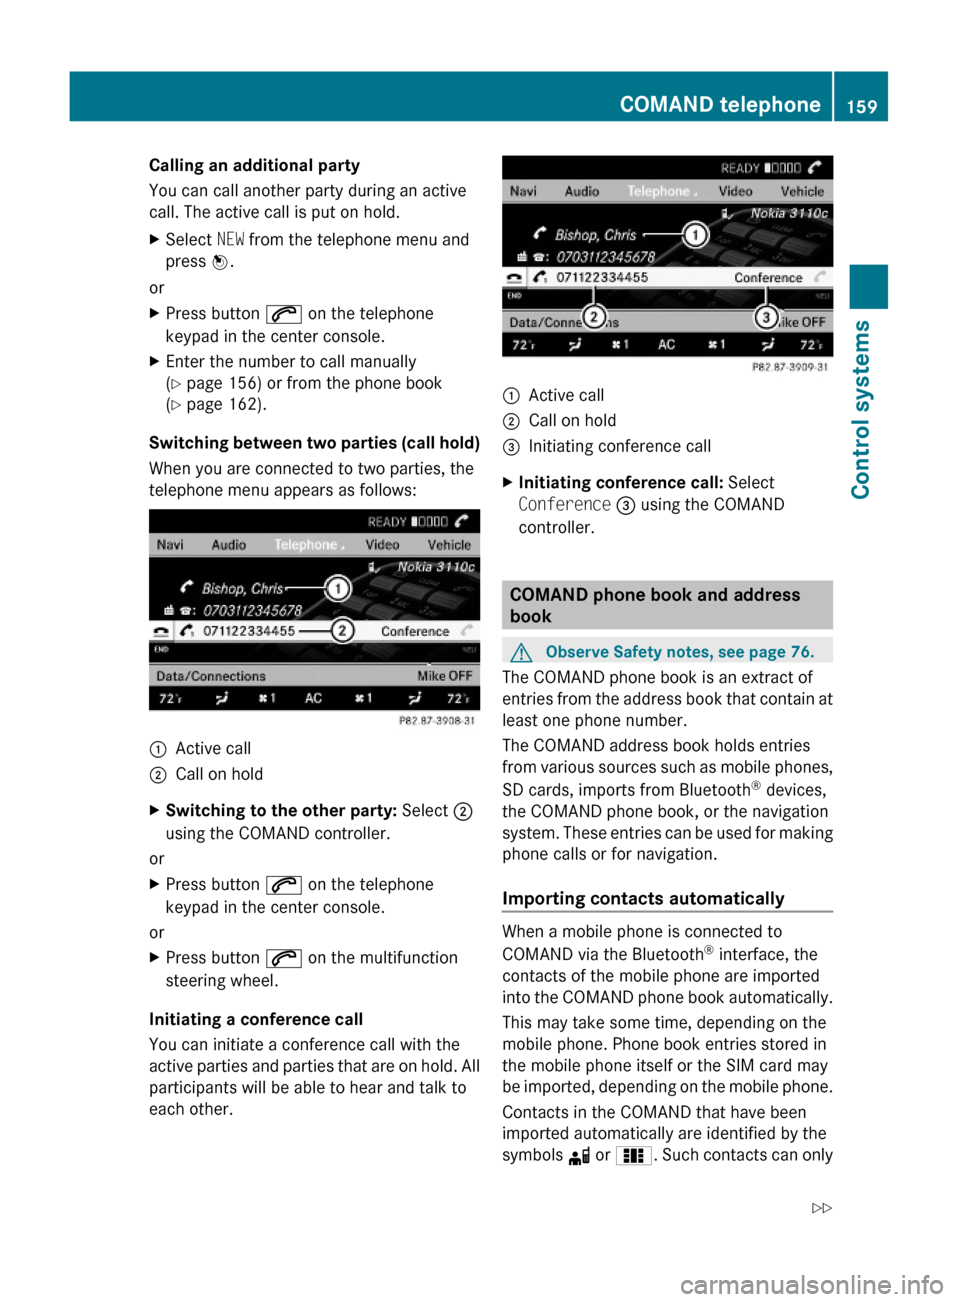
When you are connected to two parties, the
telephone menu appears as follows:
:Active call;Call on holdXSwitching to the other party: Select ;
using the COMAND controller.
or
XPress button 6 on the telephone
keypad in the center console.
or
XPress button 6 on the multifunction
steering wheel.
Initiating a conference call
You can initiate a conference call with the
active parties and parties that are on hold. All
participants will be able to hear and talk to
each other.
:Active call;Call on hold=Initiating conference callXInitiating conference call: Select
Conference = using the COMAND
controller.
COMAND phone book and address
book
GObserve Safety notes, see page 76.
The COMAND phone book is an extract of
entries from the address book that contain at
least one phone number.
The COMAND address book holds entries
from various sources such as mobile phones,
SD cards, imports from Bluetooth® devices,
the COMAND phone book, or the navigation
system. These entries can be used for making
phone calls or for navigation.
Importing contacts automatically
When a mobile phone is connected to
COMAND via the Bluetooth® interface, the
contacts of the mobile phone are imported
into the COMAND phone book automatically.
This may take some time, depending on the
mobile phone. Phone book entries stored in
the mobile phone itself or the SIM card may
be imported, depending on the mobile phone.
Contacts in the COMAND that have been
imported automatically are identified by the
symbols d or 0. Such contacts can only
COMAND telephone159Control systems221_AKB; 6; 20, en-USd2ugruen,Version: 2.11.8.12009-09-24T13:28:17+02:00 - Seite 159Z
Page 162 of 548
be accessed when the respective mobile
phone is connected to COMAND via the
Bluetooth® interface.
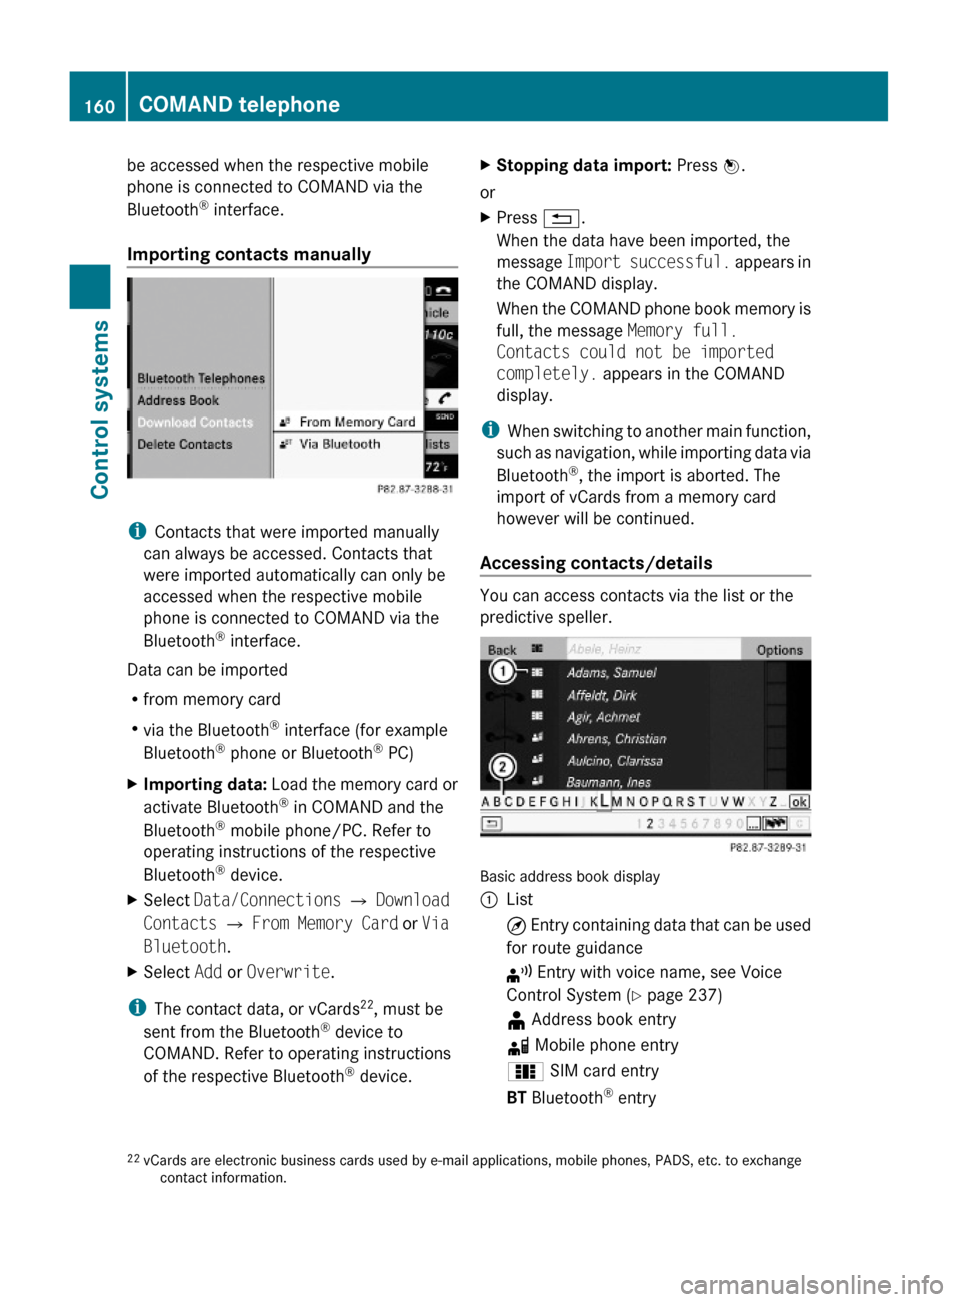
Importing contacts manually
iContacts that were imported manually
can always be accessed. Contacts that
were imported automatically can only be
accessed when the respective mobile
phone is connected to COMAND via the
Bluetooth® interface.
Data can be imported
Rfrom memory card
Rvia the Bluetooth® interface (for example
Bluetooth® phone or Bluetooth® PC)
XImporting data: Load the memory card or
activate Bluetooth® in COMAND and the
Bluetooth® mobile phone/PC. Refer to
operating instructions of the respective
Bluetooth® device.
XSelect Data/Connections Q Download
Contacts Q From Memory Card or Via
Bluetooth.
XSelect Add or Overwrite.
iThe contact data, or vCards22, must be
sent from the Bluetooth® device to
COMAND. Refer to operating instructions
of the respective Bluetooth® device.
XStopping data import: Press W.
or
XPress %.
When the data have been imported, the
message Import successful. appears in
the COMAND display.
When the COMAND phone book memory is
full, the message Memory full.
Contacts could not be imported
completely. appears in the COMAND
display.
iWhen switching to another main function,
such as navigation, while importing data via
Bluetooth®, the import is aborted. The
import of vCards from a memory card
however will be continued.
Accessing contacts/details
You can access contacts via the list or the
predictive speller.
Basic address book display
:List¤ Entry containing data that can be used
for route guidance
¦ Entry with voice name, see Voice
Control System (Y page 237)
¥ Address book entryd Mobile phone entry0 SIM card entryBT Bluetooth® entry22vCards are electronic business cards used by e-mail applications, mobile phones, PADS, etc. to exchangecontact information.
160COMAND telephoneControl systems
221_AKB; 6; 20, en-USd2ugruen,Version: 2.11.8.12009-09-24T13:28:17+02:00 - Seite 160
Page 163 of 548

¯ Memory card entryG Entry containing multiple phone
numbers
;Two-row predictive spellerB Changing predictive speller
language
p Changing character setF Deleting selection¬ Confirming selection% Back
Selecting contacts from list
XPhone book: Select Name.XAddress book: Select Data/Connections
Q Address Book.
XChanging from predictive speller to
list: Press ZV until the predictive speller
disappears.
or
XSelect ¬.XSelecting contact: Slide ZVÆ or rotate
cVd and press W.
Selecting contacts via predictive speller
XPhone book: Select Name.XAddress book: Select Data/Connections
Q Address Book.
XChanging from list to predictive
speller: Select Back from the list.
or
XPress %.XSelecting character: Slide ZVÆ or XVY
and press W. Repeat this procedure until
COMAND changes to the list automatically.
The first character you enter determines
the first letter of the entry you are
searching. When similar entries exist, the
next character that is different is
highlighted and thus offered for selection.
iYou can also enter the characters via the
telephone keypad in the center console.
Displaying contact detailsXSelect Options Q Details.
The contact details appear.
XBack to list: Slide XVY until the list is
highlighted.
Creating/editing contacts
iThis function is not available at a vehicle
speed of above approximately 3 mph
(5 km/h). When the vehicle speed is below
approximately 2 mph (3 km/h), the
function is available again.
iYou can create address data in the
address book directly. When you save
phone numbers to the phone book, they are
created in the address book. When you
save a destination for navigation, COMAND
creates an address book entry that
contains the entire data usable for route
guidance.
XSelect the contact23 (Y page 160).XSelect Options Q New Entry or
Change.
The input menu with the data fields
appears.
23For changing contact only.COMAND telephone161Control systems221_AKB; 6; 20, en-USd2ugruen,Version: 2.11.8.12009-09-24T13:28:17+02:00 - Seite 161Z
Page 164 of 548
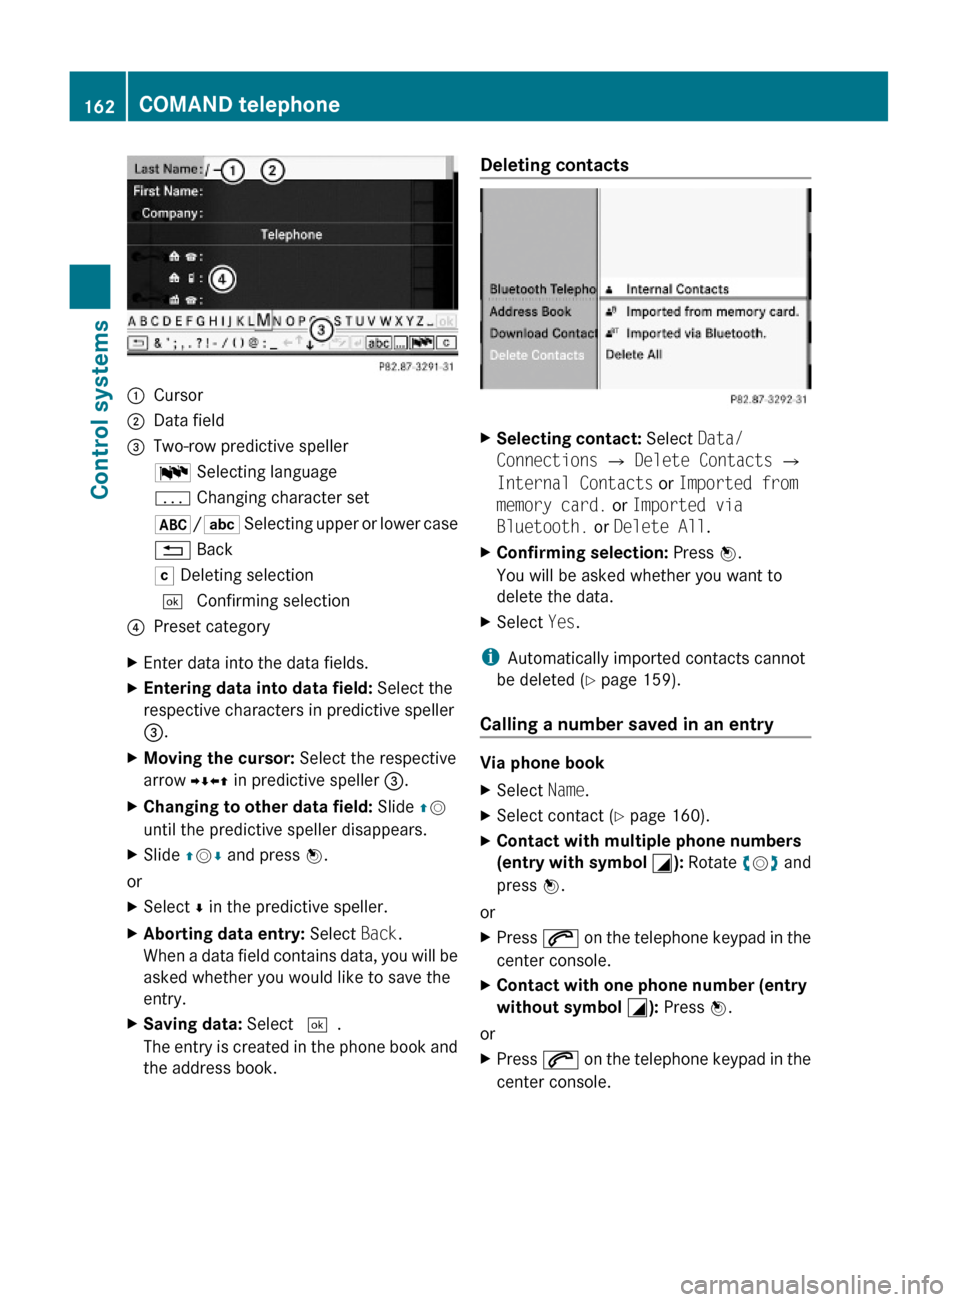
:Cursor;Data field=Two-row predictive spellerB Selecting languagep Changing character set*/E Selecting upper or lower case% BackF Deleting selection¬ Confirming selection?Preset categoryXEnter data into the data fields.XEntering data into data field: Select the
respective characters in predictive speller
=.
XMoving the cursor: Select the respective
arrow YÆXZ in predictive speller =.
XChanging to other data field: Slide ZV
until the predictive speller disappears.
XSlide ZVÆ and press W.
or
XSelect Æ in the predictive speller.XAborting data entry: Select Back.
When a data field contains data, you will be
asked whether you would like to save the
entry.
XSaving data: Select ¬.
The entry is created in the phone book and
the address book.
Deleting contacts XSelecting contact: Select Data/
Connections Q Delete Contacts Q
Internal Contacts or Imported from
memory card. or Imported via
Bluetooth. or Delete All.
XConfirming selection: Press W.
You will be asked whether you want to
delete the data.
XSelect Yes.
iAutomatically imported contacts cannot
be deleted (Y page 159).
Calling a number saved in an entry
Via phone book
XSelect Name.XSelect contact (Y page 160).XContact with multiple phone numbers
(entry with symbol G): Rotate cVd and
press W.
or
XPress 6 on the telephone keypad in the
center console.
XContact with one phone number (entry
without symbol G): Press W.
or
XPress 6 on the telephone keypad in the
center console.
162COMAND telephoneControl systems
221_AKB; 6; 20, en-USd2ugruen,Version: 2.11.8.12009-09-24T13:28:17+02:00 - Seite 162
Page 174 of 548
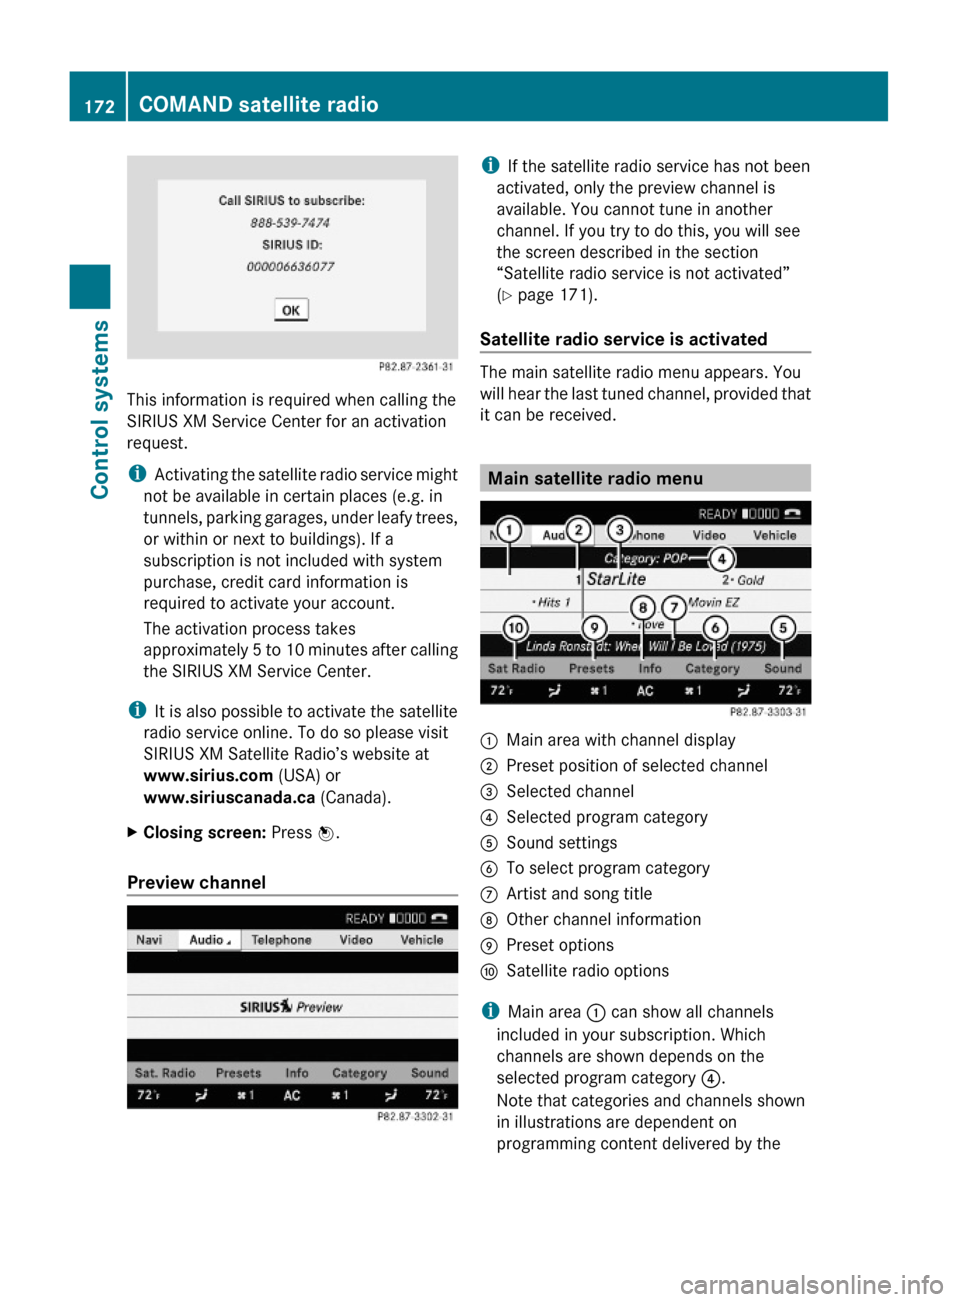
This information is required when calling the
SIRIUS XM Service Center for an activation
request.
iActivating the satellite radio service might
not be available in certain places (e.g. in
tunnels, parking garages, under leafy trees,
or within or next to buildings). If a
subscription is not included with system
purchase, credit card information is
required to activate your account.
The activation process takes
approximately 5 to 10 minutes after calling
the SIRIUS XM Service Center.
iIt is also possible to activate the satellite
radio service online. To do so please visit
SIRIUS XM Satellite Radio’s website at
www.sirius.com (USA) or
www.siriuscanada.ca (Canada).
XClosing screen: Press W.
Preview channel
iIf the satellite radio service has not been
activated, only the preview channel is
available. You cannot tune in another
channel. If you try to do this, you will see
the screen described in the section
“Satellite radio service is not activated”
(Y page 171).
Satellite radio service is activated
The main satellite radio menu appears. You
will hear the last tuned channel, provided that
it can be received.
Main satellite radio menu
:Main area with channel display;Preset position of selected channel=Selected channel?Selected program categoryASound settingsBTo select program categoryCArtist and song titleDOther channel informationEPreset optionsFSatellite radio options
iMain area : can show all channels
included in your subscription. Which
channels are shown depends on the
selected program category ?.
Note that categories and channels shown
in illustrations are dependent on
programming content delivered by the
172COMAND satellite radioControl systems
221_AKB; 6; 20, en-USd2ugruen,Version: 2.11.8.12009-09-24T13:28:17+02:00 - Seite 172