2010 MERCEDES-BENZ S550 4MATIC rear view
[x] Cancel search: rear viewPage 356 of 548
XAdjust the end position by maneuvering as
needed.XObserve the Parktronic system warning
indicator ( Y page 349).
Canceling the Parking Guidance
XPress the Parktronic switch ( Y page 349).
The Parking Guidance is canceled
immediately and the Parktronic system is
deactivated.
The Parking Guidance is canceled
automatically if guidance into the parking
space is no longer possible or if an error
occurs.
The parking space symbol disappears and the
message Parking Guidance Canceled
appears in the multifunction display.
Rear view camera
The rear view camera is an optical parking aid.
The area behind the vehicle appears in the
COMAND system display as a mirror image,
like in the rear view mirror.
In addition, the rear view camera contains
guidelines to help you with driving in reverse.
GWarning!
Make sure no persons or animals are in or
near the area in which you are parking/
maneuvering. Otherwise, they could be
injured.
GWarning!
The rear view camera is only an aid and may
display obstacles
R from a distorted perspective
R inaccurately
R may not display obstacles at all
The rear view camera does not relieve you of
the responsibility to be cautious. Take care
and pay careful attention. The rear view
camera may not show objects which are
R very close to the rear bumper
R under the rear bumper
R above the trunk handle
You are responsible for safety at all times and
must continue to pay attention to the
immediate surroundings when parking and
maneuvering. This includes the area behind,
in front of, and beside the vehicle. Otherwise
you could endanger yourself and/or others.GWarning!
The rear view camera either will not function
or will not function to its full capability if
R the trunk lid is open
R it is raining very hard, snowing or foggy
R it is night or you are parking/maneuvering
your vehicle in an area where it is very dark
R the camera is exposed to a very bright white
light
R the immediate surroundings are
illuminated with fluorescent light (the
COMAND system display can flicker)
R there is a sudden change in temperature,
e.g. if you drive into a heated garage from
the cold (lens condensation)
R the camera lens is dirty or covered
R the rear of your vehicle is damaged
In this case, have the position and setting
of the camera checked by a qualified
specialist workshop. Mercedes-Benz
recommends that you contact a Mercedes-
Benz Center for this purpose.
Do not use the rear view camera in these
situations. Otherwise you could injure
yourself or others and/or damage property
including your vehicle while parking/
maneuvering.
354Driving systemsControls in detail
221_AKB; 6; 20, en-USd2ugruen,Version: 2.11.8.12009-09-24T13:28:17+02:00 - Seite 354
Page 357 of 548
GWarning!
Use of rear view camera can be dangerous if
you are color-blind or have impaired color
vision.
Only use rear view camera if you can see and
distinguish all colored guidelines shown by
rear view camera on the COMAND system
display.
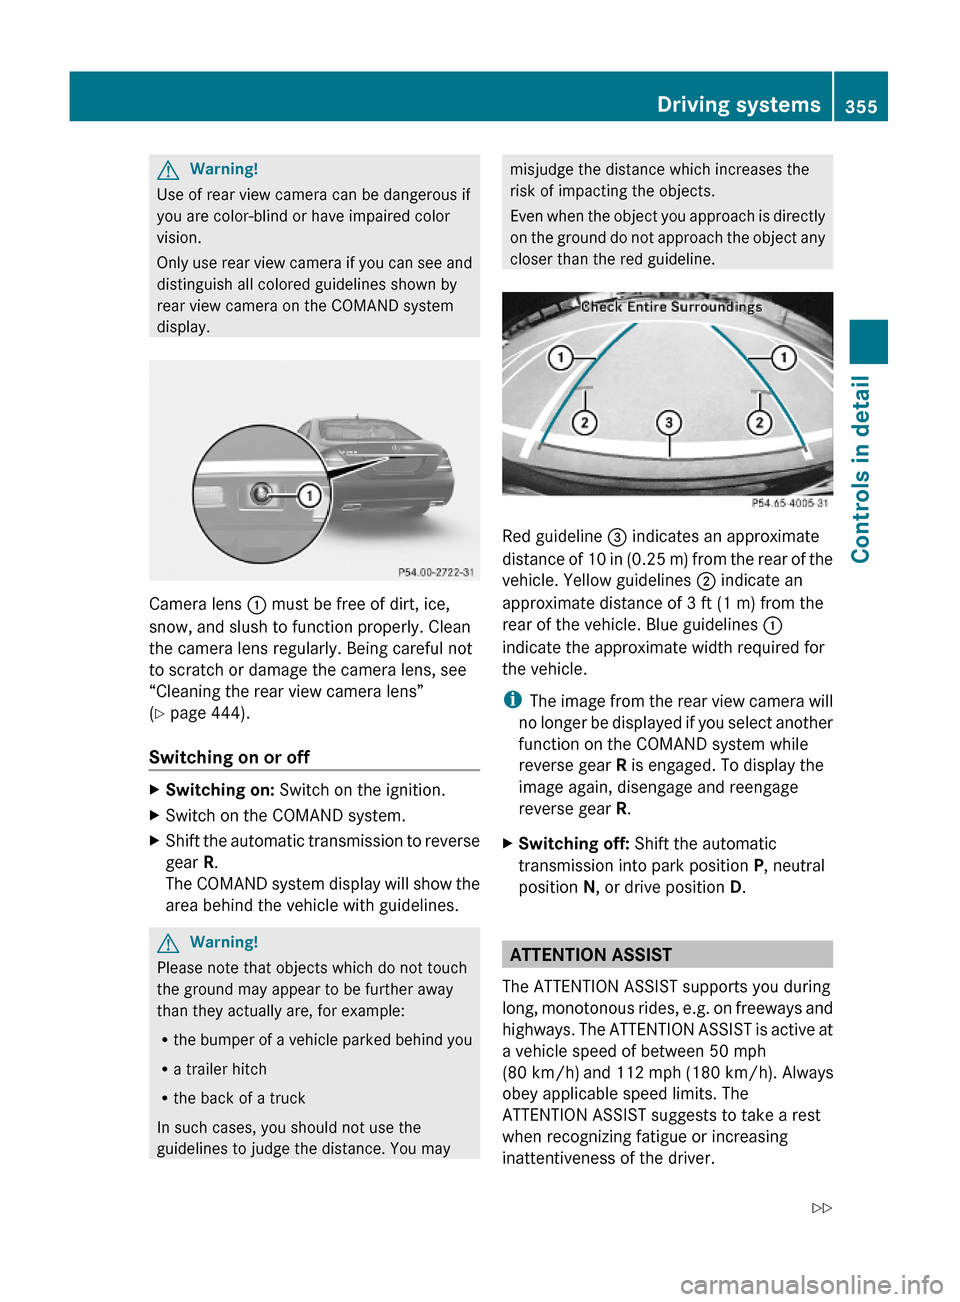
Camera lens : must be free of dirt, ice,
snow, and slush to function properly. Clean
the camera lens regularly. Being careful not
to scratch or damage the camera lens, see
“Cleaning the rear view camera lens”
(Y page 444).
Switching on or off
XSwitching on: Switch on the ignition.XSwitch on the COMAND system.XShift the automatic transmission to reverse
gear R.
The COMAND system display will show the
area behind the vehicle with guidelines.
GWarning!
Please note that objects which do not touch
the ground may appear to be further away
than they actually are, for example:
Rthe bumper of a vehicle parked behind you
Ra trailer hitch
Rthe back of a truck
In such cases, you should not use the
guidelines to judge the distance. You may
misjudge the distance which increases the
risk of impacting the objects.
Even when the object you approach is directly
on the ground do not approach the object any
closer than the red guideline.
Red guideline = indicates an approximate
distance of 10 in (0.25 m) from the rear of the
vehicle. Yellow guidelines ; indicate an
approximate distance of 3 ft (1 m) from the
rear of the vehicle. Blue guidelines :
indicate the approximate width required for
the vehicle.
iThe image from the rear view camera will
no longer be displayed if you select another
function on the COMAND system while
reverse gear R is engaged. To display the
image again, disengage and reengage
reverse gear R.
XSwitching off: Shift the automatic
transmission into park position P, neutral
position N, or drive position D.
ATTENTION ASSIST
The ATTENTION ASSIST supports you during
long, monotonous rides, e.g. on freeways and
highways. The ATTENTION ASSIST is active at
a vehicle speed of between 50 mph
(80 km/h) and 112 mph (180 km/h). Always
obey applicable speed limits. The
ATTENTION ASSIST suggests to take a rest
when recognizing fatigue or increasing
inattentiveness of the driver.
Driving systems355Controls in detail221_AKB; 6; 20, en-USd2ugruen,Version: 2.11.8.12009-09-24T13:28:17+02:00 - Seite 355Z
Page 361 of 548
XDimming illumination: Turn knob :
counterclockwise.
Dirty or fogged-up windshield
The Night View Assist Plus image is
diminished when the windshield in front of the
camera is
R dirty
R fogged up on the outside
R fogged up on the inside
GWarning!
Please do not forget that your primary
responsibility is to drive the vehicle. A driver’s
attention to the road must always be his/her
primary focus when driving. For your safety
and the safety of others, stop before trying to
remove window fogging or cleaning the
windshield in front of the Night View Assist
Plus camera.
Bear in mind that at a speed of just 30 mph
(approximately 50 km/h), your vehicle is
covering a distance of 44 feet
(approximately 14 m) every second.
XRemoving condensation: Check settings
of the climate control and change them, if
necessary ( Y page 363).XSwing the camera cover downward
( Y page 444).XCleaning inside of windshield: Use a soft,
non-scratching cloth ( Y page 444).
Blind Spot Assist
The Blind Spot Assist uses radar sensors to
monitor the area on both sides of your
vehicle. It will assist you when you change
lanes driving at speeds of above 20 mph
(30 km/h). A red warning lamp will come on
in the exterior rear view mirror as soon as
another vehicle is detected. If you then
activate the corresponding turn signals to
change lanes, the red warning lamp flashes
and warning sounds (collision warning). The
Blind Spot Assist operates using sensors in
the rear bumper.GWarning!
The Blind Spot Assist is only a driving aid and
may not detect all vehicles.
The Blind Spot Assist may not be able to
detect narrow vehicles such as motorcycles
or bicycles, or it may not detect them until it
is too late.
The monitoring function may be impaired if
your sensors are dirty, subject to heavy spray,
or if visibility is poor due to e.g. snow, rain, or
fog. This can result in vehicles not being
detected or being detected too late.
The Blind Spot Assist cannot detect road,
traffic and weather conditions.
It is the driver’s responsibility at all times to
be attentive to road, weather and traffic
conditions and to provide the steering,
braking and other driving inputs necessary to
retain control of the vehicle. Failure to do so
could result in recognizing dangers too late,
possibly resulting in an accident and serious
injury to yourself and others.
In order for the Blind Spot Assist to function,
the radar sensors must be switched on and
operational.
When traveling in Canada in a vehicle not
registered in Canada, you must switch off the
radar sensor system ( Y page 236). Canadian
law does not permit the use of the radar
sensor system for vehicles from outside of
Canada. When you switch off the radar sensor
system, the following functions are
deactivated:
R Blind Spot Assist
R BAS PLUS ( Y page 64)
R PRE-SAFE ®
Brake ( Y page 69)
R DISTRONIC PLUS ( Y page 330)
i USA only:
This device has been approved by the FCC
as a “Vehicular Radar System”. The radar
Driving systems359Controls in detail221_AKB; 6; 20, en-USd2ugruen,Version: 2.11.8.12009-09-24T13:28:17+02:00 - Seite 359Z
Page 363 of 548

of the bumper around the sensors is free of
dirt, ice and snow. The radar sensors must not
be obstructed, for example, by bicycle
carriers or overhanging luggage.
! In the event of a significant impact or
damage affecting the bumpers, have the
radar sensors checked by a qualified
specialist workshop such as a Mercedes-
Benz Center. Failure to do this can result in
Blind Spot Assist not functioning correctly.
Indicator and warning lamps
Exterior rear view mirror, driver’s side
XMake sure that the radar sensors
(Y page 236) and Blind Spot Assist
(Y page 233) are switched on.
XSwitch on the ignition.
Red warning lamps : in the exterior rear
view mirrors come on.
XStart the engine.
Yellow indicator lamps : in the exterior
rear view mirrors come on up to a speed of
20 mph (30 km/h).
Above a speed of 20 mph (30 km/h), yellow
indicator lamps : go out and the Blind Spot
Assist is active. If the Blind Spot Assist
detects a vehicle in its range, red warning
lamp : on the corresponding side of the
vehicle comes on. The warning is issued each
time a vehicle enters the area monitored by
the Blind Spot Assist from behind or from the
side. When you pass another vehicle, the
warning is issued only when the speed
differential is less than 7 mph (12 km/h).
When you shift the automatic transmission in
reverse gear R, yellow indicator lamps : in
the exterior rear view mirrors goes out after
approximately 3 seconds. The Blind Spot
Assist is then not active.
The brightness of indicator lamps/warning
lamps : is controlled automatically
depending on the brightness of the ambient
light.
GWarning!
The Blind Spot Assist is not active at speeds
below approximately 20 mph (30 km/h). The
yellow indicator lamps in the exterior rear
view mirrors are illuminated. You will not be
alerted to the presence of vehicles in the
monitored area at these speeds.
It is the driver’s responsibility at all times to
be attentive to road, weather and traffic
conditions and to provide the steering,
braking and other driving inputs necessary to
retain control of the vehicle. Failure to do so
could result in recognizing dangers too late,
possibly resulting in an accident and serious
injury to yourself and others.
Collision warning
If a vehicle is detected in the Blind Spot Assist
range and you activate the turn signal, a two-
tone warning will sound once. Red warning
lamp : on the corresponding side of the
vehicle will flash.
GWarning!
Do not change lanes or make turns, while red
warning lamp : is flashing. Doing so could
result in an accident and serious injury to
yourself and others.
XRemain on the lane that you are currently
on until traffic conditions permit to change.
If the turn signal remains on, red warning
lamp : will flash to indicate that vehicles
have been detected. No further audible
warnings will sound.
Driving systems361Controls in detail221_AKB; 6; 20, en-USd2ugruen,Version: 2.11.8.12009-09-24T13:28:17+02:00 - Seite 361Z
Page 398 of 548
When programming a garage door opener,
park vehicle outside the garage.
Do not run the engine while programming the
integrated remote control. Inhalation of
exhaust gas is hazardous to your health. All
exhaust gas contains carbon monoxide (CO),
and inhaling it can cause unconsciousness
and possible death.
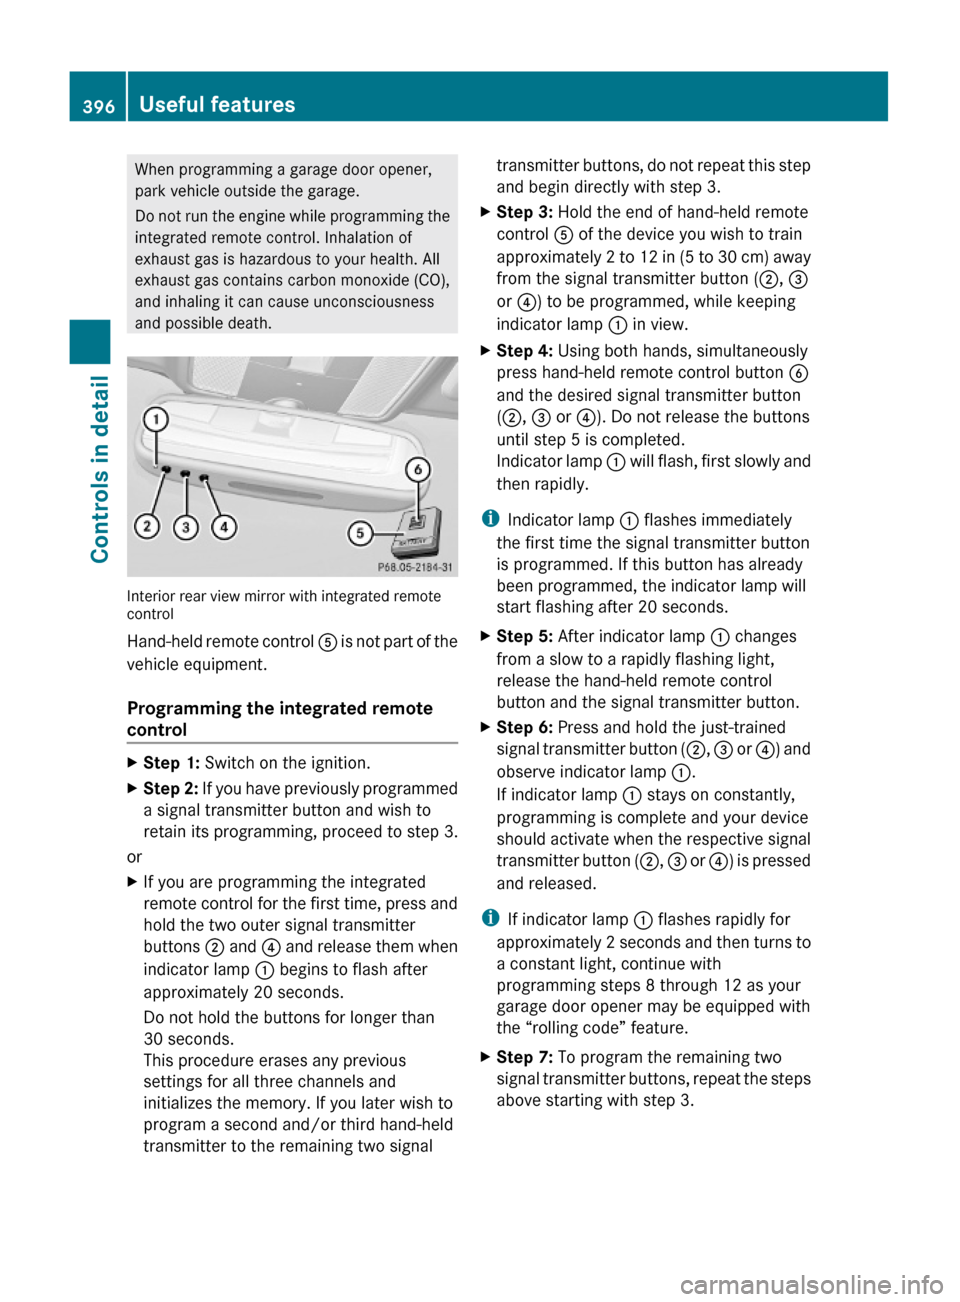
Interior rear view mirror with integrated remotecontrol
Hand-held remote control A is not part of the
vehicle equipment.
Programming the integrated remote
control
XStep 1: Switch on the ignition.XStep 2: If you have previously programmed
a signal transmitter button and wish to
retain its programming, proceed to step 3.
or
XIf you are programming the integrated
remote control for the first time, press and
hold the two outer signal transmitter
buttons ; and ? and release them when
indicator lamp : begins to flash after
approximately 20 seconds.
Do not hold the buttons for longer than
30 seconds.
This procedure erases any previous
settings for all three channels and
initializes the memory. If you later wish to
program a second and/or third hand-held
transmitter to the remaining two signal
transmitter buttons, do not repeat this step
and begin directly with step 3.
XStep 3: Hold the end of hand-held remote
control A of the device you wish to train
approximately 2 to 12 in (5 to 30 cm) away
from the signal transmitter button (;, =
or ?) to be programmed, while keeping
indicator lamp : in view.
XStep 4: Using both hands, simultaneously
press hand-held remote control button B
and the desired signal transmitter button
(;, = or ?). Do not release the buttons
until step 5 is completed.
Indicator lamp : will flash, first slowly and
then rapidly.
iIndicator lamp : flashes immediately
the first time the signal transmitter button
is programmed. If this button has already
been programmed, the indicator lamp will
start flashing after 20 seconds.
XStep 5: After indicator lamp : changes
from a slow to a rapidly flashing light,
release the hand-held remote control
button and the signal transmitter button.
XStep 6: Press and hold the just-trained
signal transmitter button (;, = or ?) and
observe indicator lamp :.
If indicator lamp : stays on constantly,
programming is complete and your device
should activate when the respective signal
transmitter button (;, = or ?) is pressed
and released.
iIf indicator lamp : flashes rapidly for
approximately 2 seconds and then turns to
a constant light, continue with
programming steps 8 through 12 as your
garage door opener may be equipped with
the “rolling code” feature.
XStep 7: To program the remaining two
signal transmitter buttons, repeat the steps
above starting with step 3.
396Useful featuresControls in detail
221_AKB; 6; 20, en-USd2ugruen,Version: 2.11.8.12009-09-24T13:28:17+02:00 - Seite 396
Page 401 of 548
iUSA only:
This device complies with Part 15 of the
FCC Rules. Operation is subject to the
following two conditions:
1. This device may not cause harmful
interference, and
2. this device must accept any
interference received, including
interference that may cause undesired
operation.
Any unauthorized modification to this
device could void the user’s authority to
operate the equipment.
iCanada only:
This device complies with RSS-210 of
Industry Canada. Operation is subject to
the following two conditions:
1.This device may not cause interference,
and
2. this device must accept any
interference received, including
interference that may cause undesired
operation of the device.
Any unauthorized modification to this
device could void the user’s authority to
operate the equipment.
Floormats
GWarning!
Whenever you are using floormats, make sure
there is enough clearance and that the
floormats are securely fastened.
Floormats should always be securely fastened
using the fastening equipment.
Before driving off, check that the floormats
are securely in place and adjust them if
necessary. A loose floormat could slip and
hinder proper functioning of the pedals.
Do not place several floormats on top of each
other as this may impair pedal movement.
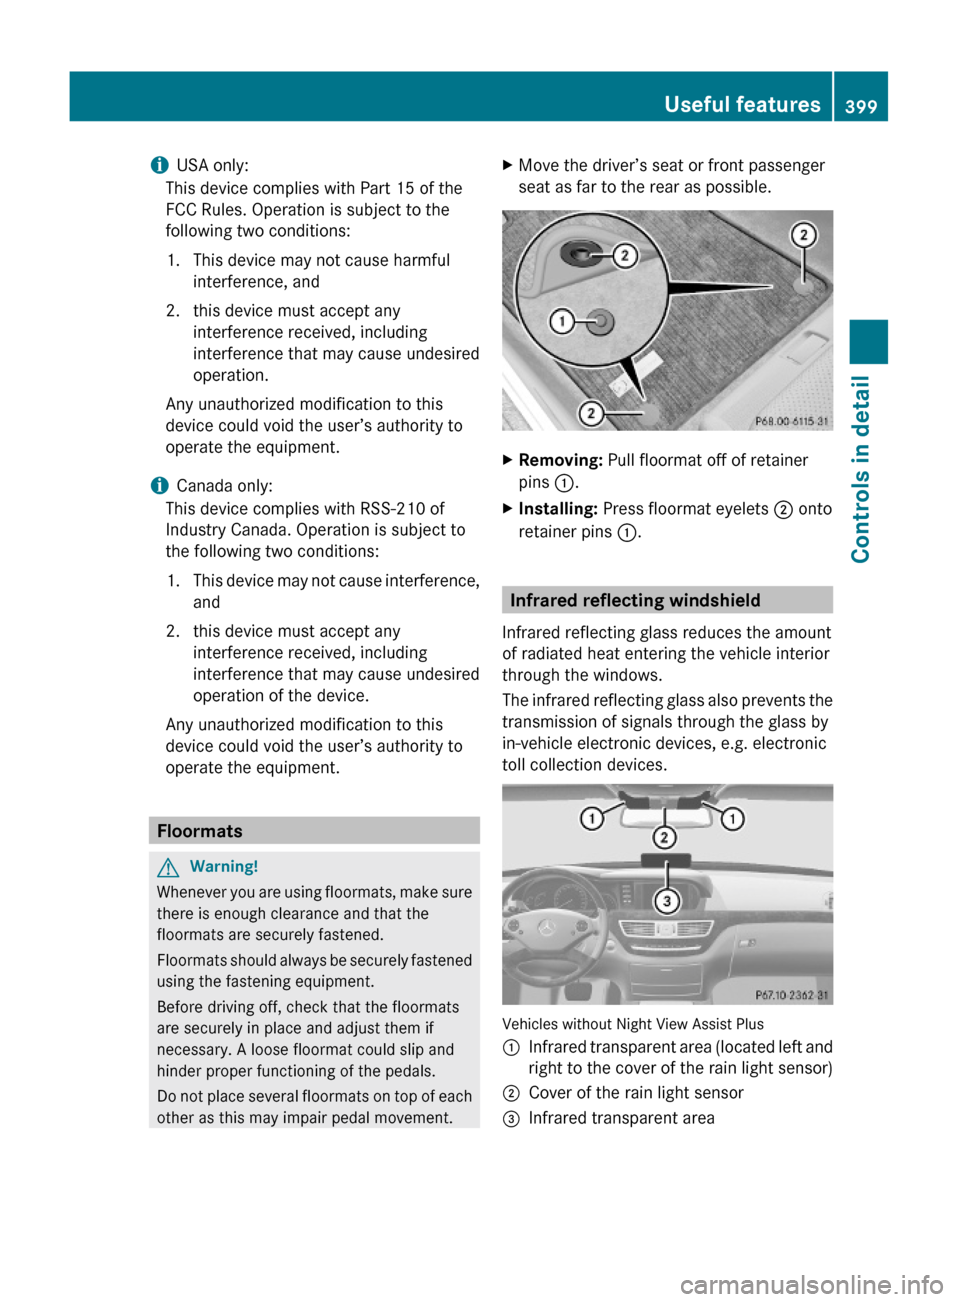
XMove the driver’s seat or front passenger
seat as far to the rear as possible.
XRemoving: Pull floormat off of retainer
pins :.
XInstalling: Press floormat eyelets ; onto
retainer pins :.
Infrared reflecting windshield
Infrared reflecting glass reduces the amount
of radiated heat entering the vehicle interior
through the windows.
The infrared reflecting glass also prevents the
transmission of signals through the glass by
in-vehicle electronic devices, e.g. electronic
toll collection devices.
Vehicles without Night View Assist Plus
:Infrared transparent area (located left and
right to the cover of the rain light sensor)
;Cover of the rain light sensor=Infrared transparent areaUseful features399Controls in detail221_AKB; 6; 20, en-USd2ugruen,Version: 2.11.8.12009-09-24T13:28:17+02:00 - Seite 399Z
Page 444 of 548
normally be done every 3 to 5 months,
depending on the climate and washing
detergent used.
Mercedes-Benz approved Paint Cleaner
should be applied if the paint surface shows
signs of embedded dirt (i.e. loss of gloss).
Do not apply any of these products or wax if
your vehicle is parked in the sun or if the hood
is still hot.XUse the appropriate MB-Touch-Up Stick for
quick and provisional repairs of minor paint
damage (i.e. chips from stones, vehicle
doors, etc.).
Engine cleaning
Prior to cleaning the engine compartment,
make sure to protect electrical components
and connectors from contact with water and
cleaning agents.
Corrosion protection, such as MB
Anticorrosion Wax should be applied to the
engine compartment after every engine
cleaning. Before applying, all control linkage
bushings and joints should be lubricated. The
poly-V-belt and all pulleys should be
protected from any wax.
Vehicle washing
In the winter, thoroughly remove all traces of
road salt as soon as possible.
When washing the vehicle underbody, do not
forget to clean the inner sides of the wheels.
i Vehicles with KEYLESS-GO:
If a door handle is hit by a strong jet of
water, and a SmartKey is within
approximately 3 ft (1 m) of the vehicle, it
could be inadvertently locked or unlocked.
Hand-wash
XDo not use hot water or wash your vehicle
in direct sunlight.XOnly use a soft, wet cloth or sponge to
clean the vehicle.XOnly use a mild vehicle wash detergent,
such as Mercedes-Benz approved Car
Shampoo.XThoroughly spray the vehicle with a
diffused jet of water.XDo not spray directly towards the
ventilation intake.XUse plenty of water and rinse the sponge
and chamois frequently.XRinse with clean water and dry with a
chamois thoroughly.
Do not allow cleaning agents to dry on the
finish.
Automatic car wash
GWarning!
The vehicle is braked when the HOLD function
or DISTRONIC PLUS is activated. Therefore,
deactivate the HOLD function or DISTRONIC
PLUS before the vehicle is washed in an
automatic car wash.
You can have your vehicle washed in an
automatic car wash from the start. Brushless
car washes are preferable.
XTo protect the filter system, activate the air
recirculation mode using rocker switch
g on the climate control panel.
!
Do not clean your vehicle in an automatic
touchless car wash which uses caustic
spray. Caustic spray will damage the paint
or ornamental moldings.
If the vehicle is very dirty, prewash it before
running it through the automatic car wash.
! Make sure the combination switch is set
to wiper setting $. Otherwise, the rain
sensor could activate and cause the wipers
to move unintentionally. This may lead to
vehicle damage.
Due to the width of the vehicle, fold in
exterior rear view mirrors prior to running
the vehicle through an automatic car wash
to prevent damage to the mirrors.
442Vehicle careOperation
221_AKB; 6; 20, en-USd2ugruen,Version: 2.11.8.12009-09-24T13:28:17+02:00 - Seite 442
Page 446 of 548
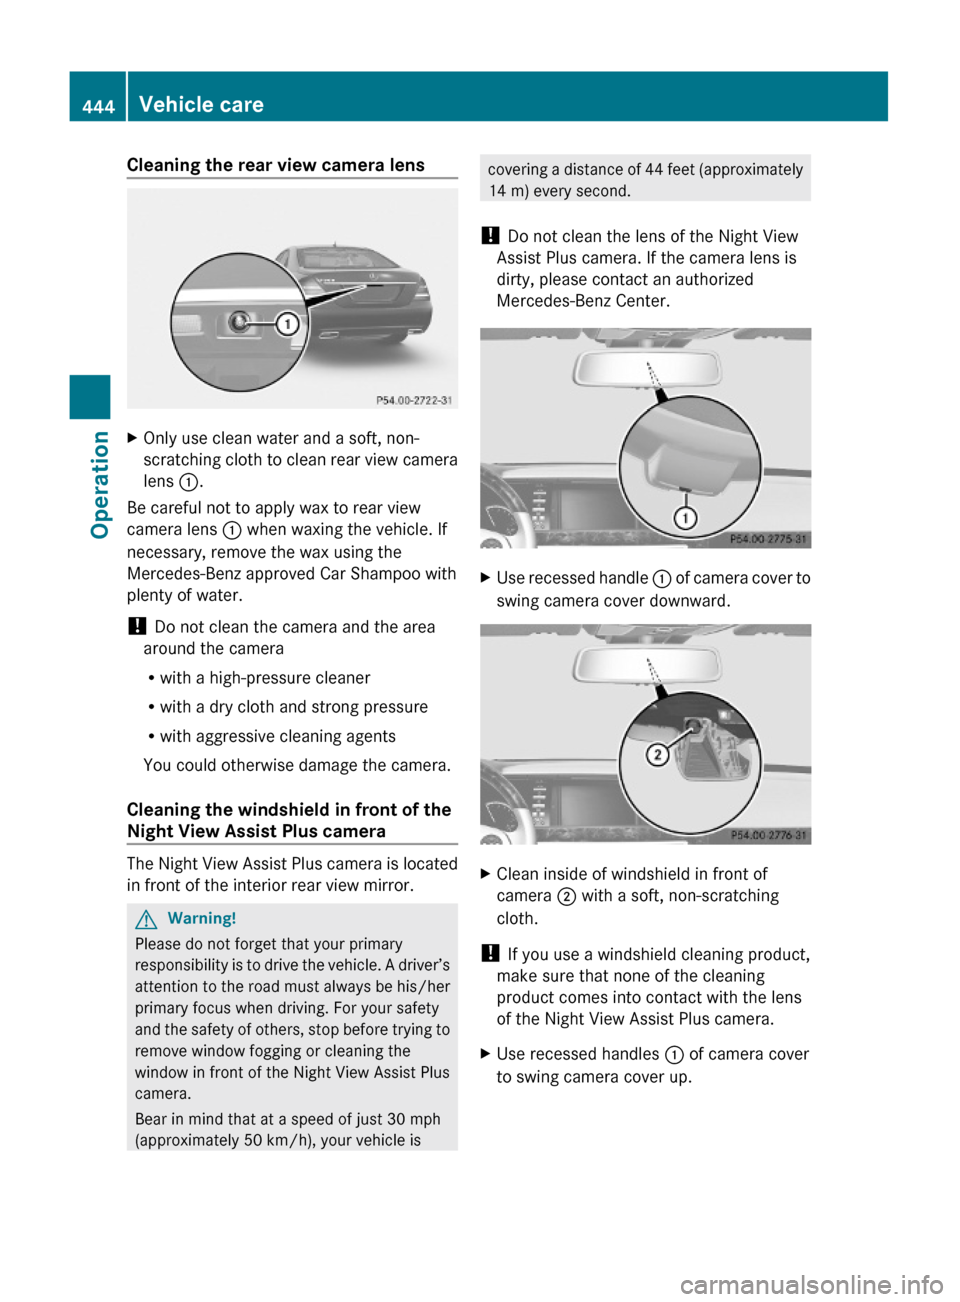
Cleaning the rear view camera lensXOnly use clean water and a soft, non-
scratching cloth to clean rear view camera
lens :.
Be careful not to apply wax to rear view
camera lens : when waxing the vehicle. If
necessary, remove the wax using the
Mercedes-Benz approved Car Shampoo with
plenty of water.
! Do not clean the camera and the area
around the camera
Rwith a high-pressure cleaner
Rwith a dry cloth and strong pressure
Rwith aggressive cleaning agents
You could otherwise damage the camera.
Cleaning the windshield in front of the
Night View Assist Plus camera
The Night View Assist Plus camera is located
in front of the interior rear view mirror.
GWarning!
Please do not forget that your primary
responsibility is to drive the vehicle. A driver’s
attention to the road must always be his/her
primary focus when driving. For your safety
and the safety of others, stop before trying to
remove window fogging or cleaning the
window in front of the Night View Assist Plus
camera.
Bear in mind that at a speed of just 30 mph
(approximately 50 km/h), your vehicle is
covering a distance of 44 feet (approximately
14 m) every second.
! Do not clean the lens of the Night View
Assist Plus camera. If the camera lens is
dirty, please contact an authorized
Mercedes-Benz Center.
XUse recessed handle : of camera cover to
swing camera cover downward.
XClean inside of windshield in front of
camera ; with a soft, non-scratching
cloth.
! If you use a windshield cleaning product,
make sure that none of the cleaning
product comes into contact with the lens
of the Night View Assist Plus camera.
XUse recessed handles : of camera cover
to swing camera cover up.
444Vehicle careOperation
221_AKB; 6; 20, en-USd2ugruen,Version: 2.11.8.12009-09-24T13:28:17+02:00 - Seite 444