2010 MERCEDES-BENZ S CLASS parking brake
[x] Cancel search: parking brakePage 486 of 548
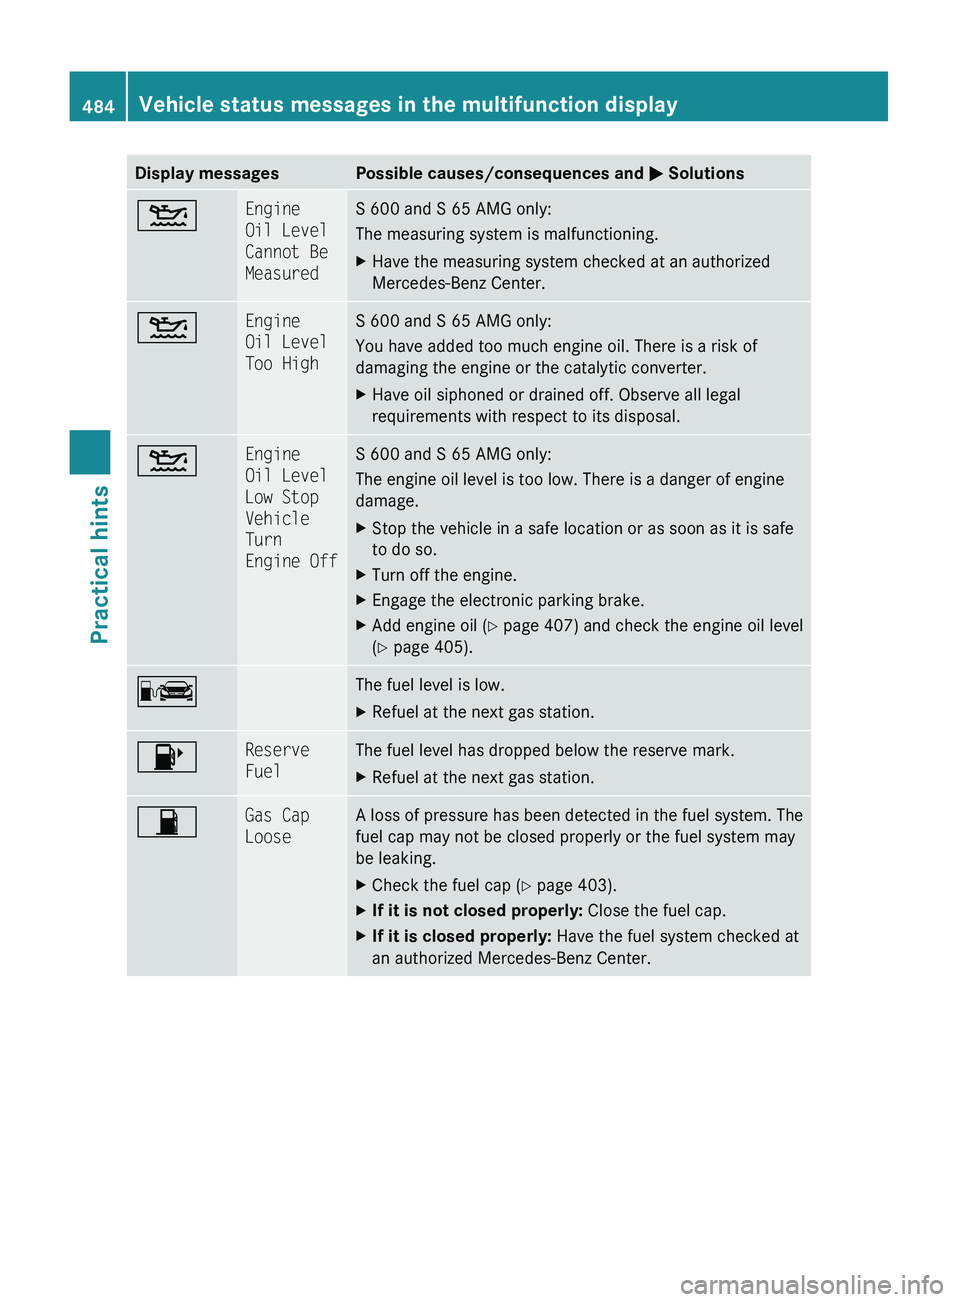
Display messagesPossible causes/consequences and 0050 Solutions00B4Engine
Oil Level
Cannot Be
MeasuredS 600 and S 65 AMG only:
The measuring system is malfunctioning.XHave the measuring system checked at an authorized
Mercedes-Benz Center.00B4Engine
Oil Level
Too HighS 600 and S 65 AMG only:
You have added too much engine oil. There is a risk of
damaging the engine or the catalytic converter.XHave oil siphoned or drained off. Observe all legal
requirements with respect to its disposal.00B4Engine
Oil Level
Low Stop
Vehicle
Turn
Engine OffS 600 and S 65 AMG only:
The engine oil level is too low. There is a danger of engine
damage.XStop the vehicle in a safe location or as soon as it is safe
to do so.XTurn off the engine.XEngage the electronic parking brake.XAdd engine oil ( Y page 407) and check the engine oil level
( Y page 405).00AAThe fuel level is low.XRefuel at the next gas station.00B8Reserve
FuelThe fuel level has dropped below the reserve mark.XRefuel at the next gas station.00B7Gas Cap
LooseA loss of pressure has been detected in the fuel system. The
fuel cap may not be closed properly or the fuel system may
be leaking.XCheck the fuel cap ( Y page 403).XIf it is not closed properly: Close the fuel cap.XIf it is closed properly: Have the fuel system checked at
an authorized Mercedes-Benz Center.484Vehicle status messages in the multifunction displayPractical hints
221_AKB; 6; 20, en-USd2ugruen,Version: 2.11.8.12009-09-24T13:28:17+02:00 - Seite 484
Page 494 of 548
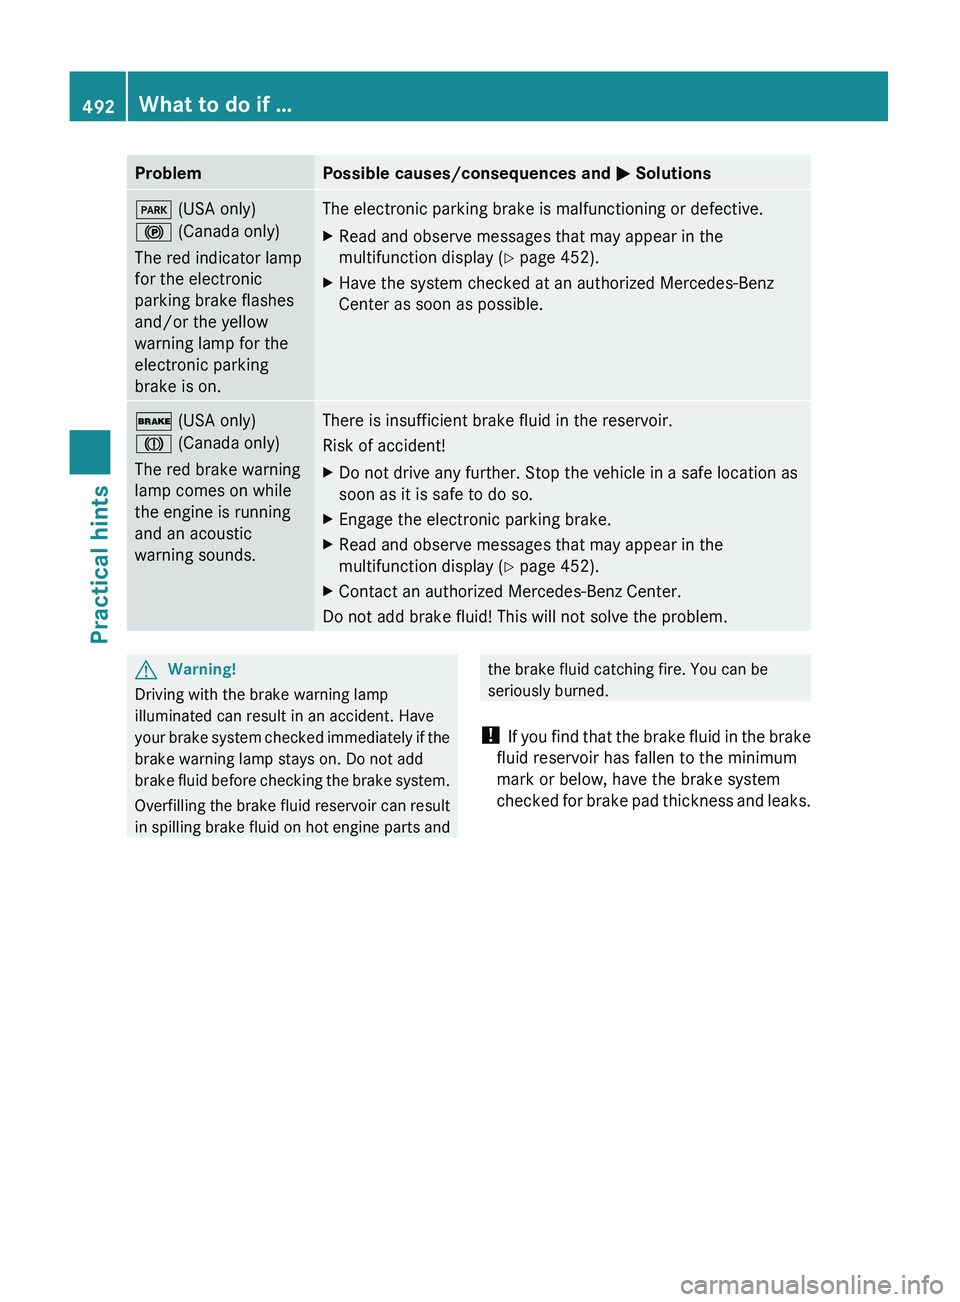
ProblemPossible causes/consequences and 0050 Solutions0049 (USA only)
0024 (Canada only)
The red indicator lamp
for the electronic
parking brake flashes
and/or the yellow
warning lamp for the
electronic parking
brake is on.The electronic parking brake is malfunctioning or defective.XRead and observe messages that may appear in the
multifunction display ( Y page 452).XHave the system checked at an authorized Mercedes-Benz
Center as soon as possible.0027 (USA only)
004D (Canada only)
The red brake warning
lamp comes on while
the engine is running
and an acoustic
warning sounds.There is insufficient brake fluid in the reservoir.
Risk of accident!XDo not drive any further. Stop the vehicle in a safe location as
soon as it is safe to do so.XEngage the electronic parking brake.XRead and observe messages that may appear in the
multifunction display ( Y page 452).XContact an authorized Mercedes-Benz Center.
Do not add brake fluid! This will not solve the problem.
GWarning!
Driving with the brake warning lamp
illuminated can result in an accident. Have
your brake system checked immediately if the
brake warning lamp stays on. Do not add
brake fluid before checking the brake system.
Overfilling the brake fluid reservoir can result
in spilling brake fluid on hot engine parts and
the brake fluid catching fire. You can be
seriously burned.
! If you find that the brake fluid in the brake
fluid reservoir has fallen to the minimum
mark or below, have the brake system
checked for brake pad thickness and leaks.492What to do if …Practical hints
221_AKB; 6; 20, en-USd2ugruen,Version: 2.11.8.12009-09-24T13:28:17+02:00 - Seite 492
Page 510 of 548
XPress the KEYLESS-GO start/stop button
repeatedly until the windshield wipers
start.
XPress the KEYLESS-GO start/stop button
when the wiper arms are in a vertical
position.
Removing wiper blades
! Do not pull on the wiper blade inserts.
They could tear.
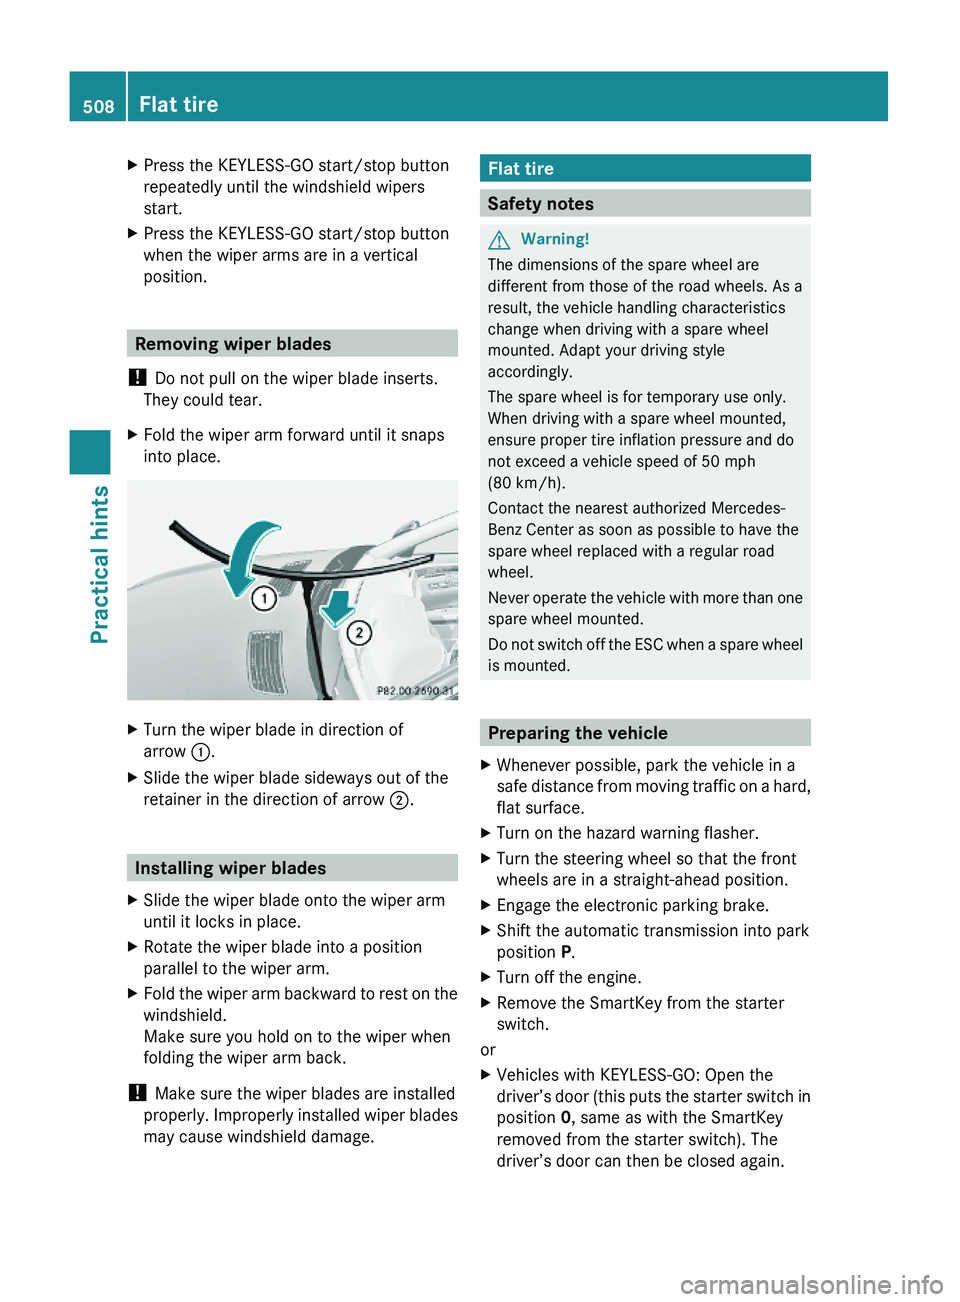
XFold the wiper arm forward until it snaps
into place.
XTurn the wiper blade in direction of
arrow \000F.
XSlide the wiper blade sideways out of the
retainer in the direction of arrow \000G.
Installing wiper blades
XSlide the wiper blade onto the wiper arm
until it locks in place.
XRotate the wiper blade into a position
parallel to the wiper arm.
XFold the wiper arm backward to rest on the
windshield.
Make sure you hold on to the wiper when
folding the wiper arm back.
! Make sure the wiper blades are installed
properly. Improperly installed wiper blades
may cause windshield damage.
Flat tire
Safety notes
GWarning!
The dimensions of the spare wheel are
different from those of the road wheels. As a
result, the vehicle handling characteristics
change when driving with a spare wheel
mounted. Adapt your driving style
accordingly.
The spare wheel is for temporary use only.
When driving with a spare wheel mounted,
ensure proper tire inflation pressure and do
not exceed a vehicle speed of 50 mph
(80 km/h).
Contact the nearest authorized Mercedes-
Benz Center as soon as possible to have the
spare wheel replaced with a regular road
wheel.
Never operate the vehicle with more than one
spare wheel mounted.
Do not switch off the ESC when a spare wheel
is mounted.
Preparing the vehicle
XWhenever possible, park the vehicle in a
safe distance from moving traffic on a hard,
flat surface.
XTurn on the hazard warning flasher.XTurn the steering wheel so that the front
wheels are in a straight-ahead position.
XEngage the electronic parking brake.XShift the automatic transmission into park
position P.
XTurn off the engine.XRemove the SmartKey from the starter
switch.
or
XVehicles with KEYLESS-GO: Open the
driver’s door (this puts the starter switch in
position 0, same as with the SmartKey
removed from the starter switch). The
driver’s door can then be closed again.
508Flat tirePractical hints
221_AKB; 6; 20, en-USd2ugruen,Version: 2.11.8.12009-09-24T13:28:17+02:00 - Seite 508
Page 511 of 548
Open doors only when conditions are safe
to do so.XVehicles with KEYLESS-GO: Remove the
KEYLESS-GO start/stop button from the
starter switch.XHave any passenger exit the vehicle at a
safe distance from the roadway. Open
doors only when conditions are safe to do
so.
Mounting the spare wheel
Introduction
XPrepare the vehicle as described
( Y page 508).XTake the following out of the vehicle:
R spare wheel
R jack
R vehicle tool kit
For information on where to find the
respective items, see “Where will I find ...?”
( Y page 450) and ( Y page 451).
i Vehicles without spare wheel are not
factory-equipped with the tools required for
a wheel change such as a jack or a wheel
wrench. Some tools required for a wheel
change are specific to your vehicle.
Contact an authorized Mercedes-Benz
Center to obtain the tools approved for
your vehicle. This section describes the
wheel change using the tools approved and
recommended for your vehicle.
Lifting the vehicle
GWarning!
When jacking up the vehicle, only use the jack
which has been specifically approved by
Mercedes-Benz for your vehicle.
The jack is designed exclusively for jacking up
the vehicle at the jack take-up brackets built
into both sides of the vehicle. Make sure the
jack arm is fully seated in the jack take-up
bracket. The jack must always be vertical
when in use, especially on inclines or
declines.
The jack is intended only for lifting the vehicle
briefly for wheel changes. It is not suited for
performing maintenance work under the
vehicle. To help avoid personal injury, use the
jack only to lift the vehicle during a wheel
change.
Never get beneath the vehicle while it is
supported by the jack. Keep hands and feet
away from the area under the lifted vehicle.
Always lower the vehicle onto sufficient
capacity jackstands before working under the
vehicle.
Always make sure the electronic parking
brake is engaged. In addition, block the
wheels with wheel chocks or other sizeable
objects before raising the vehicle with the
jack. Do not disengage the electronic parking
brake while the vehicle is raised.
Make sure that the ground on which the
vehicle is standing and where you place the
jack is solid, level and not slippery. If
necessary, use a large underlay. On slippery
surfaces, such as tiled floors, you should use
a non-slip underlay, for example a rubber mat.
Do not use wooden blocks or similar objects
to support the jack. Otherwise the jack may
not be able to achieve its load-bearing
capacity if it is not at its full height.
Never start the engine when the vehicle is
raised.
Also observe the notes on the jack.XPrevent the vehicle from rolling away by
blocking wheels with wheel chocks or other
sizeable objects.
When your vehicle is equipped with a wheel
chock, it is included with the vehicle tool kit
( Y page 450). For information on setting up
the collapsible wheel chock, see
( Y page 450).Flat tire509Practical hints221_AKB; 6; 20, en-USd2ugruen,Version: 2.11.8.12009-09-24T13:28:17+02:00 - Seite 509Z
Page 517 of 548
improper connection of jumper cables,
smoking, etc.
Attempting to jump start a frozen battery can
result in it exploding, causing personal injury.
Read all instructions before proceeding.GWarning!
HYBRID vehicles: It is imperative that you read
the HYBRID Supplemental Operating
Instructions included in your vehicle literature
portfolio. You may otherwise not receive all
necessary safety information and warning for
the operation of your vehicle.
! Do not tow-start the vehicle. You could
otherwise seriously damage the automatic
transmission which is not covered by the
Mercedes-Benz Limited Warranty.
! Jump starting should only be performed
using the jump-start terminals located in
the engine compartment.
Avoid repeated and lengthy starting
attempts.
Do not attempt to start the engine using a
battery quick-charge unit.
If the engine does not run after several
unsuccessful starting attempts, have it
checked at the nearest authorized
Mercedes-Benz Center.
Excessive unburned fuel generated by
repeated failed starting attempts may
damage the catalytic converter and may
present a fire risk.
Make sure the jumper cables do not have
loose or missing insulation.
Make sure the cable clamps do not touch
any other metal part while the other end is
still attached to a battery.
If the battery is discharged, the engine can be
started with jumper cables and the fully
charged battery of another vehicle or an
equivalent starter pack. Observe the
following:
R Access to the battery is not possible on all
vehicles. If you cannot access the battery
of the other vehicle, provide jump start
power by an external battery or starter
pack.
R Jump starting should only be performed
when the engine and catalytic converter
are cold.
R Do not jump start the engine or charge the
battery if the battery is frozen. Let the
battery thaw out first.
R Only jump start from batteries with the
same voltage rating (12 V). Jump starting
with a more powerful battery could damage
the vehicle’s electrical system. Such
damage will not be covered by the
Mercedes-Benz Limited Warranty.
R Only use jumper cables with sufficient
cross-section and insulated terminal
clamps.
R Always make sure the jumper cables are
not on or near pulleys, fans or other parts
that move when an engine is started or
running.
R Should the battery be drained completely,
let the donating power source charge the
vehicle for several minutes before
reattempting the starting process.XMake sure the two vehicles do not touch.XSwitch off all electrical consumers.XEngage the electronic parking brake.XMake sure the automatic transmission is in
park position P.XOpen the hood ( Y page 404).Jump starting515Practical hints221_AKB; 6; 20, en-USd2ugruen,Version: 2.11.8.12009-09-24T13:28:17+02:00 - Seite 515Z
Page 521 of 548
XMake sure the ignition is switched on.XWith the vehicle at a standstill, depress the
brake pedal and keep it pressed.XShift the automatic transmission into
neutral position N.XRelease the brake pedal.XIf engaged, release the electronic parking
brake.XSwitch on the hazard warning flasher
( Y page 302).
!
Keep in mind that it is important to have
the ignition switched on. Removing the
SmartKey from the starter switch or
opening a front door with the ignition
switched off will automatically shift the
automatic transmission into park position
P .
! The vehicle may be towed only for
distances up to 30 miles (50 km) and at a
speed not to exceed 30 mph (50 km/h).
i While being towed with the hazard
warning flasher in use, use the combination
switch in the usual manner to signal turns.
Only the selected turn signal will operate.
Upon canceling the turn signal, the hazard
warning flasher will operate again.
Towing with front axle raised
! The vehicle may be towed only for
distances up to 30 miles (50 km) and at a
speed not to exceed 30 mph (50 km/h).
! Vehicles with 4MATIC: Do not tow with
one axle raised. Doing so could damage the
transfer case, which is not covered by the
Mercedes-Benz Limited Warranty.
All wheels must be on or off the ground.
Observe instructions for towing the vehicle
with all wheels on the ground.
XSwitch off the automatic central locking
( Y page 210).XSwitch on the hazard warning flasher
( Y page 302).XMake sure the automatic transmission
remains in neutral position N. Observe
instructions, see “Remaining in neutral
position N” ( Y page 319).
!
Vehicles without 4MATIC:
Because the ESC operates automatically,
the engine and ignition must be shut off
(SmartKey in starter switch position 0 or
1 or KEYLESS-GO start/stop button in
position 0 or 1) when the vehicle is being
towed with one axle raised.
Active braking action through the ESC may
otherwise seriously damage the brake
system which is not covered by the
Mercedes-Benz Limited Warranty.
! Keep in mind that it is important for the
SmartKey to be left in starter switch with
the ignition switched off. As soon as the
SmartKey is removed from the starter
switch the automatic transmission will shift
to park position P.
Fuses
Introduction
The electrical fuses in your vehicle serve to
switch off malfunctioning power circuits.
If a fuse is blown, the components and
systems secured by that fuse will stop
operating.
GWarning!
Only use fuses approved by Mercedes-Benz
with the specified amperage for the system in
question and do not attempt to repair or
bridge a blown fuse. Using other than
approved fuses or using repaired or bridged
fuses may cause an overload leading to a fire,
and/or cause damage to electrical
components and/or systems. Have the cause
Fuses519Practical hints221_AKB; 6; 20, en-USd2ugruen,Version: 2.11.8.12009-09-24T13:28:17+02:00 - Seite 519Z
Page 522 of 548

determined and remedied by an authorized
Mercedes-Benz Center.
! Switch off the vehicle’s internal electrical
functions when you are working on the
fuses.
A blown fuse must be replaced by an
appropriate spare fuse (recognizable by its
color or the fuse rating given on the fuse) of
the amperage recommended in the fuse
chart. Any Mercedes-Benz Center will be glad
to advise you on this subject.
iIn case of a blown fuse contact Roadside
Assistance or an authorized Mercedes-
Benz Center.
If a newly inserted fuse blows again, have the
cause determined and rectified by an
authorized Mercedes-Benz Center.
The fuse chart is located in the trunk with the
vehicle tool kit (Y page 450). The fuse chart
explains the fuse allocation and fuse
amperages.
Before replacing fuses
XEngage the electronic parking brake.XMake sure the automatic transmission is in
park position P.
The transmission position indicator in the
multifunction display should be on P.
XSwitch off all electrical consumers.XTurn off the engine.
Fuse box in passenger compartment
! Do not use sharp objects such as a
screwdriver to open the fuse box cover in
the dashboard. You could damage the fuse
box cover or the dashboard.
Fuse box on driver’s side
Fuse box on passenger side
XOpen the respective door.XUsing your hands, pull cover \000F in direction
of arrow and remove it.
XClosing: Hook fuse box cover \000F into the
opening at the front.
! The fuse box cover must be properly
positioned as described. Otherwise,
moisture or dirt could enter the fuse box
and possibly impair fuse operation.
520FusesPractical hints
221_AKB; 6; 20, en-USd2ugruen,Version: 2.11.8.12009-09-24T13:28:17+02:00 - Seite 520