2010 MERCEDES-BENZ S CLASS reset
[x] Cancel search: resetPage 257 of 548
The system reads out the list of stations.
When the system reads the station to be
deleted:XPress button 0062.
The station to be deleted is selected. The
system reads out the selected station
again.009CDo you want to delete “Favorite
Station 37
”?009DYes.009CStation deleted.
The system deletes the station and reads out
the remaining entries in the Presets.
or
009CNo.
The system continues reading the Presets
entry by entry.
“HD Radio on”, “HD Radio off”
Use “HD Radio on” or “HD Radio off” to switch
the HD Radio™ on or off.
“Sirius”
Use “Sirius” to switch to SIRIUS XM Satellite
Radio.
Voice Control System CD/DVD
changer/MP3
Safety notes
GWarning!
Please devote your attention first and
foremost to the traffic situation you are in.
Before your journey, please familiarize
yourself with the audio functions.
Only use the Voice Control System when road
and traffic conditions permit you to do so.
Otherwise you could be involved in an
accident in which you or others could be
injured.
Operation
You can use the Voice Control System to
R select a CD/DVD or another medium
R select a track
R select a folder in MP3 mode
R change the category when in media
interface mode
R select a group in audio DVD mode
R select a chapter or scene when in video
DVD mode
i Upon the command “Next/Previous CD/
DVD”, the DVD changer switches from one
CD/DVD to the next. It will skip empty
slots. When you select an empty slot using
the commands “CD/DVD 1” through “CD/
DVD 6”, the current slot remains selected.
i The following commands “DVD audio”,
“DVD video”, “Next/Previous CD/DVD”
and “CD/DVD 1” to “CD/DVD 6”, cause
the DVD changer to switch from one slot to
another, regardless of the type of medium
found in the selected slot. In your
command, you can therefore replace the
term “CD/DVD” with “Medium”.
Selecting CD/DVD modeXPress button 0062 on the multifunction
steering wheel.XSpeak one of the following commands:
R “CD player”
R “CD changer”
R “DVD audio”
R “DVD video”
R “Hard disk”
R “Memory card”
R “Media interface”
R “USB”
R “Music Register”37Example for a voice name.Voice Control System CD/DVD changer/MP3255Control systems221_AKB; 6; 20, en-USd2ugruen,Version: 2.11.8.12009-09-24T13:28:17+02:00 - Seite 255Z
Page 273 of 548
Voice Control System
individualization
i The individualization can only be
performed when the vehicle is stationary.
If you drive off, the individualization will be
canceled.
After starting the session, the system will
guide you through the individualization by
means of acoustic instructions.
The individualization is used to adapt the
Voice Control System to your own voice and
to therefore improve speech recognition. This
does not affect the speech recognition of
other users.
Individualization consists of two stages:
R Digits
R Commands
You can activate individualization in the
COMAND system settings ( Y page 93). A
dialog and screen displays will guide you
through the individualization process.
The system can be reset to the factory
settings at any time.
i You may wish to complete only a portion
of the individualization process.
Completing the digits portion alone may
result in an improved recognition rate.
Individualization can be exited at any time.
The data trained, however, will only be
retained if a given individualization portion
is completed and the data is stored when
prompted to do so by the system.Voice Control System individualization271Control systems221_AKB; 6; 20, en-USd2ugruen,Version: 2.11.8.12009-09-24T13:28:17+02:00 - Seite 271Z
Page 281 of 548
The doors are designed to unlock
automatically after an accident if the force of
the impact exceeds a preset threshold.
The vehicle locks automatically when the
ignition is switched on and the wheels are
turning at a vehicle speed of above 9 mph
(15 km/h). You could therefore lock yourself
out when the vehicle is pushed or towed or is
on a test stand.
Locking and unlocking from the inside
GObserve Safety notes, see page 56.
You can lock or unlock the vehicle from the
inside using the central locking or unlocking
switch. This can be useful, for example, if you
want to lock the vehicle before starting to
drive.
The central locking or unlocking switch does
not lock or unlock the fuel filler flap or the
interior storage compartments, such as the
glove box.
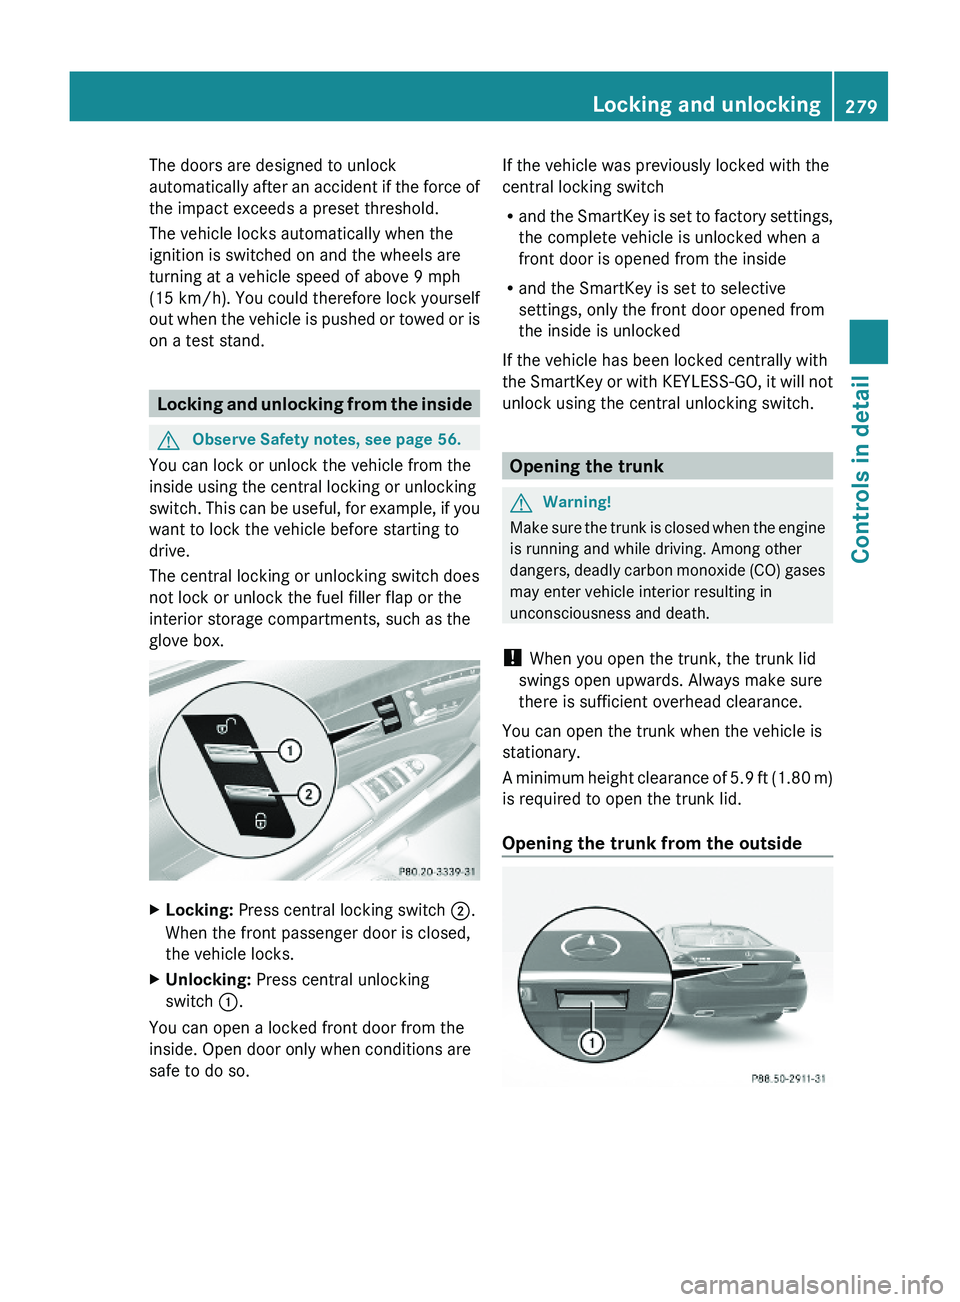
XLocking: Press central locking switch \000G.
When the front passenger door is closed,
the vehicle locks.
XUnlocking: Press central unlocking
switch \000F.
You can open a locked front door from the
inside. Open door only when conditions are
safe to do so.
If the vehicle was previously locked with the
central locking switch
Rand the SmartKey is set to factory settings,
the complete vehicle is unlocked when a
front door is opened from the inside
Rand the SmartKey is set to selective
settings, only the front door opened from
the inside is unlocked
If the vehicle has been locked centrally with
the SmartKey or with KEYLESS-GO, it will not
unlock using the central unlocking switch.
Opening the trunk
GWarning!
Make sure the trunk is closed when the engine
is running and while driving. Among other
dangers, deadly carbon monoxide (CO) gases
may enter vehicle interior resulting in
unconsciousness and death.
! When you open the trunk, the trunk lid
swings open upwards. Always make sure
there is sufficient overhead clearance.
You can open the trunk when the vehicle is
stationary.
A minimum height clearance of 5.9 ft (1.80 m)
is required to open the trunk lid.
Opening the trunk from the outside
Locking and unlocking279Controls in detail221_AKB; 6; 20, en-USd2ugruen,Version: 2.11.8.12009-09-24T13:28:17+02:00 - Seite 279Z
Page 305 of 548
right turn signals will operate when the
ignition is switched on.XSwitching off: Press hazard warning
flasher switch 0046 again.
i
If the hazard warning flasher was
activated automatically, press hazard
warning flasher switch 0046 to switch it off.
S 600 and S 65 AMG (USA only):
When the hazard warning flasher was
activated by a hard stop automatically, it
will be switched off automatically at a
vehicle speed of above 6 mph (10 km/h).
Headlamp cleaning system
The headlamps will be cleaned with a high-
pressure water jet automatically when the
engine is running and you have
R switched on the headlamps
and
R the windshield wipers have wiped the
windshield with washer fluid five times
The counter resets when you switch off the
ignition.
For information on filling up the washer
reservoir, see “Washer system and headlamp
cleaning system” ( Y page 409).
Corner-illuminating lamps
The corner-illuminating lamps improve
illumination of the area in the direction into
which you are turning.
The corner-illuminating lamps will only
operate in low ambient lighting conditions.
If you are driving faster than 25 mph
(40 km/h) the corner-illuminating function is
not available.
Switching onXMake sure the engine is running.XTurn the exterior lamp switch to position
0064 or 0066 (Y page 298).
or
XActivate the daytime running lamp mode
( Y page 299).XSwitch on the left or right turn signal,
depending on whether you are turning left
or right.
The respective corner-illuminating lamp
comes on. If you have switched on the turn
signal for one side but turn the steering
wheel in the other direction, the corner-
illuminating lamp comes on on the side of
the turn signal.
or
XTurn steering wheel in desired direction.
Driving forward: The corner-illuminating
lamp on the side of your steering direction
comes on.
Driving in reverse: The corner-illuminating
lamp opposite to your steering direction
comes on.
The corner-illuminating lamps will come on
automatically depending on the steering
angle, even if you did not switch on either turn
signal. If the corner-illuminating lamps came
on automatically, they will also go out
automatically depending on the steering
angle and vehicle speed.
The corner-illuminating lamps temporarily
come on on both sides of the vehicle if you
turn the steering wheel in one direction and
then again in the other direction shortly
thereafter.
The corner-illuminating lamp remains lit for a
short time only. It then goes out
automatically.
Lighting303Controls in detail221_AKB; 6; 20, en-USd2ugruen,Version: 2.11.8.12009-09-24T13:28:17+02:00 - Seite 303Z
Page 330 of 548
The driving safety systems ABS, Adaptive
Brake, Adaptive Brake Lights, BAS, BAS
PLUS, EBP, ESC and PRE-SAFE® Brake are
described in the “Safety and security” section
(Y page 63).
Cruise control
The cruise control maintains the speed you
set for your vehicle automatically.
The use of the cruise control is recommended
for driving at a constant speed for extended
periods of time.
The currently set speed or last set speed
(“Resume” function) appears in the
multifunction display for approximately
5 seconds. The set speed is shown by a
triangle in the speedometer and the
corresponding speedometer segments from
the selected speed to the vehicle maximum
speed in the multifunction display are
illuminated.
GWarning!
The cruise control is a convenience system
designed to assist the driver during vehicle
operation. The driver is and must always
remain responsible for the vehicle’s speed
and for safe brake operation.
Only use the cruise control if the road, traffic,
and weather conditions make it advisable to
travel at a constant speed.
RThe use of the cruise control can be
dangerous on winding roads or in heavy
traffic because conditions do not allow safe
driving at a constant speed.
RThe use of the cruise control can be
dangerous on slippery roads. Rapid
changes in tire traction can result in wheel
spin and loss of control.
RDeactivate the cruise control when driving
in fog.
The “Resume” function should only be
operated if the driver is fully aware of the
previously set speed and wishes to resume
this particular preset speed.
GWarning!
When the cruise control is braking, the brake
pedal is retracted (i.e. depressed
automatically). The pedals’ range of motion
must not be impeded by any obstacles:
RDo not place any objects in the footwell.
RMake sure that the floormats and carpets
are securely in place.
RDo not rest your foot underneath the brake
pedal, as it could otherwise be trapped.
You could otherwise cause an accident and
injure yourself and/or others.
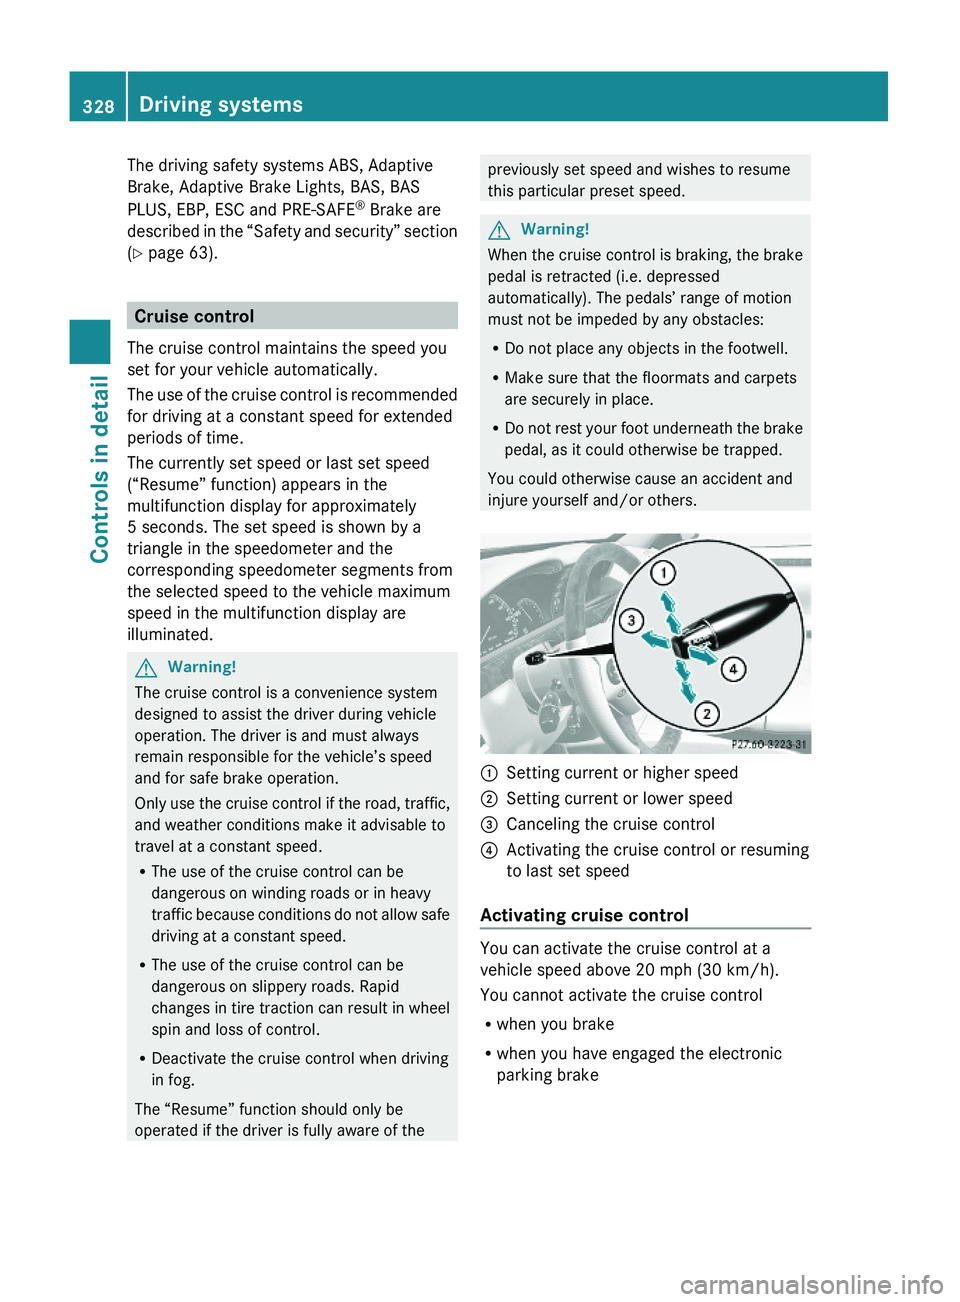
\000FSetting current or higher speed \000GSetting current or lower speed\000
Page 332 of 548

Adjustment in 1 mph (Canada:
1 km/h) increments
i The set speed value is increased or
decreased in 1 mph (Canada: 1 km/h)
increments each time you lift or press the
cruise control lever up or down to the
resistance point.XIncreasing: Briefly lift the cruise control
lever up to the resistance point in direction
of arrow 0046.XDecreasing: Briefly press the cruise
control lever down to the resistance point
in direction of arrow 0047.XRelease the cruise control lever.
The new speed is set and the vehicle will
accelerate or decelerate.
Adjustment in 5 mph (Canada:
10 km/h) increments
i The set speed value is increased or
decreased in 5 mph (Canada: 10 km/h)
increments each time you lift or press the
cruise control lever up or down past the
resistance point.
XIncreasing: Briefly lift the cruise control
lever up past the resistance point in
direction of arrow 0046.XDecreasing: Briefly press the cruise
control lever down past the resistance
point in direction of arrow 0047.XRelease the cruise control lever.
The new speed is set and the vehicle will
accelerate or decelerate. Keep in mind that
it may take a brief moment until the vehicle
has reached the set speed.
Setting stored speed (Resume
function)
GWarning!
The set speed stored in memory should only
be set again if prevailing road conditions and
legal speed limits permit. Possible
acceleration or deceleration differences
arising from returning to the preset speed
could cause an accident and/or serious injury
to you and others.XBriefly pull the cruise control lever in
direction of arrow 0088.
If no speed is stored, the current speed is
set and stored.XRemove your foot from the accelerator
pedal.
The last stored speed is deleted from memory
when the engine is turned off.
DISTRONIC PLUS
Safety notes
When activated, the DISTRONIC PLUS
adaptive cruise control system increases the
driving convenience afforded by the cruise
control while traveling on expressways and
other major roadways.
R If the DISTRONIC PLUS distance sensor
detects a slower moving vehicle directly
ahead, your vehicle speed will be reduced
so that you follow that vehicle at your
preset following distance.
R If there is no vehicle directly ahead of you,
the DISTRONIC PLUS will function in the
same way as standard cruise control
( Y page 328).
GWarning!
The DISTRONIC PLUS requires familiarity with
its operational characteristics. We strongly
recommend that you review the following
information carefully before operating the
system.
GWarning!
HYBRID vehicles: It is imperative that you read
the HYBRID Supplemental Operating
Instructions included in your vehicle literature
portfolio. You may otherwise not receive all
necessary safety information and warning for
the operation of your vehicle.
330Driving systemsControls in detail
221_AKB; 6; 20, en-USd2ugruen,Version: 2.11.8.12009-09-24T13:28:17+02:00 - Seite 330
Page 334 of 548

switched on. Otherwise, you may not be able
to recognize dangerous situations until it is
too late. This could cause an accident in which
you and/or others could be injured.GWarning!
The “Resume” function should only be
operated if the driver is fully aware of the
previously set speed and wishes to resume
this particular preset speed.
GWarning!
Close attention to road and traffic conditions
is imperative at all times, regardless of
whether or not the DISTRONIC PLUS is
activated.
Use of the DISTRONIC PLUS can be
dangerous on winding roads or in heavy traffic
because conditions do not allow safe driving
at a constant speed.
The DISTRONIC PLUS will not react to
stationary objects in the roadway (e.g. a
stopped vehicle in a traffic jam or a disabled
vehicle). The DISTRONIC PLUS will also not
respond to oncoming vehicles.
Switch off the DISTRONIC PLUS:
R when changing from the left to the right
lane if vehicles are moving more slowly in
the left lane
R when entering a turn lane or highway off
ramp
R in complex driving situations, such as in
highway construction zones
In these situations, the DISTRONIC PLUS will
continue to maintain the set speed unless
deactivated.
The DISTRONIC PLUS is designed and
intended only to maintain a set speed and
keep a set distance from moving objects in
front of it.
The DISTRONIC PLUS functions in a speed
range of 0 to 120 mph
(Canada: 0 to 200 km/h) if a preceding
vehicle is detected. If no preceding vehicle is
detected the DISTRONIC PLUS functions in a
speed range of 20 to 120 mph
(Canada: 30 to 200 km/h).
Always obey applicable speed limits.
Do not use the DISTRONIC PLUS if you are
driving on a road with steep uphill or downhill
slopes.
When traveling in Canada in a vehicle not
registered in Canada, you must switch off the
radar sensor system ( Y page 236). Canadian
law does not permit the use of the radar
sensor system for vehicles from outside of
Canada. When you switch off the radar sensor
system, the following functions are
deactivated:
R DISTRONIC PLUS
R BAS PLUS ( Y page 64)
R PRE-SAFE ®
Brake ( Y page 69)
R Blind Spot Assist ( Y page 359)
i Due to its radar-emitting nature
DISTRONIC PLUS may have an appearance
similar to a radar detector to law
enforcement officials. You may want to
refer to this section of your Operator’s
Manual when asked.
i USA only:
This device has been approved by the FCC
as a “Vehicular Radar System”. The radar
sensor is intended for use in an automotive
radar system only. Removal, tampering, or
altering of the device will void any
warranties, and is not permitted by the
FCC. Do not tamper with, alter, or use in
any non-approved way.
Any unauthorized modification to this
device could void the user’s authority to
operate the equipment.332Driving systemsControls in detail
221_AKB; 6; 20, en-USd2ugruen,Version: 2.11.8.12009-09-24T13:28:17+02:00 - Seite 332
Page 336 of 548
You must also apply the brakes yourself to
avoid a collision. The DISTRONIC PLUS brakes
the vehicle in an effort to restore the preset
distance or to maintain the set speed. The
brake pedal is automatically applied as this
happens which results in the brake pedal
moving
Keep driver’s foot area clear at all times,
including the area under the brake pedal.
Objects stored in this area may impair pedal
movement which could interfere with the
braking ability of the DISTRONIC PLUS
system.
Do not place your foot under the brake pedal
– your foot could become caught.
GWarning!
If you do not receive visual or acoustic
warning signals during a critical traffic
situation, DISTRONIC PLUS has either not
recognized the collision risk, has been
deactivated or is malfunctioning.
Remember, whether or not DISTRONIC PLUS
is operating, it is ultimately always the drivers
responsibility to apply the brakes in order to
control the vehicle and avoid a collision.
Displaying the distance graphic
In the DriveAssist menu under Distance
Display you see the current settings for
DISTRONIC PLUS. The Information shown in
the multifunction display depends on whether
DISTRONIC PLUS is activated or deactivated.
For activating or deactivating the DISTRONIC
PLUS system, see “Activating DISTRONIC
PLUS” (Y page 335) or “Deactivating
DISTRONIC PLUS” (Y page 338).
The menu overview can be found on
(Y page 222).
XPress \000@ or \000> to select the
DriveAssist menu.
XPress \000= or \000< to select the
Distance Display function.
XPress \000d.
The DISTRONIC PLUS distance graphic
appears and you will see one of the
following displays in the multifunction
display.
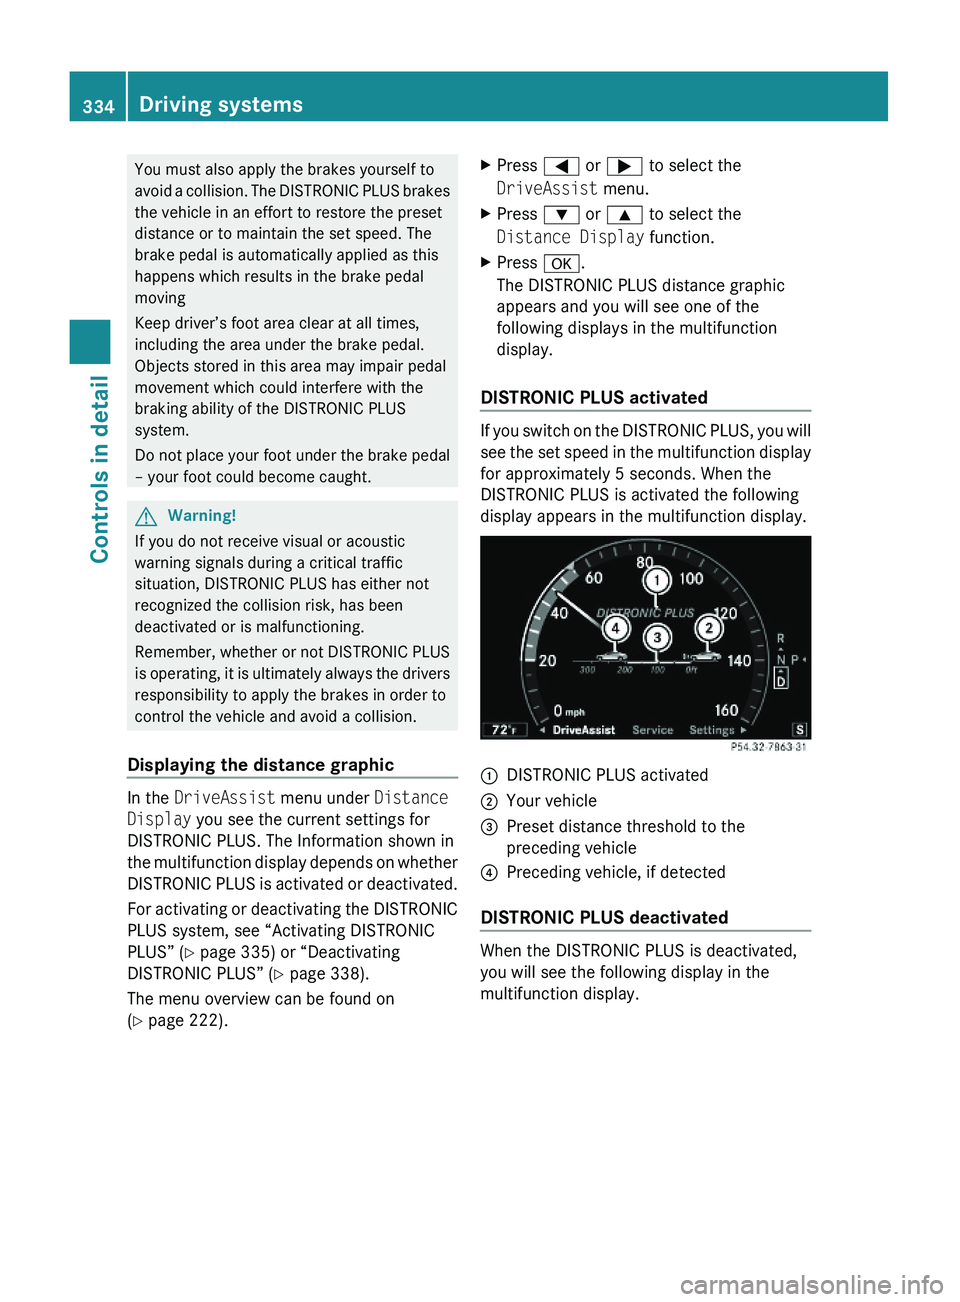
DISTRONIC PLUS activated
If you switch on the DISTRONIC PLUS, you will
see the set speed in the multifunction display
for approximately 5 seconds. When the
DISTRONIC PLUS is activated the following
display appears in the multifunction display.
\000FDISTRONIC PLUS activated\000GYour vehicle\000