2010 MERCEDES-BENZ R350 instrument panel
[x] Cancel search: instrument panelPage 9 of 364

Changing the set speed
.................144
Last stored speed .......................... 144
Lever ..............................................
143
Messages in the mutlifunction
display ........................................... 280
Resume function ............................ 144
Setting current speed .................... 143
Cup holders ........................................ 201
Curb weight ....................................... 249
Customer Assistance Center (CAC) ...23
Customer Relations Department .......23 D
Dashboard see Instrument cluster
Data recording ..................................... 23
Date, Setting ...................................... 134
Daytime running lamp mode ..............99
Switching on or off ......................... 134
Deep water
see Standing water
Defroster
Rear window .................................. 180
Windshield ............................. 168, 178
Delayed shut-off
Exterior lamps ................................ 135
Interior lighting .............................. 136
Department of Transportation
see DOT
Diesel engine
Preglow indicator lamp ....................29
Diesel fuel
see Fuel
Difficulties
While driving .................................. 113
With starting .................................. 111
Digital clock
see Clock
Digital speedometer .........................127
Dimensions (vehicle) see Vehicle specification
Direction of rotation (tires) ..............240
Displays
Digital speedometer ......................127
Distronic ........................................ 146
Maintenance service indicator .......261 Messages in the multifunction
display
........................................... 274
Multifunction display .....................125
Outside temperature .............127, 133
Symbol messages .......................... 285
Text messages ............................... 275
Trip computer ................................ 139
Vehicle status message memory ...130
Vehicle system settings ................. 130
Distronic ............................................ 145
Cleaning system sensor cover ....... 265
Control system .............................. 129
Distance warning function .............152
Distance warning
lamp ...................................... 147, 304
Driving with .................................... 151
Menu ............................................. 147
Messages in the multifunction
display ........................................... 280
Resume function ............................ 150
Sensor cover .................................. 265
Speed settings ............................... 149
Door control panel .............................. 33
Door handles ........................................ 33
Doors
Child safety locks ............................ 61
Locking/unlocking (KEYLESS-GO) ...71
Locking/unlocking (SmartKey) ........ 70
Messages in the multifunction
display ........................................... 289
Opening from inside ......................... 74
Remote door unlock (Tele Aid) ....... 212
Unlocking (Mechanical key) ........... 308
DOT (Department of
Transportation) .................................. 249
Drinking and driving .........................253
Driving
Abroad ........................................... 259
Hydroplaning ................................. 255
Instructions ........................... 110, 253
In winter ........................................ 252
Problems ....................................... 113
Safety systems ................................ 63
Systems ......................................... 142
Through standing water .................256
With Distronic ................................ 151
Driving and parking
Safety notes .................................. 110 Index
7 251_AKB; 4; 52, en-US
d2ureepe,
Version: 2.11.8.1 2009-03-23T09:22:52+01:00 - Seite 7
Page 12 of 364

Gross Vehicle Weight
see GVW
Gross Vehicle Weight Rating
see GVWR
GTW (Gross Trailer Weight) ..............249
GVW (Gross Vehicle Weight) ............249
GVWR (Gross Vehicle Weight
Rating) ................................................ 249H
Halogen headlamps see Headlamps
Hard plastic trim items, cleaning ....267
Hazard warning flasher ....................101
Headlamp cleaning system .............. 101
Headlamps
Active Bi-Xenon headlamps ............. 97
Automatic headlamp mode .............. 98
Bi-Xenon .................................. 97, 313
Cleaning lenses ............................. 265
Cleaning system ............................ 101
Daytime running lamp mode ............99
Delayed shut-off ............................ 135
Halogen ......................................... 313
High-beam flasher .........................101
High-beam headlamps ...................100
Low-beam headlamps ...................... 98
Replacing bulbs ............................. 312
Switch .............................................. 97
Headliner, cleaning and care of .......267
Head restraints .................................... 81
Adjustment ................................ 81, 83
NECK-PRO active front head
restraints ......................................... 53
NECK-PRO active front head
restraints, resetting ....................... 310
Heated steering wheel ........................93
Height adjustment
Seat belt outlet ................................ 50
Seats ............................................... 81
Vehicle level control ...................... 154
High-beam flasher ............................. 101
High-beam headlamps ..............100, 313
Indicator lamp .................................. 29
Hill-start assist system ..................... 153
Hinged quarter windows .................. 107Hood ...................................................
222
Messages in the multifunction
display
........................................... 288
Hooks ................................................. 189
Horn ...................................................... 27
HVAC see Climate control system
Hydroplaning ..................................... 255 I
Identification labels ..........................344
Identification number, vehicle
(VIN) ................................................... 345
Ignition ................................... 79, 80, 111
Immobilizer .......................................... 67
Indicator lamps see Lamps, indicator and warning
Infant and child restraint systems
see Children in the vehicle
Inflation pressure
see Tires, Inflation pressure
Infrared reflecting windshield .........217
Inside door handle .............................. 74
Instrument cluster ......................28, 122
Illumination .................................... 123
Lamps ............................................ 299
Multifunction display .....................125
Instrument lighting
see Instrument cluster, Illumination
Instrument panel
see Instrument cluster
Instruments and controls
see Cockpit
Interior lighting
Delayed shut-off ............................ 136
Emergency lighting ........................ 103
Front .............................................. 102
Front reading lamps ....................... 102
Rear ............................................... 103
Rear reading lamps ........................ 103
Interior rear view mirror .....................94
Auto-dimming rear view mirrors ....... 94
Interior storage spaces
see Storage compartments
Intermittent wiping
Rain sensor .................................... 10410
Index 251_AKB; 4; 52, en-US
d2ureepe,
Version: 2.11.8.1 2009-03-23T09:22:52+01:00 - Seite 10
Page 27 of 364
Exterior view
....................................... 26
Cockpit ................................................. 27
Instrument cluster ..............................28
Multifunction steering wheel .............30
Center console .................................... 31
Overhead control panel ......................32
Door control panel .............................. 33 25At a glance
251_AKB; 4; 52, en-US
d2ureepe,
Version: 2.11.8.1 2009-03-23T09:22:52+01:00 - Seite 25
Page 29 of 364
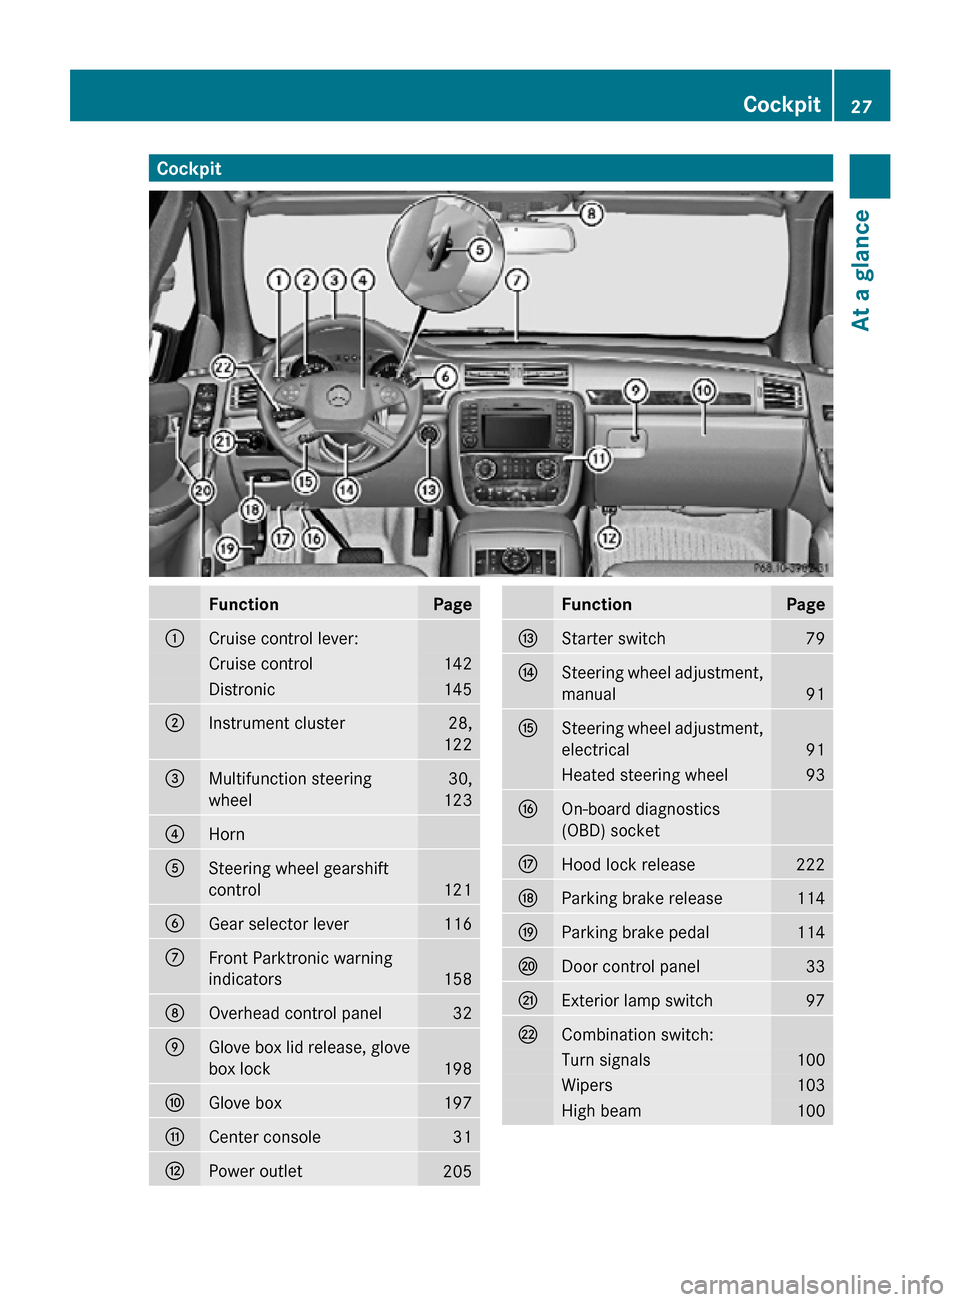
Cockpit
Function Page
:
Cruise control lever:
Cruise control 142
Distronic 145
;
Instrument cluster 28,
122 =
Multifunction steering
wheel 30,
123 ?
Horn
A
Steering wheel gearshift
control
121
B
Gear selector lever 116
C
Front Parktronic warning
indicators
158
D
Overhead control panel 32
E
Glove box lid release, glove
box lock
198
F
Glove box 197
G
Center console 31
H
Power outlet
205 Function Page
I
Starter switch 79
J
Steering wheel adjustment,
manual
91
K
Steering wheel adjustment,
electrical
91
Heated steering wheel 93
L
On-board diagnostics
(OBD) socket
M
Hood lock release 222
N
Parking brake release 114
O
Parking brake pedal 114
P
Door control panel 33
Q
Exterior lamp switch 97
R
Combination switch:
Turn signals 100
Wipers 103
High beam 100Cockpit
27At a glance
251_AKB; 4; 52, en-US
d2ureepe, Version: 2.11.8.1 2009-03-23T09:22:52+01:00 - Seite 27 Z
Page 41 of 364
bags repaired. This will help to make sure the
air
bags will continue to provide supplemental
crash protection for occupants.
Safety guidelines for the seat belt,
Emergency Tensioning Device (ETD)
and air bag G
Warning!
R Damaged
seat belts or seat belts that have
been subjected to stress in an accident
must be replaced. Their anchoring points
must also be checked. Only use seat belts
installed or supplied by an authorized
Mercedes-Benz Center.
R Air bags and pyrotechnic Emergency
Tensioning Devices (ETDs) contain
perchlorate material, which may require
special handling and regard for the
environment. Check with your local
government’s disposal guidelines.
California residents, see
www.dtsc.ca.gov/HazardousWaste/
Perchlorate/index.cfm.
R Air bags and ETDs are designed to function
on a one-time-only basis. An air bag or ETD
that has deployed must be replaced. PRE-
SAFE ®
has electrically operated reversible
pre-tensioners in addition to the
pyrotechnic ETDs.
R Do not pass seat belts over sharp edges.
They could tear.
R Do not make any modification that could
change the effectiveness of the seat belts.
R Do not bleach or dye seat belts as this may
severely weaken them. In a crash they may
not be able to provide adequate protection.
R No modifications of any kind may be made
to any components or wiring of the SRS.
R Do no change or remove any component or
part of the SRS.
R Do not install additional trim material, seat
covers, badges, etc. over the steering
wheel hub, front passenger front air bag cover, outboard sides of the seat
backrests, door trim panels, or door frame
trims.
R Do not install additional electrical/
electronic equipment on or near SRS
components and wiring.
R Keep
area between air bags and occupants
free of objects (e.g. packages, purses,
umbrellas, etc.).
R Do not hang items such as coat hangers
from the coat hooks or handles over the
door. These items may be thrown around in
the vehicle and cause head and other
injuries when the window curtain air bag is
deployed.
R Air bag system components will be hot after
an air bag has inflated. Do not touch them.
R Never place your feet on the instrument
panel, dashboard, or on the seat. Always
keep both feet on the floor in front of the
seat.
R Improper repair work on the SRS creates a
risk of rendering the SRS inoperative or
causing unintended air bag deployment.
Work on the SRS must therefore only be
performed by qualified technicians.
Contact an authorized Mercedes-Benz
Center.
R For your protection and the protection of
others, when scrapping the air bag unit or
ETD, our safety instructions must be
followed. These instructions are available
from any authorized Mercedes-Benz
Center.
R Given the considerable deployment speed,
required inflation volume, and the material
of the air bags, there is the possibility of
abrasions or other, potentially more serious
injuries resulting from air bag deployment.
If you sell your vehicle, we strongly
recommend that you inform the subsequent
owner that the vehicle is equipped with SRS.
Also refer them to the applicable section in
the Operator’s Manual. Occupant safety
39
Safety and security
251_AKB; 4; 52, en-US
d2ureepe, Version: 2.11.8.1 2009-03-23T09:22:52+01:00 - Seite 39 Z
Page 51 of 364
thresholds and in certain rollovers (window
curtain air bags and ETDs).
R Never wear the shoulder belt under your
arm,
against your neck or off your shoulder.
In a frontal crash, your body would move
too far forward. That would increase the
chance of head and neck injuries. The seat
belt would also apply too much force to the
ribs or abdomen, which could severely
injure internal organs such as your liver or
spleen.
Adjust the seat belt so that the shoulder
section is located as close as possible to
the middle of the shoulder. It should not
touch the neck. Never pass the shoulder
portion of the seat belt under your arm. For
this purpose, you can adjust the height of
the seat belt outlet.
R Position the lap belt as low as possible on
your hips and not across the abdomen. If
the lap belt is positioned across your
abdomen, it could cause serious injuries in
a crash.
R Never wear seat belts over rigid or
breakable objects in or on your clothing,
such as eyeglasses, pens, keys etc., as
these might cause injuries.
R Make sure the seat belt is always fitted
snugly. Take special care of this when
wearing loose clothing.
R Never use a seat belt for more than one
person at a time. Do not fasten a seat belt
around a person and another person or
other objects at the same time.
R Seat belts should not be worn twisted. In a
crash, you would not have the full width of
the seat belt to distribute impact forces.
The twisted seat belt against your body
could cause injuries.
R Pregnant women should also always use a
lap/shoulder belt. The lap belt portion
should be positioned as low as possible on
the hips to avoid any possible pressure on
the abdomen. R
Place the seat backrest in a position that is
as upright as possible.
R Check your seat belt during travel to make
sure it is properly positioned.
R Never place your feet on the instrument
panel, dashboard, or on the seat. Always
keep both feet on the floor in front of the
seat.
R When using a seat belt to secure infant
restraints, toddler restraints, or children in
booster seats, always follow the child seat
manufacturer’s instructions. G
Warning!
Do not pass seat belts over sharp edges. They
could tear.
Do
not allow the seat belt to get caught in the
door or in the seat adjustment mechanism.
This could damage the seat belt.
Never attempt to make modifications to seat
belts. This could impair the effectiveness of
the seat belts.
Fastening the seat belts G
Warning!
According to accident statistics, children are
safer when properly restrained in the rear
seating positions than in the front seating
position. Thus, we strongly recommend that
children
be placed in the rear seats whenever
possible. Regardless of seating position,
children 12 years old and under must be
seated and properly secured in an
appropriately sized infant restraint, toddler
restraint, or booster seat recommended for
the size and weight of the child. For additional
information, see “Children in the vehicle”.
A child’s risk of serious or fatal injuries is
significantly increased if the child restraints
are not properly secured in the vehicle and/
or the child is not properly secured in the child
restraint. Occupant safety
49
Safety and security
251_AKB; 4; 52, en-US
d2ureepe, Version: 2.11.8.1 2009-03-23T09:22:52+01:00 - Seite 49 Z
Page 71 of 364
Vehicle equipment ..............................
70
Locking and unlocking .......................70
Starter switch positions ..................... 79
Seats .................................................... 81
Multifunction steering wheel .............91
Mirrors ................................................. 93
Memory function ................................. 96
Lighting ................................................ 97
Wipers ................................................ 103
Power windows ................................. 106
Driving and parking .......................... 110
Automatic transmission ................... 115
Transfer case .................................... 122
Instrument cluster ............................122
Control system .................................. 123
Driving systems ................................ 142
Overview of climate control sys-
tem functions and air vents ............. 162
Climate control ................................. 164
3-zone automatic climate control ... 170
Rear window defroster ..................... 180
Power tilt/sliding sunroof ...............181
Panorama roof with power tilt/
sliding panel ...................................... 184
Loading and storing ..........................186
Useful features ................................. 201 69Controls in detail
251_AKB; 4; 52, en-US
d2ureepe,
Version: 2.11.8.1 2009-03-23T09:22:52+01:00 - Seite 69
Page 100 of 364
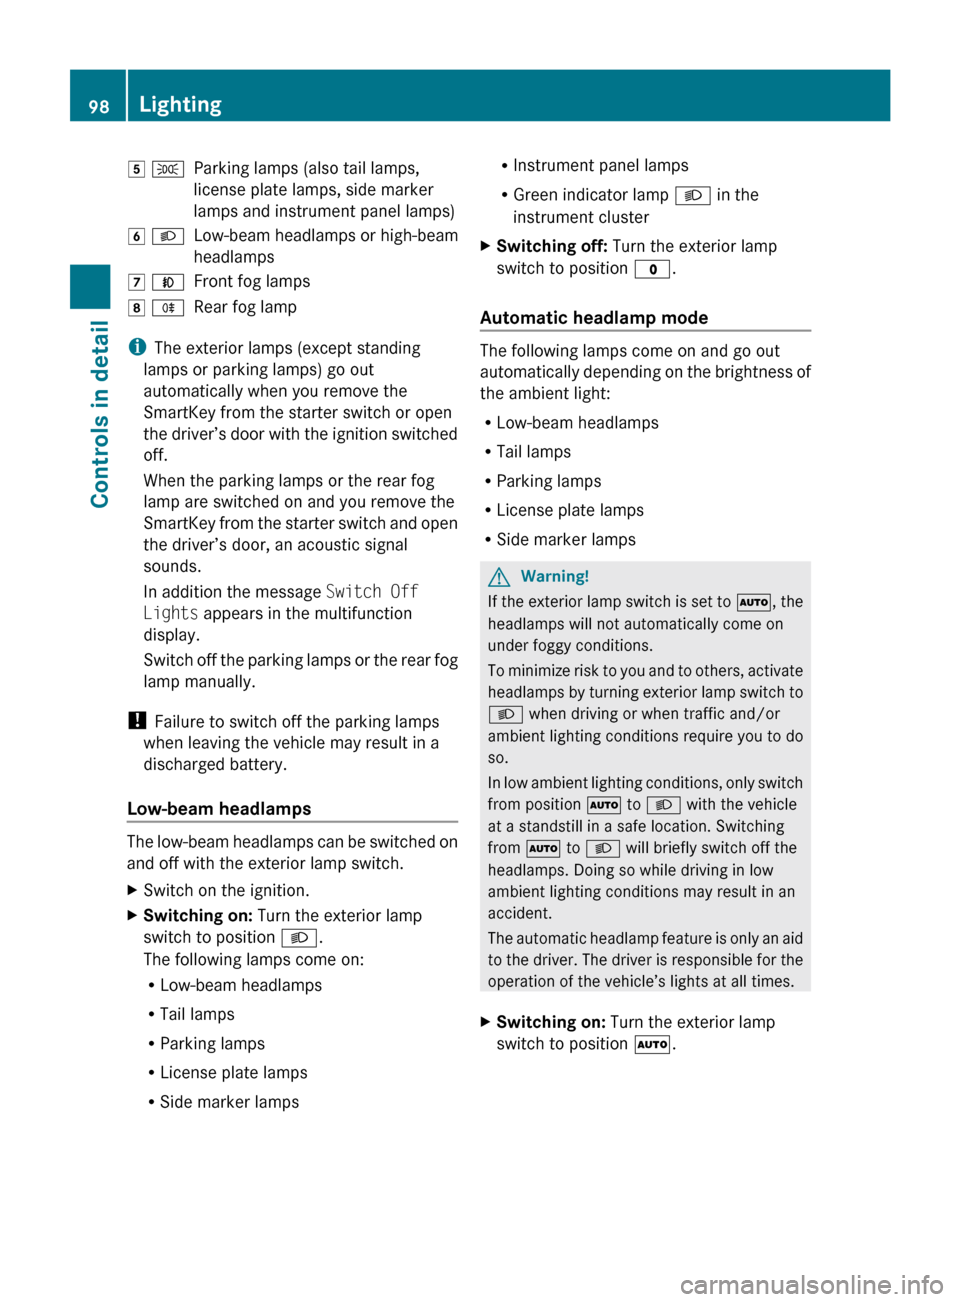
5 T
Parking lamps (also tail lamps,
license plate lamps, side marker
lamps and instrument panel lamps)
6 L Low-beam headlamps or high-beam
headlamps
7 N Front fog lamps
8 R Rear fog lamp
i The exterior lamps (except standing
lamps or parking lamps) go out
automatically when you remove the
SmartKey from the starter switch or open
the
driver’s door with the ignition switched
off.
When the parking lamps or the rear fog
lamp are switched on and you remove the
SmartKey from the starter switch and open
the driver’s door, an acoustic signal
sounds.
In addition the message Switch Off
Lights appears in the multifunction
display.
Switch off the parking lamps or the rear fog
lamp manually.
! Failure to switch off the parking lamps
when leaving the vehicle may result in a
discharged battery.
Low-beam headlamps The low-beam headlamps can be switched on
and off with the exterior lamp switch.
X
Switch on the ignition.
X Switching on: Turn the exterior lamp
switch to position L.
The following lamps come on:
R Low-beam headlamps
R Tail lamps
R Parking lamps
R License plate lamps
R Side marker lamps R
Instrument panel lamps
R Green indicator lamp L in the
instrument cluster
X Switching off: Turn the exterior lamp
switch to position $.
Automatic headlamp mode The following lamps come on and go out
automatically
depending on the brightness of
the ambient light:
R Low-beam headlamps
R Tail lamps
R Parking lamps
R License plate lamps
R Side marker lamps G
Warning!
If the exterior lamp switch is set to Ã, the
headlamps will not automatically come on
under foggy conditions.
To
minimize risk to you and to others, activate
headlamps by turning exterior lamp switch to
L when driving or when traffic and/or
ambient lighting conditions require you to do
so.
In low ambient lighting conditions, only switch
from position à to L with the vehicle
at a standstill in a safe location. Switching
from à to L will briefly switch off the
headlamps. Doing so while driving in low
ambient lighting conditions may result in an
accident.
The automatic headlamp feature is only an aid
to the driver. The driver is responsible for the
operation of the vehicle’s lights at all times.
X Switching on: Turn the exterior lamp
switch to position Ã. 98
Lighting
Controls in detail
251_AKB; 4; 52, en-US
d2ureepe,
Version: 2.11.8.1 2009-03-23T09:22:52+01:00 - Seite 98