2010 MERCEDES-BENZ R320 keyless
[x] Cancel search: keylessPage 83 of 364
Position 1
X
Press the KEYLESS-GO start/stop button
once.
This supplies power for some electrical
consumers, such as radio functions.
i If you now press the KEYLESS-GO start/
stop button
R once more, the ignition (position 2) is
switched on
R twice more the power supply is again
switched off
Ignition (or position 2) X
Press the KEYLESS-GO start/stop button
twice.
This supplies power for all electrical
consumers.
All lamps (except low-beam headlamp
indicator lamp, high-beam headlamp
indicator lamp, and turn signal indicator
lamps unless activated) in the instrument
cluster
come on. If a lamp in the instrument
cluster fails to come on when the ignition
is switched on, have it checked and
replaced if necessary. If a lamp in the
instrument cluster remains on after
starting the engine or comes on while
driving, refer to “Lamps in instrument
cluster” ( Y page 299).
i If you now press the KEYLESS-GO start/
stop
button once, the power supply is again
switched off. Seats
Safety notes
G
Warning!
In order to avoid possible loss of vehicle
control
the following must be done before the
vehicle is put into motion:
R seat adjustment
R head restraint adjustment
R steering wheel adjustment
R rear view mirror adjustment
R fastening of seat belts G
Warning!
Do not adjust the driver’s seat while driving.
Adjusting the seat while driving could cause
the driver to lose control of the vehicle.
Never ride in a moving vehicle with the seat
backrest
in an excessively reclined position as
this can be dangerous. You could slide under
the seat belt in a collision. If you slide under
it, the seat belt would apply force at the
abdomen or neck. That could cause serious
or fatal injuries. The seat backrest and seat
belts provide the best restraint when the
wearer is in a position that is as upright as
possible and seat belts are properly
positioned on the body. G
Warning!
Your seat must be adjusted so that you can
correctly fasten your seat belt.
Observe the following points:
R Adjust
the seat backrest until your arms are
slightly angled when holding the steering
wheel.
R Adjust the seat to a comfortable seating
position that still allows you to reach the
accelerator/brake pedal safely. The
position should be as far back as possible
with the driver still able to operate the
controls properly. Seats
81
Controls in detail
251_AKB; 4; 52, en-US
d2ureepe, Version: 2.11.8.1 2009-03-23T09:22:52+01:00 - Seite 81 Z
Page 94 of 364
Steering wheel adjustment, manual
X
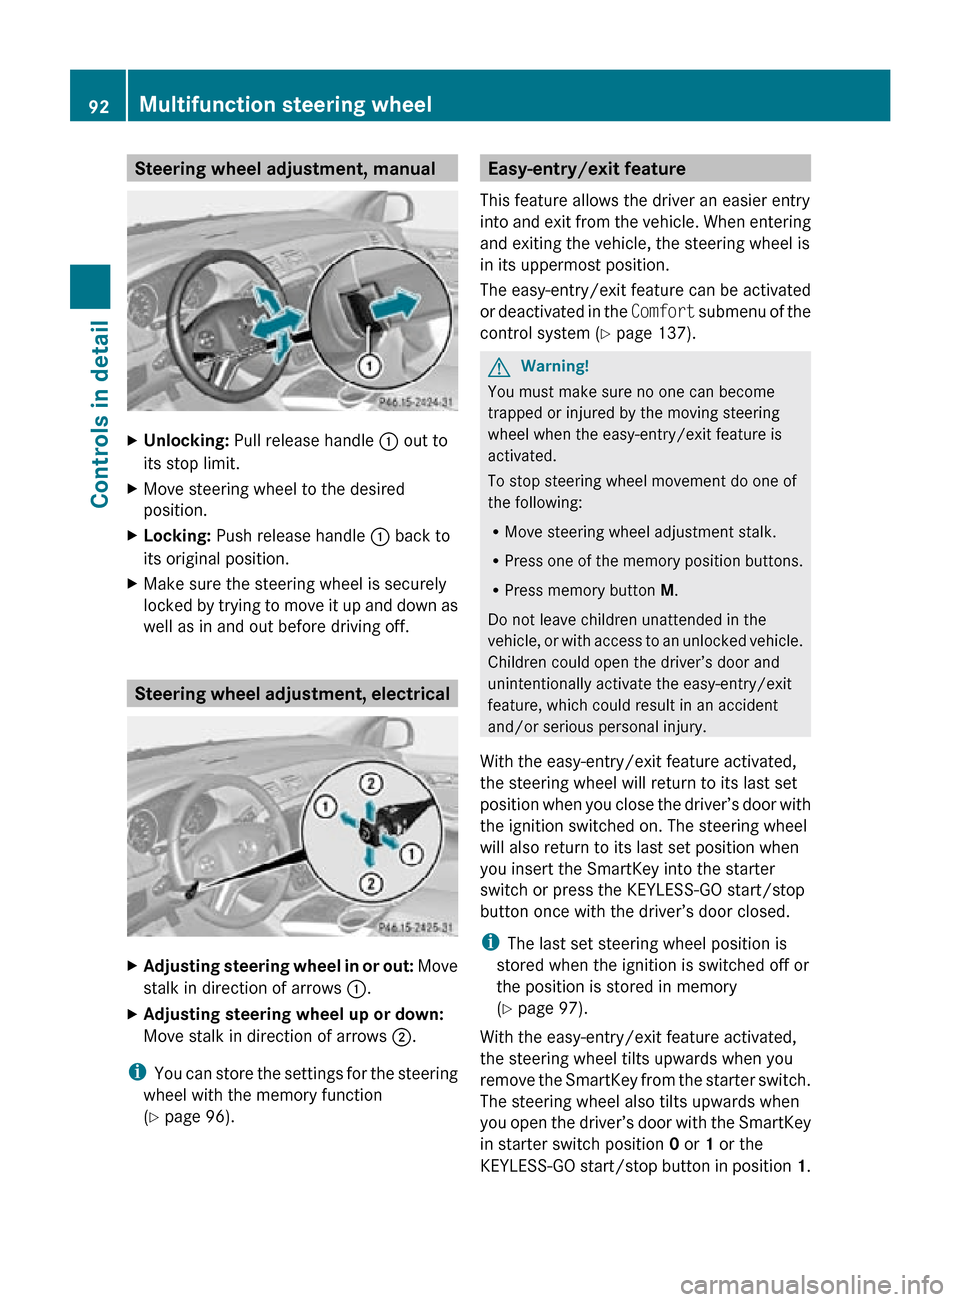
Unlocking: Pull release handle : out to
its stop limit.
X Move steering wheel to the desired
position.
X Locking: Push release handle : back to
its original position.
X Make sure the steering wheel is securely
locked by trying to move it up and down as
well as in and out before driving off. Steering wheel adjustment, electrical
X
Adjusting steering wheel in or out: Move
stalk in direction of arrows :.
X Adjusting steering wheel up or down:
Move stalk in direction of arrows ;.
i You can store the settings for the steering
wheel with the memory function
(Y page 96). Easy-entry/exit feature
This feature allows the driver an easier entry
into and exit from the vehicle. When entering
and exiting the vehicle, the steering wheel is
in its uppermost position.
The easy-entry/exit feature can be activated
or deactivated in the Comfort submenu of the
control system ( Y page 137). G
Warning!
You must make sure no one can become
trapped or injured by the moving steering
wheel when the easy-entry/exit feature is
activated.
To stop steering wheel movement do one of
the following:
R Move steering wheel adjustment stalk.
R Press one of the memory position buttons.
R Press memory button M.
Do not leave children unattended in the
vehicle, or with access to an unlocked vehicle.
Children could open the driver’s door and
unintentionally activate the easy-entry/exit
feature, which could result in an accident
and/or serious personal injury.
With the easy-entry/exit feature activated,
the steering wheel will return to its last set
position when you close the driver’s door with
the ignition switched on. The steering wheel
will also return to its last set position when
you insert the SmartKey into the starter
switch or press the KEYLESS-GO start/stop
button once with the driver’s door closed.
i The last set steering wheel position is
stored when the ignition is switched off or
the position is stored in memory
(Y page 97).
With the easy-entry/exit feature activated,
the steering wheel tilts upwards when you
remove the SmartKey from the starter switch.
The steering wheel also tilts upwards when
you open the driver’s door with the SmartKey
in starter switch position 0 or 1 or the
KEYLESS-GO start/stop button in position 1.92
Multifunction steering wheelControls in detail
251_AKB; 4; 52, en-US
d2ureepe,
Version: 2.11.8.1 2009-03-23T09:22:52+01:00 - Seite 92
Page 95 of 364
i
When the current position for the steering
wheel is in the uppermost tilt position, the
steering wheel will no longer be able to
move upward when the easy-entry/exit
feature is activated.
The adjustment procedure is briefly
interrupted when the engine is started. G
Warning!
Let the system complete the adjustment
procedure before setting the vehicle in
motion. All steering wheel adjustment must
be completed before setting the vehicle in
motion. Driving off with the steering wheel
still adjusting could cause the driver to lose
control of the vehicle.
Crash-responsive exit aid When you open the driver’s door after an
accident has occurred, the steering column
moves up. The position of the SmartKey in the
starter switch is insignificant. This function
facilitates exiting as well as rescue of vehicle
occupants.
The crash-responsive exit aid can only be
triggered when the easy-entry/exit feature is
activated via the control system.
Heated steering wheel
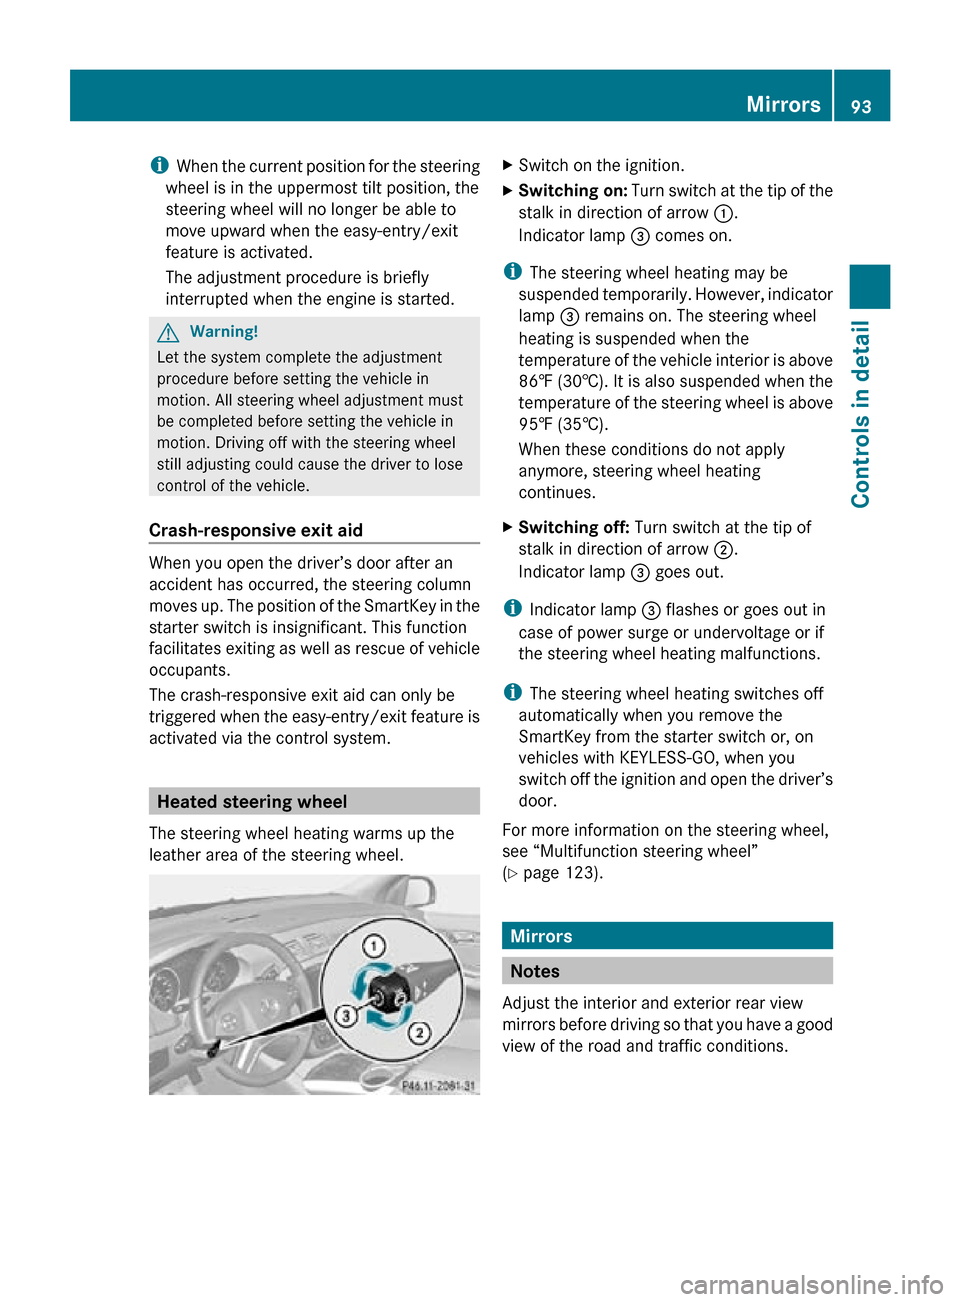
The steering wheel heating warms up the
leather area of the steering wheel. X
Switch on the ignition.
X Switching on: Turn switch at the tip of the
stalk in direction of arrow :.
Indicator lamp = comes on.
i The steering wheel heating may be
suspended temporarily. However, indicator
lamp = remains on. The steering wheel
heating is suspended when the
temperature of the vehicle interior is above
86‡ (30†). It is also suspended when the
temperature of the steering wheel is above
95‡ (35†).
When these conditions do not apply
anymore, steering wheel heating
continues.
X Switching off: Turn switch at the tip of
stalk in direction of arrow ;.
Indicator lamp = goes out.
i Indicator lamp = flashes or goes out in
case of power surge or undervoltage or if
the steering wheel heating malfunctions.
i The steering wheel heating switches off
automatically when you remove the
SmartKey from the starter switch or, on
vehicles with KEYLESS-GO, when you
switch off the ignition and open the driver’s
door.
For more information on the steering wheel,
see “Multifunction steering wheel”
(Y page 123). Mirrors
Notes
Adjust the interior and exterior rear view
mirrors before driving so that you have a good
view of the road and traffic conditions. Mirrors
93Controls in detail
251_AKB; 4; 52, en-US
d2ureepe, Version: 2.11.8.1 2009-03-23T09:22:52+01:00 - Seite 93 Z
Page 101 of 364
The following lamps come on and go out
depending on the brightness of the ambient
light with the SmartKey in starter switch
position 1 or the KEYLESS-GO start/stop
button pressed once:
R
tail lamps
R parking lamps
R license plate lamps
R side marker lamps
When the engine is running, the low-beam
headlamps will also come on and turn off
automatically.
Canada
only: High-beam headlamps are only
available with the exterior lamp switch in
position L.
Daytime running lamp mode In Canada, the daytime running lamp mode is
mandatory
and therefore in a constant mode.
In the USA, the daytime running lamp mode
is deactivated by default.
X Activate the daytime running lamp mode
using the control system, see “Switching
daytime
running lamp mode on or off (USA
only)” (Y page 134).
X Turn the exterior lamp switch to position
$ or Ã.
When the engine is running, the low-beam
headlamps come on.
In low ambient lighting conditions, the
following lamps will come on additionally:
R
Tail lamps
R Parking lamps
R License plate lamps
R Side marker lamps
With the daytime running lamp mode
activated
and the engine running, you cannot
switch off the low-beam headlamps manually. Canada only
With the exterior lamp switch in position
$
or Ã, you cannot switch on the high-
beam headlamps.
The high-beam flasher is available at all times.
X For nighttime driving turn the exterior lamp
switch
to position L to permit activation
of the high-beam headlamps.
When the engine is running, and you
R shift from a driving position to neutral
position N or park position P with the
vehicle at a standstill, the low-beam
headlamps will go out with a delay of
3 minutes
R turn the exterior lamp switch to position
T, the low-beam headlamps, the tail
and
parking lamps, the license plate lamps
and the side marker lamps come on
R turn the exterior lamp switch to position
L, the manual headlamp mode has
priority over the daytime running lamp
mode
The corresponding exterior lamps come on
(Y page 97).
USA only
You can only switch on the high-beam
headlamps in low ambient lighting conditions.
The high-beam flasher is available at all times.
X For nighttime driving turn the exterior lamp
switch to position L or à to permit
activation of the high-beam headlamps.
When the engine is running, and you turn the
exterior lamp switch to position T or
L, the manual headlamp mode has
priority
over the daytime running lamp mode.
The corresponding exterior lamps come on
(Y page 97).
Fog lamps Fog lamps cannot be switched on with the
exterior lamp switch in position Ã. Lighting
99
Controls in detail
251_AKB; 4; 52, en-US
d2ureepe, Version: 2.11.8.1 2009-03-23T09:22:52+01:00 - Seite 99 Z
Page 107 of 364
Single wipe
X
Press the combination switch briefly in
direction of arrow B to the resistance
point.
The windshield wipers wipe one time
without washer fluid.
Wiping with washer fluid X
Press the combination switch in direction
of arrow B past the resistance point.
The windshield wipers operate with washer
fluid.
i To prevent smears on the windshield or
noisy/chattering wiper blades, wipe with
washer fluid every now and then even when
it is raining.
For information on filling up the washer
reservoir, see “Washer system and headlamp
cleaning system” ( Y page 226).
For information on cleaning the headlamps
with washer fluid, see “Headlamp cleaning
system” ( Y page 101). Rear window wiper/washer
X Observe notes on page (Y page 103).
The rear window wiper engages automatically
when the automatic transmission is shifted
into reverse gear R with the windshield wipers
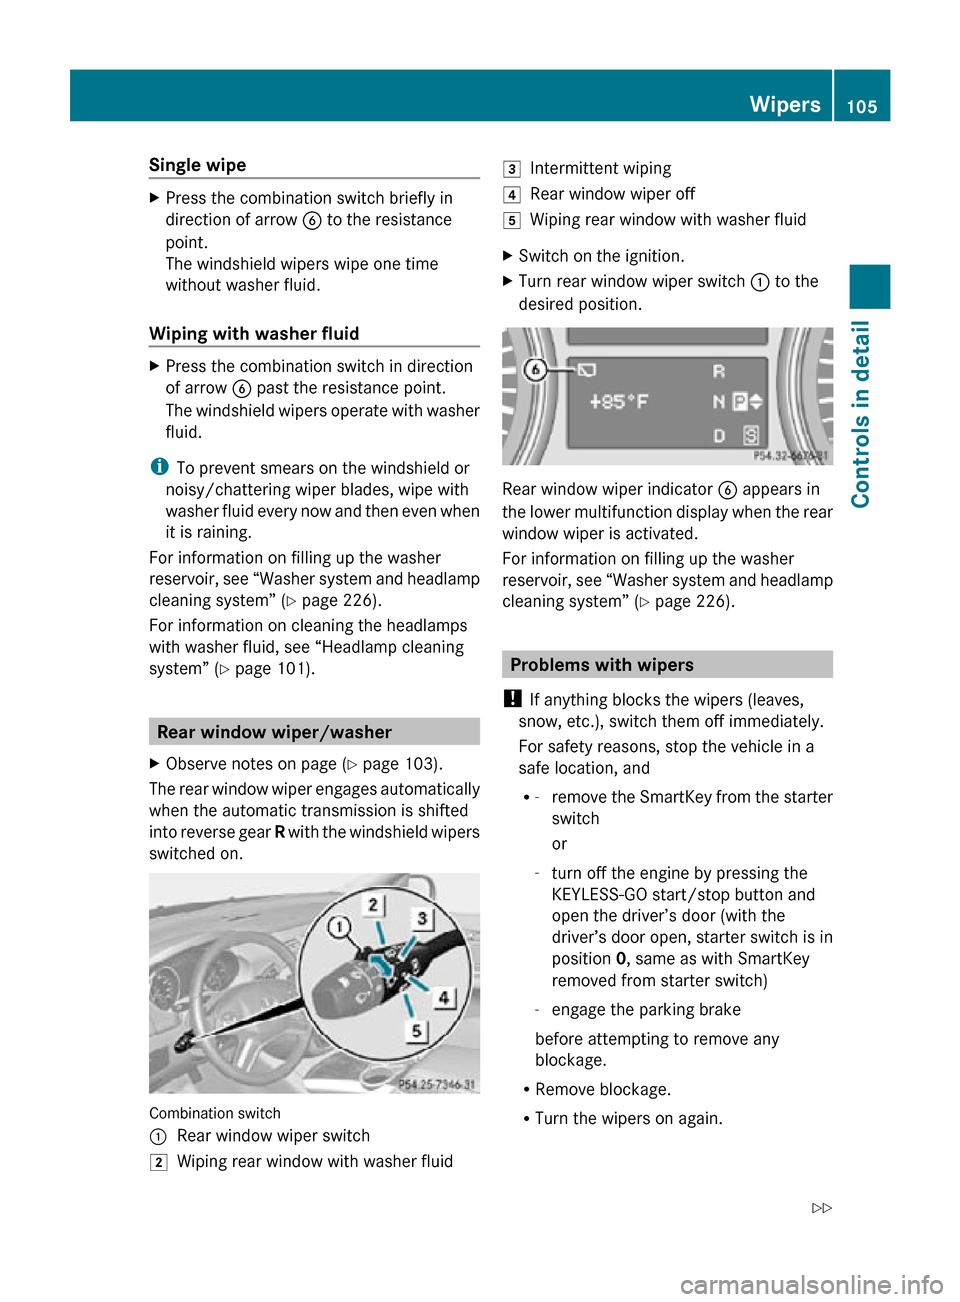
switched on. Combination switch
:
Rear window wiper switch
2 Wiping rear window with washer fluid 3
Intermittent wiping
4 Rear window wiper off
5 Wiping rear window with washer fluid
X Switch on the ignition.
X Turn rear window wiper switch : to the
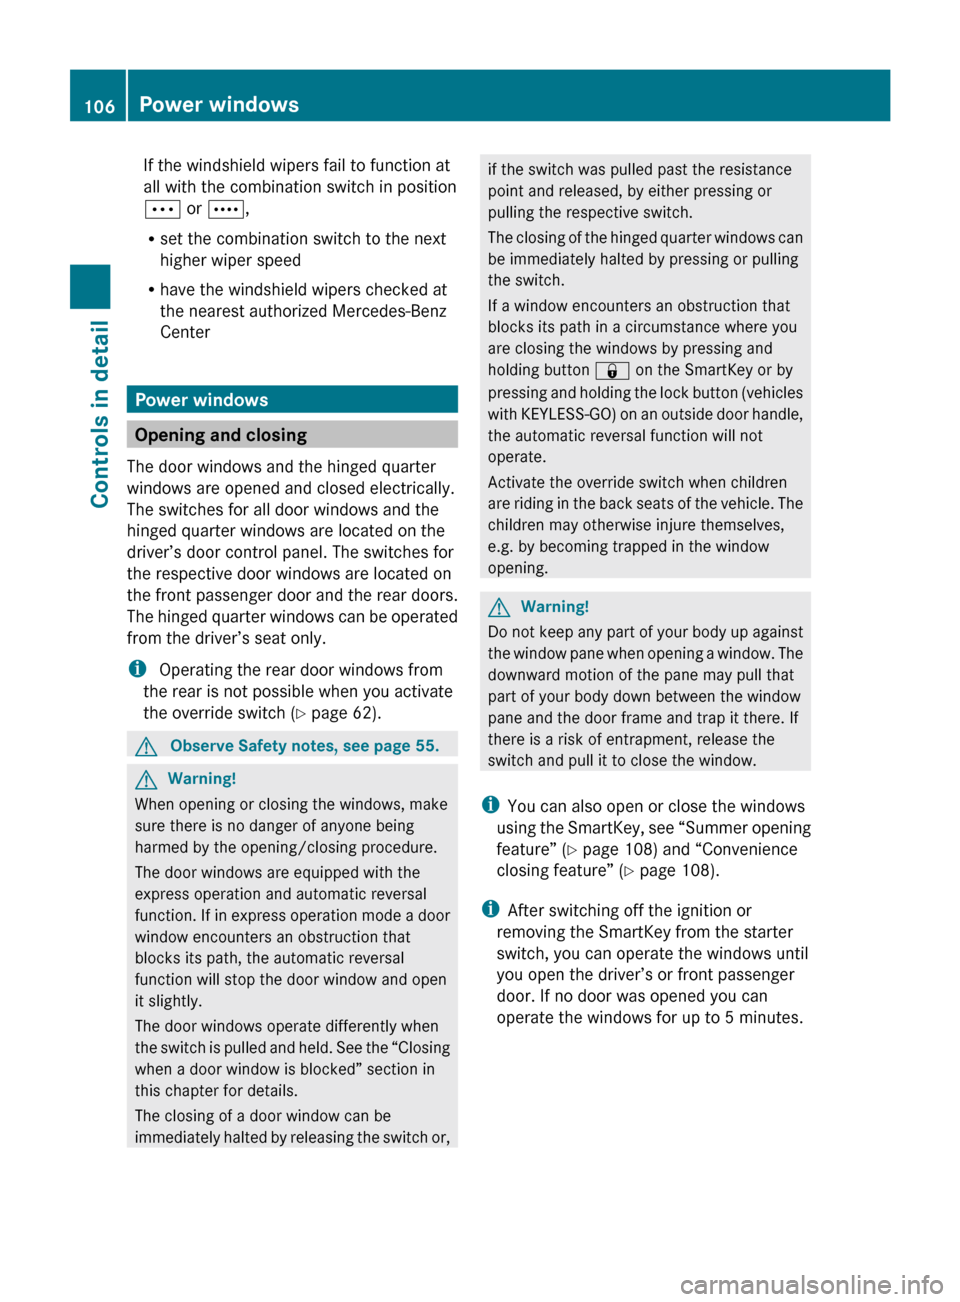
desired position. Rear window wiper indicator
B appears in
the lower multifunction display when the rear
window wiper is activated.
For information on filling up the washer
reservoir, see “Washer system and headlamp
cleaning system” ( Y page 226). Problems with wipers
! If anything blocks the wipers (leaves,
snow, etc.), switch them off immediately.
For safety reasons, stop the vehicle in a
safe location, and
R -
remove the SmartKey from the starter
switch
or
- turn off the engine by pressing the
KEYLESS-GO start/stop button and
open the driver’s door (with the
driver’s door open, starter switch is in
position 0, same as with SmartKey
removed from starter switch)
- engage the parking brake
before attempting to remove any
blockage.
R Remove blockage.
R Turn the wipers on again. Wipers
105Controls in detail
251_AKB; 4; 52, en-US
d2ureepe, Version: 2.11.8.1 2009-03-23T09:22:52+01:00 - Seite 105 Z
Page 108 of 364
If the windshield wipers fail to function at
all with the combination switch in position
Ä or Å,
R
set the combination switch to the next
higher wiper speed
R have the windshield wipers checked at
the nearest authorized Mercedes-Benz
Center Power windows
Opening and closing
The door windows and the hinged quarter
windows are opened and closed electrically.
The switches for all door windows and the
hinged quarter windows are located on the
driver’s door control panel. The switches for
the respective door windows are located on
the front passenger door and the rear doors.
The
hinged quarter windows can be operated
from the driver’s seat only.
i Operating the rear door windows from
the rear is not possible when you activate
the override switch (Y page 62). G
Observe Safety notes, see page 55. G
Warning!
When opening or closing the windows, make
sure there is no danger of anyone being
harmed by the opening/closing procedure.
The door windows are equipped with the
express operation and automatic reversal
function.
If in express operation mode a door
window encounters an obstruction that
blocks its path, the automatic reversal
function will stop the door window and open
it slightly.
The door windows operate differently when
the switch is pulled and held. See the “Closing
when a door window is blocked” section in
this chapter for details.
The closing of a door window can be
immediately halted by releasing the switch or, if the switch was pulled past the resistance
point and released, by either pressing or
pulling the respective switch.
The
closing of the hinged quarter windows can
be immediately halted by pressing or pulling
the switch.
If a window encounters an obstruction that
blocks its path in a circumstance where you
are closing the windows by pressing and
holding button & on the SmartKey or by
pressing and holding the lock button (vehicles
with KEYLESS-GO) on an outside door handle,
the automatic reversal function will not
operate.
Activate the override switch when children
are riding in the back seats of the vehicle. The
children may otherwise injure themselves,
e.g. by becoming trapped in the window
opening. G
Warning!
Do not keep any part of your body up against
the
window pane when opening a window. The
downward motion of the pane may pull that
part of your body down between the window
pane and the door frame and trap it there. If
there is a risk of entrapment, release the
switch and pull it to close the window.
i You can also open or close the windows
using the SmartKey, see “Summer opening
feature” ( Y page 108) and “Convenience
closing feature” ( Y page 108).
i After switching off the ignition or
removing the SmartKey from the starter
switch, you can operate the windows until
you open the driver’s or front passenger
door. If no door was opened you can
operate the windows for up to 5 minutes. 106
Power windows
Controls in detail
251_AKB; 4; 52, en-US
d2ureepe,
Version: 2.11.8.1 2009-03-23T09:22:52+01:00 - Seite 106
Page 111 of 364
anyone being harmed by the closing
procedure.
If
potential danger exists, proceed as follows:
R Release button & to stop the closing
procedure. To open, press and hold button
%. To continue the closing procedure
after making sure that there is no danger of
anyone being harmed by the closing
procedure, press and hold button &.
Vehicles with KEYLESS-GO:
R Release the lock button on the outside door
handle to stop the closing procedure.
R Immediately pull on the same outside door
handle and hold firmly. The windows and
the tilt/sliding sunroof or panorama roof
with power tilt/sliding panel will open for
as long as the door handle is held but the
door not opened.
With SmartKey The SmartKey must be in close proximity to
the driver’s outside door handle.
X
Aim transmitter eye of the SmartKey at the
driver’s outside door handle.
Vehicles without panorama roof with
power tilt/sliding panel
X Press and hold button & on the
SmartKey until the windows and the tilt/
sliding sunroof are closed completely.
X Release button & on the SmartKey to
interrupt the closing procedure. Vehicles with panorama roof with power
tilt/sliding panel
When tilt/sliding panel is opened:
X
Press and hold button & on the
SmartKey until the windows and the tilt/
sliding panel are closed completely.
X Press and hold button & on the
SmartKey again.
The roller sunblinds extend.
X Release button & on the SmartKey to
interrupt the closing procedure.
When tilt/sliding panel is closed:
X Press and hold button & on the
SmartKey until the windows and the roller
sunblinds are closed completely.
X Release button & on the SmartKey to
interrupt the closing procedure.
With KEYLESS-GO The SmartKey with KEYLESS-GO must be
located outside the vehicle within
approximately 3 ft (1 m) of a door.
X
Close all doors.
Vehicles without panorama roof with
power tilt/sliding panel
X Press and hold the lock button on an
outside door handle
(Y page 73) until the
windows and the tilt/sliding sunroof are
closed completely.
X Release the lock button on the outside door
handle to interrupt the closing procedure.
Vehicles with panorama roof with power
tilt/sliding panel
When tilt/sliding panel is opened:
X Press and hold the lock button on an
outside door handle
(Y page 73) until the Power windows
109
Controls in detail
251_AKB; 4; 52, en-US
d2ureepe, Version: 2.11.8.1 2009-03-23T09:22:52+01:00 - Seite 109 Z
Page 113 of 364
With SmartKey
X
Do not depress the accelerator pedal.
X Gasoline engine: Turn the SmartKey in the
starter switch to position 3 (Y page 79) and
release it.
The engine starts automatically.
X Diesel engine: Turn the SmartKey in the
starter switch to position 2 (Y page 79).
Preglow indicator lamp % in the
instrument cluster comes on.
X As soon as preglow indicator lamp %
goes out, turn the SmartKey in the starter
switch to position 3 and release it.
The engine starts automatically.
i If the engine is at operating temperature,
preglow indicator lamp % may not stay
on and you can start the engine without
preglowing.
With KEYLESS-GO G
Warning!
As long as the SmartKey is in your vehicle, the
vehicle can be started. Therefore, never leave
children unattended in the vehicle, as they
could otherwise accidentally start the engine.
When leaving the vehicle, always take the
SmartKey with you and lock the vehicle. Do
not leave children unattended in the vehicle,
or with access to an unlocked vehicle. A
child’s unsupervised access to a vehicle could
result in an accident and/or serious personal
injury.
You can start your vehicle without the
SmartKey in the starter switch using the
KEYLESS-GO start/stop button.
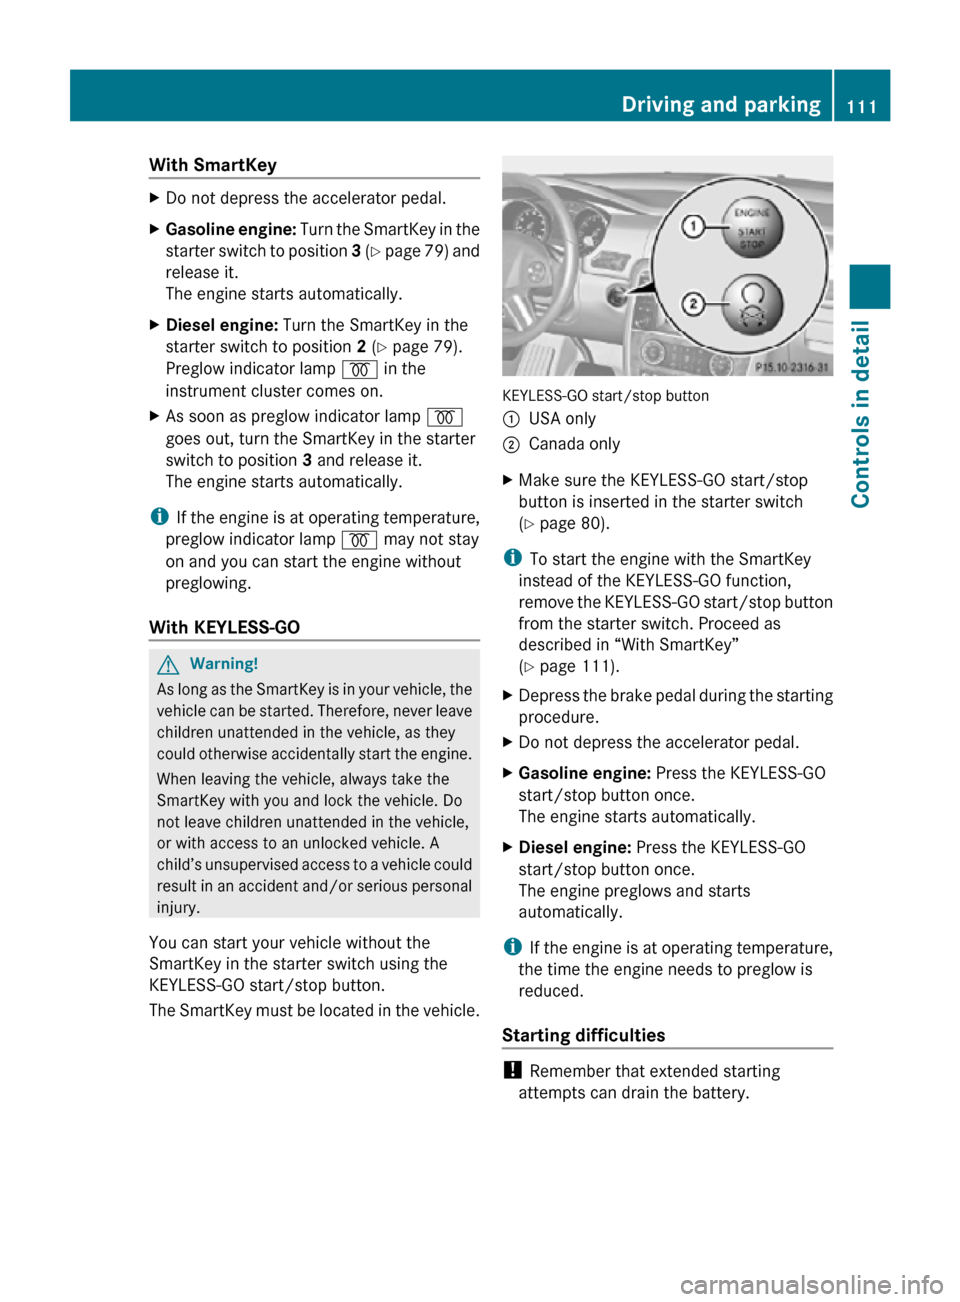
The SmartKey must be located in the vehicle. KEYLESS-GO start/stop button
:
USA only
; Canada only
X Make sure the KEYLESS-GO start/stop
button is inserted in the starter switch
(Y page 80).
i To start the engine with the SmartKey
instead of the KEYLESS-GO function,
remove the KEYLESS-GO start/stop button
from the starter switch. Proceed as
described in “With SmartKey”
(Y page 111).
X Depress the brake pedal during the starting
procedure.
X Do not depress the accelerator pedal.
X Gasoline engine: Press the KEYLESS-GO
start/stop button once.
The engine starts automatically.
X Diesel engine: Press the KEYLESS-GO
start/stop button once.
The engine preglows and starts
automatically.
i If the engine is at operating temperature,
the time the engine needs to preglow is
reduced.
Starting difficulties !
Remember that extended starting
attempts can drain the battery. Driving and parking
111Controls in detail
251_AKB; 4; 52, en-US
d2ureepe, Version: 2.11.8.1 2009-03-23T09:22:52+01:00 - Seite 111 Z