2010 MERCEDES-BENZ R320 automatic transmission
[x] Cancel search: automatic transmissionPage 127 of 364
X
Press button V or U repeatedly to
pass through each menu one after the
other.
X Press button * or & repeatedly to
pass through each function display, one
after the other, in the current menu.
In the Settings menu, instead of functions,
you will find a number of submenus for calling
up and changing settings. For instructions on
using these submenus, see “Settings menu”
(Y page 130).
The number of menus available in the system
depends on which optional equipment is
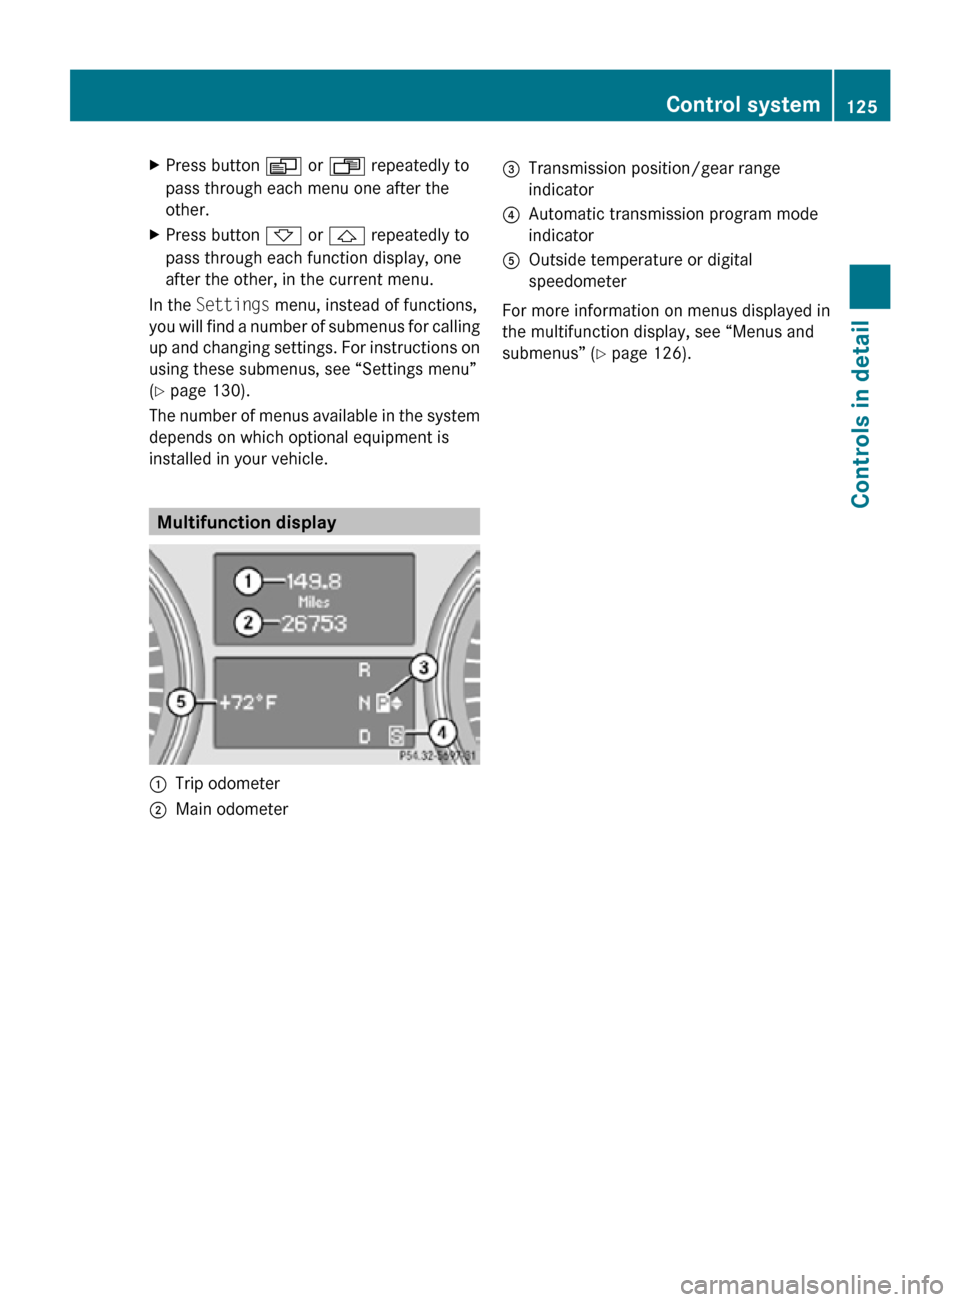
installed in your vehicle. Multifunction display
:
Trip odometer
; Main odometer =
Transmission position/gear range
indicator
? Automatic transmission program mode
indicator
A Outside temperature or digital
speedometer
For more information on menus displayed in
the multifunction display, see “Menus and
submenus” (Y page 126). Control system
125Controls in detail
251_AKB; 4; 52, en-US
d2ureepe, Version: 2.11.8.1 2009-03-23T09:22:52+01:00 - Seite 125 Z
Page 145 of 364
G
Warning!
When the cruise control is braking, the brake
pedal is retracted (i.e. depressed
automatically). The pedals’ range of motion
must not be impeded by any obstacles:
R Do not place any objects in the footwell.
R Make sure that the floormats and carpets
are securely in place.
R Do not rest your foot underneath the brake
pedal, as it could otherwise be trapped.
You could otherwise cause an accident and
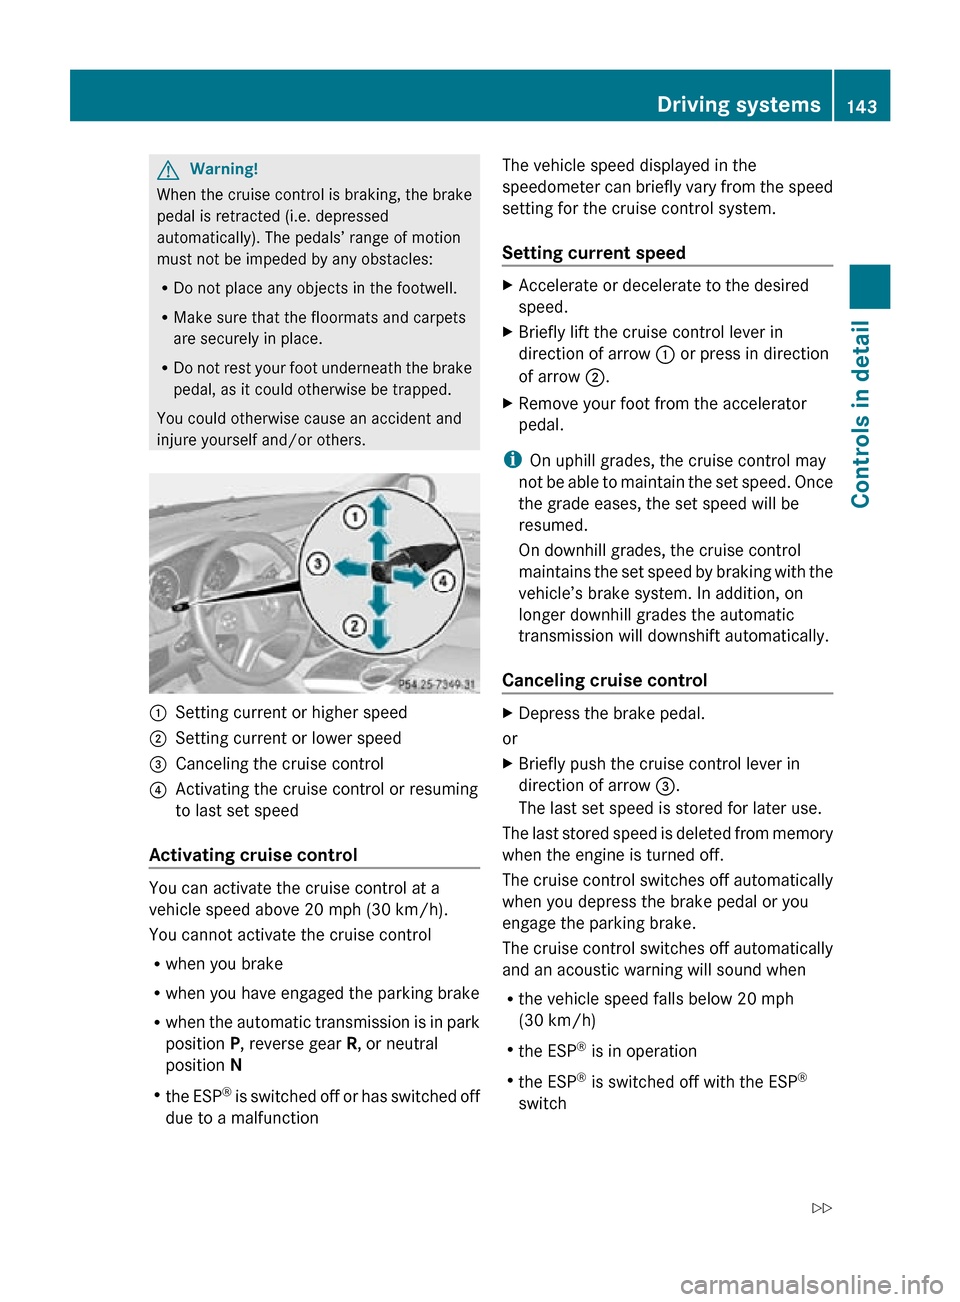
injure yourself and/or others. :
Setting current or higher speed
; Setting current or lower speed
= Canceling the cruise control
? Activating the cruise control or resuming
to last set speed
Activating cruise control You can activate the cruise control at a
vehicle speed above 20 mph (30 km/h).
You cannot activate the cruise control
R
when you brake
R when you have engaged the parking brake
R when the automatic transmission is in park
position P, reverse gear R, or neutral
position N
R the ESP ®
is switched off or has switched off
due to a malfunction The vehicle speed displayed in the
speedometer can briefly vary from the speed
setting for the cruise control system.
Setting current speed X
Accelerate or decelerate to the desired
speed.
X Briefly lift the cruise control lever in
direction of arrow : or press in direction
of arrow ;.
X Remove your foot from the accelerator
pedal.
i On uphill grades, the cruise control may
not be able to maintain the set speed. Once
the grade eases, the set speed will be
resumed.
On downhill grades, the cruise control
maintains the set speed by braking with the
vehicle’s brake system. In addition, on
longer downhill grades the automatic
transmission will downshift automatically.
Canceling cruise control X
Depress the brake pedal.
or
X Briefly push the cruise control lever in
direction of arrow =.
The last set speed is stored for later use.
The last stored speed is deleted from memory
when the engine is turned off.
The cruise control switches off automatically
when you depress the brake pedal or you
engage the parking brake.
The cruise control switches off automatically
and an acoustic warning will sound when
R the vehicle speed falls below 20 mph
(30 km/h)
R the ESP ®
is in operation
R the ESP ®
is switched off with the ESP ®
switch Driving systems
143Controls in detail
251_AKB; 4; 52, en-US
d2ureepe, Version: 2.11.8.1 2009-03-23T09:22:52+01:00 - Seite 143 Z
Page 146 of 364
R
the ESP ®
has switched off due to a
malfunction
R you shift the automatic transmission into
neutral position N while driving
Observe additional messages in the
multifunction display that may appear.
Depressing the accelerator pedal does not
deactivate the cruise control. After a brief
acceleration (e.g. for passing), the cruise
control will resume the last set speed.
Changing the set speed G
Warning!
Keep in mind that it may take a brief moment
until the vehicle has made the necessary
adjustments.
Increase
or decrease the set vehicle speed to
a value that the prevailing road conditions and
legal speed limits permit. Otherwise, sudden
and unexpected acceleration or deceleration
of the vehicle could cause an accident and/
or serious injury to you and others.
You can increase or decrease the set speed
in 1 mph (Canada: 1 km/h) increments or in
5 mph (Canada: 10 km/h) increments.
When you use the cruise control lever to
decelerate, the brake system will brake the
vehicle automatically if the engine’s braking
power does not brake the vehicle sufficiently.
Adjustment in 1 mph (Canada:
1 km/h) increments
i The set speed value is increased or
decreased in 1 mph (Canada: 1 km/h)
increments each time you lift or press the
cruise control lever up or down to the
resistance point. X
Increasing: Briefly lift the cruise control
lever
up to the resistance point in direction
of arrow :.
X Decreasing: Briefly press the cruise
control lever down to the resistance point
in direction of arrow ;.
X Release the cruise control lever.
The new speed is set and the vehicle will
accelerate or decelerate.
Adjustment in 5 mph (Canada:
10 km/h) increments
i The set speed value is increased or
decreased in 5 mph (Canada:
10 km/h)
increments each time you lift or press the
cruise control lever up or down past the
resistance point.
X Increasing: Briefly lift the cruise control
lever up past the resistance point in
direction of arrow :.
X Decreasing: Briefly press the cruise
control lever down past the resistance
point in direction of arrow ;.
X Release the cruise control lever.
The new speed is set and the vehicle will
accelerate
or decelerate. Keep in mind that
it may take a brief moment until the vehicle
has reached the set speed.
Setting stored speed (Resume
function) G
Warning!
The set speed stored in memory should only
be set again if prevailing road conditions and
legal speed limits permit. Possible
acceleration or deceleration differences
arising from returning to the preset speed
could
cause an accident and/or serious injury
to you and others. 144
Driving systems
Controls in detail
251_AKB; 4; 52, en-US
d2ureepe,
Version: 2.11.8.1 2009-03-23T09:22:52+01:00 - Seite 144
Page 151 of 364
R
when the automatic transmission is in park
position P, reverse gear R, or neutral
position N
R when the ESP ®
is switched off or has
switched off due to a malfunction
The vehicle speed displayed on the
speedometer can briefly vary from the speed
setting on the Distronic system.
Setting the current speed X
Accelerate or decelerate to the desired
speed.
X Briefly lift the cruise control lever in
direction of arrow : or depress in
direction of arrow ; (Y page 148).
X Remove your foot from the accelerator
pedal.
i If you do not take your foot off of the
accelerator pedal and continue to
accelerate
past the set speed, the following
message will appear in the multifunction
display:
DISTRONIC Override
The distance to a slower moving vehicle in
front of you will not be set. Your vehicle
speed will then be determined only by the
accelerator pedal position.
Changing the set speed G
Warning!
Keep in mind that it may take a brief moment
until the vehicle has made the necessary
adjustments.
Increase
or decrease the set vehicle speed to
a value that the prevailing road conditions and
legal speed limits permit. Otherwise, sudden
and unexpected acceleration or deceleration
of the vehicle could cause an accident and/
or serious injury to you and others.
You can increase or decrease the set speed
in 1 mph (Canada: 1 km/h) increments or in
5 mph (Canada: 10 km/h) increments. When you use the cruise control lever to
decelerate, the brake system will brake the
vehicle automatically if the engine’s braking
power
does not brake the vehicle sufficiently.
Adjustment in 1 mph (Canada:
1 km/h) increments
i The set speed value is increased or
decreased in 1 mph (Canada: 1 km/h)
increments each time you lift or press the
cruise control lever up or down to the
resistance point.
X Increasing: Briefly lift the cruise control
lever
up to the resistance point in direction
of arrow : (Y page 148).
X Decreasing: Briefly press the cruise
control lever down to the resistance point
in direction of arrow ; (Y page 148).
X Release the cruise control lever.
The new speed is set and the vehicle will
accelerate or decelerate.
Adjustment in 5 mph (Canada:
10 km/h) increments
i The set speed value is increased or
decreased in 5 mph (Canada:
10 km/h)
increments each time you lift or press the
cruise control lever up or down past the
resistance point.
X Increasing: Briefly lift the cruise control
lever up past the resistance point in
direction of arrow : (Y page 148).
X Decreasing: Briefly press the cruise
control lever down past the resistance
point in direction of arrow ;
(Y page 148).
X Release the cruise control lever.
The new speed is set and the vehicle will
accelerate
or decelerate. Keep in mind that
it may take a brief moment until the vehicle
has reached the set speed. Driving systems
149
Controls in detail
251_AKB; 4; 52, en-US
d2ureepe, Version: 2.11.8.1 2009-03-23T09:22:52+01:00 - Seite 149 Z
Page 152 of 364
Setting stored speed (Resume function)
G
Warning!
The set speed stored in memory should only
be set again if prevailing road conditions and
legal speed limits permit. Possible
acceleration or deceleration differences
arising from returning to the preset speed
could
cause an accident and/or serious injury
to you and others.
X Briefly pull the cruise control lever in
direction of arrow ? (Y page 148).
If no speed is stored, the current speed is
set and stored.
X Remove your foot from the accelerator
pedal.
Deactivating Distronic X
Depress the brake pedal.
or
X Briefly push the cruise control lever in
direction of arrow = (Y page 148).
The cruise control speed segments in the
speedometer dial will go out and the
following message appears briefly in the
multifunction display: DISTRONIC Off
The last set speed is stored for later use.
The last stored speed is deleted from memory
when the engine is turned off.
The Distronic switches off automatically
when you depress the brake pedal or you
engage the parking brake. In this case, the
cruise control speed segments in the
speedometer dial will go out.
The
Distronic also switches off automatically
when
R the vehicle speed falls below 20 mph
(30 km/h)
R the ESP ®
is in operation
R the ESP ®
is switched off with the ESP ®
switch R
the ESP ®
has switched off due to a
malfunction
R you shift the automatic transmission into
neutral position N while driving
The cruise control speed segments in the
speedometer dial goes out and an acoustic
warning will sound. Observe additional
messages in the multifunction display that
may appear. G
Warning!
Distronic switches off and releases the brakes
when the vehicle decelerates below the
minimum speed of 20 mph (30 km/h) by
operation of the system. At that time the
driver must apply the brakes in order to
reduce vehicle speed further or bring it to a
stop.
Depressing the accelerator pedal does not
deactivate the Distronic. After a brief
acceleration (e.g. for passing), the Distronic
will resume the last set speed.
Setting the following distance in
Distronic You can set the specified following distance
for Distronic by varying the time setting
between
1.0 and 2.0 seconds. Using this time
setting and the current speed of your vehicle,
Distronic calculates and sets the required
following distance to the preceding vehicle.
The set distance will be shown in the
multifunction display. G
Warning!
It is up to the driver to exercise discretion to
select the appropriate setting given road
conditions, traffic, driver’s preferred driving
style and applicable laws and driving
recommendations
for safe following distance.150
Driving systems
Controls in detail
251_AKB; 4; 52, en-US
d2ureepe,
Version: 2.11.8.1 2009-03-23T09:22:52+01:00 - Seite 150
Page 155 of 364
X
Activating/deactivating: Activate or
deactivate the distance warning function in
the control system (Y page 138).
When activated, the distance warning
function indicator Ä appears in the
multifunction display. Hill-start assist system
G
Warning!
The hill-start assist system is not designed to
function as a parking brake. It does not
prevent the vehicle from moving when parked
on an incline.
Always engage the parking brake in addition
to shifting the automatic transmission into
park position P.
On uphill grades, the hill-start assist system
maintains the pressure in the brake system
for approximately 1 second after you have
released the brake pedal. Therefore, you can
start off smoothly without the vehicle moving
immediately after releasing the brake pedal.
X Depress the brake pedal.
X Shift the automatic transmission into drive
position D or reverse gear R.
X Release the brake pedal.
X Carefully depress the accelerator pedal.
The hill-start assist system is inactive
R when starting off on a level road or downhill
grades
R with the automatic transmission in neutral
position N
R with the parking brake engaged
R if the ESP ®
has switched off due to a
malfunction Rear-axle level control
The rear-axle level control adjusts the vehicle
level for the rear axle. The rear-axle level
control is beneficial because it keeps the vehicle level at the rear axle constant,
independent of the load.
i
Observe the information on towing a
trailer, see “Trailer towing” ( Y page 256). AIRMATIC
The AIRMATIC lets you select the chassis and
suspension setup. The chassis and
suspension setup adjusts the damping
behavior and the ride height for your vehicle.
The AIRMATIC consists of two components.
The Adaptive Damping System (ADS)
(Y page 153) and the vehicle level control
(Y page 154). Adaptive Damping System (ADS)
The Adaptive Damping System (ADS) is
controlled electronically and operates
continuously. It adjusts the damping
characteristics to the current operating and
driving conditions. The damping is adjusted
individually for each wheel. Driving safety and
tire comfort are increased.
The fine tuning of the damping is dependent
on:
R your driving style
R road surface conditions
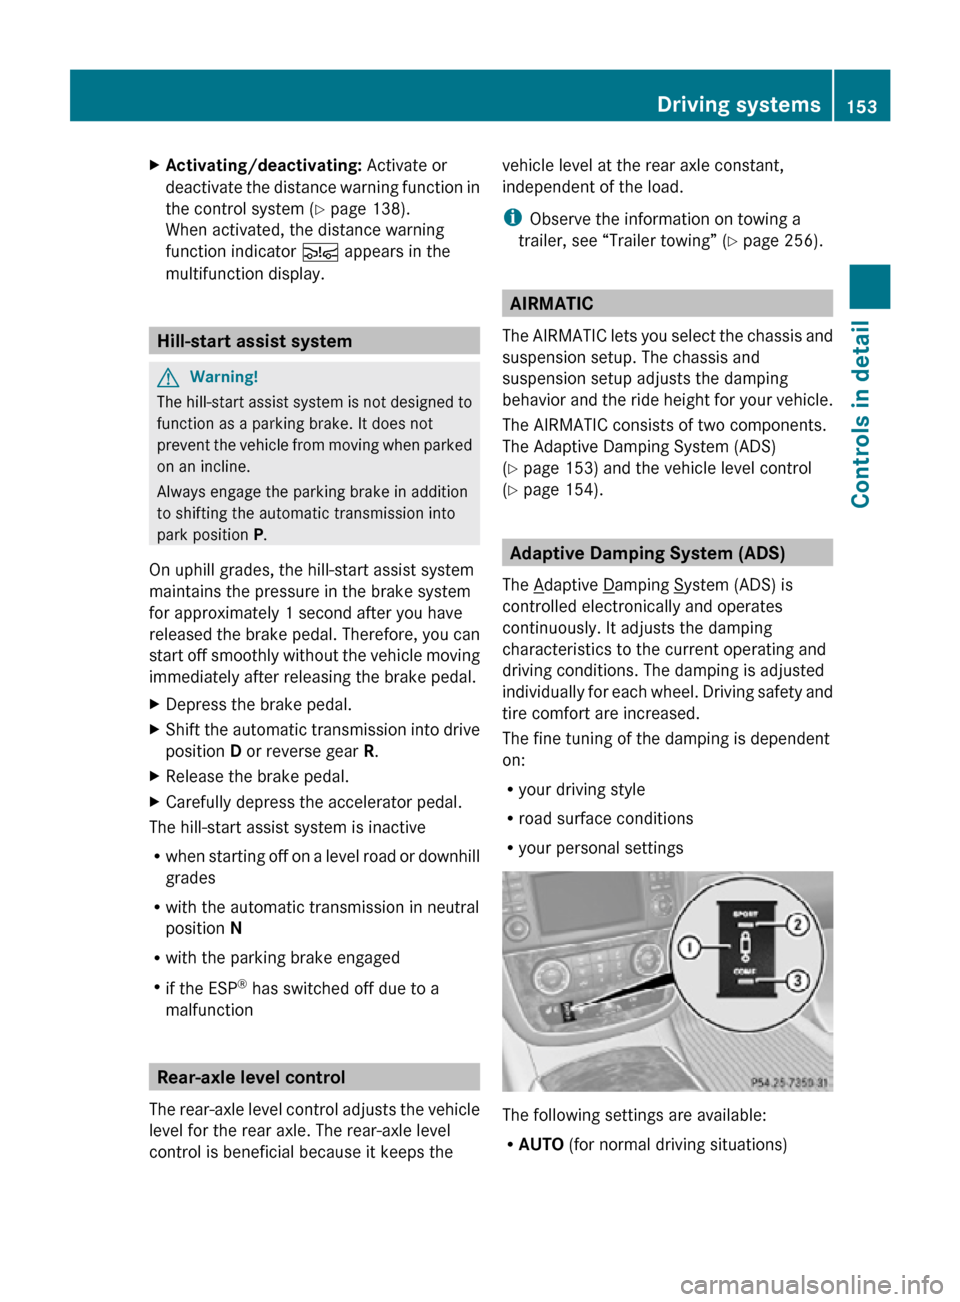
R your personal settings The following settings are available:
R
AUTO (for normal driving situations) Driving systems
153Controls in detail
251_AKB; 4; 52, en-US
d2ureepe, Version: 2.11.8.1 2009-03-23T09:22:52+01:00 - Seite 153 Z
Page 159 of 364
distance between the vehicle and an obstacle
visually and audibly.
The Parktronic system is activated
automatically when
R
you switch on the ignition
and
R you release the parking brake
and
R the automatic transmission is in drive
position D, reverse gear R, or neutral
position N
The Parktronic system deactivates at speeds
above approximately 11 mph (18 km/h). At
lower speeds, the Parktronic system
activates again.
The Parktronic system also deactivates when
you shift the automatic transmission into
park position P or engage the parking brake.
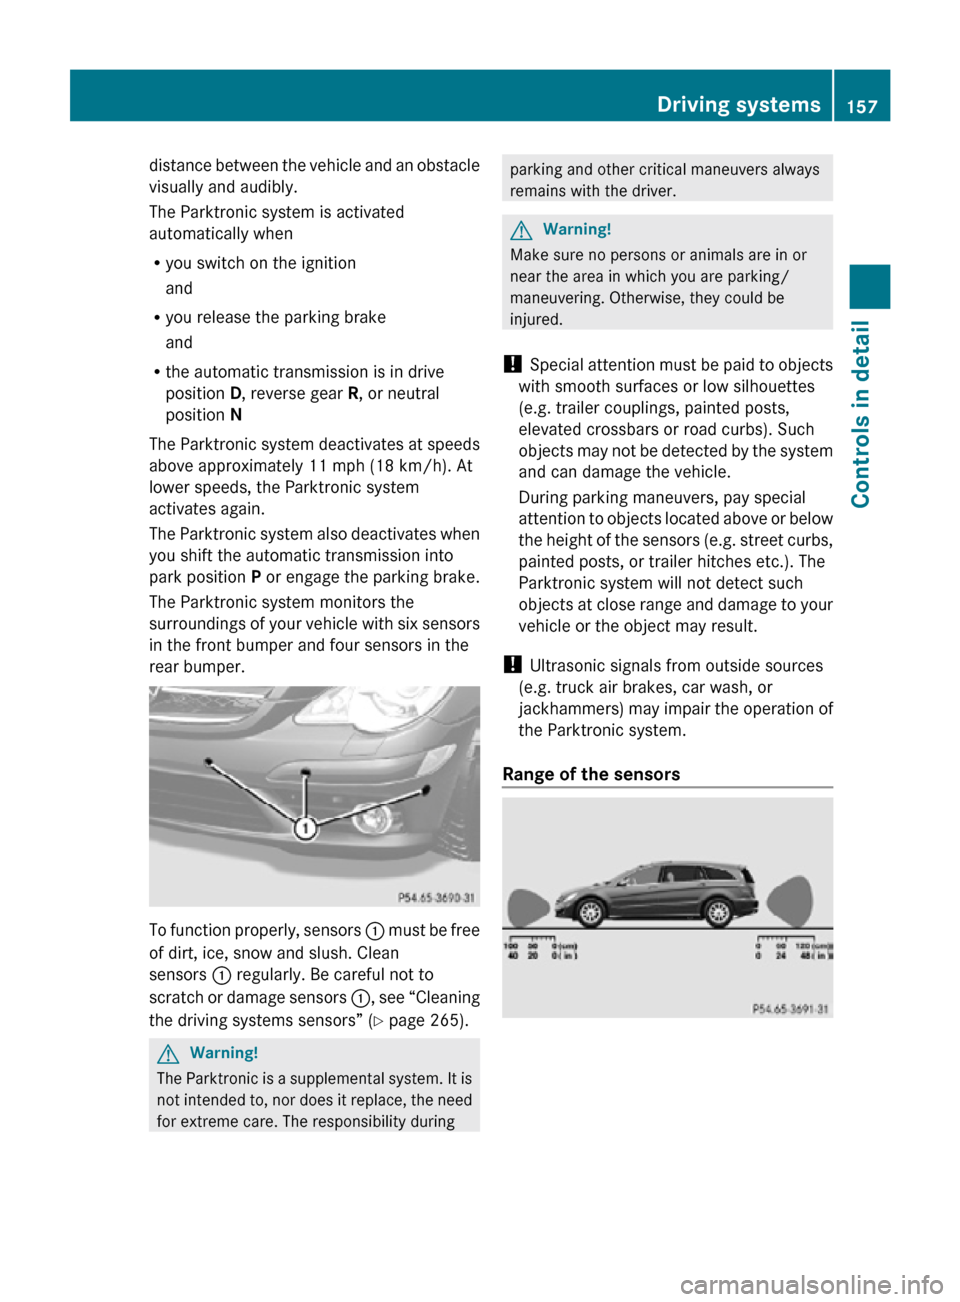
The Parktronic system monitors the
surroundings of your vehicle with six sensors
in the front bumper and four sensors in the
rear bumper. To function properly, sensors
: must be free
of dirt, ice, snow and slush. Clean
sensors : regularly. Be careful not to
scratch or damage sensors :, see “Cleaning
the driving systems sensors” (Y page 265). G
Warning!
The Parktronic is a supplemental system. It is
not intended to, nor does it replace, the need
for extreme care. The responsibility during parking and other critical maneuvers always
remains with the driver.
G
Warning!
Make sure no persons or animals are in or
near the area in which you are parking/
maneuvering. Otherwise, they could be
injured.
! Special attention must be paid to objects
with smooth surfaces or low silhouettes
(e.g. trailer couplings, painted posts,
elevated crossbars or road curbs). Such
objects may not be detected by the system
and can damage the vehicle.
During parking maneuvers, pay special
attention to objects located above or below
the height of the sensors (e.g. street curbs,
painted posts, or trailer hitches etc.). The
Parktronic system will not detect such
objects at close range and damage to your
vehicle or the object may result.
! Ultrasonic signals from outside sources
(e.g. truck air brakes, car wash, or
jackhammers) may impair the operation of
the Parktronic system.
Range of the sensors Driving systems
157Controls in detail
251_AKB; 4; 52, en-US
d2ureepe, Version: 2.11.8.1 2009-03-23T09:22:52+01:00 - Seite 157 Z
Page 161 of 364
R
Front area: An intermittent acoustic
warning lasting a maximum of 2 seconds
will sound as the first red distance segment
illuminates. A constant acoustic warning
lasting a maximum of 2 seconds will sound
for the second red distance segment. The
signal is canceled when the automatic
transmission is shifted into park
position P or the parking brake is engaged.
R Rear area: An intermittent acoustic
warning lasting a maximum of 2 seconds
will sound as the first red distance segment
illuminates. A constant acoustic warning
lasting a maximum of 2 seconds will sound
for the second red distance segment. The
signal is canceled when the automatic
transmission is shifted into drive
position D, or park position P, or the
parking brake is engaged.
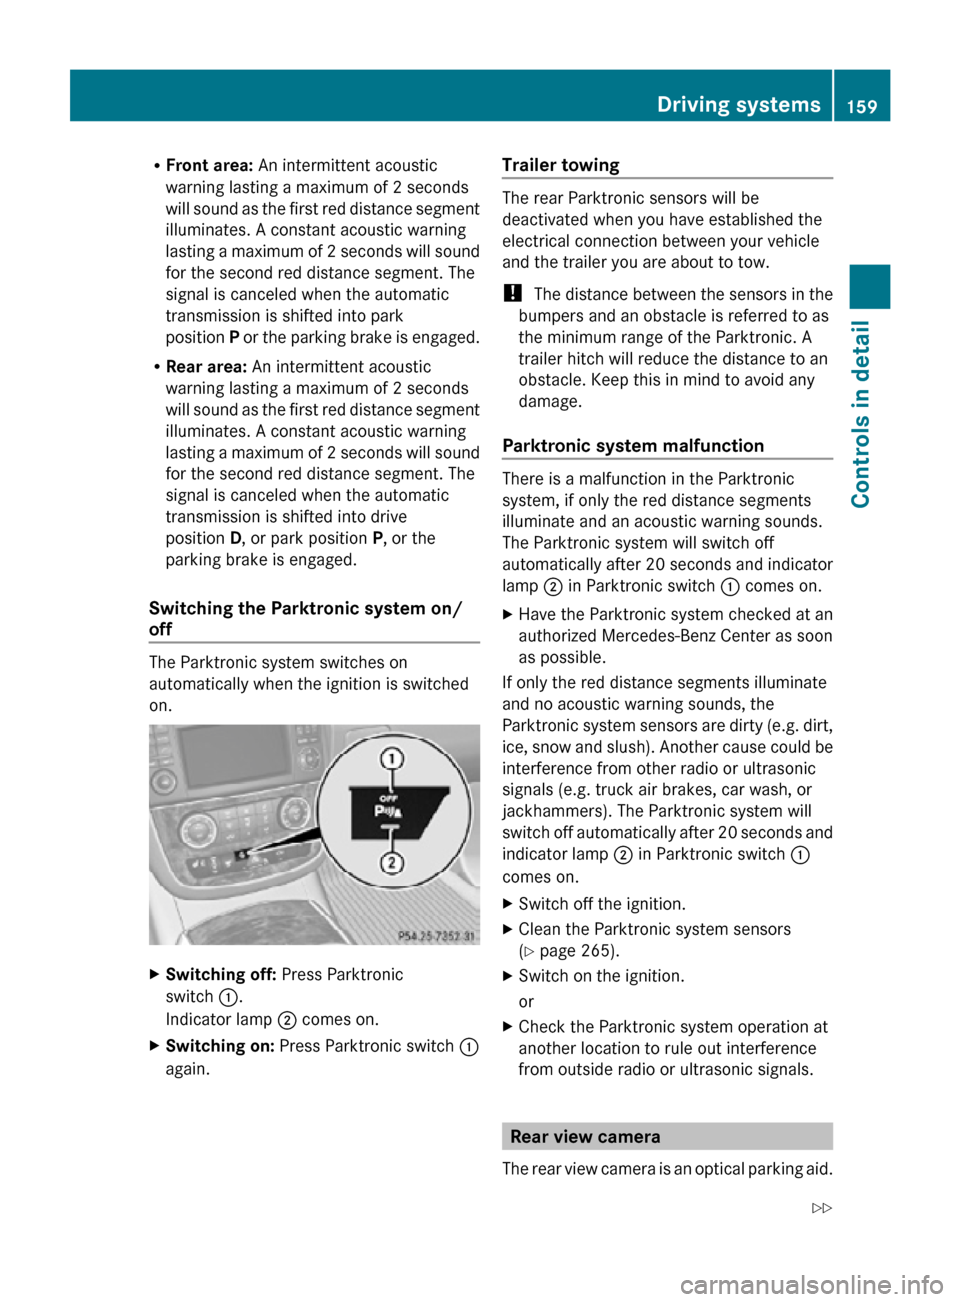
Switching the Parktronic system on/
off The Parktronic system switches on
automatically when the ignition is switched
on.
X
Switching off: Press Parktronic
switch :.
Indicator lamp ; comes on.
X Switching on: Press Parktronic switch :
again. Trailer towing The rear Parktronic sensors will be
deactivated when you have established the
electrical connection between your vehicle
and the trailer you are about to tow.
!
The distance between the sensors in the
bumpers and an obstacle is referred to as
the minimum range of the Parktronic. A
trailer hitch will reduce the distance to an
obstacle. Keep this in mind to avoid any
damage.
Parktronic system malfunction There is a malfunction in the Parktronic
system, if only the red distance segments
illuminate and an acoustic warning sounds.
The Parktronic system will switch off
automatically after 20 seconds and indicator
lamp
; in Parktronic switch : comes on.
X Have the Parktronic system checked at an
authorized Mercedes-Benz Center as soon
as possible.
If only the red distance segments illuminate
and no acoustic warning sounds, the
Parktronic system sensors are dirty (e.g. dirt,
ice, snow and slush). Another cause could be
interference from other radio or ultrasonic
signals (e.g. truck air brakes, car wash, or
jackhammers). The Parktronic system will
switch off automatically after 20 seconds and
indicator lamp ; in Parktronic switch :
comes on.
X Switch off the ignition.
X Clean the Parktronic system sensors
(Y page 265).
X Switch on the ignition.
or
X Check the Parktronic system operation at
another location to rule out interference
from outside radio or ultrasonic signals. Rear view camera
The rear view camera is an optical parking aid. Driving systems
159Controls in detail
251_AKB; 4; 52, en-US
d2ureepe, Version: 2.11.8.1 2009-03-23T09:22:52+01:00 - Seite 159 Z