2010 MERCEDES-BENZ R320 remove seats
[x] Cancel search: remove seatsPage 193 of 364
X
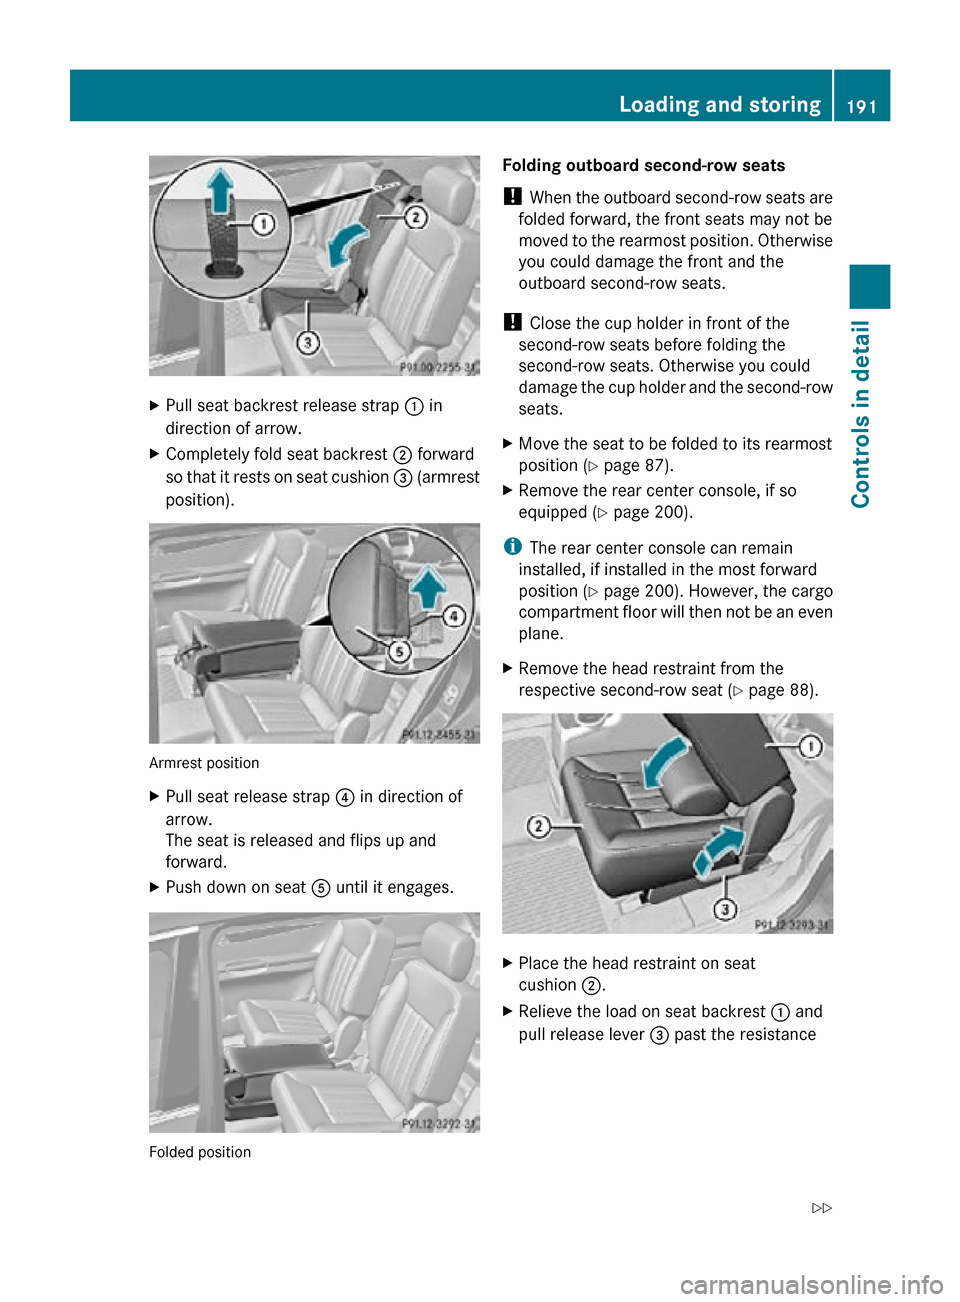
Pull seat backrest release strap : in
direction of arrow.
X Completely fold seat backrest ; forward
so that it rests on seat cushion = (armrest
position). Armrest position
X
Pull seat release strap ? in direction of
arrow.
The seat is released and flips up and
forward.
X Push down on seat A until it engages. Folded position Folding outboard second-row seats
!
When the outboard second-row seats are
folded forward, the front seats may not be
moved to the rearmost position. Otherwise
you could damage the front and the
outboard second-row seats.
! Close the cup holder in front of the
second-row seats before folding the
second-row seats. Otherwise you could
damage the cup holder and the second-row
seats.
X Move the seat to be folded to its rearmost
position (Y page 87).
X Remove the rear center console, if so
equipped ( Y page 200).
i The rear center console can remain
installed, if installed in the most forward
position ( Y page 200). However, the cargo
compartment floor will then not be an even
plane.
X Remove the head restraint from the
respective second-row seat (Y page 88). X
Place the head restraint on seat
cushion ;.
X Relieve the load on seat backrest : and
pull release lever = past the resistance Loading and storing
191Controls in detail
251_AKB; 4; 52, en-US
d2ureepe, Version: 2.11.8.1 2009-03-23T09:22:52+01:00 - Seite 191 Z
Page 197 of 364
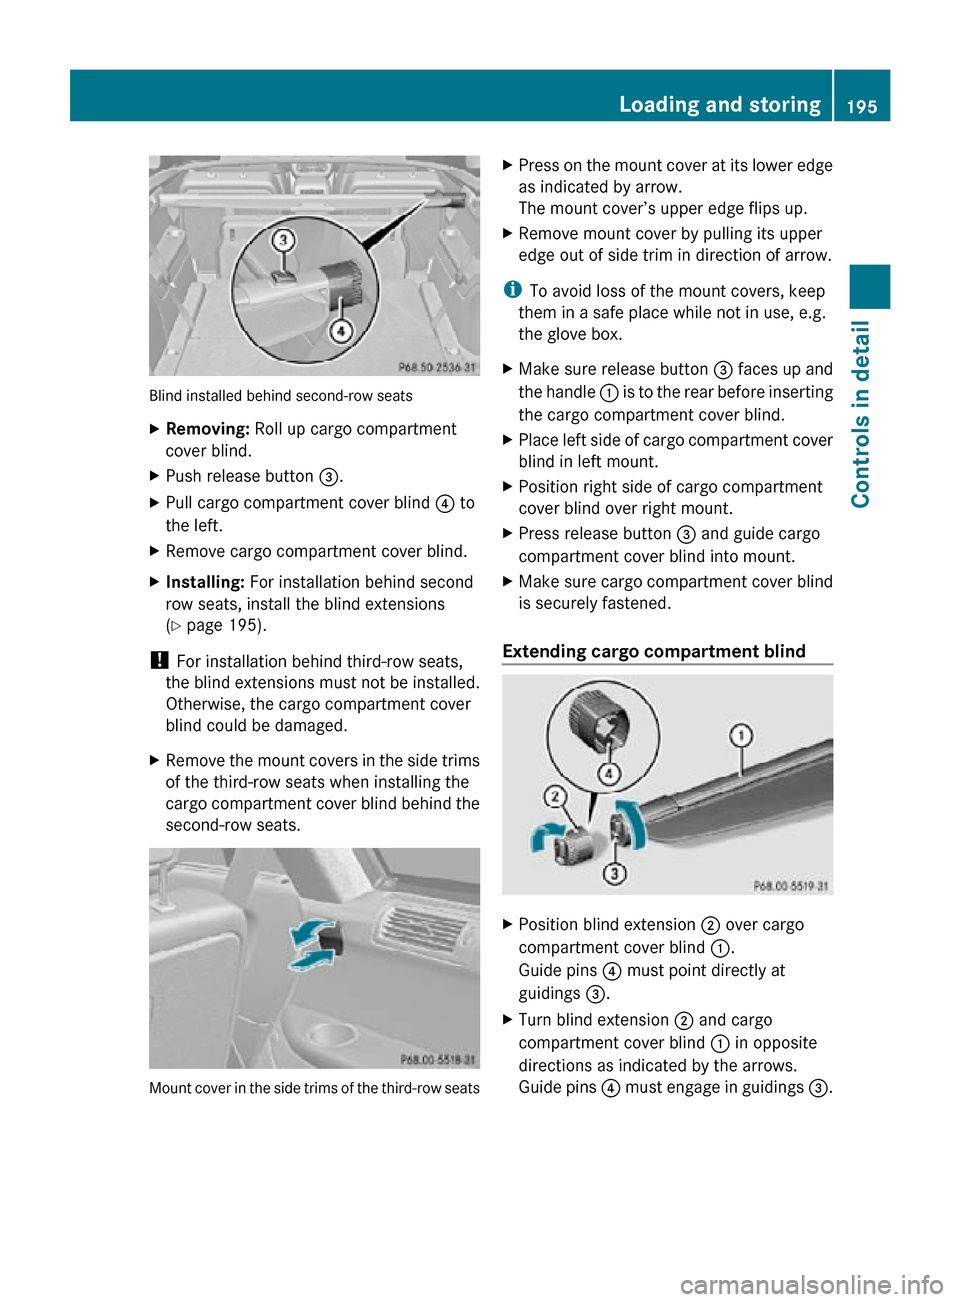
Blind installed behind second-row seats
X
Removing: Roll up cargo compartment
cover blind.
X Push release button =.
X Pull cargo compartment cover blind ? to
the left.
X Remove cargo compartment cover blind.
X Installing: For installation behind second
row seats, install the blind extensions
(Y page 195).
! For installation behind third-row seats,
the blind extensions must not be installed.
Otherwise, the cargo compartment cover
blind could be damaged.
X Remove the mount covers in the side trims
of the third-row seats when installing the
cargo compartment cover blind behind the
second-row seats. Mount cover in the side trims of the third-row seats X
Press on the mount cover at its lower edge
as indicated by arrow.
The mount cover’s upper edge flips up.
X Remove mount cover by pulling its upper
edge out of side trim in direction of arrow.
i To avoid loss of the mount covers, keep
them in a safe place while not in use, e.g.
the glove box.
X Make sure release button = faces up and
the handle : is to the rear before inserting
the cargo compartment cover blind.
X Place left side of cargo compartment cover
blind in left mount.
X Position right side of cargo compartment
cover blind over right mount.
X Press release button = and guide cargo
compartment cover blind into mount.
X Make sure cargo compartment cover blind
is securely fastened.
Extending cargo compartment blind X
Position blind extension ; over cargo
compartment cover blind :.
Guide pins ? must point directly at
guidings =.
X Turn blind extension ; and cargo
compartment cover blind : in opposite
directions as indicated by the arrows.
Guide pins ? must engage in guidings =. Loading and storing
195Controls in detail
251_AKB; 4; 52, en-US
d2ureepe, Version: 2.11.8.1 2009-03-23T09:22:52+01:00 - Seite 195 Z
Page 202 of 364
i
If your vehicle is equipped with a 3-zone
automatic climate control, the storage
compartments are replaced by adjustable
air vents (Y page 164). Rear center console
The rear center console is located between
the second-row seats.
The rear center console contains a storage
compartment (Y page 199) and a cup holder
(Y page 203).
i When fully expanding the cargo
compartment, the rear center console has
to be removed from the vehicle in order for
the cargo compartment floor to be an even
plane ( Y page 190).
Removing G
Warning!
Remove all containers that may be stored in
the cup holder of the rear center console.
Otherwise liquids could spill on vehicle
occupants and/or vehicle equipment. Hot
liquids spilled on vehicle occupants may
cause serious personal injury. Liquids spilled
on vehicle equipment may cause damage not
covered by the Mercedes-Benz Limited
Warranty.
! To prevent damage to the rear center
console and/or its components, make sure
the storage compartment is closed before
removing the rear center console.
i Remove all items from the rear armrest
storage compartment (Y page 199) of the
rear center console to reduce its weight. X
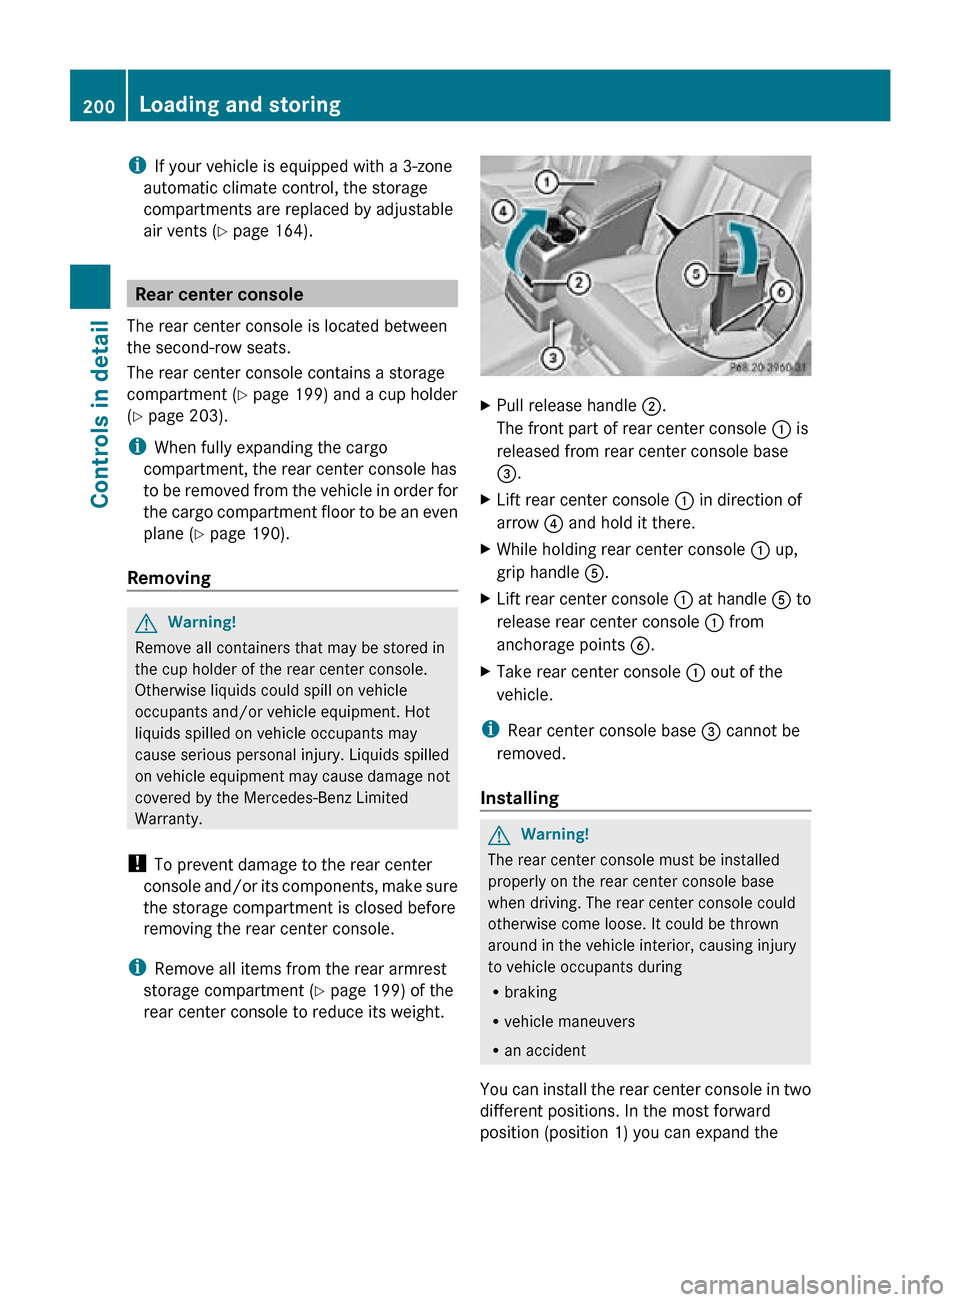
Pull release handle ;.
The front part of rear center console : is
released from rear center console base
=.
X Lift rear center console : in direction of
arrow ? and hold it there.
X While holding rear center console : up,
grip handle A.
X Lift rear center console : at handle A to
release rear center console : from
anchorage points B.
X Take rear center console : out of the
vehicle.
i Rear center console base = cannot be
removed.
Installing G
Warning!
The rear center console must be installed
properly on the rear center console base
when driving. The rear center console could
otherwise come loose. It could be thrown
around in the vehicle interior, causing injury
to vehicle occupants during
R braking
R vehicle maneuvers
R an accident
You can install the rear center console in two
different positions. In the most forward
position (position 1) you can expand the 200
Loading and storingControls in detail
251_AKB; 4; 52, en-US
d2ureepe,
Version: 2.11.8.1 2009-03-23T09:22:52+01:00 - Seite 200
Page 204 of 364
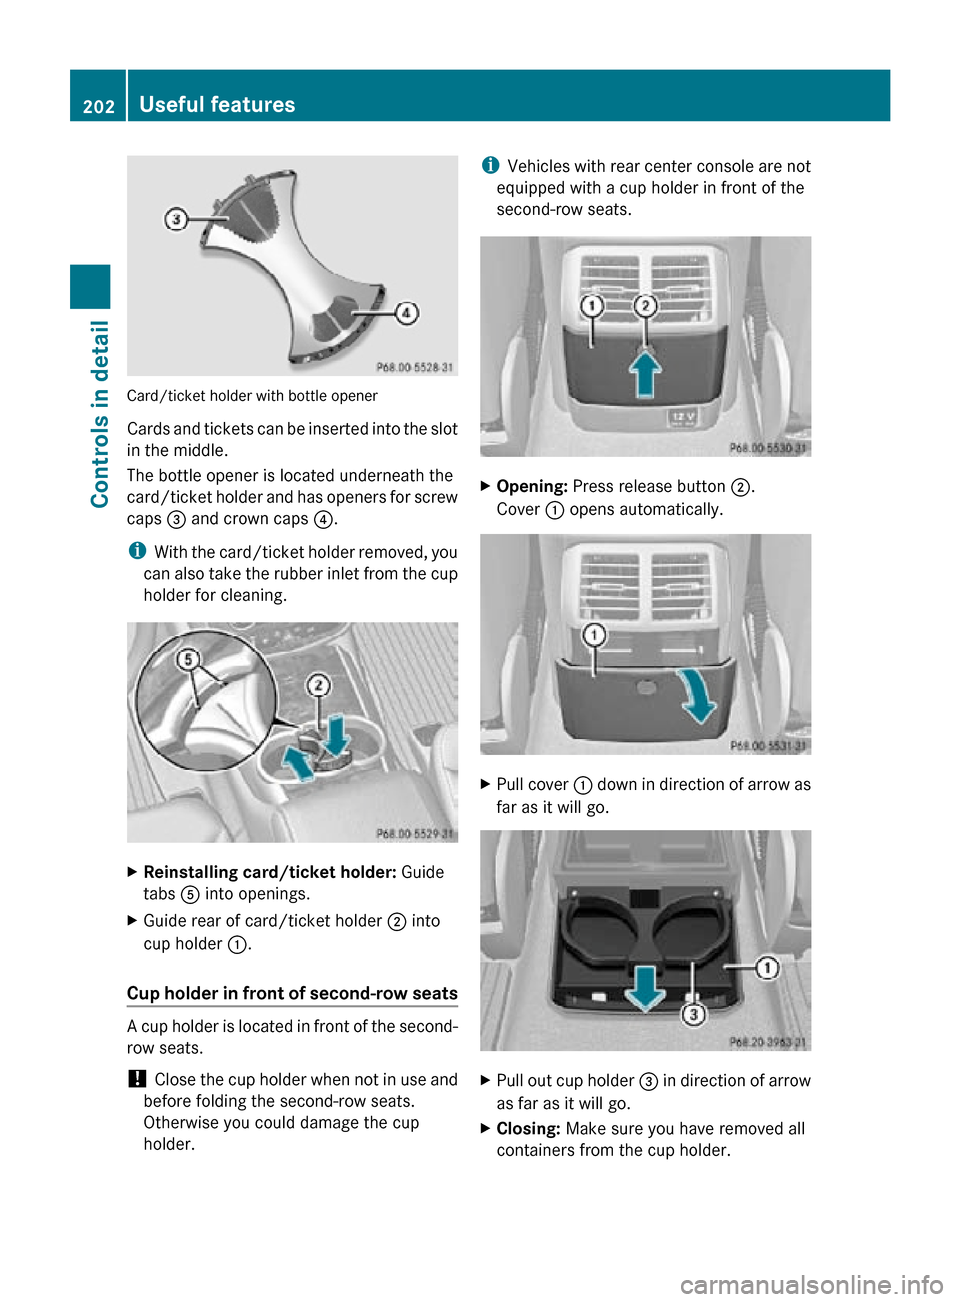
Card/ticket holder with bottle opener
Cards and tickets can be inserted into the slot
in the middle.
The bottle opener is located underneath the
card/ticket holder and has openers for screw
caps = and crown caps ?.
i With the card/ticket holder removed, you
can also take the rubber inlet from the cup
holder for cleaning. X
Reinstalling card/ticket holder: Guide
tabs A into openings.
X Guide rear of card/ticket holder ; into
cup holder :.
Cup holder in front of second-row seats A cup holder is located in front of the second-
row seats.
!
Close the cup holder when not in use and
before folding the second-row seats.
Otherwise you could damage the cup
holder. i
Vehicles with rear center console are not
equipped with a cup holder in front of the
second-row seats. X
Opening: Press release button ;.
Cover : opens automatically. X
Pull cover : down in direction of arrow as
far as it will go. X
Pull out cup holder = in direction of arrow
as far as it will go.
X Closing: Make sure you have removed all
containers from the cup holder. 202
Useful featuresControls in detail
251_AKB; 4; 52, en-US
d2ureepe,
Version: 2.11.8.1 2009-03-23T09:22:52+01:00 - Seite 202
Page 270 of 364
G
Warning!
Do not bleach or dye seat belts as this may
severely weaken them. In a crash they may
not be able to provide adequate protection.
Upholstery Using aftermarket seat covers or wearing
clothing that have the tendency to give off
coloring (e.g. when wet, etc.) may cause the
upholstery to become permanently
discolored. By lining the seats with a proper
intermediate
cover, contact-discoloration will
be prevented. G
Warning!
Only use seat or head restraint covers which
have
been tested and approved by Mercedes-
Benz for your vehicle model.
Using other seat or head restraint covers may
interfere with or prevent
R deployment of the front side impact air
bags
R deployment of the rear side impact air bags
R activation of the NECK-PRO active front
head restraints
Contact an authorized Mercedes-Benz Center
for availability.
Leather upholstery
Please note that leather upholstery is a
natural product and is therefore subject to a
natural aging process. Leather upholstery
may also react to certain ambient influences
such as high humidity or high temperature by
showing wrinkles for example.
X Wipe leather upholstery with a damp cloth
and
dry thoroughly or clean with Mercedes-
Benz approved Leather Care.
! To avoid damage to leather upholstery:
R Wipe with light pressure only.
R Do not clean with abrasive cleaning
agents
such as scouring milk or powder.
R Do not soak the leather upholstery. As leather is a natural product, it could
otherwise harden or become porous.
R Exercise particular care when cleaning
perforated leather as its underside
should not become wet.
MB Tex upholstery
X Use Mercedes-Benz approved Interior Care
onto a soft, lint-free cloth and apply with
light pressure for cleaning the upholstery.
Wood trims X
Only use water and a damp cloth to clean
wood trims in your vehicle.
! Do not use solvents like tar remover or
wheel cleaner nor polishes or waxes as
these may be abrasive.
Chrome-plated exhaust tip Regular cleaning and care of chrome-plated
exhaust tips will help to maintain their shine
and the classy appearance.
X
Use Mercedes-Benz approved Chrome
Polishing Paste each time the vehicle has
been
washed, especially during the winter.
! Do not use alkaline cleaners such as
wheel cleaners as they could cause
corrosion. 268
Vehicle care
Operation
251_AKB; 4; 52, en-US
d2ureepe,
Version: 2.11.8.1 2009-03-23T09:22:52+01:00 - Seite 268