2010 MERCEDES-BENZ R320 low beam
[x] Cancel search: low beamPage 101 of 364
The following lamps come on and go out
depending on the brightness of the ambient
light with the SmartKey in starter switch
position 1 or the KEYLESS-GO start/stop
button pressed once:
R
tail lamps
R parking lamps
R license plate lamps
R side marker lamps
When the engine is running, the low-beam
headlamps will also come on and turn off
automatically.
Canada
only: High-beam headlamps are only
available with the exterior lamp switch in
position L.
Daytime running lamp mode In Canada, the daytime running lamp mode is
mandatory
and therefore in a constant mode.
In the USA, the daytime running lamp mode
is deactivated by default.
X Activate the daytime running lamp mode
using the control system, see “Switching
daytime
running lamp mode on or off (USA
only)” (Y page 134).
X Turn the exterior lamp switch to position
$ or Ã.
When the engine is running, the low-beam
headlamps come on.
In low ambient lighting conditions, the
following lamps will come on additionally:
R
Tail lamps
R Parking lamps
R License plate lamps
R Side marker lamps
With the daytime running lamp mode
activated
and the engine running, you cannot
switch off the low-beam headlamps manually. Canada only
With the exterior lamp switch in position
$
or Ã, you cannot switch on the high-
beam headlamps.
The high-beam flasher is available at all times.
X For nighttime driving turn the exterior lamp
switch
to position L to permit activation
of the high-beam headlamps.
When the engine is running, and you
R shift from a driving position to neutral
position N or park position P with the
vehicle at a standstill, the low-beam
headlamps will go out with a delay of
3 minutes
R turn the exterior lamp switch to position
T, the low-beam headlamps, the tail
and
parking lamps, the license plate lamps
and the side marker lamps come on
R turn the exterior lamp switch to position
L, the manual headlamp mode has
priority over the daytime running lamp
mode
The corresponding exterior lamps come on
(Y page 97).
USA only
You can only switch on the high-beam
headlamps in low ambient lighting conditions.
The high-beam flasher is available at all times.
X For nighttime driving turn the exterior lamp
switch to position L or à to permit
activation of the high-beam headlamps.
When the engine is running, and you turn the
exterior lamp switch to position T or
L, the manual headlamp mode has
priority
over the daytime running lamp mode.
The corresponding exterior lamps come on
(Y page 97).
Fog lamps Fog lamps cannot be switched on with the
exterior lamp switch in position Ã. Lighting
99
Controls in detail
251_AKB; 4; 52, en-US
d2ureepe, Version: 2.11.8.1 2009-03-23T09:22:52+01:00 - Seite 99 Z
Page 102 of 364
G
Warning!
In low ambient lighting or foggy conditions,
only switch from position à to L with
the vehicle at a standstill in a safe location.
Switching from à to L will briefly
switch off the headlamps. Doing so while
driving in low ambient lighting conditions may
result in an accident.
Fog lamps will operate with the parking lamps
and/or the low-beam headlamps on. Fog
lamps should only be used in conjunction with
low-beam headlamps. Consult your State or
Province Motor Vehicle Regulations
regarding permissible lamp operation.
X Switch on the ignition.
X Turn the exterior lamp switch to position
T or L (Y page 97).
X Switching on front fog lamps: Pull out the
exterior lamp switch to first stop.
The green indicator lamp N in the
exterior lamp switch comes on.
X Switching on rear fog lamp: Pull out the
exterior lamp switch to second stop.
The rear fog lamp, the front fog lamps, the
green and the yellow indicator lamp R
in the exterior lamp switch come on.
X Switching off front fog lamps/rear fog
lamp: Push in the exterior lamp switch to
its stop.
Locator lighting and night security
illumination Locator lighting and night security
illumination are described in the “Control
system” section, see “Switching locator
lighting on or off” (Y page 135) and
“Switching night security illumination
(Headlamps delayed shut-off feature) on or
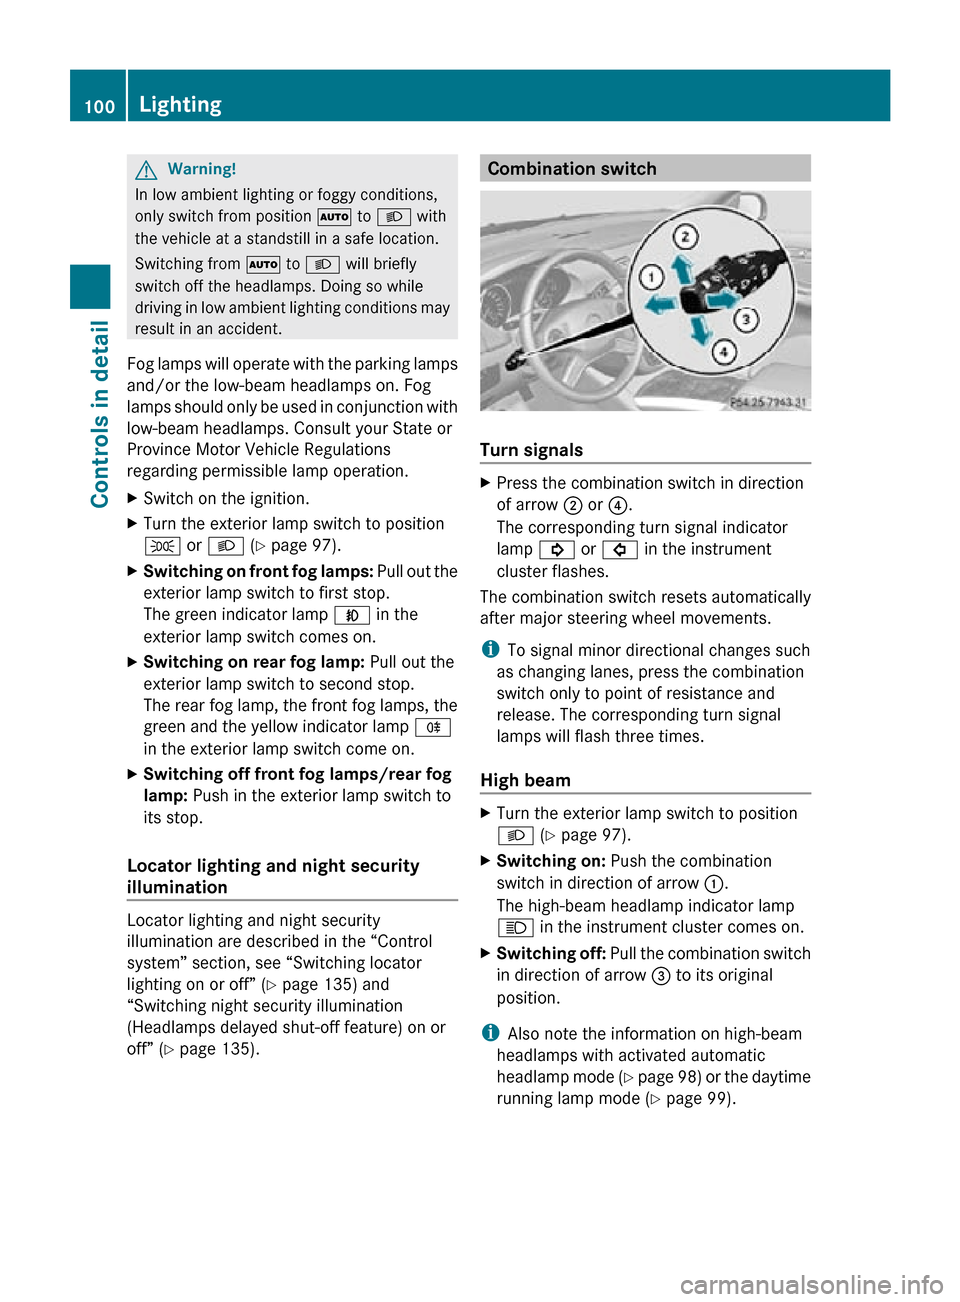
off” (Y page 135). Combination switch
Turn signals
X
Press the combination switch in direction
of arrow ; or ?.
The corresponding turn signal indicator
lamp ! or # in the instrument
cluster flashes.
The combination switch resets automatically
after major steering wheel movements.
i To signal minor directional changes such
as changing lanes, press the combination
switch only to point of resistance and
release. The corresponding turn signal
lamps will flash three times.
High beam X
Turn the exterior lamp switch to position
L (Y page 97).
X Switching on: Push the combination
switch in direction of arrow :.
The high-beam headlamp indicator lamp
K in the instrument cluster comes on.
X Switching off: Pull the combination switch
in direction of arrow = to its original
position.
i Also note the information on high-beam
headlamps with activated automatic
headlamp mode (Y page 98) or the daytime
running lamp mode ( Y page 99).100
LightingControls in detail
251_AKB; 4; 52, en-US
d2ureepe,
Version: 2.11.8.1 2009-03-23T09:22:52+01:00 - Seite 100
Page 103 of 364
High-beam flasher
X
Switching on: Pull the combination switch
briefly in direction of arrow =.Hazard warning flasher
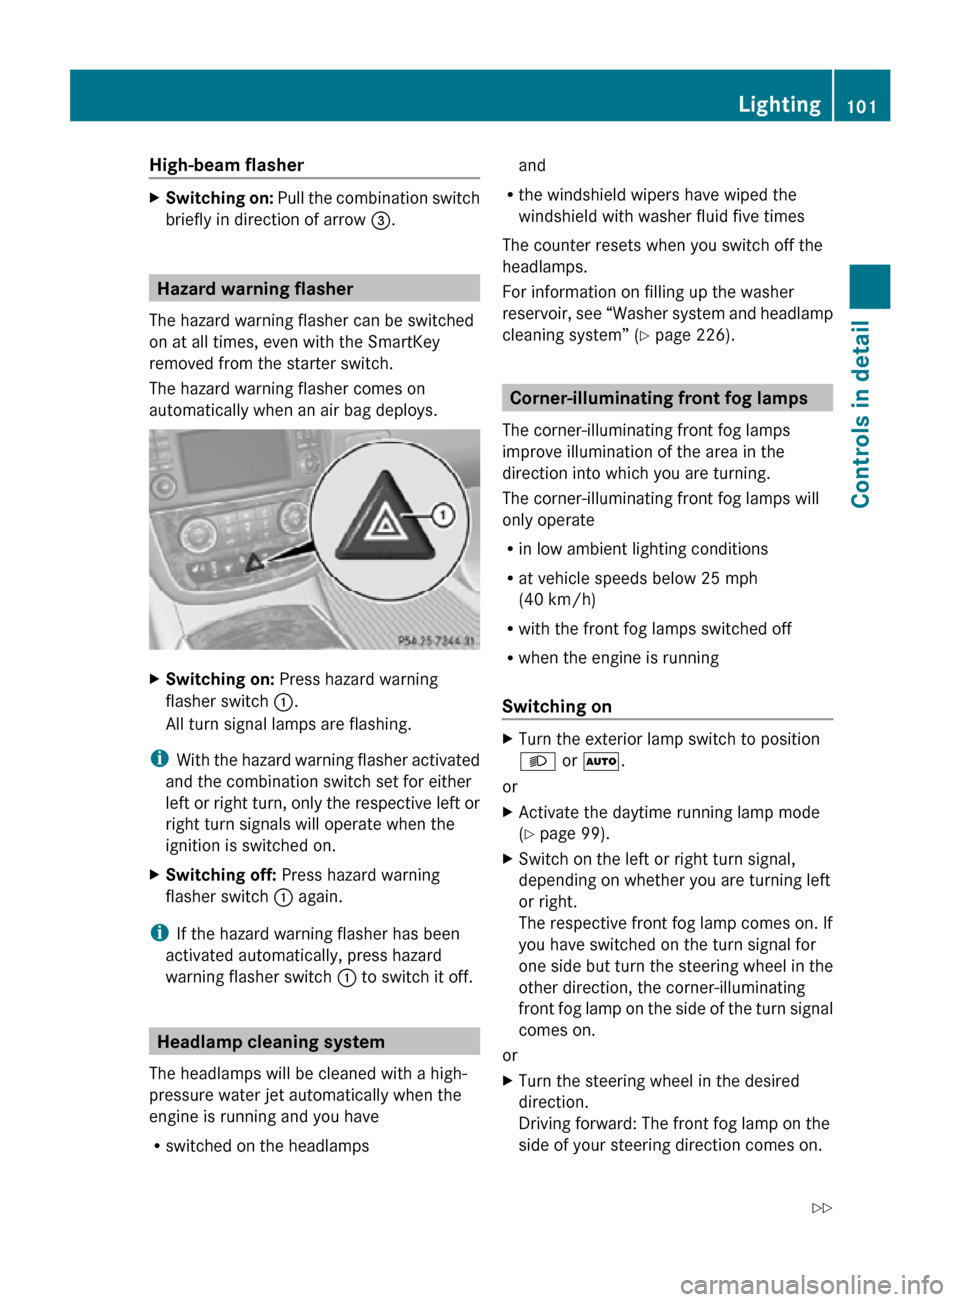
The hazard warning flasher can be switched
on at all times, even with the SmartKey
removed from the starter switch.
The hazard warning flasher comes on
automatically when an air bag deploys. X
Switching on: Press hazard warning
flasher switch :.
All turn signal lamps are flashing.
i With the hazard warning flasher activated
and the combination switch set for either
left or right turn, only the respective left or
right turn signals will operate when the
ignition is switched on.
X Switching off: Press hazard warning
flasher switch : again.
i If the hazard warning flasher has been
activated automatically, press hazard
warning flasher switch : to switch it off.Headlamp cleaning system
The headlamps will be cleaned with a high-
pressure water jet automatically when the
engine is running and you have
R switched on the headlamps and
R the windshield wipers have wiped the
windshield with washer fluid five times
The counter resets when you switch off the
headlamps.
For information on filling up the washer
reservoir, see “Washer system and headlamp
cleaning system” ( Y page 226). Corner-illuminating front fog lamps
The corner-illuminating front fog lamps
improve illumination of the area in the
direction into which you are turning.
The corner-illuminating front fog lamps will
only operate
R in low ambient lighting conditions
R at vehicle speeds below 25 mph
(40 km/h)
R with the front fog lamps switched off
R when the engine is running
Switching on X
Turn the exterior lamp switch to position
L or Ã.
or
X Activate the daytime running lamp mode
(Y page 99).
X Switch on the left or right turn signal,
depending on whether you are turning left
or right.
The respective front fog lamp comes on. If
you have switched on the turn signal for
one side but turn the steering wheel in the
other direction, the corner-illuminating
front fog lamp on the side of the turn signal
comes on.
or
X Turn the steering wheel in the desired
direction.
Driving forward: The front fog lamp on the
side of your steering direction comes on. Lighting
101Controls in detail
251_AKB; 4; 52, en-US
d2ureepe, Version: 2.11.8.1 2009-03-23T09:22:52+01:00 - Seite 101 Z
Page 137 of 364
X
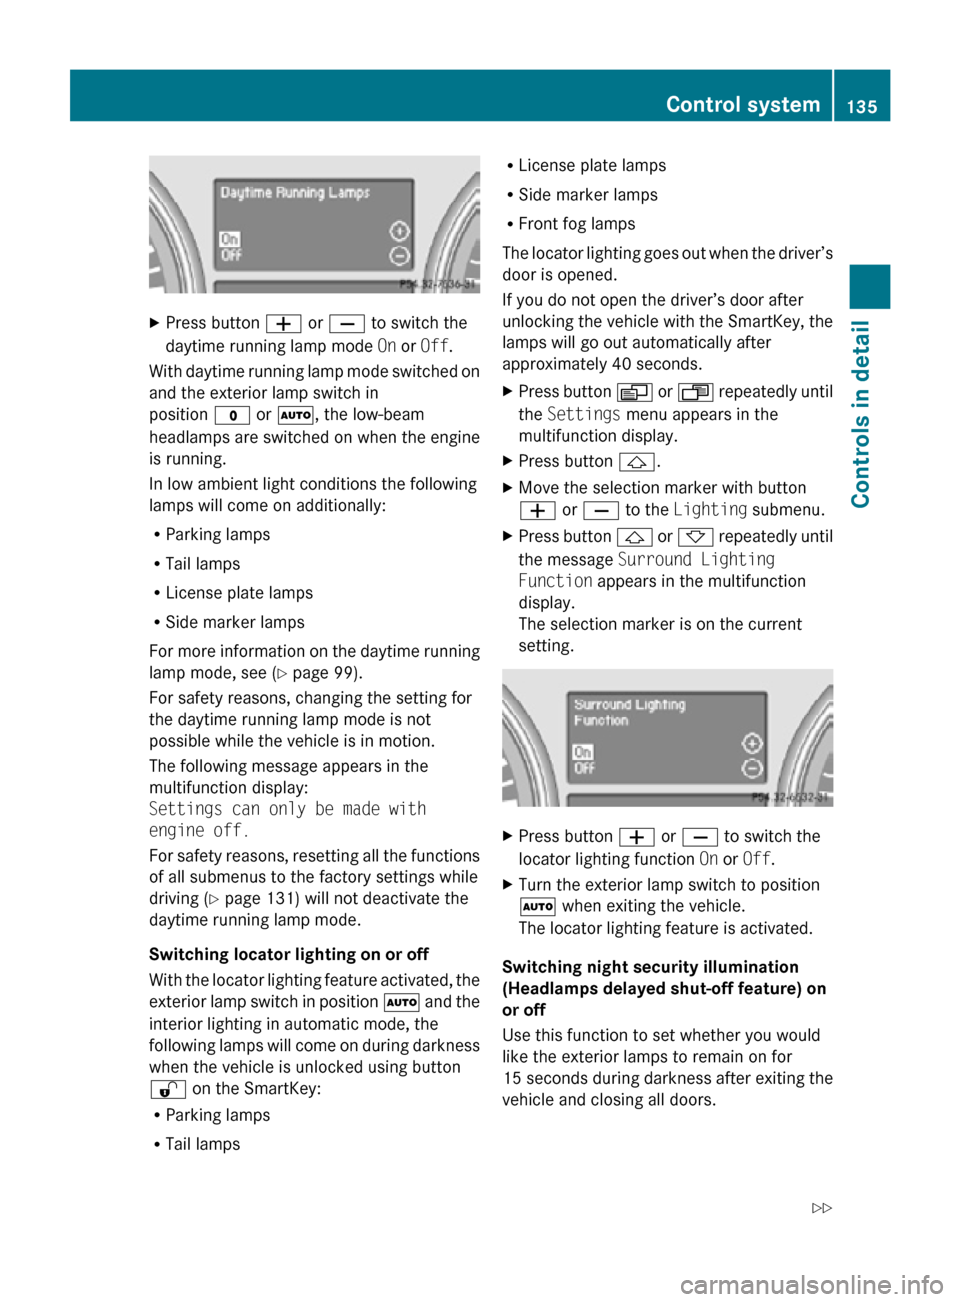
Press button W or X to switch the
daytime running lamp mode On or Off.
With daytime running lamp mode switched on
and the exterior lamp switch in
position $ or Ã, the low-beam
headlamps are switched on when the engine
is running.
In low ambient light conditions the following
lamps will come on additionally:
R Parking lamps
R Tail lamps
R License plate lamps
R Side marker lamps
For more information on the daytime running
lamp mode, see ( Y page 99).
For safety reasons, changing the setting for
the daytime running lamp mode is not
possible while the vehicle is in motion.
The following message appears in the
multifunction display:
Settings can only be made with
engine off.
For safety reasons, resetting all the functions
of all submenus to the factory settings while
driving ( Y page 131) will not deactivate the
daytime running lamp mode.
Switching locator lighting on or off
With the locator lighting feature activated, the
exterior lamp switch in position à and the
interior lighting in automatic mode, the
following lamps will come on during darkness
when the vehicle is unlocked using button
% on the SmartKey:
R Parking lamps
R Tail lamps R
License plate lamps
R Side marker lamps
R Front fog lamps
The locator lighting goes out when the driver’s
door is opened.
If you do not open the driver’s door after
unlocking the vehicle with the SmartKey, the
lamps will go out automatically after
approximately 40 seconds.
X Press button V or U repeatedly until
the Settings menu appears in the
multifunction display.
X Press button &.
X Move the selection marker with button
W or X to the Lighting submenu.
X Press button & or * repeatedly until
the message Surround Lighting
Function appears in the multifunction
display.
The selection marker is on the current
setting. X
Press button W or X to switch the
locator lighting function On or Off.
X Turn the exterior lamp switch to position
à when exiting the vehicle.
The locator lighting feature is activated.
Switching night security illumination
(Headlamps delayed shut-off feature) on
or off
Use this function to set whether you would
like the exterior lamps to remain on for
15 seconds during darkness after exiting the
vehicle and closing all doors. Control system
135Controls in detail
251_AKB; 4; 52, en-US
d2ureepe, Version: 2.11.8.1 2009-03-23T09:22:52+01:00 - Seite 135 Z
Page 298 of 364
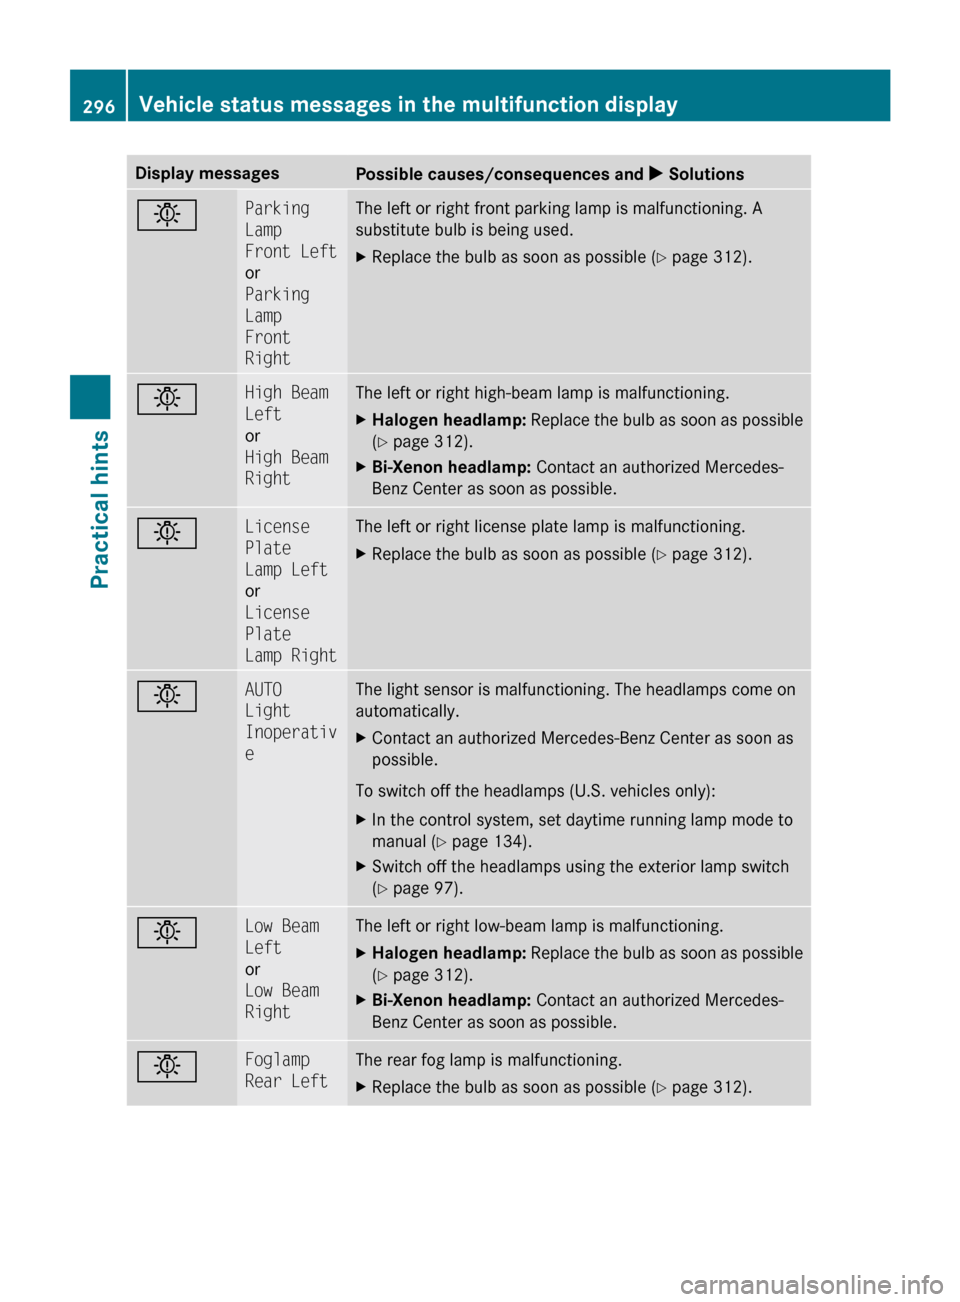
Display messages
Possible causes/consequences and
X Solutionsb Parking
Lamp
Front Left
or
Parking
Lamp
Front
Right The left or right front parking lamp is malfunctioning. A
substitute bulb is being used.
X
Replace the bulb as soon as possible (Y page 312). b High Beam
Left
or
High Beam
Right The left or right high-beam lamp is malfunctioning.
X
Halogen headlamp: Replace the bulb as soon as possible
(Y page 312).
X Bi-Xenon headlamp: Contact an authorized Mercedes-
Benz Center as soon as possible. b License
Plate
Lamp Left
or
License
Plate
Lamp Right The left or right license plate lamp is malfunctioning.
X
Replace the bulb as soon as possible (Y page 312). b AUTO
Light
Inoperativ
e The light sensor is malfunctioning. The headlamps come on
automatically.
X
Contact an authorized Mercedes-Benz Center as soon as
possible.
To switch off the headlamps (U.S. vehicles only):
X In the control system, set daytime running lamp mode to
manual
(Y page 134).
X Switch off the headlamps using the exterior lamp switch
(Y page 97). b Low Beam
Left
or
Low Beam
Right The left or right low-beam lamp is malfunctioning.
X
Halogen headlamp:
Replace the bulb as soon as possible
(Y page 312).
X Bi-Xenon headlamp: Contact an authorized Mercedes-
Benz Center as soon as possible. b Foglamp
Rear Left The rear fog lamp is malfunctioning.
X
Replace the bulb as soon as possible (Y page 312). 296
Vehicle status messages in the multifunction display
Practical hints
251_AKB; 4; 52, en-US
d2ureepe,
Version: 2.11.8.1 2009-03-23T09:22:52+01:00 - Seite 296
Page 301 of 364
Display messages
Possible causes/consequences and
X Solutionsh Tire
Pressure
Check
Tires The tire inflation pressure in at least one tire is significantly
below the reference value.
X
Carefully bring the vehicle to a halt, avoiding abrupt
steering and braking maneuvers.
X Check and adjust tire inflation pressure as required.
X If necessary, change the wheel (Y page 319). G
Warning!
Do not drive with a flat tire. A flat tire affects the ability to steer or brake the vehicle. You may
lose control of the vehicle. Continued driving with a flat tire will cause excessive heat build-up
and possibly a fire. G
Warning!
Follow recommended tire inflation pressures.
Do not underinflate tires. Underinflated tires wear excessively and/or unevenly, adversely affect
handling and fuel economy, and are more likely to fail from being overheated.
Do not overinflate tires. Overinflated tires can adversely affect handling and ride comfort, wear
unevenly, increase stopping distance, and result in sudden deflation (blowout) because they are
more likely to become punctured or damaged by road debris, potholes etc. What to do if …
Lamps in instrument cluster
Notes If any of the following lamps in the instrument
cluster fails to come on during the bulb self-
check when switching on the ignition, have
the respective bulb checked and replaced if
necessary.
When you switch on the ignition, all lamps
(except low-beam headlamp indicator lamp,
high-beam
headlamp indicator lamp, and turn
signal indicator lamps unless activated) in the
instrument cluster come on. If a lamp in the
instrument cluster fails to come on when the
ignition is switched on, have it checked and
replaced if necessary. What to do if …
299
Practical hints
251_AKB; 4; 52, en-US
d2ureepe, Version: 2.11.8.1 2009-03-23T09:22:52+01:00 - Seite 299 Z
Page 315 of 364
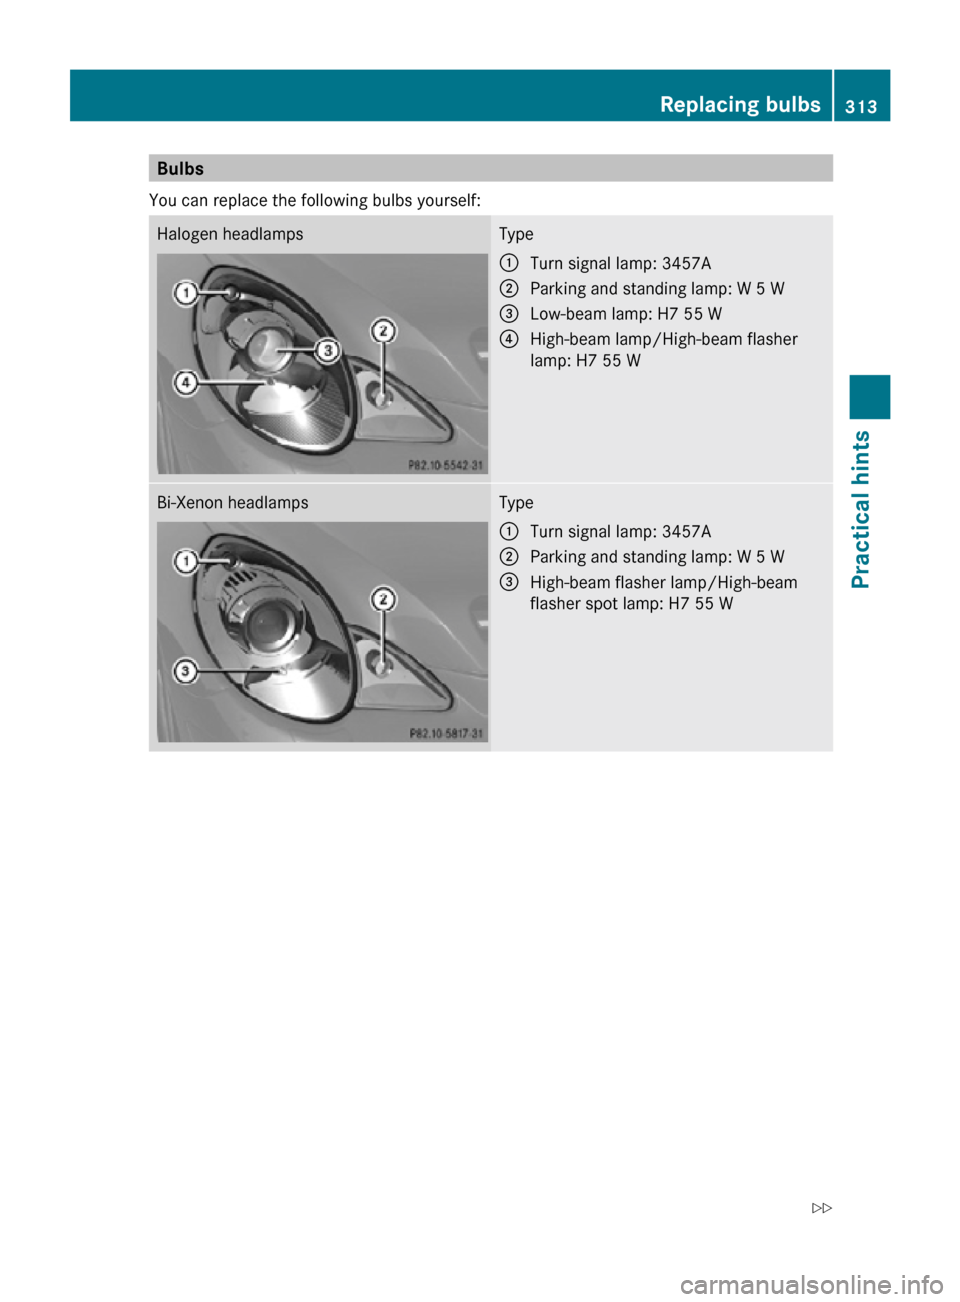
Bulbs
You can replace the following bulbs yourself: Halogen headlamps Type
:
Turn signal lamp: 3457A
; Parking and standing lamp: W 5 W
= Low-beam lamp: H7 55 W
? High-beam lamp/High-beam flasher
lamp: H7 55 W Bi-Xenon headlamps Type
:
Turn signal lamp: 3457A
; Parking and standing lamp: W 5 W
= High-beam flasher lamp/High-beam
flasher spot lamp: H7 55 W Replacing bulbs
313Practical hints
251_AKB; 4; 52, en-US
d2ureepe, Version: 2.11.8.1 2009-03-23T09:22:52+01:00 - Seite 313 Z
Page 317 of 364

Example illustration: Passenger side headlamp
:
Housing cover for low-beam and high-
beam halogen or Bi-Xenon headlamp G
Warning!
Do not remove the cover for the Bi-Xenon
headlamp. Because of high voltage in Xenon
lamps, it is dangerous to replace the bulb or
repair the lamp and its components. It is
recommended to have such work done by a
qualified technician. ;
Bulb socket for front turn signal lamp bulb ;
Bulb socket for front turn signal lamp bulb
= Bulb socket for low-beam headlamp bulb
(halogen headlamps only)
? Bulb socket for high-beam headlamp/
high-beam flasher bulb
Low-beam bulb (halogen headlamps
only) X
Turn housing cover : counterclockwise
and remove it.
X Turn bulb socket = with the bulb
counterclockwise and remove it.
X Pull the bulb out of bulb socket =.
X Gently press the new bulb into bulb socket
=.
X Place bulb socket = back into the housing
and turn it clockwise until it engages.
X Align housing cover : and turn it
clockwise until it engages.
High-beam and high-beam flasher bulb
(halogen headlamps only) X
Turn housing cover : counterclockwise
and remove it.
X Turn bulb socket ? with the bulb
counterclockwise and remove it.
X Pull the bulb out of bulb socket ?.
X Gently press the new bulb into bulb
socket ?. Replacing bulbs
315Practical hints
251_AKB; 4; 52, en-US
d2ureepe, Version: 2.11.8.1 2009-03-23T09:22:52+01:00 - Seite 315 Z