2010 MERCEDES-BENZ R320 fog light
[x] Cancel search: fog lightPage 137 of 364
X
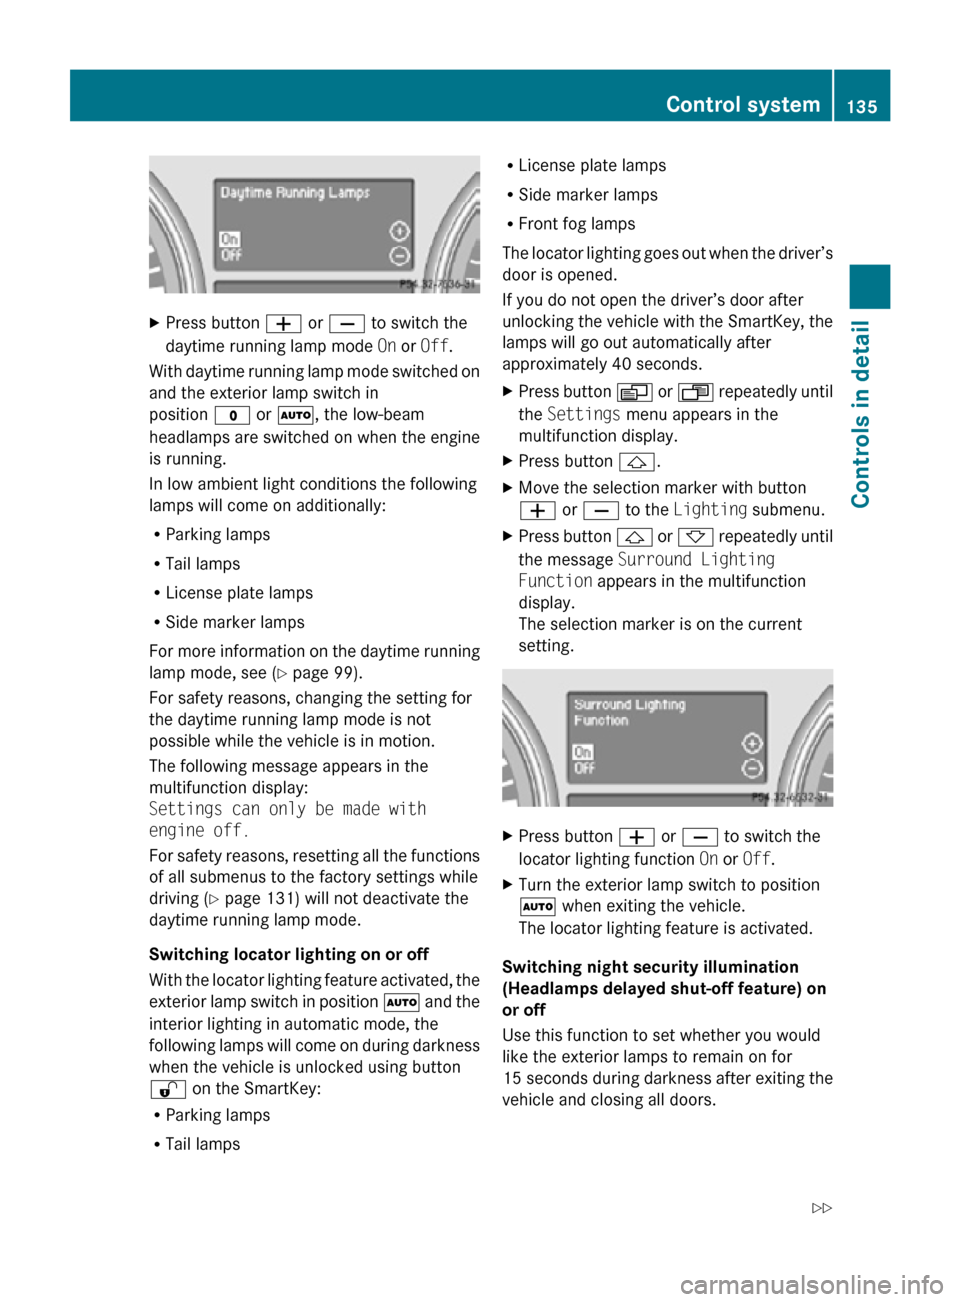
Press button W or X to switch the
daytime running lamp mode On or Off.
With daytime running lamp mode switched on
and the exterior lamp switch in
position $ or Ã, the low-beam
headlamps are switched on when the engine
is running.
In low ambient light conditions the following
lamps will come on additionally:
R Parking lamps
R Tail lamps
R License plate lamps
R Side marker lamps
For more information on the daytime running
lamp mode, see ( Y page 99).
For safety reasons, changing the setting for
the daytime running lamp mode is not
possible while the vehicle is in motion.
The following message appears in the
multifunction display:
Settings can only be made with
engine off.
For safety reasons, resetting all the functions
of all submenus to the factory settings while
driving ( Y page 131) will not deactivate the
daytime running lamp mode.
Switching locator lighting on or off
With the locator lighting feature activated, the
exterior lamp switch in position à and the
interior lighting in automatic mode, the
following lamps will come on during darkness
when the vehicle is unlocked using button
% on the SmartKey:
R Parking lamps
R Tail lamps R
License plate lamps
R Side marker lamps
R Front fog lamps
The locator lighting goes out when the driver’s
door is opened.
If you do not open the driver’s door after
unlocking the vehicle with the SmartKey, the
lamps will go out automatically after
approximately 40 seconds.
X Press button V or U repeatedly until
the Settings menu appears in the
multifunction display.
X Press button &.
X Move the selection marker with button
W or X to the Lighting submenu.
X Press button & or * repeatedly until
the message Surround Lighting
Function appears in the multifunction
display.
The selection marker is on the current
setting. X
Press button W or X to switch the
locator lighting function On or Off.
X Turn the exterior lamp switch to position
à when exiting the vehicle.
The locator lighting feature is activated.
Switching night security illumination
(Headlamps delayed shut-off feature) on
or off
Use this function to set whether you would
like the exterior lamps to remain on for
15 seconds during darkness after exiting the
vehicle and closing all doors. Control system
135Controls in detail
251_AKB; 4; 52, en-US
d2ureepe, Version: 2.11.8.1 2009-03-23T09:22:52+01:00 - Seite 135 Z
Page 138 of 364
With the headlamps delayed shut-off feature
activated and the exterior lamp switch in
position
à before the engine is turned off,
the following lamps will come on when the
engine is turned off:
R Parking lamps
R Tail lamps
R License plate lamps
R Side marker lamps
R Front fog lamps
If, after turning off the engine, you do not
open a door or do not close an opened door,
the lamps will automatically go out after
60 seconds.
X Press button V or U repeatedly until
the Settings menu appears in the
multifunction display.
X Press button &.
X Move the selection marker with button
W or X to the Lighting submenu.
X Press button & or * repeatedly until
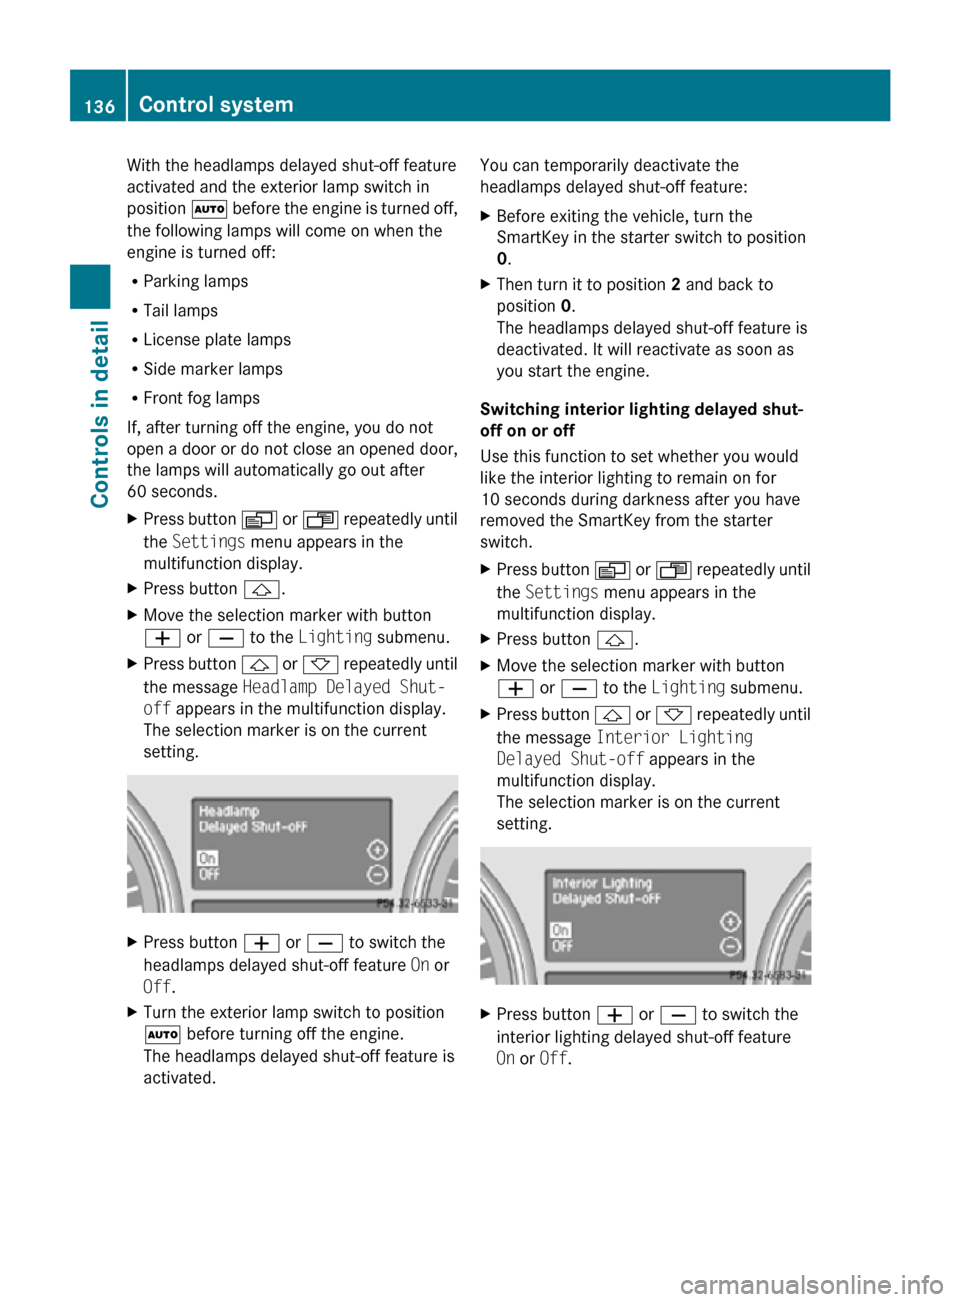
the message Headlamp Delayed Shut-
off appears in the multifunction display.
The selection marker is on the current
setting. X
Press button W or X to switch the
headlamps delayed shut-off feature On or
Off.
X Turn the exterior lamp switch to position
à before turning off the engine.
The headlamps delayed shut-off feature is
activated. You can temporarily deactivate the
headlamps delayed shut-off feature:
X
Before exiting the vehicle, turn the
SmartKey in the starter switch to position
0.
X Then turn it to position 2 and back to
position 0.
The headlamps delayed shut-off feature is
deactivated. It will reactivate as soon as
you start the engine.
Switching interior lighting delayed shut-
off on or off
Use this function to set whether you would
like the interior lighting to remain on for
10 seconds during darkness after you have
removed the SmartKey from the starter
switch.
X Press button V or U repeatedly until
the Settings menu appears in the
multifunction display.
X Press button &.
X Move the selection marker with button
W or X to the Lighting submenu.
X Press button & or * repeatedly until
the message Interior Lighting
Delayed Shut-off appears in the
multifunction display.
The selection marker is on the current
setting. X
Press button W or X to switch the
interior lighting delayed shut-off feature
On or Off. 136
Control systemControls in detail
251_AKB; 4; 52, en-US
d2ureepe,
Version: 2.11.8.1 2009-03-23T09:22:52+01:00 - Seite 136
Page 162 of 364
The area behind the vehicle appears in the
COMAND system display as a mirror image,
like in the rear view mirror.
In addition, the rear view camera contains
guidelines to help you with driving in reverse.
G
Warning!
Make sure no persons or animals are in or
near the area in which you are parking/
maneuvering. Otherwise, they could be
injured. G
Warning!
The rear view camera is only an aid and may
display obstacles
R from a distorted perspective
R inaccurately
R may not display obstacles at all
The rear view camera does not relieve you of
the responsibility to be cautious. Take care
and pay careful attention. The rear view
camera may not show objects which are
R very close to the rear bumper
R under the rear bumper
R above the tailgate handle
You are responsible for safety at all times and
must continue to pay attention to the
immediate surroundings when parking and
maneuvering. This includes the area behind,
in front of, and beside the vehicle. Otherwise
you could endanger yourself and/or others. G
Warning!
The rear view camera either will not function
or will not function to its full capability if
R the tailgate is open
R it is raining very hard, snowing or foggy
R it is night or you are parking/maneuvering
your vehicle in an area where it is very dark
R the camera is exposed to a very bright white
light R
the immediate surroundings are
illuminated with fluorescent light (the
display may flicker)
R there is a sudden change in temperature,
e.g. if you drive into a heated garage from
the cold (lens condensation)
R the camera lens is dirty or covered
R the rear of your vehicle is damaged
In this case, have the position and setting
of the camera checked by a qualified
specialist workshop. Mercedes-Benz
recommends that you contact a Mercedes-
Benz Center for this purpose.
Do not use the rear view camera in these
situations. Otherwise you could injure
yourself or others and/or damage property
including your vehicle while parking/
maneuvering. G
Warning!
Use of rear view camera can be dangerous if
you are color-blind or have impaired color
vision.
Only use rear view camera if you can see and
distinguish all colored guidelines shown by
rear view camera on the COMAND system
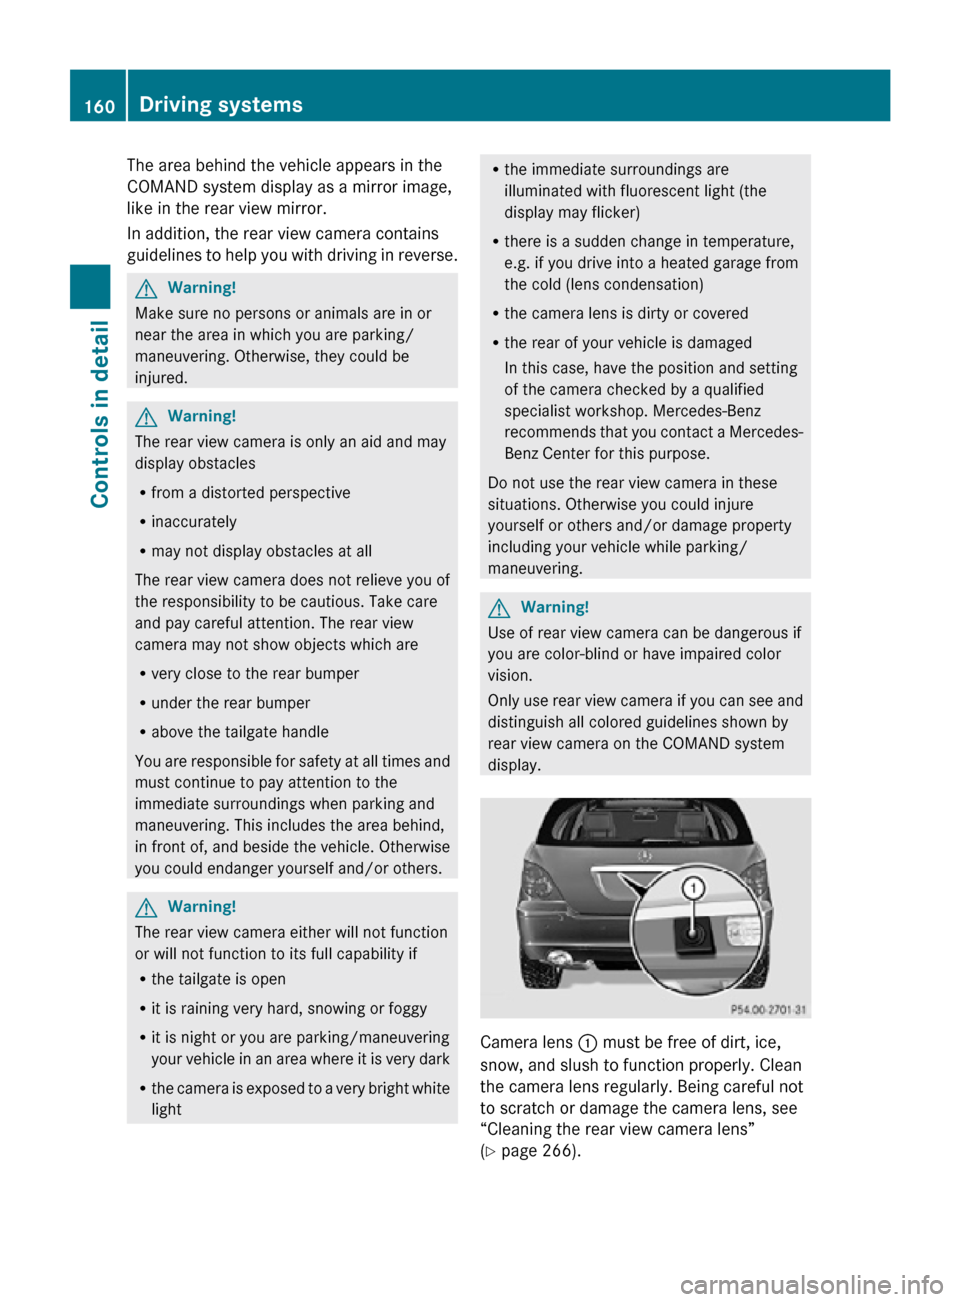
display. Camera lens
: must be free of dirt, ice,
snow, and slush to function properly. Clean
the camera lens regularly. Being careful not
to scratch or damage the camera lens, see
“Cleaning the rear view camera lens”
(Y page 266). 160
Driving systemsControls in detail
251_AKB; 4; 52, en-US
d2ureepe,
Version: 2.11.8.1 2009-03-23T09:22:52+01:00 - Seite 160
Page 170 of 364
shown in air volume display
G
(Y page 164).
or
X Press air distribution button ¯, P, or
O.
The indicator lamp in button à goes out.
The automatic operation of air distribution
switches off. Setting the temperature
You can adjust the air temperature on each
side of the passenger compartment. You
should
raise or lower the temperature setting
in small increments, preferably starting at
72‡ (22†).
X Increasing/decreasing: Turn
temperature control : and/or C
(Y page 164) slightly clockwise or
counterclockwise. Adjusting air distribution
The
air distribution can be adjusted manually.
The symbols on the buttons represent the
following functions: Symbol Function
¯
Directs air to the windshield and
side air vents
P
Directs air through the center
and side air vents
O
Directs air to the footwells and
side air vents
X
Press the desired air distribution button
¯, P, or O.
The
indicator lamp in button à goes out.
The automatic mode is switched off. Air
distribution is controlled according to the
desired button. Adjusting air volume
X Decreasing/increasing: Press button
I or K.
The automatic mode is switched off. The
selected blower speed is shown in air
volume display G (Y page 164).
When using the Voice Control System, the
blower speed reduces automatically. When
the Voice Control System is not used
anymore, the blower speed increases to the
previously selected level. Front defroster
You can use this setting to defrost the
windshield, for example if it is iced up.
You can also defog the windshield and the
side windows.
i Keep this setting selected only until the
windshield or the side windows are clear
again.
Activating X
Press button ¦.
The
indicator lamp in the button comes on.
The climate control switches to the
following functions automatically:
R most efficient blower speed and heating
power, depending on outside
temperature
R air flows onto the windshield and the
front door windows (side air vents must
be open)
R the air conditioning compressor
switches on at outside temperatures
above approximately 41‡ (5†) for air-
drying
Adjustments
You can adjust the air volume and the
temperature when the front defroster is
switched on. The air flow will remain on the
windshield and front door windows. 168
Climate control
Controls in detail
251_AKB; 4; 52, en-US
d2ureepe,
Version: 2.11.8.1 2009-03-23T09:22:52+01:00 - Seite 168
Page 171 of 364
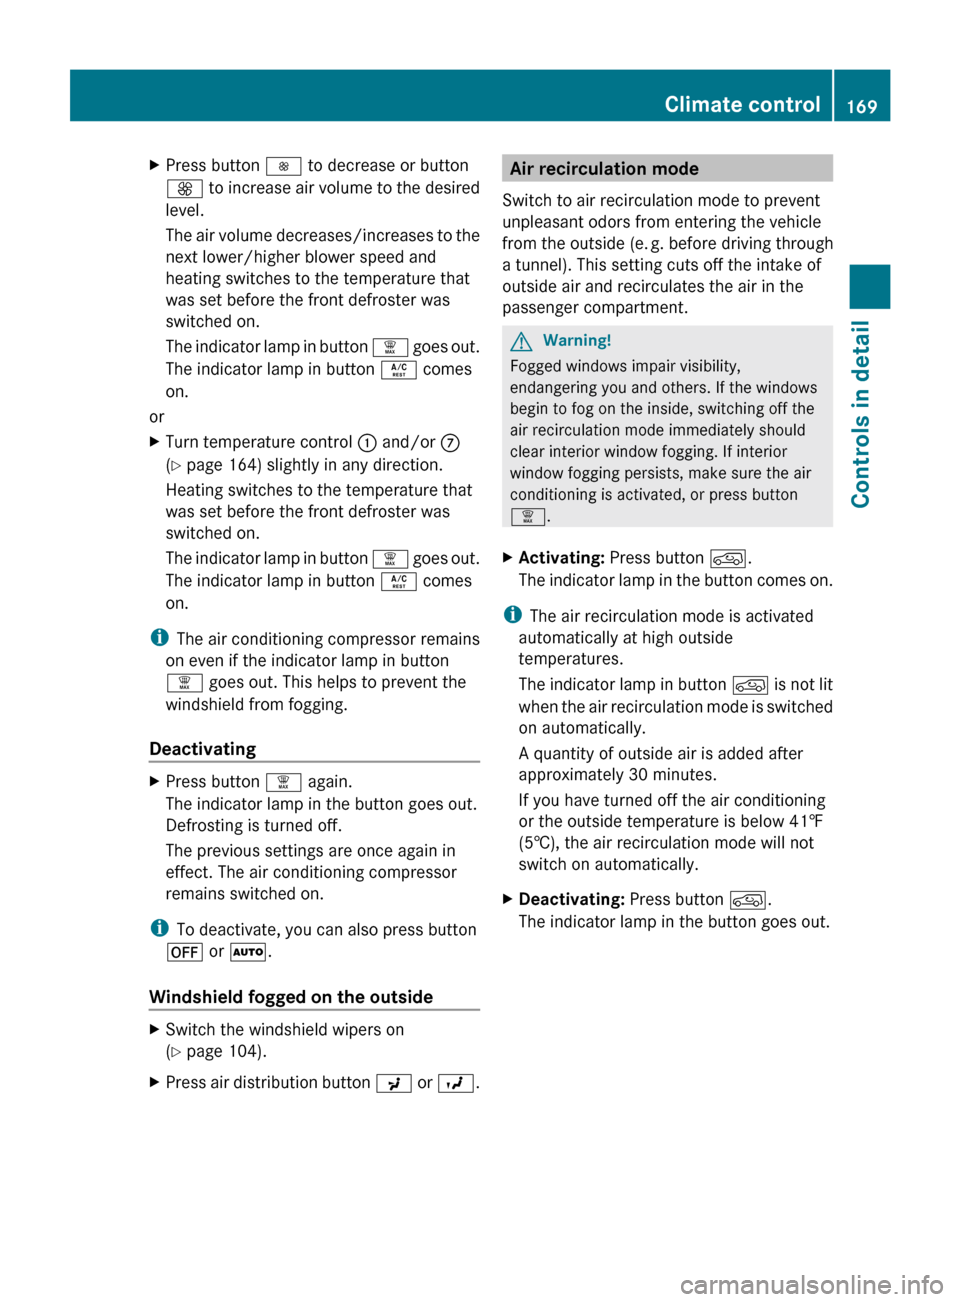
X
Press button I to decrease or button
K to increase air volume to the desired
level.
The air volume decreases/increases to the
next lower/higher blower speed and
heating switches to the temperature that
was set before the front defroster was
switched on.
The indicator lamp in button ¦ goes out.
The indicator lamp in button Á comes
on.
or
X Turn temperature control : and/or C
(Y page 164) slightly in any direction.
Heating switches to the temperature that
was set before the front defroster was
switched on.
The
indicator lamp in button ¦ goes out.
The indicator lamp in button Á comes
on.
i The air conditioning compressor remains
on even if the indicator lamp in button
¦ goes out. This helps to prevent the
windshield from fogging.
Deactivating X
Press button ¦ again.
The indicator lamp in the button goes out.
Defrosting is turned off.
The previous settings are once again in
effect. The air conditioning compressor
remains switched on.
i To deactivate, you can also press button
^ or Ã.
Windshield fogged on the outside X
Switch the windshield wipers on
(Y page 104).
X Press air distribution button P
or O. Air recirculation mode
Switch to air recirculation mode to prevent
unpleasant odors from entering the vehicle
from the outside (e. g. before driving through
a tunnel). This setting cuts off the intake of
outside air and recirculates the air in the
passenger compartment. G
Warning!
Fogged windows impair visibility,
endangering you and others. If the windows
begin to fog on the inside, switching off the
air recirculation mode immediately should
clear interior window fogging. If interior
window fogging persists, make sure the air
conditioning is activated, or press button
¦.
X Activating: Press button d.
The
indicator lamp in the button comes on.
i The air recirculation mode is activated
automatically at high outside
temperatures.
The
indicator lamp in button d is not lit
when the air recirculation mode is switched
on automatically.
A quantity of outside air is added after
approximately 30 minutes.
If you have turned off the air conditioning
or the outside temperature is below 41‡
(5†), the air recirculation mode will not
switch on automatically.
X Deactivating: Press button d.
The indicator lamp in the button goes out. Climate control
169
Controls in detail
251_AKB; 4; 52, en-US
d2ureepe, Version: 2.11.8.1 2009-03-23T09:22:52+01:00 - Seite 169 Z
Page 181 of 364
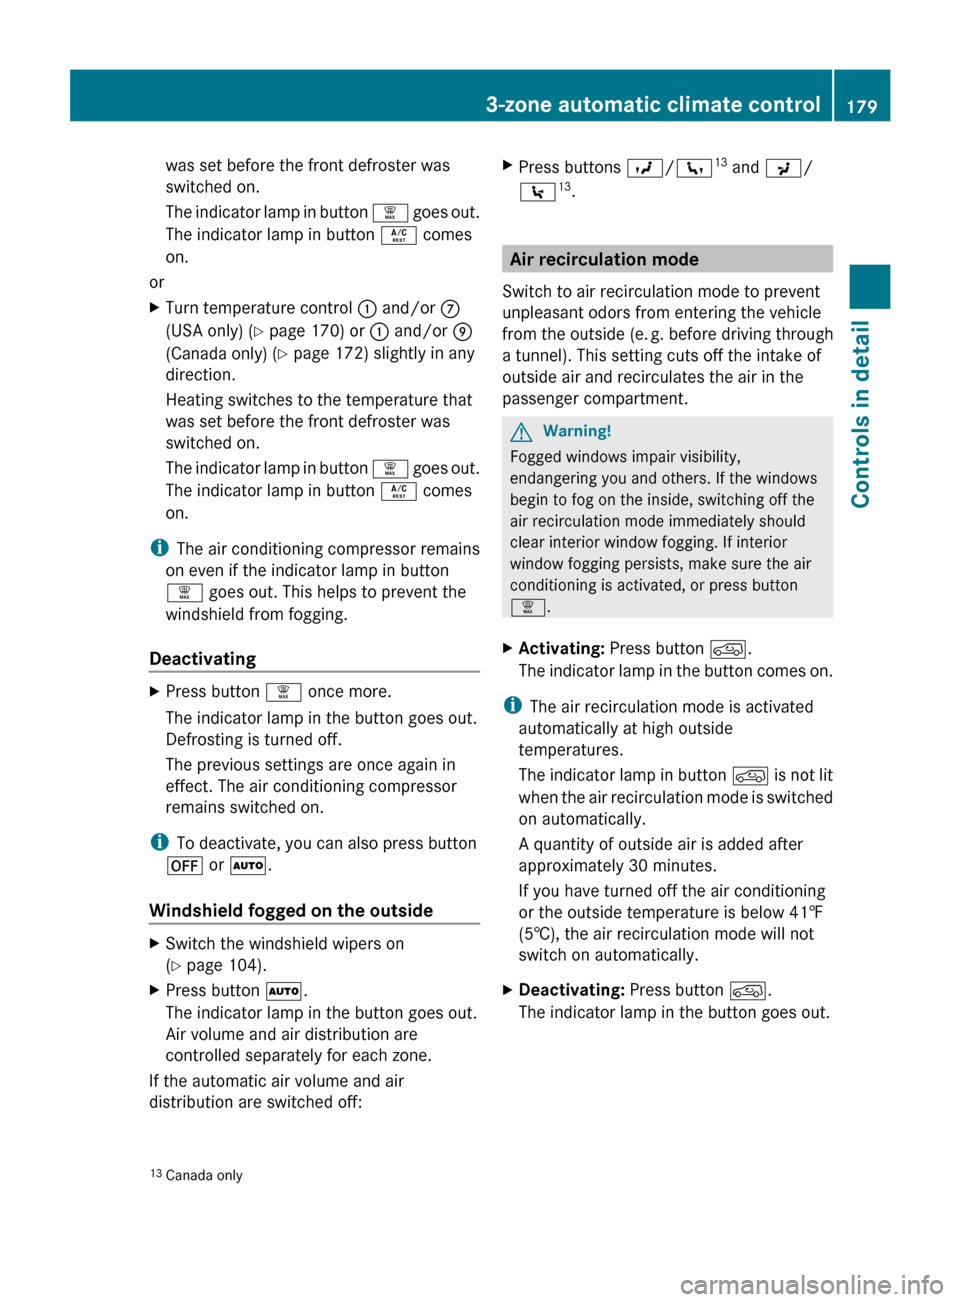
was set before the front defroster was
switched on.
The
indicator lamp in button ¦ goes out.
The indicator lamp in button Á comes
on.
or
X Turn temperature control : and/or C
(USA only) ( Y page 170) or : and/or E
(Canada only)
(Y page 172) slightly in any
direction.
Heating switches to the temperature that
was set before the front defroster was
switched on.
The indicator lamp in button ¦ goes out.
The indicator lamp in button Á comes
on.
i The air conditioning compressor remains
on even if the indicator lamp in button
¦ goes out. This helps to prevent the
windshield from fogging.
Deactivating X
Press button ¦ once more.
The indicator lamp in the button goes out.
Defrosting is turned off.
The previous settings are once again in
effect. The air conditioning compressor
remains switched on.
i To deactivate, you can also press button
^ or Ã.
Windshield fogged on the outside X
Switch the windshield wipers on
(Y page 104).
X Press button Ã.
The indicator lamp in the button goes out.
Air volume and air distribution are
controlled separately for each zone.
If the automatic air volume and air
distribution are switched off: X
Press buttons O/c 13
and P/
\ 13
. Air recirculation mode
Switch to air recirculation mode to prevent
unpleasant odors from entering the vehicle
from the outside (e. g. before driving through
a tunnel). This setting cuts off the intake of
outside air and recirculates the air in the
passenger compartment. G
Warning!
Fogged windows impair visibility,
endangering you and others. If the windows
begin to fog on the inside, switching off the
air recirculation mode immediately should
clear interior window fogging. If interior
window fogging persists, make sure the air
conditioning is activated, or press button
¦.
X Activating: Press button d.
The
indicator lamp in the button comes on.
i The air recirculation mode is activated
automatically at high outside
temperatures.
The
indicator lamp in button d is not lit
when the air recirculation mode is switched
on automatically.
A quantity of outside air is added after
approximately 30 minutes.
If you have turned off the air conditioning
or the outside temperature is below 41‡
(5†), the air recirculation mode will not
switch on automatically.
X Deactivating: Press button d.
The indicator lamp in the button goes out.
13 Canada only 3-zone automatic climate control
179
Controls in detail
251_AKB; 4; 52, en-US
d2ureepe, Version: 2.11.8.1 2009-03-23T09:22:52+01:00 - Seite 179 Z
Page 298 of 364
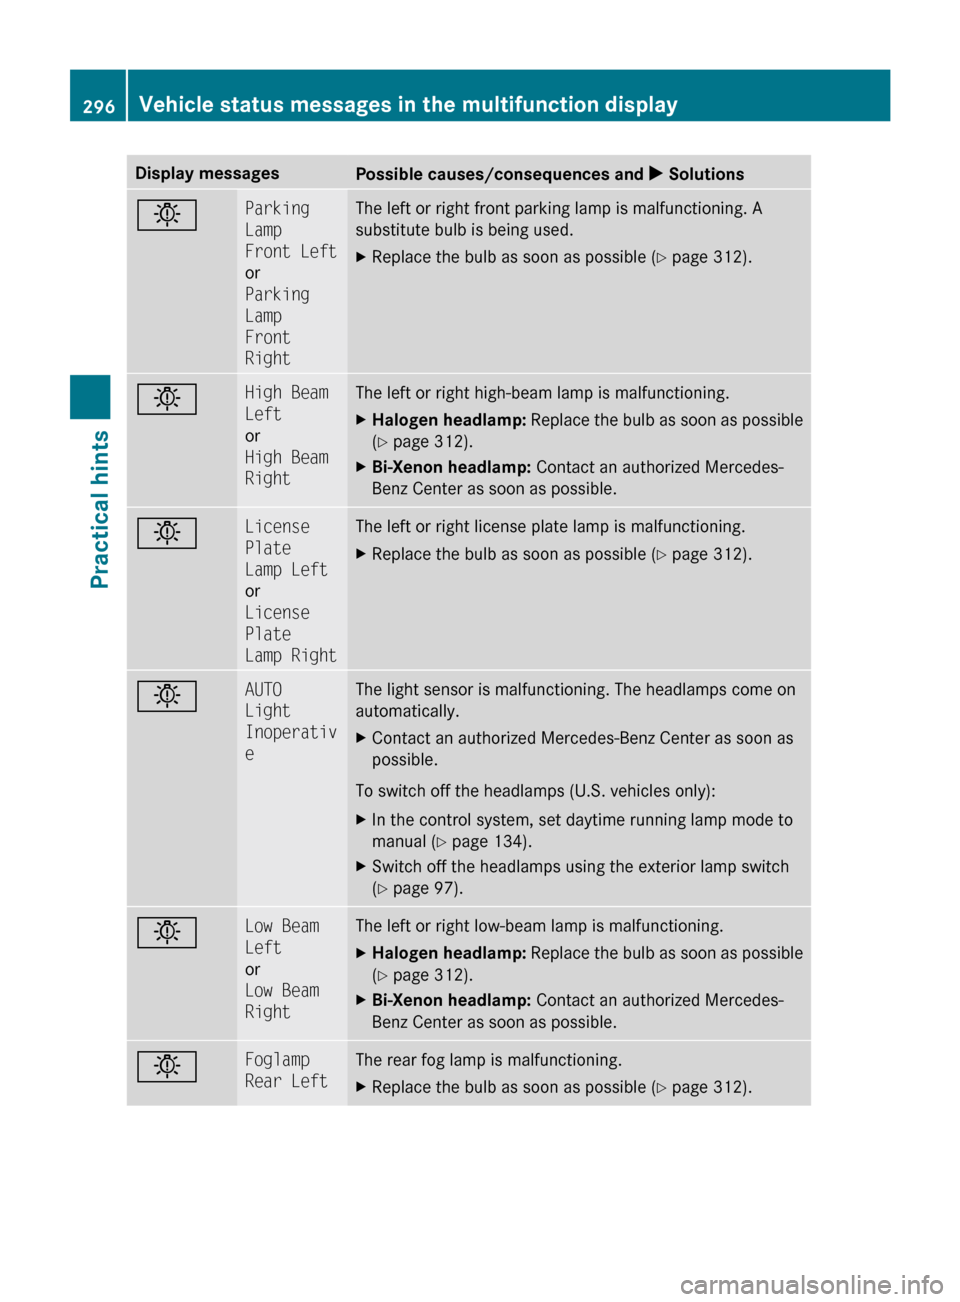
Display messages
Possible causes/consequences and
X Solutionsb Parking
Lamp
Front Left
or
Parking
Lamp
Front
Right The left or right front parking lamp is malfunctioning. A
substitute bulb is being used.
X
Replace the bulb as soon as possible (Y page 312). b High Beam
Left
or
High Beam
Right The left or right high-beam lamp is malfunctioning.
X
Halogen headlamp: Replace the bulb as soon as possible
(Y page 312).
X Bi-Xenon headlamp: Contact an authorized Mercedes-
Benz Center as soon as possible. b License
Plate
Lamp Left
or
License
Plate
Lamp Right The left or right license plate lamp is malfunctioning.
X
Replace the bulb as soon as possible (Y page 312). b AUTO
Light
Inoperativ
e The light sensor is malfunctioning. The headlamps come on
automatically.
X
Contact an authorized Mercedes-Benz Center as soon as
possible.
To switch off the headlamps (U.S. vehicles only):
X In the control system, set daytime running lamp mode to
manual
(Y page 134).
X Switch off the headlamps using the exterior lamp switch
(Y page 97). b Low Beam
Left
or
Low Beam
Right The left or right low-beam lamp is malfunctioning.
X
Halogen headlamp:
Replace the bulb as soon as possible
(Y page 312).
X Bi-Xenon headlamp: Contact an authorized Mercedes-
Benz Center as soon as possible. b Foglamp
Rear Left The rear fog lamp is malfunctioning.
X
Replace the bulb as soon as possible (Y page 312). 296
Vehicle status messages in the multifunction display
Practical hints
251_AKB; 4; 52, en-US
d2ureepe,
Version: 2.11.8.1 2009-03-23T09:22:52+01:00 - Seite 296
Page 299 of 364
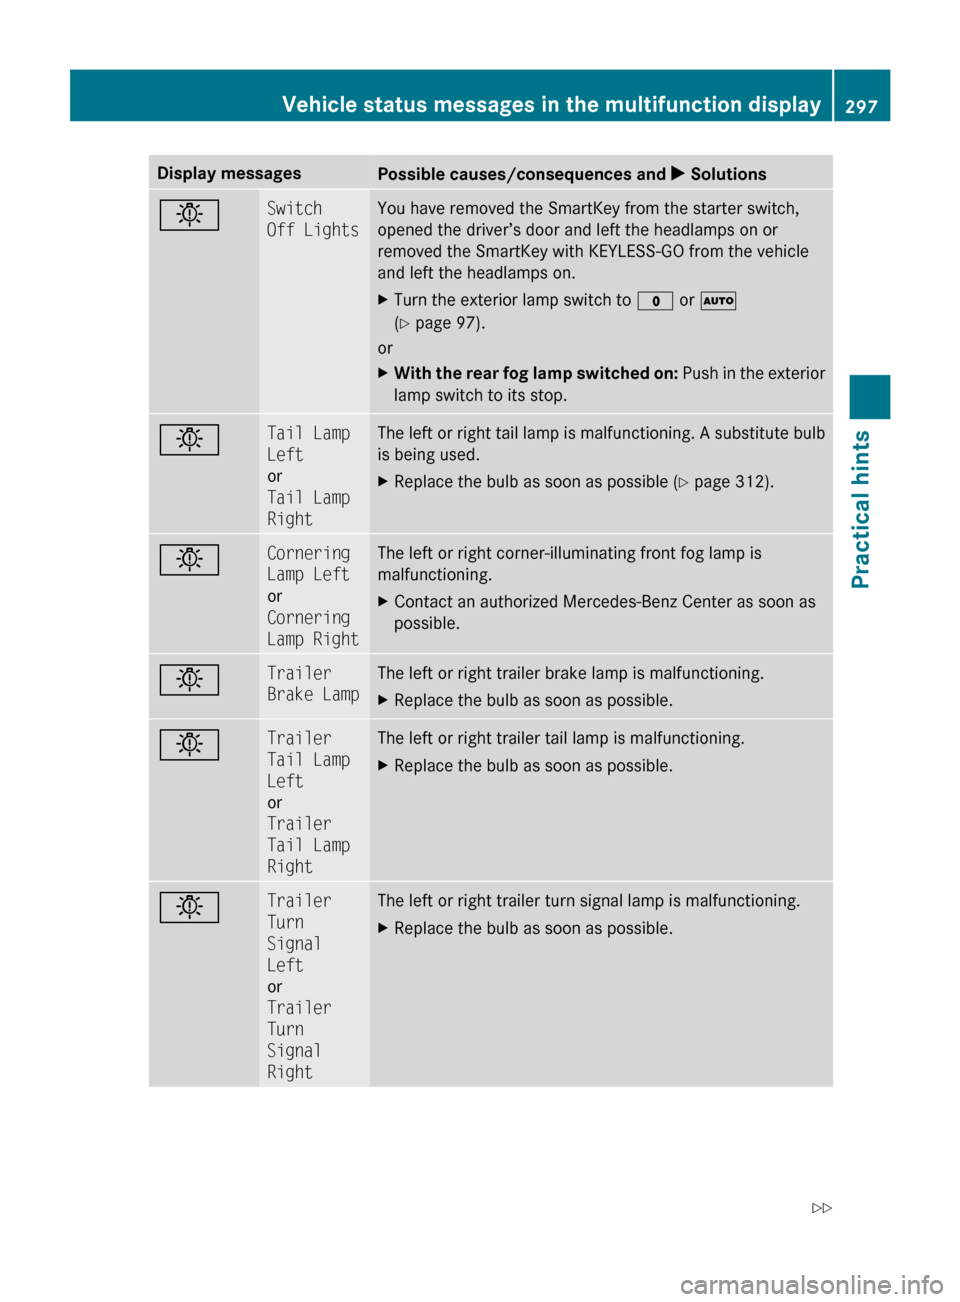
Display messages
Possible causes/consequences and
X Solutionsb Switch
Off Lights You have removed the SmartKey from the starter switch,
opened the driver’s door and left the headlamps on or
removed the SmartKey with KEYLESS-GO from the vehicle
and left the headlamps on.
X
Turn the exterior lamp switch to $ or Ã
(Y page 97).
or
X With the rear fog lamp switched on: Push in the exterior
lamp switch to its stop. b Tail Lamp
Left
or
Tail Lamp
Right The left or right tail lamp is malfunctioning. A substitute bulb
is being used.
X
Replace the bulb as soon as possible (Y page 312). b Cornering
Lamp Left
or
Cornering
Lamp Right The left or right corner-illuminating front fog lamp is
malfunctioning.
X
Contact an authorized Mercedes-Benz Center as soon as
possible. b Trailer
Brake Lamp The left or right trailer brake lamp is malfunctioning.
X
Replace the bulb as soon as possible. b Trailer
Tail Lamp
Left
or
Trailer
Tail Lamp
Right The left or right trailer tail lamp is malfunctioning.
X
Replace the bulb as soon as possible. b Trailer
Turn
Signal
Left
or
Trailer
Turn
Signal
Right The left or right trailer turn signal lamp is malfunctioning.
X
Replace the bulb as soon as possible. Vehicle status messages in the multifunction display
297
Practical hints
251_AKB; 4; 52, en-US
d2ureepe,Version: 2.11.8.1 2009-03-23T09:22:52+01:00 - Seite 297 Z