2010 MERCEDES-BENZ R320 clock
[x] Cancel search: clockPage 275 of 364
X
Removing: Open the tailgate ( Y page 75).
X Lift the cargo compartment floor and
secure it on the upper cargo compartment
lip ( Y page 270).
! To prevent damage, always disengage the
securing hook from upper cargo
compartment lip and lower the cargo
compartment floor before closing the
tailgate.
X Remove the jack from the vehicle tool kit
(Y page 271). X
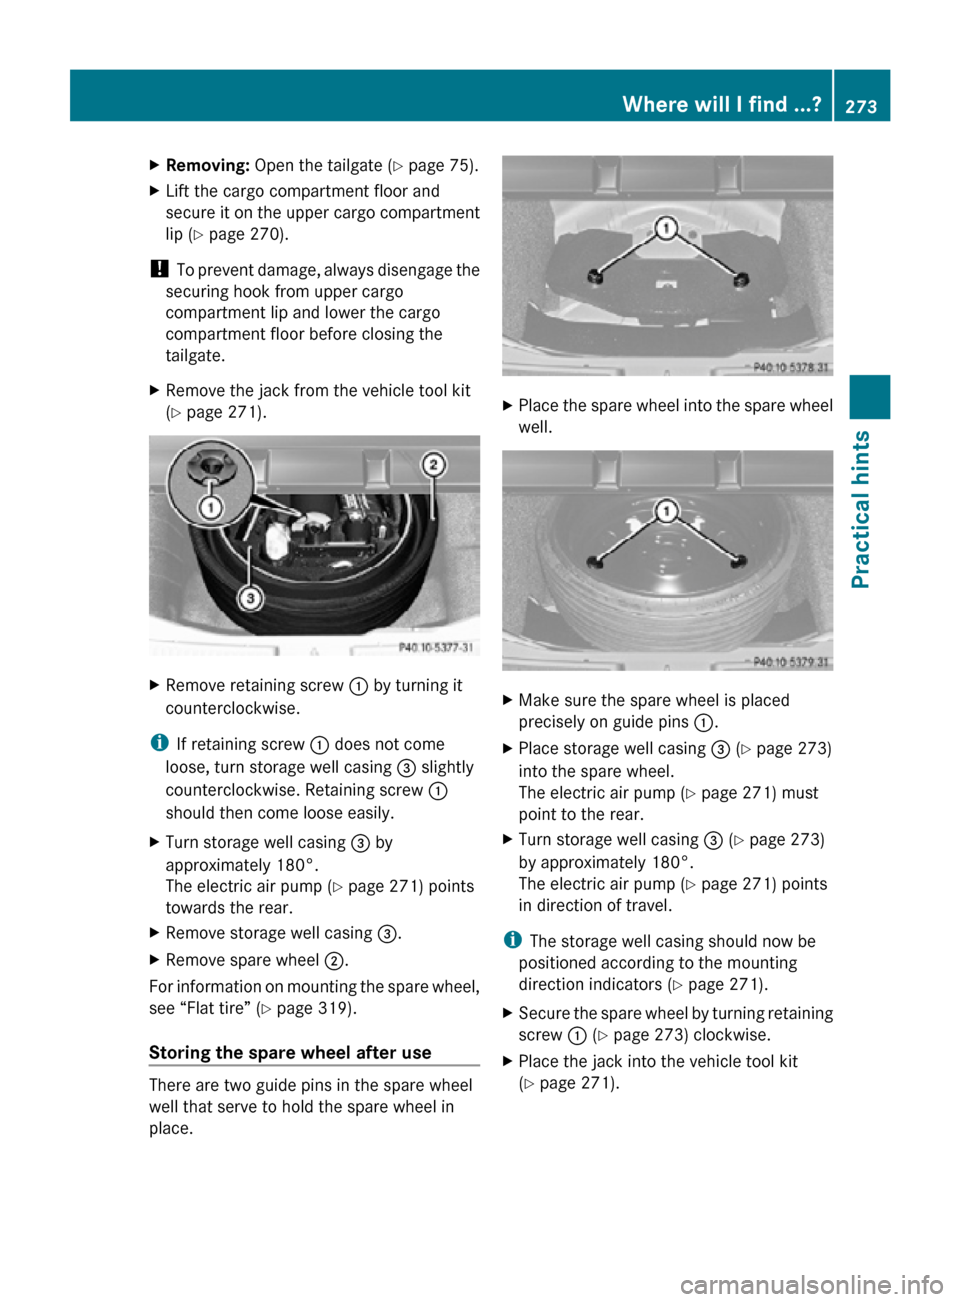
Remove retaining screw : by turning it
counterclockwise.
i If retaining screw : does not come
loose, turn storage well casing = slightly
counterclockwise. Retaining screw :
should then come loose easily.
X Turn storage well casing = by
approximately 180°.
The electric air pump ( Y page 271) points
towards the rear.
X Remove storage well casing =.
X Remove spare wheel ;.
For information on mounting the spare wheel,
see “Flat tire” ( Y page 319).
Storing the spare wheel after use There are two guide pins in the spare wheel
well that serve to hold the spare wheel in
place. X
Place the spare wheel into the spare wheel
well. X
Make sure the spare wheel is placed
precisely on guide pins :.
X Place storage well casing = (Y page 273)
into the spare wheel.
The electric air pump ( Y page 271) must
point to the rear.
X Turn storage well casing = (Y page 273)
by approximately 180°.
The electric air pump ( Y page 271) points
in direction of travel.
i The storage well casing should now be
positioned according to the mounting
direction indicators (Y page 271).
X Secure the spare wheel by turning retaining
screw : (Y page 273) clockwise.
X Place the jack into the vehicle tool kit
(Y page 271). Where will I find ...?
273Practical hints
251_AKB; 4; 52, en-US
d2ureepe, Version: 2.11.8.1 2009-03-23T09:22:52+01:00 - Seite 273 Z
Page 311 of 364
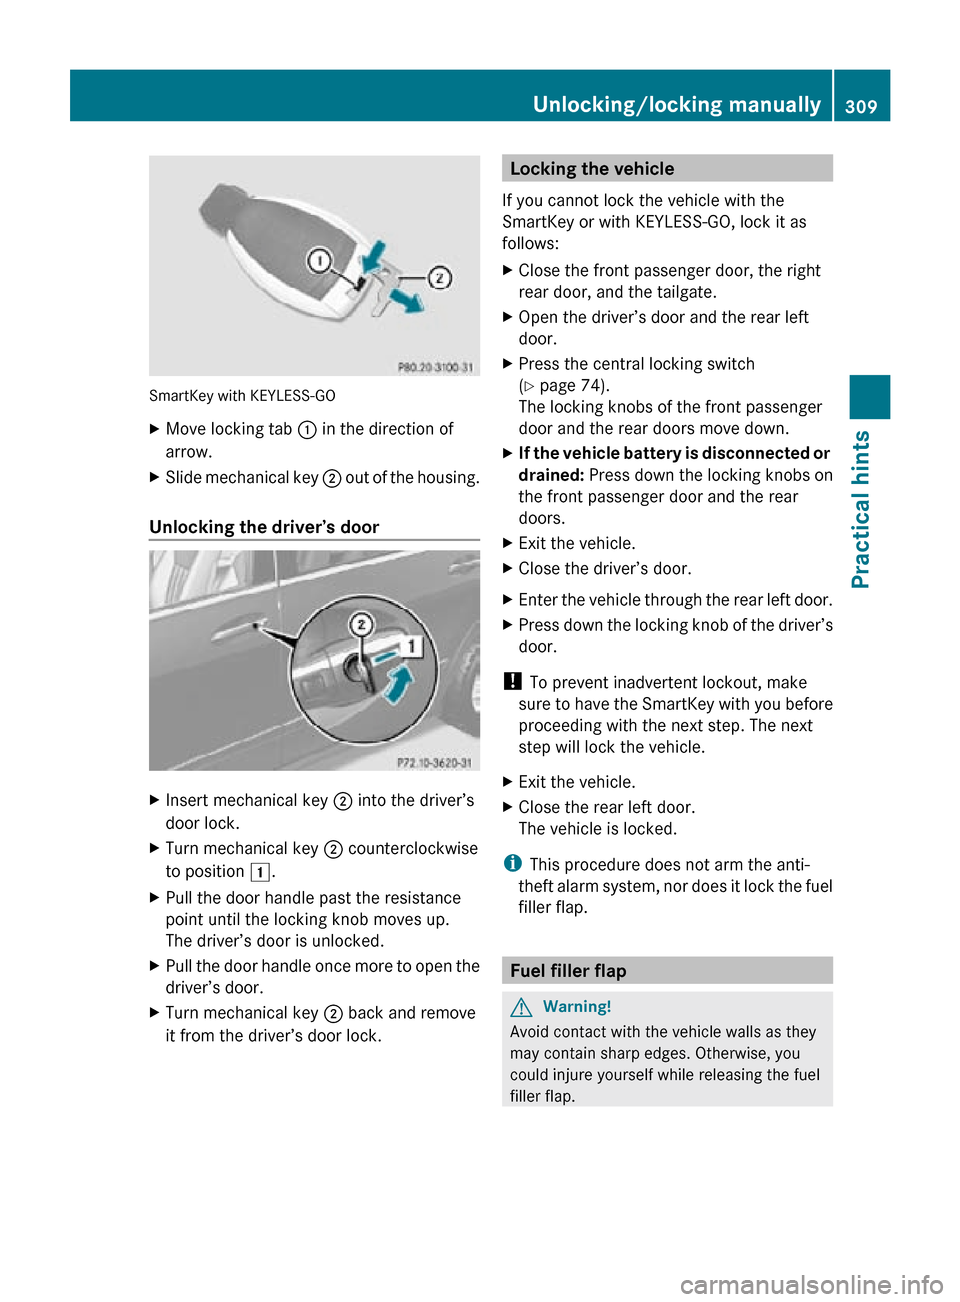
SmartKey with KEYLESS-GO
X
Move locking tab : in the direction of
arrow.
X Slide mechanical key ; out of the housing.
Unlocking the driver’s door X
Insert mechanical key ; into the driver’s
door lock.
X Turn mechanical key ; counterclockwise
to position 1.
X Pull the door handle past the resistance
point until the locking knob moves up.
The driver’s door is unlocked.
X Pull the door handle once more to open the
driver’s door.
X Turn mechanical key ; back and remove
it from the driver’s door lock. Locking the vehicle
If you cannot lock the vehicle with the
SmartKey or with KEYLESS-GO, lock it as
follows:
X Close the front passenger door, the right
rear door, and the tailgate.
X Open the driver’s door and the rear left
door.
X Press the central locking switch
(Y page 74).
The locking knobs of the front passenger
door and the rear doors move down.
X If the vehicle battery is disconnected or
drained: Press down the locking knobs on
the front passenger door and the rear
doors.
X Exit the vehicle.
X Close the driver’s door.
X Enter the vehicle through the rear left door.
X Press down the locking knob of the driver’s
door.
! To prevent inadvertent lockout, make
sure to have the SmartKey with you before
proceeding with the next step. The next
step will lock the vehicle.
X Exit the vehicle.
X Close the rear left door.
The vehicle is locked.
i This procedure does not arm the anti-
theft alarm system, nor does it lock the fuel
filler flap. Fuel filler flap
G
Warning!
Avoid contact with the vehicle walls as they
may contain sharp edges. Otherwise, you
could injure yourself while releasing the fuel
filler flap. Unlocking/locking manually
309Practical hints
251_AKB; 4; 52, en-US
d2ureepe, Version: 2.11.8.1 2009-03-23T09:22:52+01:00 - Seite 309 Z
Page 317 of 364

Example illustration: Passenger side headlamp
:
Housing cover for low-beam and high-
beam halogen or Bi-Xenon headlamp G
Warning!
Do not remove the cover for the Bi-Xenon
headlamp. Because of high voltage in Xenon
lamps, it is dangerous to replace the bulb or
repair the lamp and its components. It is
recommended to have such work done by a
qualified technician. ;
Bulb socket for front turn signal lamp bulb ;
Bulb socket for front turn signal lamp bulb
= Bulb socket for low-beam headlamp bulb
(halogen headlamps only)
? Bulb socket for high-beam headlamp/
high-beam flasher bulb
Low-beam bulb (halogen headlamps
only) X
Turn housing cover : counterclockwise
and remove it.
X Turn bulb socket = with the bulb
counterclockwise and remove it.
X Pull the bulb out of bulb socket =.
X Gently press the new bulb into bulb socket
=.
X Place bulb socket = back into the housing
and turn it clockwise until it engages.
X Align housing cover : and turn it
clockwise until it engages.
High-beam and high-beam flasher bulb
(halogen headlamps only) X
Turn housing cover : counterclockwise
and remove it.
X Turn bulb socket ? with the bulb
counterclockwise and remove it.
X Pull the bulb out of bulb socket ?.
X Gently press the new bulb into bulb
socket ?. Replacing bulbs
315Practical hints
251_AKB; 4; 52, en-US
d2ureepe, Version: 2.11.8.1 2009-03-23T09:22:52+01:00 - Seite 315 Z
Page 318 of 364
X
Place bulb socket ? back into the housing
and turn it clockwise until it engages.
X Align housing cover : and turn it
clockwise until it engages.
Front turn signal lamp bulb X
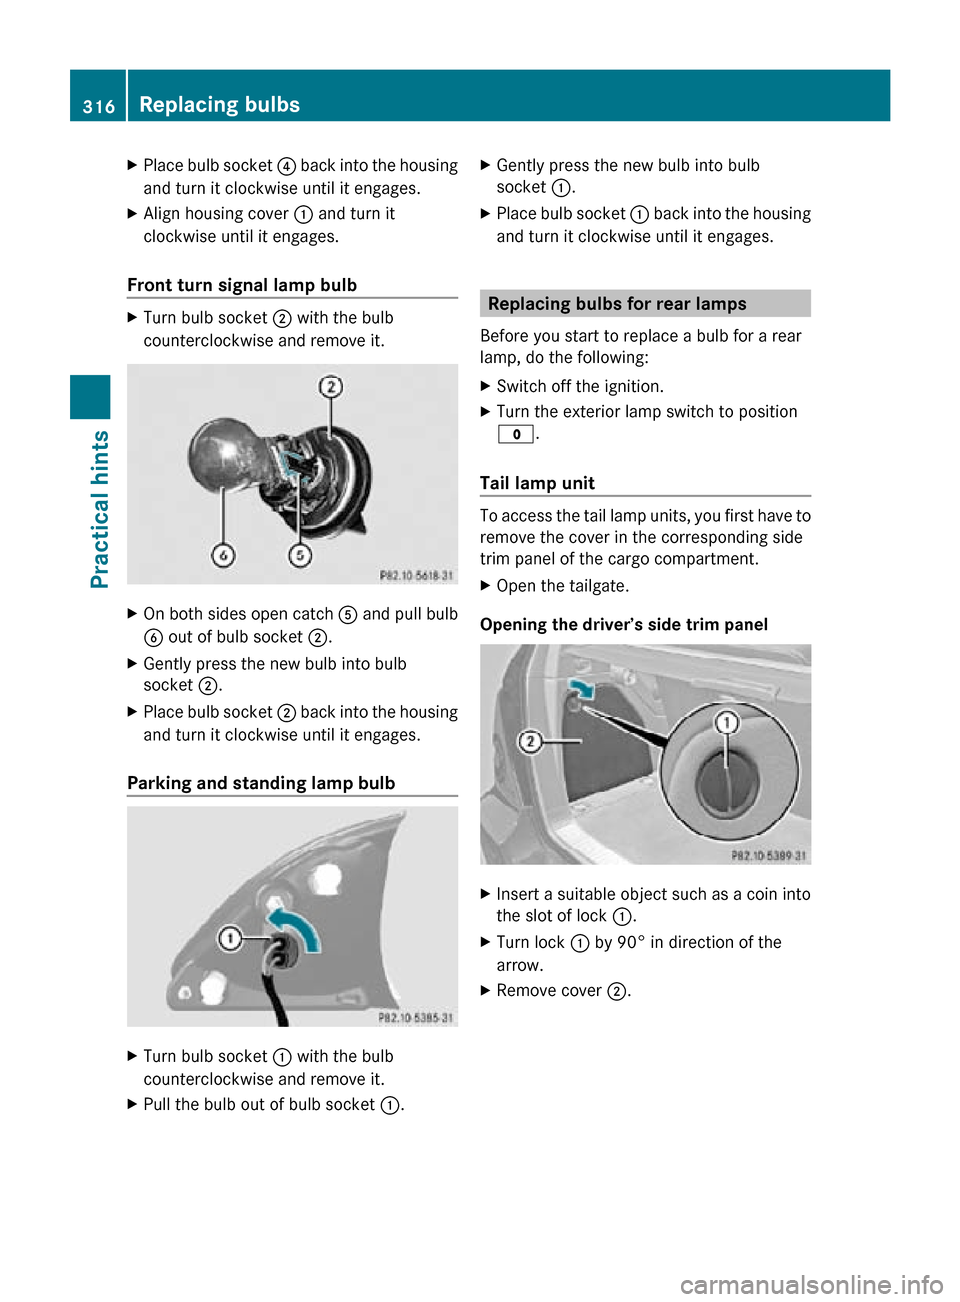
Turn bulb socket ; with the bulb
counterclockwise and remove it. X
On both sides open catch A and pull bulb
B out of bulb socket ;.
X Gently press the new bulb into bulb
socket ;.
X Place bulb socket ; back into the housing
and turn it clockwise until it engages.
Parking and standing lamp bulb X
Turn bulb socket : with the bulb
counterclockwise and remove it.
X Pull the bulb out of bulb socket :.X
Gently press the new bulb into bulb
socket :.
X Place bulb socket : back into the housing
and turn it clockwise until it engages. Replacing bulbs for rear lamps
Before you start to replace a bulb for a rear
lamp, do the following:
X Switch off the ignition.
X Turn the exterior lamp switch to position
$.
Tail lamp unit To access the tail lamp units, you first have to
remove the cover in the corresponding side
trim panel of the cargo compartment.
X
Open the tailgate.
Opening the driver’s side trim panel X
Insert a suitable object such as a coin into
the slot of lock :.
X Turn lock : by 90° in direction of the
arrow.
X Remove cover ;. 316
Replacing bulbsPractical hints
251_AKB; 4; 52, en-US
d2ureepe,
Version: 2.11.8.1 2009-03-23T09:22:52+01:00 - Seite 316
Page 319 of 364
Opening the passenger-side trim panel
X
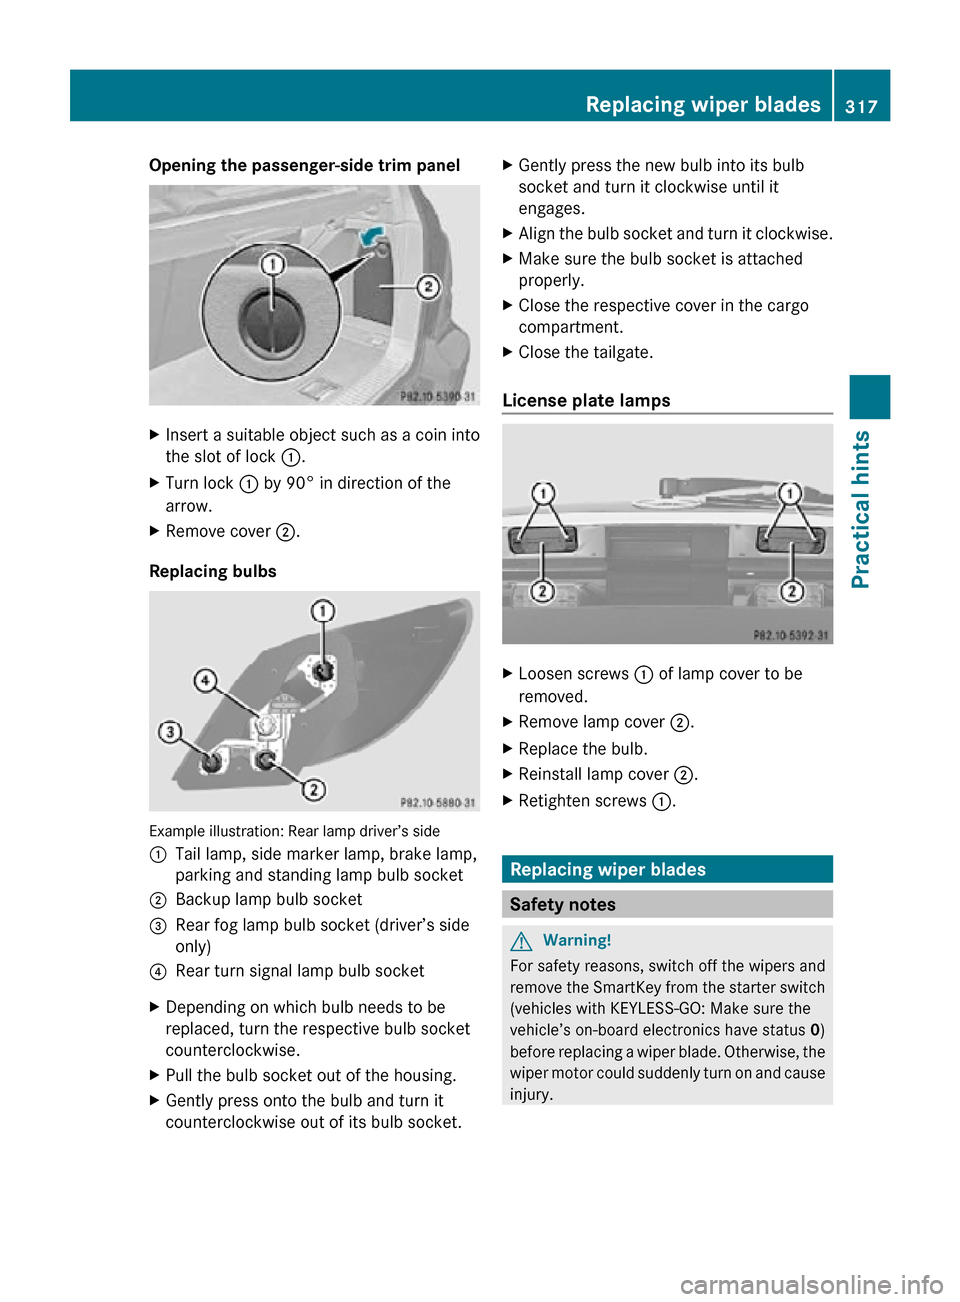
Insert a suitable object such as a coin into
the slot of lock :.
X Turn lock : by 90° in direction of the
arrow.
X Remove cover ;.
Replacing bulbs Example illustration: Rear lamp driver’s side
:
Tail lamp, side marker lamp, brake lamp,
parking and standing lamp bulb socket
; Backup lamp bulb socket
= Rear fog lamp bulb socket (driver’s side
only)
? Rear turn signal lamp bulb socket
X Depending on which bulb needs to be
replaced, turn the respective bulb socket
counterclockwise.
X Pull the bulb socket out of the housing.
X Gently press onto the bulb and turn it
counterclockwise out of its bulb socket. X
Gently press the new bulb into its bulb
socket and turn it clockwise until it
engages.
X Align the bulb socket and turn it clockwise.
X Make sure the bulb socket is attached
properly.
X Close the respective cover in the cargo
compartment.
X Close the tailgate.
License plate lamps X
Loosen screws : of lamp cover to be
removed.
X Remove lamp cover ;.
X Replace the bulb.
X Reinstall lamp cover ;.
X Retighten screws :. Replacing wiper blades
Safety notes
G
Warning!
For safety reasons, switch off the wipers and
remove the SmartKey from the starter switch
(vehicles with KEYLESS-GO: Make sure the
vehicle’s on-board electronics have status 0)
before replacing a wiper blade. Otherwise, the
wiper motor could suddenly turn on and cause
injury. Replacing wiper blades
317Practical hints
251_AKB; 4; 52, en-US
d2ureepe, Version: 2.11.8.1 2009-03-23T09:22:52+01:00 - Seite 317 Z
Page 334 of 364
Always use the particular AdBlue
®
refill
containers for refilling outside the
maintenance service interval. Contact an
authorized Mercedes-Benz Center or call
Roadside Assistance if necessary
(Y page 210).
Additional information on BlueTEC exhaust
gas aftertreatment and AdBlue ®
is available
at any authorized Mercedes-Benz Center. Refilling with AdBlue
®
G
Warning!
Make sure
R AdBlue ®
does not come into contact with
skin, eyes, or clothing
R to keep AdBlue ®
out of the reach of children
If you and/or others have come into contact
with AdBlue ®
:
R If AdBlue ®
has gotten into contact with
eyes, flush with plenty of water immediately
and seek medical help.
R Clean affected skin immediately with plenty
of water.
R If AdBlue ®
was swallowed, rinse mouth
immediately with plenty of water and drink
plenty of water. Consult a physician. G
Warning!
When opening the filler cap of the AdBlue ®
tank ammonia gas vapors may escape. Refill
AdBlue ®
in a well ventilated area only.
Ammonia gas vapors have a pungent odor and
are particularly irritating for your skin,
mucous membranes, and eyes. Inhaling
ammonia gas vapors will cause burning eyes,
nose, and throat, as well as coughing and
watering eyes.
! Only use AdBlue ®
complying with
ISO 22241. Do not add additives to
AdBlue ®
and do not dilute AdBlue ®
with water. Otherwise, the BlueTEC exhaust gas
aftertreatment system could be damaged.
Damage caused by using additives or
diluting with water are not covered by the
Mercedes-Benz Limited Warranty.
! Rinse surfaces that have come into
contact with AdBlue ®
, or remove AdBlue ®
with a moist cloth and cold water
immediately. If AdBlue ®
has crystallized
already, use cold water and a sponge.
AdBlue ®
residues will crystallize and soil
the affected surfaces.
! AdBlue ®
is not a fuel additive and must
not be added to the diesel fuel tank. If
AdBlue ®
reaches the diesel fuel tank, the
engine could be damaged which is not
covered by the Mercedes-Benz Limited
Warranty.
For more information on AdBlue ®
, see
(Y page 354).
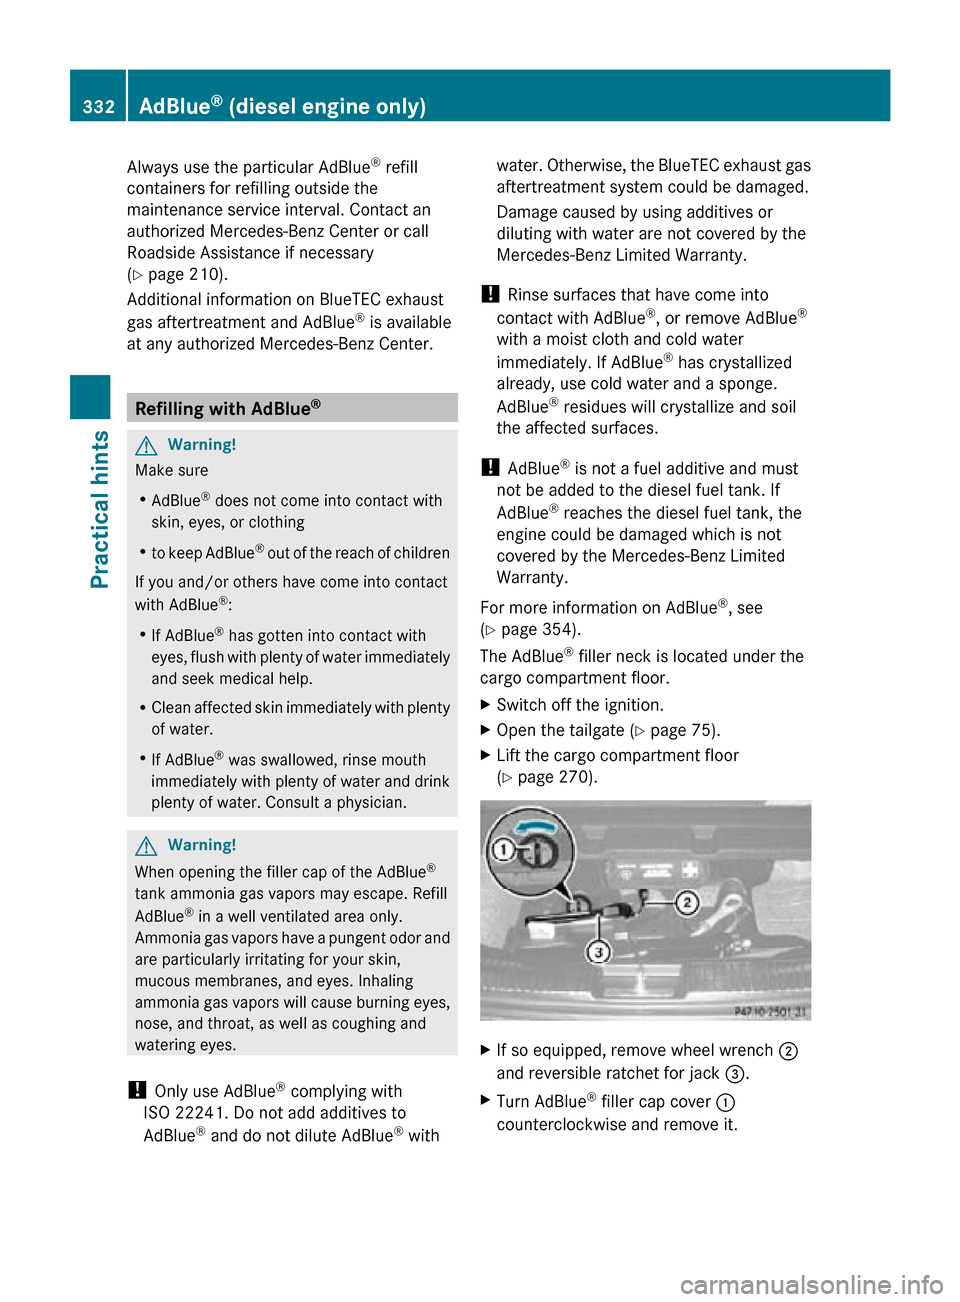
The AdBlue ®
filler neck is located under the
cargo compartment floor.
X Switch off the ignition.
X Open the tailgate ( Y page 75).
X Lift the cargo compartment floor
(Y page 270). X
If so equipped, remove wheel wrench ;
and reversible ratchet for jack =.
X Turn AdBlue ®
filler cap cover :
counterclockwise and remove it. 332
AdBlue ®
(diesel engine only)Practical hints
251_AKB; 4; 52, en-US
d2ureepe, Version: 2.11.8.1 2009-03-23T09:22:52+01:00 - Seite 332
Page 335 of 364
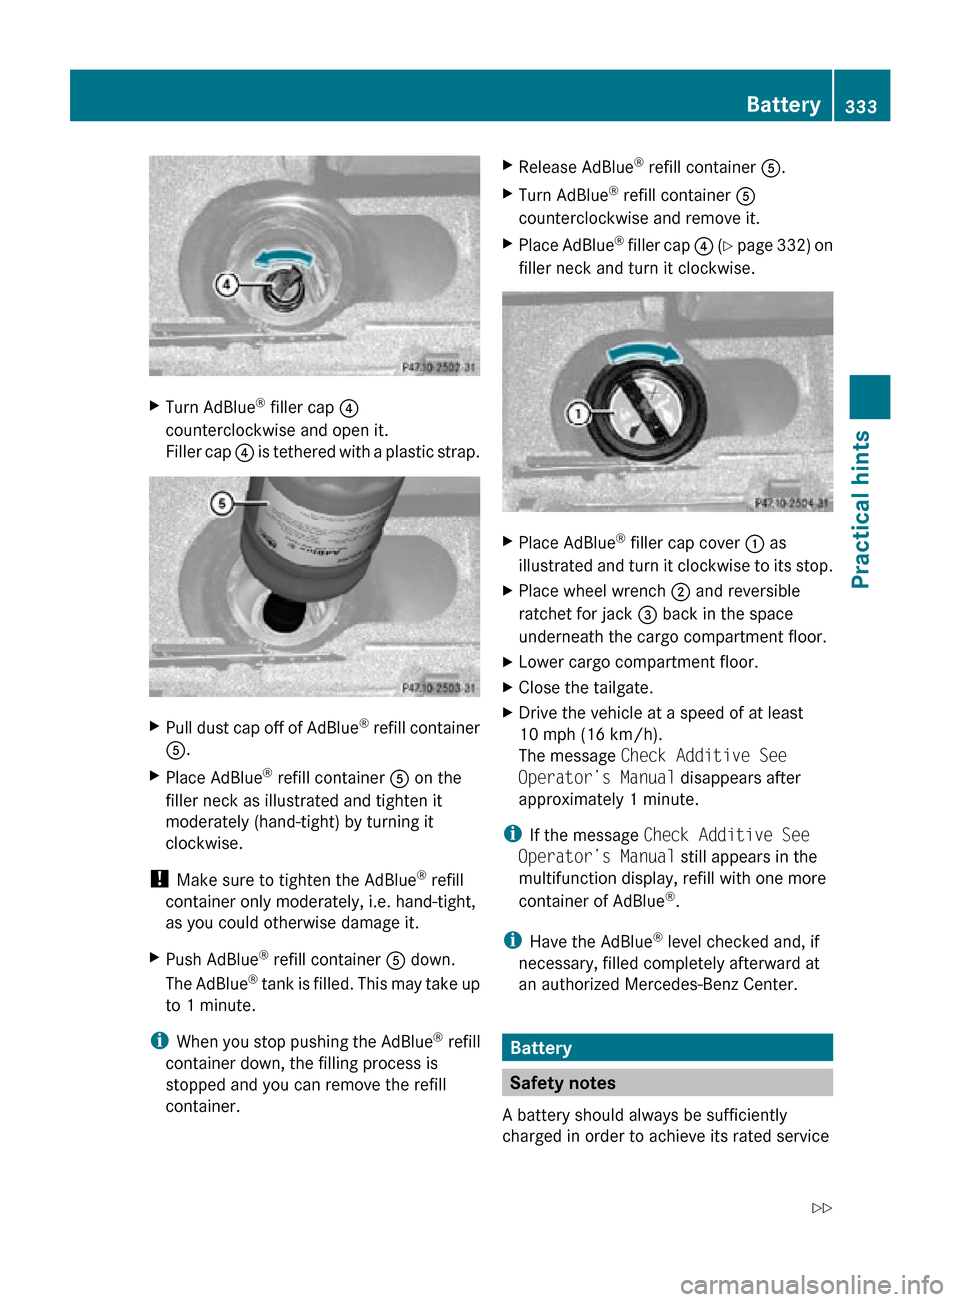
X
Turn AdBlue ®
filler cap ?
counterclockwise and open it.
Filler cap ? is tethered with a plastic strap. X
Pull dust cap off of AdBlue ®
refill container
A.
X Place AdBlue ®
refill container A on the
filler neck as illustrated and tighten it
moderately (hand-tight) by turning it
clockwise.
! Make sure to tighten the AdBlue ®
refill
container only moderately, i.e. hand-tight,
as you could otherwise damage it.
X Push AdBlue ®
refill container A down.
The AdBlue ®
tank is filled. This may take up
to 1 minute.
i When you stop pushing the AdBlue ®
refill
container down, the filling process is
stopped and you can remove the refill
container. X
Release AdBlue ®
refill container A.
X Turn AdBlue ®
refill container A
counterclockwise and remove it.
X Place AdBlue ®
filler cap ? (Y page 332) on
filler neck and turn it clockwise. X
Place AdBlue ®
filler cap cover : as
illustrated and turn it clockwise to its stop.
X Place wheel wrench ; and reversible
ratchet for jack = back in the space
underneath the cargo compartment floor.
X Lower cargo compartment floor.
X Close the tailgate.
X Drive the vehicle at a speed of at least
10 mph (16 km/h).
The message Check Additive See
Operator’s Manual disappears after
approximately 1 minute.
i If the message Check Additive See
Operator’s Manual still appears in the
multifunction display, refill with one more
container of AdBlue ®
.
i Have the AdBlue ®
level checked and, if
necessary, filled completely afterward at
an authorized Mercedes-Benz Center. Battery
Safety notes
A battery should always be sufficiently
charged in order to achieve its rated service Battery
333Practical hints
251_AKB; 4; 52, en-US
d2ureepe, Version: 2.11.8.1 2009-03-23T09:22:52+01:00 - Seite 333 Z
Page 337 of 364
battery cover is non-removable. Do not
attempt to open the battery as otherwise
the battery will be damaged.
VRLA
batteries do not require topping-up of
the electrolyte level. They cannot be
opened to check the electrolyte level.
However, the battery condition must be
checked periodically by performing a
battery conductance test. Refer to
Maintenance Booklet for battery condition
testing intervals.
The factory-equipped battery may only be
replaced with a battery that
R has the same security features
R is of identical size
R is of identical voltage
R is of identical capacity
! As any other battery, the battery may
discharge if you do not operate the vehicle
for an extended period of time. Have the
battery disconnected at a qualified
workshop or an authorized Mercedes-Benz
Center in such a case. You may also
connect an accessory battery charge unit
expressly approved by Mercedes-Benz for
your vehicle model to maintain the battery
charge. Contact an authorized Mercedes-
Benz Center for further information.
The battery, the battery ventilation hose
and the lateral plug must always be
securely installed when the vehicle is in
operation.
! Never loosen or detach battery terminal
clamps while the engine is running or the
SmartKey is in the starter switch or
KEYLESS-GO button is in position 1.
Otherwise the alternator and other
electronic components could be severely
damaged.
Have the battery checked regularly at an
authorized Mercedes-Benz Center.
Refer to Maintenance Booklet for
maintenance intervals or contact an authorized Mercedes-Benz Center for
further information.
i After battery power was interrupted, do
the following:
R Set the clock
(Y page 133).
Vehicles with COMAND system with
navigation module: Time and date are set
automatically.
R Synchronize the door windows
(Y page 107).
R Synchronize the power tilt/sliding
sunroof (Y page 183).
R Synchronize the power tilt/sliding panel
(Y page 186).
R Synchronize the exterior rear view
mirrors (Y page 96). Charging the battery
G
Warning!
Never charge a battery while still installed in
the vehicle unless the accessory battery
charge unit approved by Mercedes-Benz is
being used. Gases may escape during
charging and could cause an explosion that
may
result in personal injury, paint damage or
corrosion.
An accessory battery charge unit specially
adapted for Mercedes-Benz vehicles and
tested and approved by Mercedes-Benz is
available. It permits the charging of the
battery in its installed position. Contact an
authorized Mercedes-Benz Center for
information and availability.
Charge battery in accordance with the
separate instructions for the accessory
battery charger.
Have the battery charged at an authorized
Mercedes-Benz Center. If you charge the
battery yourself, follow the operating
instructions for your charging device. Battery
335
Practical hints
251_AKB; 4; 52, en-US
d2ureepe, Version: 2.11.8.1 2009-03-23T09:22:52+01:00 - Seite 335 Z