2010 MERCEDES-BENZ R320 air condition
[x] Cancel search: air conditionPage 144 of 364
Redialing
The control system stores the most recently
dialed phone numbers. This eliminates the
need to search through your entire phone
book.
X
Press button U or V repeatedly until
the message TEL appears in the
multifunction display.
X Press button 6.
The first number in the redial memory
appears in the multifunction display.
X Press button &
or * repeatedly until
the desired number or name appears in the
multifunction display.
X Press button 6.
The control system dials the selected
phone number. Driving systems
Introduction
This section describes the following driving
systems of your vehicle:
R Cruise control
R Distronic
R Distance warning function (only available
with Distronic)
R Hill-start assist system
R Rear-axle level control
R AIRMATIC
R All-wheel drive (4MATIC)
R Parktronic system
R Rear view camera
The
driving safety systems ABS, BAS, EBP and
ESP ®
are described in the “Safety and
security” section (Y page 63). Cruise control
The cruise control maintains the speed you
set for your vehicle automatically.
The
use of the cruise control is recommended
for driving at a constant speed for extended
periods of time.
The currently set speed or last set speed
(“Resume” function) appears in the status
indicator of the multifunction display:
R USA only: e.g. Cruise 55 Miles
R Canada only: e.g. ¯ 90 Km/h G
Warning!
The cruise control is a convenience system
designed to assist the driver during vehicle
operation. The driver is and must always
remain responsible for the vehicle’s speed
and for safe brake operation.
Only
use the cruise control if the road, traffic,
and weather conditions make it advisable to
travel at a constant speed.
R The use of the cruise control can be
dangerous on winding roads or in heavy
traffic because conditions do not allow safe
driving at a constant speed.
R The use of the cruise control can be
dangerous on slippery roads. Rapid
changes in tire traction can result in wheel
spin and loss of control.
R Deactivate the cruise control when driving
in fog.
The “Resume” function should only be
operated if the driver is fully aware of the
previously set speed and wishes to resume
this particular preset speed. 142
Driving systems
Controls in detail
251_AKB; 4; 52, en-US
d2ureepe,
Version: 2.11.8.1 2009-03-23T09:22:52+01:00 - Seite 142
Page 148 of 364
G
Warning!
Use of the Distronic can be dangerous on
slippery roads. Rapid changes in tire traction
can result in wheel spin and loss of control.
The Distronic does not function in adverse
sight and distance conditions. Do not use the
Distronic during conditions of fog, heavy rain,
snow or sleet. G
Warning!
The Distronic cannot take weather conditions
into account. Switch off the Distronic or do
not switch it on if:
R roads are slippery or covered with snow or
ice. The wheels could lose traction while
braking or accelerating, and the vehicle
could skid.
R the Distronic system sensor cover is dirty
or visibility is diminished due to snow, rain
or fog, for example. The distance control
system functionality could be impaired.
Always pay attention to surrounding traffic
conditions even while the Distronic is
switched on. Otherwise, you may not be able
to recognize dangerous situations until it is
too late. This could cause an accident in which
you and/or others could be injured. G
Warning!
The “Resume” function should only be
operated if the driver is fully aware of the
previously set speed and wishes to resume
this particular preset speed. G
Warning!
Close attention to road and traffic conditions
is imperative at all times, regardless of
whether or not the Distronic is activated.
Use of the Distronic can be dangerous on
winding roads or in heavy traffic because
conditions do not allow safe driving at a
constant speed.
The Distronic will not react to stationary
objects in the roadway (e.g. a stopped vehicle
in a traffic jam or a disabled vehicle). The Distronic will also not respond to oncoming
vehicles.
Switch off the Distronic:
R
when changing from the left to the right
lane if vehicles are moving more slowly in
the left lane
R when entering a turn lane or highway off
ramp
R in complex driving situations, such as in
highway construction zones
In these situations, the Distronic will continue
to maintain the set speed unless deactivated.
The Distronic is designed and intended only
to maintain a set speed and keep a set
distance from moving objects in front of it.
i This device has been approved by the FCC
as a “Vehicular Radar System”. The radar
sensor is intended for use in an automotive
radar system only. Removal, tampering, or
altering of the device will void any
warranties, and is not permitted by the
FCC. Do not tamper with, alter, or use in
any non-approved way.
Any unauthorized modification to this
device could void the user’s authority to
operate the equipment.
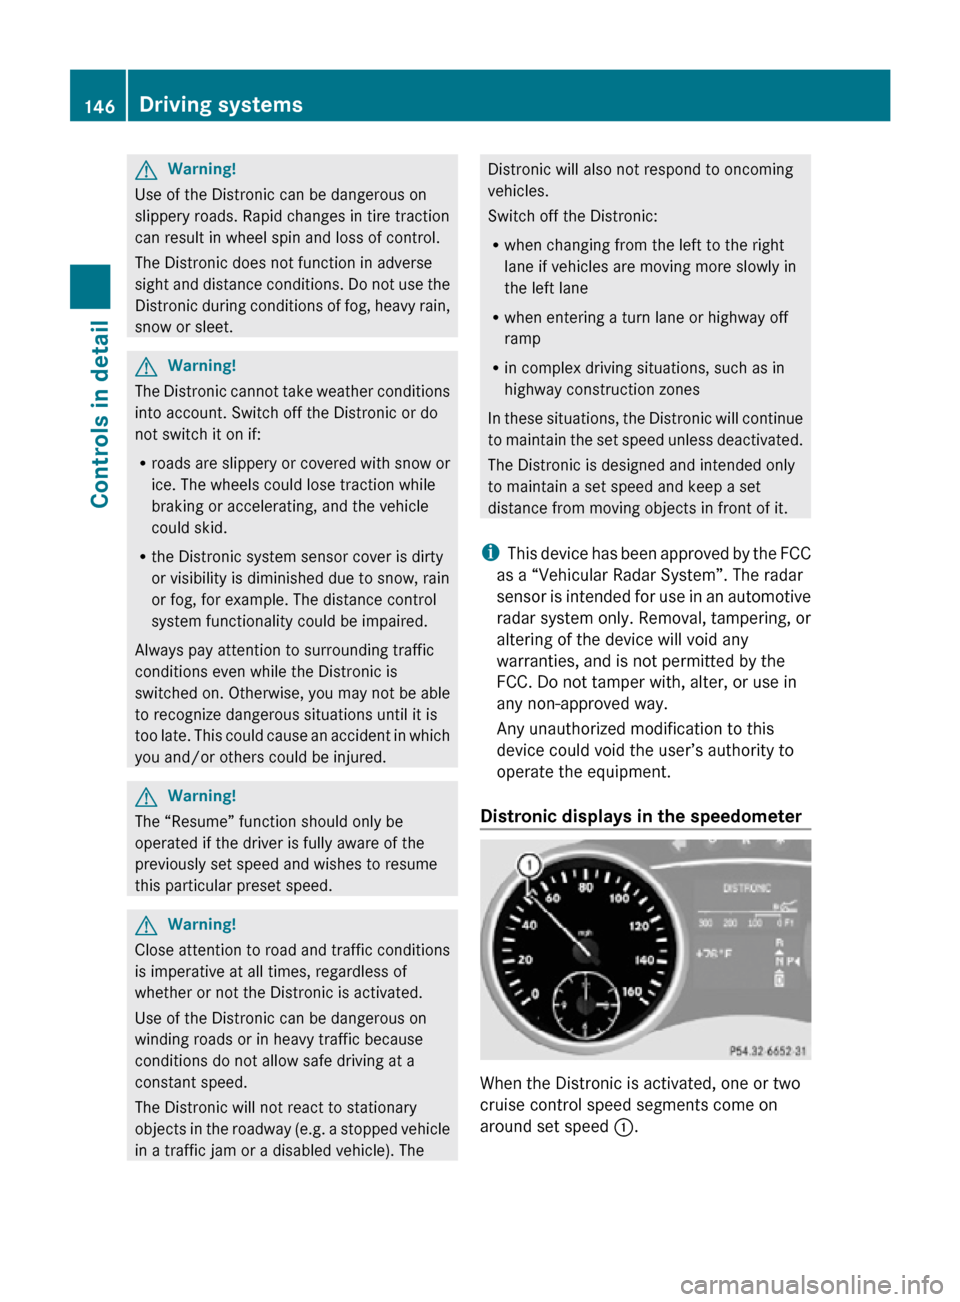
Distronic displays in the speedometer When the Distronic is activated, one or two
cruise control speed segments come on
around set speed
:.146
Driving systemsControls in detail
251_AKB; 4; 52, en-US
d2ureepe,
Version: 2.11.8.1 2009-03-23T09:22:52+01:00 - Seite 146
Page 155 of 364
X
Activating/deactivating: Activate or
deactivate the distance warning function in
the control system (Y page 138).
When activated, the distance warning
function indicator Ä appears in the
multifunction display. Hill-start assist system
G
Warning!
The hill-start assist system is not designed to
function as a parking brake. It does not
prevent the vehicle from moving when parked
on an incline.
Always engage the parking brake in addition
to shifting the automatic transmission into
park position P.
On uphill grades, the hill-start assist system
maintains the pressure in the brake system
for approximately 1 second after you have
released the brake pedal. Therefore, you can
start off smoothly without the vehicle moving
immediately after releasing the brake pedal.
X Depress the brake pedal.
X Shift the automatic transmission into drive
position D or reverse gear R.
X Release the brake pedal.
X Carefully depress the accelerator pedal.
The hill-start assist system is inactive
R when starting off on a level road or downhill
grades
R with the automatic transmission in neutral
position N
R with the parking brake engaged
R if the ESP ®
has switched off due to a
malfunction Rear-axle level control
The rear-axle level control adjusts the vehicle
level for the rear axle. The rear-axle level
control is beneficial because it keeps the vehicle level at the rear axle constant,
independent of the load.
i
Observe the information on towing a
trailer, see “Trailer towing” ( Y page 256). AIRMATIC
The AIRMATIC lets you select the chassis and
suspension setup. The chassis and
suspension setup adjusts the damping
behavior and the ride height for your vehicle.
The AIRMATIC consists of two components.
The Adaptive Damping System (ADS)
(Y page 153) and the vehicle level control
(Y page 154). Adaptive Damping System (ADS)
The Adaptive Damping System (ADS) is
controlled electronically and operates
continuously. It adjusts the damping
characteristics to the current operating and
driving conditions. The damping is adjusted
individually for each wheel. Driving safety and
tire comfort are increased.
The fine tuning of the damping is dependent
on:
R your driving style
R road surface conditions
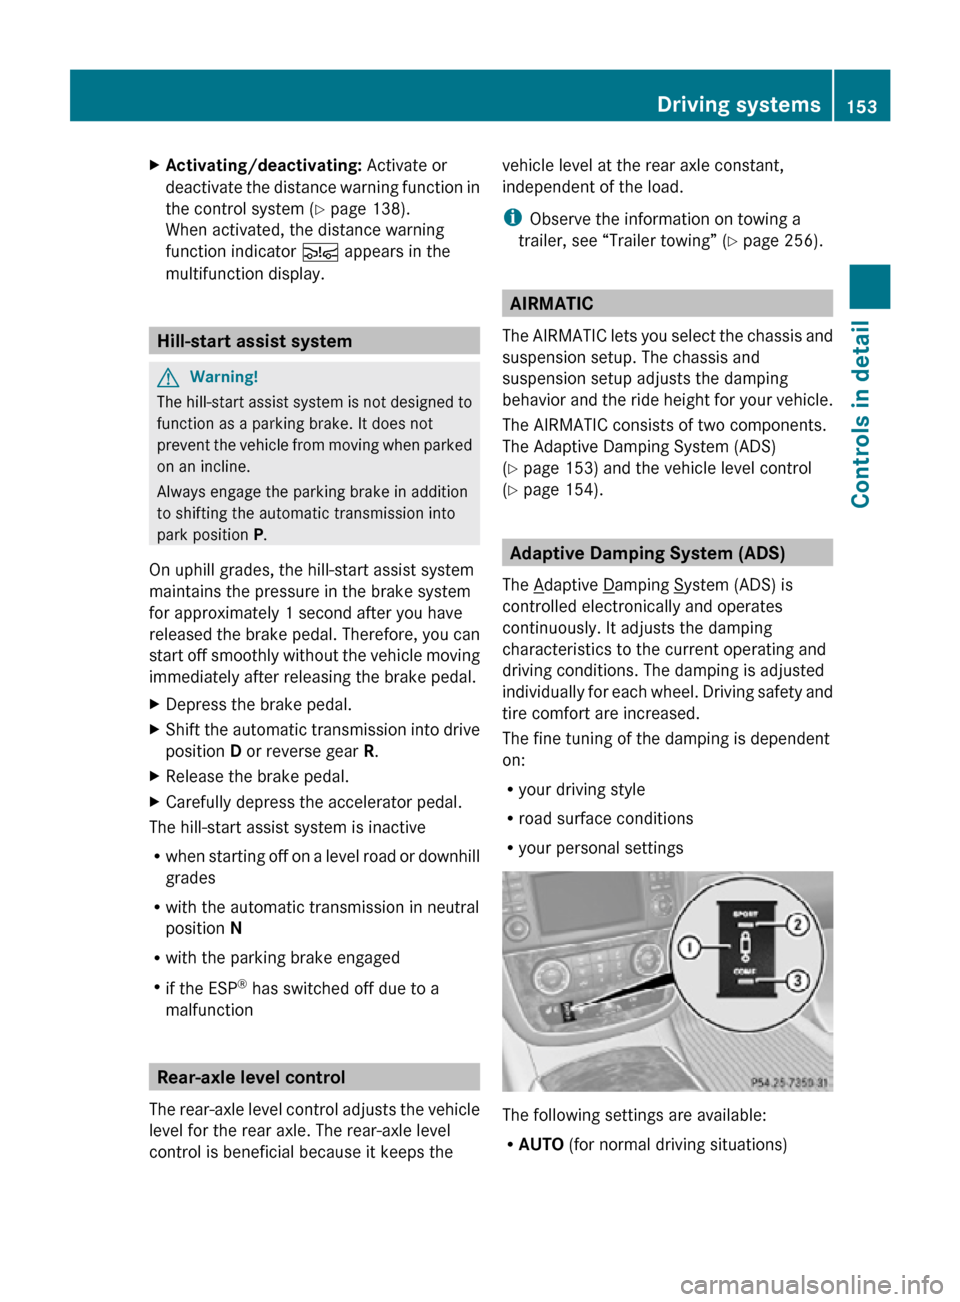
R your personal settings The following settings are available:
R
AUTO (for normal driving situations) Driving systems
153Controls in detail
251_AKB; 4; 52, en-US
d2ureepe, Version: 2.11.8.1 2009-03-23T09:22:52+01:00 - Seite 153 Z
Page 156 of 364

Indicator lamps ; and = are off.
R SPORT (for sporty driving)
Indicator lamp ; comes on.
R COMF (for comfort driving)
Indicator lamp = comes on.
X Start the engine.
X Press ADS switch : repeatedly until the
desired suspension tuning is reached.
The setting remains stored when you turn off
the engine. Vehicle level control
Your vehicle automatically adjusts its ride
height.
The all-around vehicle level control provides
best possible suspension and constant
ground clearance. The vehicle lowers at high
speed automatically in order to increase
driving safety and to reduce fuel
consumption.
Changes to the vehicle level should be made
while the vehicle is moving. The vehicle will
then reach the set level as fast as possible.
When you park the vehicle and the ambient
temperature changes, the vehicle level may
change visibly. When the temperature drops,
the vehicle lowers. When the temperature
rises, the vehicle raises.
The vehicle begins adjusting to the set vehicle
level as soon as the doors or tailgate are
unlocked or opened or closed with the vehicle
unlocked.
For major changes in vehicle level, the engine
must be running. G
Warning!
Make sure no one is near the wheel housing
or under the vehicle when you lower the
vehicle while it is standing still. Limbs could
become wedged into or under the vehicle.
For safety reasons, the vehicle can only be
lowered with all doors and the tailgate closed.
Lowering is interrupted if a door or the tailgate is opened and will continue after the door is
closed again.
! Keep in mind that on rough or uneven
roads, adjusting the vehicle to a lower level
may cause the vehicle underbody to come
in contact with the road and result in
damage to the vehicle underbody. Always
make sure the vehicle has sufficient ground
clearance before adjusting it to a lower
level.
! Before jacking up the vehicle with
equipment that lifts one or more of the
wheels completely off of the ground,
remove the SmartKey from the starter
switch.
i The activation threshold is defined by the
ADS setting (Y page 153). Basic settings
The following vehicle chassis ride heights can
be selected using vehicle level control
switch : in the center console:
Level Driving situation
Raised level For driving on rough roads.
Indicator lamp ; is on.
Highway
level For driving on paved roads
in fair or better condition.
Indicator lamp ; is off.154
Driving systemsControls in detail
251_AKB; 4; 52, en-US
d2ureepe,
Version: 2.11.8.1 2009-03-23T09:22:52+01:00 - Seite 154
Page 167 of 364
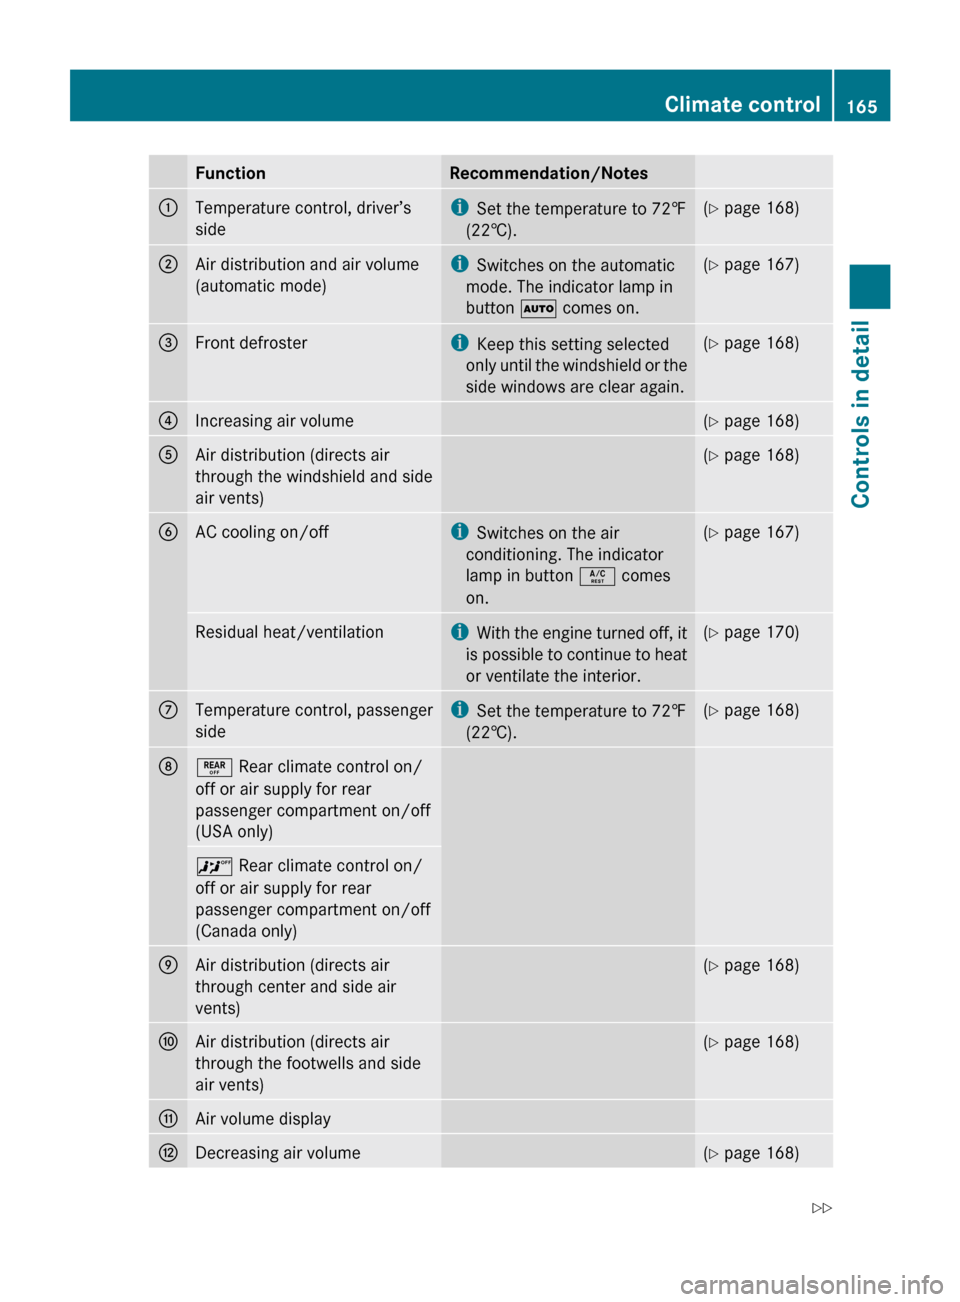
Function Recommendation/Notes
:
Temperature control, driver’s
side i
Set the temperature to 72 ‡
(22†). (Y page 168)
;
Air distribution and air volume
(automatic mode) i
Switches on the automatic
mode. The indicator lamp in
button à comes on. (Y page 167)
=
Front defroster i
Keep this setting selected
only
until the windshield or the
side windows are clear again. (Y page 168)
?
Increasing air volume (Y page 168)
A
Air distribution (directs air
through the windshield and side
air vents) (Y page 168)
B
AC cooling on/off i
Switches on the air
conditioning. The indicator
lamp in button Á comes
on. (Y page 167)
Residual heat/ventilation i
With
the engine turned off, it
is possible to continue to heat
or ventilate the interior. (Y page 170)
C
Temperature control, passenger
side i
Set the temperature to 72
‡
(22†). (Y page 168)
D
± Rear climate control on/
off or air supply for rear
passenger compartment on/off
(USA only)
^ Rear climate control on/
off or air supply for rear
passenger compartment on/off
(Canada only)
E
Air distribution (directs air
through center and side air
vents) (Y page 168)
F
Air distribution (directs air
through the footwells and side
air vents) (Y page 168)
G
Air volume display
H
Decreasing air volume (Y page 168)Climate control
165
Controls in detail
251_AKB; 4; 52, en-US
d2ureepe, Version: 2.11.8.1 2009-03-23T09:22:52+01:00 - Seite 165 Z
Page 168 of 364
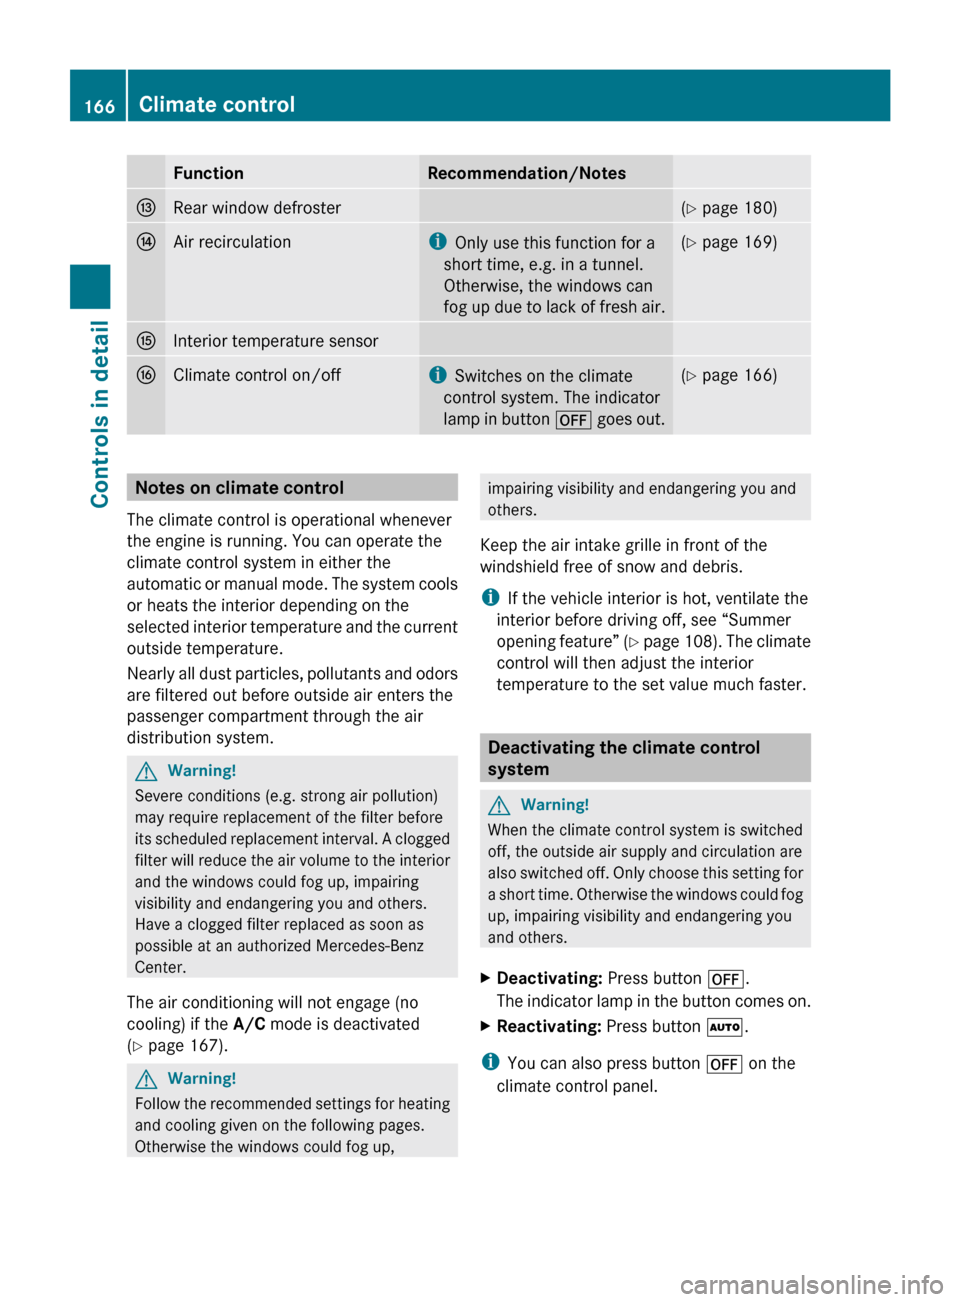
Function Recommendation/Notes
I
Rear window defroster (Y page 180)
J
Air recirculation i
Only use this function for a
short time, e.g. in a tunnel.
Otherwise, the windows can
fog
up due to lack of fresh air. (Y page 169)
K
Interior temperature sensor
L
Climate control on/off i
Switches on the climate
control system. The indicator
lamp
in button ^ goes out. (Y page 166)
Notes on climate control
The climate control is operational whenever
the engine is running. You can operate the
climate control system in either the
automatic
or manual mode. The system cools
or heats the interior depending on the
selected interior temperature and the current
outside temperature.
Nearly all dust particles, pollutants and odors
are filtered out before outside air enters the
passenger compartment through the air
distribution system. G
Warning!
Severe conditions (e.g. strong air pollution)
may require replacement of the filter before
its
scheduled replacement interval. A clogged
filter will reduce the air volume to the interior
and the windows could fog up, impairing
visibility and endangering you and others.
Have a clogged filter replaced as soon as
possible at an authorized Mercedes-Benz
Center.
The air conditioning will not engage (no
cooling) if the A/C mode is deactivated
(Y page 167). G
Warning!
Follow the recommended settings for heating
and cooling given on the following pages.
Otherwise the windows could fog up, impairing visibility and endangering you and
others.
Keep the air intake grille in front of the
windshield free of snow and debris.
i If the vehicle interior is hot, ventilate the
interior before driving off, see “Summer
opening
feature” (Y page 108). The climate
control will then adjust the interior
temperature to the set value much faster. Deactivating the climate control
system
G
Warning!
When the climate control system is switched
off, the outside air supply and circulation are
also
switched off. Only choose this setting for
a short time. Otherwise the windows could fog
up, impairing visibility and endangering you
and others.
X Deactivating: Press button ^.
The
indicator lamp in the button comes on.
X Reactivating: Press button Ã.
i You can also press button ^ on the
climate control panel. 166
Climate control
Controls in detail
251_AKB; 4; 52, en-US
d2ureepe,
Version: 2.11.8.1 2009-03-23T09:22:52+01:00 - Seite 166
Page 169 of 364
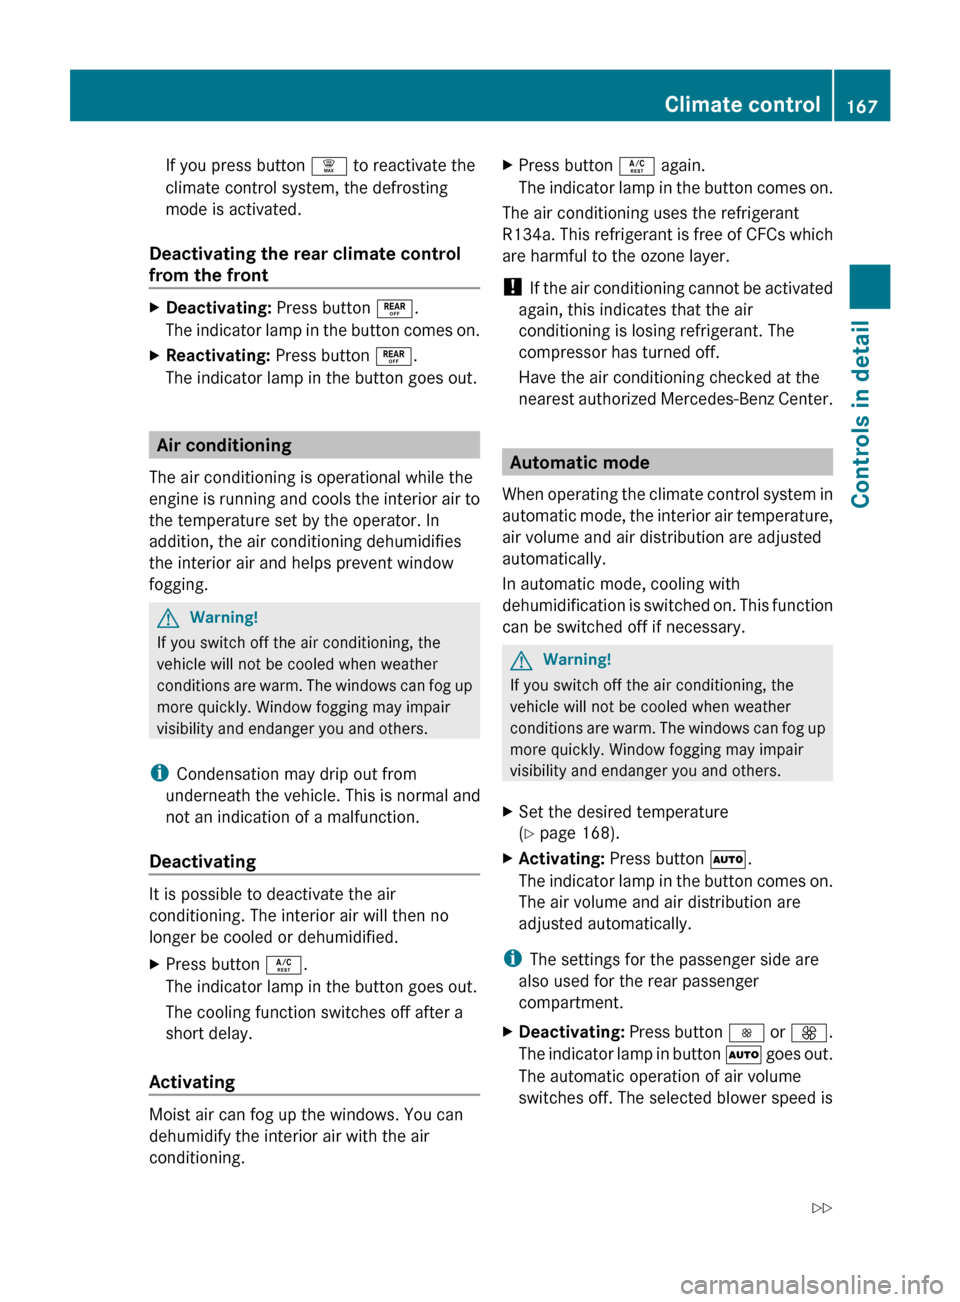
If you press button ¦ to reactivate the
climate control system, the defrosting
mode is activated.
Deactivating the rear climate control
from the front X
Deactivating: Press button ±.
The indicator lamp in the button comes on.
X Reactivating: Press button ±.
The indicator lamp in the button goes out. Air conditioning
The air conditioning is operational while the
engine
is running and cools the interior air to
the temperature set by the operator. In
addition, the air conditioning dehumidifies
the interior air and helps prevent window
fogging. G
Warning!
If you switch off the air conditioning, the
vehicle will not be cooled when weather
conditions
are warm. The windows can fog up
more quickly. Window fogging may impair
visibility and endanger you and others.
i Condensation may drip out from
underneath the vehicle. This is normal and
not an indication of a malfunction.
Deactivating It is possible to deactivate the air
conditioning. The interior air will then no
longer be cooled or dehumidified.
X
Press button Á.
The indicator lamp in the button goes out.
The cooling function switches off after a
short delay.
Activating Moist air can fog up the windows. You can
dehumidify the interior air with the air
conditioning. X
Press button Á again.
The
indicator lamp in the button comes on.
The air conditioning uses the refrigerant
R134a.
This refrigerant is free of CFCs which
are harmful to the ozone layer.
! If the air conditioning cannot be activated
again, this indicates that the air
conditioning is losing refrigerant. The
compressor has turned off.
Have the air conditioning checked at the
nearest authorized Mercedes-Benz Center. Automatic mode
When
operating the climate control system in
automatic mode, the interior air temperature,
air volume and air distribution are adjusted
automatically.
In automatic mode, cooling with
dehumidification is switched on. This function
can be switched off if necessary. G
Warning!
If you switch off the air conditioning, the
vehicle will not be cooled when weather
conditions
are warm. The windows can fog up
more quickly. Window fogging may impair
visibility and endanger you and others.
X Set the desired temperature
(Y page 168).
X Activating: Press button Ã.
The
indicator lamp in the button comes on.
The air volume and air distribution are
adjusted automatically.
i The settings for the passenger side are
also used for the rear passenger
compartment.
X Deactivating:
Press button I or K.
The indicator lamp in button à goes out.
The automatic operation of air volume
switches off. The selected blower speed is Climate control
167
Controls in detail
251_AKB; 4; 52, en-US
d2ureepe, Version: 2.11.8.1 2009-03-23T09:22:52+01:00 - Seite 167 Z
Page 170 of 364
shown in air volume display
G
(Y page 164).
or
X Press air distribution button ¯, P, or
O.
The indicator lamp in button à goes out.
The automatic operation of air distribution
switches off. Setting the temperature
You can adjust the air temperature on each
side of the passenger compartment. You
should
raise or lower the temperature setting
in small increments, preferably starting at
72‡ (22†).
X Increasing/decreasing: Turn
temperature control : and/or C
(Y page 164) slightly clockwise or
counterclockwise. Adjusting air distribution
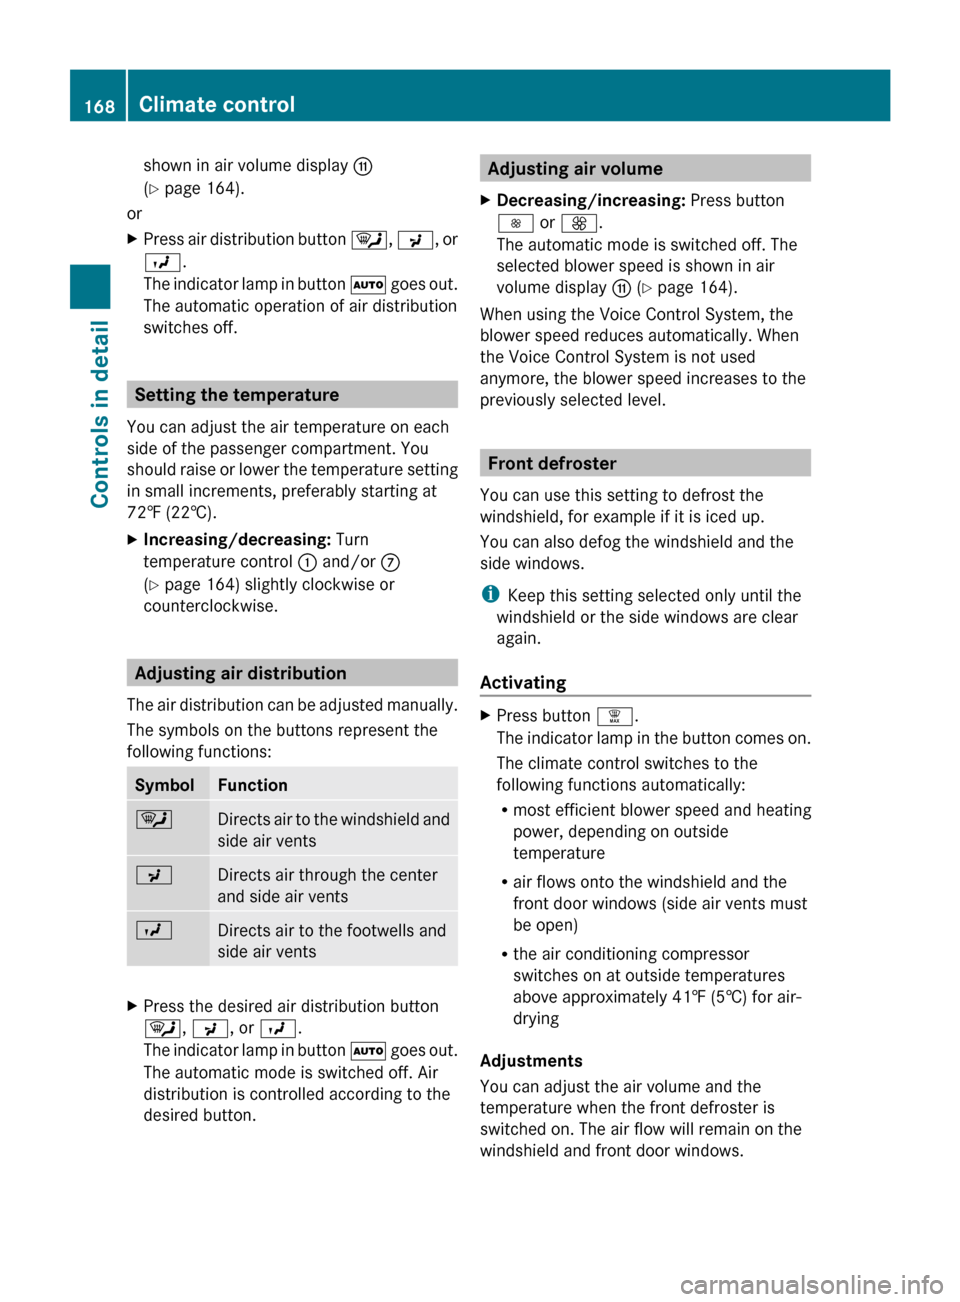
The
air distribution can be adjusted manually.
The symbols on the buttons represent the
following functions: Symbol Function
¯
Directs air to the windshield and
side air vents
P
Directs air through the center
and side air vents
O
Directs air to the footwells and
side air vents
X
Press the desired air distribution button
¯, P, or O.
The
indicator lamp in button à goes out.
The automatic mode is switched off. Air
distribution is controlled according to the
desired button. Adjusting air volume
X Decreasing/increasing: Press button
I or K.
The automatic mode is switched off. The
selected blower speed is shown in air
volume display G (Y page 164).
When using the Voice Control System, the
blower speed reduces automatically. When
the Voice Control System is not used
anymore, the blower speed increases to the
previously selected level. Front defroster
You can use this setting to defrost the
windshield, for example if it is iced up.
You can also defog the windshield and the
side windows.
i Keep this setting selected only until the
windshield or the side windows are clear
again.
Activating X
Press button ¦.
The
indicator lamp in the button comes on.
The climate control switches to the
following functions automatically:
R most efficient blower speed and heating
power, depending on outside
temperature
R air flows onto the windshield and the
front door windows (side air vents must
be open)
R the air conditioning compressor
switches on at outside temperatures
above approximately 41‡ (5†) for air-
drying
Adjustments
You can adjust the air volume and the
temperature when the front defroster is
switched on. The air flow will remain on the
windshield and front door windows. 168
Climate control
Controls in detail
251_AKB; 4; 52, en-US
d2ureepe,
Version: 2.11.8.1 2009-03-23T09:22:52+01:00 - Seite 168