2010 MERCEDES-BENZ ML350 manual unlock
[x] Cancel search: manual unlockPage 89 of 368

Make sure
Ryou can reach the steering wheel with your
arms slightly bent at the elbows
Ryou can move your legs freely
Rall displays (including malfunction and
indicator lamps) on the instrument cluster
are clearly visible
Steering wheel adjustment, manual
XUnlocking: Pull release handle : out to
its stop limit.
XMove steering wheel to the desired
position.
XLocking: Push release handle : back to
its original position.
XMake sure the steering wheel is securely
locked by trying to move it up and down as
well as in and out before driving off.
Steering wheel adjustment, electrical
XAdjusting steering wheel in or out: Move
stalk in direction of arrows :.
XAdjusting steering wheel up or down:
Move stalk in direction of arrows ;.
iYou can store the settings for the steering
wheel with the memory function
(Y page 92).
Easy-entry/exit feature
This feature allows the driver an easier entry
into and exit from the vehicle. When entering
and exiting the vehicle, the steering wheel is
in its uppermost position.
The easy-entry/exit feature can be activated
or deactivated in the Comfort submenu of the
control system (Y page 135).
GWarning!
You must make sure no one can become
trapped or injured by the moving steering
wheel when the easy-entry/exit feature is
activated.
To stop steering wheel movement do one of
the following:
RMove steering wheel adjustment stalk.
RPress one of the memory position buttons.
RPress memory button M.
Do not leave children unattended in the
vehicle, or with access to an unlocked vehicle.
Children could open the driver’s door and
unintentionally activate the easy-entry/exit
feature, which could result in an accident
and/or serious personal injury.
With the easy-entry/exit feature activated,
the steering wheel will return to its last set
position when you close the driver’s door with
the ignition switched on. The steering wheel
will also return to its last set position when
you insert the SmartKey into the starter
switch or press the KEYLESS-GO start/stop
button once with the driver’s door closed.
Multifunction steering wheel87Controls in detail164_AKB; 7; 31, en-USd2ureepe,Version: 2.11.8.12009-09-11T12:07:36+02:00 - Seite 87Z
Page 93 of 368
The passenger-side exterior rear view mirror
returns to its previously stored driving
position
R10 seconds after you have put the gear
selector lever out of reverse gear R
Rimmediately once your vehicle exceeds a
speed of approximately 6 mph (10 km/h)
Rimmediately when you press button : to
select the driver’s side exterior rear view
mirror
Power-folding exterior rear view
mirrors
! Before you drive the vehicle through an
automatic car wash, fold in the exterior rear
view mirrors. Otherwise they may get
damaged.
Folding in and out automatically
The function must be activated in the
Convenience submenu (Y page 137).
The exterior rear view mirrors fold in
automatically as soon as the vehicle is locked
from the outside.
The exterior rear view mirrors fold out
automatically as soon as the vehicle is
unlocked and the driver’s or front passenger
door is subsequently opened.
Synchronizing
The power-folding rear view mirrors may have
to be synchronized after the vehicle battery
has been disconnected or discharged. If the
exterior rear view mirrors do not fold properly
upon locking or unlocking the vehicle, do the
following:
XMake sure the power-folding function in the
control system is activated (Y page 137).
XWhen the power-folding function is
activated and the exterior rear view
mirrors still do not fold properly: Fold
each exterior rear view mirror in completely
(Y page 91).
XFold each exterior rear view mirror out
completely (Y page 91).
When the exterior rear view mirrors fold
properly upon locking the vehicle, the exterior
mirrors are synchronized. Otherwise repeat
the above steps.
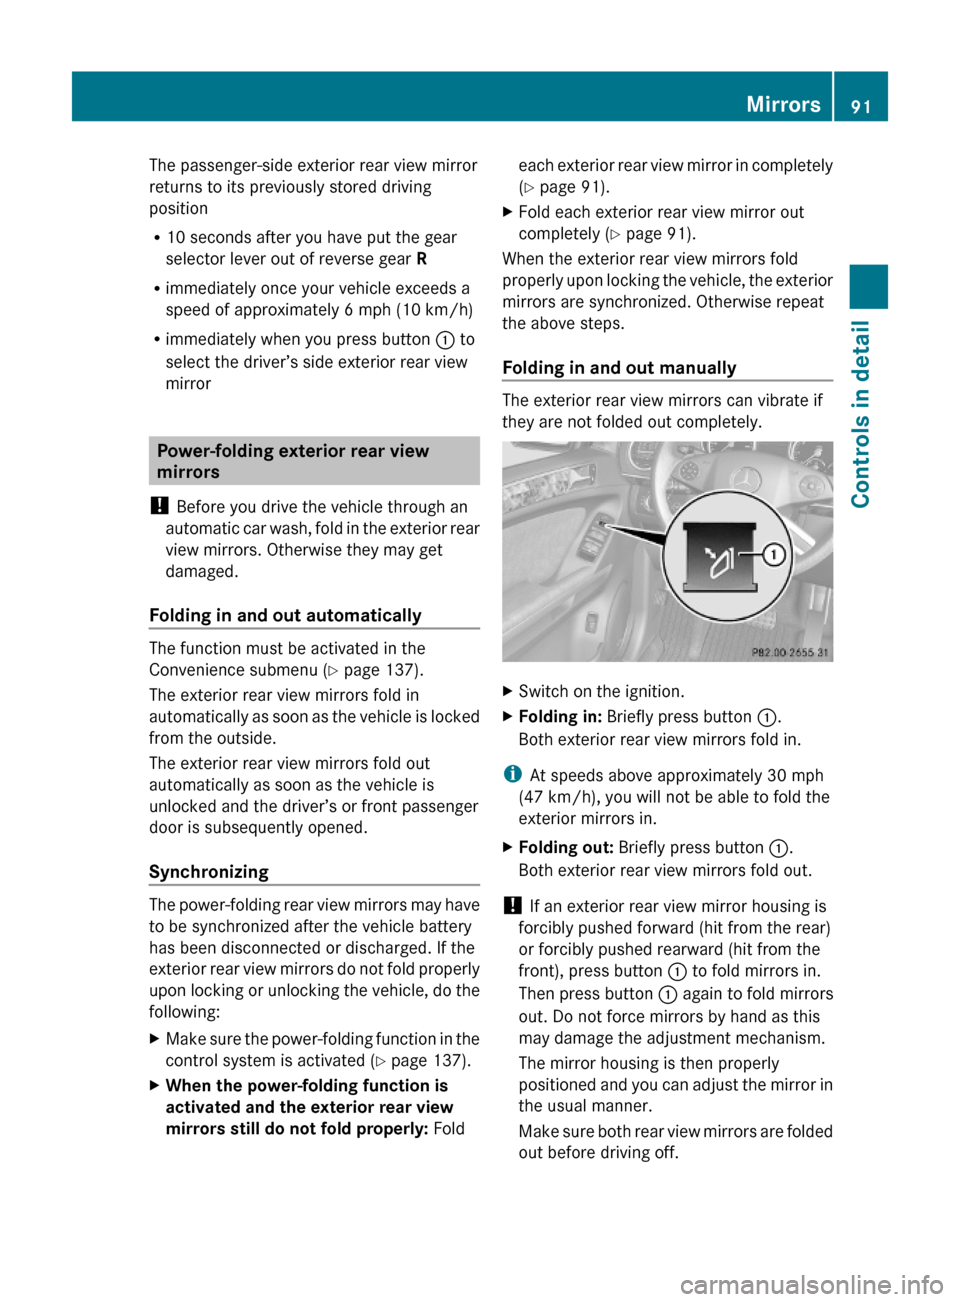
Folding in and out manually
The exterior rear view mirrors can vibrate if
they are not folded out completely.
XSwitch on the ignition.XFolding in: Briefly press button :.
Both exterior rear view mirrors fold in.
iAt speeds above approximately 30 mph
(47 km/h), you will not be able to fold the
exterior mirrors in.
XFolding out: Briefly press button :.
Both exterior rear view mirrors fold out.
! If an exterior rear view mirror housing is
forcibly pushed forward (hit from the rear)
or forcibly pushed rearward (hit from the
front), press button : to fold mirrors in.
Then press button : again to fold mirrors
out. Do not force mirrors by hand as this
may damage the adjustment mechanism.
The mirror housing is then properly
positioned and you can adjust the mirror in
the usual manner.
Make sure both rear view mirrors are folded
out before driving off.
Mirrors91Controls in detail164_AKB; 7; 31, en-USd2ureepe,Version: 2.11.8.12009-09-11T12:07:36+02:00 - Seite 91Z
Page 100 of 368

Runlock the vehicle
Rremove the SmartKey from the starter
switch (Interior Lighting Delayed
Shut-off must be switched on
(Y page 135))
Ropen a door
Ropen the tailgate
The interior lighting goes out after a short
time.
iIf a door remains open, the interior lamps
go out automatically after approximately
5 minutes when the SmartKey is removed
or in starter switch position 0.
XDeactivating: Press button ~.
Button ~ engages.
Manual control
! An interior lamp switched on manually
does not go out automatically.
Leaving an interior lamp switched on for an
extended period of time with the engine
turned off could result in a discharged
battery.
XSwitching front interior lighting on/
off: Press switch c.
XSwitching rear interior lighting on/off:
Press switch v.
XSwitching front reading lamps on/off:
Press respective switch p.
Emergency lighting
The interior lighting comes on automatically
if the vehicle is involved in an accident.
Switching off:
XPress button ~.
or
XPress hazard warning flasher switch
(Y page 96).
or
XUnlock the vehicle with the SmartKey.Interior lighting in the rear
! An interior lamp switched on manually
does not go out automatically.
Leaving an interior lamp switched on for an
extended period of time with the engine
turned off could result in a discharged
battery.
XSwitching rear reading lamps on/off:
Press reading lamp : where indicated by
the arrow.
Wipers
Notes
! Do not operate the wipers when the
windshield/rear window is dry. Dust that
accumulates on a windshield/rear window
might scratch the glass and/or damage the
wiper blades when wiping occurs on a dry
windshield/rear window. If it is necessary
to operate the wipers in dry weather
conditions, always operate the wipers with
washer fluid.
Windshield wipers
XObserve notes on page (Y page 98).98WipersControls in detail
164_AKB; 7; 31, en-USd2ureepe,Version: 2.11.8.12009-09-11T12:07:36+02:00 - Seite 98
Page 201 of 368
XStart the engine.
RThe temperature of the DC/AC inverter is
temporarily too high.
XPull the plug of the small device out of
115V AC socket : and plug it in again
after waiting a few minutes.
R Some small devices have a continuous
power rating of less than 150 W but a very
high switch-on current. Such devices will
not operate. When connecting such a
device, 115V AC socket : will not provide
power.
If LED ; still does not come on, contact an
authorized Mercedes-Benz Center.
Tele Aid
! In order to activate the Tele Aid system, a
subscriber agreement must be completed.
To ensure your system is activated and
operational, please press Information
button E to perform the acquaintance
call. Failure to complete either of these
steps may result in a system that is not
activated.
If you have any questions regarding
activation, please call the Customer
Assistance Center at
1-800-FOR-MERCedes (1-800-367-6372)
(USA only) or 1-888-923-8367 (Canada
only).
Shortly after the completion of your Tele Aid
acquaintance call, you will receive a user ID
and password in the mail. You may use this
password to access the Tele Aid section in
“Owner’s Online” at www.mbusa.com (USA
only). The “My Tele Aid” section will give you
access to account information, remote door
unlock and more.
The Tele Aid system is available if
R it has been activated and is operational.
Activation requires a subscription for
monitoring services, connection and
cellular air time
R vehicle battery power is available
R the relevant cellular phone network and
GPS signals are available and pass the
information on to the Customer Assistance
Center
i Location of the vehicle on a map is only
possible if the vehicle is able to receive
signals from the GPS satellite network and
pass the information on to the Customer
Assistance Center.
The Tele Aid system
(Telematic Alarm Identification on Demand)
The Tele Aid system consists of three types
of response:
R Automatic and manual emergency
R Roadside Assistance
R Information
To adjust the speaker volume during a Tele
Aid call do the following:
XPress button W or X on the
multifunction steering wheel.
or
XUse the adjustment button on your
COMAND system.
Be sure to check “Owner’s Online” at
www.mbusa.com (USA only) for more
information and a description of all available
features.
System self-test
The system performs a self-test after you
have switched on the ignition.
GWarning!
A malfunction in the system has been
detected if any or all of the following
conditions occur:
Useful features199Controls in detail164_AKB; 7; 31, en-USd2ureepe,Version: 2.11.8.12009-09-11T12:07:36+02:00 - Seite 199Z
Page 215 of 368

This could cause the hood to come loose and
injure you and/or others.
GWarning!
HYBRID vehicles: It is imperative that you read
the HYBRID Supplemental Operating
Instructions included in your vehicle literature
portfolio. You may otherwise not receive all
necessary safety information and warning for
the operation of your vehicle.
Opening
GWarning!
Do not open the hood when the engine is
overheated. You could be seriously injured.
Observe the coolant temperature display to
determine whether the engine may be
overheated. If you see flames or smoke
coming from the engine compartment, move
away from the vehicle. Wait until the engine
has cooled. If necessary, call the fire
department.
GWarning!
You could be injured when the hood is open –
even when the engine is turned off.
Parts of the engine can become very hot. To
prevent burns, let the engine cool completely
before touching any components on the
vehicle. Comply with all relevant safety
precautions.
GWarning!
To help prevent personal injury, stay clear of
moving parts when the hood is open and the
engine is running.
The radiator fan may continue to run for
approximately 30 seconds or may even
restart after the engine has been turned off.
Stay clear of fan blades.
GWarning!
Vehicles with gasoline engine:
The engine is equipped with a transistorized
ignition system. Because of the high voltage
it is dangerous to touch any components
(ignition coils, spark plug sockets, diagnostic
socket) of the ignition system
Rwith the engine running
Rwhile starting the engine
Rwhen the ignition is switched on and the
engine is turned manually
GWarning!
Vehicles with diesel engine:
The engine is equipped with a high-voltage
electronic control unit for the injection
system. Because of the high voltage it is
dangerous to touch any components of the
injection system (injectors, electrical wires)
Rwith the engine running
Rwhile starting the engine
Rwhen the ignition is switched on
XPull hood lock release lever :.
The hood is unlocked.
! Never open the hood if the wiper arms are
folded forward away from the windshield.
Otherwise the windshield wipers or the
hood could be damaged.
Engine compartment213Operation164_AKB; 7; 31, en-USd2ureepe,Version: 2.11.8.12009-09-11T12:07:36+02:00 - Seite 213Z
Page 269 of 368

Vehicle equipment ............................268
Where will I find ...? ..........................268
Vehicle status messages in the
multifunction display .......................272
What to do if … ..................................297
Unlocking/locking manually ...........306
Resetting activated NECK-PRO
active front head restraints .............309
Replacing SmartKey batteries .........309
Replacing bulbs .................................311
Replacing wiper blades ....................318
Flat tire ..............................................319
Bleeding the fuel system (diesel
engine only) .......................................331
AdBlue® (diesel engine only) ...........331
Battery ...............................................334
Jump starting ....................................336
Towing the vehicle ............................338
Fuses ..................................................342
267Practical hints164_AKB; 7; 31, en-USd2ureepe,Version: 2.11.8.12009-09-11T12:07:36+02:00 - Seite 267
Page 308 of 368
GWarning!
If the 42 indicator lamp
illuminates and remains illuminated with the
weight of a typical adult or someone larger
than a small individual on the front passenger
seat, do not have any passenger use the front
passenger seat until the system has been
repaired.
ProblemPossible causes/consequences and M SolutionsUSA only:
42
The front passenger
front air bag off
indicator lamp does not
illuminate and/or does
not remain illuminated
with the weight of a
typical 12-month-old
child in a standard child
restraint or less on the
front passenger seat.
The system is malfunctioning.XMake sure there is nothing between seat cushion and child seat
and check installation of the child seat.
XMake sure no objects applying supplemental weight onto the
seat are present.
XMake sure no objects which apply forces to the seat are present
(e.g. objects such as books, briefcases etc. lodged behind or
around the seat, head restraints pushing against roof etc.). The
system may recognize such forces as supplemental weight.
XIf the front passenger front air bag off indicator lamp remains
out, have the system checked as soon as possible at an
authorized Mercedes-Benz Center. Do not transport a child on
the front passenger seat until the system has been repaired.
XRead and observe messages in the multifunction display and
follow corrective steps (Y page 272).
GWarning!
If the 42 indicator lamp does not
illuminate or remains out with the weight of a
typical 12-month-old child in a standard child
restraint or less on the front passenger seat,
do not transport a child on the front
passenger seat until the system has been
repaired.
Unlocking/locking manually
Unlocking the vehicle
If you cannot unlock the vehicle with the
SmartKey or with KEYLESS-GO, unlock the
driver’s door using the mechanical key.
The anti-theft alarm system will trigger when
you
Runlocking the driver’s door with the
mechanical key
and
Ropen the driver’s door
To cancel the alarm, insert the SmartKey into
the starter switch.
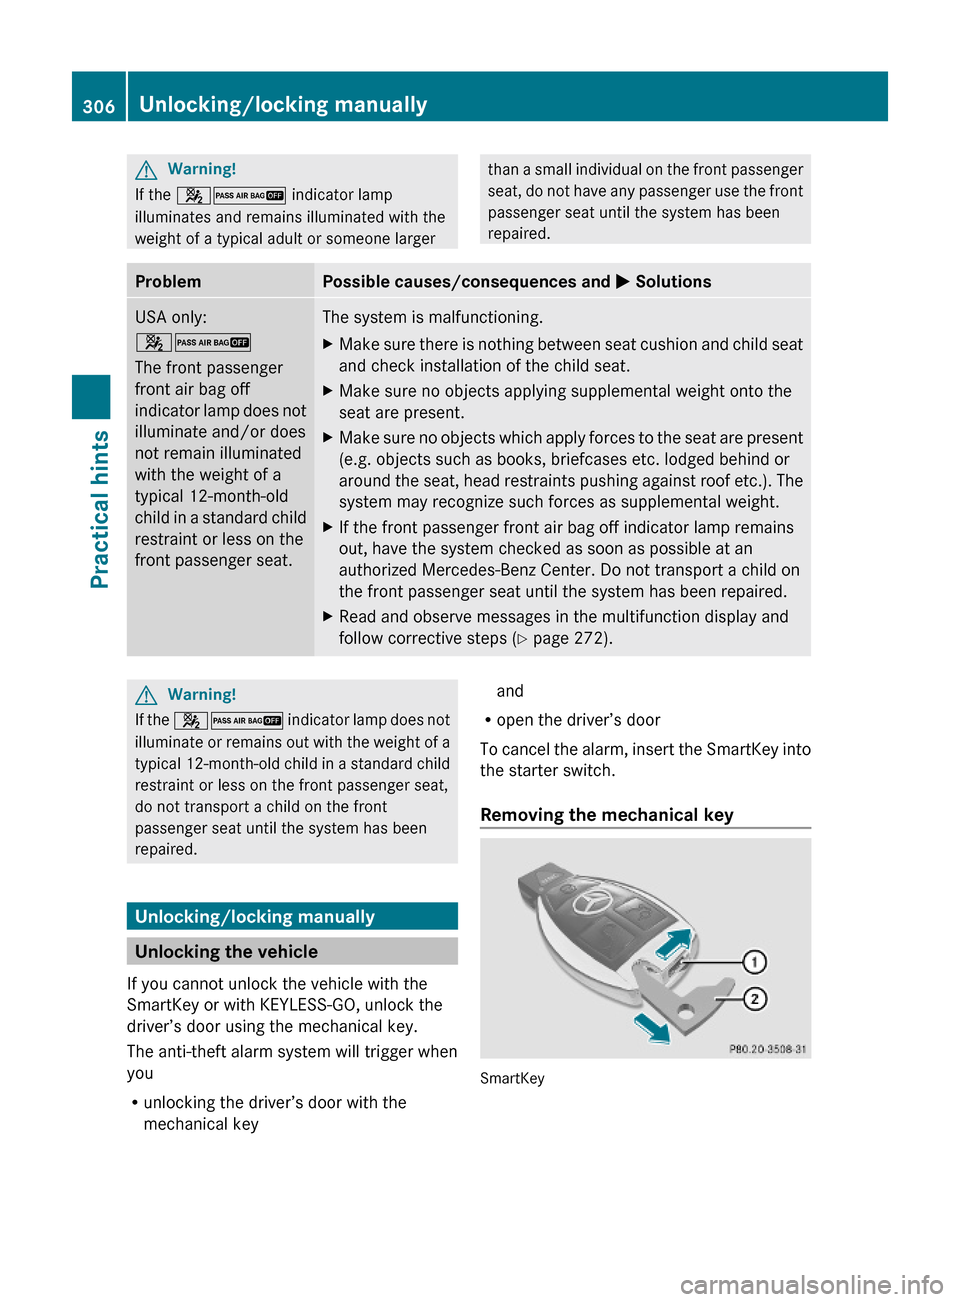
Removing the mechanical key
SmartKey
306Unlocking/locking manuallyPractical hints
164_AKB; 7; 31, en-USd2ureepe,Version: 2.11.8.12009-09-11T12:07:36+02:00 - Seite 306
Page 309 of 368

SmartKey with KEYLESS-GO
XMove locking tab : in the direction of
arrow.
XSlide mechanical key ; out of the housing.
Unlocking the driver’s door
XInsert mechanical key ; into the driver’s
door lock.
XTurn mechanical key ; counterclockwise
to position 1.
XPull the door handle past the resistance
point until the locking knob moves up.
The driver’s door is unlocked.
XPull the door handle once more to open the
driver’s door.
XTurn mechanical key ; back and remove
it from the driver’s door lock.Locking the vehicle
If you cannot lock the vehicle with the
SmartKey or with KEYLESS-GO, lock it as
follows:
XClose the front passenger door, the right
rear door, and the tailgate.
XOpen the driver’s door and the rear left
door.
XPress the central locking switch
(Y page 75).
The locking knobs of the front passenger
door and the rear doors move down.
XIf the vehicle battery is disconnected or
drained: Press down the locking knobs on
the front passenger door and the rear
doors.
XExit the vehicle.XClose the driver’s door.XEnter the vehicle through the rear left door.XPress down the locking knob of the driver’s
door.
! To prevent inadvertent lockout, make
sure to have the SmartKey with you before
proceeding with the next step. The next
step will lock the vehicle.
XExit the vehicle.XClose the rear left door.
The vehicle is locked.
iThis procedure does not arm the anti-
theft alarm system, nor does it lock the fuel
filler flap.
Unlocking and opening the tailgate
If the tailgate can no longer be unlocked and
opened using button F on the SmartKey
or the KEYLESS-GO function, use the
emergency release lever to unlock and open
the tailgate.
The emergency release lever is located on the
inside of the tailgate.
Unlocking/locking manually307Practical hints164_AKB; 7; 31, en-USd2ureepe,Version: 2.11.8.12009-09-11T12:07:36+02:00 - Seite 307Z