2010 MERCEDES-BENZ GLK350 4MATIC seats
[x] Cancel search: seatsPage 67 of 344
Vehicle equipment ..............................66
Locking and unlocking .......................66
Starter switch positions .....................76
Seats ....................................................78
Multifunction steering wheel .............82
Mirrors .................................................83
Memory function .................................86
Lighting ................................................87
Wipers ..................................................93
Power windows ...................................95
Driving and parking ............................98
Automatic transmission ...................103
Transfer case ....................................108
Instrument cluster ............................108
Control system ..................................110
Audio system ....................................125
Driving systems ................................168
Climate control system ....................177
Rear window defroster .....................184
Panorama roof with power tilt/
sliding panel ......................................184
Loading and storing ..........................187
Useful features .................................195
65Controls in detailX204_AKB; 3; 23, en-USd2ureepe,Version: 2.11.8.12009-07-16T19:16:58+02:00 - Seite 65
Page 80 of 344
Seats
Safety notes
GWarning!
In order to avoid possible loss of vehicle
control the following must be done before the
vehicle is put into motion:
R seat adjustment
R head restraint adjustment
R steering wheel adjustment
R rear view mirror adjustment
R fastening of seat belts
GWarning!
Do not adjust the driver’s seat while driving.
Adjusting the seat while driving could cause
the driver to lose control of the vehicle.
Never ride in a moving vehicle with the seat
backrest in an excessively reclined position as
this can be dangerous. You could slide under
the seat belt in a collision. If you slide under
it, the seat belt would apply force at the
abdomen or neck. That could cause serious
or fatal injuries. The seat backrest and seat
belts provide the best restraint when the
wearer is in a position that is as upright as
possible and seat belts are properly
positioned on the body.
GWarning!
Your seat must be adjusted so that you can
correctly fasten your seat belt.
Observe the following points:
R Adjust the seat backrest until your arms are
slightly angled when holding the steering
wheel.
R Adjust the seat to a comfortable seating
position that still allows you to reach the
accelerator/brake pedal safely. The
position should be as far back as possible
with the driver still able to operate the
controls properly.
R Adjust the head restraint so that it is as
close to the head as possible. The center of
the head restraint must support the back of
the head at eye level.
R Never place hands under the seat or near
any moving parts while a seat is being
adjusted.
Failure to do so could result in an accident
and/or serious personal injury.GWarning!
The power seats can be operated at any time.
Therefore, do not leave children unattended
in the vehicle, or with access to an unlocked
vehicle. A child’s unsupervised access to a
vehicle could result in an accident and/or
serious personal injury.
GWarning!
According to accident statistics, children are
safer when properly restrained in the rear
seating positions than in the front seating
position. Thus, we strongly recommend that
children be placed in the rear seats whenever
possible. Regardless of seating position,
children 12 years old and under must be
seated and properly secured in an
appropriately sized infant restraint, toddler
restraint, or booster seat recommended for
the size and weight of the child. For additional
information, see “Children in the vehicle”.
A child’s risk of serious or fatal injuries is
significantly increased if the child restraints
are not properly secured in the vehicle and/
or the child is not properly secured in the child
restraint.
GWarning!
For your protection, drive only with properly
positioned head restraints.
Adjust the head restraint so that it is as close
to the head as possible and the center of the
head restraint supports the back of the head
at eye level. This will reduce the potential for
injury to the head and neck in the event of an
accident or similar situation.
78SeatsControls in detail
X204_AKB; 3; 23, en-USd2ureepe,Version: 2.11.8.12009-07-16T19:16:58+02:00 - Seite 78
Page 81 of 344
Do not drive the vehicle without the seat head
restraints. Head restraints are intended to
help reduce injuries during an accident.
Seat adjustment
! When moving the seats, make sure there
are no items in the footwell or behind the
seats. Otherwise, you could damage the
seats and/or the items.
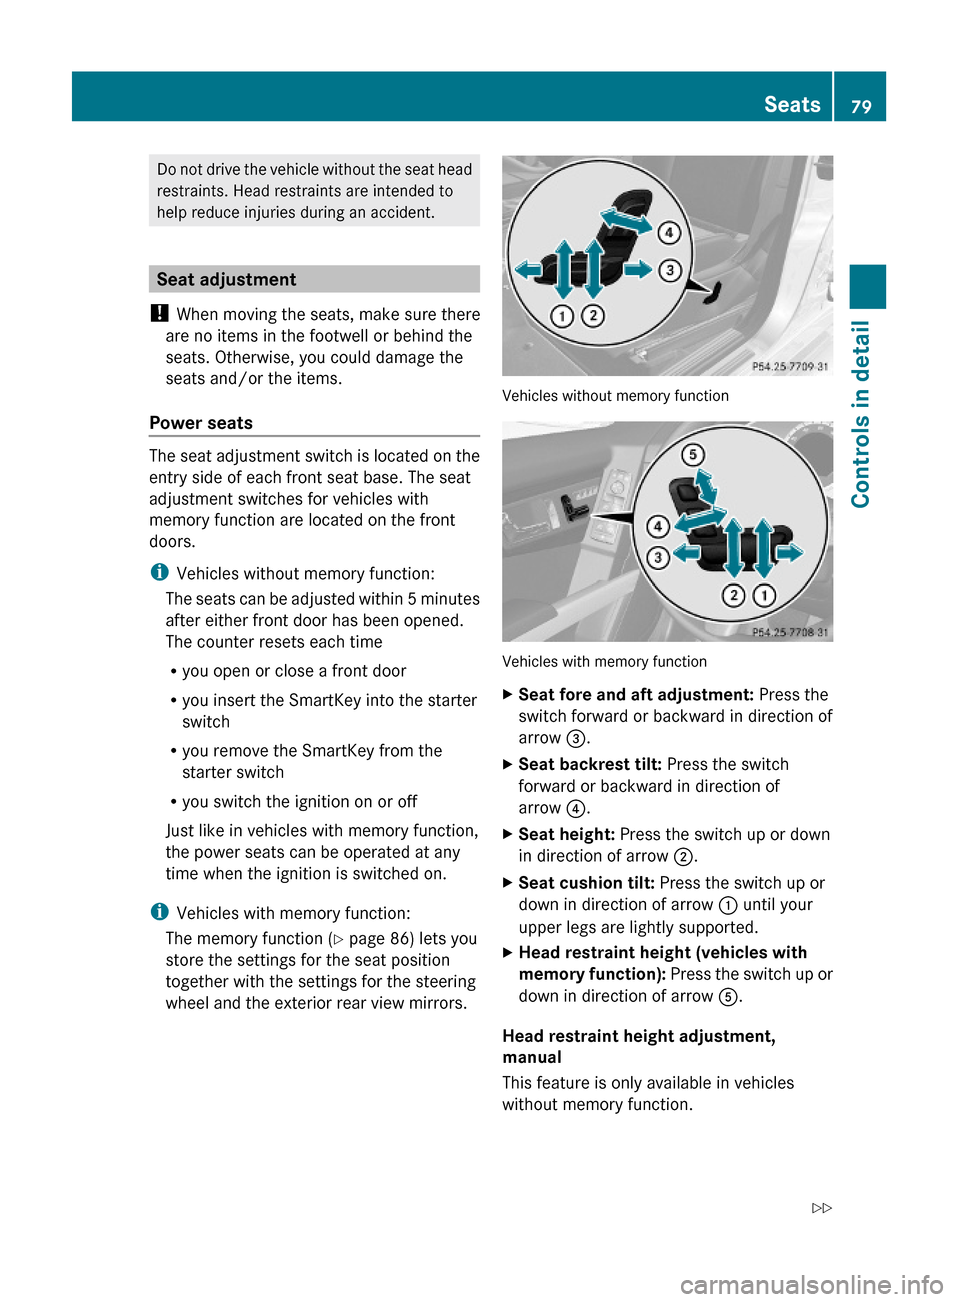
Power seats
The seat adjustment switch is located on the
entry side of each front seat base. The seat
adjustment switches for vehicles with
memory function are located on the front
doors.
iVehicles without memory function:
The seats can be adjusted within 5 minutes
after either front door has been opened.
The counter resets each time
Ryou open or close a front door
Ryou insert the SmartKey into the starter
switch
Ryou remove the SmartKey from the
starter switch
Ryou switch the ignition on or off
Just like in vehicles with memory function,
the power seats can be operated at any
time when the ignition is switched on.
iVehicles with memory function:
The memory function (Y page 86) lets you
store the settings for the seat position
together with the settings for the steering
wheel and the exterior rear view mirrors.
Vehicles without memory function
Vehicles with memory function
XSeat fore and aft adjustment: Press the
switch forward or backward in direction of
arrow =.
XSeat backrest tilt: Press the switch
forward or backward in direction of
arrow ?.
XSeat height: Press the switch up or down
in direction of arrow ;.
XSeat cushion tilt: Press the switch up or
down in direction of arrow : until your
upper legs are lightly supported.
XHead restraint height (vehicles with
memory function): Press the switch up or
down in direction of arrow A.
Head restraint height adjustment,
manual
This feature is only available in vehicles
without memory function.
Seats79Controls in detailX204_AKB; 3; 23, en-USd2ureepe,Version: 2.11.8.12009-07-16T19:16:58+02:00 - Seite 79Z
Page 82 of 344
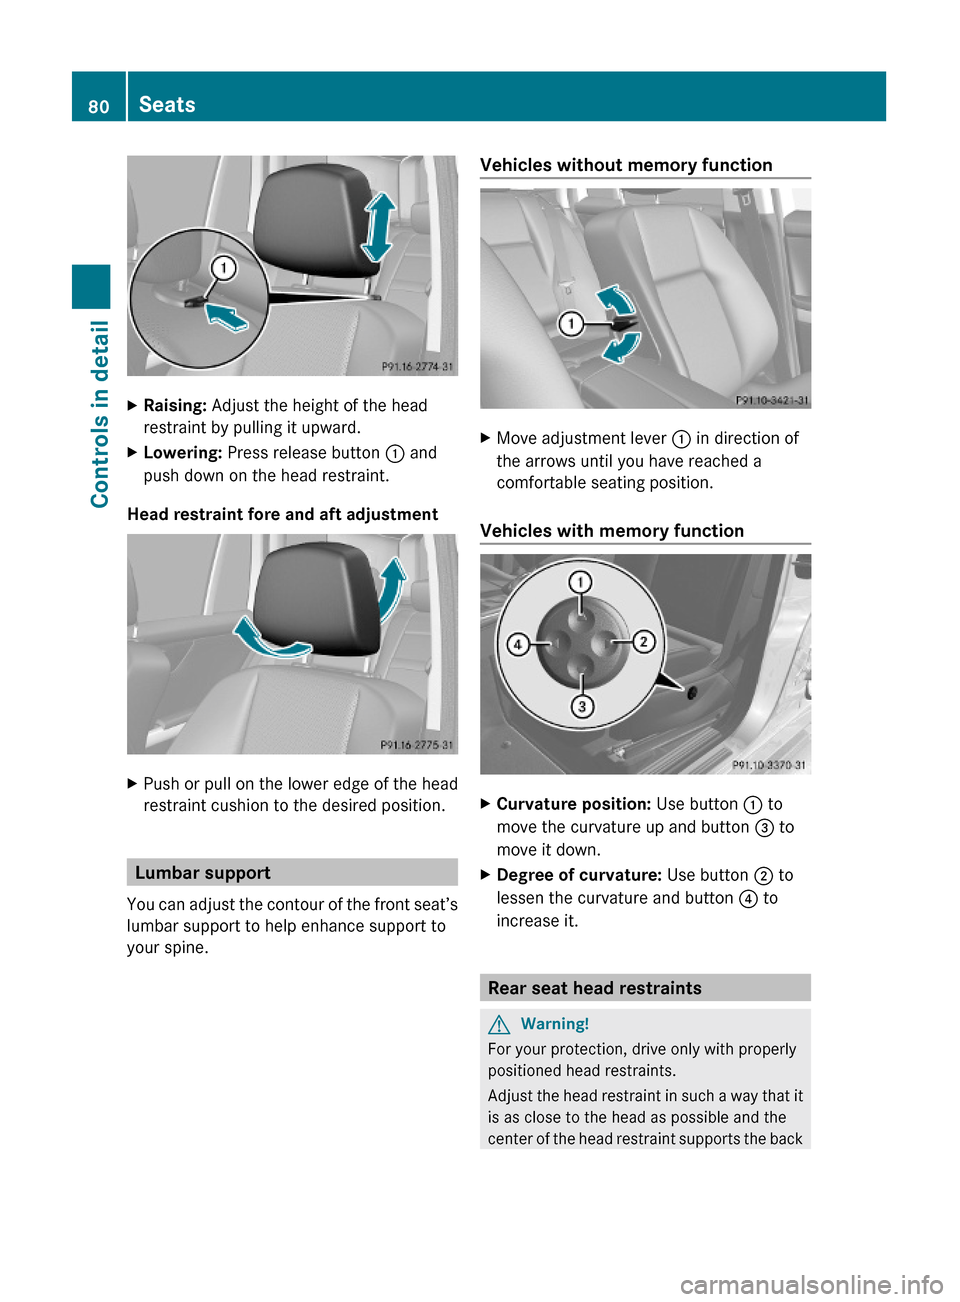
XRaising: Adjust the height of the head
restraint by pulling it upward.
XLowering: Press release button : and
push down on the head restraint.
Head restraint fore and aft adjustment
XPush or pull on the lower edge of the head
restraint cushion to the desired position.
Lumbar support
You can adjust the contour of the front seat’s
lumbar support to help enhance support to
your spine.
Vehicles without memory functionXMove adjustment lever : in direction of
the arrows until you have reached a
comfortable seating position.
Vehicles with memory function
XCurvature position: Use button : to
move the curvature up and button = to
move it down.
XDegree of curvature: Use button ; to
lessen the curvature and button ? to
increase it.
Rear seat head restraints
GWarning!
For your protection, drive only with properly
positioned head restraints.
Adjust the head restraint in such a way that it
is as close to the head as possible and the
center of the head restraint supports the back
80SeatsControls in detail
X204_AKB; 3; 23, en-USd2ureepe,Version: 2.11.8.12009-07-16T19:16:58+02:00 - Seite 80
Page 83 of 344
of the head at eye level. This will reduce the
potential for injury to the head and neck in the
event of an accident or similar situation.
With a rear seat occupied, make sure to move
the respective head restraint up from the
lowest non-use position and have the
occupant adjust the head restraint properly.
Do not drive the vehicle without the seat head
restraints installed when the rear seats are
occupied. Head restraints are intended to
help reduce injuries during an accident.
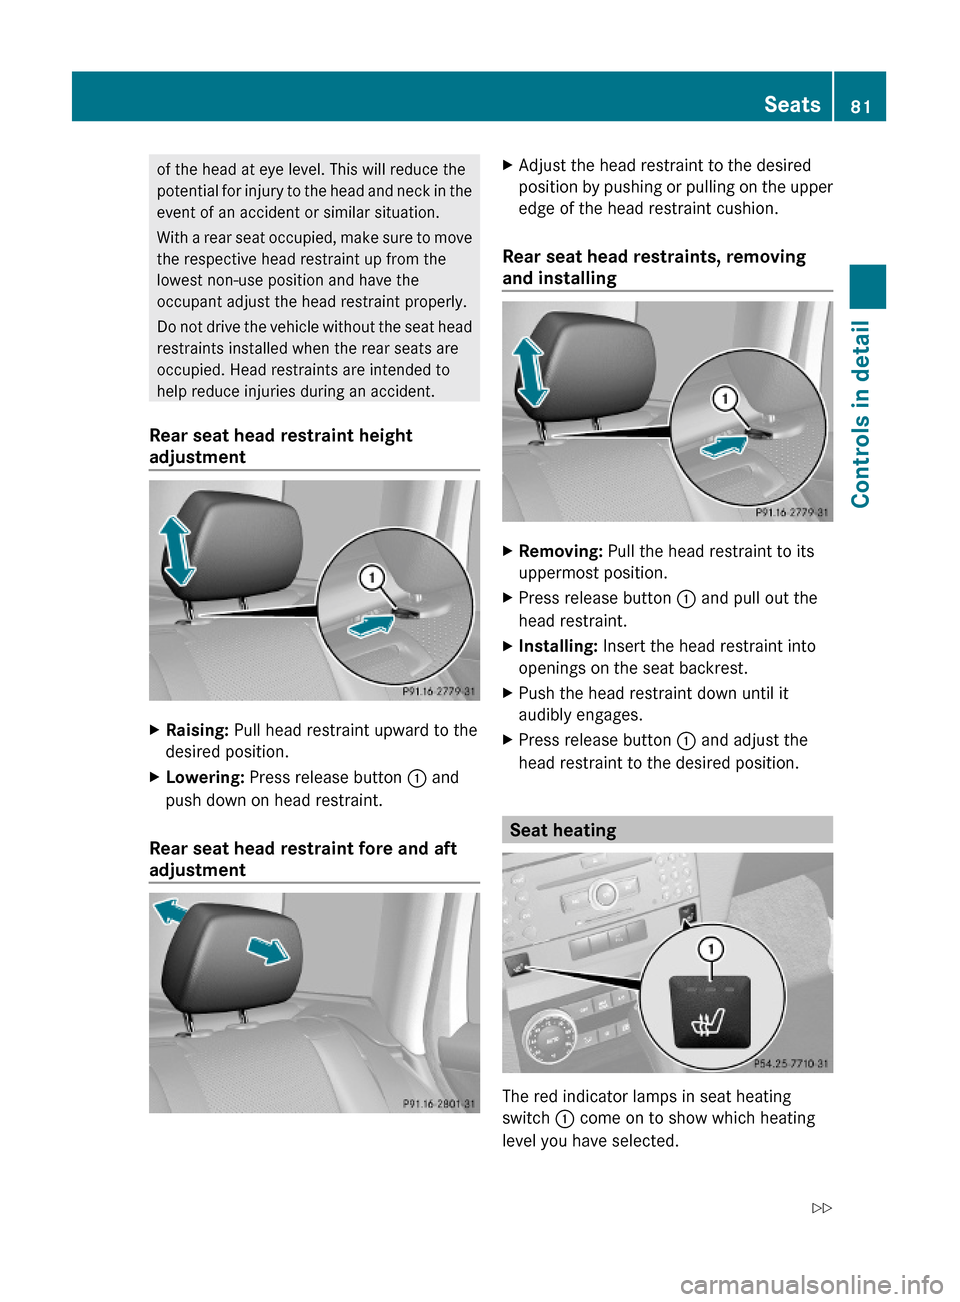
Rear seat head restraint height
adjustment
XRaising: Pull head restraint upward to the
desired position.
XLowering: Press release button : and
push down on head restraint.
Rear seat head restraint fore and aft
adjustment
XAdjust the head restraint to the desired
position by pushing or pulling on the upper
edge of the head restraint cushion.
Rear seat head restraints, removing
and installing
XRemoving: Pull the head restraint to its
uppermost position.
XPress release button : and pull out the
head restraint.
XInstalling: Insert the head restraint into
openings on the seat backrest.
XPush the head restraint down until it
audibly engages.
XPress release button : and adjust the
head restraint to the desired position.
Seat heating
The red indicator lamps in seat heating
switch : come on to show which heating
level you have selected.
Seats81Controls in detailX204_AKB; 3; 23, en-USd2ureepe,Version: 2.11.8.12009-07-16T19:16:58+02:00 - Seite 81Z
Page 89 of 344
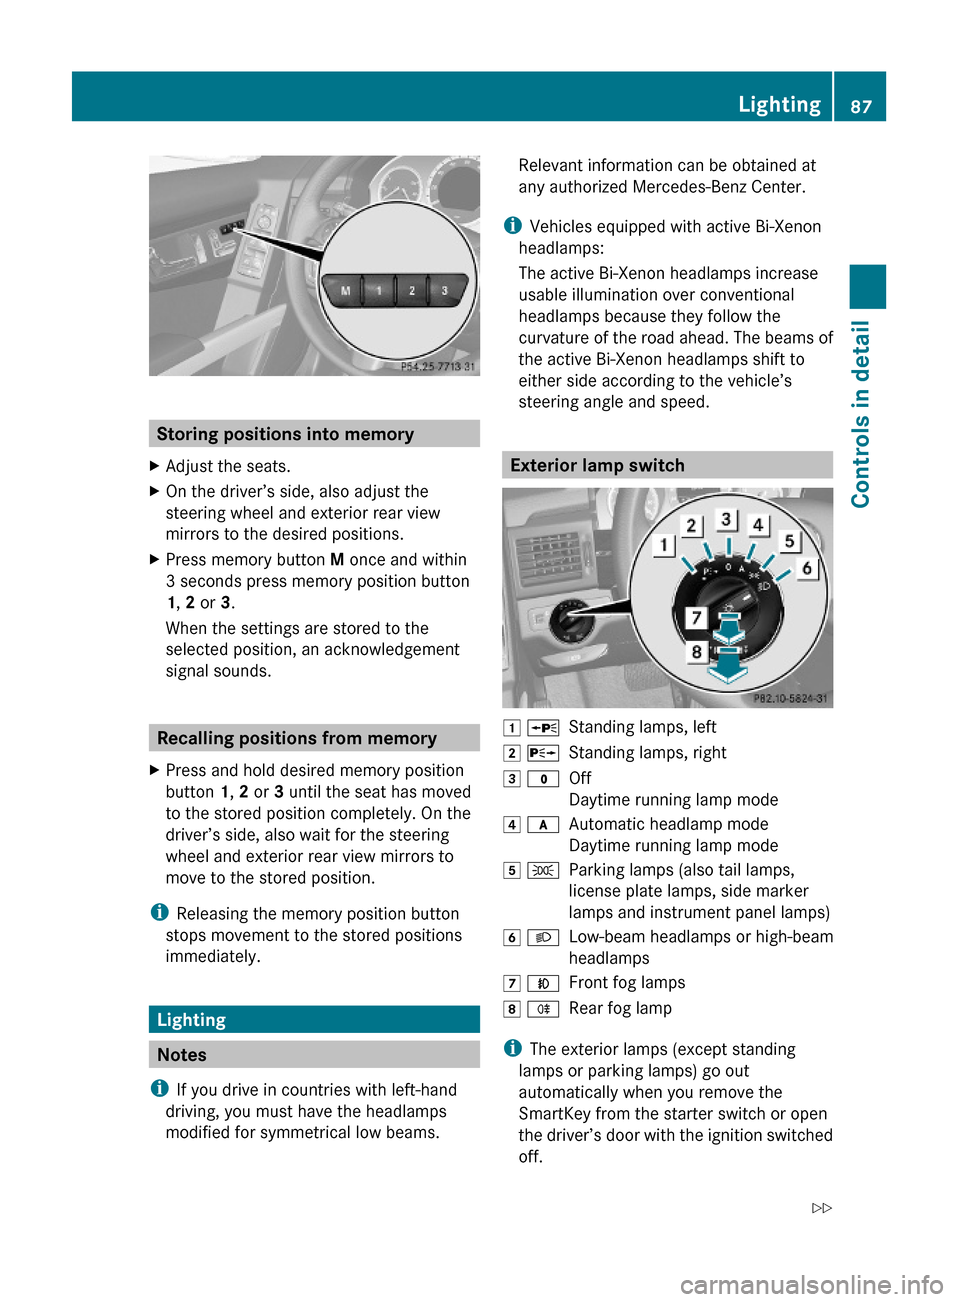
Storing positions into memory
XAdjust the seats.XOn the driver’s side, also adjust the
steering wheel and exterior rear view
mirrors to the desired positions.
XPress memory button M once and within
3 seconds press memory position button
1, 2 or 3.
When the settings are stored to the
selected position, an acknowledgement
signal sounds.
Recalling positions from memory
XPress and hold desired memory position
button 1, 2 or 3 until the seat has moved
to the stored position completely. On the
driver’s side, also wait for the steering
wheel and exterior rear view mirrors to
move to the stored position.
iReleasing the memory position button
stops movement to the stored positions
immediately.
Lighting
Notes
iIf you drive in countries with left-hand
driving, you must have the headlamps
modified for symmetrical low beams.
Relevant information can be obtained at
any authorized Mercedes-Benz Center.
iVehicles equipped with active Bi-Xenon
headlamps:
The active Bi-Xenon headlamps increase
usable illumination over conventional
headlamps because they follow the
curvature of the road ahead. The beams of
the active Bi-Xenon headlamps shift to
either side according to the vehicle’s
steering angle and speed.
Exterior lamp switch
1 WStanding lamps, left2 XStanding lamps, right3 $Off
Daytime running lamp mode
4 cAutomatic headlamp mode
Daytime running lamp mode
5 TParking lamps (also tail lamps,
license plate lamps, side marker
lamps and instrument panel lamps)
6 LLow-beam headlamps or high-beam
headlamps
7 NFront fog lamps8 RRear fog lamp
iThe exterior lamps (except standing
lamps or parking lamps) go out
automatically when you remove the
SmartKey from the starter switch or open
the driver’s door with the ignition switched
off.
Lighting87Controls in detailX204_AKB; 3; 23, en-USd2ureepe,Version: 2.11.8.12009-07-16T19:16:58+02:00 - Seite 87Z
Page 97 of 344
Problems with wipers
! If anything blocks the wipers (leaves,
snow, etc.), switch them off immediately.
For safety reasons, do the following before
attempting to remove any blockage:
R Stop the vehicle in a safe location.
R Remove the SmartKey from the starter
switch.
or
R Turn off the engine by pressing the
KEYLESS-GO start/stop button and
open the driver’s door (with the driver’s
door open, starter switch is in position
0 , same as with SmartKey removed from
starter switch).
R Engage the parking brake.
R Remove blockage.
R Turn the wipers on again.
If the windshield wipers fail to function at
all with the combination switch in position
Ä or Å ,
R set the combination switch to the next
higher wiper speed
R have the windshield wipers checked at
the nearest authorized Mercedes-Benz
Center
Power windows
Opening and closing
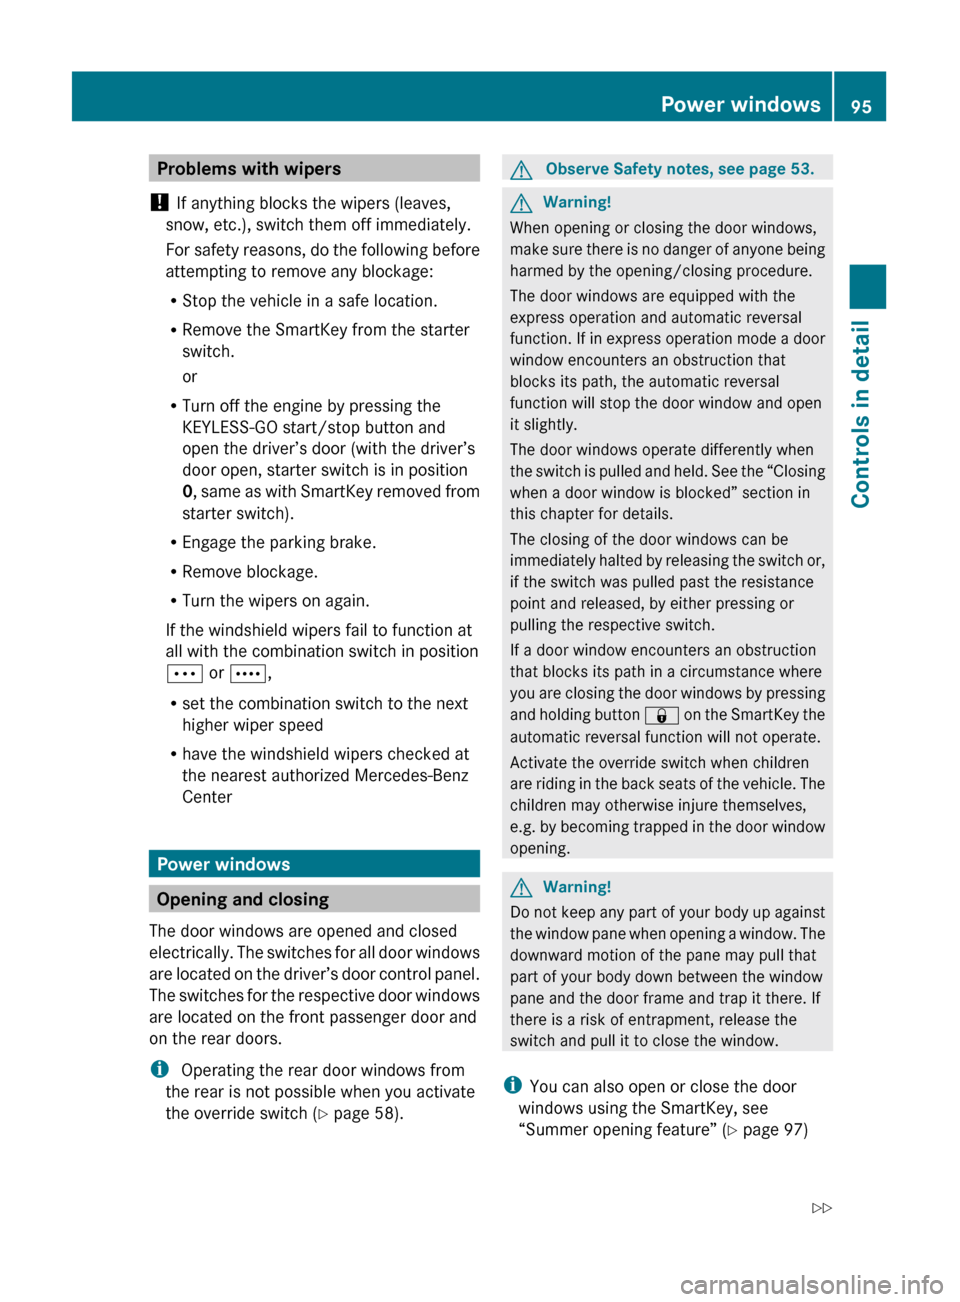
The door windows are opened and closed
electrically. The switches for all door windows
are located on the driver’s door control panel.
The switches for the respective door windows
are located on the front passenger door and
on the rear doors.
i Operating the rear door windows from
the rear is not possible when you activate
the override switch ( Y page 58).
GObserve Safety notes, see page 53.GWarning!
When opening or closing the door windows,
make sure there is no danger of anyone being
harmed by the opening/closing procedure.
The door windows are equipped with the
express operation and automatic reversal
function. If in express operation mode a door
window encounters an obstruction that
blocks its path, the automatic reversal
function will stop the door window and open
it slightly.
The door windows operate differently when
the switch is pulled and held. See the “Closing
when a door window is blocked” section in
this chapter for details.
The closing of the door windows can be
immediately halted by releasing the switch or,
if the switch was pulled past the resistance
point and released, by either pressing or
pulling the respective switch.
If a door window encounters an obstruction
that blocks its path in a circumstance where
you are closing the door windows by pressing
and holding button & on the SmartKey the
automatic reversal function will not operate.
Activate the override switch when children
are riding in the back seats of the vehicle. The
children may otherwise injure themselves,
e.g. by becoming trapped in the door window
opening.
GWarning!
Do not keep any part of your body up against
the window pane when opening a window. The
downward motion of the pane may pull that
part of your body down between the window
pane and the door frame and trap it there. If
there is a risk of entrapment, release the
switch and pull it to close the window.
i You can also open or close the door
windows using the SmartKey, see
“Summer opening feature” ( Y page 97)
Power windows95Controls in detailX204_AKB; 3; 23, en-USd2ureepe,Version: 2.11.8.12009-07-16T19:16:58+02:00 - Seite 95Z
Page 136 of 344
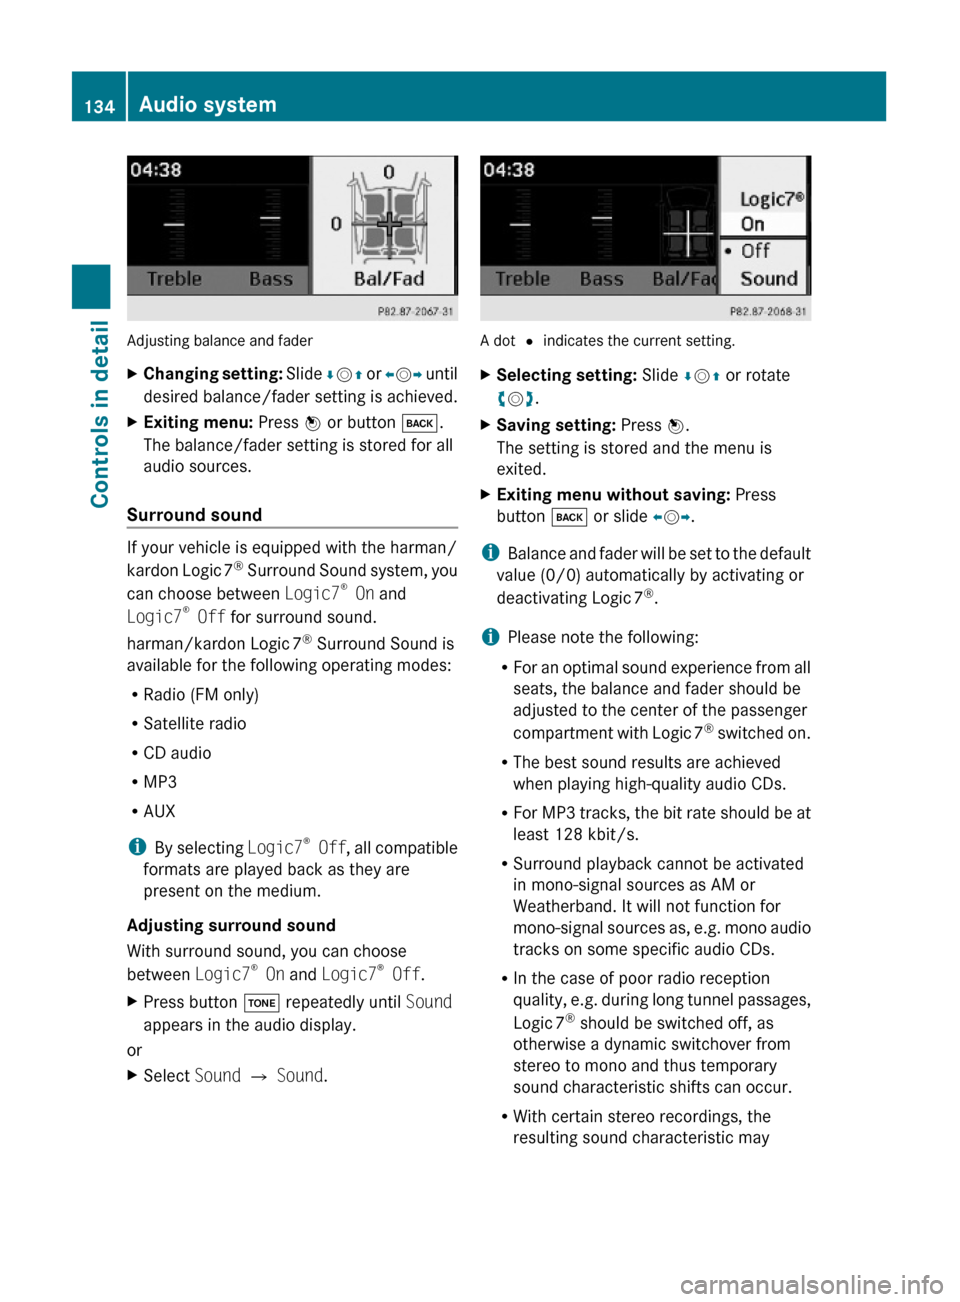
Adjusting balance and fader
XChanging setting: Slide ÆVZ or XVY until
desired balance/fader setting is achieved.
XExiting menu: Press W or button k.
The balance/fader setting is stored for all
audio sources.
Surround sound
If your vehicle is equipped with the harman/
kardon Logic 7® Surround Sound system, you
can choose between Logic7® On and
Logic7® Off for surround sound.
harman/kardon Logic 7® Surround Sound is
available for the following operating modes:
RRadio (FM only)
RSatellite radio
RCD audio
RMP3
RAUX
iBy selecting Logic7® Off, all compatible
formats are played back as they are
present on the medium.
Adjusting surround sound
With surround sound, you can choose
between Logic7® On and Logic7® Off.
XPress button J repeatedly until Sound
appears in the audio display.
or
XSelect Sound Q Sound.
A dot # indicates the current setting.
XSelecting setting: Slide ÆVZ or rotate
cVd.
XSaving setting: Press W.
The setting is stored and the menu is
exited.
XExiting menu without saving: Press
button k or slide XVY.
iBalance and fader will be set to the default
value (0/0) automatically by activating or
deactivating Logic 7®.
iPlease note the following:
RFor an optimal sound experience from all
seats, the balance and fader should be
adjusted to the center of the passenger
compartment with Logic 7® switched on.
RThe best sound results are achieved
when playing high-quality audio CDs.
RFor MP3 tracks, the bit rate should be at
least 128 kbit/s.
RSurround playback cannot be activated
in mono-signal sources as AM or
Weatherband. It will not function for
mono-signal sources as, e.g. mono audio
tracks on some specific audio CDs.
RIn the case of poor radio reception
quality, e.g. during long tunnel passages,
Logic 7® should be switched off, as
otherwise a dynamic switchover from
stereo to mono and thus temporary
sound characteristic shifts can occur.
RWith certain stereo recordings, the
resulting sound characteristic may
134Audio systemControls in detail
X204_AKB; 3; 23, en-USd2ureepe,Version: 2.11.8.12009-07-16T19:16:58+02:00 - Seite 134