2010 MERCEDES-BENZ GLK350 4MATIC headlamp
[x] Cancel search: headlampPage 92 of 344
Locator lighting
The locator lighting is described in the
“Control system” section, see “Switching
locator lighting on or off” (Y page 122).
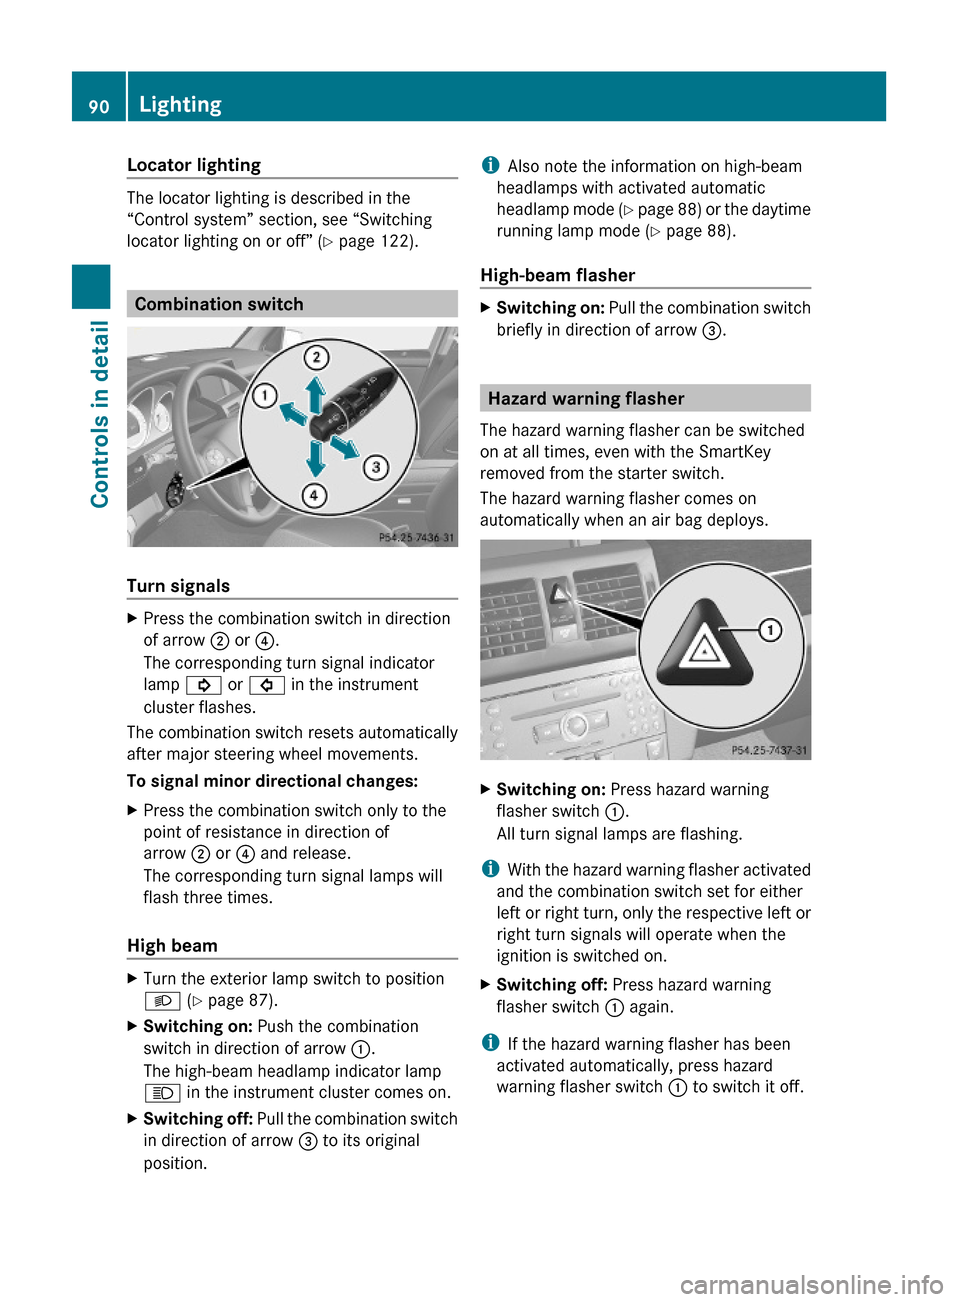
Combination switch
Turn signals
XPress the combination switch in direction
of arrow ; or ?.
The corresponding turn signal indicator
lamp ! or # in the instrument
cluster flashes.
The combination switch resets automatically
after major steering wheel movements.
To signal minor directional changes:
XPress the combination switch only to the
point of resistance in direction of
arrow ; or ? and release.
The corresponding turn signal lamps will
flash three times.
High beam
XTurn the exterior lamp switch to position
L (Y page 87).
XSwitching on: Push the combination
switch in direction of arrow :.
The high-beam headlamp indicator lamp
K in the instrument cluster comes on.
XSwitching off: Pull the combination switch
in direction of arrow = to its original
position.
iAlso note the information on high-beam
headlamps with activated automatic
headlamp mode (Y page 88) or the daytime
running lamp mode (Y page 88).
High-beam flasher
XSwitching on: Pull the combination switch
briefly in direction of arrow =.
Hazard warning flasher
The hazard warning flasher can be switched
on at all times, even with the SmartKey
removed from the starter switch.
The hazard warning flasher comes on
automatically when an air bag deploys.
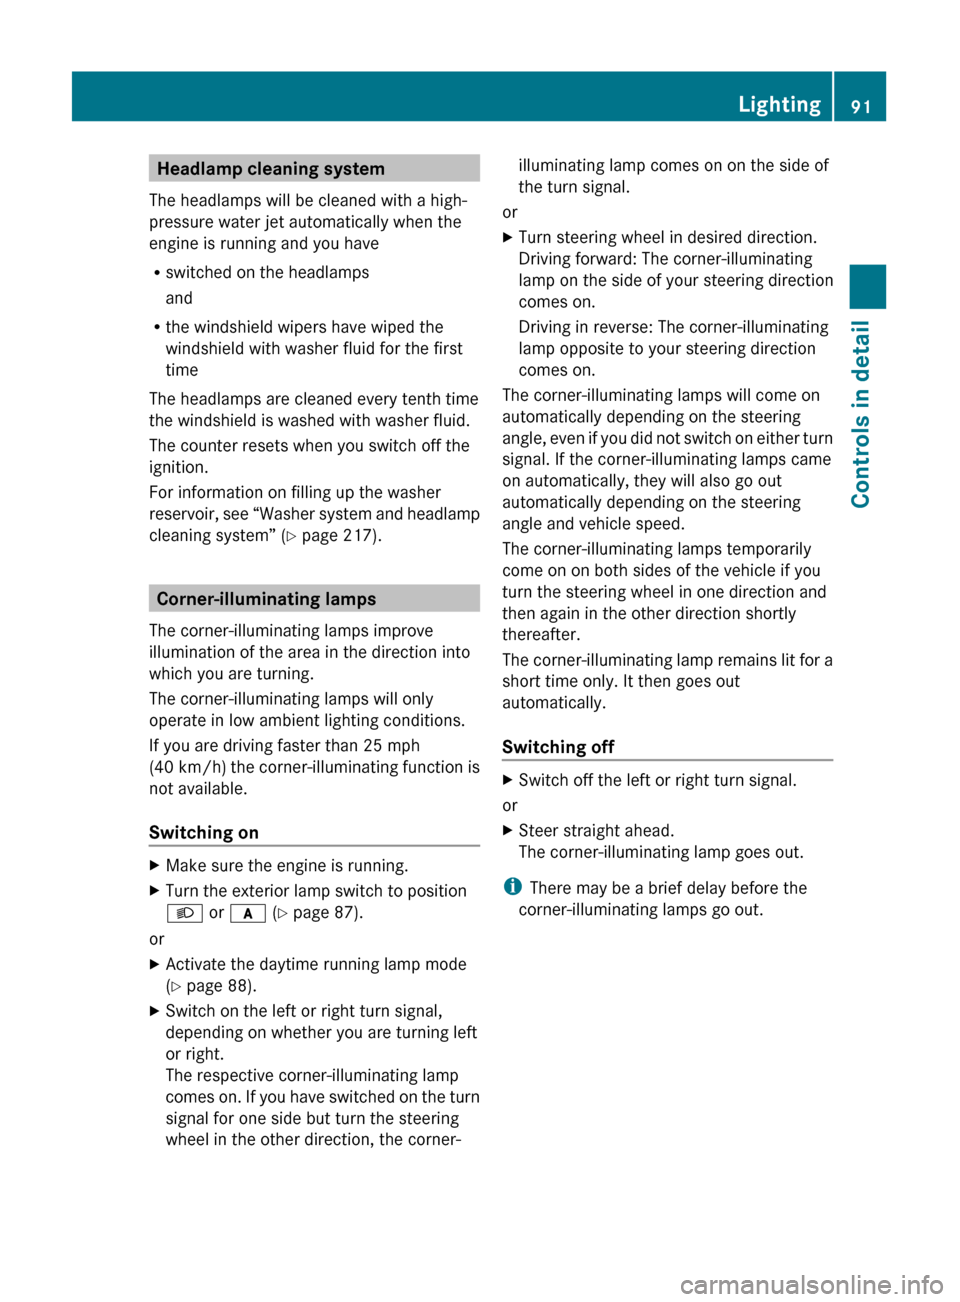
XSwitching on: Press hazard warning
flasher switch :.
All turn signal lamps are flashing.
iWith the hazard warning flasher activated
and the combination switch set for either
left or right turn, only the respective left or
right turn signals will operate when the
ignition is switched on.
XSwitching off: Press hazard warning
flasher switch : again.
iIf the hazard warning flasher has been
activated automatically, press hazard
warning flasher switch : to switch it off.
90LightingControls in detail
X204_AKB; 3; 23, en-USd2ureepe,Version: 2.11.8.12009-07-16T19:16:58+02:00 - Seite 90
Page 93 of 344
Headlamp cleaning system
The headlamps will be cleaned with a high-
pressure water jet automatically when the
engine is running and you have
R switched on the headlamps
and
R the windshield wipers have wiped the
windshield with washer fluid for the first
time
The headlamps are cleaned every tenth time
the windshield is washed with washer fluid.
The counter resets when you switch off the
ignition.
For information on filling up the washer
reservoir, see “Washer system and headlamp
cleaning system” ( Y page 217).
Corner-illuminating lamps
The corner-illuminating lamps improve
illumination of the area in the direction into
which you are turning.
The corner-illuminating lamps will only
operate in low ambient lighting conditions.
If you are driving faster than 25 mph
(40 km/h) the corner-illuminating function is
not available.
Switching on
XMake sure the engine is running.XTurn the exterior lamp switch to position
L or c (Y page 87).
or
XActivate the daytime running lamp mode
( Y page 88).XSwitch on the left or right turn signal,
depending on whether you are turning left
or right.
The respective corner-illuminating lamp
comes on. If you have switched on the turn
signal for one side but turn the steering
wheel in the other direction, the corner-illuminating lamp comes on on the side of
the turn signal.
or
XTurn steering wheel in desired direction.
Driving forward: The corner-illuminating
lamp on the side of your steering direction
comes on.
Driving in reverse: The corner-illuminating
lamp opposite to your steering direction
comes on.
The corner-illuminating lamps will come on
automatically depending on the steering
angle, even if you did not switch on either turn
signal. If the corner-illuminating lamps came
on automatically, they will also go out
automatically depending on the steering
angle and vehicle speed.
The corner-illuminating lamps temporarily
come on on both sides of the vehicle if you
turn the steering wheel in one direction and
then again in the other direction shortly
thereafter.
The corner-illuminating lamp remains lit for a
short time only. It then goes out
automatically.
Switching off
XSwitch off the left or right turn signal.
or
XSteer straight ahead.
The corner-illuminating lamp goes out.
i There may be a brief delay before the
corner-illuminating lamps go out.
Lighting91Controls in detailX204_AKB; 3; 23, en-USd2ureepe,Version: 2.11.8.12009-07-16T19:16:58+02:00 - Seite 91Z
Page 96 of 344
! Vehicles with rain sensor: If you have set
intermittent wiping, dirt on the surface of
the rain sensor or optical effects may cause
the windshield wipers to wipe in an
undesired fashion. This could then damage
the windshield wiper blades or scratch the
windshield. You should therefore switch off
the windshield wipers when weather
conditions are dry.
Vehicles with rain sensor: Intermittent wiping
interval is dependent on the wetness of the
windshield. After the initial wipe, pauses
between wipes are controlled by the rain
sensor automatically.
XTurn the combination switch to position
Ä or Å.
Intermittent wiping starts with selected
wiping interval.
Intermittent wiping is interrupted when the
vehicle is at a standstill and a front door is
opened. This protects persons getting into or
out of the vehicle from being sprayed.
Intermittent wiping will be continued when all
doors are closed andRthe automatic transmission is in drive
position D or reverse gear R
or
Rthe wiper setting is changed using the
combination switch
Single wipe
XPress the combination switch briefly in
direction of arrow B to the resistance
point.
The windshield wipers wipe one time
without washer fluid.
Wiping with washer fluid
XPress the combination switch in direction
of arrow B past the resistance point.
The windshield wipers operate with washer
fluid.
iTo prevent smears on the windshield or
noisy/chattering wiper blades, wipe with
washer fluid every now and then even when
it is raining.
For information on filling up the washer
reservoir, see “Washer system and headlamp
cleaning system” (Y page 217).
For information on cleaning the headlamps
with washer fluid, see “Headlamp cleaning
system” (Y page 91).
Rear window wiper/washer
XObserve notes on page (Y page 93).
The rear window wiper engages automatically
when the automatic transmission is shifted
into reverse gear R with the windshield wipers
switched on.
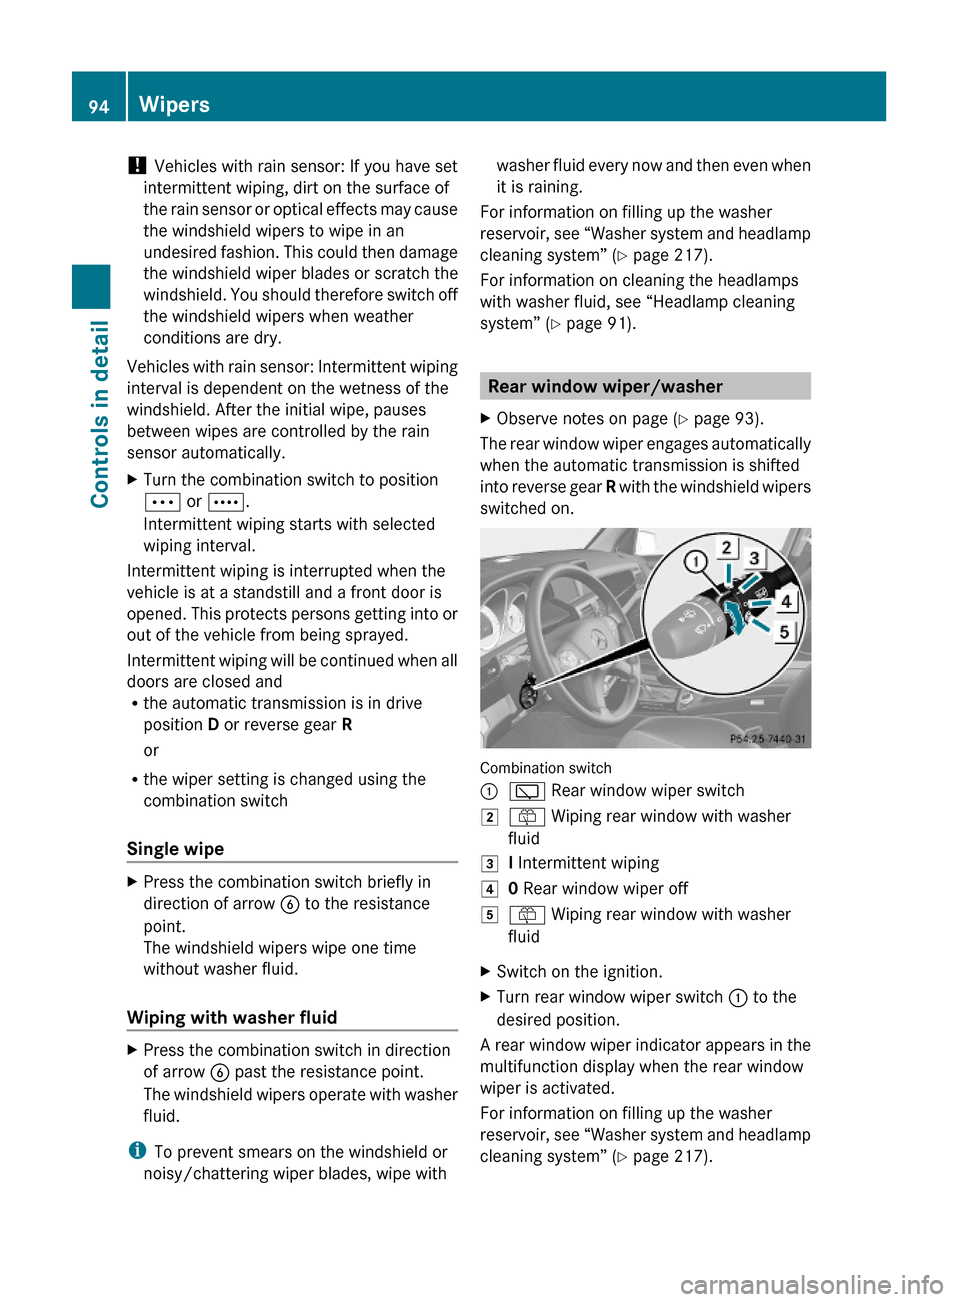
Combination switch
:è Rear window wiper switch2ô Wiping rear window with washer
fluid
3I Intermittent wiping40 Rear window wiper off5ô Wiping rear window with washer
fluid
XSwitch on the ignition.XTurn rear window wiper switch : to the
desired position.
A rear window wiper indicator appears in the
multifunction display when the rear window
wiper is activated.
For information on filling up the washer
reservoir, see “Washer system and headlamp
cleaning system” (Y page 217).
94WipersControls in detail
X204_AKB; 3; 23, en-USd2ureepe,Version: 2.11.8.12009-07-16T19:16:58+02:00 - Seite 94
Page 124 of 344
XPress button a.
The current date appears in the
multifunction display.
XTo set a new date press button a again.XPress button = or ; to select the
setting you wish to change: month, day or
year.
XPress button : or 9 to change the
setting which is highlighted.
XPress button a to store the entry.
Lights submenu
Access the Lights submenu via the
Settings menu. Use the Lights submenu to
change the lamp and lighting settings on your
vehicle.
The following functions are available:
RSwitching daytime running lamp mode on
or off (USA only) (Y page 122)
RSwitching locator lighting function on or off
(Y page 122)
RSwitching interior lighting delayed shut-off
on or off (Y page 123)
Switching daytime running lamp mode on
or off (USA only)
XPress button = or ; to select the
Settings menu.
XPress button : or 9 to select the
Lights submenu.
XPress button a.XPress button : or 9 to select the
Daytime Running Lamps: function.
The current setting Enabled or Disabled
is shown.
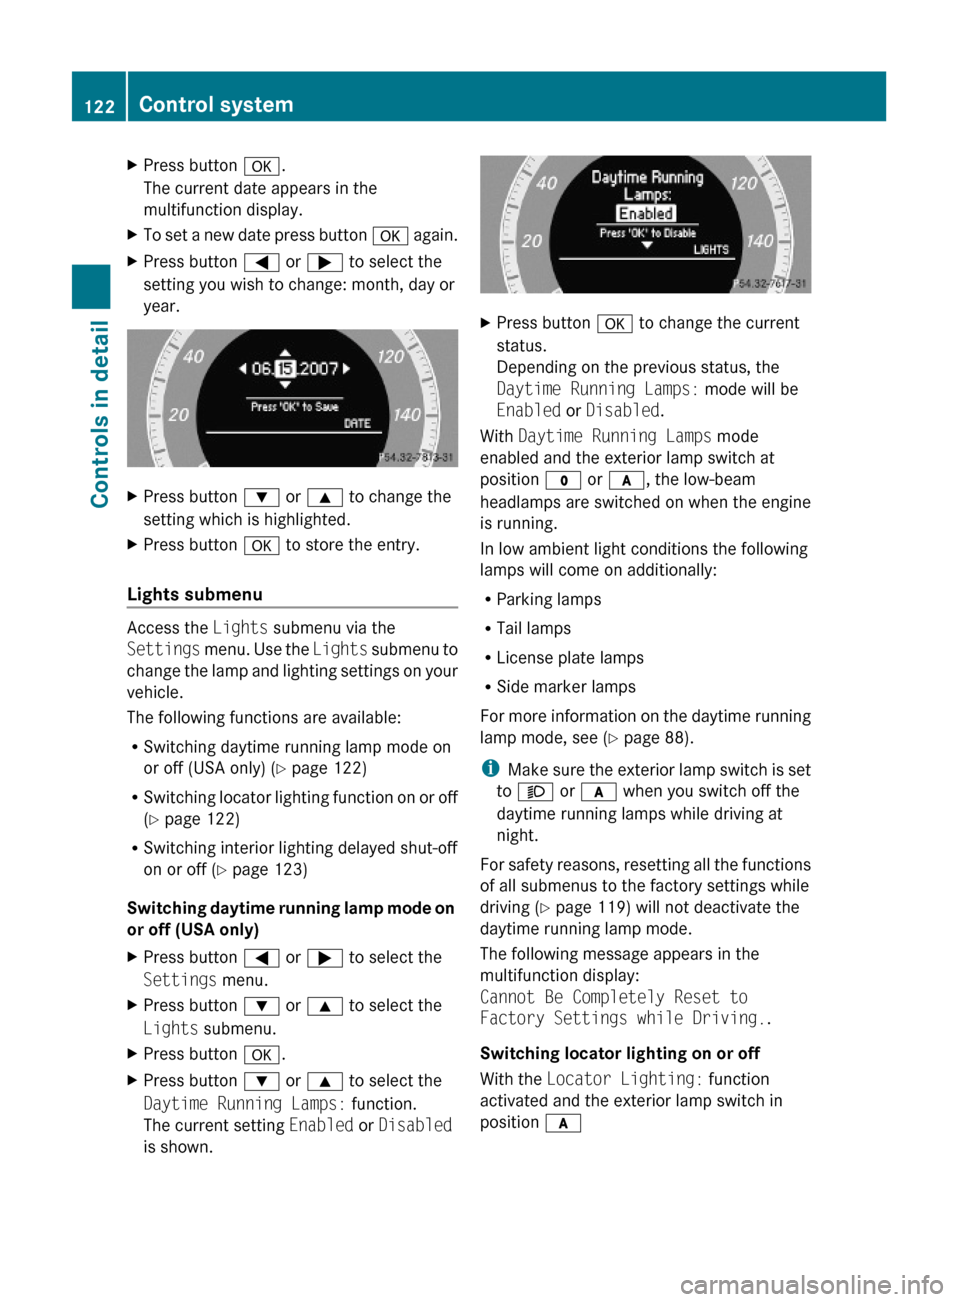
XPress button a to change the current
status.
Depending on the previous status, the
Daytime Running Lamps: mode will be
Enabled or Disabled.
With Daytime Running Lamps mode
enabled and the exterior lamp switch at
position $ or c, the low-beam
headlamps are switched on when the engine
is running.
In low ambient light conditions the following
lamps will come on additionally:
RParking lamps
RTail lamps
RLicense plate lamps
RSide marker lamps
For more information on the daytime running
lamp mode, see (Y page 88).
iMake sure the exterior lamp switch is set
to M or c when you switch off the
daytime running lamps while driving at
night.
For safety reasons, resetting all the functions
of all submenus to the factory settings while
driving (Y page 119) will not deactivate the
daytime running lamp mode.
The following message appears in the
multifunction display:
Cannot Be Completely Reset to
Factory Settings while Driving..
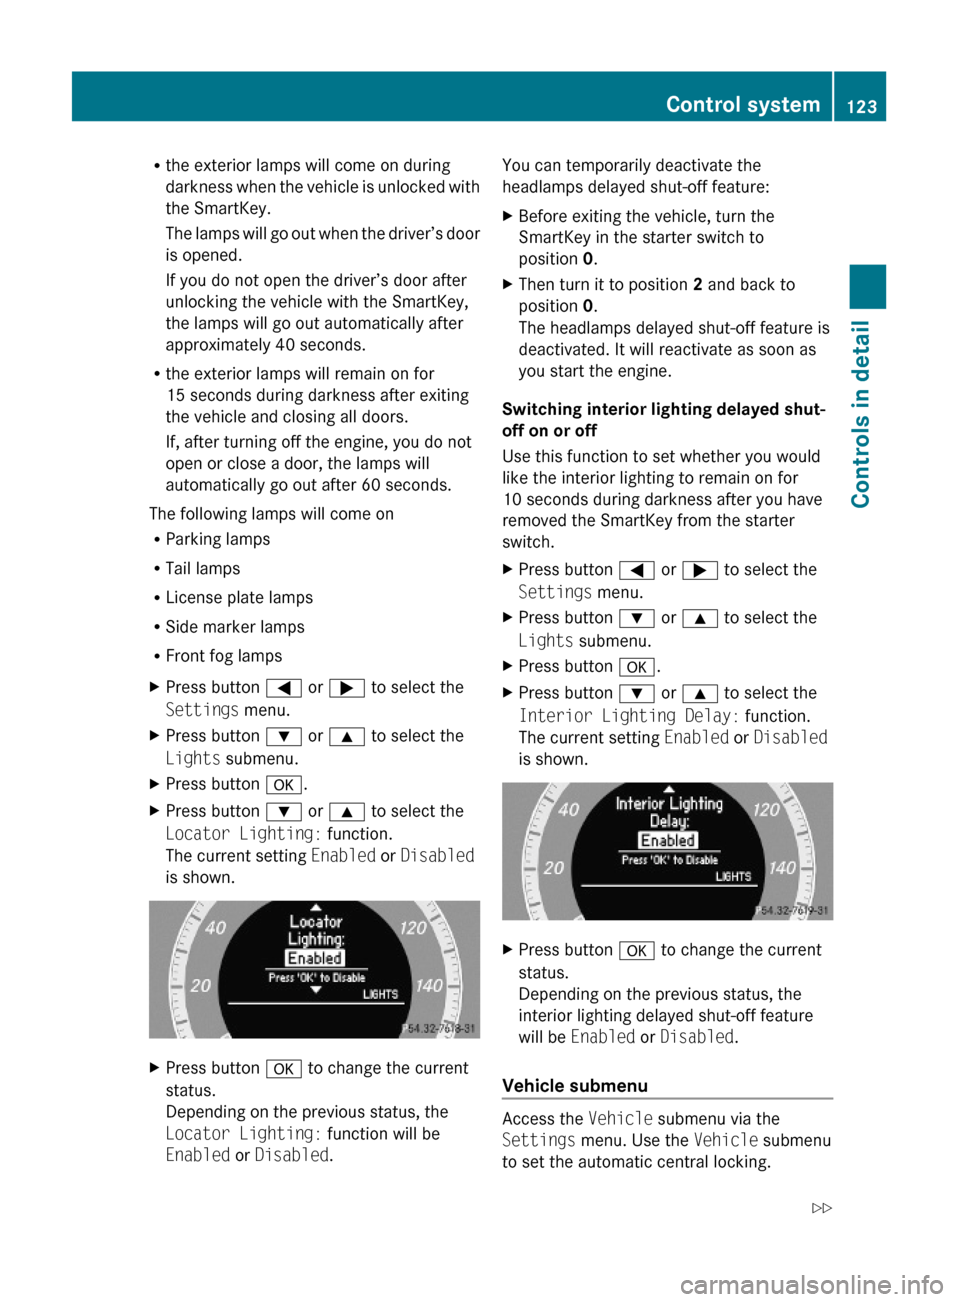
Switching locator lighting on or off
With the Locator Lighting: function
activated and the exterior lamp switch in
position c
122Control systemControls in detail
X204_AKB; 3; 23, en-USd2ureepe,Version: 2.11.8.12009-07-16T19:16:58+02:00 - Seite 122
Page 125 of 344
Rthe exterior lamps will come on during
darkness when the vehicle is unlocked with
the SmartKey.
The lamps will go out when the driver’s door
is opened.
If you do not open the driver’s door after
unlocking the vehicle with the SmartKey,
the lamps will go out automatically after
approximately 40 seconds.
Rthe exterior lamps will remain on for
15 seconds during darkness after exiting
the vehicle and closing all doors.
If, after turning off the engine, you do not
open or close a door, the lamps will
automatically go out after 60 seconds.
The following lamps will come on
RParking lamps
RTail lamps
RLicense plate lamps
RSide marker lamps
RFront fog lamps
XPress button = or ; to select the
Settings menu.
XPress button : or 9 to select the
Lights submenu.
XPress button a.XPress button : or 9 to select the
Locator Lighting: function.
The current setting Enabled or Disabled
is shown.
XPress button a to change the current
status.
Depending on the previous status, the
Locator Lighting: function will be
Enabled or Disabled.
You can temporarily deactivate the
headlamps delayed shut-off feature:
XBefore exiting the vehicle, turn the
SmartKey in the starter switch to
position 0.
XThen turn it to position 2 and back to
position 0.
The headlamps delayed shut-off feature is
deactivated. It will reactivate as soon as
you start the engine.
Switching interior lighting delayed shut-
off on or off
Use this function to set whether you would
like the interior lighting to remain on for
10 seconds during darkness after you have
removed the SmartKey from the starter
switch.
XPress button = or ; to select the
Settings menu.
XPress button : or 9 to select the
Lights submenu.
XPress button a.XPress button : or 9 to select the
Interior Lighting Delay: function.
The current setting Enabled or Disabled
is shown.
XPress button a to change the current
status.
Depending on the previous status, the
interior lighting delayed shut-off feature
will be Enabled or Disabled.
Vehicle submenu
Access the Vehicle submenu via the
Settings menu. Use the Vehicle submenu
to set the automatic central locking.
Control system123Controls in detailX204_AKB; 3; 23, en-USd2ureepe,Version: 2.11.8.12009-07-16T19:16:58+02:00 - Seite 123Z
Page 215 of 344
Any noticeable irregularities in engine
operation should be repaired promptly.
Otherwise, excessive unburned fuel may
reach the catalytic converter, causing it to
overheat and potentially start a fire.
i Only use premium unleaded gasoline with
a minimum Posted Octane Rating of 91
(average of 96 RON/86 MON).
Information on gasoline quality can
normally be found on the fuel pump. Please
contact gas station personnel in case
labels on the pump cannot be found.
Locking/unlocking the vehicle with the
SmartKey or KEYLESS-GO automatically
locks/unlocks the fuel filler flap.
iIn case the central locking system does
not release the fuel filler flap, see “Fuel filler
flap” (Y page 301).
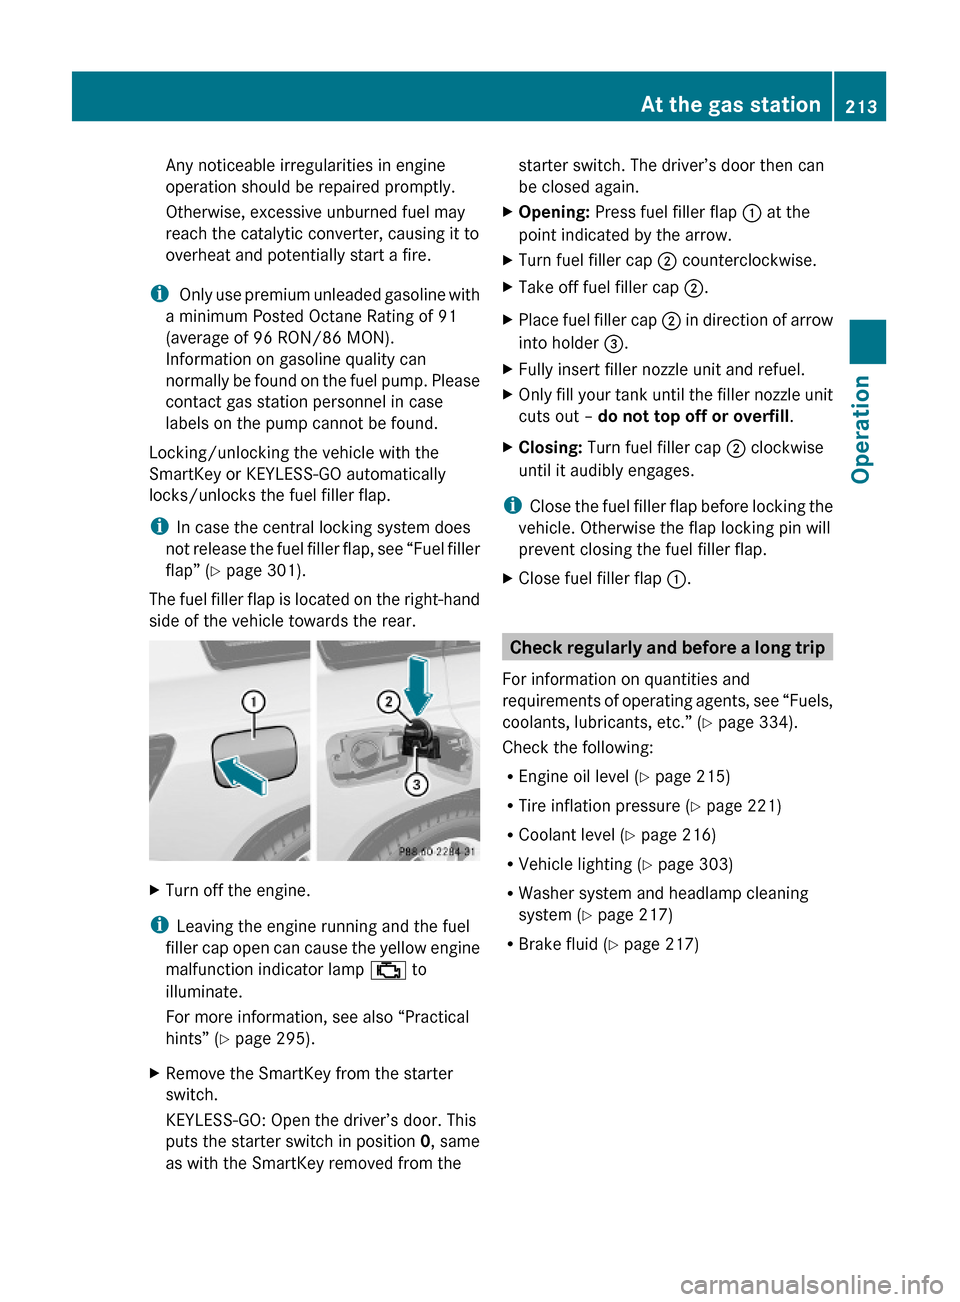
The fuel filler flap is located on the right-hand
side of the vehicle towards the rear.
XTurn off the engine.
iLeaving the engine running and the fuel
filler cap open can cause the yellow engine
malfunction indicator lamp ; to
illuminate.
For more information, see also “Practical
hints” (Y page 295).
XRemove the SmartKey from the starter
switch.
KEYLESS-GO: Open the driver’s door. This
puts the starter switch in position 0, same
as with the SmartKey removed from the
starter switch. The driver’s door then can
be closed again.
XOpening: Press fuel filler flap : at the
point indicated by the arrow.
XTurn fuel filler cap ; counterclockwise.XTake off fuel filler cap ;.XPlace fuel filler cap ; in direction of arrow
into holder =.
XFully insert filler nozzle unit and refuel.XOnly fill your tank until the filler nozzle unit
cuts out – do not top off or overfill.
XClosing: Turn fuel filler cap ; clockwise
until it audibly engages.
iClose the fuel filler flap before locking the
vehicle. Otherwise the flap locking pin will
prevent closing the fuel filler flap.
XClose fuel filler flap :.
Check regularly and before a long trip
For information on quantities and
requirements of operating agents, see “Fuels,
coolants, lubricants, etc.” (Y page 334).
Check the following:
REngine oil level (Y page 215)
RTire inflation pressure (Y page 221)
RCoolant level (Y page 216)
RVehicle lighting (Y page 303)
RWasher system and headlamp cleaning
system (Y page 217)
RBrake fluid (Y page 217)
At the gas station213OperationX204_AKB; 3; 23, en-USd2ureepe,Version: 2.11.8.12009-07-16T19:16:58+02:00 - Seite 213Z
Page 217 of 344
ClosingGWarning!
When closing the hood, use extreme caution
not to catch hands or fingers. Be careful that
you do not close the hood on anyone.
Make sure the hood is securely engaged
before driving off. Do not continue driving if
the hood can no longer engage after an
accident, for example. The hood could
otherwise come loose while the vehicle is in
motion and injure you and/or others.
XLet the hood drop from a height of
approximately 8 in (20 cm).
XCheck to make sure the hood is fully
closed.
If you can raise the hood at a point above
the headlamps, then it is not properly
closed. Open it again and let it drop with
somewhat greater force.
Engine oil
The amount of oil your engine consumes will
depend on a number of factors, including
driving style. Increased oil consumption can
occur when the vehicle is new or the vehicle
is driven frequently at higher engine speeds.
Engine oil consumption checks should only
be made after the vehicle break-in period.
! Do not use any special lubricant additives,
as these may damage the drive assemblies.
Using special additives not approved by
Mercedes-Benz may cause damage not
covered by the Mercedes-Benz Limited
Warranty.
For further information contact an
authorized Mercedes-Benz Center.
Notes on checking engine oil level
When checking the oil level
Rthe vehicle must be parked on level ground
Rwith the engine at operating temperature,
the vehicle must have been stationary for
at least 5 minutes with the engine turned
off
Rwith the engine not at operating
temperature, the vehicle must have been
stationary for at least 30 minutes with the
engine turned off
Checking engine oil level
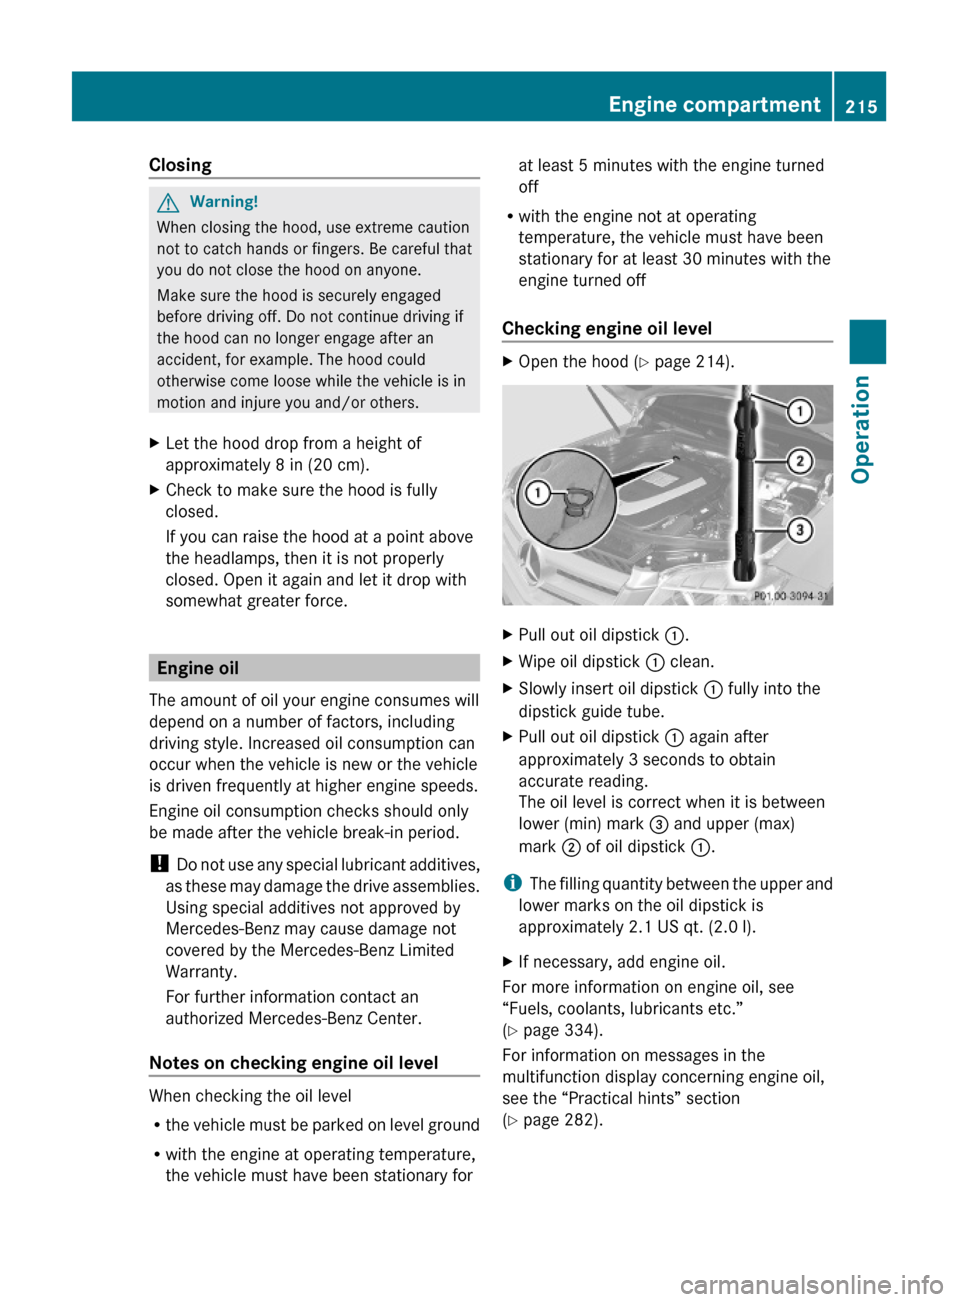
XOpen the hood (Y page 214).XPull out oil dipstick :.XWipe oil dipstick : clean.XSlowly insert oil dipstick : fully into the
dipstick guide tube.
XPull out oil dipstick : again after
approximately 3 seconds to obtain
accurate reading.
The oil level is correct when it is between
lower (min) mark = and upper (max)
mark ; of oil dipstick :.
iThe filling quantity between the upper and
lower marks on the oil dipstick is
approximately 2.1 US qt. (2.0 l).
XIf necessary, add engine oil.
For more information on engine oil, see
“Fuels, coolants, lubricants etc.”
(Y page 334).
For information on messages in the
multifunction display concerning engine oil,
see the “Practical hints” section
(Y page 282).
Engine compartment215OperationX204_AKB; 3; 23, en-USd2ureepe,Version: 2.11.8.12009-07-16T19:16:58+02:00 - Seite 215Z
Page 219 of 344
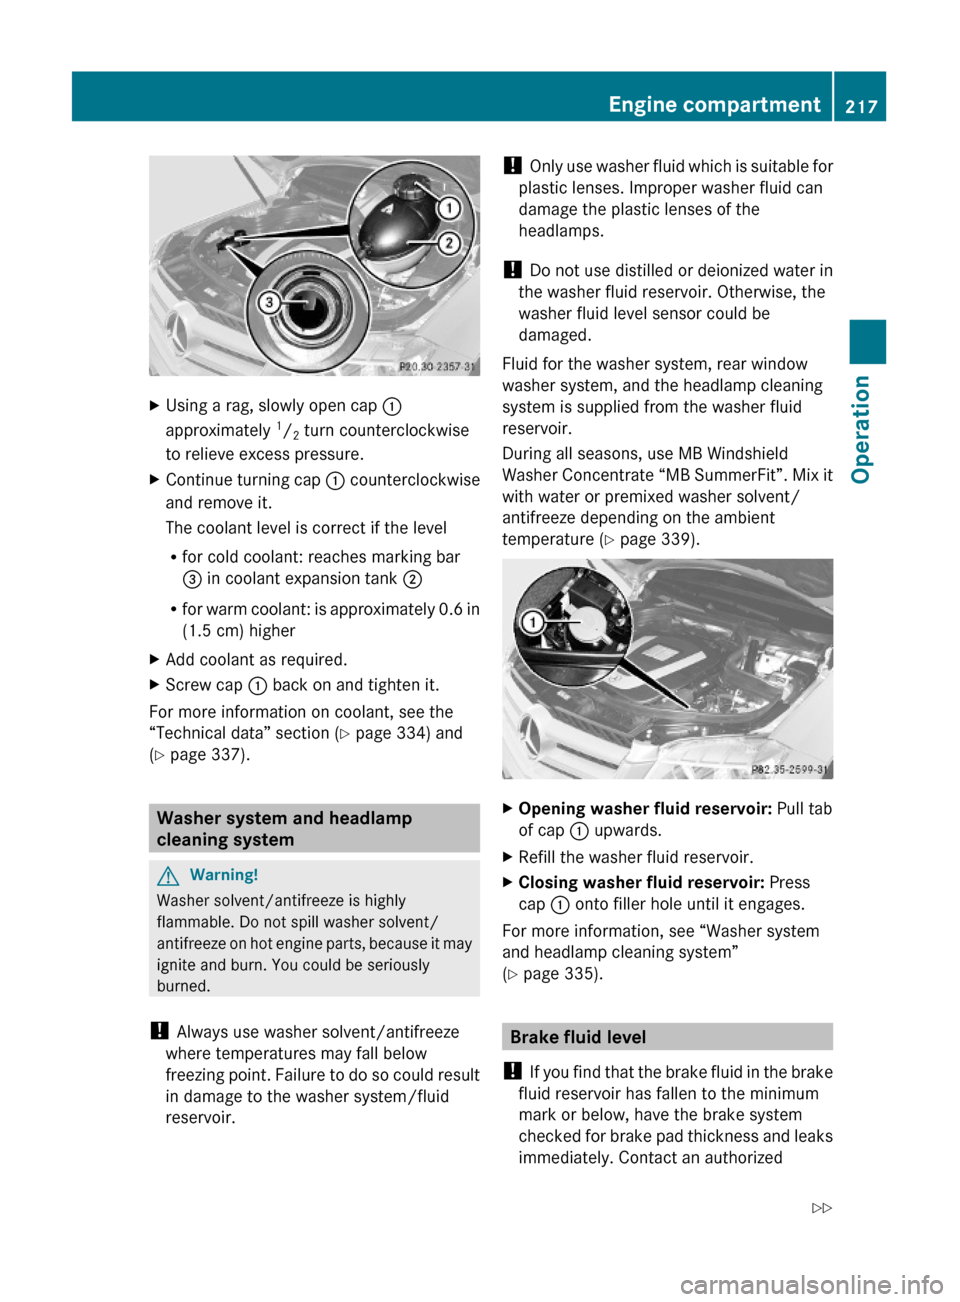
XUsing a rag, slowly open cap :
approximately 1/2 turn counterclockwise
to relieve excess pressure.
XContinue turning cap : counterclockwise
and remove it.
The coolant level is correct if the level
Rfor cold coolant: reaches marking bar
= in coolant expansion tank ;
Rfor warm coolant: is approximately 0.6 in
(1.5 cm) higher
XAdd coolant as required.XScrew cap : back on and tighten it.
For more information on coolant, see the
“Technical data” section (Y page 334) and
(Y page 337).
Washer system and headlamp
cleaning system
GWarning!
Washer solvent/antifreeze is highly
flammable. Do not spill washer solvent/
antifreeze on hot engine parts, because it may
ignite and burn. You could be seriously
burned.
! Always use washer solvent/antifreeze
where temperatures may fall below
freezing point. Failure to do so could result
in damage to the washer system/fluid
reservoir.
! Only use washer fluid which is suitable for
plastic lenses. Improper washer fluid can
damage the plastic lenses of the
headlamps.
! Do not use distilled or deionized water in
the washer fluid reservoir. Otherwise, the
washer fluid level sensor could be
damaged.
Fluid for the washer system, rear window
washer system, and the headlamp cleaning
system is supplied from the washer fluid
reservoir.
During all seasons, use MB Windshield
Washer Concentrate “MB SummerFit”. Mix it
with water or premixed washer solvent/
antifreeze depending on the ambient
temperature (Y page 339).
XOpening washer fluid reservoir: Pull tab
of cap : upwards.
XRefill the washer fluid reservoir.XClosing washer fluid reservoir: Press
cap : onto filler hole until it engages.
For more information, see “Washer system
and headlamp cleaning system”
(Y page 335).
Brake fluid level
! If you find that the brake fluid in the brake
fluid reservoir has fallen to the minimum
mark or below, have the brake system
checked for brake pad thickness and leaks
immediately. Contact an authorized
Engine compartment217OperationX204_AKB; 3; 23, en-USd2ureepe,Version: 2.11.8.12009-07-16T19:16:58+02:00 - Seite 217Z