2010 MERCEDES-BENZ GLK350 4MATIC sensor
[x] Cancel search: sensorPage 95 of 344
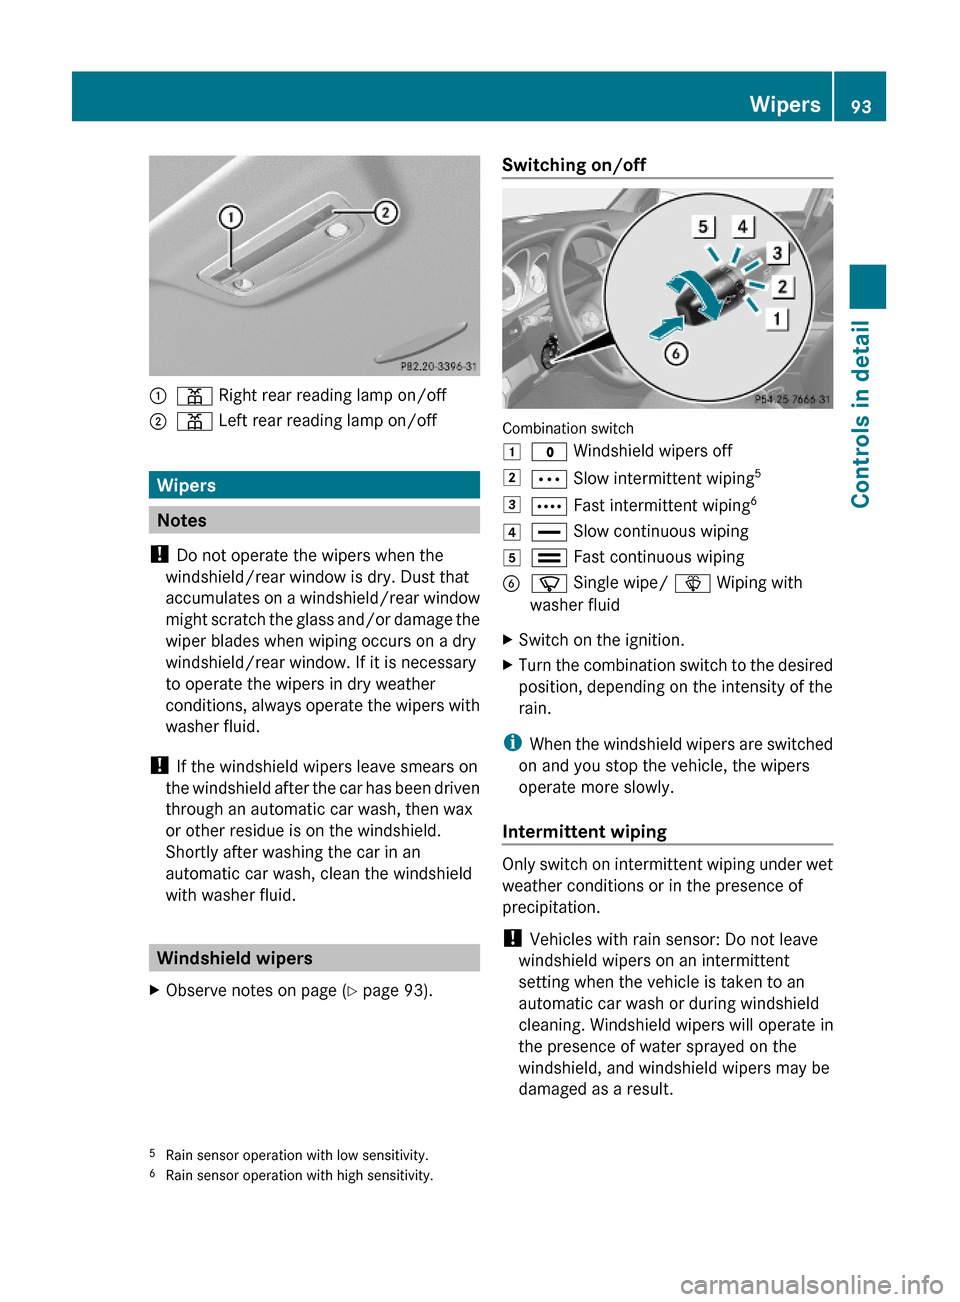
:p Right rear reading lamp on/off;p Left rear reading lamp on/off
Wipers
Notes
! Do not operate the wipers when the
windshield/rear window is dry. Dust that
accumulates on a windshield/rear window
might scratch the glass and/or damage the
wiper blades when wiping occurs on a dry
windshield/rear window. If it is necessary
to operate the wipers in dry weather
conditions, always operate the wipers with
washer fluid.
! If the windshield wipers leave smears on
the windshield after the car has been driven
through an automatic car wash, then wax
or other residue is on the windshield.
Shortly after washing the car in an
automatic car wash, clean the windshield
with washer fluid.
Windshield wipers
XObserve notes on page (Y page 93).Switching on/off
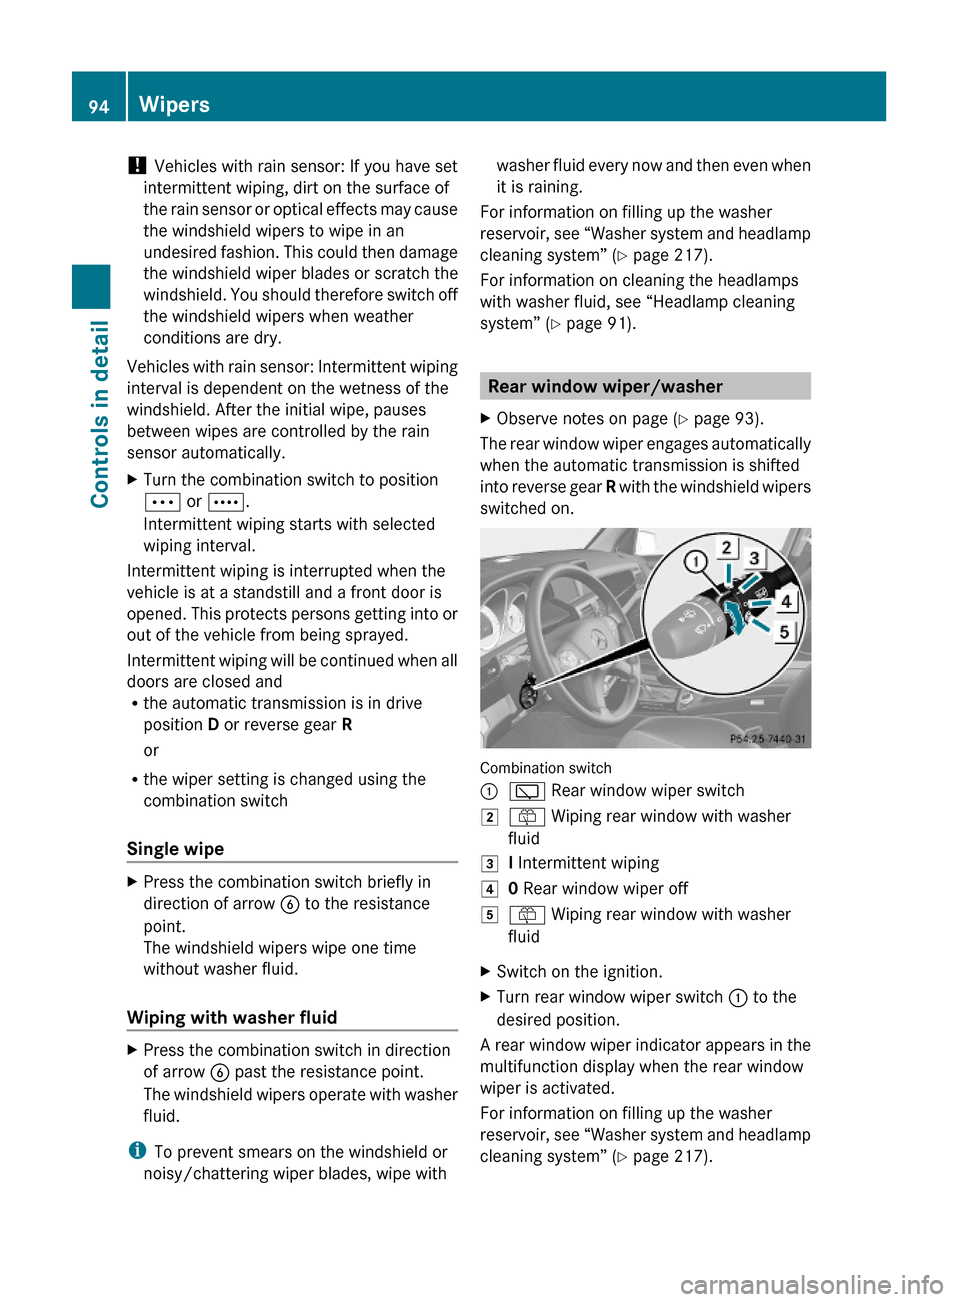
Combination switch
1$ Windshield wipers off2Ä Slow intermittent wiping53Å Fast intermittent wiping64° Slow continuous wiping5¯ Fast continuous wipingBí Single wipe/ î Wiping with
washer fluid
XSwitch on the ignition.XTurn the combination switch to the desired
position, depending on the intensity of the
rain.
iWhen the windshield wipers are switched
on and you stop the vehicle, the wipers
operate more slowly.
Intermittent wiping
Only switch on intermittent wiping under wet
weather conditions or in the presence of
precipitation.
! Vehicles with rain sensor: Do not leave
windshield wipers on an intermittent
setting when the vehicle is taken to an
automatic car wash or during windshield
cleaning. Windshield wipers will operate in
the presence of water sprayed on the
windshield, and windshield wipers may be
damaged as a result.
5Rain sensor operation with low sensitivity.6Rain sensor operation with high sensitivity.
Wipers93Controls in detailX204_AKB; 3; 23, en-USd2ureepe,Version: 2.11.8.12009-07-16T19:16:58+02:00 - Seite 93Z
Page 96 of 344
! Vehicles with rain sensor: If you have set
intermittent wiping, dirt on the surface of
the rain sensor or optical effects may cause
the windshield wipers to wipe in an
undesired fashion. This could then damage
the windshield wiper blades or scratch the
windshield. You should therefore switch off
the windshield wipers when weather
conditions are dry.
Vehicles with rain sensor: Intermittent wiping
interval is dependent on the wetness of the
windshield. After the initial wipe, pauses
between wipes are controlled by the rain
sensor automatically.
XTurn the combination switch to position
Ä or Å.
Intermittent wiping starts with selected
wiping interval.
Intermittent wiping is interrupted when the
vehicle is at a standstill and a front door is
opened. This protects persons getting into or
out of the vehicle from being sprayed.
Intermittent wiping will be continued when all
doors are closed andRthe automatic transmission is in drive
position D or reverse gear R
or
Rthe wiper setting is changed using the
combination switch
Single wipe
XPress the combination switch briefly in
direction of arrow B to the resistance
point.
The windshield wipers wipe one time
without washer fluid.
Wiping with washer fluid
XPress the combination switch in direction
of arrow B past the resistance point.
The windshield wipers operate with washer
fluid.
iTo prevent smears on the windshield or
noisy/chattering wiper blades, wipe with
washer fluid every now and then even when
it is raining.
For information on filling up the washer
reservoir, see “Washer system and headlamp
cleaning system” (Y page 217).
For information on cleaning the headlamps
with washer fluid, see “Headlamp cleaning
system” (Y page 91).
Rear window wiper/washer
XObserve notes on page (Y page 93).
The rear window wiper engages automatically
when the automatic transmission is shifted
into reverse gear R with the windshield wipers
switched on.
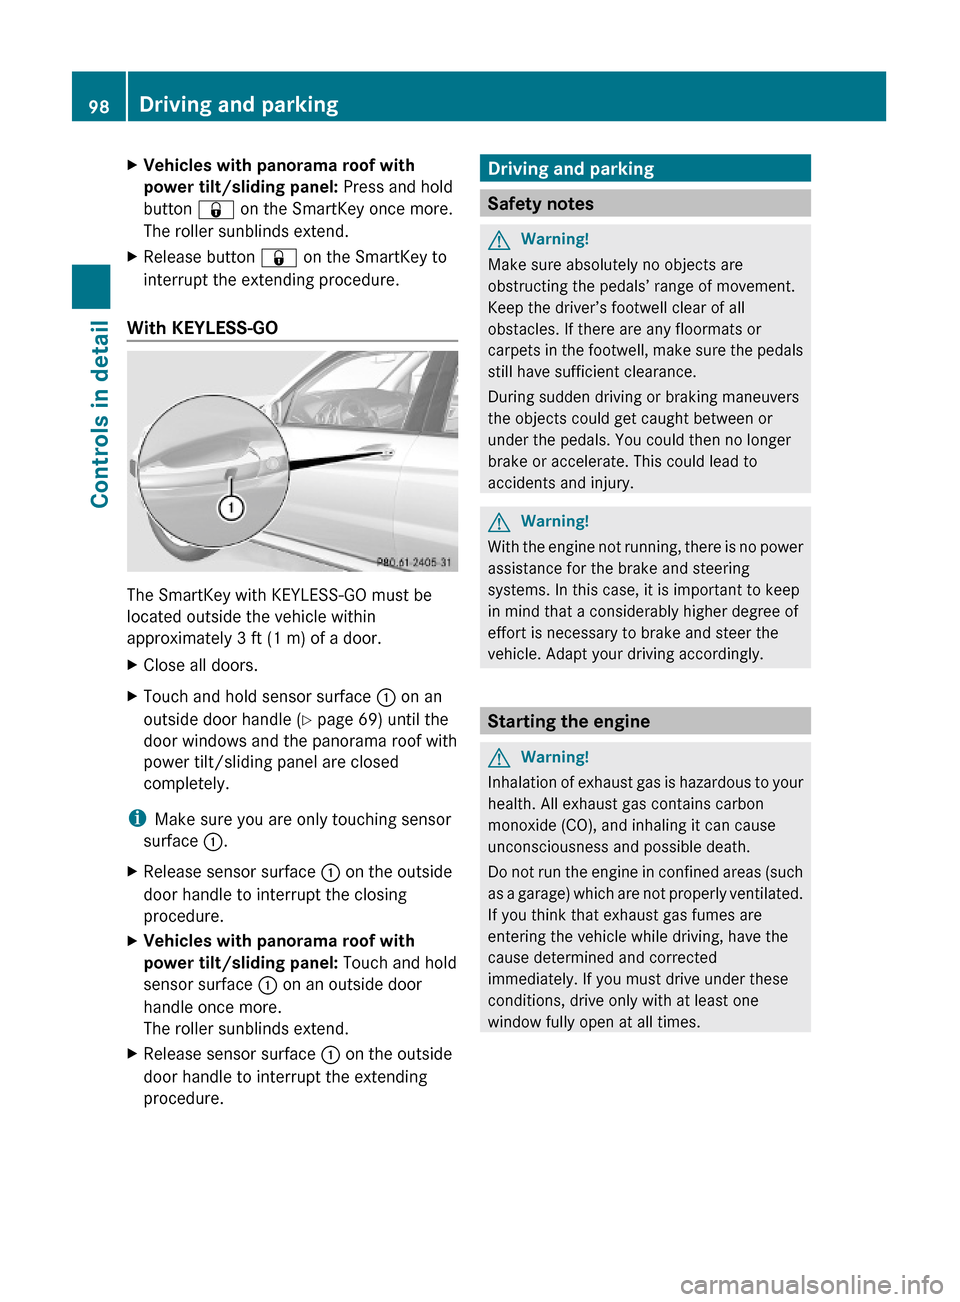
Combination switch
:è Rear window wiper switch2ô Wiping rear window with washer
fluid
3I Intermittent wiping40 Rear window wiper off5ô Wiping rear window with washer
fluid
XSwitch on the ignition.XTurn rear window wiper switch : to the
desired position.
A rear window wiper indicator appears in the
multifunction display when the rear window
wiper is activated.
For information on filling up the washer
reservoir, see “Washer system and headlamp
cleaning system” (Y page 217).
94WipersControls in detail
X204_AKB; 3; 23, en-USd2ureepe,Version: 2.11.8.12009-07-16T19:16:58+02:00 - Seite 94
Page 100 of 344
XVehicles with panorama roof with
power tilt/sliding panel: Press and hold
button & on the SmartKey once more.
The roller sunblinds extend.
XRelease button & on the SmartKey to
interrupt the extending procedure.
With KEYLESS-GO
The SmartKey with KEYLESS-GO must be
located outside the vehicle within
approximately 3 ft (1 m) of a door.
XClose all doors.XTouch and hold sensor surface : on an
outside door handle (Y page 69) until the
door windows and the panorama roof with
power tilt/sliding panel are closed
completely.
iMake sure you are only touching sensor
surface :.
XRelease sensor surface : on the outside
door handle to interrupt the closing
procedure.
XVehicles with panorama roof with
power tilt/sliding panel: Touch and hold
sensor surface : on an outside door
handle once more.
The roller sunblinds extend.
XRelease sensor surface : on the outside
door handle to interrupt the extending
procedure.
Driving and parking
Safety notes
GWarning!
Make sure absolutely no objects are
obstructing the pedals’ range of movement.
Keep the driver’s footwell clear of all
obstacles. If there are any floormats or
carpets in the footwell, make sure the pedals
still have sufficient clearance.
During sudden driving or braking maneuvers
the objects could get caught between or
under the pedals. You could then no longer
brake or accelerate. This could lead to
accidents and injury.
GWarning!
With the engine not running, there is no power
assistance for the brake and steering
systems. In this case, it is important to keep
in mind that a considerably higher degree of
effort is necessary to brake and steer the
vehicle. Adapt your driving accordingly.
Starting the engine
GWarning!
Inhalation of exhaust gas is hazardous to your
health. All exhaust gas contains carbon
monoxide (CO), and inhaling it can cause
unconsciousness and possible death.
Do not run the engine in confined areas (such
as a garage) which are not properly ventilated.
If you think that exhaust gas fumes are
entering the vehicle while driving, have the
cause determined and corrected
immediately. If you must drive under these
conditions, drive only with at least one
window fully open at all times.
98Driving and parkingControls in detail
X204_AKB; 3; 23, en-USd2ureepe,Version: 2.11.8.12009-07-16T19:16:58+02:00 - Seite 98
Page 137 of 344
deviate from conventional stereo
playback.
SYS menu
System settings menu overview
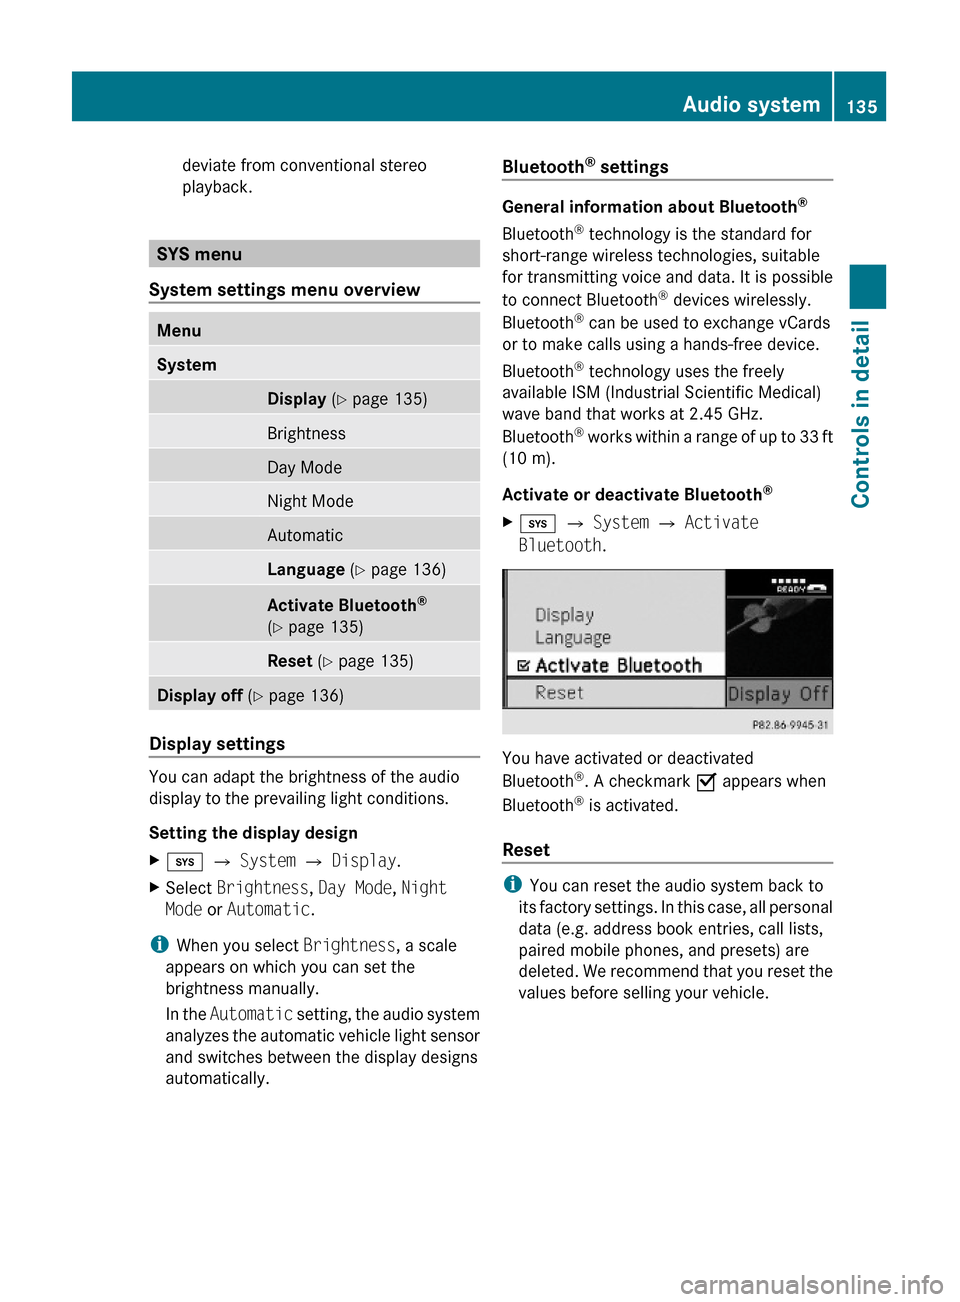
MenuSystemDisplay (Y page 135)BrightnessDay ModeNight ModeAutomaticLanguage (Y page 136)Activate Bluetooth®
(Y page 135)
Reset (Y page 135)Display off (Y page 136)
Display settings
You can adapt the brightness of the audio
display to the prevailing light conditions.
Setting the display design
Xi Q System Q Display.XSelect Brightness, Day Mode, Night
Mode or Automatic.
iWhen you select Brightness, a scale
appears on which you can set the
brightness manually.
In the Automatic setting, the audio system
analyzes the automatic vehicle light sensor
and switches between the display designs
automatically.
Bluetooth® settings
General information about Bluetooth®
Bluetooth® technology is the standard for
short-range wireless technologies, suitable
for transmitting voice and data. It is possible
to connect Bluetooth® devices wirelessly.
Bluetooth® can be used to exchange vCards
or to make calls using a hands-free device.
Bluetooth® technology uses the freely
available ISM (Industrial Scientific Medical)
wave band that works at 2.45 GHz.
Bluetooth® works within a range of up to 33 ft
(10 m).
Activate or deactivate Bluetooth®
Xi Q System Q Activate
Bluetooth.
You have activated or deactivated
Bluetooth®. A checkmark O appears when
Bluetooth® is activated.
Reset
iYou can reset the audio system back to
its factory settings. In this case, all personal
data (e.g. address book entries, call lists,
paired mobile phones, and presets) are
deleted. We recommend that you reset the
values before selling your vehicle.
Audio system135Controls in detailX204_AKB; 3; 23, en-USd2ureepe,Version: 2.11.8.12009-07-16T19:16:58+02:00 - Seite 135Z
Page 174 of 344
Parktronic system (Parking Assist)
The Parktronic system is an electronic
parking aid with ultrasonic sensors designed
to assist the driver during parking maneuvers.
The Parktronic system indicates the relative
distance between the vehicle and an obstacle
visually and audibly.
The Parktronic system is activated
automatically when
Ryou switch on the ignition
and
Ryou release the parking brake
and
Rthe automatic transmission is in drive
position D, reverse gear R, or neutral
position N
The Parktronic system deactivates at speeds
above approximately 11 mph (18 km/h). At
lower speeds, the Parktronic system
activates again.
The Parktronic system also deactivates when
you shift the automatic transmission into
park position P or engage the parking brake.
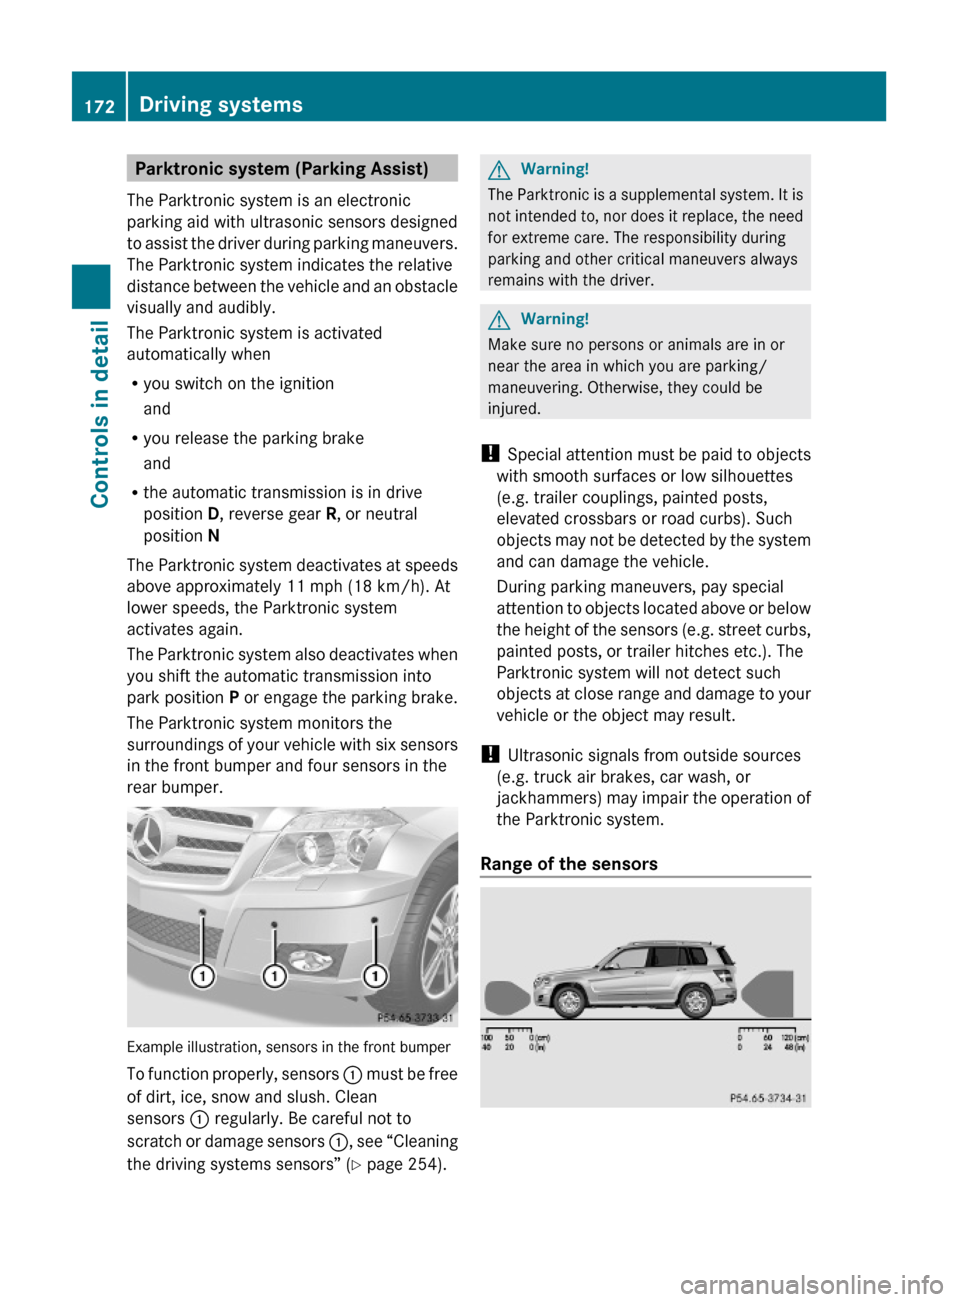
The Parktronic system monitors the
surroundings of your vehicle with six sensors
in the front bumper and four sensors in the
rear bumper.
Example illustration, sensors in the front bumper
To function properly, sensors : must be free
of dirt, ice, snow and slush. Clean
sensors : regularly. Be careful not to
scratch or damage sensors :, see “Cleaning
the driving systems sensors” (Y page 254).
GWarning!
The Parktronic is a supplemental system. It is
not intended to, nor does it replace, the need
for extreme care. The responsibility during
parking and other critical maneuvers always
remains with the driver.
GWarning!
Make sure no persons or animals are in or
near the area in which you are parking/
maneuvering. Otherwise, they could be
injured.
! Special attention must be paid to objects
with smooth surfaces or low silhouettes
(e.g. trailer couplings, painted posts,
elevated crossbars or road curbs). Such
objects may not be detected by the system
and can damage the vehicle.
During parking maneuvers, pay special
attention to objects located above or below
the height of the sensors (e.g. street curbs,
painted posts, or trailer hitches etc.). The
Parktronic system will not detect such
objects at close range and damage to your
vehicle or the object may result.
! Ultrasonic signals from outside sources
(e.g. truck air brakes, car wash, or
jackhammers) may impair the operation of
the Parktronic system.
Range of the sensors
172Driving systemsControls in detail
X204_AKB; 3; 23, en-USd2ureepe,Version: 2.11.8.12009-07-16T19:16:58+02:00 - Seite 172
Page 175 of 344
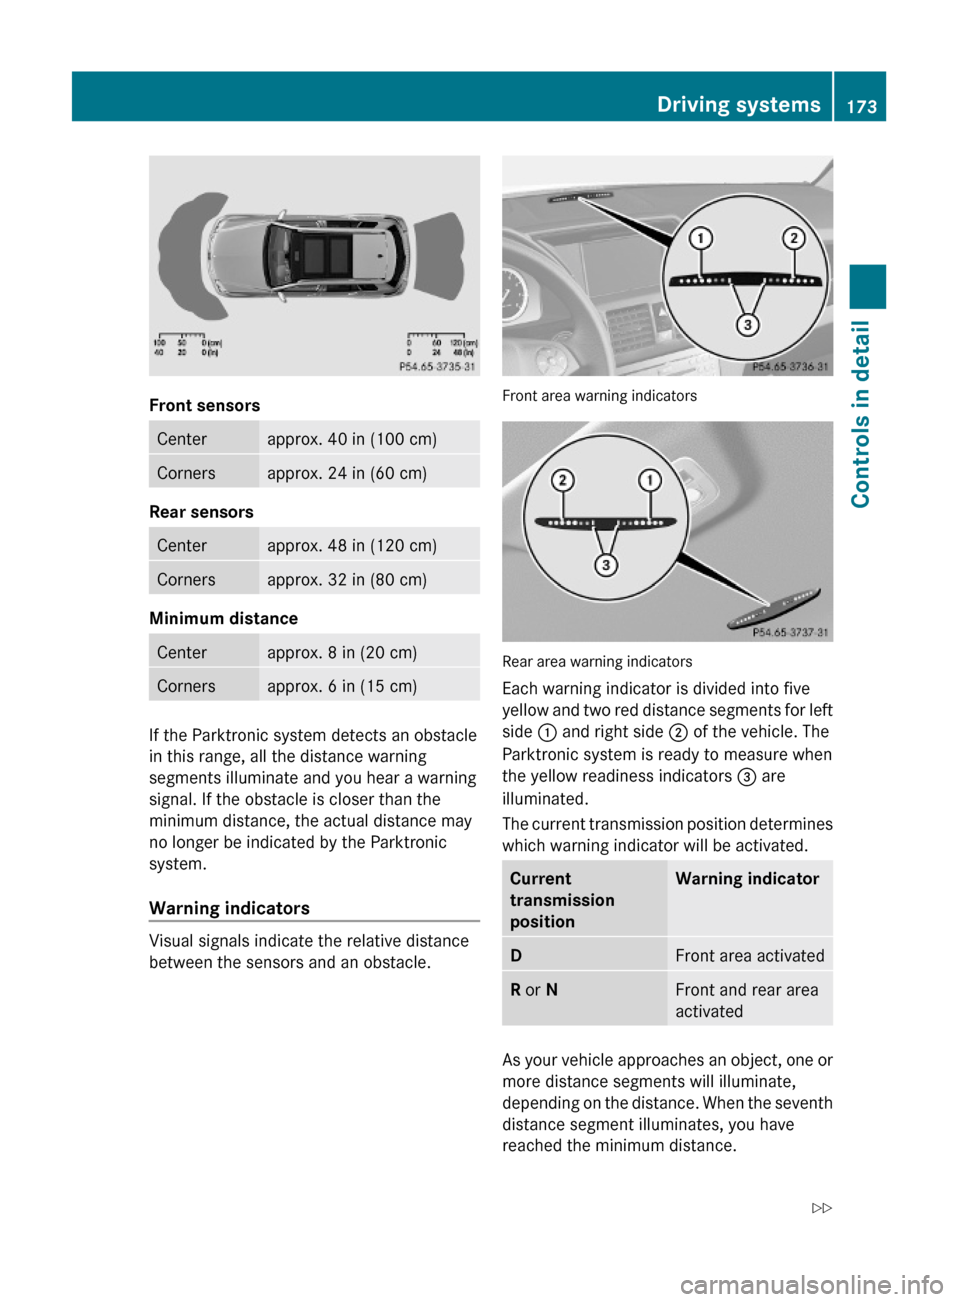
Front sensors
Centerapprox. 40 in (100 cm)Cornersapprox. 24 in (60 cm)
Rear sensors
Centerapprox. 48 in (120 cm)Cornersapprox. 32 in (80 cm)
Minimum distance
Centerapprox. 8 in (20 cm)Cornersapprox. 6 in (15 cm)
If the Parktronic system detects an obstacle
in this range, all the distance warning
segments illuminate and you hear a warning
signal. If the obstacle is closer than the
minimum distance, the actual distance may
no longer be indicated by the Parktronic
system.
Warning indicators
Visual signals indicate the relative distance
between the sensors and an obstacle.
Front area warning indicators
Rear area warning indicators
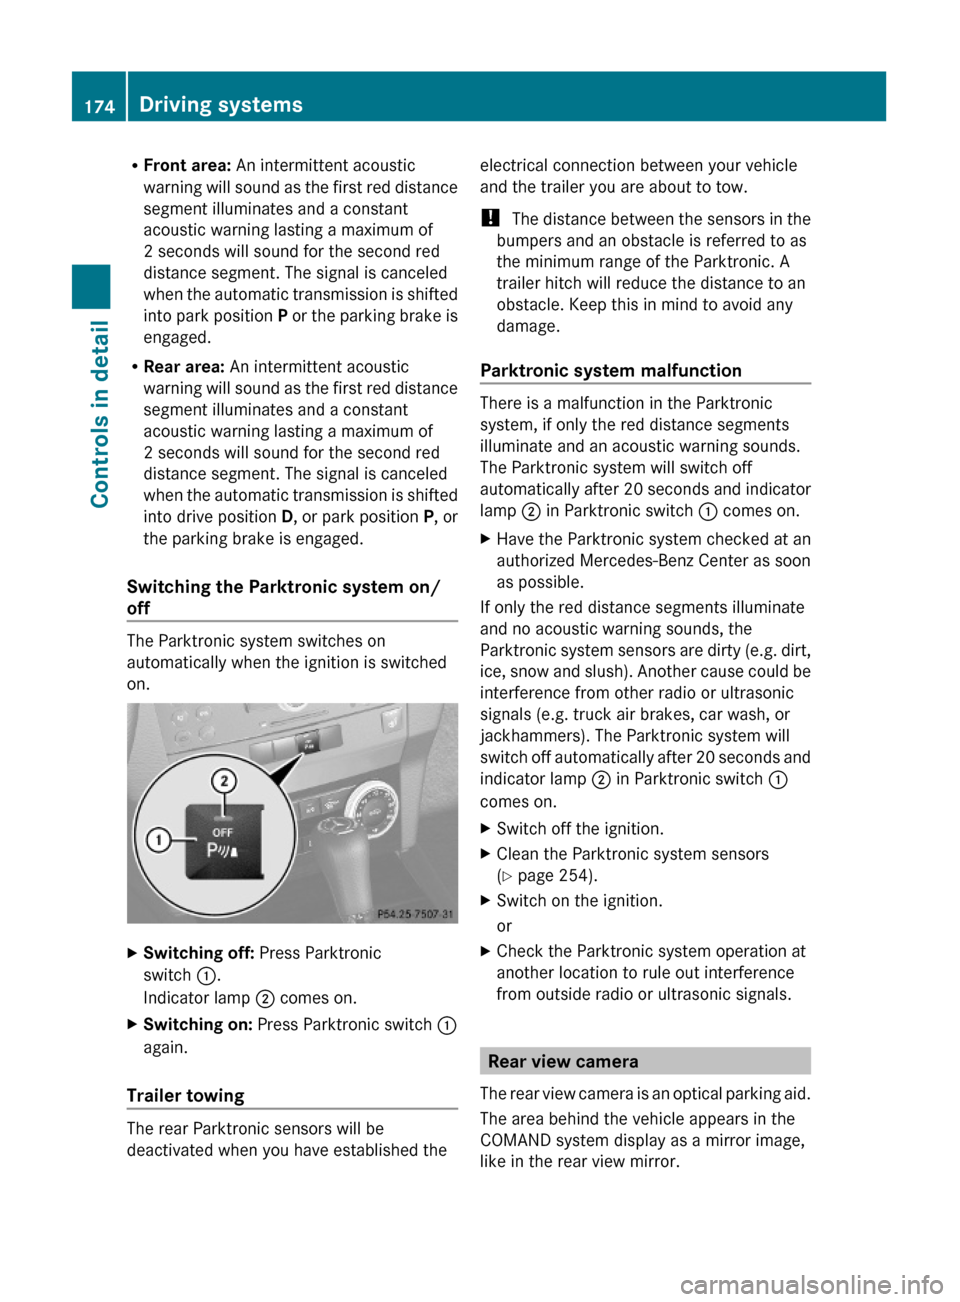
Each warning indicator is divided into five
yellow and two red distance segments for left
side : and right side ; of the vehicle. The
Parktronic system is ready to measure when
the yellow readiness indicators = are
illuminated.
The current transmission position determines
which warning indicator will be activated.
Current
transmission
position
Warning indicatorDFront area activatedR or NFront and rear area
activated
As your vehicle approaches an object, one or
more distance segments will illuminate,
depending on the distance. When the seventh
distance segment illuminates, you have
reached the minimum distance.
Driving systems173Controls in detailX204_AKB; 3; 23, en-USd2ureepe,Version: 2.11.8.12009-07-16T19:16:58+02:00 - Seite 173Z
Page 176 of 344
RFront area: An intermittent acoustic
warning will sound as the first red distance
segment illuminates and a constant
acoustic warning lasting a maximum of
2 seconds will sound for the second red
distance segment. The signal is canceled
when the automatic transmission is shifted
into park position P or the parking brake is
engaged.
RRear area: An intermittent acoustic
warning will sound as the first red distance
segment illuminates and a constant
acoustic warning lasting a maximum of
2 seconds will sound for the second red
distance segment. The signal is canceled
when the automatic transmission is shifted
into drive position D, or park position P, or
the parking brake is engaged.
Switching the Parktronic system on/
off
The Parktronic system switches on
automatically when the ignition is switched
on.
XSwitching off: Press Parktronic
switch :.
Indicator lamp ; comes on.
XSwitching on: Press Parktronic switch :
again.
Trailer towing
The rear Parktronic sensors will be
deactivated when you have established the
electrical connection between your vehicle
and the trailer you are about to tow.
! The distance between the sensors in the
bumpers and an obstacle is referred to as
the minimum range of the Parktronic. A
trailer hitch will reduce the distance to an
obstacle. Keep this in mind to avoid any
damage.
Parktronic system malfunction
There is a malfunction in the Parktronic
system, if only the red distance segments
illuminate and an acoustic warning sounds.
The Parktronic system will switch off
automatically after 20 seconds and indicator
lamp ; in Parktronic switch : comes on.
XHave the Parktronic system checked at an
authorized Mercedes-Benz Center as soon
as possible.
If only the red distance segments illuminate
and no acoustic warning sounds, the
Parktronic system sensors are dirty (e.g. dirt,
ice, snow and slush). Another cause could be
interference from other radio or ultrasonic
signals (e.g. truck air brakes, car wash, or
jackhammers). The Parktronic system will
switch off automatically after 20 seconds and
indicator lamp ; in Parktronic switch :
comes on.
XSwitch off the ignition.XClean the Parktronic system sensors
(Y page 254).
XSwitch on the ignition.
or
XCheck the Parktronic system operation at
another location to rule out interference
from outside radio or ultrasonic signals.
Rear view camera
The rear view camera is an optical parking aid.
The area behind the vehicle appears in the
COMAND system display as a mirror image,
like in the rear view mirror.
174Driving systemsControls in detail
X204_AKB; 3; 23, en-USd2ureepe,Version: 2.11.8.12009-07-16T19:16:58+02:00 - Seite 174
Page 219 of 344
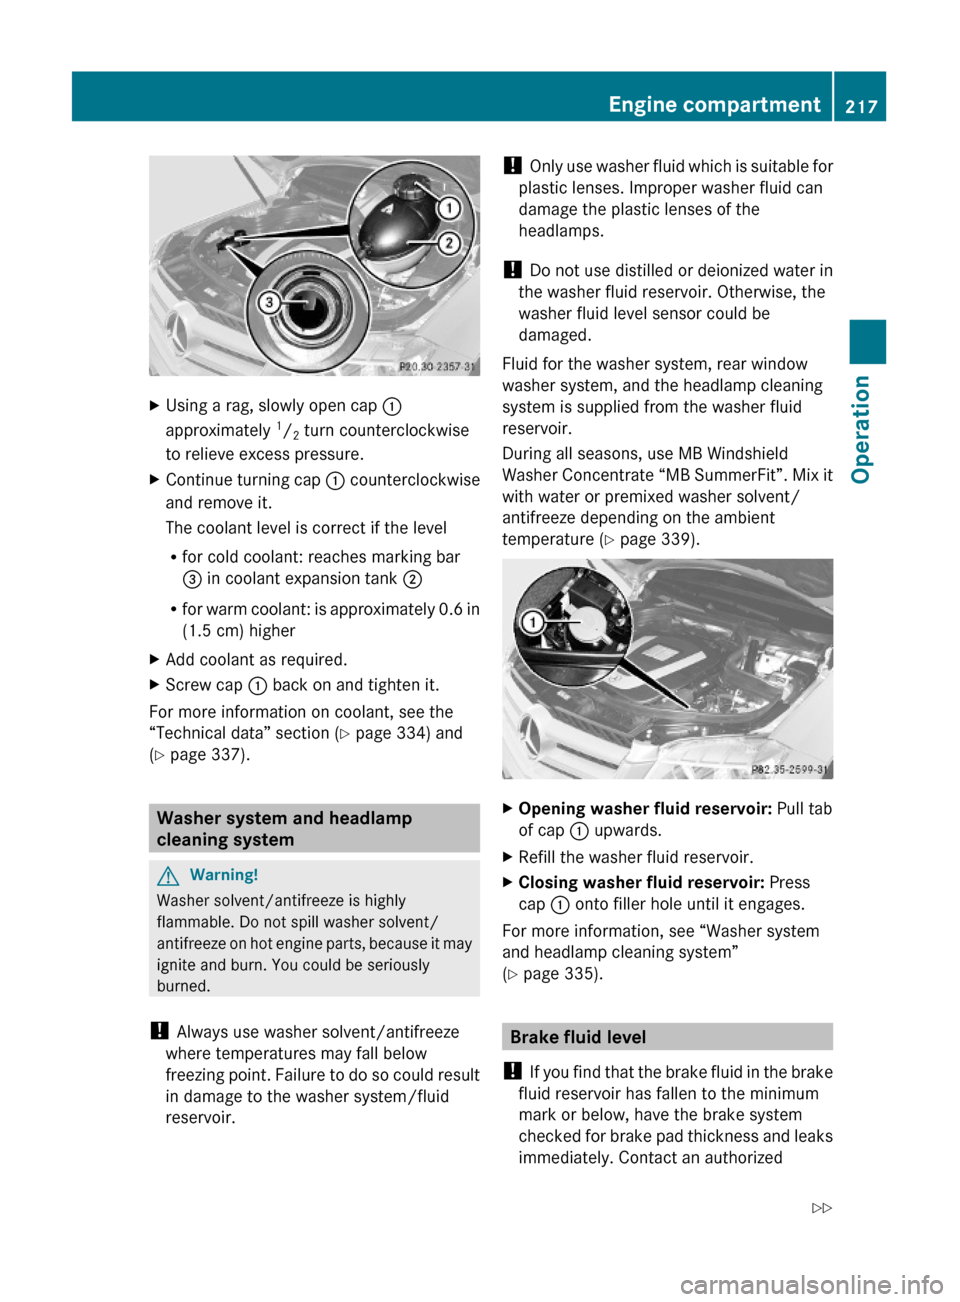
XUsing a rag, slowly open cap :
approximately 1/2 turn counterclockwise
to relieve excess pressure.
XContinue turning cap : counterclockwise
and remove it.
The coolant level is correct if the level
Rfor cold coolant: reaches marking bar
= in coolant expansion tank ;
Rfor warm coolant: is approximately 0.6 in
(1.5 cm) higher
XAdd coolant as required.XScrew cap : back on and tighten it.
For more information on coolant, see the
“Technical data” section (Y page 334) and
(Y page 337).
Washer system and headlamp
cleaning system
GWarning!
Washer solvent/antifreeze is highly
flammable. Do not spill washer solvent/
antifreeze on hot engine parts, because it may
ignite and burn. You could be seriously
burned.
! Always use washer solvent/antifreeze
where temperatures may fall below
freezing point. Failure to do so could result
in damage to the washer system/fluid
reservoir.
! Only use washer fluid which is suitable for
plastic lenses. Improper washer fluid can
damage the plastic lenses of the
headlamps.
! Do not use distilled or deionized water in
the washer fluid reservoir. Otherwise, the
washer fluid level sensor could be
damaged.
Fluid for the washer system, rear window
washer system, and the headlamp cleaning
system is supplied from the washer fluid
reservoir.
During all seasons, use MB Windshield
Washer Concentrate “MB SummerFit”. Mix it
with water or premixed washer solvent/
antifreeze depending on the ambient
temperature (Y page 339).
XOpening washer fluid reservoir: Pull tab
of cap : upwards.
XRefill the washer fluid reservoir.XClosing washer fluid reservoir: Press
cap : onto filler hole until it engages.
For more information, see “Washer system
and headlamp cleaning system”
(Y page 335).
Brake fluid level
! If you find that the brake fluid in the brake
fluid reservoir has fallen to the minimum
mark or below, have the brake system
checked for brake pad thickness and leaks
immediately. Contact an authorized
Engine compartment217OperationX204_AKB; 3; 23, en-USd2ureepe,Version: 2.11.8.12009-07-16T19:16:58+02:00 - Seite 217Z