2010 MERCEDES-BENZ GLK350 4MATIC display
[x] Cancel search: displayPage 180 of 344
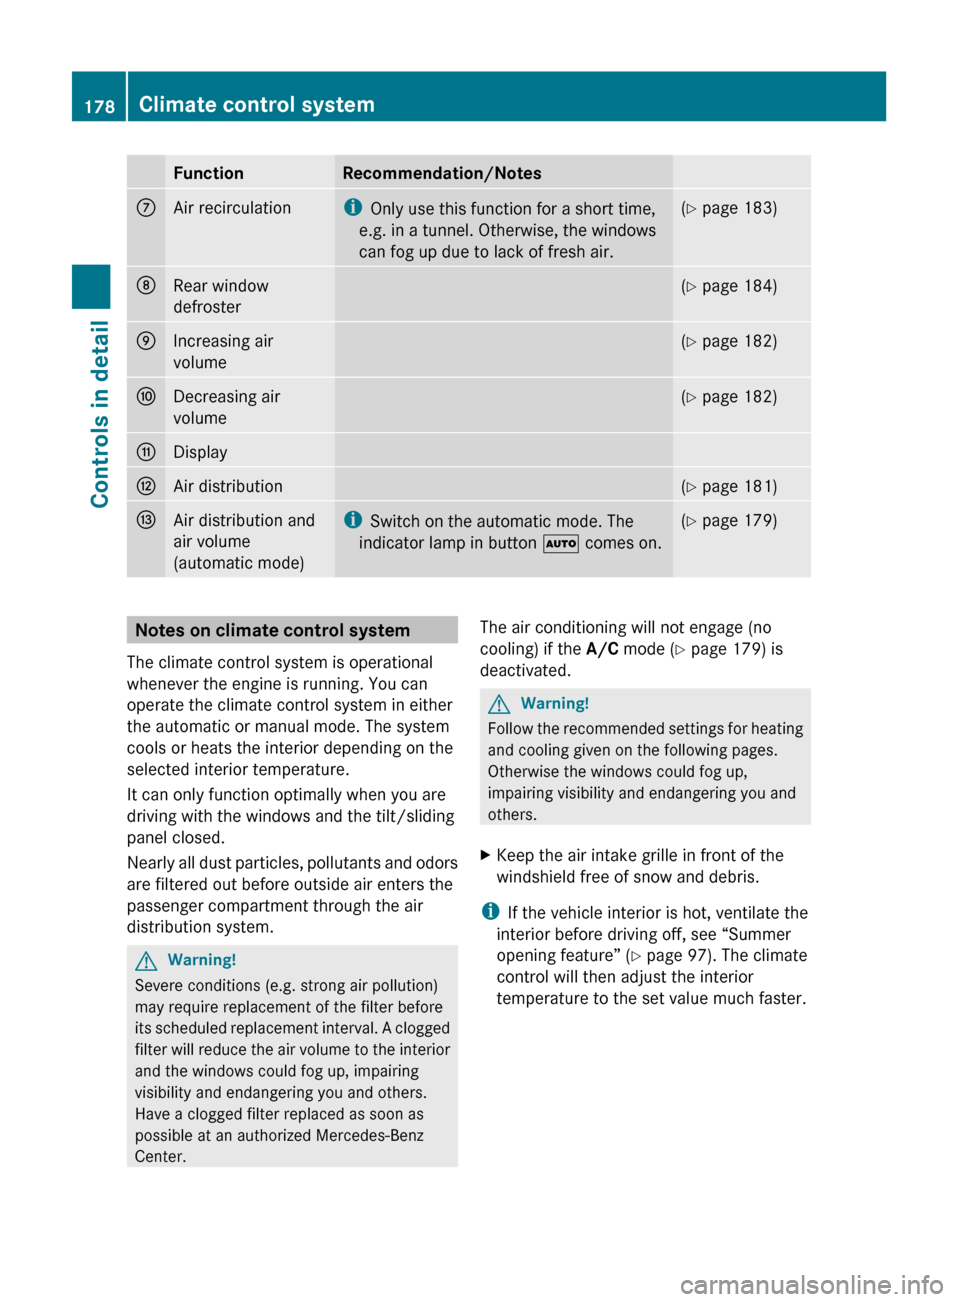
FunctionRecommendation/NotesCAir recirculationiOnly use this function for a short time,
e.g. in a tunnel. Otherwise, the windows
can fog up due to lack of fresh air.( Y page 183)DRear window
defroster( Y page 184)EIncreasing air
volume( Y page 182)FDecreasing air
volume( Y page 182)GDisplayHAir distribution(Y page 181)IAir distribution and
air volume
(automatic mode)i Switch on the automatic mode. The
indicator lamp in button à comes on.(Y page 179)Notes on climate control system
The climate control system is operational
whenever the engine is running. You can
operate the climate control system in either
the automatic or manual mode. The system
cools or heats the interior depending on the
selected interior temperature.
It can only function optimally when you are
driving with the windows and the tilt/sliding
panel closed.
Nearly all dust particles, pollutants and odors
are filtered out before outside air enters the
passenger compartment through the air
distribution system.GWarning!
Severe conditions (e.g. strong air pollution)
may require replacement of the filter before
its scheduled replacement interval. A clogged
filter will reduce the air volume to the interior
and the windows could fog up, impairing
visibility and endangering you and others.
Have a clogged filter replaced as soon as
possible at an authorized Mercedes-Benz
Center.
The air conditioning will not engage (no
cooling) if the A/C mode ( Y page 179) is
deactivated.GWarning!
Follow the recommended settings for heating
and cooling given on the following pages.
Otherwise the windows could fog up,
impairing visibility and endangering you and
others.
XKeep the air intake grille in front of the
windshield free of snow and debris.
i If the vehicle interior is hot, ventilate the
interior before driving off, see “Summer
opening feature” ( Y page 97). The climate
control will then adjust the interior
temperature to the set value much faster.
178Climate control systemControls in detail
X204_AKB; 3; 23, en-USd2ureepe,Version: 2.11.8.12009-07-16T19:16:58+02:00 - Seite 178
Page 182 of 344
more quickly. Window fogging may impair
visibility and endanger you and others.
XSet the desired temperature
(Y page 180).
XActivating: Press button Ã.
The indicator lamp in the button comes on.
The air volume and air distribution are
adjusted automatically.
XDeactivating: Press button I, K or
_.
The indicator lamp in button à goes out.
The automatic operation of air volume and
air distribution switches off. The symbols of
air distribution or air volume appear in
display G (Y page 177).
XAdjust air distribution (Y page 181).XAdjust air volume (Y page 182).
Setting temperature
You can adjust the air temperature on each
side of the passenger compartment. You
should raise or lower the temperature setting
in small increments, preferably starting at
72‡ (22†).
You can adjust the air temperature on each
side of the passenger compartment. You
should raise or lower the temperature setting
in small increments, preferably starting at
72‡ (22†).
XIncreasing/decreasing: Turn
temperature controls : and B
(Y page 177) slightly clockwise or
counterclockwise.
Adjusting air vents
GWarning!
When operating the climate control, the air
that enters the passenger compartment
through the air vents can be very hot or very
cold (depending on the set temperature). This
may cause burns or frostbite to unprotected
skin in the immediate area of the air vents.
Always keep sufficient distance between
unprotected parts of the body and the air
vents. If necessary, use the air distribution
adjustment to direct the air to air vents in the
vehicle interior that are not in the immediate
area of unprotected skin.
For best possible performance of the climate
control:
XKeep the air intake grille in front of the
windshield free of snow, leaves, sticks, and
any other debris.
XAlways keep all air vents and grilles in the
passenger compartment free from
obstruction.
iFor draft-free ventilation, move the
adjustable center and side air vents to the
middle position.
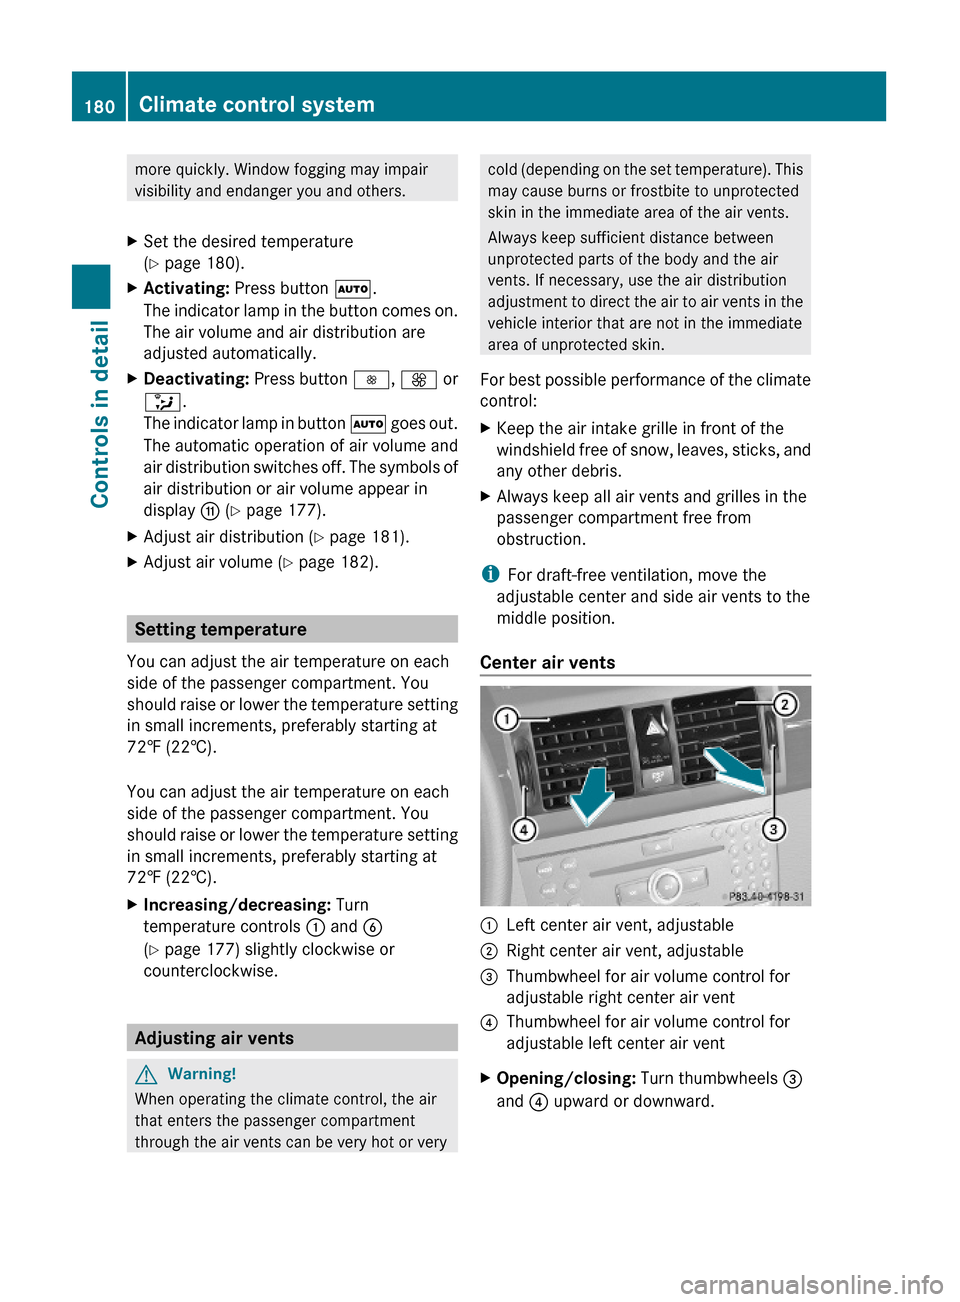
Center air vents
:Left center air vent, adjustable;Right center air vent, adjustable=Thumbwheel for air volume control for
adjustable right center air vent
?Thumbwheel for air volume control for
adjustable left center air vent
XOpening/closing: Turn thumbwheels =
and ? upward or downward.
180Climate control systemControls in detail
X204_AKB; 3; 23, en-USd2ureepe,Version: 2.11.8.12009-07-16T19:16:58+02:00 - Seite 180
Page 183 of 344
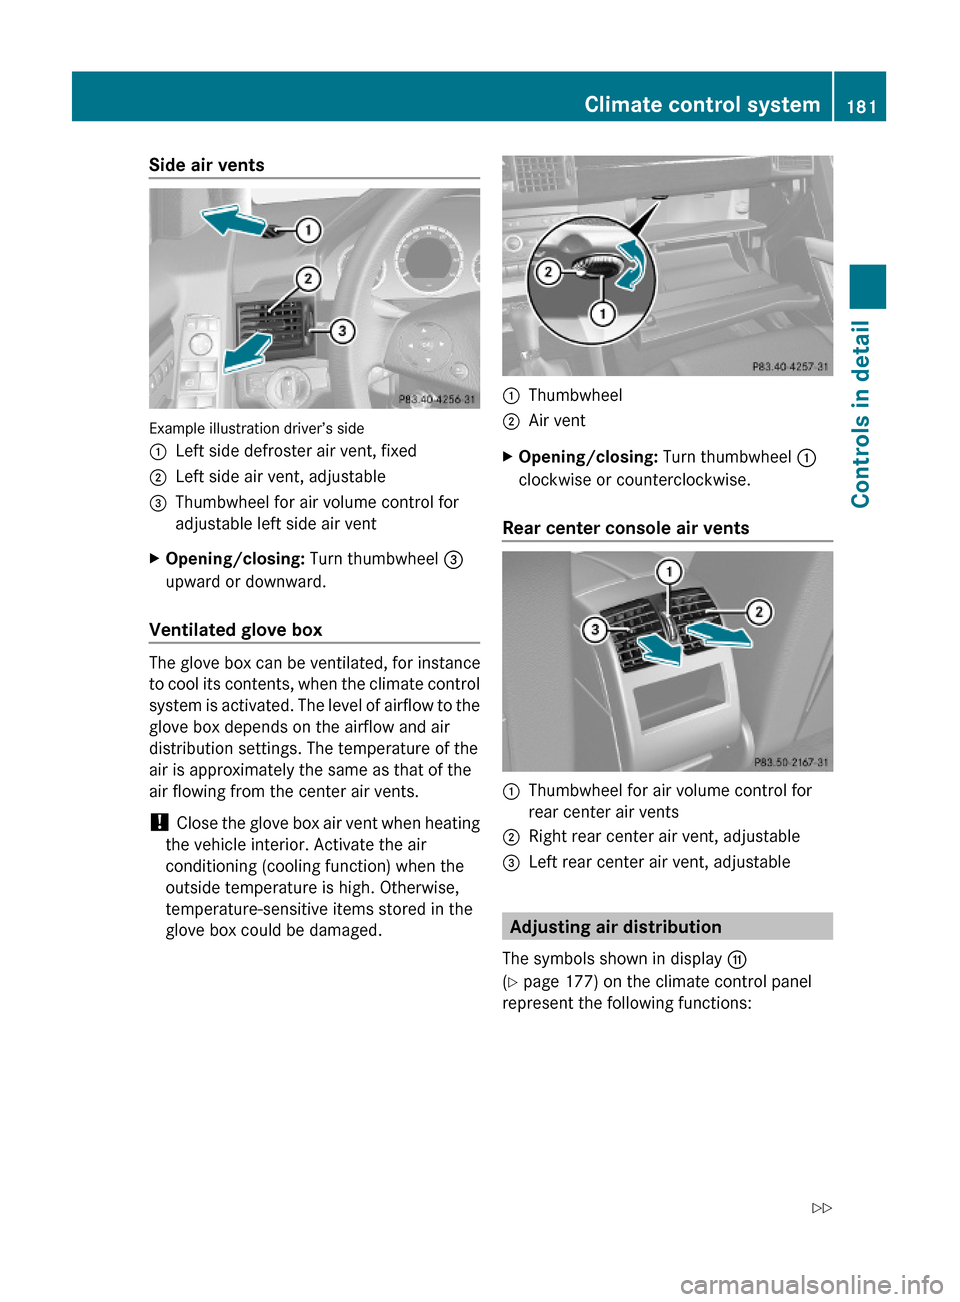
Side air vents
Example illustration driver’s side
:Left side defroster air vent, fixed;Left side air vent, adjustable=Thumbwheel for air volume control for
adjustable left side air vent
XOpening/closing: Turn thumbwheel =
upward or downward.
Ventilated glove box
The glove box can be ventilated, for instance
to cool its contents, when the climate control
system is activated. The level of airflow to the
glove box depends on the airflow and air
distribution settings. The temperature of the
air is approximately the same as that of the
air flowing from the center air vents.
! Close the glove box air vent when heating
the vehicle interior. Activate the air
conditioning (cooling function) when the
outside temperature is high. Otherwise,
temperature-sensitive items stored in the
glove box could be damaged.
:Thumbwheel;Air ventXOpening/closing: Turn thumbwheel :
clockwise or counterclockwise.
Rear center console air vents
:Thumbwheel for air volume control for
rear center air vents
;Right rear center air vent, adjustable=Left rear center air vent, adjustable
Adjusting air distribution
The symbols shown in display G
(Y page 177) on the climate control panel
represent the following functions:
Climate control system181Controls in detailX204_AKB; 3; 23, en-USd2ureepe,Version: 2.11.8.12009-07-16T19:16:58+02:00 - Seite 181Z
Page 184 of 344
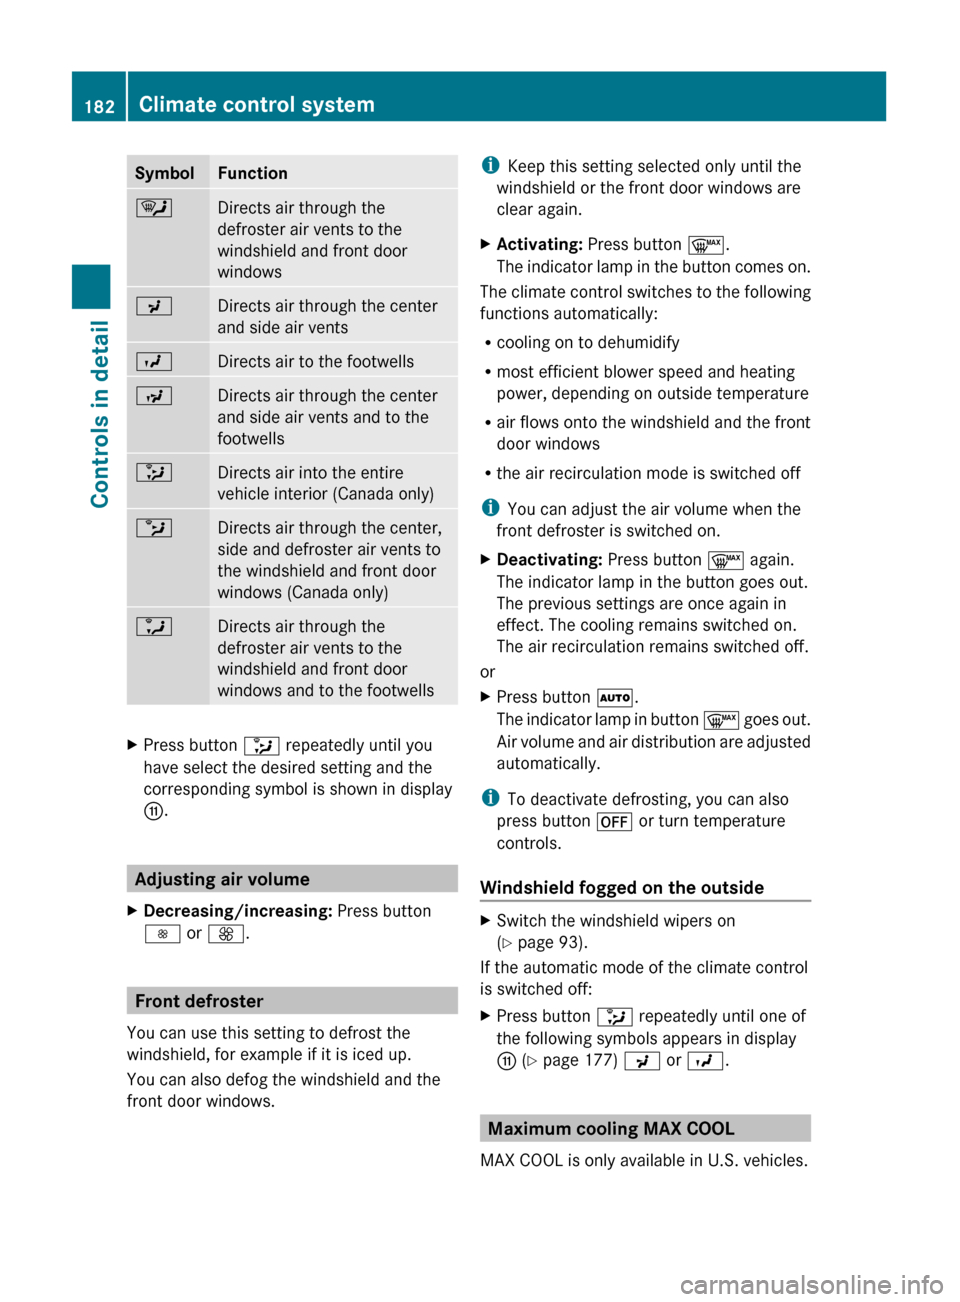
SymbolFunction¯Directs air through the
defroster air vents to the
windshield and front door
windowsPDirects air through the center
and side air ventsODirects air to the footwellsNDirects air through the center
and side air vents and to the
footwells_Directs air into the entire
vehicle interior (Canada only)bDirects air through the center,
side and defroster air vents to
the windshield and front door
windows (Canada only)aDirects air through the
defroster air vents to the
windshield and front door
windows and to the footwellsXPress button _ repeatedly until you
have select the desired setting and the
corresponding symbol is shown in display
G .
Adjusting air volume
XDecreasing/increasing: Press button
I or K .
Front defroster
You can use this setting to defrost the
windshield, for example if it is iced up.
You can also defog the windshield and the
front door windows.
i Keep this setting selected only until the
windshield or the front door windows are
clear again.XActivating: Press button ¬.
The indicator lamp in the button comes on.
The climate control switches to the following
functions automatically:
R cooling on to dehumidify
R most efficient blower speed and heating
power, depending on outside temperature
R air flows onto the windshield and the front
door windows
R the air recirculation mode is switched off
i You can adjust the air volume when the
front defroster is switched on.
XDeactivating: Press button ¬ again.
The indicator lamp in the button goes out.
The previous settings are once again in
effect. The cooling remains switched on.
The air recirculation remains switched off.
or
XPress button Ã.
The indicator lamp in button ¬ goes out.
Air volume and air distribution are adjusted
automatically.
i To deactivate defrosting, you can also
press button ^ or turn temperature
controls.
Windshield fogged on the outside
XSwitch the windshield wipers on
( Y page 93).
If the automatic mode of the climate control
is switched off:
XPress button _ repeatedly until one of
the following symbols appears in display
G (Y page 177) P or O .
Maximum cooling MAX COOL
MAX COOL is only available in U.S. vehicles.
182Climate control systemControls in detail
X204_AKB; 3; 23, en-USd2ureepe,Version: 2.11.8.12009-07-16T19:16:58+02:00 - Seite 182
Page 201 of 344
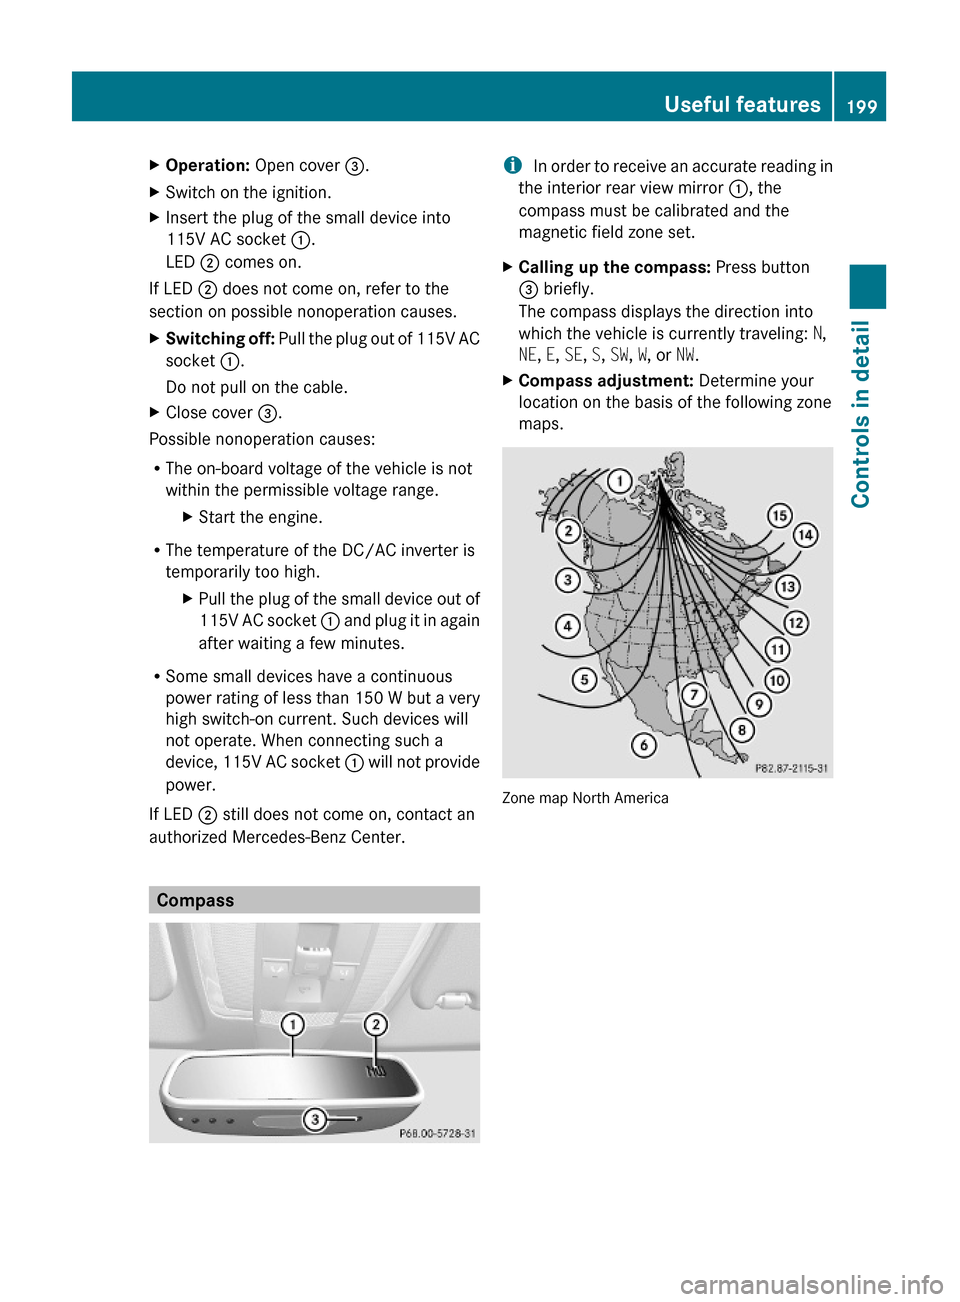
XOperation: Open cover =.XSwitch on the ignition.XInsert the plug of the small device into
115V AC socket :.
LED ; comes on.
If LED ; does not come on, refer to the
section on possible nonoperation causes.
XSwitching off: Pull the plug out of 115V AC
socket :.
Do not pull on the cable.
XClose cover =.
Possible nonoperation causes:
RThe on-board voltage of the vehicle is not
within the permissible voltage range.
XStart the engine.
RThe temperature of the DC/AC inverter is
temporarily too high.
XPull the plug of the small device out of
115V AC socket : and plug it in again
after waiting a few minutes.
RSome small devices have a continuous
power rating of less than 150 W but a very
high switch-on current. Such devices will
not operate. When connecting such a
device, 115V AC socket : will not provide
power.
If LED ; still does not come on, contact an
authorized Mercedes-Benz Center.
Compass
i In order to receive an accurate reading in
the interior rear view mirror :, the
compass must be calibrated and the
magnetic field zone set.
XCalling up the compass: Press button
= briefly.
The compass displays the direction into
which the vehicle is currently traveling: N,
NE, E, SE, S, SW, W, or NW.
XCompass adjustment: Determine your
location on the basis of the following zone
maps.
Zone map North America
Useful features199Controls in detailX204_AKB; 3; 23, en-USd2ureepe,Version: 2.11.8.12009-07-16T19:16:58+02:00 - Seite 199Z
Page 202 of 344
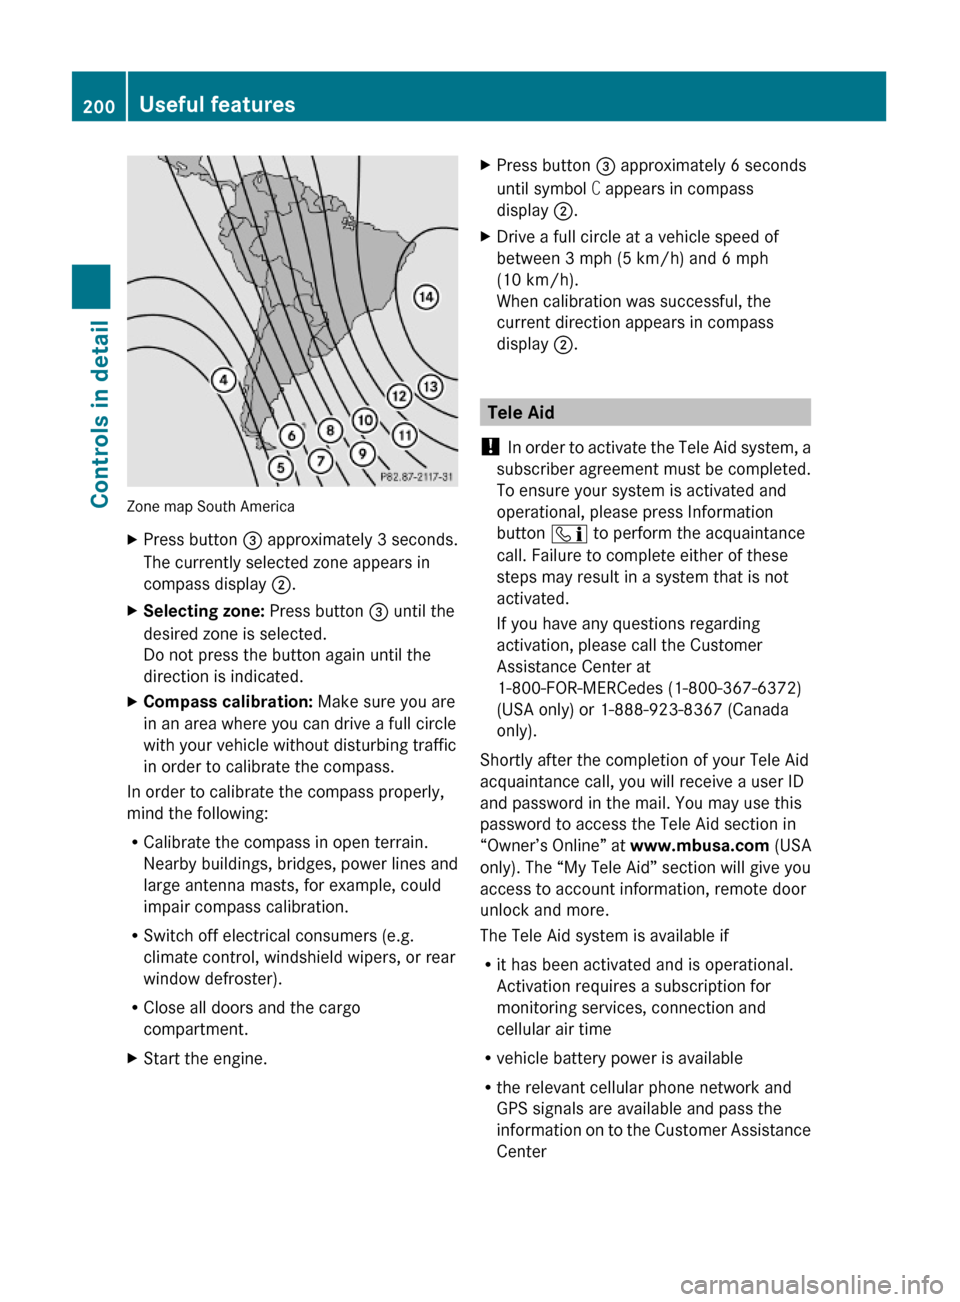
Zone map South America
XPress button = approximately 3 seconds.
The currently selected zone appears in
compass display ;.
XSelecting zone: Press button = until the
desired zone is selected.
Do not press the button again until the
direction is indicated.
XCompass calibration: Make sure you are
in an area where you can drive a full circle
with your vehicle without disturbing traffic
in order to calibrate the compass.
In order to calibrate the compass properly,
mind the following:
RCalibrate the compass in open terrain.
Nearby buildings, bridges, power lines and
large antenna masts, for example, could
impair compass calibration.
RSwitch off electrical consumers (e.g.
climate control, windshield wipers, or rear
window defroster).
RClose all doors and the cargo
compartment.
XStart the engine.XPress button = approximately 6 seconds
until symbol C appears in compass
display ;.
XDrive a full circle at a vehicle speed of
between 3 mph (5 km/h) and 6 mph
(10 km/h).
When calibration was successful, the
current direction appears in compass
display ;.
Tele Aid
! In order to activate the Tele Aid system, a
subscriber agreement must be completed.
To ensure your system is activated and
operational, please press Information
button ï to perform the acquaintance
call. Failure to complete either of these
steps may result in a system that is not
activated.
If you have any questions regarding
activation, please call the Customer
Assistance Center at
1-800-FOR-MERCedes (1-800-367-6372)
(USA only) or 1-888-923-8367 (Canada
only).
Shortly after the completion of your Tele Aid
acquaintance call, you will receive a user ID
and password in the mail. You may use this
password to access the Tele Aid section in
“Owner’s Online” at www.mbusa.com (USA
only). The “My Tele Aid” section will give you
access to account information, remote door
unlock and more.
The Tele Aid system is available if
Rit has been activated and is operational.
Activation requires a subscription for
monitoring services, connection and
cellular air time
Rvehicle battery power is available
Rthe relevant cellular phone network and
GPS signals are available and pass the
information on to the Customer Assistance
Center
200Useful featuresControls in detail
X204_AKB; 3; 23, en-USd2ureepe,Version: 2.11.8.12009-07-16T19:16:58+02:00 - Seite 200
Page 203 of 344
iLocation of the vehicle on a map is only
possible if the vehicle is able to receive
signals from the GPS satellite network and
pass the information on to the Customer
Assistance Center.
The Tele Aid system
(Telematic Alarm Identification on Demand)
The Tele Aid system consists of three types
of response:
R Automatic and manual emergency
R Roadside Assistance
R Information
To adjust the speaker volume during a Tele
Aid call do the following:
XPress button W or X on the
multifunction steering wheel.
or
XUse the rotary control on the audio system
( Y page 133).
Be sure to check “Owner’s Online” at
www.mbusa.com (USA only) for more
information and a description of all available
features.
System self-test
The system performs a self-test after you
have switched on the ignition.
GWarning!
A malfunction in the system has been
detected if any or all of the following
conditions occur:
R The indicator lamp in the SOS button does
not come on during the system self-test.
R The indicator lamp in the Roadside
Assistance button F does not come on
during the system self-test.
R The indicator lamp in the Information
button ï does not come on during the
system self-test.
R The indicator lamp in the SOS button,
Roadside Assistance button F, or
Information button ï remains
illuminated constantly in red after the
system self-test.
R The message Tele Aid Inoperative or
Tele Aid Not Activated appears in the
multifunction display after the system self-
test
If a malfunction is indicated as outlined above,
the system may not operate as expected. In
case of an emergency, help will have to be
summoned by other means.
Have the system checked at the nearest
Mercedes-Benz Center or contact the
Customer Assistance Center at
1-800-FOR-MERCedes (1-800-367-6372)
(USA only) or 1-888-923-8367 (Canada only)
as soon as possible.
Emergency calls
! In order to activate the Tele Aid system, a
subscriber agreement must be completed.
To ensure your system is activated and
operational, please press Information
button ï to perform the acquaintance
call. Failure to complete either of these
steps may result in a system that is not
activated.
If you have any questions regarding
activation, please call the Customer
Assistance Center at
1-800-FOR-MERCedes (1-800-367-6372)
(USA only) or 1-888-923-8367 (Canada
only).
An emergency call is initiated automatically
following an accident in which the Emergency
Tensioning Devices (ETDs) or air bags have
deployed.
i An automatically initiated Tele Aid
emergency call cannot be canceled.
An emergency call can also be initiated
manually ( Y page 202).
Useful features201Controls in detailX204_AKB; 3; 23, en-USd2ureepe,Version: 2.11.8.12009-07-16T19:16:58+02:00 - Seite 201Z
Page 204 of 344
Once the emergency call is in progress, the
indicator lamp in the SOS button will begin to
flash. The message Connecting Call
appears in the multifunction display and the
COMAND system is muted. When the
connection is established, the message
Call Connected appears in the
multifunction display.
All information relevant to the emergency,
such as the location of the vehicle
(determined by the GPS satellite location
system), vehicle model, identification number
and color are generated.
A voice connection between the Customer
Assistance Center and the occupants of the
vehicle will be established automatically soon
after the emergency call has been initiated.
The Customer Assistance Center will attempt
to determine the nature of the emergency
more precisely, provided they can speak to
an occupant of the vehicle.
iIf no vehicle occupant responds, an
ambulance will be sent to the vehicle
immediately.
GWarning!
If the indicator lamp in the SOS button is
flashing continuously and there was no voice
connection to the Customer Assistance
Center established, then the Tele Aid system
could not initiate an emergency call (e.g. the
relevant cellular phone network is not
available).
The message Call Failed appears in the
multifunction display for approximately
10 seconds.
Should this occur, assistance must be
summoned by other means.
iThe “911” emergency call system is a
public service. Using it without due cause
is a criminal offense.
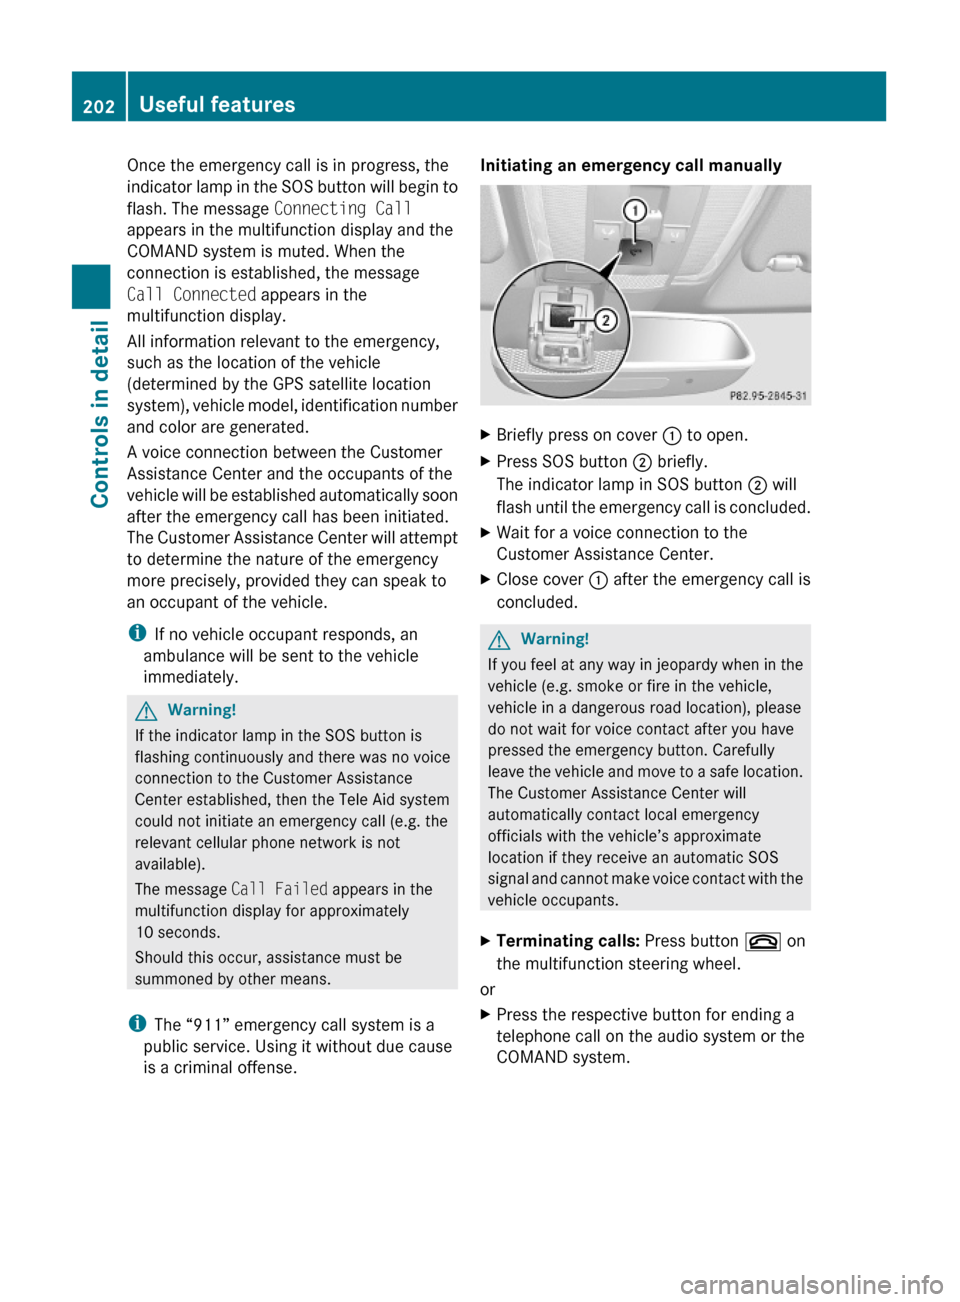
Initiating an emergency call manually XBriefly press on cover : to open.XPress SOS button ; briefly.
The indicator lamp in SOS button ; will
flash until the emergency call is concluded.
XWait for a voice connection to the
Customer Assistance Center.
XClose cover : after the emergency call is
concluded.
GWarning!
If you feel at any way in jeopardy when in the
vehicle (e.g. smoke or fire in the vehicle,
vehicle in a dangerous road location), please
do not wait for voice contact after you have
pressed the emergency button. Carefully
leave the vehicle and move to a safe location.
The Customer Assistance Center will
automatically contact local emergency
officials with the vehicle’s approximate
location if they receive an automatic SOS
signal and cannot make voice contact with the
vehicle occupants.
XTerminating calls: Press button ~ on
the multifunction steering wheel.
or
XPress the respective button for ending a
telephone call on the audio system or the
COMAND system.
202Useful featuresControls in detail
X204_AKB; 3; 23, en-USd2ureepe,Version: 2.11.8.12009-07-16T19:16:58+02:00 - Seite 202