2010 MERCEDES-BENZ GL450 ECU
[x] Cancel search: ECUPage 149 of 380
XIncreasing: Briefly lift the cruise control
lever up past the resistance point in
direction of arrow :.XDecreasing: Briefly press the cruise
control lever down past the resistance
point in direction of arrow ;.XRelease the cruise control lever.
The new speed is set and the vehicle will
accelerate or decelerate. Keep in mind that
it may take a brief moment until the vehicle
has reached the set speed.
Setting stored speed (Resume
function)
GWarning!
The set speed stored in memory should only
be set again if prevailing road conditions and
legal speed limits permit. Possible
acceleration or deceleration differences
arising from returning to the preset speed
could cause an accident and/or serious injury
to you and others.
XBriefly pull the cruise control lever in
direction of arrow ?.
If no speed is stored, the current speed is
set and stored.XRemove your foot from the accelerator
pedal.
The last stored speed is deleted from memory
when the engine is turned off.
Distronic
Safety notes
When activated, the Distronic adaptive cruise
control increases the driving convenience
afforded by the cruise control while traveling
on expressways and other major roadways.
R If the Distronic distance sensor detects a
slower moving vehicle directly ahead, your
vehicle speed will be reduced so that you
follow that vehicle at your preset following
distance.
R If there is no vehicle directly ahead of you,
the Distronic will function in the same way
as standard cruise control ( Y page 144).GWarning!
The Distronic requires familiarity with its
operational characteristics. We strongly
recommend that you review the following
information carefully before operating the
system.
GWarning!
When the Distronic is braking, the brake pedal
is retracted (i.e. depressed automatically).
The pedals’ range of motion must not be
impeded by any obstacles:
R Do not place any objects in the footwell.
R Make sure that the floormats and carpets
are securely in place.
R Do not rest your foot underneath the brake
pedal, as it could otherwise be trapped.
You could otherwise cause an accident and
injure yourself and/or others.
GWarning!
The Distronic is a convenience system. Its
speed adjustment reduction capability is
intended to make cruise control more
effective and usable when traffic speeds vary.
It is not however, intended to, nor does it,
replace the need for extreme care.
The responsibility for the vehicle’s speed,
distance to the preceding vehicle and, most
importantly, brake operation to ensure a safe
stopping distance, always remains with the
driver.
The Distronic cannot take street and traffic
conditions into account. Complex driving
situations are not always fully recognized by
the Distronic. This could result in wrong or
missing distance warnings.
Driving systems147Controls in detailX164_AKB; 5; 31, en-USd2ureepe,Version: 2.11.8.12009-09-11T12:30:16+02:00 - Seite 147Z
Page 196 of 380

closing the tilt/sliding sunroof with greater
force or without automatic reversal function.
If the movement of the tilt/sliding sunroof is
blocked during the closing procedure (e.g. by
ice or pollution), the tilt/sliding sunroof will
stop and open slightly.XImmediately after the tilt/sliding sunroof
has stopped and opened because it was
blocked, pull and hold the sunroof switch
in direction of arrow = until the tilt/sliding
sunroof is fully closed.
The tilt/sliding sunroof closes with greater
force.
If the tilt/sliding sunroof is blocked again and
opens slightly:
XImmediately after the tilt/sliding sunroof
was blocked and has opened, pull and hold
the sunroof switch in direction of arrow
= until the tilt/sliding sunroof is fully
closed.
The tilt/sliding sunroof closes without
automatic reversal function.GWarning!
Pulling and holding the sunroof switch to
close the tilt/sliding sunroof immediately
after it had been blocked two times will cause
the tilt/sliding sunroof to close without any
reversal function for as long as you hold the
sunroof switch.
Synchronizing
The tilt/sliding sunroof must be synchronized
R after the battery has been disconnected or
discharged
R after a malfunction
R if the tilt/sliding sunroof does not open
smoothly
! If the tilt/sliding sunroof cannot be closed
or synchronized, contact an authorized
Mercedes-Benz Center or call Roadside
Assistance.
XVehicles with SmartKey: Switch off the
ignition and remove the SmartKey from the
starter switch.XVehicles with KEYLESS-GO: Switch off the
ignition and open the driver’s door. This
puts the starter switch in position 0, same
as with the SmartKey removed from the
starter switch. The driver’s door then can
be closed again.XRemove the fuse for the tilt/sliding sunroof
from the fuse box ( Y page 355).XReinsert the fuse in the fuse box.XSwitch on the ignition.XPress and hold the sunroof switch in
direction of arrow : ( Y page 193) until the
tilt/sliding sunroof is fully raised at the
rear.XKeep holding the sunroof switch in
direction of arrow : for approximately
1 second.XCheck the express operation feature
( Y page 193).
If the tilt/sliding sunroof opens and closes
completely, the roof is synchronized.
Otherwise repeat the above steps.
Loading and storing
Loading instructions
GWarning!
Always fasten items being carried as securely
as possible. Use cargo tie-down rings and
fastening materials appropriate for the weight
and size of the load.
In an accident, during hard braking or sudden
maneuvers, loose items will be thrown around
inside the vehicle. This can cause injury to
vehicle occupants unless the items are
securely fastened in the vehicle.
To help avoid personal injury during a collision
or sudden maneuver, exercise care when
transporting cargo. Do not pile luggage or
cargo higher than the seat backrests.
194Loading and storingControls in detail
X164_AKB; 5; 31, en-USd2ureepe,Version: 2.11.8.12009-09-11T12:30:16+02:00 - Seite 194
Page 197 of 380
The cargo compartment is the preferred place
to carry objects. Always use cargo tie-down
rings, and if so equipped, always use the cargo
net when transporting cargo.
Never drive a vehicle with the tailgate open.
Deadly carbon monoxide (CO) gases may
enter vehicle interior resulting in
unconsciousness and death.
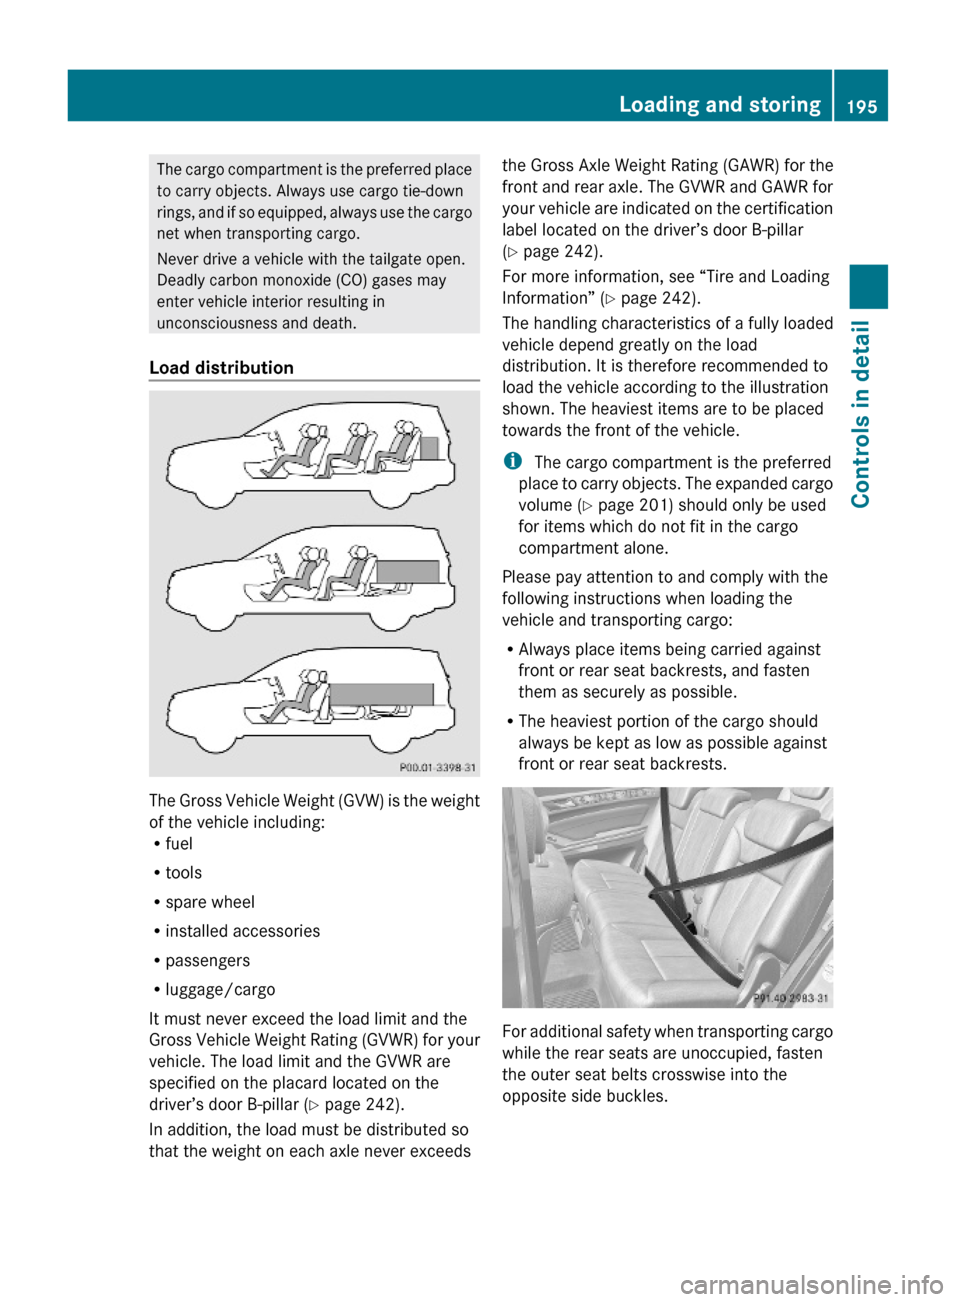
Load distribution
The Gross Vehicle Weight (GVW) is the weight
of the vehicle including:Rfuel
Rtools
Rspare wheel
Rinstalled accessories
Rpassengers
Rluggage/cargo
It must never exceed the load limit and the
Gross Vehicle Weight Rating (GVWR) for your
vehicle. The load limit and the GVWR are
specified on the placard located on the
driver’s door B-pillar (Y page 242).
In addition, the load must be distributed so
that the weight on each axle never exceeds
the Gross Axle Weight Rating (GAWR) for the
front and rear axle. The GVWR and GAWR for
your vehicle are indicated on the certification
label located on the driver’s door B-pillar
(Y page 242).
For more information, see “Tire and Loading
Information” (Y page 242).
The handling characteristics of a fully loaded
vehicle depend greatly on the load
distribution. It is therefore recommended to
load the vehicle according to the illustration
shown. The heaviest items are to be placed
towards the front of the vehicle.
i The cargo compartment is the preferred
place to carry objects. The expanded cargo
volume (Y page 201) should only be used
for items which do not fit in the cargo
compartment alone.
Please pay attention to and comply with the
following instructions when loading the
vehicle and transporting cargo:
RAlways place items being carried against
front or rear seat backrests, and fasten
them as securely as possible.
RThe heaviest portion of the cargo should
always be kept as low as possible against
front or rear seat backrests.
For additional safety when transporting cargo
while the rear seats are unoccupied, fasten
the outer seat belts crosswise into the
opposite side buckles.
Loading and storing195Controls in detailX164_AKB; 5; 31, en-USd2ureepe,Version: 2.11.8.12009-09-11T12:30:16+02:00 - Seite 195Z
Page 199 of 380

objects attached to them could come loose
from your vehicle and cause an accident,
thereby injuring you and other persons and/
or causing damage to property, including
damage to your vehicle.GWarning!
Every time the crossbars are mounted, before
you set off on a journey and periodically
during longer journeys, check all the screws
on the crossbars to make sure that they are
secure, and tighten them if necessary. Repeat
these checks at regular intervals as road-
surface conditions dictate, and at least after
every 1500 miles (2500 km) of continuous
use.
Otherwise, the crossbars, mounted
accessories and the objects attached to them
could come loose from the vehicle causing an
accident, thereby injuring you and other
persons and/or causing damage to property,
including damage to your vehicle.
Do not use lubricant on the screws of the
crossbars. The screws could work loose and
the crossbars could become detached from
your vehicle, together with the objects
attached to them causing an accident,
thereby injuring you and other persons and/
or causing damage to property, including
damage to your vehicle.
GWarning!
Only install the crossbars at the exact
locations designated on the roof rails. The
designated locations for the front crossbars
are between the markings engraved on the
inside of the roof rails. The designated
locations for the rear crossbars are between
the gaps on the roof rails.
Otherwise, the crossbars, mounted
accessories and the objects attached to them
could come loose from the vehicle causing an
accident, thereby injuring you and other
persons and/or causing damage to property,
including damage to your vehicle.
GWarning!
A roof load creates a greater surface area
exposed to the wind and causes the vehicle
to have a higher center of gravity, thereby
changing the vehicle’s driving characteristics.
Accordingly, the additional weight on the roof
of the vehicle can have a detrimental effect
on braking, cornering and acceleration.
Never exceed the maximum permissible roof
load or the maximum permissible vehicle
weight, even when accessories for the
crossbars (e.g. ski racks, bicycle racks, etc.)
are being used. Overloading the vehicle could
result in an accident. When calculating the
weight placed on the roof please make sure
to add the weight of the crossbars, accessory
racks and the load carried together.
Always adapt your driving style to the road,
traffic and weather conditions, and drive with
added caution when the roof is loaded.
Always drive with extreme care when the
carrier is loaded. Take into consideration that
when the carrier is loaded, the handling
characteristics are different from those when
operating the vehicle without a carrier loaded.
GWarning!
Do not use accessories which have not been
approved by Mercedes-Benz for use in
conjunction with these crossbars. If non-
approved accessories are used, these
accessories and/or the objects attached to
them could come loose from the vehicle,
thereby injuring you and other persons and/
or causing damage to property, including
damage to your vehicle.
! Have a second person assist you when
installing the crossbars. The vehicle could
otherwise be damaged.
! Objects attached to the crossbar
system’s accessories must not be allowed
to restrict the movement of the tilt/sliding
sunroof. The tilt/sliding sunroof could
otherwise be damaged when it is raised.
Loading and storing197Controls in detailX164_AKB; 5; 31, en-USd2ureepe,Version: 2.11.8.12009-09-11T12:30:16+02:00 - Seite 197Z
Page 202 of 380
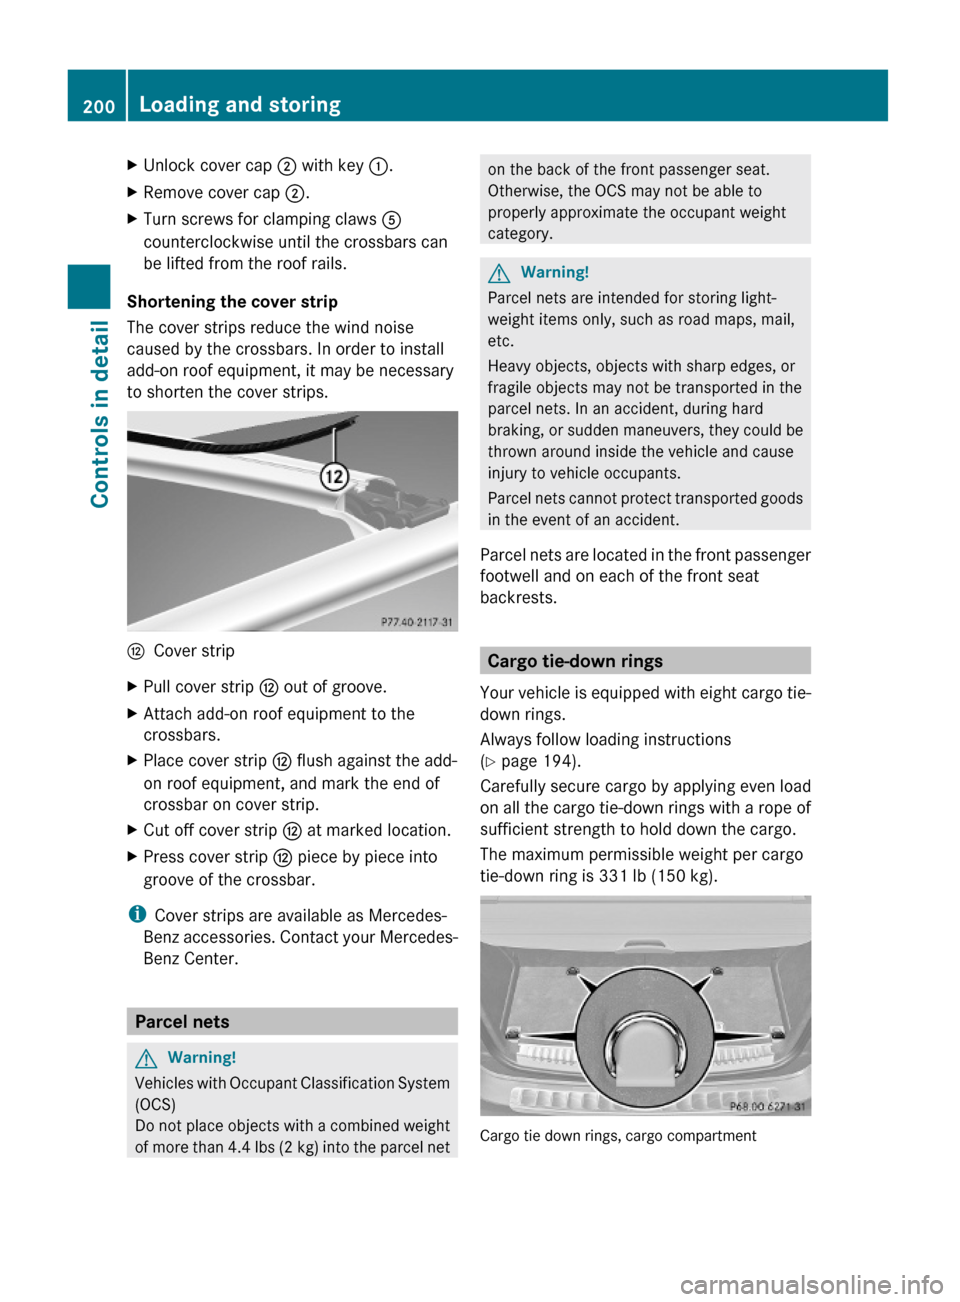
XUnlock cover cap ; with key :.XRemove cover cap ;.XTurn screws for clamping claws A
counterclockwise until the crossbars can
be lifted from the roof rails.
Shortening the cover strip
The cover strips reduce the wind noise
caused by the crossbars. In order to install
add-on roof equipment, it may be necessary
to shorten the cover strips.
HCover stripXPull cover strip H out of groove.XAttach add-on roof equipment to the
crossbars.
XPlace cover strip H flush against the add-
on roof equipment, and mark the end of
crossbar on cover strip.
XCut off cover strip H at marked location.XPress cover strip H piece by piece into
groove of the crossbar.
iCover strips are available as Mercedes-
Benz accessories. Contact your Mercedes-
Benz Center.
Parcel nets
GWarning!
Vehicles with Occupant Classification System
(OCS)
Do not place objects with a combined weight
of more than 4.4 lbs (2 kg) into the parcel net
on the back of the front passenger seat.
Otherwise, the OCS may not be able to
properly approximate the occupant weight
category.
GWarning!
Parcel nets are intended for storing light-
weight items only, such as road maps, mail,
etc.
Heavy objects, objects with sharp edges, or
fragile objects may not be transported in the
parcel nets. In an accident, during hard
braking, or sudden maneuvers, they could be
thrown around inside the vehicle and cause
injury to vehicle occupants.
Parcel nets cannot protect transported goods
in the event of an accident.
Parcel nets are located in the front passenger
footwell and on each of the front seat
backrests.
Cargo tie-down rings
Your vehicle is equipped with eight cargo tie-
down rings.
Always follow loading instructions
(Y page 194).
Carefully secure cargo by applying even load
on all the cargo tie-down rings with a rope of
sufficient strength to hold down the cargo.
The maximum permissible weight per cargo
tie-down ring is 331 lb (150 kg).
Cargo tie down rings, cargo compartment
200Loading and storingControls in detail
X164_AKB; 5; 31, en-USd2ureepe,Version: 2.11.8.12009-09-11T12:30:16+02:00 - Seite 200
Page 203 of 380
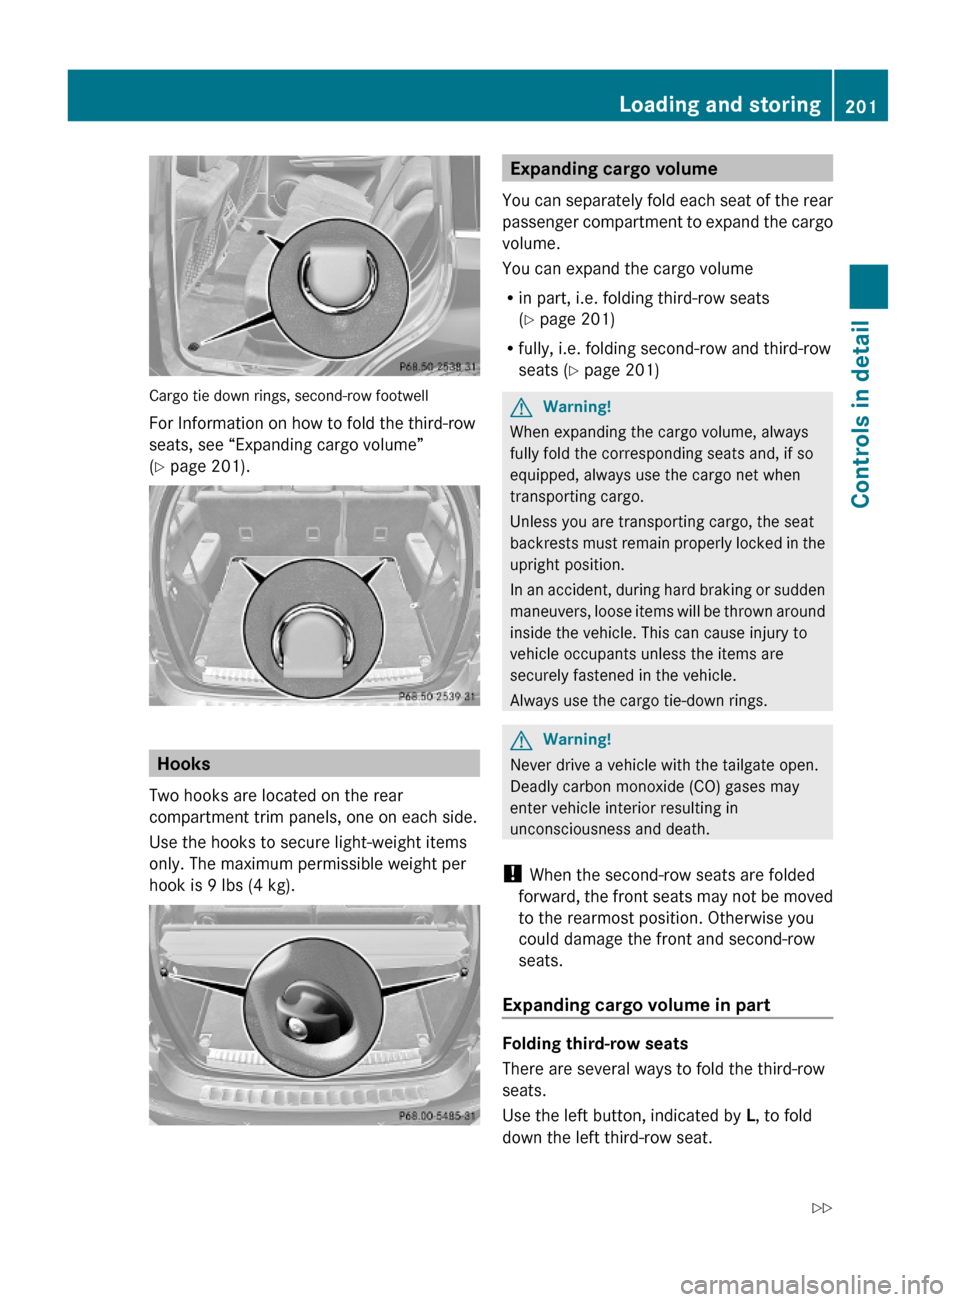
Cargo tie down rings, second-row footwell
For Information on how to fold the third-row
seats, see “Expanding cargo volume”
(Y page 201).
Hooks
Two hooks are located on the rear
compartment trim panels, one on each side.
Use the hooks to secure light-weight items
only. The maximum permissible weight per
hook is 9 lbs (4 kg).
Expanding cargo volume
You can separately fold each seat of the rear
passenger compartment to expand the cargo
volume.
You can expand the cargo volume
Rin part, i.e. folding third-row seats
(Y page 201)
Rfully, i.e. folding second-row and third-row
seats (Y page 201)
GWarning!
When expanding the cargo volume, always
fully fold the corresponding seats and, if so
equipped, always use the cargo net when
transporting cargo.
Unless you are transporting cargo, the seat
backrests must remain properly locked in the
upright position.
In an accident, during hard braking or sudden
maneuvers, loose items will be thrown around
inside the vehicle. This can cause injury to
vehicle occupants unless the items are
securely fastened in the vehicle.
Always use the cargo tie-down rings.
GWarning!
Never drive a vehicle with the tailgate open.
Deadly carbon monoxide (CO) gases may
enter vehicle interior resulting in
unconsciousness and death.
! When the second-row seats are folded
forward, the front seats may not be moved
to the rearmost position. Otherwise you
could damage the front and second-row
seats.
Expanding cargo volume in part
Folding third-row seats
There are several ways to fold the third-row
seats.
Use the left button, indicated by L, to fold
down the left third-row seat.
Loading and storing201Controls in detailX164_AKB; 5; 31, en-USd2ureepe,Version: 2.11.8.12009-09-11T12:30:16+02:00 - Seite 201Z
Page 205 of 380
accident and be thrown around the vehicle
interior. Objects thrown around the vehicle
interior may cause an accident and/or
serious personal injury.
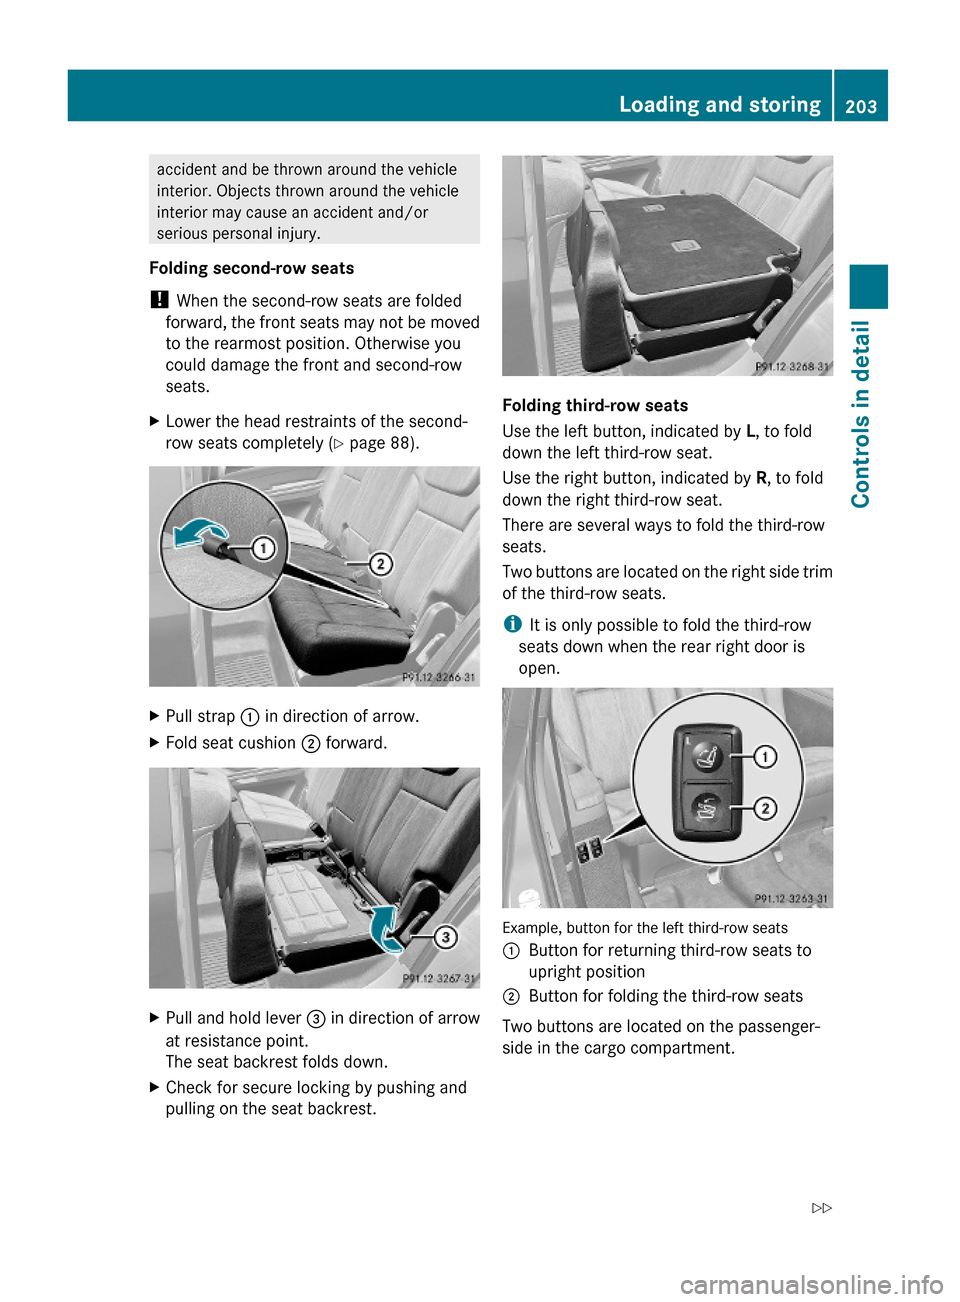
Folding second-row seats
! When the second-row seats are folded
forward, the front seats may not be moved
to the rearmost position. Otherwise you
could damage the front and second-row
seats.
XLower the head restraints of the second-
row seats completely (Y page 88).
XPull strap : in direction of arrow.XFold seat cushion ; forward.XPull and hold lever = in direction of arrow
at resistance point.
The seat backrest folds down.
XCheck for secure locking by pushing and
pulling on the seat backrest.
Folding third-row seats
Use the left button, indicated by L, to fold
down the left third-row seat.
Use the right button, indicated by R, to fold
down the right third-row seat.
There are several ways to fold the third-row
seats.
Two buttons are located on the right side trim
of the third-row seats.
iIt is only possible to fold the third-row
seats down when the rear right door is
open.
Example, button for the left third-row seats
:Button for returning third-row seats to
upright position
;Button for folding the third-row seats
Two buttons are located on the passenger-
side in the cargo compartment.
Loading and storing203Controls in detailX164_AKB; 5; 31, en-USd2ureepe,Version: 2.11.8.12009-09-11T12:30:16+02:00 - Seite 203Z
Page 207 of 380
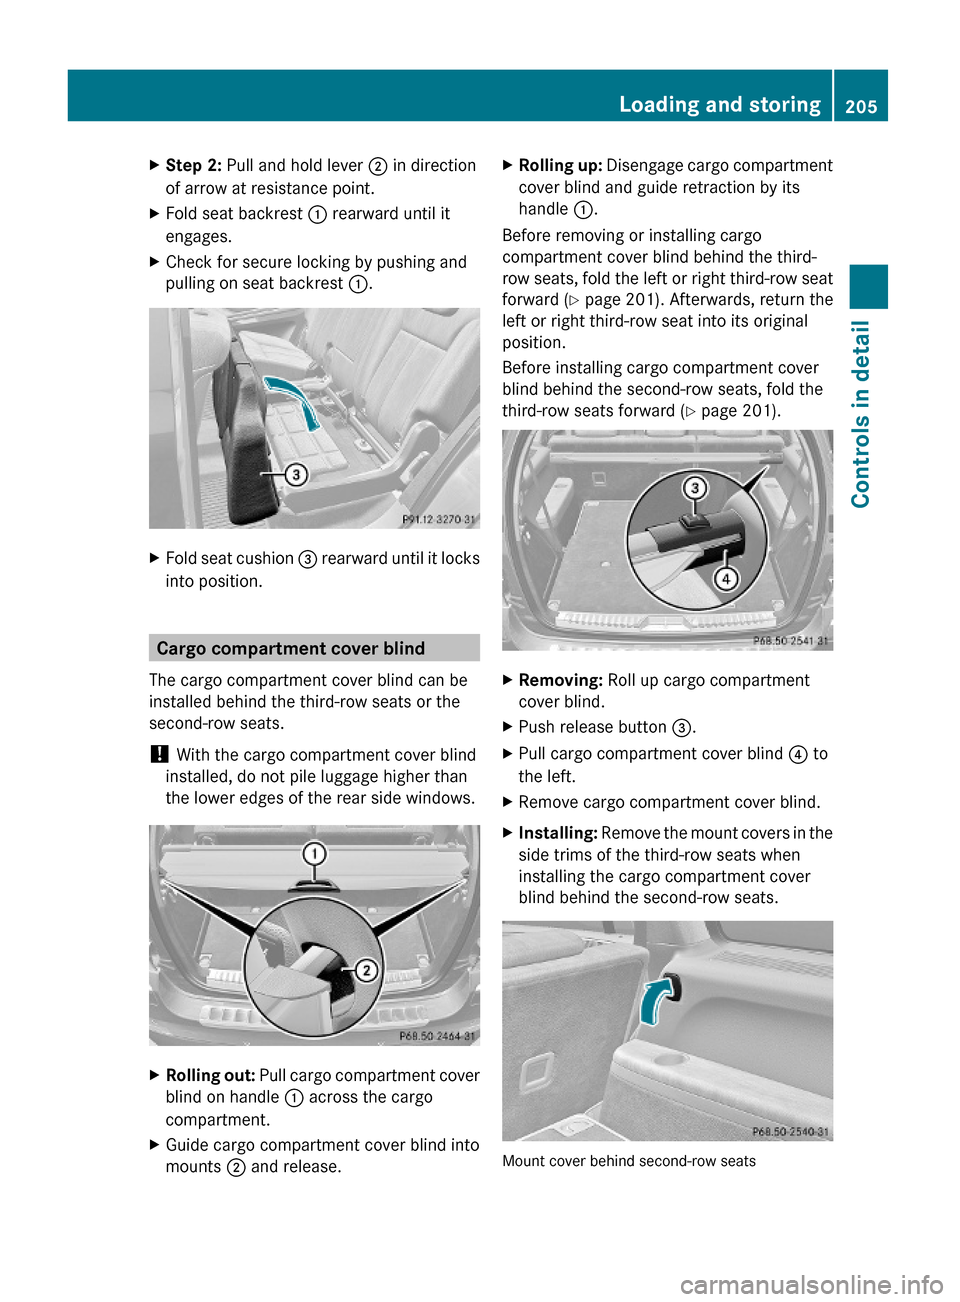
XStep 2: Pull and hold lever ; in direction
of arrow at resistance point.
XFold seat backrest : rearward until it
engages.
XCheck for secure locking by pushing and
pulling on seat backrest :.
XFold seat cushion = rearward until it locks
into position.
Cargo compartment cover blind
The cargo compartment cover blind can be
installed behind the third-row seats or the
second-row seats.
! With the cargo compartment cover blind
installed, do not pile luggage higher than
the lower edges of the rear side windows.
XRolling out: Pull cargo compartment cover
blind on handle : across the cargo
compartment.
XGuide cargo compartment cover blind into
mounts ; and release.
XRolling up: Disengage cargo compartment
cover blind and guide retraction by its
handle :.
Before removing or installing cargo
compartment cover blind behind the third-
row seats, fold the left or right third-row seat
forward (Y page 201). Afterwards, return the
left or right third-row seat into its original
position.
Before installing cargo compartment cover
blind behind the second-row seats, fold the
third-row seats forward (Y page 201).
XRemoving: Roll up cargo compartment
cover blind.
XPush release button =.XPull cargo compartment cover blind ? to
the left.
XRemove cargo compartment cover blind.XInstalling: Remove the mount covers in the
side trims of the third-row seats when
installing the cargo compartment cover
blind behind the second-row seats.
Mount cover behind second-row seats
Loading and storing205Controls in detailX164_AKB; 5; 31, en-USd2ureepe,Version: 2.11.8.12009-09-11T12:30:16+02:00 - Seite 205Z