2010 MERCEDES-BENZ GL tailgate
[x] Cancel search: tailgatePage 204 of 380
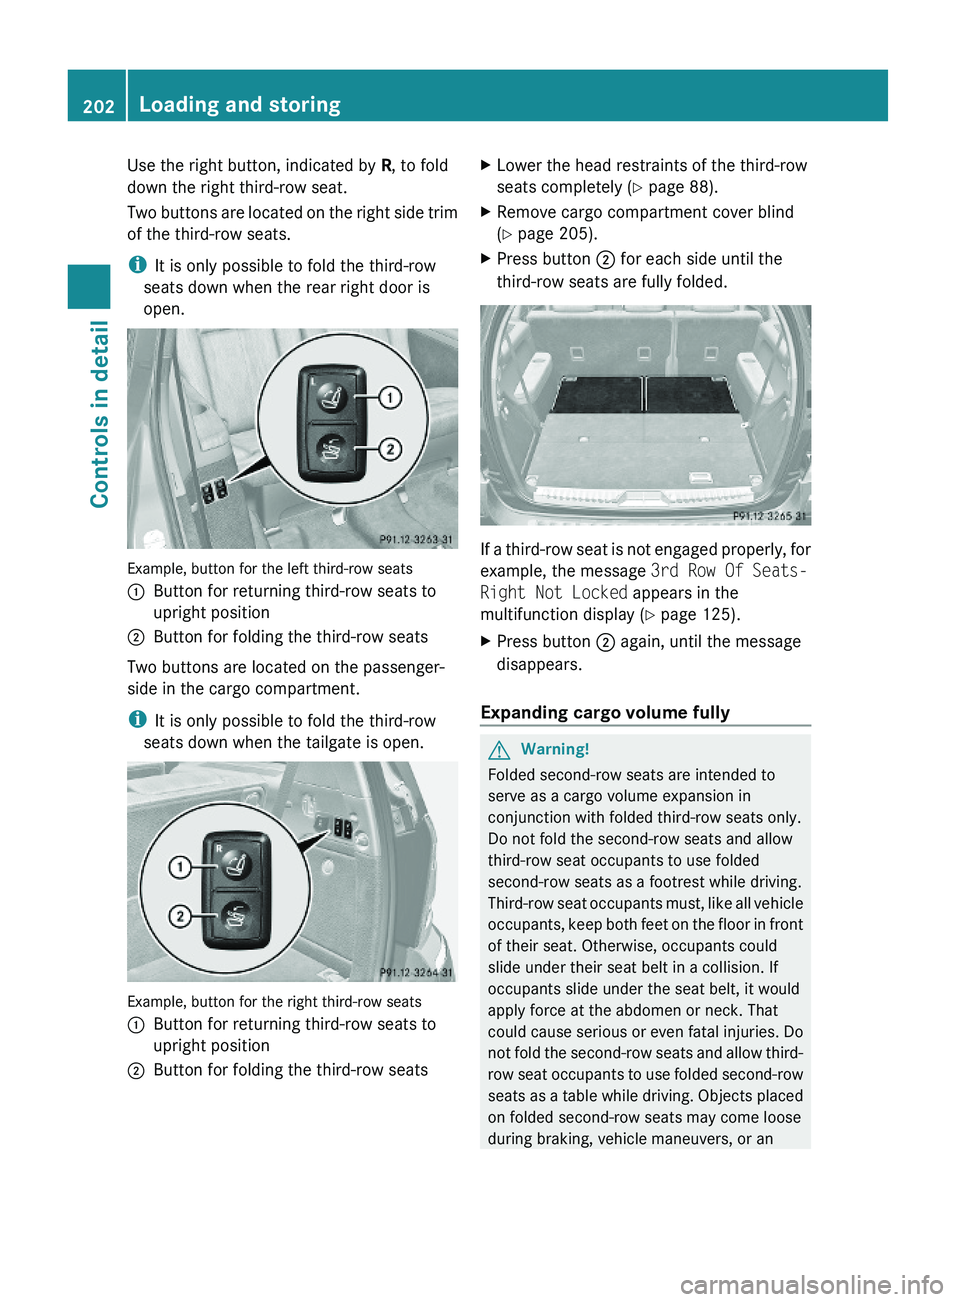
Use the right button, indicated by R, to fold
down the right third-row seat.
Two buttons are located on the right side trim
of the third-row seats.
iIt is only possible to fold the third-row
seats down when the rear right door is
open.
Example, button for the left third-row seats
:Button for returning third-row seats to
upright position
;Button for folding the third-row seats
Two buttons are located on the passenger-
side in the cargo compartment.
iIt is only possible to fold the third-row
seats down when the tailgate is open.
Example, button for the right third-row seats
:Button for returning third-row seats to
upright position
;Button for folding the third-row seatsXLower the head restraints of the third-row
seats completely (Y page 88).
XRemove cargo compartment cover blind
(Y page 205).
XPress button ; for each side until the
third-row seats are fully folded.
If a third-row seat is not engaged properly, for
example, the message 3rd Row Of Seats-
Right Not Locked appears in the
multifunction display (Y page 125).
XPress button ; again, until the message
disappears.
Expanding cargo volume fully
GWarning!
Folded second-row seats are intended to
serve as a cargo volume expansion in
conjunction with folded third-row seats only.
Do not fold the second-row seats and allow
third-row seat occupants to use folded
second-row seats as a footrest while driving.
Third-row seat occupants must, like all vehicle
occupants, keep both feet on the floor in front
of their seat. Otherwise, occupants could
slide under their seat belt in a collision. If
occupants slide under the seat belt, it would
apply force at the abdomen or neck. That
could cause serious or even fatal injuries. Do
not fold the second-row seats and allow third-
row seat occupants to use folded second-row
seats as a table while driving. Objects placed
on folded second-row seats may come loose
during braking, vehicle maneuvers, or an
202Loading and storingControls in detail
X164_AKB; 5; 31, en-USd2ureepe,Version: 2.11.8.12009-09-11T12:30:16+02:00 - Seite 202
Page 206 of 380
iIt is only possible to fold the third-row
seats down when the tailgate is open.
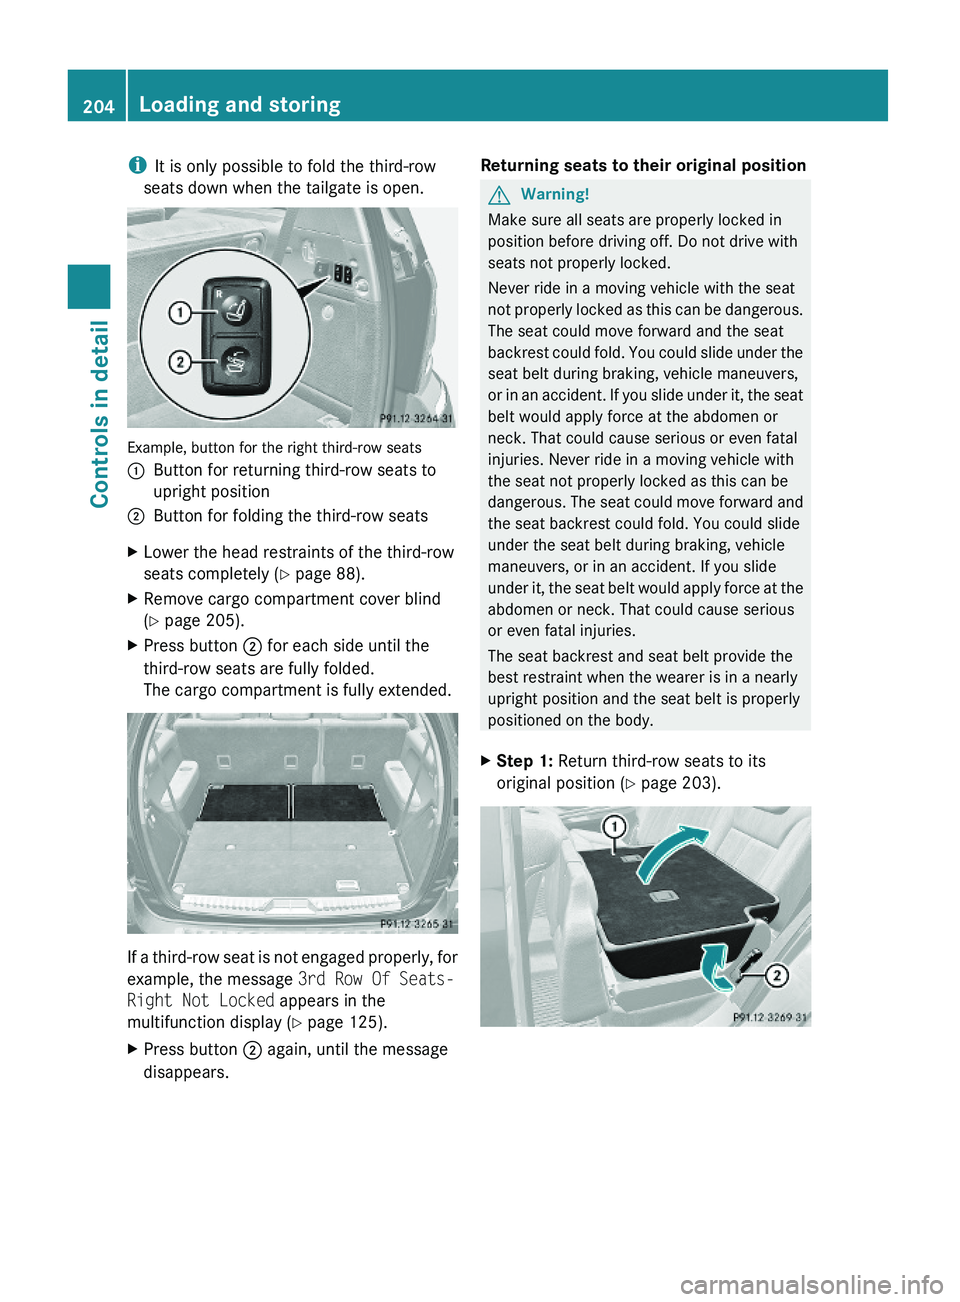
Example, button for the right third-row seats
:Button for returning third-row seats to
upright position
;Button for folding the third-row seatsXLower the head restraints of the third-row
seats completely (Y page 88).
XRemove cargo compartment cover blind
(Y page 205).
XPress button ; for each side until the
third-row seats are fully folded.
The cargo compartment is fully extended.
If a third-row seat is not engaged properly, for
example, the message 3rd Row Of Seats-
Right Not Locked appears in the
multifunction display (Y page 125).
XPress button ; again, until the message
disappears.
Returning seats to their original positionGWarning!
Make sure all seats are properly locked in
position before driving off. Do not drive with
seats not properly locked.
Never ride in a moving vehicle with the seat
not properly locked as this can be dangerous.
The seat could move forward and the seat
backrest could fold. You could slide under the
seat belt during braking, vehicle maneuvers,
or in an accident. If you slide under it, the seat
belt would apply force at the abdomen or
neck. That could cause serious or even fatal
injuries. Never ride in a moving vehicle with
the seat not properly locked as this can be
dangerous. The seat could move forward and
the seat backrest could fold. You could slide
under the seat belt during braking, vehicle
maneuvers, or in an accident. If you slide
under it, the seat belt would apply force at the
abdomen or neck. That could cause serious
or even fatal injuries.
The seat backrest and seat belt provide the
best restraint when the wearer is in a nearly
upright position and the seat belt is properly
positioned on the body.
XStep 1: Return third-row seats to its
original position (Y page 203).
204Loading and storingControls in detail
X164_AKB; 5; 31, en-USd2ureepe,Version: 2.11.8.12009-09-11T12:30:16+02:00 - Seite 204
Page 221 of 380
on “Search & Send”, refer to separate
COMAND system operating instructions.
Remote door unlock
In case you have locked your vehicle
unintentionally (e.g. SmartKey inside vehicle),
and the reserve SmartKey is not available:
XContact the Customer Assistance Center
at 1-800-FOR-MERCedes
(1-800-367-6372) (USA only) or
1-888-923-8367 (Canada only).
You will be asked to provide your password.XThen return to your vehicle at the time
arranged and pull the tailgate recessed
handle ( Y page 75) for a minimum of
20 seconds until the indicator lamp in the
SOS button is flashing.
The message Connecting Call appears in
the multifunction display.
As an alternative, you may unlock the vehicle
via Internet in the “My Tele Aid” section of
“Owner’s Online”, using your ID and password
(USA only).
i The remote door unlock feature is
available if the relevant cellular phone
network is available.
The SOS button will flash and the message
Call Connected will appear in the
multifunction display to indicate receipt of
the door unlock command.
If the tailgate recessed handle was pulled
for more than 20 seconds before door
unlock authorization was received by the
Customer Assistance Center, you must
wait 15 minutes before pulling the tailgate
recessed handle again.
Stolen Vehicle Recovery Services
In the event your vehicle was stolen:
XReport the incident to the police.
The police will issue a numbered incident
report.XPass this number on to the Customer
Assistance Center along with your
password.
The Customer Assistance Center will then
attempt to covertly contact the vehicle’s
Tele Aid system. Once the vehicle is
located, the Customer Assistance Center
will contact the local law enforcement and
you. The vehicle’s location will only be
provided to law enforcement.
i If the anti-theft alarm stays on for more
than 30 seconds, the Tele Aid system will
notify the Customer Assistance Center
automatically.
Garage door opener
The integrated remote control can operate up
to three separately controlled devices
compatible with HomeLink ®
or some other
systems.
GWarning!
Before programming the integrated remote
control to a garage door opener or gate
operator, make sure people and objects are
out of the way of the device to prevent
potential harm or damage. When
programming a garage door opener, the door
moves up or down. When programming a gate
operator, the gate opens or closes.
Do not use the integrated remote control with
any garage door opener that lacks safety stop
and reverse features as required by U.S.
federal safety standards (this includes any
garage door opener model manufactured
before April 1, 1982). A garage door that
cannot detect an object - signaling the door
to stop and reverse - does not meet current
U.S. federal safety standards.
Useful features219Controls in detailX164_AKB; 5; 31, en-USd2ureepe,Version: 2.11.8.12009-09-11T12:30:16+02:00 - Seite 219Z
Page 265 of 380
We recommend that you start out with easy
off-road travel.
Special driving features for off-road
driving
The following driving features are available for
specific kind of operation:
R Off-road ABS ( Y page 63)
R Off-road ESP ®
(Y page 65)
R Off-road 4-ETS ( Y page 64)
R Hill-start assist system ( Y page 117)
R LOW RANGE mode ( Y page 120)
R Differential locks ( Y page 121)
R Downhill Speed Regulation (DSR)
( Y page 155)
R Off-road driving program (Vehicles without
enhanced off-road package) ( Y page 158)
R Air suspension program ( Y page 159)
Off-road driving rules
R Engage the off-road driving program
( Y page 158) or LOW RANGE mode
( Y page 120) before driving under off-road
conditions.
R If necessary, activate differential locks
( Y page 121).
R Make sure you select a vehicle level
( Y page 159) appropriate to the
topographical conditions. Always make
sure the vehicle has enough ground
clearance.
R Fasten items being carried as securely as
possible ( Y page 194).
R Always navigate gradients with the engine
on and with the transmission engaged in a
gear. Switch on the DSR ( Y page 155) to
help maintain a preset speed.
! Observe the following during off-road
driving:
R Keep doors, tailgate, windows, and tilt/
sliding sunroof closed whenever driving
off-road.
R Adjust vehicle speed to condition of
terrain. The more uneven, rutty and
steeper the terrain, the lower the speed
should be. Drive through water slowly at
an even speed, avoiding a bow wave.
R Be especially careful when driving in
unknown territory. It may be necessary
to get out of the vehicle and scout the
path you intend to take.
R Watch out for obstacles, such as rocks,
holes, tree stumps and ruts.
R Before driving through water, determine
its depth.
R Do not stop vehicle while immersed in
water, and do not shut off the engine.
R In sandy soil, drive at a steady speed as
allowed by conditions. This helps
overcome the vehicle rolling resistance
and reduces the likelihood of the vehicle
sinking into the ground.
R Do not initiate jumps with the vehicle. It
interrupts the forward momentum of the
vehicle.
R Always drive onto slopes with the engine
running and the vehicle in gear.
R Do not shift automatic transmission into
neutral position N.GWarning!
Do not reduce the tire inflation pressure
before driving through sand. However, if you
do so, remember to correct the tire inflation
pressure before continuing your trip. Driving
with reduced tire inflation pressure increases
the risk of losing control of the vehicle and
rolling over.
Driving instructions263OperationX164_AKB; 5; 31, en-USd2ureepe,Version: 2.11.8.12009-09-11T12:30:16+02:00 - Seite 263Z
Page 272 of 380
The values as measured must not exceed
the weight limits listed under “Vehicle and
trailer weights and ratings” ( Y page 269).
Coupling a trailer GWarning!
While you are coupling or decoupling a trailer,
make sure nobody locks or unlocks the
vehicle and/or opens or closes doors or the
tailgate.
The vehicle’s level could change and you
could endanger yourself and/or others as a
result.
Make sure that you do not operate the ADS
button or the vehicle level control system
when coupling/decoupling the trailer.
Observe maximum permitted trailer
dimensions (width and length).
Most states and all Canadian provinces
require
R safety chains between the towing vehicle
and the trailer
The chains should be criss-crossed under
the trailer tongue. They must be attached
to the hitch receiver, and not to the
vehicle’s bumper or axle.
Make sure to leave enough slack in the
chains to permit turning corners.
R a separate brake system at various trailer
weights
R a break-away switch on trailers with a
separate brake system.
Check with your local state laws for specific
requirements.
The switch activates the trailer brakes in
the possible event that the trailer might
separate from the tow vehicle.
! Do not connect a trailer brake system (if
trailer is so equipped) directly to the
vehicle’s hydraulic brake system, as your
vehicle is equipped with antilock brakes. If
you do, neither the vehicle’s brakes nor the
trailer’s brakes will function properly.
i The provided vehicle electrical wiring
harness for trailer towing has a brake signal
wire for hook-up to a brake controller.XMake sure the automatic transmission is in
park position P (Y page 115).XEngage the parking brake for the vehicle
( Y page 112).XStart the engine ( Y page 108).XSelect the highway level ( Y page 159).XVehicles with Adaptive Damping System
(ADS):
Set the ADS to AUTO or COMF
( Y page 159).XTurn off the engine ( Y page 113).XClose all doors and the tailgate.XAttach the trailer.XPlug in all electrical connectors.
i
When you are towing a trailer, the vehicle
level always remains in the highway setting.
The following applies additionally when
towing a trailer:
R The vehicle is lowered to the highway
level when it reaches a speed of 5 mph
(8 km/h) if not set to highway level.
R The highspeed level is not available.
The restrictions that apply to towing also
apply when using accessories that are
connected to the trailer power socket, such
as a bicycle rack.
Towing a trailer
There are many different laws, including
speed limit restrictions, having to do with
trailer towing. Make sure your rig will be legal,
not only for where you reside, but also for
where you will be driving. A good source for
this information can be the police or local
authorities.
Note the following, when driving with a trailer:
R In order to gain skill and an understanding
of the vehicle’s behavior, you should
270Driving instructionsOperation
X164_AKB; 5; 31, en-USd2ureepe,Version: 2.11.8.12009-09-11T12:30:16+02:00 - Seite 270
Page 274 of 380
vehicle and/or opens or closes doors or the
tailgate.
The vehicle’s level could change and you
could endanger yourself and/or others as a
result.
Make sure that you do not operate the ADS
button or the vehicle level control system
when coupling/decoupling the trailer.XMake sure the automatic transmission is in
park position P (Y page 115).XEngage the parking brake for the vehicle
( Y page 112).XStart the engine ( Y page 108).XClose all doors and the tailgate.XEngage the parking brake for the trailer.GWarning!
As soon as you disconnect the electrical
connection between the trailer and the
vehicle, the vehicle will lower. To help avoid
personal injury, make sure no one is near the
wheel housing or underneath the vehicle
before the electrical connection is
disconnected.
When you decouple the trailer, the vehicle is
temporarily raised because the springs are
relieved of load. Be especially careful during
this process, as you could otherwise injure
yourself and/or others. Make sure that any
persons remaining in the vehicle do not press
the switches for vehicle level control or the
ADS.
XDisconnect all electrical plug connectors.XDecouple the trailer.XMake sure that the trailer coupling is free
of load.XTurn off the engine ( Y page 113).
Driving abroad
If you plan to drive the vehicle outside the U.S.
or Canada, you should request dealer
network information for your destination from
any authorized Mercedes-Benz Center.
Control and operation of radio
transmitter
Safety notes
GWarning!
Please do not forget that your primary
responsibility is to drive the vehicle. A driver’s
attention to the road must always be his/her
primary focus when driving. For your safety
and the safety of others, we recommend that
you pull over to a safe location and stop
before placing or taking a telephone call.
If you choose to use the telephone 18
while
driving, please use the hands-free device and
only use the telephone when road, weather
and traffic conditions permit. Some
jurisdictions prohibit the driver from using a
mobile telephone while driving a vehicle.
Only operate the COMAND 18
(Cockpit
Management and Data System) if road,
weather and traffic conditions permit.
Otherwise, you may not be able to observe
traffic conditions and could endanger yourself
and others.
Bear in mind that at a speed of just 30 mph
(approximately 50 km/h), your vehicle is
covering a distance of 44 feet (approximately
14 m) every second.
Emission control
Certain systems of the engine serve to keep
the toxic components of the exhaust gases
within permissible limits required by law.
These systems will function properly only
when maintained strictly according to factory
specifications. Any adjustments on the
engine should, therefore, be carried out only
by qualified Mercedes-Benz Center
authorized technicians.
18 Observe all legal requirements.272Driving instructionsOperation
X164_AKB; 5; 31, en-USd2ureepe,Version: 2.11.8.12009-09-11T12:30:16+02:00 - Seite 272
Page 286 of 380
Vehicle equipment
iThis Operator’s Manual describes all
features, standard or optional, potentially
available for your vehicle at the time of
purchase. Please be aware that your
vehicle might not be equipped with all
features described in this manual.
Where will I find ...?
First aid kit
iCheck expiration dates and contents for
completeness at least once a year and
replace missing/expired items.
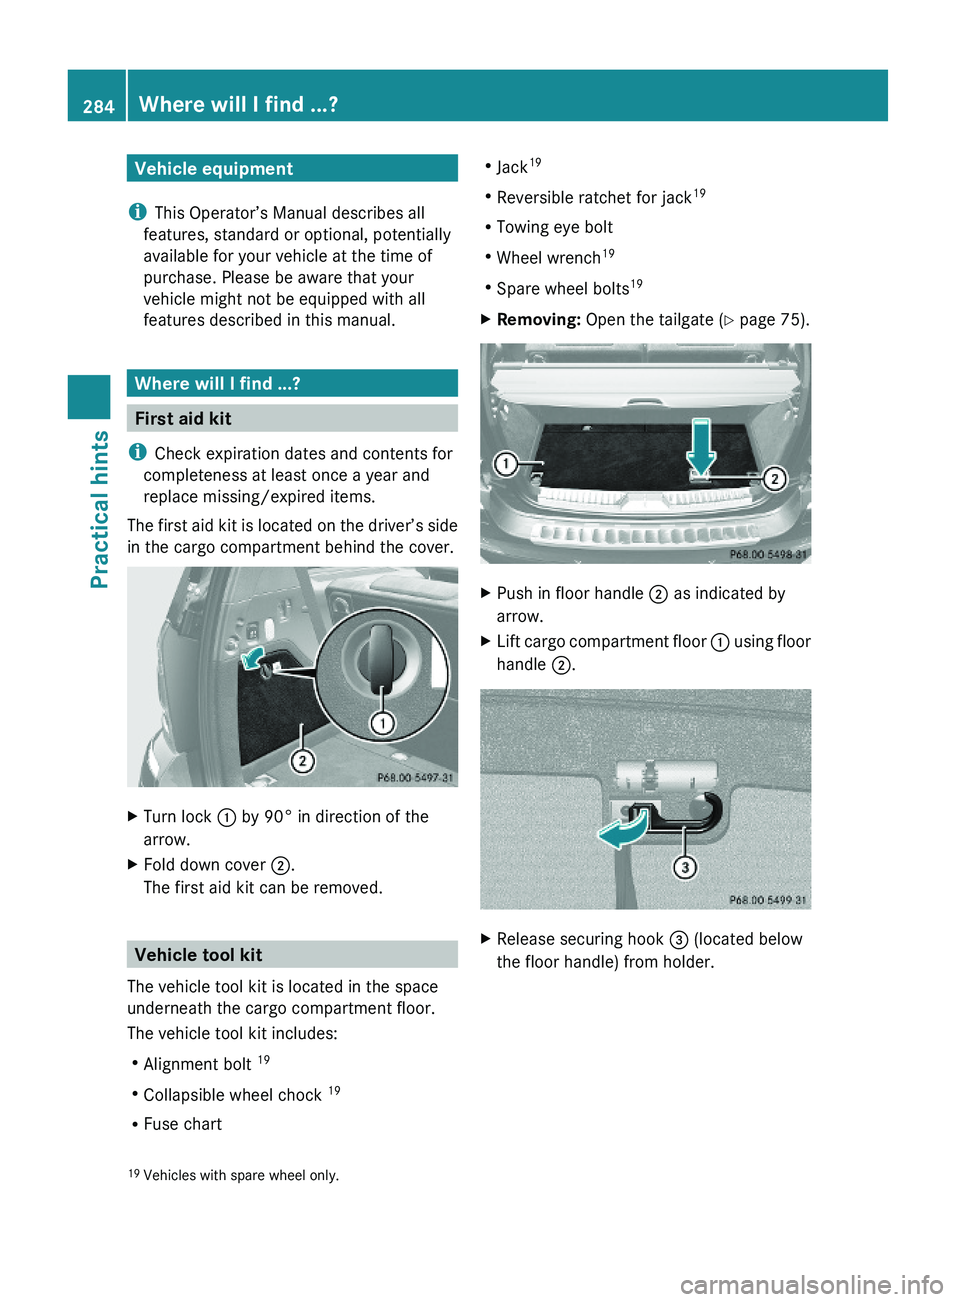
The first aid kit is located on the driver’s side
in the cargo compartment behind the cover.
XTurn lock : by 90° in direction of the
arrow.
XFold down cover ;.
The first aid kit can be removed.
Vehicle tool kit
The vehicle tool kit is located in the space
underneath the cargo compartment floor.
The vehicle tool kit includes:
RAlignment bolt 19
RCollapsible wheel chock 19
RFuse chart
RJack19
RReversible ratchet for jack19
RTowing eye bolt
RWheel wrench19
RSpare wheel bolts19
XRemoving: Open the tailgate (Y page 75).XPush in floor handle ; as indicated by
arrow.
XLift cargo compartment floor : using floor
handle ;.
XRelease securing hook = (located below
the floor handle) from holder.19Vehicles with spare wheel only.284Where will I find ...?Practical hints
X164_AKB; 5; 31, en-USd2ureepe,Version: 2.11.8.12009-09-11T12:30:16+02:00 - Seite 284
Page 287 of 380
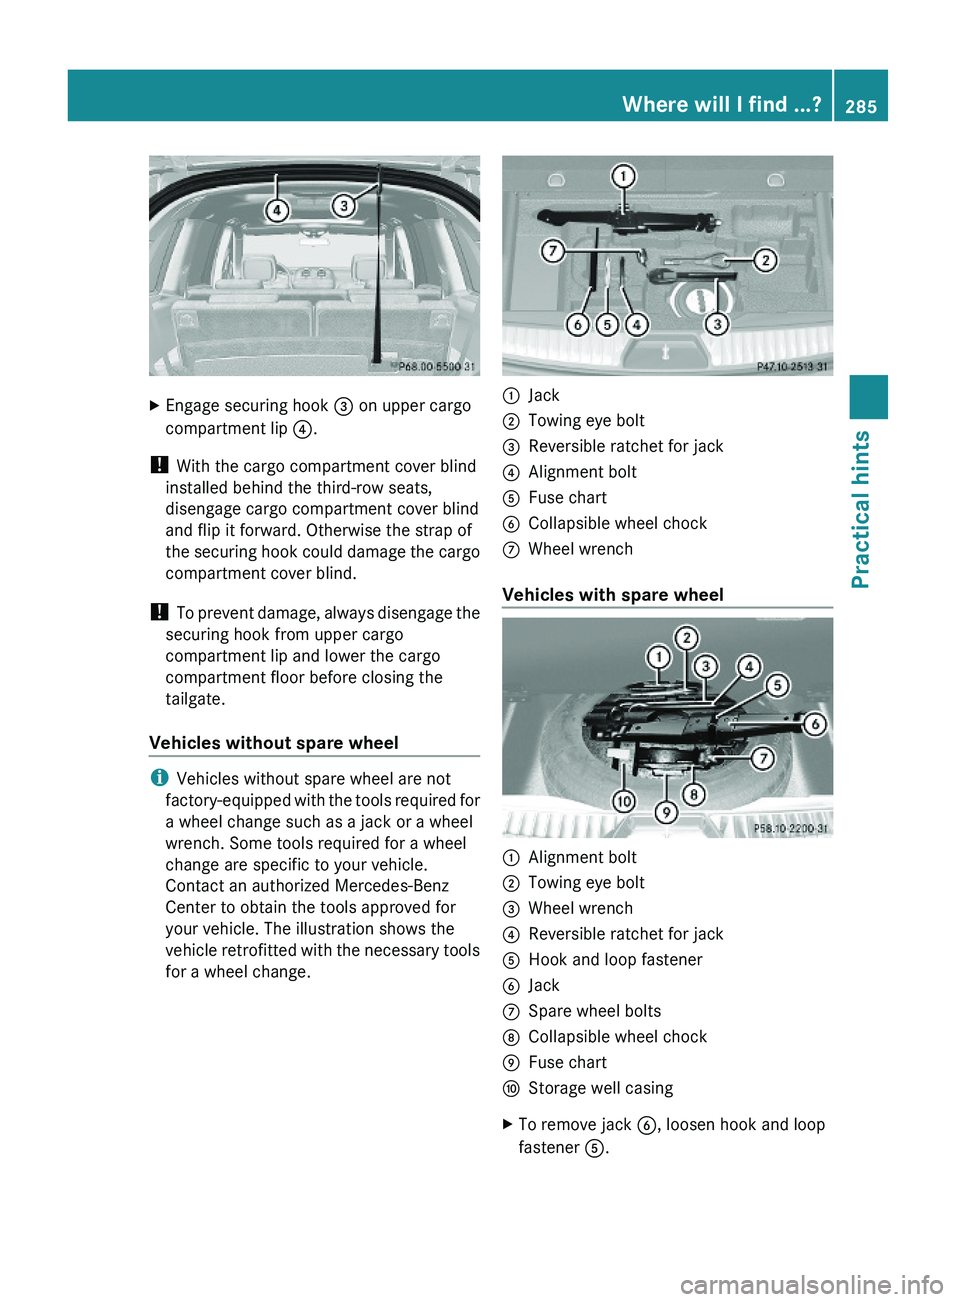
XEngage securing hook = on upper cargo
compartment lip ?.
! With the cargo compartment cover blind
installed behind the third-row seats,
disengage cargo compartment cover blind
and flip it forward. Otherwise the strap of
the securing hook could damage the cargo
compartment cover blind.
! To prevent damage, always disengage the
securing hook from upper cargo
compartment lip and lower the cargo
compartment floor before closing the
tailgate.
Vehicles without spare wheel
iVehicles without spare wheel are not
factory-equipped with the tools required for
a wheel change such as a jack or a wheel
wrench. Some tools required for a wheel
change are specific to your vehicle.
Contact an authorized Mercedes-Benz
Center to obtain the tools approved for
your vehicle. The illustration shows the
vehicle retrofitted with the necessary tools
for a wheel change.
:Jack;Towing eye bolt=Reversible ratchet for jack?Alignment boltAFuse chartBCollapsible wheel chockCWheel wrench
Vehicles with spare wheel
:Alignment bolt;Towing eye bolt=Wheel wrench?Reversible ratchet for jackAHook and loop fastenerBJackCSpare wheel boltsDCollapsible wheel chockEFuse chartFStorage well casingXTo remove jack B, loosen hook and loop
fastener A.
Where will I find ...?285Practical hintsX164_AKB; 5; 31, en-USd2ureepe,Version: 2.11.8.12009-09-11T12:30:16+02:00 - Seite 285Z