2010 MERCEDES-BENZ G550 turn signal bulb
[x] Cancel search: turn signal bulbPage 219 of 272

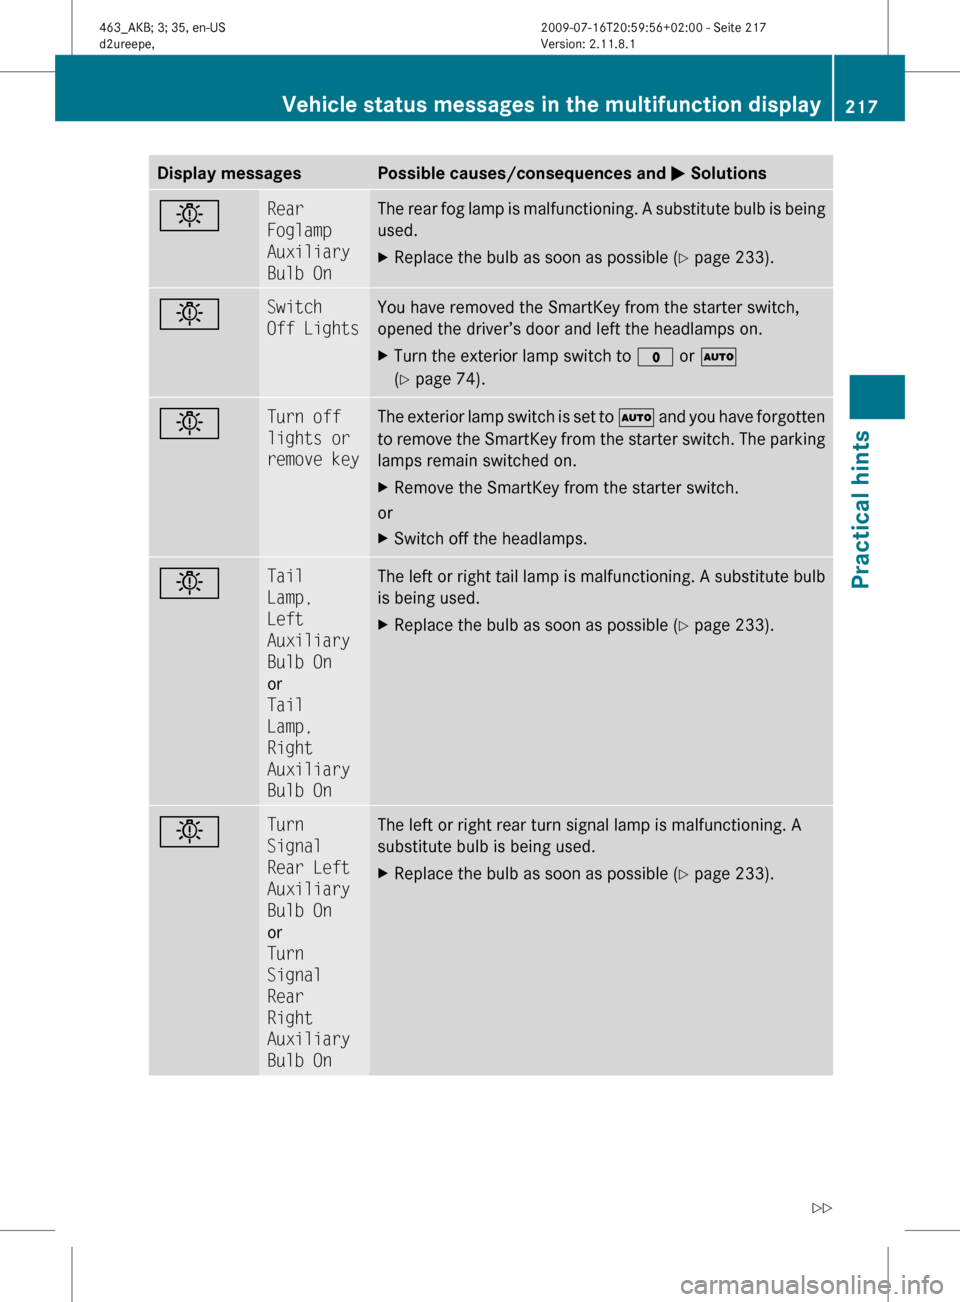
Display messagesPossible causes/consequences and M SolutionsbRear
Foglamp
Auxiliary
Bulb OnThe rear fog lamp is malfunctioning. A substitute bulb is being
used.XReplace the bulb as soon as possible ( Y page 233).bSwitch
Off LightsYou have removed the SmartKey from the starter switch,
opened the driver’s door and left the headlamps on.XTurn the exterior lamp switch to $ or Ã
( Y page 74).bTurn off
lights or
remove keyThe exterior lamp switch is set to à and you have forgotten
to remove the SmartKey from the starter switch. The parking
lamps remain switched on.XRemove the SmartKey from the starter switch.
or
XSwitch off the headlamps.bTail
Lamp,
Left
Auxiliary
Bulb On
or
Tail
Lamp,
Right
Auxiliary
Bulb OnThe left or right tail lamp is malfunctioning. A substitute bulb
is being used.XReplace the bulb as soon as possible ( Y page 233).bTurn
Signal
Rear Left
Auxiliary
Bulb On
or
Turn
Signal
Rear
Right
Auxiliary
Bulb OnThe left or right rear turn signal lamp is malfunctioning. A
substitute bulb is being used.XReplace the bulb as soon as possible ( Y page 233).Vehicle status messages in the multifunction display217Practical hints463_AKB; 3; 35, en-USd2ureepe,Version: 2.11.8.12009-07-16T20:59:56+02:00 - Seite 217Z
Page 220 of 272

Display messagesPossible causes/consequences and M SolutionsbTurn
Signal
Front
Left
Auxiliary
Bulb On
or
Turn
Signal
Front
Right
Auxiliary
Bulb OnThe left or right front turn signal lamp is malfunctioning. A
substitute bulb is being used.XReplace the bulb as soon as possible ( Y page 233).bTurn
Signal In
Left
Mirror
or
Turn
Signal In
Right
MirrorThe turn signal in the left or right exterior rear view mirror is
malfunctioning. This message will only appear if all LEDs have
stopped working.XContact an authorized Mercedes-Benz Center as soon as
possible.
Tires
Display messagesPossible causes/consequences and M SolutionshCorrect
The Tire
Pres.The tire inflation pressure is too low in at least one tire.
or
The tire inflation pressure of the individual tires differ from
each other significantly.XCheck and correct tire inflation pressure as required
( Y page 161).hTire
Pres.
Caution
Tire
DefectAt least one tire is deflating.XCarefully bring the vehicle to a halt, avoiding abrupt
steering and braking maneuvers.XIf necessary, change the wheel ( Y page 239).218Vehicle status messages in the multifunction displayPractical hints
463_AKB; 3; 35, en-USd2ureepe,Version: 2.11.8.12009-07-16T20:59:56+02:00 - Seite 218
Page 221 of 272

Display messagesPossible causes/consequences and M SolutionshTire
Pres.
Check
TiresThe tire inflation pressure in at least one tire is significantly
below the reference value.XCarefully bring the vehicle to a halt, avoiding abrupt
steering and braking maneuvers.XCheck and adjust tire inflation pressure as required.XIf necessary, change the wheel ( Y page 239).GWarning!
Do not drive with a flat tire. A flat tire affects the ability to steer or brake the vehicle. You may
lose control of the vehicle. Continued driving with a flat tire will cause excessive heat build-up
and possibly a fire.
GWarning!
Follow recommended tire inflation pressures.
Do not underinflate tires. Underinflated tires wear excessively and/or unevenly, adversely affect
handling and fuel economy, and are more likely to fail from being overheated.
Do not overinflate tires. Overinflated tires can adversely affect handling and ride comfort, wear
unevenly, increase stopping distance, and result in sudden deflation (blowout) because they are
more likely to become punctured or damaged by road debris, potholes etc.
What to do if …
Lamps in instrument cluster
Notes
If any of the following lamps in the instrument
cluster fails to come on during the bulb self-
check when switching on the ignition, have
the respective bulb checked and replaced if
necessary.
When you switch on the ignition, all lamps in
the instrument cluster come on. The low-
beam headlamp indicator lamp, high-beam
headlamp indicator lamp, and turn signal
indicator lamps will only come on if activated.
If a lamp in the instrument cluster fails to
come on when the ignition is switched on,
have it checked and replaced if necessary.What to do if …219Practical hints463_AKB; 3; 35, en-USd2ureepe,Version: 2.11.8.12009-07-16T20:59:56+02:00 - Seite 219Z
Page 236 of 272

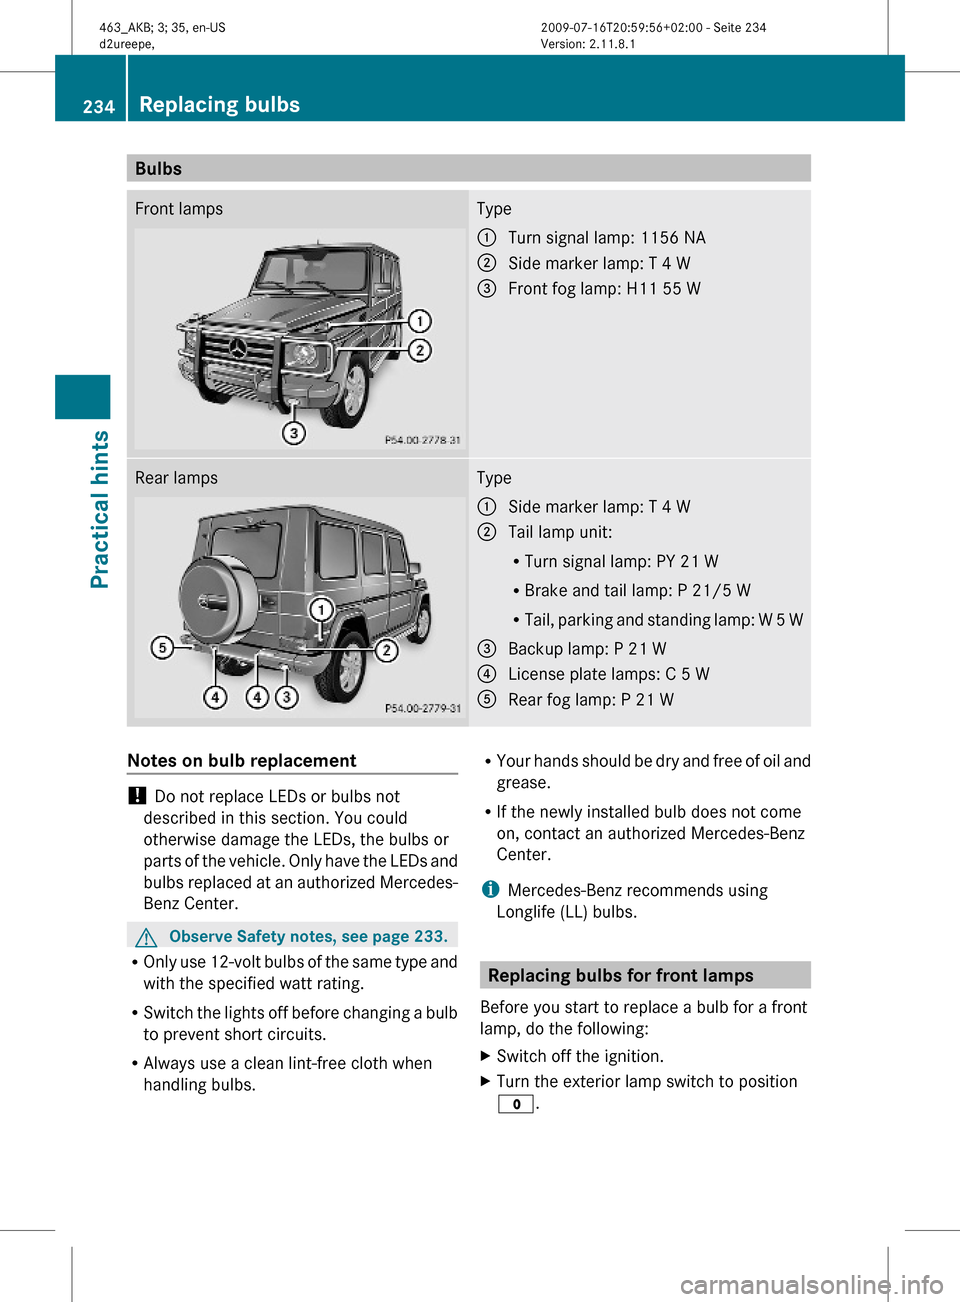
BulbsFront lampsType:Turn signal lamp: 1156 NA;Side marker lamp: T 4 W=Front fog lamp: H11 55 WRear lampsType:Side marker lamp: T 4 W;Tail lamp unit:
RTurn signal lamp: PY 21 W
RBrake and tail lamp: P 21/5 W
RTail, parking and standing lamp: W 5 W
=Backup lamp: P 21 W?License plate lamps: C 5 WARear fog lamp: P 21 WNotes on bulb replacement
! Do not replace LEDs or bulbs not
described in this section. You could
otherwise damage the LEDs, the bulbs or
parts of the vehicle. Only have the LEDs and
bulbs replaced at an authorized Mercedes-
Benz Center.
GObserve Safety notes, see page 233.
ROnly use 12-volt bulbs of the same type and
with the specified watt rating.
RSwitch the lights off before changing a bulb
to prevent short circuits.
RAlways use a clean lint-free cloth when
handling bulbs.
RYour hands should be dry and free of oil and
grease.
RIf the newly installed bulb does not come
on, contact an authorized Mercedes-Benz
Center.
iMercedes-Benz recommends using
Longlife (LL) bulbs.
Replacing bulbs for front lamps
Before you start to replace a bulb for a front
lamp, do the following:
XSwitch off the ignition.XTurn the exterior lamp switch to position
$.
234Replacing bulbsPractical hints
463_AKB; 3; 35, en-USd2ureepe,Version: 2.11.8.12009-07-16T20:59:56+02:00 - Seite 234
Page 238 of 272

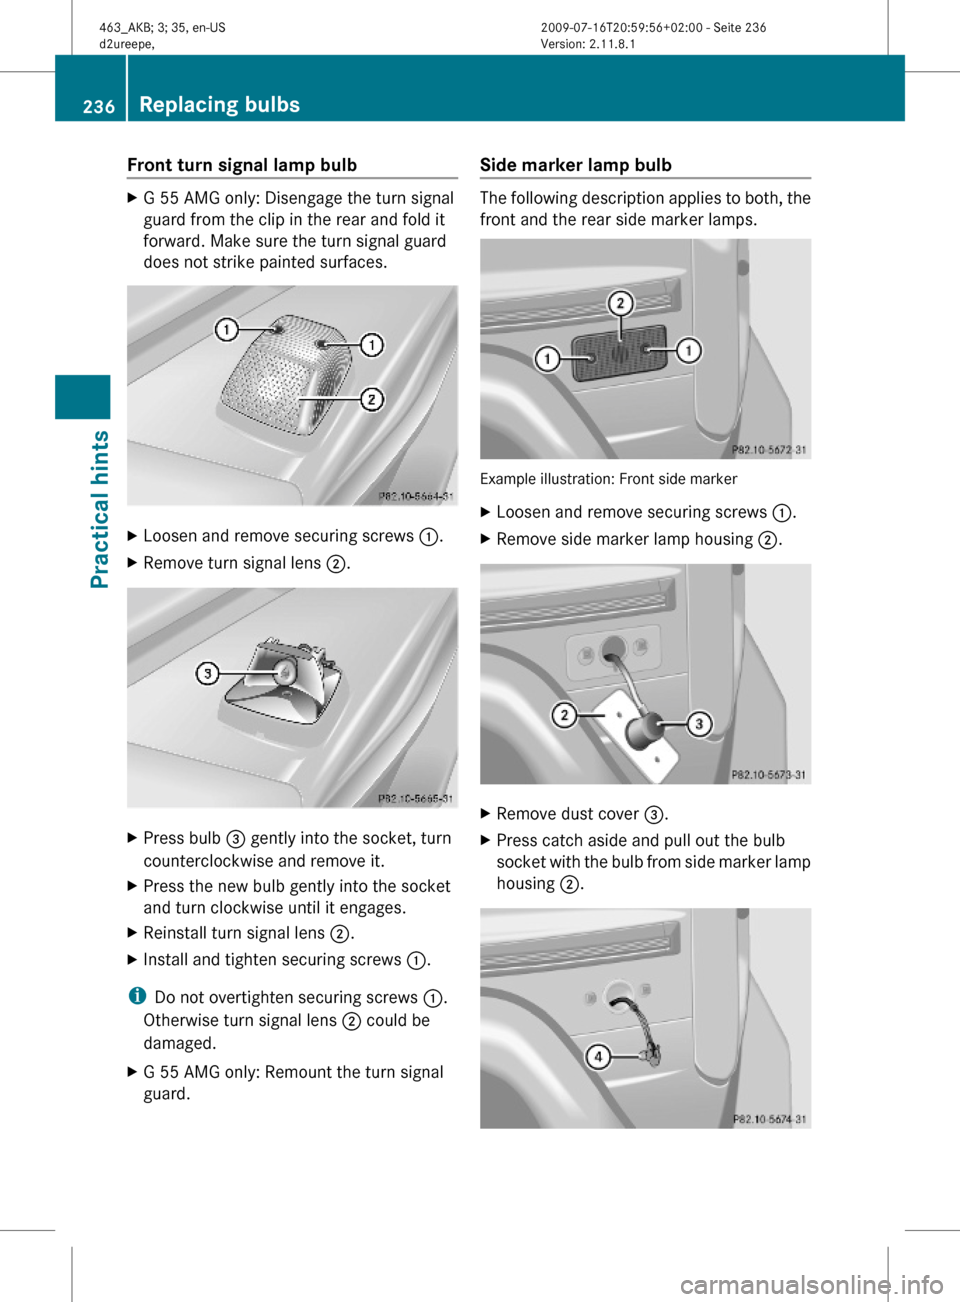
Front turn signal lamp bulbXG 55 AMG only: Disengage the turn signal
guard from the clip in the rear and fold it
forward. Make sure the turn signal guard
does not strike painted surfaces.
XLoosen and remove securing screws :.XRemove turn signal lens ;.XPress bulb = gently into the socket, turn
counterclockwise and remove it.
XPress the new bulb gently into the socket
and turn clockwise until it engages.
XReinstall turn signal lens ;.XInstall and tighten securing screws :.
iDo not overtighten securing screws :.
Otherwise turn signal lens ; could be
damaged.
XG 55 AMG only: Remount the turn signal
guard.
Side marker lamp bulb
The following description applies to both, the
front and the rear side marker lamps.
Example illustration: Front side marker
XLoosen and remove securing screws :.XRemove side marker lamp housing ;.XRemove dust cover =.XPress catch aside and pull out the bulb
socket with the bulb from side marker lamp
housing ;.
236Replacing bulbsPractical hints
463_AKB; 3; 35, en-USd2ureepe,Version: 2.11.8.12009-07-16T20:59:56+02:00 - Seite 236
Page 239 of 272

XGently press onto bulb ? and turn
counterclockwise out of its bulb socket.
XGently press the new bulb into the bulb
socket and turn clockwise until it engages.
XInsert the bulb socket back into side
marker lamp housing ;.
XReinstall dust cover =.XReinstall side marker lamp housing ;.XInstall and tighten securing screws :.
iDo not overtighten securing screws :.
Otherwise side marker lamp housing ;
could be damaged.
Replacing bulbs for rear lamps
Before you start to replace a bulb for a rear
lamp, do the following:
XSwitch off the ignition.XTurn the exterior lamp switch to position
$.
Removing/installing rear lamp guard
(G 55 AMG only)
XRemove screws ;.XSwivel rear lamp guard : outward. Make
sure the guard does not strike painted
surfaces.
XSwivel rear lamp guard : back after
replacing bulbs and fasten it with
screws ;.
Tail lamp unit XG 55 AMG only: Remove the rear lamp
guard.
Example illustration: Left tail lamp lens (right taillamp lens laterally reversed)
XLoosen and remove securing screws :.XRemove tail lamp lens ;.
Example illustration: Left tail lamp unit (right taillamp unit laterally reversed)
=Turn signal lamp bulb?Brake, tail, parking and standing lamp
bulb
ATail, parking and standing lamp bulbXGently press onto respective bulb =, ?,
or A and turn counterclockwise out of its
bulb socket.
XGently press the new bulb into the bulb
socket and turn clockwise until it engages.
XReinstall tail lamp lens ;.XInstall and tighten securing screws :.Replacing bulbs237Practical hints463_AKB; 3; 35, en-USd2ureepe,Version: 2.11.8.12009-07-16T20:59:56+02:00 - Seite 237Z