2010 MERCEDES-BENZ G550 lights
[x] Cancel search: lightsPage 2 of 272

Symbols
Trademarks:
R BabySmart TM
is a trademark of Siemens
Automotive Corp.
R Bluetooth ®
is a registered trademark of
Bluetooth SIG Inc.
R ESP ®
is a registered trademark of Daimler.
R HomeLink ®
is a registered trademark of
Prince, a Johnson Controls Company.
R SIRIUS and related marks are trademarks
of SIRIUS XM Radio Inc.
The following symbols are found in this
Operator’s Manual:GWarning!
Warning notices draw your attention to
hazards that may endanger your health or life,
or the health or life of others.
! Highlights hazards that may result in
damage to your vehicle.
i Helpful hints or further information you
may find useful.
XThis symbol points to instructions
for you to follow.XA number of these symbols
appearing in succession indicates
a multiple-step procedure.Y pageThis symbol tells you where to look
for further information on a topic.YYThis continuation symbol marks a
warning or procedure which is
continued on the next page.DisplayText in displays, such as the control
system, are printed in the type
shown here.463_AKB; 3; 35, en-USd2ureepe,Version: 2.11.8.12009-07-16T20:59:56+02:00 - Seite 2
Page 77 of 272

7 NFront fog lamps8 RRear fog lamp
i
If you hear a warning signal you have
forgotten to switch off the low-beam
headlamps or the parking lamps before
opening the driver’s door.
In addition, the message Switch Off
Lights appears in the multifunction
display.
Switch off the low-beam headlamps or the
parking lamps.
If the message Turn off lights or
remove key appears in the multifunction
display remove the SmartKey from the
starter switch or switch off the headlamps.
! Failure to switch off the exterior lamps
when leaving the vehicle may result in a
discharged battery.
Low-beam headlamps
The low-beam headlamps can be switched on
and off with the exterior lamp switch.
XSwitching on: Turn the exterior lamp
switch to position L.
The following lamps come on:
R Low-beam headlamps
R Tail lamps
R Parking lamps
R License plate lamps
R Side marker lamps
R Instrument panel lamps
R Green indicator lamp L in the
instrument clusterXSwitching off: Turn the exterior lamp
switch to position $.Automatic headlamp mode
The following lamps come on and go out
automatically depending on the brightness of
the ambient light:
R Low-beam headlamps
R Tail lamps
R Parking lamps
R License plate lamps
R Side marker lamps
GWarning!
If the exterior lamp switch is set to Ã, the
headlamps will not automatically come on
under foggy conditions.
To minimize risk to you and to others, activate
headlamps by turning exterior lamp switch to
L when driving or when traffic and/or
ambient lighting conditions require you to do
so.
In low ambient lighting conditions, only switch
from position à to L with the vehicle
at a standstill in a safe location. Switching
from à to L will briefly switch off the
headlamps. Doing so while driving in low
ambient lighting conditions may result in an
accident.
The automatic headlamp feature is only an aid
to the driver. The driver is responsible for the
operation of the vehicle’s lights at all times.
XSwitching on: Turn the exterior lamp
switch to position Ã.
The following lamps come on and go out
depending on the brightness of the ambient
light with the SmartKey in starter switch
position 1:
R Tail lamps
R Parking lamps
R License plate lamps
R Side marker lamps
When the engine is running, the low-beam
headlamps will also come on and turn off
automatically.
Lighting75Controls in detail463_AKB; 3; 35, en-USd2ureepe,Version: 2.11.8.12009-07-16T20:59:56+02:00 - Seite 75Z
Page 90 of 272

XAllow the engine and coolant to cool off.XCheck the coolant level and add coolant if
necessary (Y page 156).
In case of accident
If the vehicle is leaking fuel:
XDo not start the engine under any
circumstances.
XExit the vehicle at a safe distance from the
roadway.
XNotify local fire and/or police authorities.
If the extent of the damage cannot be
determined:
XContact an authorized Mercedes-Benz
Center or call Roadside Assistance.
If no damage on major assemblies, fuel
system, and engine mount can be
determined:
XStart the engine in the usual manner.
Parking
GWarning!
Do not park this vehicle in areas where
combustible materials such as grass, hay or
leaves can come into contact with the hot
exhaust system. These materials could be
ignited and cause a vehicle fire.
Vehicle movement can cause serious
personal injury or damage to the vehicle or
the vehicle drivetrain. Therefore, always do
the following before turning off the engine and
leaving the vehicle:
RKeep right foot on the brake pedal.
REngage the parking brake.
RShift the automatic transmission into park
position P.
RSlowly release the brake pedal.
RWhen parked on an incline, always turn the
front wheels towards the road curb.
RTurn the SmartKey in the starter switch to
position 0 and remove the SmartKey from
the starter switch.
RTake the SmartKey with you and lock the
vehicle when leaving.
Parking brake
GWarning!
Engaging the parking brake while the vehicle
is in motion can cause the rear wheels to lock
up. You could lose control of the vehicle and
cause an accident. In addition, the vehicle’s
brake lights do not light up when the parking
brake is engaged.
GWarning!
When leaving the vehicle, always remove the
SmartKey from the starter switch, take it with
you, and lock the vehicle. Do not leave
children unattended in the vehicle, or with
access to an unlocked vehicle. Children could
release the parking brake and/or shift the
automatic transmission out of park position
P, either of which could result in an accident
and/or serious personal injury.
XReleasing: Pull up slightly on parking brake
lever : and press release button ;.
XPush parking brake lever : down to its
original position.
When the ignition is switched on or the
engine is running, the brake warning lamp
88Driving and parkingControls in detail
463_AKB; 3; 35, en-USd2ureepe,Version: 2.11.8.12009-07-16T20:59:56+02:00 - Seite 88
Page 219 of 272

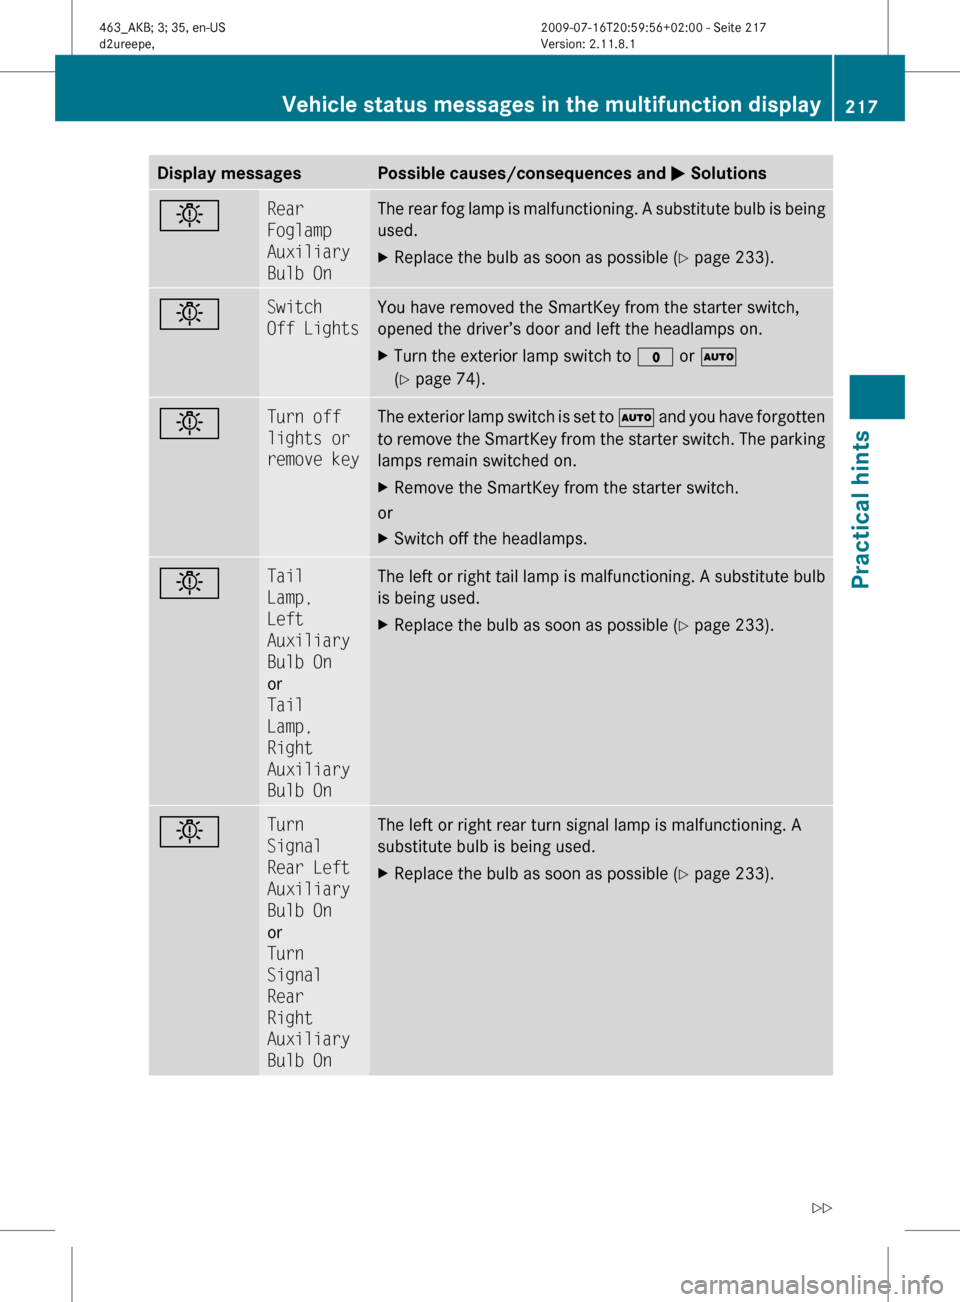
Display messagesPossible causes/consequences and M SolutionsbRear
Foglamp
Auxiliary
Bulb OnThe rear fog lamp is malfunctioning. A substitute bulb is being
used.XReplace the bulb as soon as possible ( Y page 233).bSwitch
Off LightsYou have removed the SmartKey from the starter switch,
opened the driver’s door and left the headlamps on.XTurn the exterior lamp switch to $ or Ã
( Y page 74).bTurn off
lights or
remove keyThe exterior lamp switch is set to à and you have forgotten
to remove the SmartKey from the starter switch. The parking
lamps remain switched on.XRemove the SmartKey from the starter switch.
or
XSwitch off the headlamps.bTail
Lamp,
Left
Auxiliary
Bulb On
or
Tail
Lamp,
Right
Auxiliary
Bulb OnThe left or right tail lamp is malfunctioning. A substitute bulb
is being used.XReplace the bulb as soon as possible ( Y page 233).bTurn
Signal
Rear Left
Auxiliary
Bulb On
or
Turn
Signal
Rear
Right
Auxiliary
Bulb OnThe left or right rear turn signal lamp is malfunctioning. A
substitute bulb is being used.XReplace the bulb as soon as possible ( Y page 233).Vehicle status messages in the multifunction display217Practical hints463_AKB; 3; 35, en-USd2ureepe,Version: 2.11.8.12009-07-16T20:59:56+02:00 - Seite 217Z
Page 234 of 272

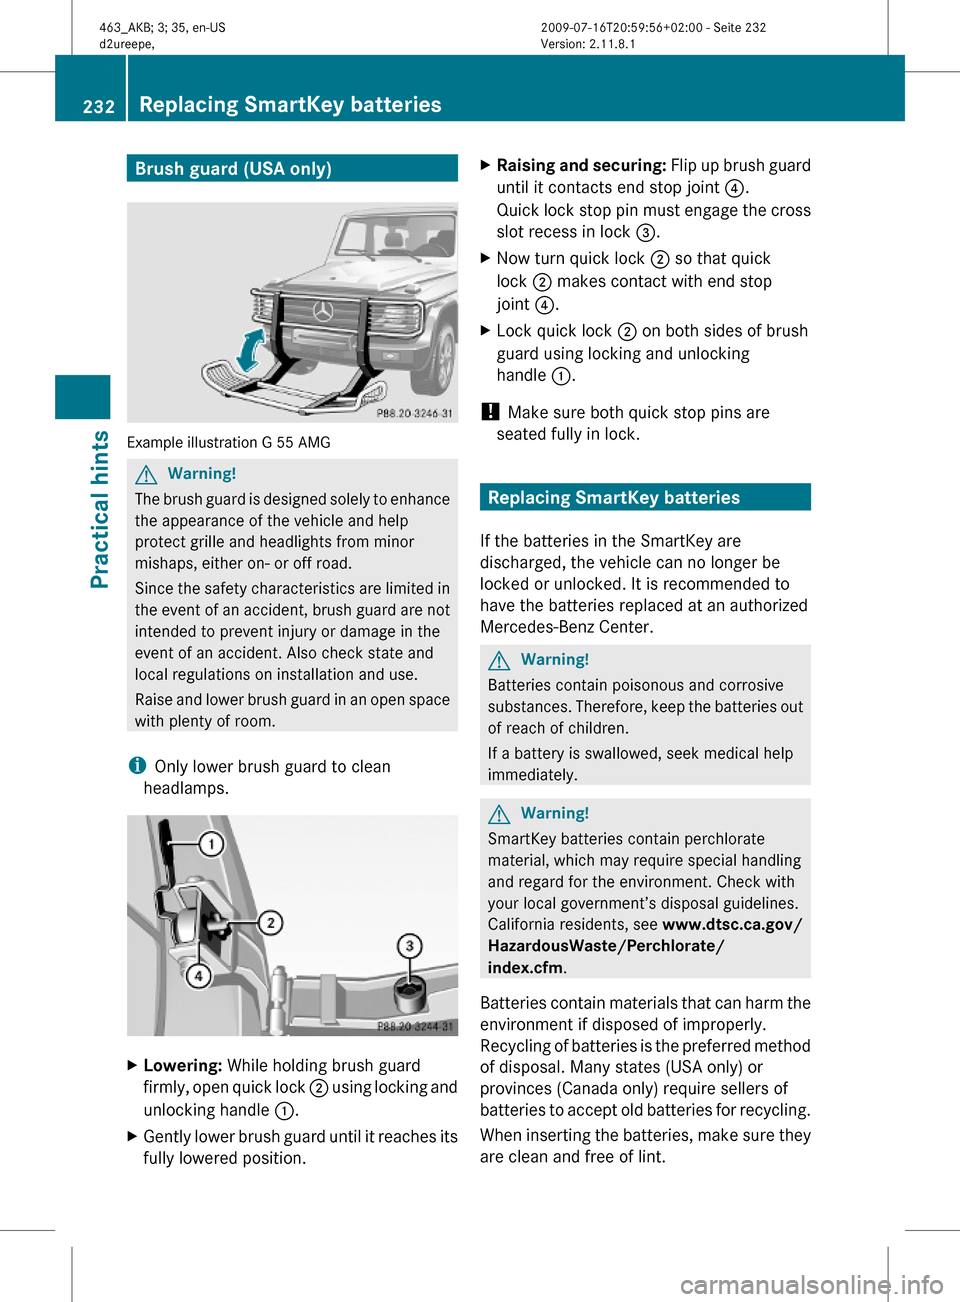
Brush guard (USA only)
Example illustration G 55 AMG
GWarning!
The brush guard is designed solely to enhance
the appearance of the vehicle and help
protect grille and headlights from minor
mishaps, either on- or off road.
Since the safety characteristics are limited in
the event of an accident, brush guard are not
intended to prevent injury or damage in the
event of an accident. Also check state and
local regulations on installation and use.
Raise and lower brush guard in an open space
with plenty of room.
iOnly lower brush guard to clean
headlamps.
XLowering: While holding brush guard
firmly, open quick lock ; using locking and
unlocking handle :.
XGently lower brush guard until it reaches its
fully lowered position.
XRaising and securing: Flip up brush guard
until it contacts end stop joint ?.
Quick lock stop pin must engage the cross
slot recess in lock =.
XNow turn quick lock ; so that quick
lock ; makes contact with end stop
joint ?.
XLock quick lock ; on both sides of brush
guard using locking and unlocking
handle :.
! Make sure both quick stop pins are
seated fully in lock.
Replacing SmartKey batteries
If the batteries in the SmartKey are
discharged, the vehicle can no longer be
locked or unlocked. It is recommended to
have the batteries replaced at an authorized
Mercedes-Benz Center.
GWarning!
Batteries contain poisonous and corrosive
substances. Therefore, keep the batteries out
of reach of children.
If a battery is swallowed, seek medical help
immediately.
GWarning!
SmartKey batteries contain perchlorate
material, which may require special handling
and regard for the environment. Check with
your local government’s disposal guidelines.
California residents, see www.dtsc.ca.gov/
HazardousWaste/Perchlorate/
index.cfm.
Batteries contain materials that can harm the
environment if disposed of improperly.
Recycling of batteries is the preferred method
of disposal. Many states (USA only) or
provinces (Canada only) require sellers of
batteries to accept old batteries for recycling.
When inserting the batteries, make sure they
are clean and free of lint.
232Replacing SmartKey batteriesPractical hints
463_AKB; 3; 35, en-USd2ureepe,Version: 2.11.8.12009-07-16T20:59:56+02:00 - Seite 232
Page 235 of 272

When replacing batteries, always replace
both batteries.
iThe required replacement batteries are
available at any authorized Mercedes-Benz
Center.
Replacement batteries: Lithium, type
CR 2025 or equivalent.
XRemove the mechanical key from the
SmartKey (Y page 228).
XPress mechanical key ; into the SmartKey
opening until battery compartment
cover : opens. Do not keep the cover
shut.
XRemove the battery compartment cover.XPat the SmartKey against the palm of your
hand until battery = falls out.
XInsert the new battery with the positive
terminal (+) facing up. Use a lint-free cloth.
XInsert the tabs of the battery compartment
cover into the housing and press the cover
closed.
XCheck the operation of the SmartKey.
Replacing bulbs
Safety notes
Safe vehicle operation depends on proper
exterior lighting and signaling to a large
degree.
Correct headlamp adjustment is extremely
important. Have headlamps checked and
readjusted at regular intervals and when a
bulb has been replaced. Contact an
authorized Mercedes-Benz Center for
headlamp adjustment.
GWarning!
Bulbs and bulb sockets can be very hot. Allow
the lamp to cool down before changing a bulb.
Keep bulbs out of reach of children.
Halogen lamps contain pressurized gas. A
bulb can explode if you
Rtouch or move it when hot
Rdrop the bulb
Rscratch the bulb
Wear eye and hand protection.
Because of high voltage in Xenon lamps, it is
dangerous to replace the bulb or repair the
lamp and its components. We recommend
that you have such work done by a qualified
technician.
iSince replacing bulbs is a technically
highly demanding process, we recommend
to have them replaced at an authorized
Mercedes-Benz Center.
iIf the headlamps or front fog lamps are
fogged up on the inside as a result of high
humidity, driving the vehicle a distance with
the lights on should clear up the fogging.
Replacing bulbs233Practical hints463_AKB; 3; 35, en-USd2ureepe,Version: 2.11.8.12009-07-16T20:59:56+02:00 - Seite 233Z
Page 236 of 272

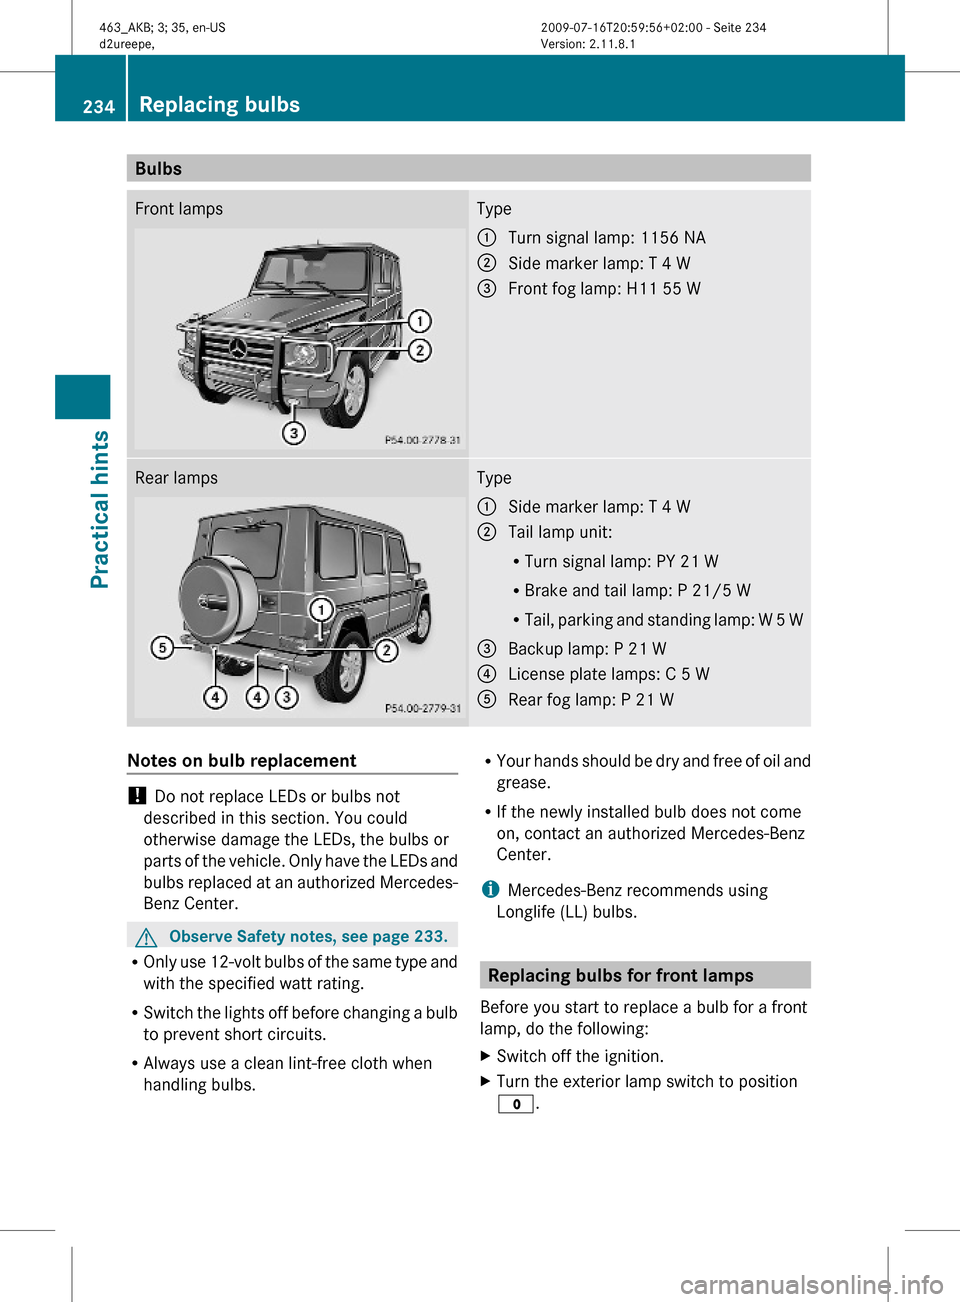
BulbsFront lampsType:Turn signal lamp: 1156 NA;Side marker lamp: T 4 W=Front fog lamp: H11 55 WRear lampsType:Side marker lamp: T 4 W;Tail lamp unit:
RTurn signal lamp: PY 21 W
RBrake and tail lamp: P 21/5 W
RTail, parking and standing lamp: W 5 W
=Backup lamp: P 21 W?License plate lamps: C 5 WARear fog lamp: P 21 WNotes on bulb replacement
! Do not replace LEDs or bulbs not
described in this section. You could
otherwise damage the LEDs, the bulbs or
parts of the vehicle. Only have the LEDs and
bulbs replaced at an authorized Mercedes-
Benz Center.
GObserve Safety notes, see page 233.
ROnly use 12-volt bulbs of the same type and
with the specified watt rating.
RSwitch the lights off before changing a bulb
to prevent short circuits.
RAlways use a clean lint-free cloth when
handling bulbs.
RYour hands should be dry and free of oil and
grease.
RIf the newly installed bulb does not come
on, contact an authorized Mercedes-Benz
Center.
iMercedes-Benz recommends using
Longlife (LL) bulbs.
Replacing bulbs for front lamps
Before you start to replace a bulb for a front
lamp, do the following:
XSwitch off the ignition.XTurn the exterior lamp switch to position
$.
234Replacing bulbsPractical hints
463_AKB; 3; 35, en-USd2ureepe,Version: 2.11.8.12009-07-16T20:59:56+02:00 - Seite 234