2010 MERCEDES-BENZ E63AMG lock
[x] Cancel search: lockPage 307 of 372
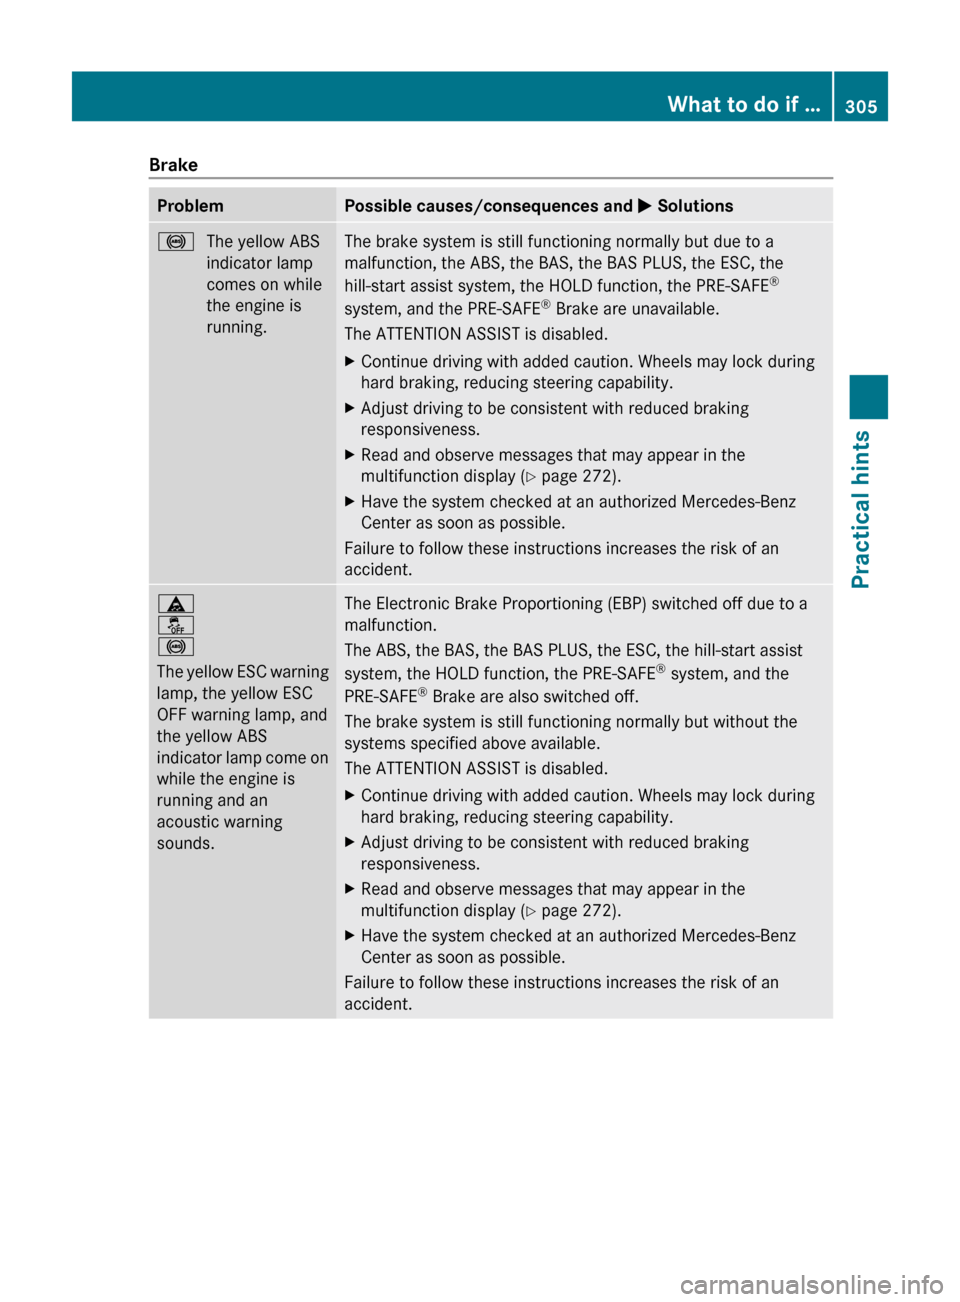
BrakeProblemPossible causes/consequences and M Solutions!The yellow ABS
indicator lamp
comes on while
the engine is
running.The brake system is still functioning normally but due to a
malfunction, the ABS, the BAS, the BAS PLUS, the ESC, the
hill-start assist system, the HOLD function, the PRE-SAFE ®
system, and the PRE-SAFE ®
Brake are unavailable.
The ATTENTION ASSIST is disabled.XContinue driving with added caution. Wheels may lock during
hard braking, reducing steering capability.XAdjust driving to be consistent with reduced braking
responsiveness.XRead and observe messages that may appear in the
multifunction display ( Y page 272).XHave the system checked at an authorized Mercedes-Benz
Center as soon as possible.
Failure to follow these instructions increases the risk of an
accident.
ä
å
!
The yellow ESC warning
lamp, the yellow ESC
OFF warning lamp, and
the yellow ABS
indicator lamp come on
while the engine is
running and an
acoustic warning
sounds.The Electronic Brake Proportioning (EBP) switched off due to a
malfunction.
The ABS, the BAS, the BAS PLUS, the ESC, the hill-start assist
system, the HOLD function, the PRE-SAFE ®
system, and the
PRE-SAFE ®
Brake are also switched off.
The brake system is still functioning normally but without the
systems specified above available.
The ATTENTION ASSIST is disabled.XContinue driving with added caution. Wheels may lock during
hard braking, reducing steering capability.XAdjust driving to be consistent with reduced braking
responsiveness.XRead and observe messages that may appear in the
multifunction display ( Y page 272).XHave the system checked at an authorized Mercedes-Benz
Center as soon as possible.
Failure to follow these instructions increases the risk of an
accident.
What to do if …305Practical hints212_AKB; 2; 41, en-USd2ureepe,Version: 2.11.8.12009-07-17T09:14:21+02:00 - Seite 305Z
Page 311 of 372
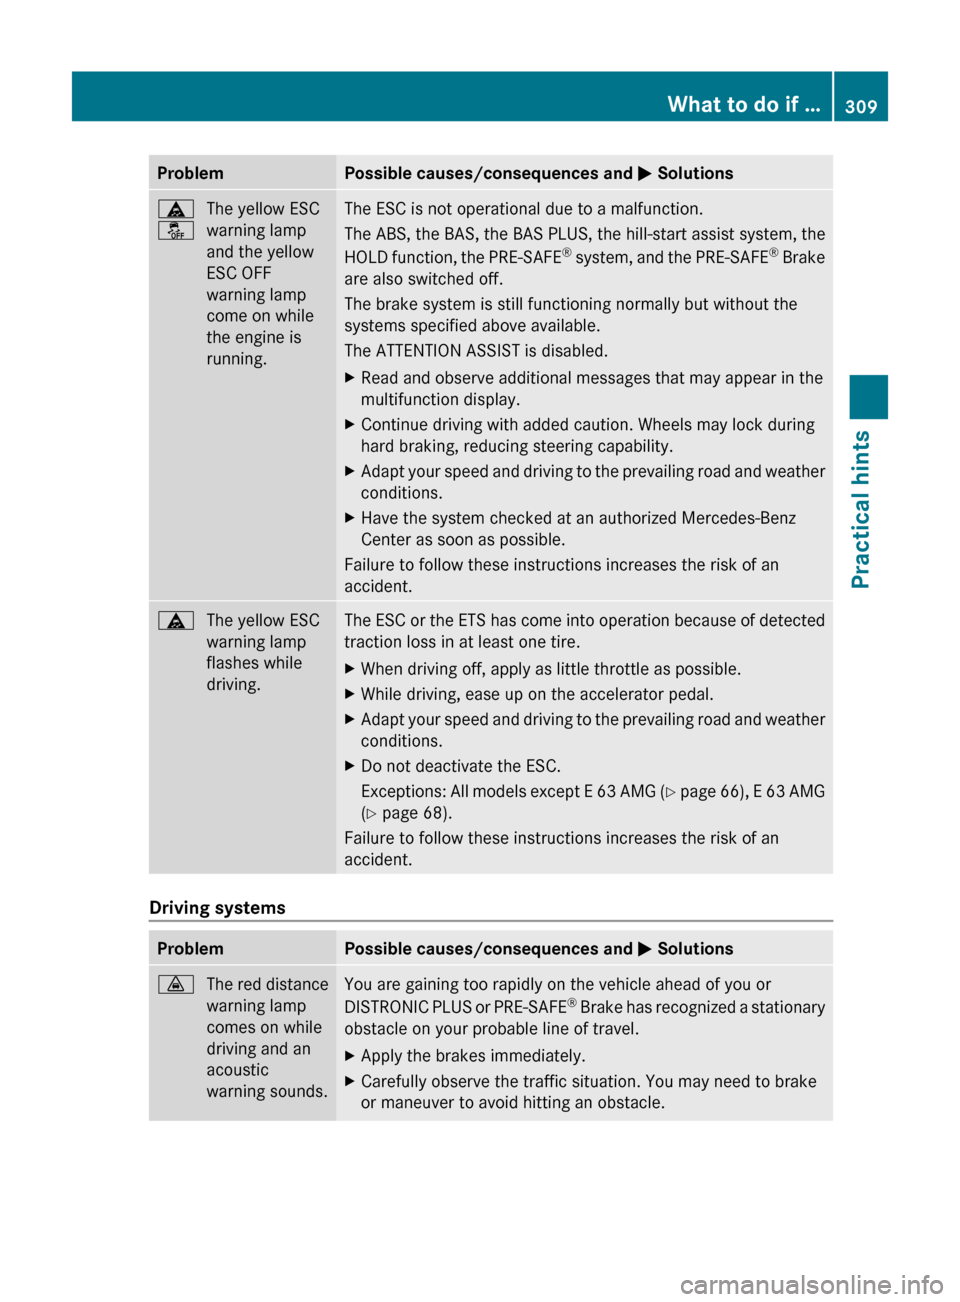
ProblemPossible causes/consequences and M Solutionsä
åThe yellow ESC
warning lamp
and the yellow
ESC OFF
warning lamp
come on while
the engine is
running.The ESC is not operational due to a malfunction.
The ABS, the BAS, the BAS PLUS, the hill-start assist system, the
HOLD function, the PRE-SAFE ®
system, and the PRE-SAFE ®
Brake
are also switched off.
The brake system is still functioning normally but without the
systems specified above available.
The ATTENTION ASSIST is disabled.XRead and observe additional messages that may appear in the
multifunction display.XContinue driving with added caution. Wheels may lock during
hard braking, reducing steering capability.XAdapt your speed and driving to the prevailing road and weather
conditions.XHave the system checked at an authorized Mercedes-Benz
Center as soon as possible.
Failure to follow these instructions increases the risk of an
accident.
äThe yellow ESC
warning lamp
flashes while
driving.The ESC or the ETS has come into operation because of detected
traction loss in at least one tire.XWhen driving off, apply as little throttle as possible.XWhile driving, ease up on the accelerator pedal.XAdapt your speed and driving to the prevailing road and weather
conditions.XDo not deactivate the ESC.
Exceptions: All models except E 63 AMG (Y page 66), E 63 AMG
( Y page 68).
Failure to follow these instructions increases the risk of an
accident.
Driving systems
ProblemPossible causes/consequences and M Solutions·The red distance
warning lamp
comes on while
driving and an
acoustic
warning sounds.You are gaining too rapidly on the vehicle ahead of you or
DISTRONIC PLUS or PRE-SAFE ®
Brake has recognized a stationary
obstacle on your probable line of travel.XApply the brakes immediately.XCarefully observe the traffic situation. You may need to brake
or maneuver to avoid hitting an obstacle.What to do if …309Practical hints212_AKB; 2; 41, en-USd2ureepe,Version: 2.11.8.12009-07-17T09:14:21+02:00 - Seite 309Z
Page 316 of 372

ProblemPossible causes/consequences and M SolutionsUSA only:
45
The front passenger
front air bag off
indicator lamp
illuminates and
remains illuminated
with the weight of a
typical adult or
someone larger than a
small individual on the
front passenger seat.The system is malfunctioning.XHave the system checked as soon as possible at an authorized
Mercedes-Benz Center.XRead and observe messages in the multifunction display and
follow corrective steps ( Y page 272).GWarning!
If the 45 indicator lamp illuminates
and remains illuminated with the weight of a
typical adult or someone larger than a small
individual on the front passenger seat, do not
have any passenger use the front passenger
seat until the system has been repaired.ProblemPossible causes/consequences and M SolutionsUSA only:
45
The front passenger
front air bag off
indicator lamp does not
illuminate and/or does
not remain illuminated
with the weight of a
typical 12-month-old
child in a standard child
restraint or less on the
front passenger seat.The system is malfunctioning.XMake sure there is nothing between seat cushion and child seat
and check installation of the child seat.XMake sure no objects applying supplemental weight onto the
seat are present.XIf the front passenger front air bag off indicator lamp remains
out, have the system checked as soon as possible at an
authorized Mercedes-Benz Center. Do not transport a child on
the front passenger seat until the system has been repaired.XRead and observe messages in the multifunction display and
follow corrective steps ( Y page 272).GWarning!
If the 45 indicator lamp does not
illuminate or remains out with the weight of a
typical 12-month-old child in a standard child
restraint or less on the front passenger seat,
do not transport a child on the front
passenger seat until the system has been
repaired.
Unlocking/locking manually
Unlocking the vehicle
If you cannot unlock the vehicle with the
SmartKey or with KEYLESS-GO, unlock the
driver’s door and the trunk using the
mechanical key.
314Unlocking/locking manuallyPractical hints
212_AKB; 2; 41, en-USd2ureepe,Version: 2.11.8.12009-07-17T09:14:21+02:00 - Seite 314
Page 317 of 372

The anti-theft alarm system will trigger when
you
Runlock the driver’s door or the trunk with
the mechanical key
and
Ropen the driver’s door or the trunk
To cancel the alarm, insert the SmartKey into
the starter switch.
Removing the mechanical key
XMove locking tab : in the direction of
arrow.
XSlide mechanical key ; out of the housing.
Unlocking the driver’s door
XInsert mechanical key ; into the driver’s
door lock.
XTurn mechanical key ; counterclockwise
to position 1.
XPull the door handle to open the driver’s
door.
XTurn mechanical key ; back and remove
it from the driver’s door lock.
Unlocking the trunk
A minimum height clearance of 5.78 ft
(1.76 m) is required to open the trunk lid.
XInsert mechanical key ; into the trunk lid
lock.
XTurn mechanical key ; counterclockwise
to position 1.
! When you open the trunk, the trunk lid
swings open upwards. Always make sure
there is sufficient overhead clearance.
XTurn mechanical key ; back and remove
it from the trunk lid lock.
Locking the vehicle
If you cannot lock the vehicle with the
SmartKey or with KEYLESS-GO, lock it as
follows:
XOpen the driver’s door.XClose the front passenger door, the rear
doors, and the trunk.
XPress the central locking switch
(Y page 81).
The locking knobs of the front passenger
door and the rear doors move down.
XIf the vehicle battery is disconnected or
drained: Press down the locking knobs on
Unlocking/locking manually315Practical hints212_AKB; 2; 41, en-USd2ureepe,Version: 2.11.8.12009-07-17T09:14:21+02:00 - Seite 315Z
Page 318 of 372

the front passenger door and the rear
doors.
XExit the vehicle.XClose the driver’s door.XRemove mechanical key ; from the
SmartKey (Y page 315).
XInsert mechanical key ; into the driver’s
door lock.
XTurn mechanical key ; clockwise to
position 1.
The vehicle is locked.
XTurn mechanical key ; back and remove
it from the driver’s door lock.
XCheck whether the doors and the trunk are
locked.
XIf necessary, lock the trunk with the
mechanical key (Y page 85).
iThis procedure does not arm the anti-
theft alarm system, nor does it lock the fuel
filler flap.
Fuel filler flap
GWarning!
Avoid contact with the vehicle walls as they
may contain sharp edges. Otherwise, you
could injure yourself while releasing the fuel
filler flap.
In case the central locking system does not
release the fuel filler flap, you can open it
manually.
The fuel filler flap release is located on the
passenger side in the trunk behind the cover.
XOpen the trunk (Y page 81).XPush the parcel net down.XOpen the cover (Y page 268).XRemove fuel filler flap release ; from
holder :.
XPull fuel filler flap release ; in direction of
the arrow.
XOpen the fuel filler flap (Y page 220).XClose the cover.XClose the trunk.
Resetting activated NECK-PRO active
front head restraints
If the NECK-PRO active front head restraints
have been triggered in a rear-end collision,
they must be reset.
You can tell that the NECK-PRO active front
head restraints have been triggered when
they have been moved forward and cannot be
adjusted.
GWarning!
For safety reasons, have the NECK-PRO active
front head restraints checked at an
authorized Mercedes-Benz Center after a
rear-end collision.
316Resetting activated NECK-PRO active front head restraintsPractical hints
212_AKB; 2; 41, en-USd2ureepe,Version: 2.11.8.12009-07-17T09:14:21+02:00 - Seite 316
Page 319 of 372
GWarning!
When pushing back the head restraint
cushion, make sure your fingers do not
become caught between the head restraint
cushion and the cover. Failing to do so may
lead to injury.
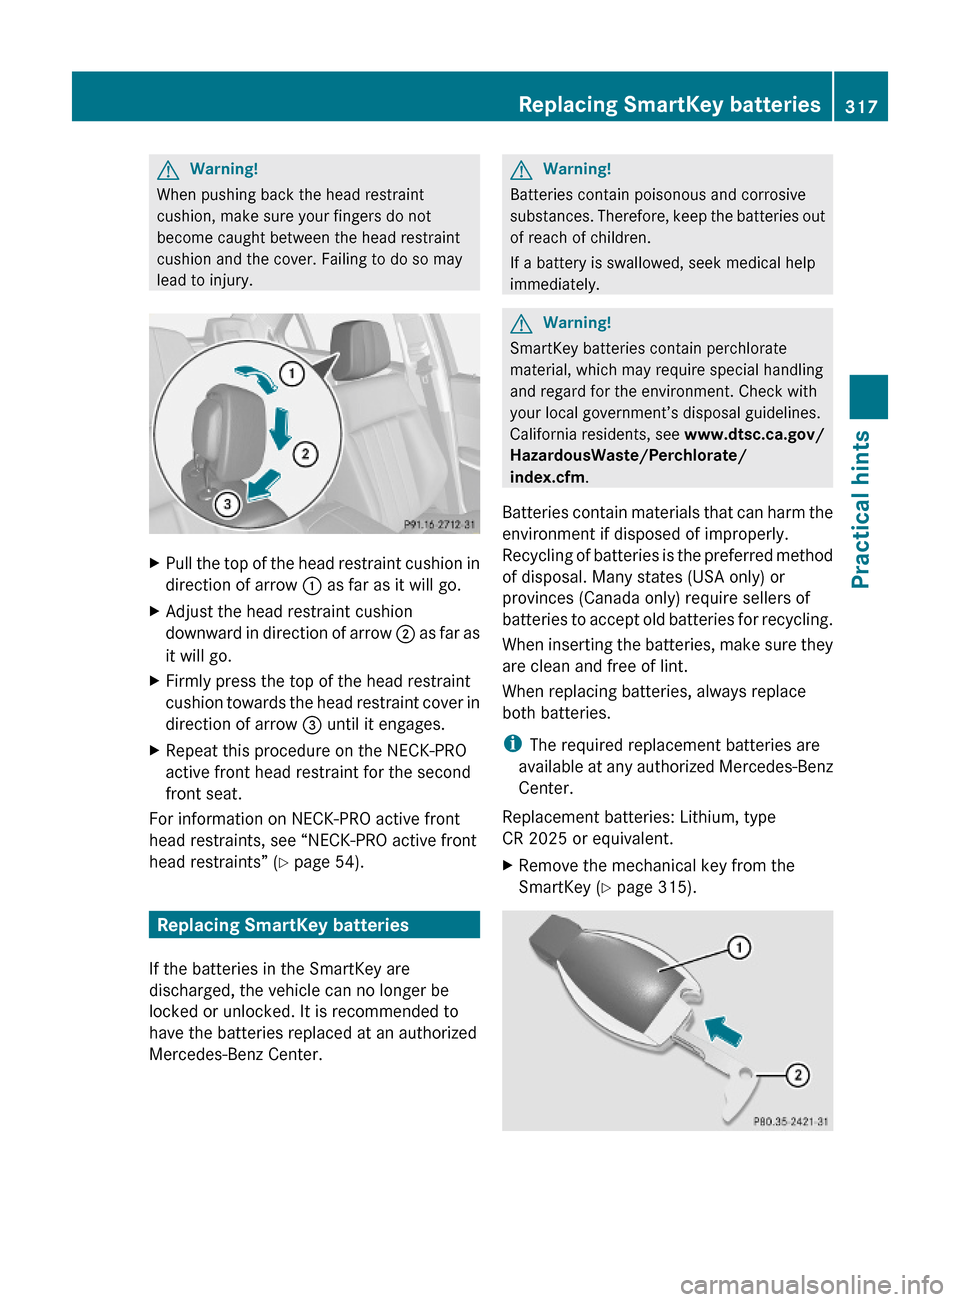
XPull the top of the head restraint cushion in
direction of arrow : as far as it will go.
XAdjust the head restraint cushion
downward in direction of arrow ; as far as
it will go.
XFirmly press the top of the head restraint
cushion towards the head restraint cover in
direction of arrow = until it engages.
XRepeat this procedure on the NECK-PRO
active front head restraint for the second
front seat.
For information on NECK-PRO active front
head restraints, see “NECK-PRO active front
head restraints” (Y page 54).
Replacing SmartKey batteries
If the batteries in the SmartKey are
discharged, the vehicle can no longer be
locked or unlocked. It is recommended to
have the batteries replaced at an authorized
Mercedes-Benz Center.
GWarning!
Batteries contain poisonous and corrosive
substances. Therefore, keep the batteries out
of reach of children.
If a battery is swallowed, seek medical help
immediately.
GWarning!
SmartKey batteries contain perchlorate
material, which may require special handling
and regard for the environment. Check with
your local government’s disposal guidelines.
California residents, see www.dtsc.ca.gov/
HazardousWaste/Perchlorate/
index.cfm.
Batteries contain materials that can harm the
environment if disposed of improperly.
Recycling of batteries is the preferred method
of disposal. Many states (USA only) or
provinces (Canada only) require sellers of
batteries to accept old batteries for recycling.
When inserting the batteries, make sure they
are clean and free of lint.
When replacing batteries, always replace
both batteries.
iThe required replacement batteries are
available at any authorized Mercedes-Benz
Center.
Replacement batteries: Lithium, type
CR 2025 or equivalent.
XRemove the mechanical key from the
SmartKey (Y page 315).
Replacing SmartKey batteries317Practical hints212_AKB; 2; 41, en-USd2ureepe,Version: 2.11.8.12009-07-17T09:14:21+02:00 - Seite 317Z
Page 322 of 372
recommended to have such work done by a
qualified technician.
Before you start to replace a bulb for a front
lamp, do the following:
XSwitch off the ignition.XTurn the exterior lamp switch to position
$.
XOpen the hood (Y page 223).
Releasing/fixing the washer fluid
reservoir
To replace bulbs of the driver’s side
headlamp, the washer fluid reservoir in the
engine compartment must be released.
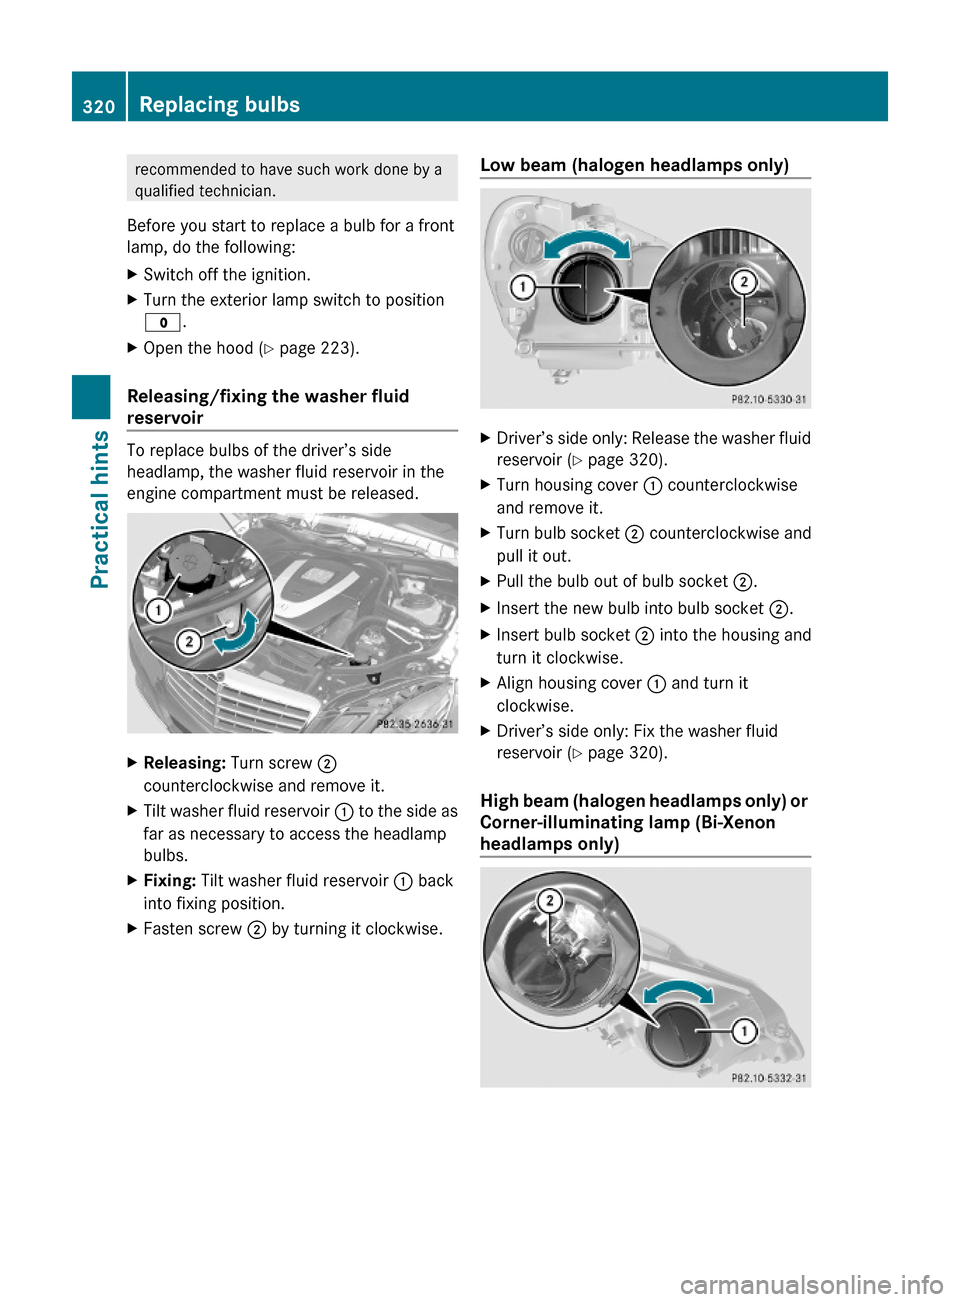
XReleasing: Turn screw ;
counterclockwise and remove it.
XTilt washer fluid reservoir : to the side as
far as necessary to access the headlamp
bulbs.
XFixing: Tilt washer fluid reservoir : back
into fixing position.
XFasten screw ; by turning it clockwise.Low beam (halogen headlamps only)XDriver’s side only: Release the washer fluid
reservoir (Y page 320).
XTurn housing cover : counterclockwise
and remove it.
XTurn bulb socket ; counterclockwise and
pull it out.
XPull the bulb out of bulb socket ;.XInsert the new bulb into bulb socket ;.XInsert bulb socket ; into the housing and
turn it clockwise.
XAlign housing cover : and turn it
clockwise.
XDriver’s side only: Fix the washer fluid
reservoir (Y page 320).
High beam (halogen headlamps only) or
Corner-illuminating lamp (Bi-Xenon
headlamps only)
320Replacing bulbsPractical hints
212_AKB; 2; 41, en-USd2ureepe,Version: 2.11.8.12009-07-17T09:14:21+02:00 - Seite 320
Page 323 of 372
XDriver’s side only: Release the washer fluid
reservoir (Y page 320).
XTurn housing cover : counterclockwise
and remove it.
XTurn bulb socket ; counterclockwise and
pull it out.
XPull the bulb out of bulb socket ;.XInsert the new bulb into bulb socket ;.XInsert bulb socket ; into the housing and
turn it clockwise.
XAlign housing cover : and turn it
clockwise.
XDriver’s side only: Fix the washer fluid
reservoir (Y page 320).
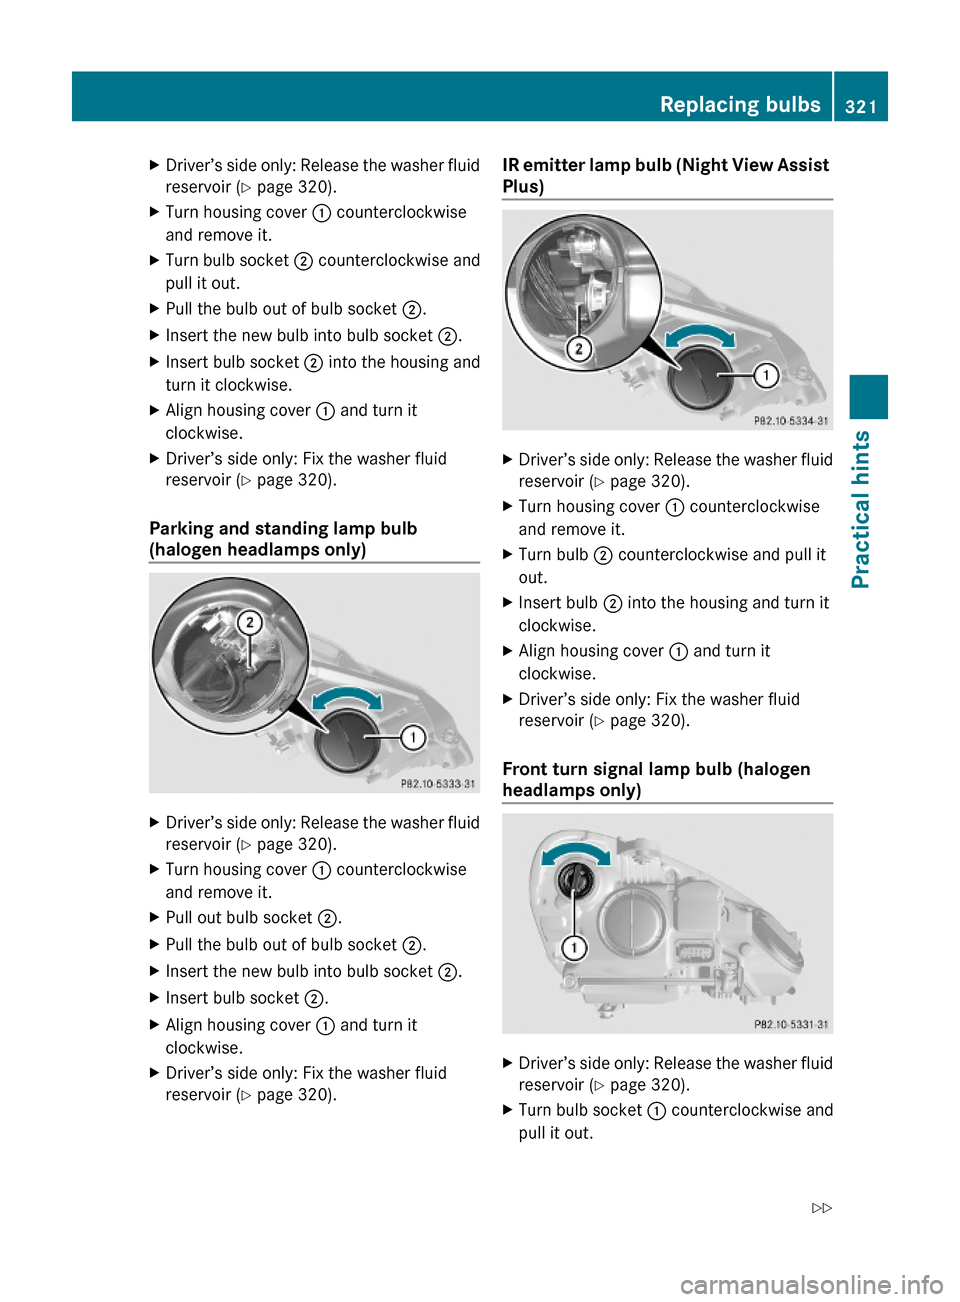
Parking and standing lamp bulb
(halogen headlamps only)
XDriver’s side only: Release the washer fluid
reservoir (Y page 320).
XTurn housing cover : counterclockwise
and remove it.
XPull out bulb socket ;.XPull the bulb out of bulb socket ;.XInsert the new bulb into bulb socket ;.XInsert bulb socket ;.XAlign housing cover : and turn it
clockwise.
XDriver’s side only: Fix the washer fluid
reservoir (Y page 320).
IR emitter lamp bulb (Night View Assist
Plus)
XDriver’s side only: Release the washer fluid
reservoir (Y page 320).
XTurn housing cover : counterclockwise
and remove it.
XTurn bulb ; counterclockwise and pull it
out.
XInsert bulb ; into the housing and turn it
clockwise.
XAlign housing cover : and turn it
clockwise.
XDriver’s side only: Fix the washer fluid
reservoir (Y page 320).
Front turn signal lamp bulb (halogen
headlamps only)
XDriver’s side only: Release the washer fluid
reservoir (Y page 320).
XTurn bulb socket : counterclockwise and
pull it out.
Replacing bulbs321Practical hints212_AKB; 2; 41, en-USd2ureepe,Version: 2.11.8.12009-07-17T09:14:21+02:00 - Seite 321Z