2010 MERCEDES-BENZ E63AMG Head rest down
[x] Cancel search: Head rest downPage 7 of 372

ATTENTION ASSIST ........................... 178
Messages in the multifunction
display ........................................... 292
Switching on or off ......................... 138
Audio menu ........................................ 134
Auto-dimming rear view mirrors ........ 95
Automatic central locking .......... 80, 144
Automatic climate control see Climate control system
Automatic headlamp mode ................ 98
Automatic interior lighting control .. 103
Automatic locking when driving ...... 144
Automatic shift program .................. 120
Automatic transmission ................... 114
Automatic shift program ................120
Gear range indicator ......................120
Gear ranges ................................... 120
Gear selector lever ........................115
Hill-start assist system ..................160
Kickdown ....................................... 119
Kickdown (manual shift program) ..124
Manual shift program ..................... 122
One-touch gearshifting ..................121
Program mode indicator ................121
Program mode selector dial
(E 63 AMG) ............................ 121, 123
Program mode selector switch
(automatic shift program) ..............120
Shifting procedure .........................118
Steering wheel gearshift control ....122
Transmission position indicator .....118
Transmission positions ..................118
AUX socket ........................................ 201
Axle oils .............................................. 360
B
BabySmart™
Air bag deactivation system .............46
Self-test ........................................... 47
Backrest
see Seats
Backup lamps
Messages in the multifunction
display ........................................... 300
Bar (air pressure unit) ....................... 250
BAS (Brake Assist System) ................. 63
BAS PLUS (Brake Assist System
PLUS) .................................................... 63
Batteries, SmartKey
Checking condition ..........................79
Replacing ....................................... 317
Battery, Vehicle ................................. 336
Charging ........................................ 337
Jump starting ................................. 338
Messages in the multifunction
display ................................... 284, 297
Bead (tire) .......................................... 250
Beverage holders see Cup holders
Bleeding the fuel system (diesel
engine) ............................................... 333
Blind Spot Assist ............................... 175
Messages in the multifunction
display ........................................... 281
Switching on or off ......................... 138
BlueTEC
AdBlue ®
tank ................................. 333
Brake Assist System
see BAS
Brake Assist System PLUS
see BAS PLUS
Brake fluid
Checking level ............................... 227
Messages in the multifunction
display ........................................... 289
Brake lamps
Cleaning lenses ............................. 262
Brake pads
Messages in the multifunction
display ........................................... 287
Brakes ................................................ 254
Ceramic brake system ...................256
High-performance brake system ....256
Parking brake ................................ 113
Warning lamp ................................. 305
Break-in period .................................. 220
Bug cover (Radiator) ......................... 224
Bulbs see Replacing bulbs Index5212_AKB; 2; 41, en-USd2ureepe,Version: 2.11.8.12009-07-17T09:14:21+02:00 - Seite 5
Page 13 of 372

Rear ............................................... 104
Rear reading lamps ........................104
Interior rear view mirror ..................... 94
Auto-dimming rear view mirrors ....... 95
Interior storage spaces
see Storage compartments
Intermittent wiping ........................... 104
Rain sensor .................................... 104
IR emitter
Replacing bulbs ............................. 319
ISOFIX (Child seat anchors –
LATCH-type) see Children in the vehicle
J
Jack ..................................................... 270
Jump starting ..................................... 338
K
Key, Mechanical
Loss of ............................................. 79
Replacing ......................................... 80
Unlocking/locking manually ..........314
Valet locking .................................... 85
Key, SmartKey
Battery check lamp ..........................79
Checking batteries ...........................79
Factory setting ........................... 77, 79
Global locking (KEYLESS-
GO) .................................................. 79
Global locking (SmartKey) ................ 77
Global unlocking (KEYLESS-
GO) .................................................. 79
Global unlocking
(SmartKey) ....................................... 77
Important notes on KEYLESS-GO .....78
Locking/unlocking ........................... 76
Loss of ............................................. 79
Messages in the multifunction
display ........................................... 293
Opening, trunk ................................. 82
Opening and closing the power
tilt/sliding sunroof or the
panorama roof ............................... 107
Opening and closing the windows . 107
Remote control ................................ 76
Replacing ......................................... 80
Replacing batteries ........................317
Restoring to factory setting .......77, 79
Selective setting ........................77, 79
Starter switch positions ...................85
KEYLESS-GO
Starter switch positions ...................86
Kickdown ........................................... 119
Kickdown (manual shift program) ... 124
Kilopascal (air pressure unit) ........... 250
Knee bag .............................................. 40
L
Labels
Certification ................................... 346
Emission control information .........347
Tire and Loading Information
placard ........................................... 237
Tire inflation pressure ....................230
Lamps, exterior
Exterior lamp switch ........................97
Front .............................................. 319
Messages in the multifunction
display ........................................... 299
Switching on/off .............................. 97
Lamps, indicator and warning
ABS .......................................... 29, 305
Adaptive Highbeam Assist .............100
Brakes ........................................... 305
Coolant .......................................... 311
Distance warning lamp ..........151, 309
Engine malfunction ........................310
ESC .......................................... 29, 309
ESC OFF ........................................ 308
Fog lamps ........................................ 99
Front passenger front air bag off
(Canada only) .......................... 46, 313
Front passenger front air bag off
(USA only) ................................ 43, 314
Fuel tank reserve ........................... 310
High-beam headlamps .............29, 100
Instrument cluster .........................304
Low-beam headlamps ................30, 98
Low tire pressure/TPMS
malfunction telltale ........................312
Seat belt telltale ................29, 52, 307
Index11212_AKB; 2; 41, en-USd2ureepe,Version: 2.11.8.12009-07-17T09:14:21+02:00 - Seite 11
Page 34 of 372
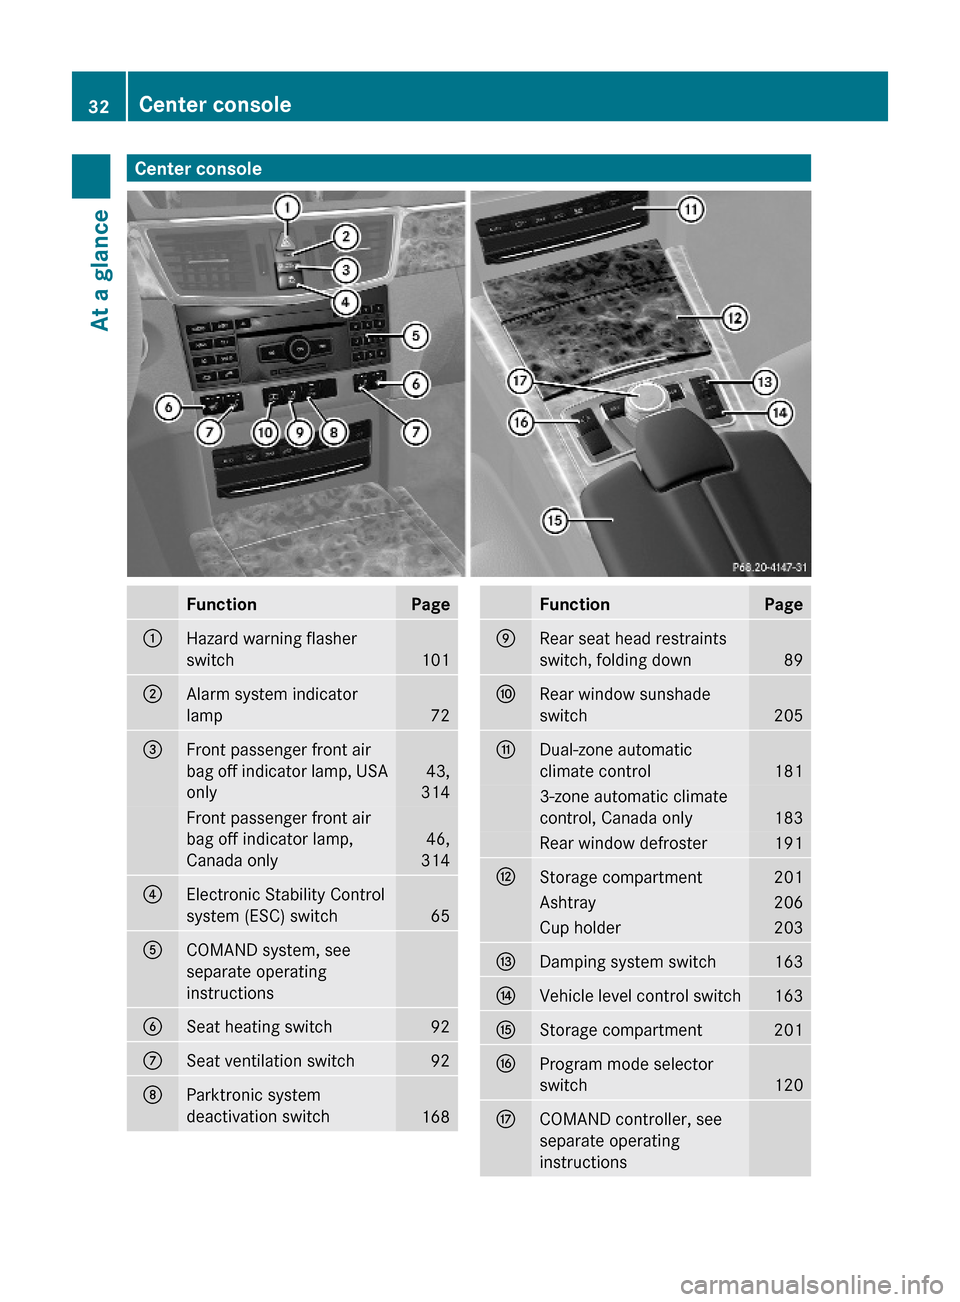
Center consoleFunctionPage:Hazard warning flasher
switch101
;Alarm system indicator
lamp72
=Front passenger front air
bag off indicator lamp, USA
only
43,
314
Front passenger front air
bag off indicator lamp,
Canada only
46,
314
?Electronic Stability Control
system (ESC) switch65
ACOMAND system, see
separate operating
instructions
BSeat heating switch92CSeat ventilation switch92DParktronic system
deactivation switch168
FunctionPageERear seat head restraints
switch, folding down89
FRear window sunshade
switch205
GDual-zone automatic
climate control181
3-zone automatic climate
control, Canada only183
Rear window defroster191HStorage compartment201Ashtray206Cup holder203IDamping system switch163JVehicle level control switch163KStorage compartment201LProgram mode selector
switch120
MCOMAND controller, see
separate operating
instructions
32Center consoleAt a glance
212_AKB; 2; 41, en-USd2ureepe,Version: 2.11.8.12009-07-17T09:14:21+02:00 - Seite 32
Page 61 of 372
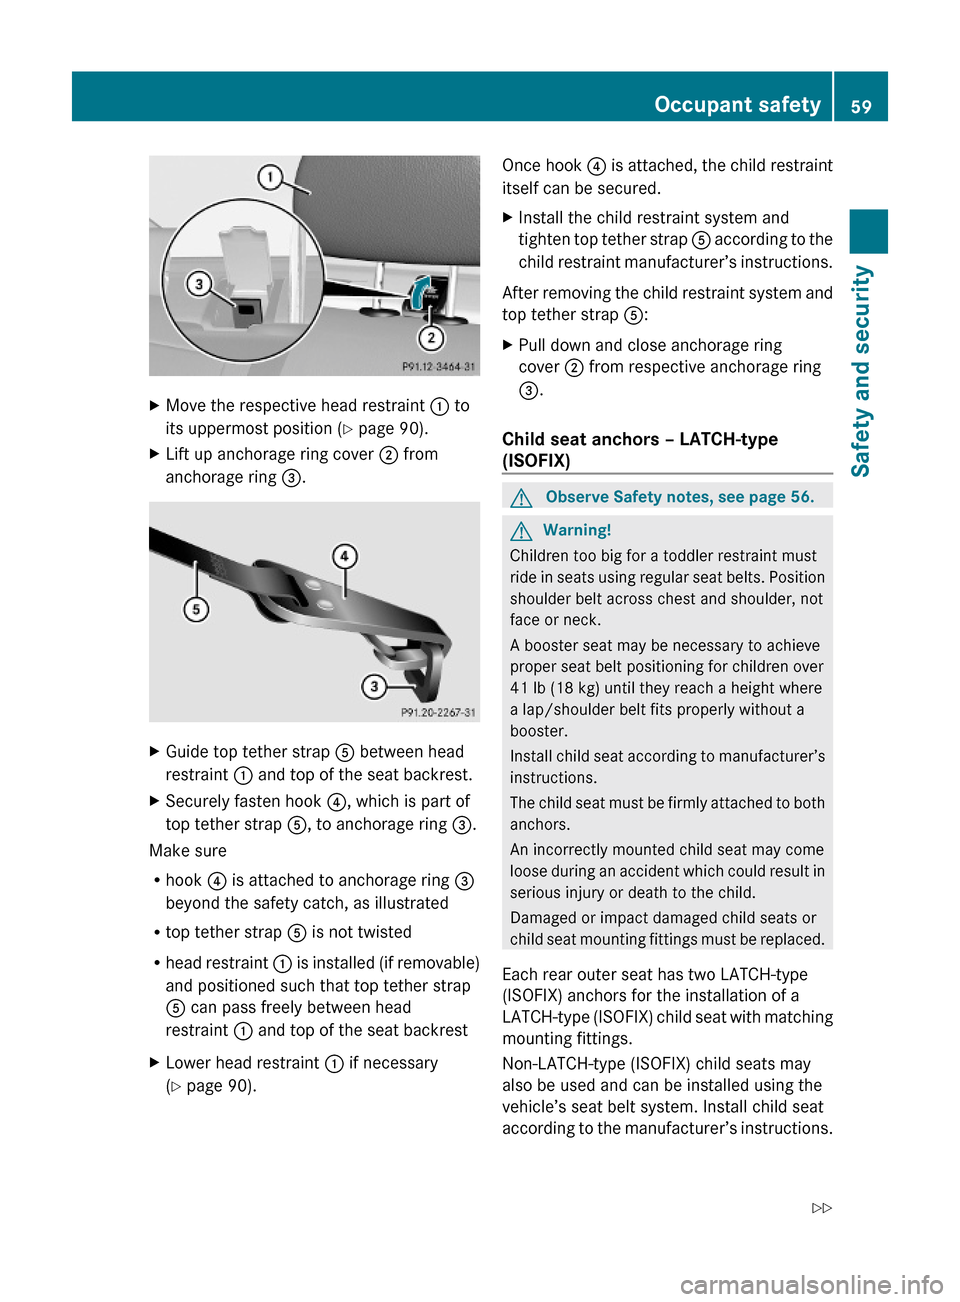
XMove the respective head restraint : to
its uppermost position (Y page 90).
XLift up anchorage ring cover ; from
anchorage ring =.
XGuide top tether strap A between head
restraint : and top of the seat backrest.
XSecurely fasten hook ?, which is part of
top tether strap A, to anchorage ring =.
Make sure
Rhook ? is attached to anchorage ring =
beyond the safety catch, as illustrated
Rtop tether strap A is not twisted
Rhead restraint : is installed (if removable)
and positioned such that top tether strap
A can pass freely between head
restraint : and top of the seat backrest
XLower head restraint : if necessary
(Y page 90).
Once hook ? is attached, the child restraint
itself can be secured.
XInstall the child restraint system and
tighten top tether strap A according to the
child restraint manufacturer’s instructions.
After removing the child restraint system and
top tether strap A:
XPull down and close anchorage ring
cover ; from respective anchorage ring
=.
Child seat anchors – LATCH-type
(ISOFIX)
GObserve Safety notes, see page 56.GWarning!
Children too big for a toddler restraint must
ride in seats using regular seat belts. Position
shoulder belt across chest and shoulder, not
face or neck.
A booster seat may be necessary to achieve
proper seat belt positioning for children over
41 lb (18 kg) until they reach a height where
a lap/shoulder belt fits properly without a
booster.
Install child seat according to manufacturer’s
instructions.
The child seat must be firmly attached to both
anchors.
An incorrectly mounted child seat may come
loose during an accident which could result in
serious injury or death to the child.
Damaged or impact damaged child seats or
child seat mounting fittings must be replaced.
Each rear outer seat has two LATCH-type
(ISOFIX) anchors for the installation of a
LATCH-type (ISOFIX) child seat with matching
mounting fittings.
Non-LATCH-type (ISOFIX) child seats may
also be used and can be installed using the
vehicle’s seat belt system. Install child seat
according to the manufacturer’s instructions.
Occupant safety59Safety and security212_AKB; 2; 41, en-USd2ureepe,Version: 2.11.8.12009-07-17T09:14:21+02:00 - Seite 59Z
Page 90 of 372

RAdjust the head restraint so that it is as
close to the head as possible. The center of
the head restraint must support the back of
the head at eye level.
RNever place hands under the seat or near
any moving parts while a seat is being
adjusted.
Failure to do so could result in an accident
and/or serious personal injury.
GWarning!
The power seats can be operated at any time.
Therefore, do not leave children unattended
in the vehicle, or with access to an unlocked
vehicle. A child’s unsupervised access to a
vehicle could result in an accident and/or
serious personal injury.
GWarning!
According to accident statistics, children are
safer when properly restrained in the rear
seating positions than in the front seating
position. Thus, we strongly recommend that
children be placed in the rear seats whenever
possible. Regardless of seating position,
children 12 years old and under must be
seated and properly secured in an
appropriately sized infant restraint, toddler
restraint, or booster seat recommended for
the size and weight of the child. For additional
information, see “Children in the vehicle”.
A child’s risk of serious or fatal injuries is
significantly increased if the child restraints
are not properly secured in the vehicle and/
or the child is not properly secured in the child
restraint.
GWarning!
For your protection, drive only with properly
positioned head restraints.
Adjust the head restraint so that it is as close
to the head as possible and the center of the
head restraint supports the back of the head
at eye level. This will reduce the potential for
injury to the head and neck in the event of an
accident or similar situation.
Do not drive the vehicle without the seat head
restraints. Head restraints are intended to
help reduce injuries during an accident.
Seat adjustment
! When moving the seats, make sure there
are no items in the footwell or behind the
seats. Otherwise, you could damage the
seats and/or the items.
Power seats
iThe memory function (Y page 96) lets
you store the settings for the seat position
together with the settings for the steering
wheel and the exterior rear view mirrors.
iVehicles with split rear seat bench:
If you fold down one or both sections of the
rear seat backrest, the respective front
seat is moved forward slightly, if necessary,
to prevent contact with the rear seat
backrest.
XSeat fore and aft adjustment: Press the
switch forward or backward in direction of
arrow ?.
XSeat backrest tilt: Press the switch
forward or backward in direction of arrow
A.
XSeat height: Press the switch up or down
in direction of arrow =.
88SeatsControls in detail
212_AKB; 2; 41, en-USd2ureepe,Version: 2.11.8.12009-07-17T09:14:21+02:00 - Seite 88
Page 91 of 372
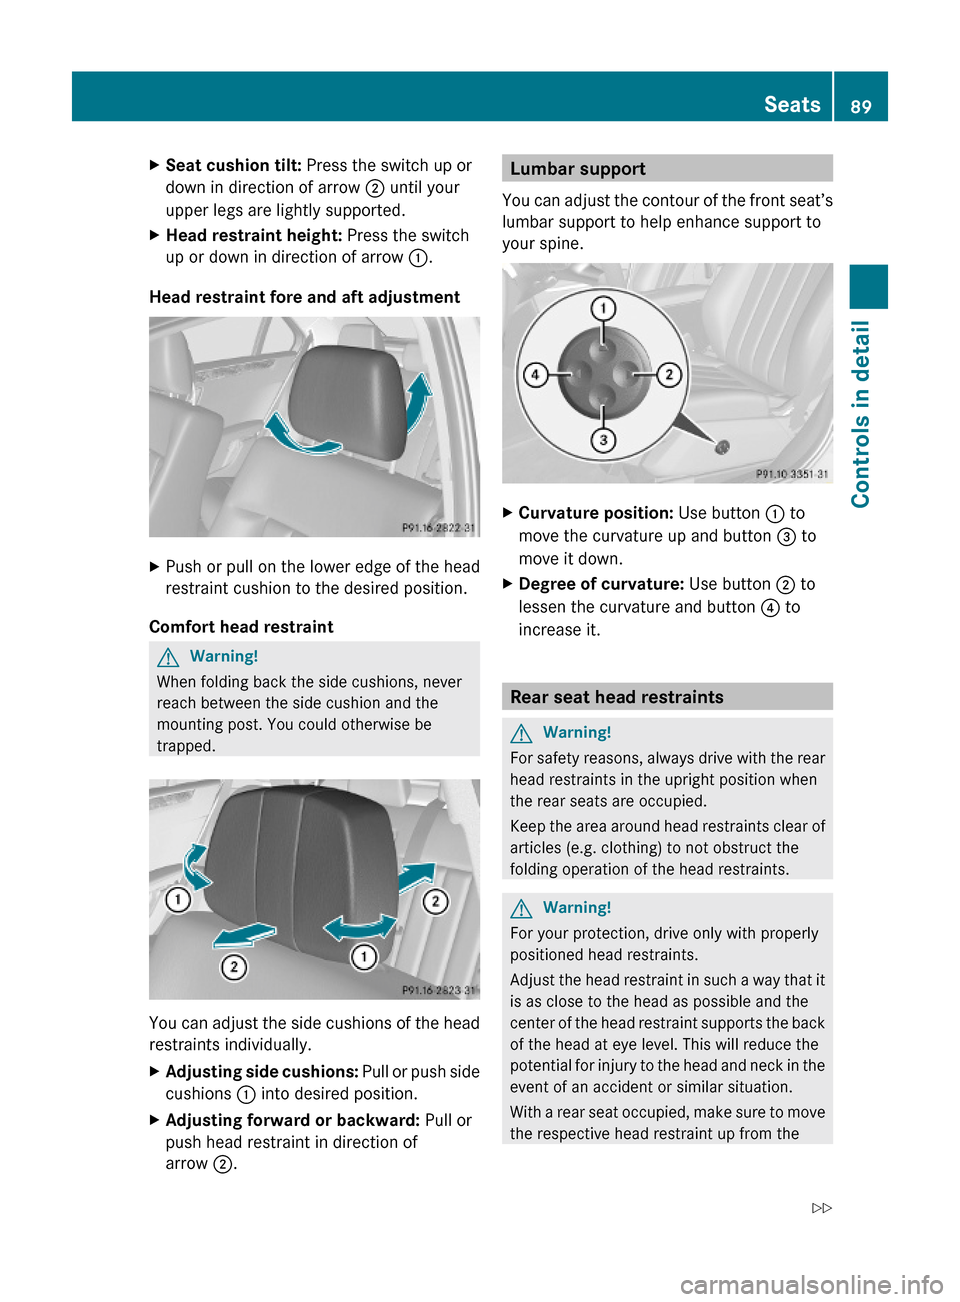
XSeat cushion tilt: Press the switch up or
down in direction of arrow ; until your
upper legs are lightly supported.
XHead restraint height: Press the switch
up or down in direction of arrow :.
Head restraint fore and aft adjustment
XPush or pull on the lower edge of the head
restraint cushion to the desired position.
Comfort head restraint
GWarning!
When folding back the side cushions, never
reach between the side cushion and the
mounting post. You could otherwise be
trapped.
You can adjust the side cushions of the head
restraints individually.
XAdjusting side cushions: Pull or push side
cushions : into desired position.
XAdjusting forward or backward: Pull or
push head restraint in direction of
arrow ;.
Lumbar support
You can adjust the contour of the front seat’s
lumbar support to help enhance support to
your spine.
XCurvature position: Use button : to
move the curvature up and button = to
move it down.
XDegree of curvature: Use button ; to
lessen the curvature and button ? to
increase it.
Rear seat head restraints
GWarning!
For safety reasons, always drive with the rear
head restraints in the upright position when
the rear seats are occupied.
Keep the area around head restraints clear of
articles (e.g. clothing) to not obstruct the
folding operation of the head restraints.
GWarning!
For your protection, drive only with properly
positioned head restraints.
Adjust the head restraint in such a way that it
is as close to the head as possible and the
center of the head restraint supports the back
of the head at eye level. This will reduce the
potential for injury to the head and neck in the
event of an accident or similar situation.
With a rear seat occupied, make sure to move
the respective head restraint up from the
Seats89Controls in detail212_AKB; 2; 41, en-USd2ureepe,Version: 2.11.8.12009-07-17T09:14:21+02:00 - Seite 89Z
Page 92 of 372
lowest non-use position and have the
occupant adjust the head restraint properly.
Do not drive the vehicle without the seat head
restraints installed when the rear seats are
occupied. Head restraints are intended to
help reduce injuries during an accident.
GWarning!
Make sure the rear seat head restraints
engage when placing them upright manually.
Otherwise their protective function cannot be
ensured.
The back of the head will not be supported in
the event of a collision. That could cause
serious or even fatal injuries. Rear seat
occupants can be seriously injured or killed.
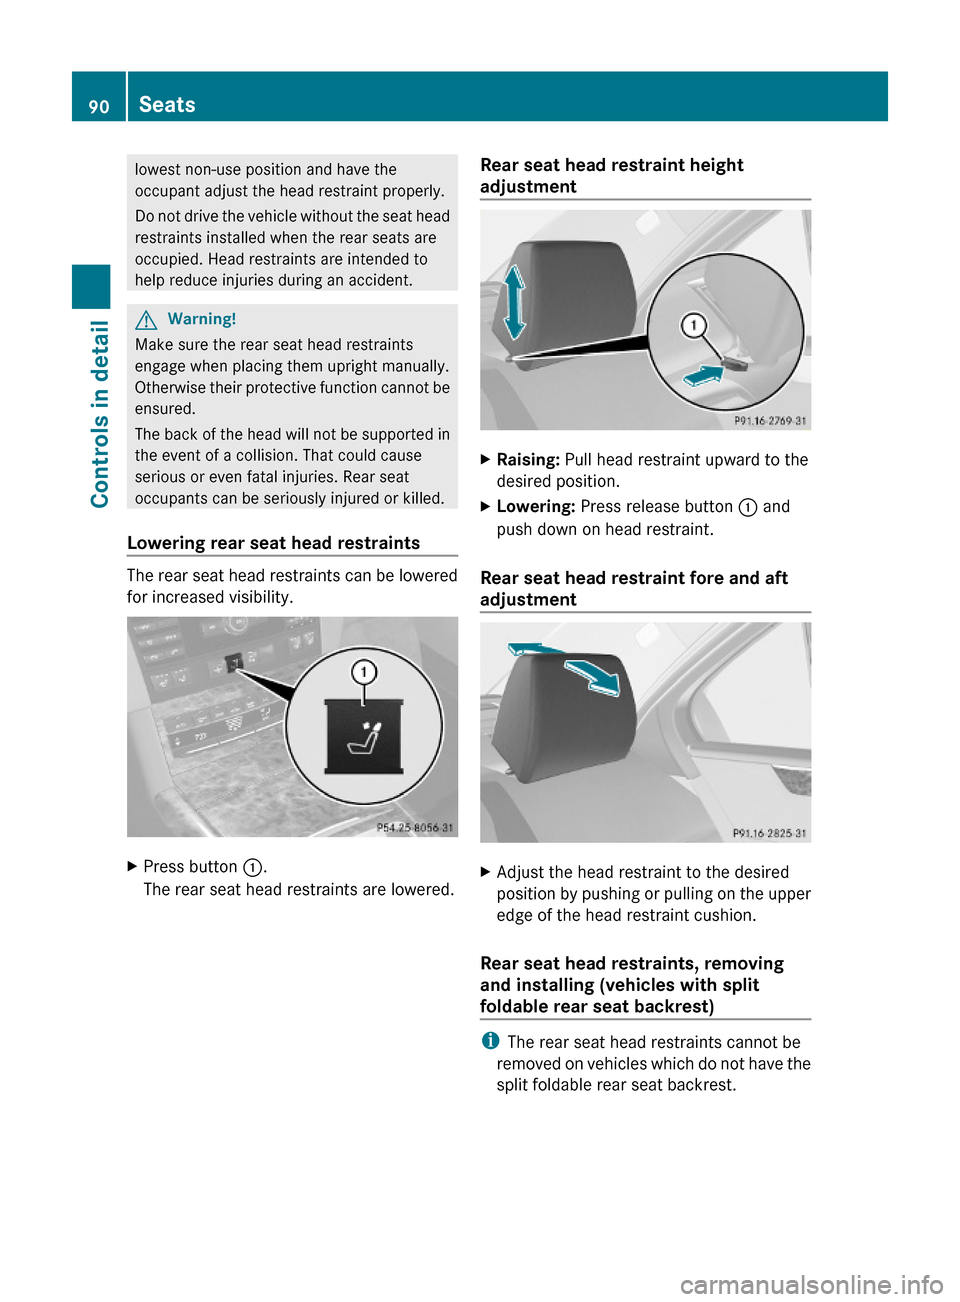
Lowering rear seat head restraints
The rear seat head restraints can be lowered
for increased visibility.
XPress button :.
The rear seat head restraints are lowered.
Rear seat head restraint height
adjustment
XRaising: Pull head restraint upward to the
desired position.
XLowering: Press release button : and
push down on head restraint.
Rear seat head restraint fore and aft
adjustment
XAdjust the head restraint to the desired
position by pushing or pulling on the upper
edge of the head restraint cushion.
Rear seat head restraints, removing
and installing (vehicles with split
foldable rear seat backrest)
iThe rear seat head restraints cannot be
removed on vehicles which do not have the
split foldable rear seat backrest.
90SeatsControls in detail
212_AKB; 2; 41, en-USd2ureepe,Version: 2.11.8.12009-07-17T09:14:21+02:00 - Seite 90
Page 93 of 372
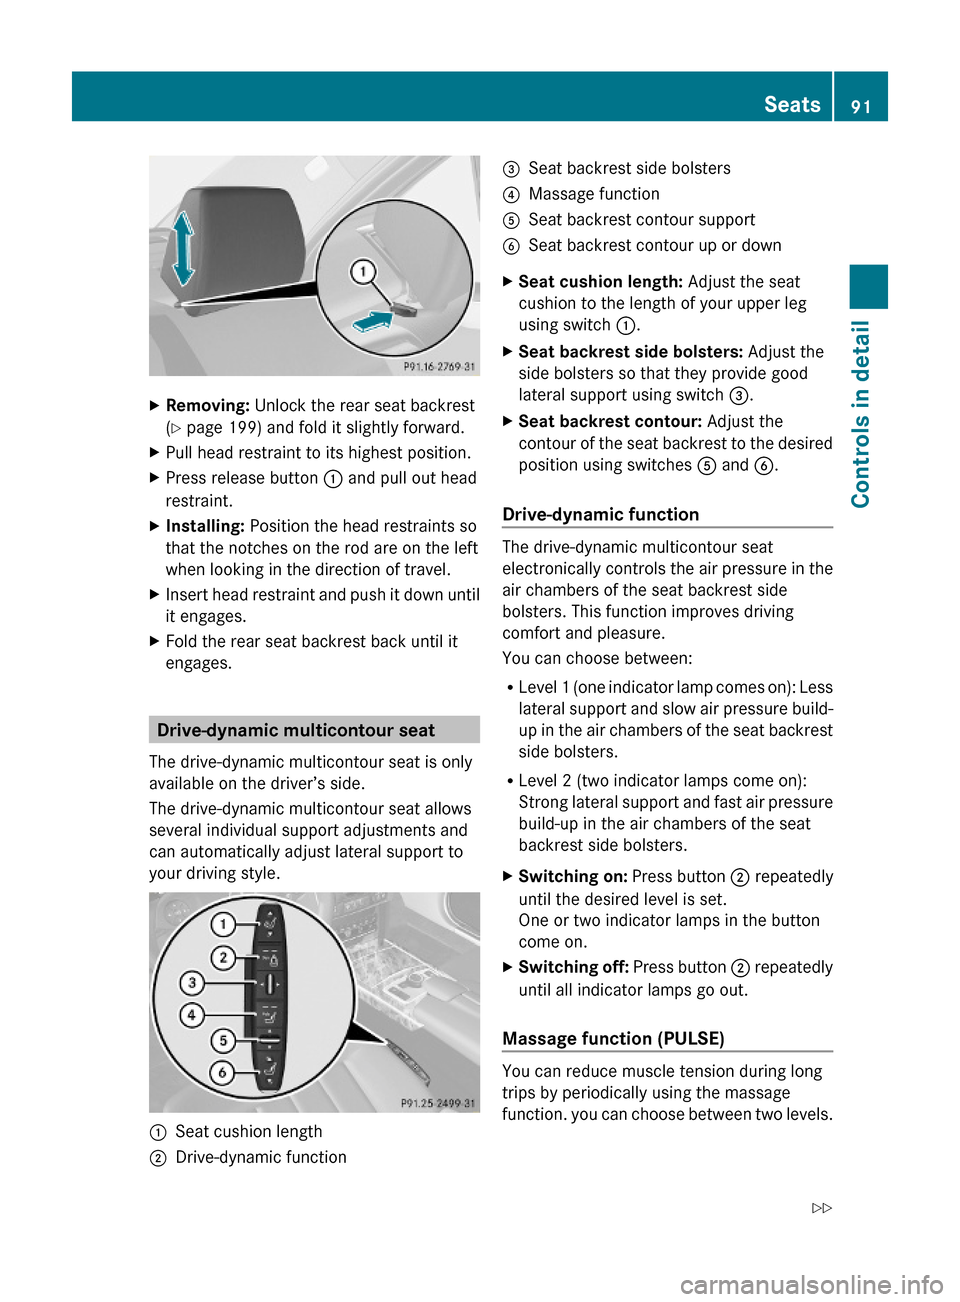
XRemoving: Unlock the rear seat backrest
(Y page 199) and fold it slightly forward.
XPull head restraint to its highest position.XPress release button : and pull out head
restraint.
XInstalling: Position the head restraints so
that the notches on the rod are on the left
when looking in the direction of travel.
XInsert head restraint and push it down until
it engages.
XFold the rear seat backrest back until it
engages.
Drive-dynamic multicontour seat
The drive-dynamic multicontour seat is only
available on the driver’s side.
The drive-dynamic multicontour seat allows
several individual support adjustments and
can automatically adjust lateral support to
your driving style.
:Seat cushion length;Drive-dynamic function=Seat backrest side bolsters?Massage functionASeat backrest contour supportBSeat backrest contour up or downXSeat cushion length: Adjust the seat
cushion to the length of your upper leg
using switch :.
XSeat backrest side bolsters: Adjust the
side bolsters so that they provide good
lateral support using switch =.
XSeat backrest contour: Adjust the
contour of the seat backrest to the desired
position using switches A and B.
Drive-dynamic function
The drive-dynamic multicontour seat
electronically controls the air pressure in the
air chambers of the seat backrest side
bolsters. This function improves driving
comfort and pleasure.
You can choose between:
RLevel 1 (one indicator lamp comes on): Less
lateral support and slow air pressure build-
up in the air chambers of the seat backrest
side bolsters.
RLevel 2 (two indicator lamps come on):
Strong lateral support and fast air pressure
build-up in the air chambers of the seat
backrest side bolsters.
XSwitching on: Press button ; repeatedly
until the desired level is set.
One or two indicator lamps in the button
come on.
XSwitching off: Press button ; repeatedly
until all indicator lamps go out.
Massage function (PULSE)
You can reduce muscle tension during long
trips by periodically using the massage
function. you can choose between two levels.
Seats91Controls in detail212_AKB; 2; 41, en-USd2ureepe,Version: 2.11.8.12009-07-17T09:14:21+02:00 - Seite 91Z