2010 MERCEDES-BENZ E550 Esp
[x] Cancel search: EspPage 237 of 372
pressure displayed by the control system
apply to sea level. In high-altitude
locations, the reading on a tire pressure
gauge will be higher than the reading issued
by the vehicle’s control system. Do not
reduce the tire inflation pressure under
such circumstances.
XSwitch on the ignition.XPress button = or ; on the
multifunction steering wheel to select the
Serv. menu (Y page 138).
XPress button 9 or : to select Tire
Pressure.
XPress button a.
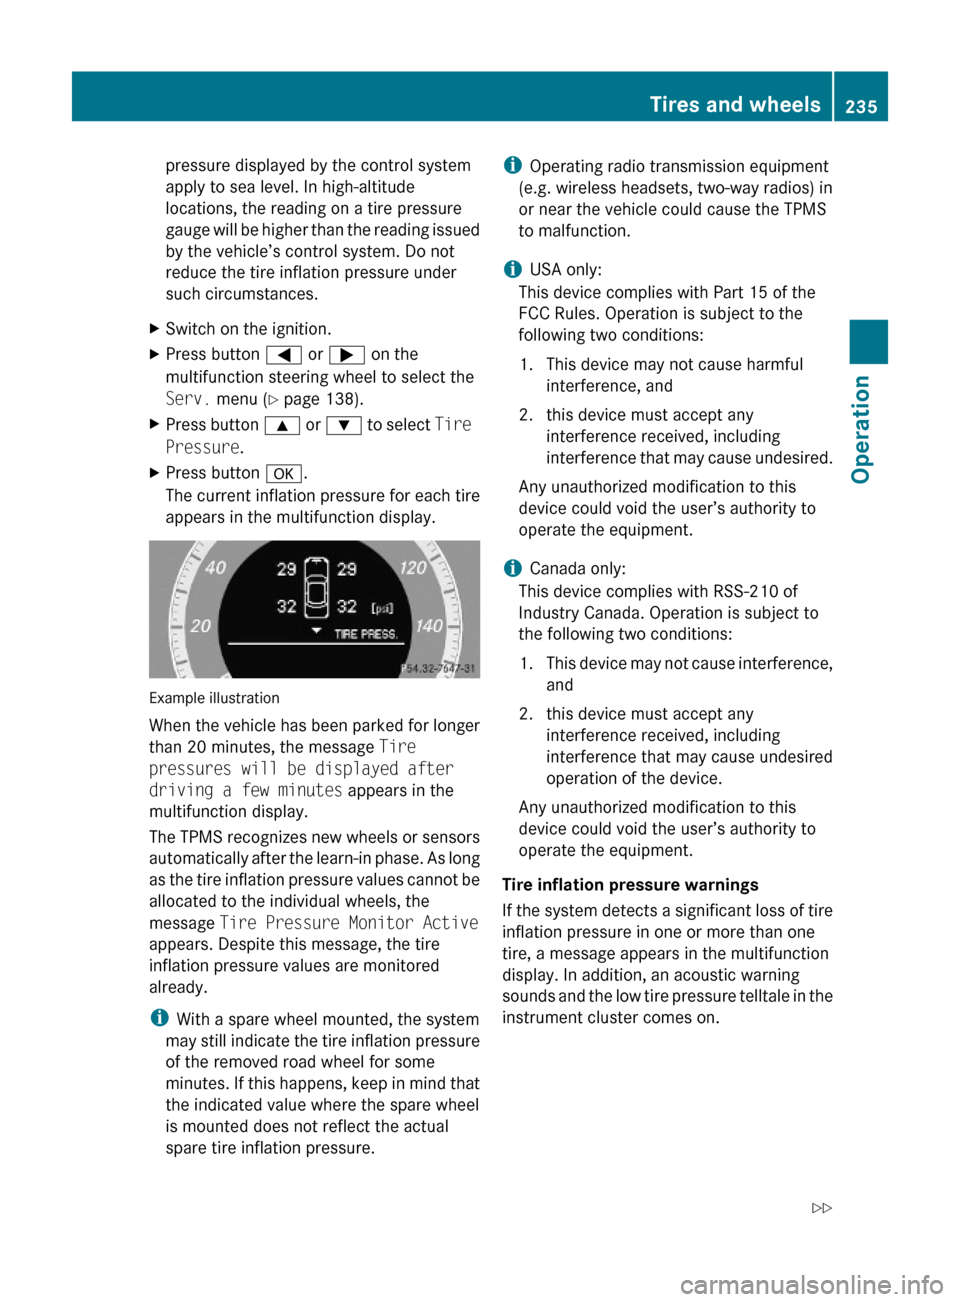
The current inflation pressure for each tire
appears in the multifunction display.
Example illustration
When the vehicle has been parked for longer
than 20 minutes, the message Tire
pressures will be displayed after
driving a few minutes appears in the
multifunction display.
The TPMS recognizes new wheels or sensors
automatically after the learn-in phase. As long
as the tire inflation pressure values cannot be
allocated to the individual wheels, the
message Tire Pressure Monitor Active
appears. Despite this message, the tire
inflation pressure values are monitored
already.
iWith a spare wheel mounted, the system
may still indicate the tire inflation pressure
of the removed road wheel for some
minutes. If this happens, keep in mind that
the indicated value where the spare wheel
is mounted does not reflect the actual
spare tire inflation pressure.
iOperating radio transmission equipment
(e.g. wireless headsets, two-way radios) in
or near the vehicle could cause the TPMS
to malfunction.
iUSA only:
This device complies with Part 15 of the
FCC Rules. Operation is subject to the
following two conditions:
1. This device may not cause harmful
interference, and
2. this device must accept any
interference received, including
interference that may cause undesired.
Any unauthorized modification to this
device could void the user’s authority to
operate the equipment.
iCanada only:
This device complies with RSS-210 of
Industry Canada. Operation is subject to
the following two conditions:
1.This device may not cause interference,
and
2. this device must accept any
interference received, including
interference that may cause undesired
operation of the device.
Any unauthorized modification to this
device could void the user’s authority to
operate the equipment.
Tire inflation pressure warnings
If the system detects a significant loss of tire
inflation pressure in one or more than one
tire, a message appears in the multifunction
display. In addition, an acoustic warning
sounds and the low tire pressure telltale in the
instrument cluster comes on.
Tires and wheels235Operation212_AKB; 2; 41, en-USd2ureepe,Version: 2.11.8.12009-07-17T09:14:21+02:00 - Seite 235Z
Page 238 of 372
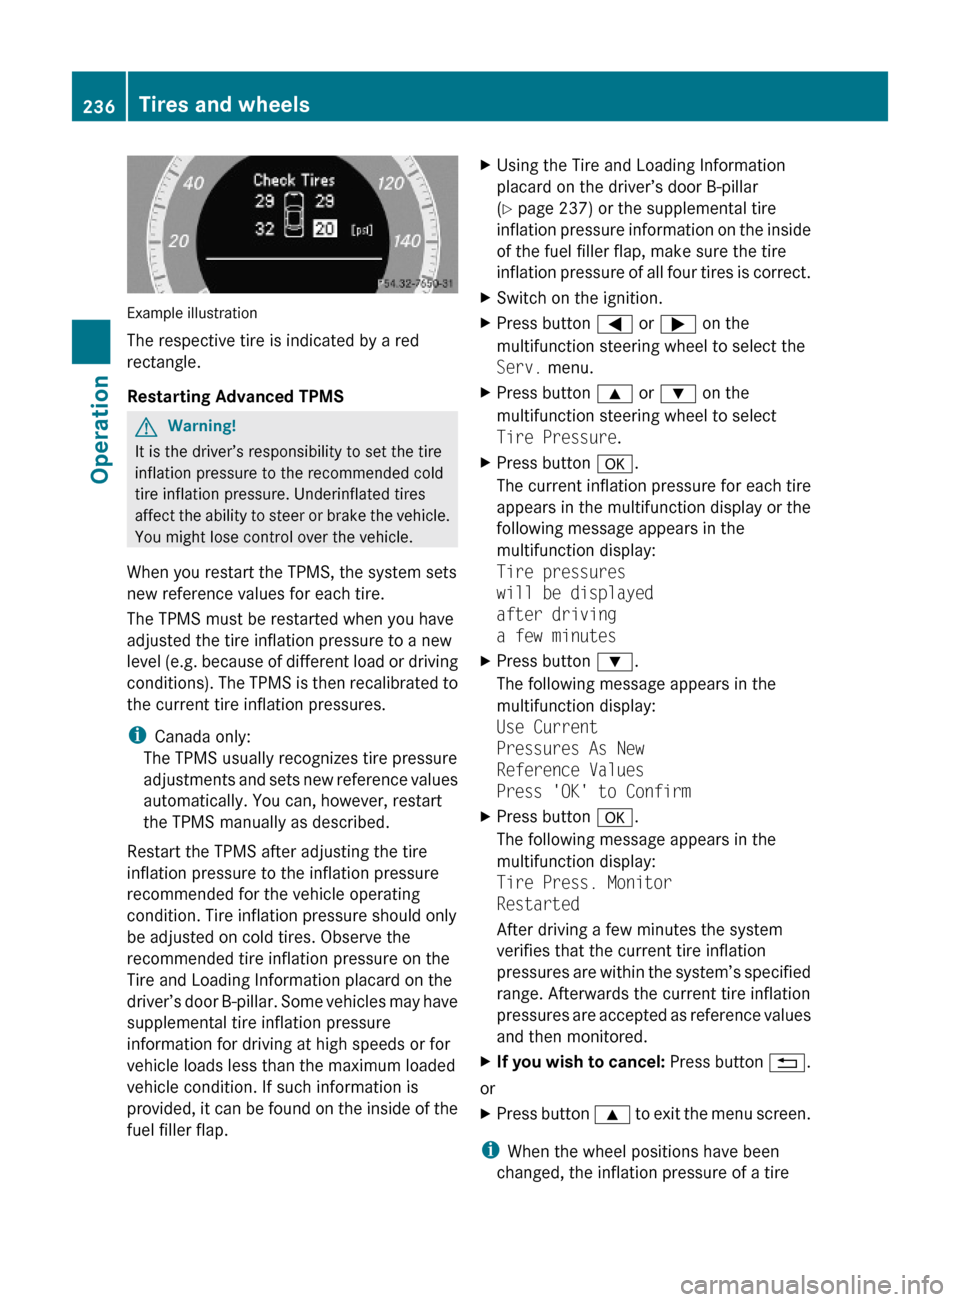
Example illustration
The respective tire is indicated by a red
rectangle.
Restarting Advanced TPMS
GWarning!
It is the driver’s responsibility to set the tire
inflation pressure to the recommended cold
tire inflation pressure. Underinflated tires
affect the ability to steer or brake the vehicle.
You might lose control over the vehicle.
When you restart the TPMS, the system sets
new reference values for each tire.
The TPMS must be restarted when you have
adjusted the tire inflation pressure to a new
level (e.g. because of different load or driving
conditions). The TPMS is then recalibrated to
the current tire inflation pressures.
iCanada only:
The TPMS usually recognizes tire pressure
adjustments and sets new reference values
automatically. You can, however, restart
the TPMS manually as described.
Restart the TPMS after adjusting the tire
inflation pressure to the inflation pressure
recommended for the vehicle operating
condition. Tire inflation pressure should only
be adjusted on cold tires. Observe the
recommended tire inflation pressure on the
Tire and Loading Information placard on the
driver’s door B-pillar. Some vehicles may have
supplemental tire inflation pressure
information for driving at high speeds or for
vehicle loads less than the maximum loaded
vehicle condition. If such information is
provided, it can be found on the inside of the
fuel filler flap.
XUsing the Tire and Loading Information
placard on the driver’s door B-pillar
(Y page 237) or the supplemental tire
inflation pressure information on the inside
of the fuel filler flap, make sure the tire
inflation pressure of all four tires is correct.
XSwitch on the ignition.XPress button = or ; on the
multifunction steering wheel to select the
Serv. menu.
XPress button 9 or : on the
multifunction steering wheel to select
Tire Pressure.
XPress button a.
The current inflation pressure for each tire
appears in the multifunction display or the
following message appears in the
multifunction display:
Tire pressures
will be displayed
after driving
a few minutes
XPress button :.
The following message appears in the
multifunction display:
Use Current
Pressures As New
Reference Values
Press 'OK' to Confirm
XPress button a.
The following message appears in the
multifunction display:
Tire Press. Monitor
Restarted
After driving a few minutes the system
verifies that the current tire inflation
pressures are within the system’s specified
range. Afterwards the current tire inflation
pressures are accepted as reference values
and then monitored.
XIf you wish to cancel: Press button %.
or
XPress button 9 to exit the menu screen.
iWhen the wheel positions have been
changed, the inflation pressure of a tire
236Tires and wheelsOperation
212_AKB; 2; 41, en-USd2ureepe,Version: 2.11.8.12009-07-17T09:14:21+02:00 - Seite 236
Page 246 of 372
tire graded 150 would wear one and one-half
(1 1
/ 2) times as well on the government
course as a tire graded 100.
The relative performance of tires depends
upon the actual conditions of their use,
however, and may depart significantly from
the norm due to variations in driving habits,
service practices and differences in road
characteristics and climate.
Traction GWarning!
The traction grade assigned to this tire is
based on straight-ahead braking traction
tests, and does not include acceleration,
cornering, hydroplaning, or peak traction
characteristics.
The traction grades, from highest to lowest,
are AA, A, B, and C. Those grades represent
the tire’s ability to stop on wet pavement as
measured under controlled conditions on
specified government test surfaces of asphalt
and concrete. A tire marked C may have poor
traction performance.
GWarning!
If ice has formed on the road, tire traction will
be substantially reduced. Under such weather
conditions, drive, steer and brake with
extreme caution.
The safe speed on a wet, snow covered or icy
road is always lower than on a dry road.
You should pay particular attention to the
condition of the road whenever the outside
temperature is close to the freezing point.
Mercedes-Benz recommends winter tires
( Y page 252) with a minimum tread depth of
approximately 1
/ 6 in (4 mm) on all four wheels
for the winter season to ensure normal
balanced handling characteristics. On
packed snow, they can reduce your stopping
distance compared to summer tires.
Stopping distance, however, is still
considerably greater than when the road is
not covered with snow or ice. Exercise
appropriate caution.
! Avoid spinning of a drive wheel. This may
cause serious damage to the drivetrain
which is not covered by the Mercedes-Benz
Limited Warranty.
Temperature GWarning!
The temperature grade for this tire is
established for a tire that is properly inflated
and not overloaded. Excessive speed,
underinflation, or excessive loading, either
separately or in combination, can cause
excessive heat build-up and possible tire
failure.
The temperature grades are A (the highest),
B, and C, representing the tire’s resistance to
the generation of heat and its ability to
dissipate heat when tested under controlled
conditions on a specified indoor laboratory
test wheel. Sustained high temperature can
cause the material of the tire to degenerate
and reduce tire life, and excessive
temperature can lead to sudden tire failure.
The grade C corresponds to a level of
performance which all passenger car tires
must meet under the Federal Motor Vehicle
Safety Standard No. 109. Grades B and A
represent higher levels of performance on the
laboratory test wheel than the minimum
required by law.
Rotating tires
GWarning!
Rotate front and rear wheels only if the tires
are of the same dimension.
If your vehicle is equipped with mixed-size
tires (different tire dimensions front vs. rear),
tire rotation is not possible.
244Tires and wheelsOperation
212_AKB; 2; 41, en-USd2ureepe,Version: 2.11.8.12009-07-17T09:14:21+02:00 - Seite 244
Page 249 of 372
For example, a load rating of 91 corresponds
to a maximum load of 1356 lb (615 kg) the
tire is designed to support. See also
“Maximum tire load” (Y page 241) where the
maximum load associated with the load index
is indicated in kilograms and lbs.
For additional information on the load index,
see “Load identification” ( Y page 248).
Speed symbol GWarning!
Even when permitted by law, never operate a
vehicle at speeds greater than the maximum
speed rating of the tires.
Exceeding the maximum speed for which tires
are rated can lead to sudden tire failure,
causing loss of vehicle control and possibly
resulting in an accident and/or serious
personal injury and possible death, for you
and for others.
Regardless of the tire speed rating, local
speed limits should be obeyed. Use prudent
driving speeds appropriate to prevailing
conditions.
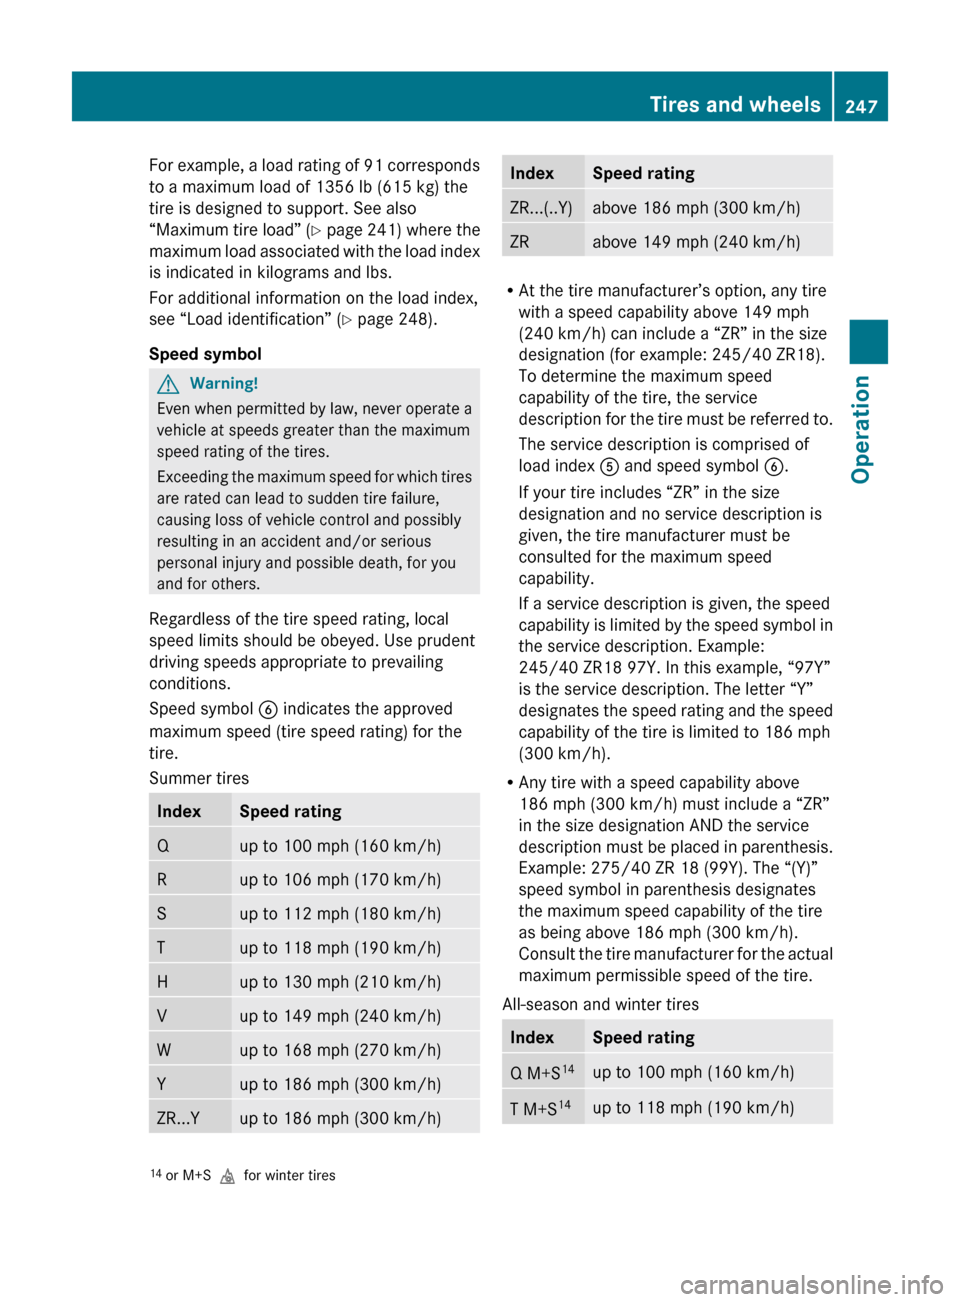
Speed symbol B indicates the approved
maximum speed (tire speed rating) for the
tire.
Summer tires
IndexSpeed ratingQup to 100 mph (160 km/h)Rup to 106 mph (170 km/h)Sup to 112 mph (180 km/h)Tup to 118 mph (190 km/h)Hup to 130 mph (210 km/h)Vup to 149 mph (240 km/h)Wup to 168 mph (270 km/h)Yup to 186 mph (300 km/h)ZR...Yup to 186 mph (300 km/h)IndexSpeed ratingZR...(..Y)above 186 mph (300 km/h)ZRabove 149 mph (240 km/h)
R At the tire manufacturer’s option, any tire
with a speed capability above 149 mph
(240 km/h) can include a “ZR” in the size
designation (for example: 245/40 ZR18).
To determine the maximum speed
capability of the tire, the service
description for the tire must be referred to.
The service description is comprised of
load index A and speed symbol B.
If your tire includes “ZR” in the size
designation and no service description is
given, the tire manufacturer must be
consulted for the maximum speed
capability.
If a service description is given, the speed
capability is limited by the speed symbol in
the service description. Example:
245/40 ZR18 97Y. In this example, “97Y”
is the service description. The letter “Y”
designates the speed rating and the speed
capability of the tire is limited to 186 mph
(300 km/h).
R Any tire with a speed capability above
186 mph (300 km/h) must include a “ZR”
in the size designation AND the service
description must be placed in parenthesis.
Example: 275/40 ZR 18 (99Y). The “(Y)”
speed symbol in parenthesis designates
the maximum speed capability of the tire
as being above 186 mph (300 km/h).
Consult the tire manufacturer for the actual
maximum permissible speed of the tire.
All-season and winter tires
IndexSpeed ratingQ M+S 14up to 100 mph (160 km/h)T M+S14up to 118 mph (190 km/h)14
or M+S ifor winter tiresTires and wheels247Operation212_AKB; 2; 41, en-USd2ureepe,Version: 2.11.8.12009-07-17T09:14:21+02:00 - Seite 247Z
Page 255 of 372
control. Other settings may result in
damage to your vehicle.
! Some tire sizes do not leave adequate
clearance for snow chains. To help avoid
serious damage to your vehicle or tires,
make sure the use of snow chains is
permissible as specified in the “Technical
data” section of this Operator’s Manual.
Snow chains should only be driven on snow-
covered roads at speeds not to exceed
30 mph (50 km/h). Remove chains as soon
as possible when driving on roads without
snow.
Observe the following guidelines when using
snow chains:
R Use of snow chains is not permissible with
all wheel/tire combinations ( Y page 353).
R Use snow chains in pairs and on rear
wheels only. Follow the manufacturer’s
mounting instructions.
! If snow chains are mounted to the front
wheels, they may scrape against the body
or axle components. The tires or the vehicle
could be damaged as a result.
R Only use snow chains that are approved by
Mercedes-Benz. Any authorized Mercedes-
Benz Center will be glad to advise you on
this subject.
R Use of snow chains may be prohibited
depending on location. Always check local
and state laws before installing snow
chains.
R Do not use snow chains on the spare wheel.
i When driving with snow chains, you may
wish to switch off the ESC ( Y page 66)
before setting the vehicle in motion. This
will improve the vehicle’s traction.Winter driving instructionsGWarning!
If the vehicle becomes stuck in snow, make
sure snow is kept clear of the exhaust pipe
and from around the vehicle with the engine
running. Otherwise, deadly carbon monoxide
(CO) gases may enter vehicle interior
resulting in unconsciousness and death.
To assure sufficient fresh air ventilation, open
a window slightly on the side of the vehicle
not facing the wind.
GWarning!
The outside temperature indicator is not
designed to serve as an ice-warning device
and is therefore unsuitable for that purpose.
Indicated temperatures just above the
freezing point do not guarantee that the road
surface is free of ice. The road may still be icy,
especially in wooded areas or on bridges.
GWarning!
On slippery road surfaces, never downshift in
order to obtain braking action. This could
result in drive wheel slip and reduced vehicle
control. Your vehicle’s ABS will not prevent
this type of loss of control.
The most important rule for slippery or icy
roads is to drive sensibly and to avoid abrupt
acceleration, braking and steering
maneuvers. Do not use the cruise control or
DISTRONIC PLUS system under such
conditions.
When the vehicle is in danger of skidding, shift
the automatic transmission to neutral
position N. Try to keep the vehicle under
control by corrective steering action.
i For information on driving with snow
chains, see “Snow chains” ( Y page 252).
Road salts and chemicals can adversely
affect braking efficiency. Increased pedal
force may become necessary to produce the
normal brake effect.
Winter driving253Operation212_AKB; 2; 41, en-USd2ureepe,Version: 2.11.8.12009-07-17T09:14:21+02:00 - Seite 253Z
Page 258 of 372

! Vehicles with 4MATIC:
Only conduct operational or performance
tests on a two-axle dynamometer. If such
tests are necessary, contact an authorized
Mercedes-Benz Center. You could
otherwise seriously damage the brake
system or the transfer case which is not
covered by the Mercedes-Benz Limited
Warranty.
! Vehicles with 4MATIC:
Because the ESC operates automatically,
the engine and ignition must be shut off
(SmartKey in starter switch position 0 or
1 or KEYLESS-GO start/stop button in
position 0 or 1) when the electronic parking
brake is being tested on a brake test
dynamometer.
Active braking action through the ESC may
otherwise seriously damage the brake
system which is not covered by the
Mercedes-Benz Limited Warranty.
! Vehicles without 4MATIC:
Because the ESC operates automatically,
the engine and ignition must be shut off
(SmartKey in starter switch position 0 or
1 or KEYLESS-GO start/stop button in
position 0 or 1) when the electronic parking
brake is being tested on a brake test
dynamometer or when the vehicle is being
towed with one axle raised.
Active braking action through the ESC may
otherwise seriously damage the brake
system which is not covered by the
Mercedes-Benz Limited Warranty.
If your brake system is only subjected to
moderate loads, you should occasionally test
the effectiveness of the brakes by applying
above-normal braking pressure at higher
speeds. This will also enhance the grip of the
brake pads.GWarning!
Make sure not to endanger any other road
users when carrying out these braking
maneuvers.
Refer to the description of the Brake Assist
System (BAS) ( Y page 63) or BAS PLUS
( Y page 63).
High-performance brake system and
ceramic brake system
The high-performance brake system and
ceramic brake system is only available on
E 63 AMG.
GWarning!
New vehicle brake pads and disks, and
replacement brake pads and disks may take
several hundred miles of driving until they
provide optimum braking efficiency. Until that
time, you may need to use increased brake
pedal pressure while braking. Please be aware
of this and adjust your driving and braking
accordingly during this break-in period.
Excessive high-demand braking will cause
correspondingly high brake wear. Please be
attentive to the brake warning lamp in the
instrument cluster and brake condition
messages in the multifunction display.
Especially for high performance driving, it is
important to maintain and have the brake
system checked regularly.
The high-performance brake system is
designed to operate under the extremely high
operating demands required to
accommodate the performance capabilities
of the vehicle.
The brakes may produce a squeaking-type
noise depending on the
R vehicle speed
R brake force applied
R ambient conditions, e.g. temperature and
humidity
As with any brake system, the wear of
individual brake system components such as
brake pads or disks strongly depends on your
driving style and the conditions under which
you operate the vehicle. Thus, a driving style
calling for high-demand braking will cause
your vehicle’s brakes to wear more quickly.
256Driving instructionsOperation
212_AKB; 2; 41, en-USd2ureepe,Version: 2.11.8.12009-07-17T09:14:21+02:00 - Seite 256
Page 259 of 372
Driving off
Warm up the engine smoothly. Do not place
full load on the engine until the operating
temperature has been reached.
! When driving off on a slippery surface, do
not allow a drive wheel to spin for an
extended period with the ESC switched off.
Doing so may cause serious damage to the
drivetrain which is not covered by the
Mercedes-Benz Limited Warranty.
! Simultaneously depressing the
accelerator pedal and applying the brakes
reduces engine performance and causes
premature brake and drivetrain wear which
is not covered by the Mercedes-Benz
Limited Warranty.
Hydroplaning
Depending on the depth of the water layer on
the road, hydroplaning may occur, even at low
speeds and with new tires. In heavy rain or
when conditions indicate possible
hydroplaning:
XReduce vehicle speed.XAvoid track grooves in the road.XApply brakes cautiously.
Standing water
! Do not drive through flooded areas.
Before driving through water, determine its
depth.
If you must drive through standing water,
drive slowly to prevent water from entering
the passenger compartment or the engine
compartment. Water in these areas could
cause damage to electrical components or
wiring of the engine or transmission, or
could result in water being ingested by the
engine through the air intake causing
severe internal engine damage. Any such
damage is not covered by the Mercedes-
Benz Limited Warranty.
Driving abroad
If you plan to drive the vehicle outside the U.S.
or Canada, you should request dealer
network information for your destination from
any authorized Mercedes-Benz Center.
Control and operation of radio
transmitters
Safety notes
GWarning!
Please do not forget that your primary
responsibility is to drive the vehicle. A driver’s
attention to the road must always be his/her
primary focus when driving. For your safety
and the safety of others, we recommend that
you pull over to a safe location and stop
before placing or taking a telephone call.
If you choose to use the telephone 15
while
driving, please use the hands-free device and
only use the telephone when road, weather
and traffic conditions permit. Some
jurisdictions prohibit the driver from using a
mobile telephone while driving a vehicle.
Only operate the audio system or
COMAND 15
(Cockpit Management and Data
System) if road, weather and traffic
conditions permit. Otherwise, you may not be
able to observe traffic conditions and could
endanger yourself and others.
Bear in mind that at a speed of just 30 mph
(approximately 50 km/h), your vehicle is
covering a distance of 44 feet (approximately
14 m) every second.
15 Observe all legal requirements.Driving instructions257Operation212_AKB; 2; 41, en-USd2ureepe,Version: 2.11.8.12009-07-17T09:14:21+02:00 - Seite 257Z
Page 265 of 372
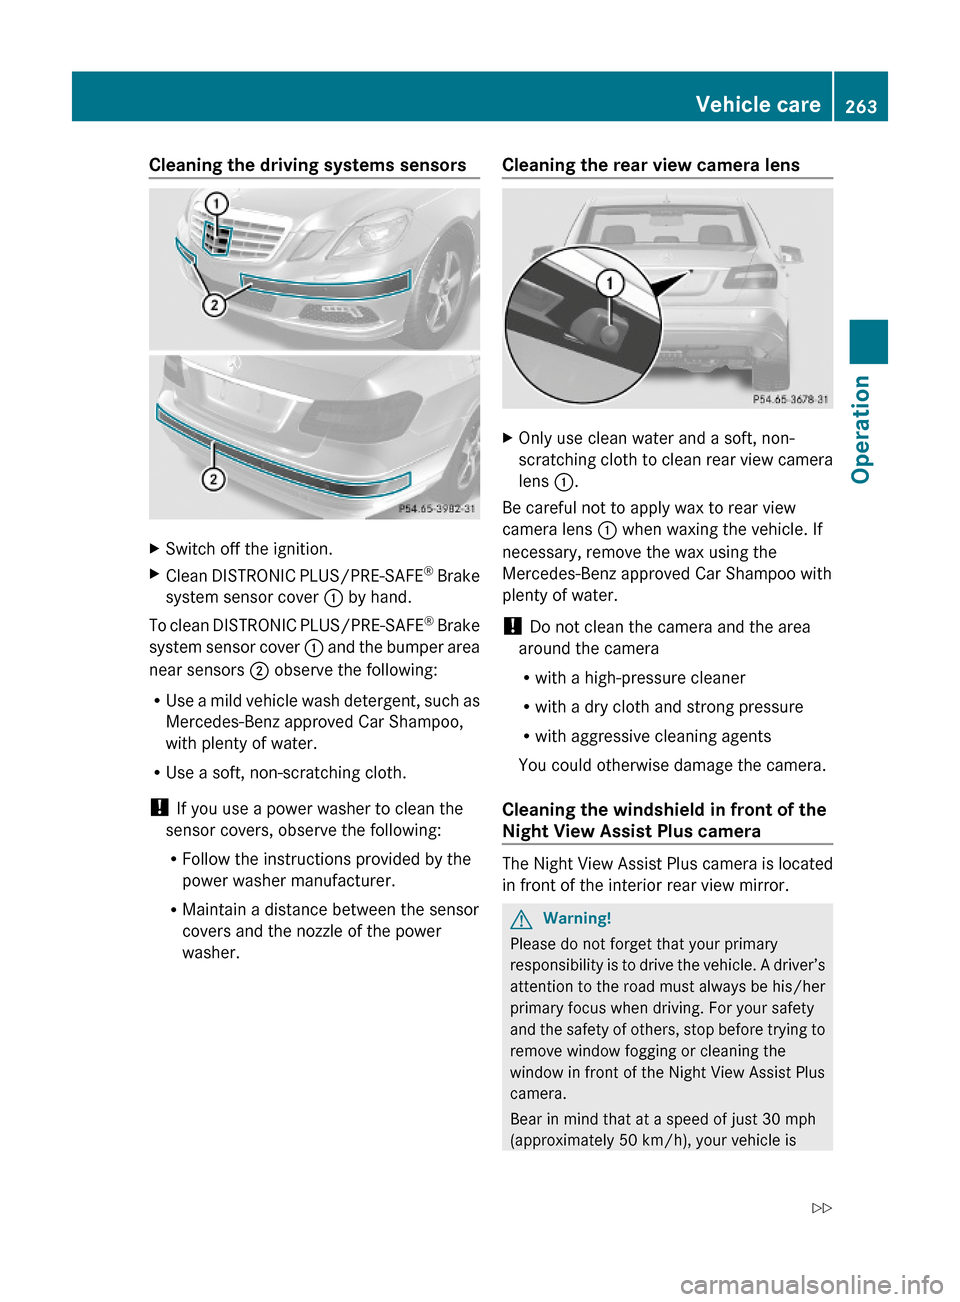
Cleaning the driving systems sensorsXSwitch off the ignition.XClean DISTRONIC PLUS/PRE-SAFE® Brake
system sensor cover : by hand.
To clean DISTRONIC PLUS/PRE-SAFE® Brake
system sensor cover : and the bumper area
near sensors ; observe the following:
RUse a mild vehicle wash detergent, such as
Mercedes-Benz approved Car Shampoo,
with plenty of water.
RUse a soft, non-scratching cloth.
! If you use a power washer to clean the
sensor covers, observe the following:
RFollow the instructions provided by the
power washer manufacturer.
RMaintain a distance between the sensor
covers and the nozzle of the power
washer.
Cleaning the rear view camera lensXOnly use clean water and a soft, non-
scratching cloth to clean rear view camera
lens :.
Be careful not to apply wax to rear view
camera lens : when waxing the vehicle. If
necessary, remove the wax using the
Mercedes-Benz approved Car Shampoo with
plenty of water.
! Do not clean the camera and the area
around the camera
Rwith a high-pressure cleaner
Rwith a dry cloth and strong pressure
Rwith aggressive cleaning agents
You could otherwise damage the camera.
Cleaning the windshield in front of the
Night View Assist Plus camera
The Night View Assist Plus camera is located
in front of the interior rear view mirror.
GWarning!
Please do not forget that your primary
responsibility is to drive the vehicle. A driver’s
attention to the road must always be his/her
primary focus when driving. For your safety
and the safety of others, stop before trying to
remove window fogging or cleaning the
window in front of the Night View Assist Plus
camera.
Bear in mind that at a speed of just 30 mph
(approximately 50 km/h), your vehicle is
Vehicle care263Operation212_AKB; 2; 41, en-USd2ureepe,Version: 2.11.8.12009-07-17T09:14:21+02:00 - Seite 263Z