2010 MERCEDES-BENZ E350 driver seat
[x] Cancel search: driver seatPage 157 of 372

will no longer brake your vehicle. You are
always responsible for maintaining a distance
from other vehicles, observing road speeds
and braking well in advance.
StoppingGWarning!
The braking effect of the DISTRONIC PLUS is
canceled and the vehicle can start to roll if
R the DISTRONIC PLUS is switched off using
the DISTRONIC PLUS lever
R you accelerate
R the DISTRONIC PLUS system or the power
supply is malfunctioning, e.g. due to battery
failure
R the electrical components in the engine
compartment or the fuses have been
manipulated
R the battery is disconnected
GWarning!
Never get out of the vehicle while the
DISTRONIC PLUS is switched on!
The DISTRONIC PLUS must never be operated
or switched off by passengers or from outside
the vehicle.
The DISTRONIC PLUS is not a substitute for
the parking brake. It must not be used to
secure the vehicle when parking.
When you get out of the vehicle or switch off
the engine, deactivate the DISTRONIC PLUS
and secure the vehicle from rolling away by
engaging the parking brake.
When the DISTRONIC PLUS detects that the
preceding vehicle is stopping, the vehicle
brakes until it also stops. Once the vehicle is
at a standstill, it remains stationary, without
depressing the brake pedal.
Depending on the following distance set
using the distance setting switch on the
DISTRONIC PLUS lever ( Y page 157), the
vehicle will stop adequate away from the
preceding vehicle.
When the DISTRONIC PLUS is activated and
the vehicle is at a standstill, the automatic
transmission shifts into park position P
automatically when
R opening the driver’s door and releasing the
seat belt
R turning off the engine
R opening the hood
R a system malfunction occurs
R the on-board voltage is insufficient
The DISTRONIC PLUS is deactivated.
Setting the current speedXAccelerate or decelerate to the desired
speed.XBriefly lift the DISTRONIC PLUS lever in
direction of arrow : or depress in
direction of arrow ; (Y page 153).
The current speed is set.XRemove your foot from the accelerator
pedal.
i If you do not take your foot off of the
accelerator pedal and continue to
accelerate past the set speed, the following
message will appear in the multifunction
display:
DISTRONIC PLUS Override
The distance to a slower moving vehicle in
front of you will not be set. Your vehicle
speed will then be determined only by the
accelerator pedal position.
Changing the set speed
GWarning!
Keep in mind that it may take a brief moment
until the vehicle has made the necessary
adjustments.
Increase or decrease the set vehicle speed to
a value that the prevailing road conditions and
legal speed limits permit. Otherwise, sudden
and unexpected acceleration or deceleration
Driving systems155Controls in detail212_AKB; 2; 41, en-USd2ureepe,Version: 2.11.8.12009-07-17T09:14:21+02:00 - Seite 155Z
Page 163 of 372

XRelease the brake pedal.XCarefully depress the accelerator pedal.
The hill-start assist system is inactive
R when starting off on a level road or downhill
grades
R with the automatic transmission in neutral
position N
R with the parking brake engaged
R if the ESC has switched off due to a
malfunction
All-wheel drive (4MATIC)
In vehicles with all-wheel drive (4MATIC),
both axles are powered at all times when the
vehicle is being operated. The 4MATIC
improves traction in conjunction with the ESC
( Y page 65) and the Electronic Traction
System (ETS/4-ETS) ( Y page 65).
GWarning!
If a drive wheel is spinning due to insufficient
traction:
R While driving off, apply as little throttle as
possible.
R While driving, ease up on the accelerator
pedal.
R Adapt your speed and driving style to the
prevailing road conditions.
Failure to observe these guidelines could
cause the vehicle to skid.
The 4MATIC cannot prevent accidents
resulting from excessive speed.
! Do not tow with one axle raised. Doing so
could damage the transfer case, which is
not covered by the Mercedes-Benz Limited
Warranty. All wheels must be on or off the
ground. Observe instructions for towing the
vehicle with all wheels on the ground.
! Only conduct operational or performance
tests on a two-axle dynamometer. If such
tests are necessary, contact an authorized
Mercedes-Benz Center. You could
otherwise seriously damage the brake
system and/or the transfer case which is
not covered by the Mercedes-Benz Limited
Warranty.
i In winter operation, the maximum
effectiveness of the 4MATIC is only
achieved with winter tires ( Y page 252) or
snow chains as required.
HOLD function
The HOLD function can assist you
R when driving off, especially on steep slopes
R when maneuvering on steep slopes
R when waiting in traffic
The vehicle is kept stationary without the
driver having to depress the brake pedal.
Upon depressing the accelerator pedal, the
braking effect is canceled and the HOLD
function is deactivated.
Activation conditions
You can activate the HOLD function when
R the vehicle is stationary
R the engine is running
R your seat belt is fastened or the driver’s
door is closed
R the parking brake is released
R the hood is closed
R the automatic transmission is in neutral
position N, drive position D, or reverse gear
R
R the DISTRONIC PLUS is deactivated
( Y page 156)
Driving systems161Controls in detail212_AKB; 2; 41, en-USd2ureepe,Version: 2.11.8.12009-07-17T09:14:21+02:00 - Seite 161Z
Page 164 of 372

Activating HOLD XMake sure the activation conditions are
met.
XDepress the brake pedal.XContinue to depress the brake pedal with
increased pedal pressure until the message
HOLD appears in the multifunction display.
The HOLD function is activated. You can
now release the brake pedal.
Example illustration, HOLD function activated
iIf the HOLD function is not activated when
depressing the brake pedal, wait briefly and
repeat the above steps.
GWarning!
The vehicle’s brakes are applied when the
HOLD function is activated. Therefore,
deactivate the HOLD function, for example,
when the vehicle is pulled through an
automatic car wash or being towed.
Deactivating HOLD
The HOLD function is switched off when
Ryou depress the accelerator pedal with the
automatic transmission in drive position D
or reverse gear R
Ryou shift the automatic transmission into
park position P
Ryou depress the brake pedal fully again
until the message HOLD in the multifunction
display disappears
Ryou activate the DISTRONIC PLUS
GWarning!
The braking effect of the HOLD function is
canceled and the vehicle can start to roll if
Rthe HOLD function is deactivated by
depressing the accelerator pedal or the
brake pedal
Rthe HOLD function or the power supply is
malfunctioning, e.g. due to battery failure
Rthe electrical components in the engine
compartment or the fuses have been
manipulated
Rthe battery is disconnected
GWarning!
Never get out of the vehicle while the HOLD
function is activated!
The HOLD function must never be operated
or deactivated by passengers or from outside
the vehicle.
The HOLD function does not replace the
parking brake. It must not be used to secure
the vehicle when parking.
Deactivate the HOLD function when leaving
or parking the vehicle. Use the parking brake
to secure the vehicle.
When the HOLD function is activated, the
automatic transmission shifts into park
position P automatically when
Ropening the driver’s door and releasing the
seat belt
Rturning off the engine
Ropening the hood
Ra system malfunction occurs
Rthe on-board voltage is insufficient
The HOLD function is deactivated.
AIRMATIC (E 550 and E 550 4MATIC)
Introduction
The AIRMATIC lets you select the chassis and
suspension setup. The chassis and
162Driving systemsControls in detail
212_AKB; 2; 41, en-USd2ureepe,Version: 2.11.8.12009-07-17T09:14:21+02:00 - Seite 162
Page 181 of 372

recognize dangers too late which could result
in an accident and serious injury to you and/
or others.
The ATTENTION ASSIST interprets your
fatigue or increasing inattentiveness
considering the following criteria:
Rthe individual driving style, for example the
way you steer
Rthe driving conditions such as time of day
and duration of the ride
The ATTENTION ASSIST function is restricted
and warnings will be delayed or not issued at
all when
Rroad conditions are bad, e.g. heavy bumps
or potholes
Rcrosswinds are strong
Rdriving in a sporty manner with high speed
in curves or rapid acceleration
Rdriving slower than 50 mph (80 km/h) or
faster than 112 mph (180 km/h) most of
the time
Roperating the COMAND or making phone
calls via COMAND
Rchanging lanes or varying the vehicle
speed, i.e. you intervene actively
Warnings and displays in the
multifunction display
Example illustration
XSwitch on the ATTENTION ASSIST via the
control system (Y page 138).
ATTENTION ASSIST indicator : appears in
the multifunction display.
When the ATTENTION ASSIST is active, it will
warn you after 20 minutes of driving at the
earliest. An intermittent warning will then
sound twice and the message Attention
Assist: Time for a rest? appears in the
multifunction display.
XIf possible park your vehicle in a safe
location and take a rest.
XConfirm the message by pressing button
a on the multifunction steering wheel.
If you do not take a rest and the
ATTENTION ASSIST continues to recognize
fatigue or increasing inattentiveness, you will
be warned once more after 15 minutes at the
earliest.
During long trips, take regular and duly rests
that allow you to recover sufficiently.
The ATTENTION ASSIST will be reset and
restarts evaluating the degree of your fatigue
when
Ryou turn off the engine
Ryou release the seat belt and open the
driver’s door, e.g. during a rest or for a
driver change
Driving systems179Controls in detail212_AKB; 2; 41, en-USd2ureepe,Version: 2.11.8.12009-07-17T09:14:21+02:00 - Seite 179Z
Page 194 of 372

some time of operation depending on the
outside temperature.XSwitch on the ignition.XSwitching on: Press button ¤.
The indicator lamp above the button comes
on.XSwitching off: Press button ¤ again.
The rear window defroster switches off when
the battery voltage is too low. Too many
electrical consumers may be operating
simultaneously.
XSwitch off consumers that are currently not
needed if required.
Power tilt/sliding sunroof
Opening and closing
GObserve Safety notes, see page 56.GWarning!
When opening or closing the tilt/sliding
sunroof, make sure there is no danger of
anyone being harmed by the opening/closing
procedure.
The tilt/sliding sunroof is equipped with the
express operation and automatic reversal
function. If the movement of the tilt/sliding
sunroof is blocked during the closing
procedure, the tilt/sliding sunroof will stop
and open slightly.
The tilt/sliding sunroof operates differently
when the sunroof switch is pressed and held.
See the “Closing when the tilt/sliding sunroof
is blocked” section for details.
The opening/closing procedure of the tilt/
sliding sunroof can be immediately halted by
releasing the sunroof switch or, if the sunroof
switch was moved past the resistance point
and released, by moving the sunroof switch in
any direction.
GWarning!
The tilt/sliding sunroof is made out of glass.
In the event of an accident, the glass may
shatter. This may result in an opening in the
roof.
In a vehicle rollover, occupants not wearing
their seat belts or not wearing them properly
may be thrown out of the opening. Such an
opening also presents a potential for injury for
occupants wearing their seat belts properly as
entire body parts or portions of them may
protrude from the passenger compartment.
! To avoid damaging the seals, do not
transport any objects with sharp edges
which can stick out of the tilt/sliding
sunroof.
Do not open the tilt/sliding sunroof if there
is snow or ice on the roof, as this could
result in malfunctions.
If you cannot open or close the tilt/sliding
sunroof due to a malfunction contact
Roadside Assistance or an authorized
Mercedes-Benz Center.
! Please keep in mind that weather
conditions can sometimes change rapidly.
Make sure to close the tilt/sliding sunroof
when leaving the vehicle. If water enters
the vehicle interior, vehicle electronics
could be damaged which is not covered by
the Mercedes-Benz Limited Warranty.
i You can also open or close the tilt/sliding
sunroof using the SmartKey or the
KEYLESS-GO function, see “Summer
opening feature” ( Y page 107) and
“Convenience closing feature”
( Y page 108).
i After switching off the ignition or
removing the SmartKey from the starter
switch, you can operate the tilt/sliding
sunroof until you open the driver’s or front
passenger door. If no door was opened you
can operate the tilt/sliding sunroof for up
to 5 minutes.192Power tilt/sliding sunroofControls in detail
212_AKB; 2; 41, en-USd2ureepe,Version: 2.11.8.12009-07-17T09:14:21+02:00 - Seite 192
Page 199 of 372

if the tilt/sliding panel does not open
smoothly.
! Do not attempt to open the tilt/sliding
panel before the tilt/sliding panel is
properly synchronized. The tilt/sliding
panel could otherwise lock-up in the open
position.
If the tilt/sliding panel cannot be closed or
synchronized, contact an authorized
Mercedes-Benz Center or call Roadside
Assistance.
XSwitch on the ignition.XPull the roof panel switch repeatedly in
direction of arrow = to the resistance
point until the tilt/sliding panel is closed
completely.
XPull and hold the roof panel switch in
direction of arrow = for 1 more second.
XPull the roof panel switch repeatedly in
direction of arrow = to the resistance
point until the roller sunblinds are closed
completely.
XPull and hold the roof panel switch in
direction of arrow = for 1 more second.
XCheck whether the tilt/sliding panel and
the roller sunblinds can be opened
completely (Y page 195).
Loading and storing
Loading instructions
GWarning!
Always fasten items being carried as securely
as possible. Use cargo tie-down rings and
fastening materials appropriate for the weight
and size of the load.
In an accident, during hard braking or sudden
maneuvers, loose items will be thrown around
inside the vehicle. This can cause injury to
vehicle occupants unless the items are
securely fastened in the vehicle.
To help avoid personal injury during a collision
or sudden maneuver, exercise care when
transporting cargo. Do not pile luggage or
cargo higher than the seat backrests.
The trunk is the preferred place to carry
objects.
Never drive a vehicle with the trunk open.
Deadly carbon monoxide (CO) gases may
enter vehicle interior resulting in
unconsciousness and death.
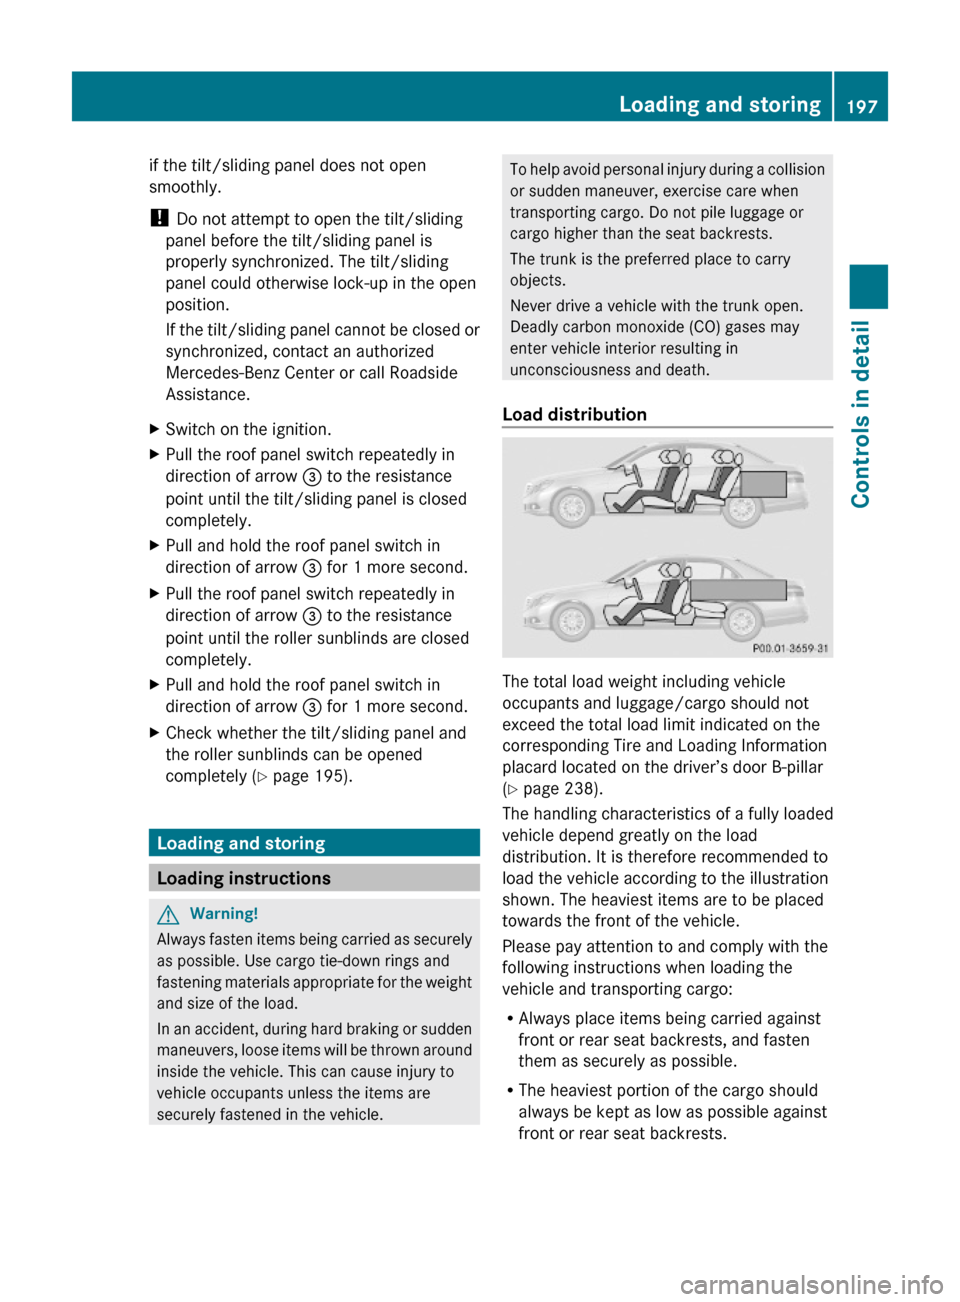
Load distribution
The total load weight including vehicle
occupants and luggage/cargo should not
exceed the total load limit indicated on the
corresponding Tire and Loading Information
placard located on the driver’s door B-pillar
(Y page 238).
The handling characteristics of a fully loaded
vehicle depend greatly on the load
distribution. It is therefore recommended to
load the vehicle according to the illustration
shown. The heaviest items are to be placed
towards the front of the vehicle.
Please pay attention to and comply with the
following instructions when loading the
vehicle and transporting cargo:
RAlways place items being carried against
front or rear seat backrests, and fasten
them as securely as possible.
RThe heaviest portion of the cargo should
always be kept as low as possible against
front or rear seat backrests.
Loading and storing197Controls in detail212_AKB; 2; 41, en-USd2ureepe,Version: 2.11.8.12009-07-17T09:14:21+02:00 - Seite 197Z
Page 202 of 372

The two sections can be folded down
separately.
GWarning!
When expanding the cargo volume, always
fold the seat backrests fully forward.
Unless you are transporting cargo, the seat
backrests must remain properly locked in the
upright position.
In an accident, during hard braking or sudden
maneuvers, loose items will be thrown around
inside the vehicle. This can cause injury to
vehicle occupants unless the items are
securely fastened in the vehicle.
Always use the cargo tie-down rings.
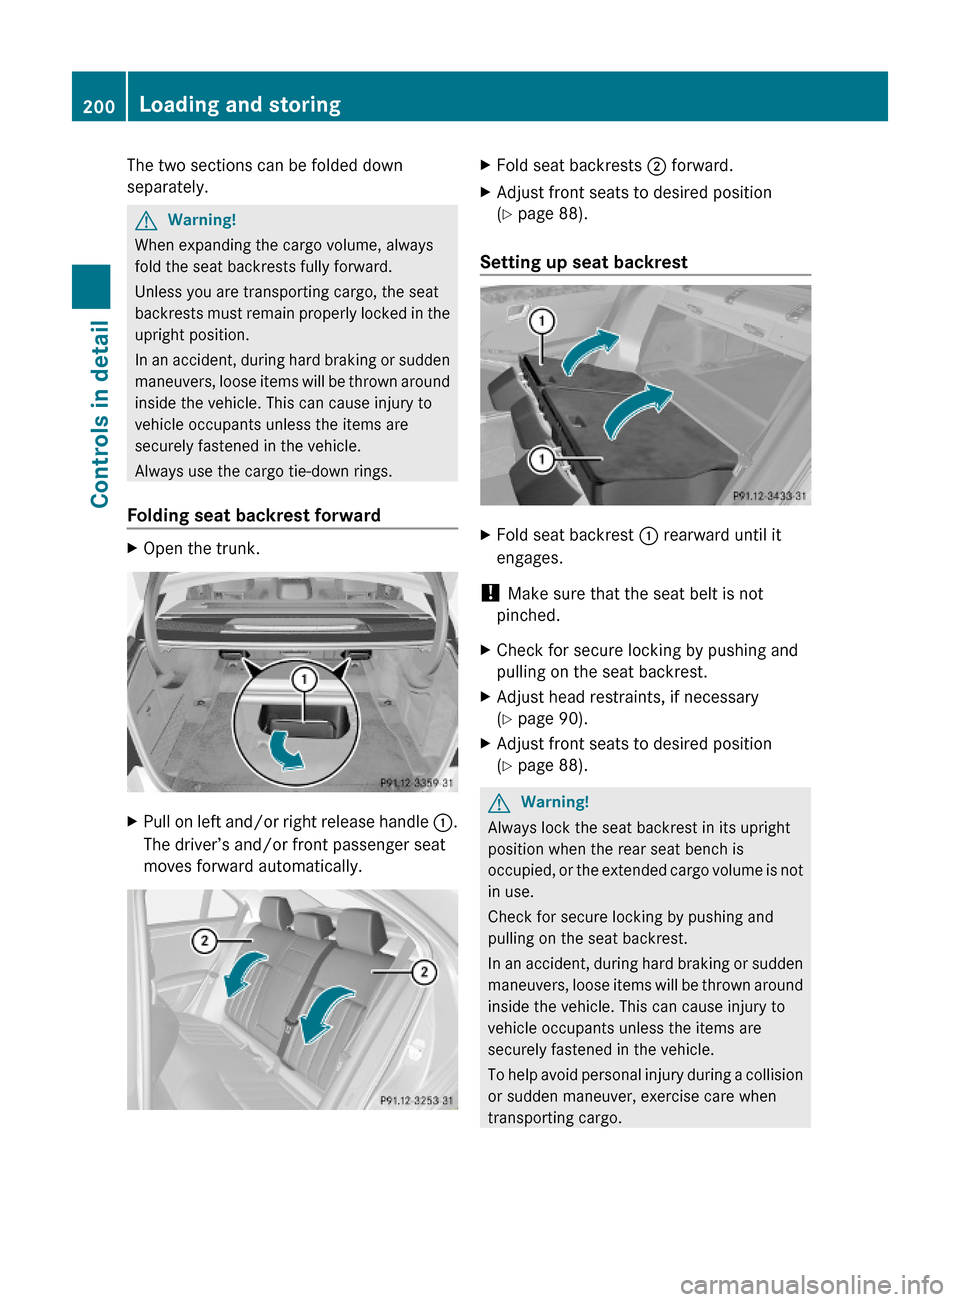
Folding seat backrest forward
XOpen the trunk.XPull on left and/or right release handle :.
The driver’s and/or front passenger seat
moves forward automatically.
XFold seat backrests ; forward.XAdjust front seats to desired position
(Y page 88).
Setting up seat backrest
XFold seat backrest : rearward until it
engages.
! Make sure that the seat belt is not
pinched.
XCheck for secure locking by pushing and
pulling on the seat backrest.
XAdjust head restraints, if necessary
(Y page 90).
XAdjust front seats to desired position
(Y page 88).
GWarning!
Always lock the seat backrest in its upright
position when the rear seat bench is
occupied, or the extended cargo volume is not
in use.
Check for secure locking by pushing and
pulling on the seat backrest.
In an accident, during hard braking or sudden
maneuvers, loose items will be thrown around
inside the vehicle. This can cause injury to
vehicle occupants unless the items are
securely fastened in the vehicle.
To help avoid personal injury during a collision
or sudden maneuver, exercise care when
transporting cargo.
200Loading and storingControls in detail
212_AKB; 2; 41, en-USd2ureepe,Version: 2.11.8.12009-07-17T09:14:21+02:00 - Seite 200
Page 219 of 372

XPress button = approximately 3 seconds.
The currently selected zone appears in
compass display ;.
XSelecting zone: Press button = until the
desired zone is selected.
Do not press the button again until the
direction is indicated.
XCompass calibration: Make sure you are
in an area where you can drive a full circle
with your vehicle without disturbing traffic
in order to calibrate the compass.
In order to calibrate the compass properly,
mind the following:
RCalibrate the compass in open terrain.
Nearby buildings, bridges, power lines and
large antenna masts, for example, could
impair compass calibration.
RSwitch off electrical consumers (e.g.
climate control, windshield wipers, or rear
window defroster).
RClose all doors and the trunk.
XStart the engine.XPress button = approximately 6 seconds
until symbol C appears in compass
display ;.
XDrive a full circle at a vehicle speed of
between 3 mph (5 km/h) and 6 mph
(10 km/h).
When calibration was successful, the
current direction appears in compass
display ;.
Floormat (driver’s side only)
GWarning!
Whenever you are using a floormat, make sure
there is enough clearance and that the
floormat is securely fastened.
The floormat should always be securely
fastened using the fastening equipment.
Before driving off, check that the floormat is
securely in place and adjust it if necessary. A
loose floormat could slip and hinder proper
functioning of the pedals.
Do not place several floormats on top of each
other as this may impair pedal movement.
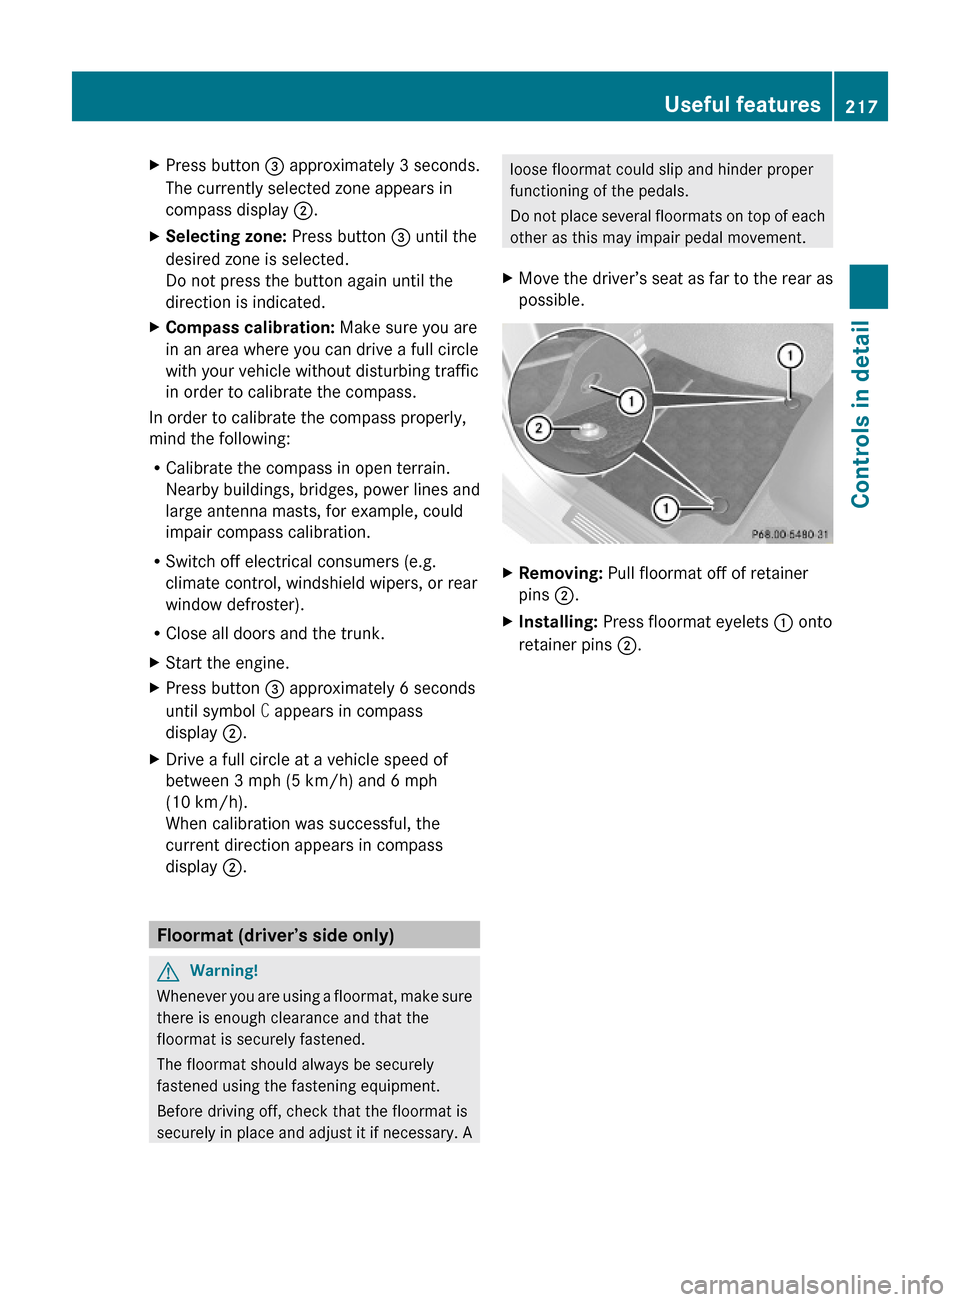
XMove the driver’s seat as far to the rear as
possible.
XRemoving: Pull floormat off of retainer
pins ;.
XInstalling: Press floormat eyelets : onto
retainer pins ;.
Useful features217Controls in detail212_AKB; 2; 41, en-USd2ureepe,Version: 2.11.8.12009-07-17T09:14:21+02:00 - Seite 217Z