2010 MERCEDES-BENZ E350 driver seat
[x] Cancel search: driver seatPage 53 of 372

XWith a smooth motion, pull the seat belt out
of seat belt outlet :.XPlace the shoulder portion of the seat belt
across the top of your shoulder and the lap
portion across your hips.XPush latch plate ; into buckle = until it
clicks.
Seat belt adjustment function: The seat
belts on both front seats adjust to the
upper body automatically as necessary
( Y page 51).XIf necessary, adjust the seat belt to the
correct height ( Y page 51).XIf necessary, tighten the lap portion to a
snug fit by pulling shoulder portion up.
All lap/shoulder belts except the driver’s seat
belt have special seat belt retractors to
secure child restraints properly. For more
information on special seat belt retractors,
see “Infant and child restraint systems”
( Y page 56).
To release the seat belt with seat belt release
button ?, see ( Y page 51).
Seat belt adjustment function
The seat belt adjustment function adjusts the
seat belts on both front seats to the upper
body of the respective vehicle occupant. The
seat belt will be pulled slightly tighter for that
purpose when
R you engage the latch plate into the buckle
and then turn the SmartKey in the starter
switch to position 2
R the SmartKey in the starter switch is in
position 2 and you then engage the latch
plate in the buckle
The seat belt adjustment function takes place
with a certain amount of retracting force
when the system senses slack between the
vehicle occupant and the seat belt. Do not
retain the seat belt during this procedure. You
can activate or deactivate the seat belt
adjustment function via the control system
( Y page 145).
Releasing the seat beltsXPress seat belt release button ?
( Y page 50).
Allow the retractor to completely rewind
the seat belt by guiding latch plate ;
( Y page 50).
!
Make sure the seat belt retracts
completely. Otherwise the seat belt and/or
latch plate could get caught or pinched in
the door or in the seat mechanism. This can
damage the seat belt and impair its
effectiveness, and/or cause damage to the
door and/or door trim panel. Such damage
is not covered by the Mercedes-Benz
Limited Warranty.
Damaged seat belts must be replaced.
Contact an authorized Mercedes-Benz
Center.
Rear center seat belt
The seat belt of the rear center seat may be
blocked when the left rear seat backrest is
folded forward and back ( Y page 199). The
seat belt can then not be pulled out.
XUnblocking the seat belt of the rear
center seat: Pull the center seat belt
approximately 1 in (25 mm) out of the seat
belt outlet in the seat backrest and release
it.
The seat belt is retracted and unblocked.
Seat belt outlet height adjustment
You can adjust the height of the seat belt
outlet for the driver’s and front passenger
seat.
Occupant safety51Safety and security212_AKB; 2; 41, en-USd2ureepe,Version: 2.11.8.12009-07-17T09:14:21+02:00 - Seite 51Z
Page 54 of 372

XRaising: Slide the seat belt outlet height
adjuster upward.
The seat belt outlet height adjuster
engages in different positions.
XLowering: Press and hold release
button :.
XSlide the seat belt outlet height adjuster
downward.
XRelease release button : and make sure
the seat belt outlet height adjuster engages
into place.
Enhanced seat belt reminder system
When the engine is started, the seat belt
telltale 7 will always illuminate for
6 seconds to remind you and your passengers
to fasten your seat belts.
If the driver’s seat belt is not fastened when
the engine is started, an additional warning
chime will sound. The warning chime goes out
after approximately 6 seconds or once the
driver’s seat belt is fastened.
If after these 6 seconds the driver’s or the
front passenger’s seat belt (with the front
passenger seat occupied) is not fastened with
front doors closed,
Rthe seat belt telltale 7 remains
illuminated for as long as either the driver’s
or front passenger’s seat belt is not
fastened.
Rand if the vehicle speed once exceeds
15 mph (25 km/h), the seat belt telltale
7 starts flashing and a warning chime
sounds with increasing intensity for a
maximum of 60 seconds or until the
driver’s and front passenger’s seat belt are
fastened.
If you and/or your passenger release the
seat belt during driving, the seat belt
telltale 7 starts flashing and the
warning chime sounds as described before.
If the driver’s or the front passenger’s seat
belt remains unfastened after 60 seconds,
the warning chime stops sounding, the seat
belt telltale 7 stops flashing but
continues to be illuminated.
After a vehicle standstill, the warning chime
is reactivated and the seat belt telltale
7 is flashing again if the vehicle speed
once exceeds 15 mph (25 km/h).
The seat belt telltale 7 will only go out if
both the driver’s and the front passenger’s
seat belt (with the front passenger seat
occupied) are fastened, or the vehicle is
standing still and a front door is opened.
For more information, see “Practical hints”
(Y page 307).
Emergency Tensioning Device (ETD),
seat belt force limiter
The seat belts for the front seats and rear
outer seats are equipped with ETDs and seat
belt force limiters.
The ETDs are designed to activate in the
following cases:
Rin frontal or rear-end impacts exceeding
the system’s preset deployment threshold
Rin side impacts exceeding the system’s
preset deployment threshold on the far
side of the impact
Rin certain vehicle rollovers
Rif the restraint systems are operational and
functioning correctly, see “SRS indicator
lamp” (Y page 36)
The ETDs for the front seats will only activate
if the front seat belts are fastened (latch plate
properly inserted into buckle).
52Occupant safetySafety and security
212_AKB; 2; 41, en-USd2ureepe,Version: 2.11.8.12009-07-17T09:14:21+02:00 - Seite 52
Page 56 of 372

tension and decreases the air pressure in the
air pockets of the drive-dynamic multicontour
front seats. All of the PRE-SAFE ®
system
settings can be re-adjusted following the
critical driving event.
If the seat belts do not release:XAdjust the seat backrest or seat slightly to
the rear until the seat belt tension is
reduced.
The locking mechanism releases.
! When moving the seats, make sure there
are no items in the footwell or behind the
seats. Otherwise, you could damage the
seats and/or the items.
For information on the seat belt adjustment
function as an integrated comfort feature of
the PRE-SAFE ®
system, see ( Y page 51).
NECK-PRO active front head
restraints
The NECK-PRO active front head restraints
are intended to offer the driver and front
passenger increased protection from
whiplash-type injuries. In the event of a rear-
end collision, the NECK-PRO active front head
restraints are designed to move forward and
up in the direction of travel. They thus provide
the head with increased support earlier on in
the collision sequence. The NECK-PRO active
front head restraints will move forward and
up whether the seats are occupied or not.
GWarning!
Do not attach any objects (e.g. hangers) to the
head restraint posts. Otherwise, the NECK-
PRO active front head restraints may not be
able to function properly or offer the intended
degree of protection they were designed for
in the event of a rear-end collision.
GWarning!
Only use seat or head restraint covers which
have been tested and approved by Mercedes-
Benz for your vehicle model.
Using other seat or head restraint covers may
interfere with or prevent the activation of the
NECK-PRO active front head restraints and/
or the deployment of the front side impact air
bags or pelvis air bags.
Contact an authorized Mercedes-Benz Center
for availability.
When the NECK-PRO active front head
restraints have been triggered in an accident,
the NECK-PRO active front head restraints
must be reset. Otherwise, the NECK-PRO
active front head restraints cannot offer any
additional protection in the event of another
rear-end collision.
For information on resetting the activated
NECK-PRO active front head restraints, see
“Resetting activated head restraints”
( Y page 316).
You cannot remove the NECK-PRO active
front head restraints.GWarning!
For your protection, drive only with properly
positioned head restraints.
Adjust the head restraint so that it is as close
to the head as possible and the center of the
head restraint supports the back of the head
at eye level. This will reduce the potential for
injury to the head and neck in the event of an
accident or similar situation.
For information on head restraint adjustment,
see “Head restraint height” ( Y page 89), or
see “Head restraint fore and aft adjustment”
( Y page 89).
Correct driver seat adjustment
GWarning!
In order to avoid possible loss of vehicle
control the following must be done before the
vehicle is put into motion:
R seat adjustment
R head restraint adjustment
54Occupant safetySafety and security
212_AKB; 2; 41, en-USd2ureepe,Version: 2.11.8.12009-07-17T09:14:21+02:00 - Seite 54
Page 58 of 372

Children in the vehicle
Safety notes
If an infant or child is traveling with you in the
vehicle:
XSecure the child using an infant or child
restraint appropriate to the age and size of
the child.XMake sure the infant or child is properly
secured at all times while the vehicle is in
motion.GWarning!
When leaving the vehicle, always remove the
SmartKey from the starter switch. Always
take the SmartKey with you and lock the
vehicle. Do not leave children unattended in
the vehicle, even if they are secured in a child
restraint system, or with access to an
unlocked vehicle. A child’s unsupervised
access to a vehicle could result in an accident
and/or serious personal injury. The children
could
R injure themselves on parts of the vehicle
R be seriously or fatally injured through
excessive exposure to extreme heat or cold
R injure themselves or cause an accident with
vehicle equipment that can be operated
even if the SmartKey is removed from the
starter switch or removed from the vehicle,
such as seat adjustment, steering wheel
adjustment, or the memory function
If children open a door, they could injure other
persons or get out of the vehicle and injure
themselves or be injured by following traffic.
Do not expose the child restraint system to
direct sunlight. The child restraint system’s
metal parts, for example, could become very
hot, and the child could be burned by these
parts.
GWarning!
Do not carry heavy or hard objects in the
passenger compartment or trunk unless they
are firmly secured in place.
Unsecured or improperly positioned cargo
increases a child’s risk of injury in the event
of
R strong braking maneuvers
R sudden changes of direction
R an accident
Infant and child restraint systemsGObserve Safety notes, see page 56.
We recommend all infants and children be
properly restrained at all times while the
vehicle is in motion.
Canada only:
Only use a BabySmart™ compatible child
restraint for the front passenger seat in this
vehicle.
All lap/shoulder belts except the driver’s seat
belt have special seat belt retractors for
secure fastening of child restraints.
To fasten a child restraint, follow the child
restraint manufacturer’s instructions for
mounting.
To activate the special seat belt retractor:
XPull the shoulder belt out completely and
let it retract.
During seat belt retraction, a ratcheting
sound can be heard to indicate that the
special seat belt retractor is activated.
The seat belt is now locked.XPush down on child restraint to take up any
slack.
To deactivate the special seat belt retractor:
XRelease the seat belt buckle and let the
seat belt retract completely.
The seat belt can then again be used in the
usual manner.
To deactivate the special seat belt retractor
for the front passenger seat, the front
passenger seat must be in the most backward
position.
56Occupant safetySafety and security
212_AKB; 2; 41, en-USd2ureepe,Version: 2.11.8.12009-07-17T09:14:21+02:00 - Seite 56
Page 71 of 372

GWarning!
When the ESC OFF warning lamp å is on,
the ESC is switched off.
When the ESC warning lamp ä and the
ESC OFF warning lamp å are on
continuously, the ESC is not operational due
to a malfunction.
When the ESC is switched off or not
operational, vehicle stability in standard
driving maneuvers is reduced.
Adapt your speed and driving to the prevailing
road conditions and to the non-operating
status of the ESC.
! Avoid spinning of a drive wheel for an
extended period with the ESC switched off.
This may cause serious damage to the
drivetrain which is not covered by the
Mercedes-Benz Limited Warranty.
XSwitching on: With the engine running,
press ESC switch : briefly.
The ESC OFF warning lamp å in the
instrument cluster goes out. The message
ESC-ON appears in the multifunction
display.
PRE-SAFE ®
Brake
The PRE-SAFE ®
Brake is available in vehicles
equipped with DISTRONIC PLUS. The PRE-
SAFE ®
Brake can assist you in minimizing the
risk of a rear-end collision with a vehicle in
front of you. The PRE-SAFE ®
Brake may also
reduce the severity of an accident. At speeds
above approximately 20 mph (30 km/h) it will
issue a warning when your vehicle is
approaching the preceding vehicle very
quickly. An intermittent acoustic warning
sounds and the distance warning lamp ·
in the instrument cluster comes on.
Due to the system characteristics, warnings
could be issued without cause in complex
driving situations.
When the driver and front passenger have
fastened their seat belts, the PRE-SAFE ®
Brake can also
R brake the vehicle within a speed range of
up to 124 mph (200 km/h) automatically
R activate preventative occupant safety
measures (PRE-SAFE ®
) ( Y page 53)GWarning!
An intermittent warning sounds and the
distance warning lamp · in the instrument
cluster is illuminated if the PRE-SAFE ®
Brake
calculates that the distance to the vehicle
ahead and your vehicle’s current speed
indicate that the PRE-SAFE ®
Brake will not be
capable of slowing the vehicle sufficiently to
maintain the preset following distance, which
creates a danger of a collision.
Immediately brake your vehicle to increase
the distance between your vehicle and the
vehicle driving in front of you. The warning
sound is intended as a final caution that you
have not interceded with your own braking
inputs to avoid a potentially dangerous
situation. Do not wait for the operation of the
warning signal to intercede with your own
braking, as that will result in potentially
dangerous emergency braking which will not
always result in an impact being avoided.
Tailgating increases the risk of an accident.
GWarning!
The PRE-SAFE ®
Brake is a convenience
system designed to assist the driver during
vehicle operation. The responsibility for the
vehicle speed and the distance to the vehicle
ahead, including most importantly brake
operation to assure safe stopping distance,
always remains with the driver.
Always pay attention to traffic conditions
even while the PRE-SAFE ®
Brake is switched
on. Otherwise, you may not be able to
recognize dangerous situations until it is too
late and could cause an accident resulting in
personal or fatal injury to you or others.
Driving safety systems69Safety and security212_AKB; 2; 41, en-USd2ureepe,Version: 2.11.8.12009-07-17T09:14:21+02:00 - Seite 69Z
Page 89 of 372

Position 0
Before you press the KEYLESS-GO start/stop
button, the vehicle’s on-board electronics
have status 0 (as with SmartKey removed).
Position 1
XPress the KEYLESS-GO start/stop button
once.
This supplies power for some electrical
consumers, e.g. wipers.
i When you now open the driver’s door, the
power supply is switched off.
Ignition (or position 2)
XPress the KEYLESS-GO start/stop button
twice.
This supplies power for all electrical
consumers.
When you switch on the ignition, all lamps
in the instrument cluster come on. The low-
beam headlamp indicator lamp, high-beam
headlamp indicator lamp, turn signal
indicator lamps, and the indicator lamps for
the fog lamps will only come on if activated.
If a lamp in the instrument cluster fails to
come on when the ignition is switched on,
have it checked and replaced if necessary.
If a lamp in the instrument cluster remains
on after starting the engine or comes on
while driving, refer to “Lamps in instrument
cluster” ( Y page 304).
i
When you now press the KEYLESS-GO
start/stop button once and the driver’s
door is open, the power supply is switched
off.
Seats
Safety notes
GWarning!
In order to avoid possible loss of vehicle
control the following must be done before the
vehicle is put into motion:
R seat adjustment
R head restraint adjustment
R steering wheel adjustment
R rear view mirror adjustment
R fastening of seat belts
GWarning!
Do not adjust the driver’s seat while driving.
Adjusting the seat while driving could cause
the driver to lose control of the vehicle.
Never ride in a moving vehicle with the seat
backrest in an excessively reclined position as
this can be dangerous. You could slide under
the seat belt in a collision. If you slide under
it, the seat belt would apply force at the
abdomen or neck. That could cause serious
or fatal injuries. The seat backrest and seat
belts provide the best restraint when the
wearer is in a position that is as upright as
possible and seat belts are properly
positioned on the body.
GWarning!
Your seat must be adjusted so that you can
correctly fasten your seat belt.
Observe the following points:
R Adjust the seat backrest until your arms are
slightly angled when holding the steering
wheel.
R Adjust the seat to a comfortable seating
position that still allows you to reach the
accelerator/brake pedal safely. The
position should be as far back as possible
with the driver still able to operate the
controls properly.
Seats87Controls in detail212_AKB; 2; 41, en-USd2ureepe,Version: 2.11.8.12009-07-17T09:14:21+02:00 - Seite 87Z
Page 93 of 372

XRemoving: Unlock the rear seat backrest
(Y page 199) and fold it slightly forward.
XPull head restraint to its highest position.XPress release button : and pull out head
restraint.
XInstalling: Position the head restraints so
that the notches on the rod are on the left
when looking in the direction of travel.
XInsert head restraint and push it down until
it engages.
XFold the rear seat backrest back until it
engages.
Drive-dynamic multicontour seat
The drive-dynamic multicontour seat is only
available on the driver’s side.
The drive-dynamic multicontour seat allows
several individual support adjustments and
can automatically adjust lateral support to
your driving style.
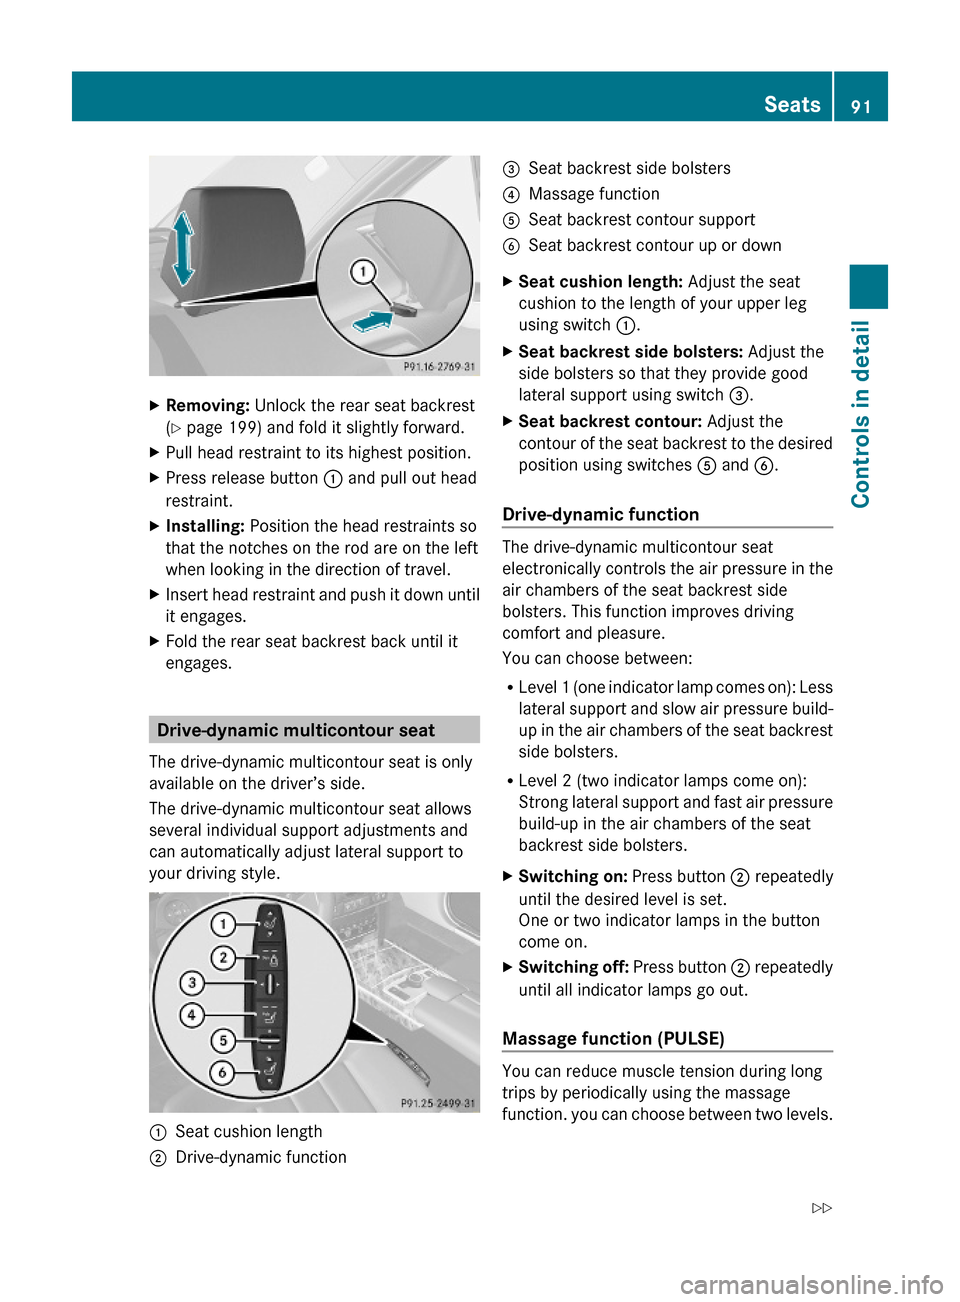
:Seat cushion length;Drive-dynamic function=Seat backrest side bolsters?Massage functionASeat backrest contour supportBSeat backrest contour up or downXSeat cushion length: Adjust the seat
cushion to the length of your upper leg
using switch :.
XSeat backrest side bolsters: Adjust the
side bolsters so that they provide good
lateral support using switch =.
XSeat backrest contour: Adjust the
contour of the seat backrest to the desired
position using switches A and B.
Drive-dynamic function
The drive-dynamic multicontour seat
electronically controls the air pressure in the
air chambers of the seat backrest side
bolsters. This function improves driving
comfort and pleasure.
You can choose between:
RLevel 1 (one indicator lamp comes on): Less
lateral support and slow air pressure build-
up in the air chambers of the seat backrest
side bolsters.
RLevel 2 (two indicator lamps come on):
Strong lateral support and fast air pressure
build-up in the air chambers of the seat
backrest side bolsters.
XSwitching on: Press button ; repeatedly
until the desired level is set.
One or two indicator lamps in the button
come on.
XSwitching off: Press button ; repeatedly
until all indicator lamps go out.
Massage function (PULSE)
You can reduce muscle tension during long
trips by periodically using the massage
function. you can choose between two levels.
Seats91Controls in detail212_AKB; 2; 41, en-USd2ureepe,Version: 2.11.8.12009-07-17T09:14:21+02:00 - Seite 91Z
Page 94 of 372

XSwitching on: Press button ? repeatedly
until the desired level is set.
One or two indicator lamps in the button
come on. The air cushions in the lumbar
region inflate and deflate rhythmically for
approximately 20 minutes.
Seat ventilation
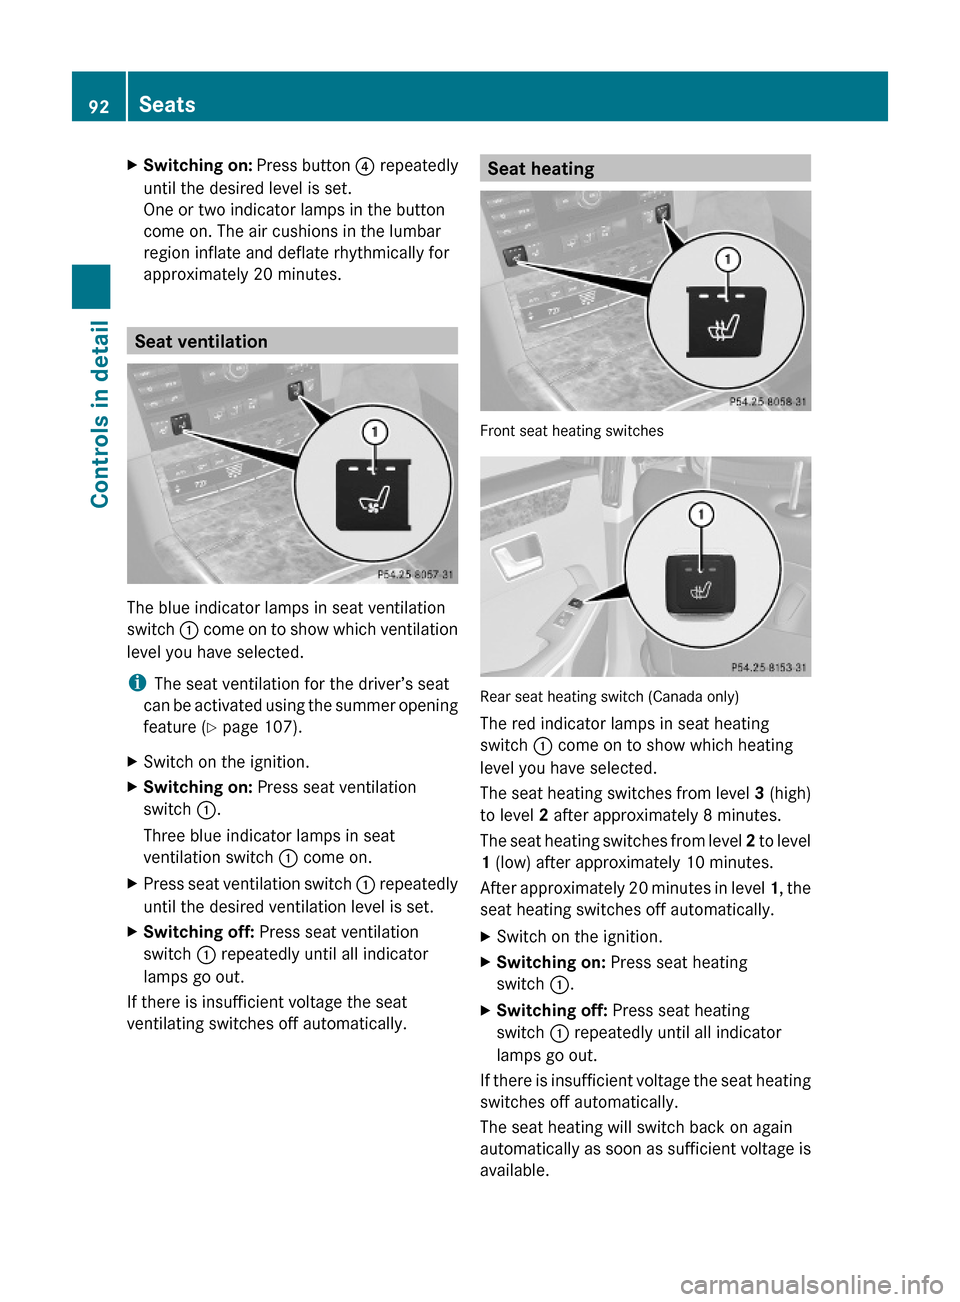
The blue indicator lamps in seat ventilation
switch : come on to show which ventilation
level you have selected.
iThe seat ventilation for the driver’s seat
can be activated using the summer opening
feature (Y page 107).
XSwitch on the ignition.XSwitching on: Press seat ventilation
switch :.
Three blue indicator lamps in seat
ventilation switch : come on.
XPress seat ventilation switch : repeatedly
until the desired ventilation level is set.
XSwitching off: Press seat ventilation
switch : repeatedly until all indicator
lamps go out.
If there is insufficient voltage the seat
ventilating switches off automatically.
Seat heating
Front seat heating switches
Rear seat heating switch (Canada only)
The red indicator lamps in seat heating
switch : come on to show which heating
level you have selected.
The seat heating switches from level 3 (high)
to level 2 after approximately 8 minutes.
The seat heating switches from level 2 to level
1 (low) after approximately 10 minutes.
After approximately 20 minutes in level 1, the
seat heating switches off automatically.
XSwitch on the ignition.XSwitching on: Press seat heating
switch :.
XSwitching off: Press seat heating
switch : repeatedly until all indicator
lamps go out.
If there is insufficient voltage the seat heating
switches off automatically.
The seat heating will switch back on again
automatically as soon as sufficient voltage is
available.
92SeatsControls in detail
212_AKB; 2; 41, en-USd2ureepe,Version: 2.11.8.12009-07-17T09:14:21+02:00 - Seite 92