2010 MERCEDES-BENZ E350 change time
[x] Cancel search: change timePage 213 of 372

When the connection is established, the
message Call Connected appears in the
multifunction display. The Tele Aid system will
transmit data generating the vehicle
identification number, model, color and
location (subject to availability of cellular and
GPS signals).
i The COMAND system display indicates
that a Tele Aid call is in progress. While the
call is connected you can change to the
navigation menu by pressing the NAVI
button on the COMAND system. Spoken
commands are not available.
A voice connection between the Customer
Assistance Center representative and the
occupants of the vehicle will be established.
Information regarding the operation of your
vehicle, the nearest authorized Mercedes-
Benz Center or Mercedes-Benz USA products
and services is available to you.
For more details concerning the Tele Aid
system, please visit www.mbusa.com (USA
only), log in to “Owner’s Online” and visit the
“My Tele Aid” section to learn more.
i If the indicator lamp in Information
button : is flashing continuously and
there was no voice connection to the
Customer Assistance Center established,
then the Tele Aid system could not initiate
an Information call (e.g. the relevant
cellular phone network is not available).
The message Call Failed appears in the
multifunction display.XTerminating calls: Press button ~ on
the multifunction steering wheel.
or
XPress the respective button for ending a
telephone call on the COMAND system.
Call priority
If other service calls such as a Roadside
Assistance call or Information call are active,
an emergency call is still possible. In this
case, the emergency call will take priority and
override all other active calls.
The indicator lamp in the respective button
flashes until the call is concluded. Automatic
initiated emergency calls can only be
terminated by a Customer Assistance Center
representative. All other calls can be
terminated by pressing button ~ on the
multifunction steering wheel or the
respective button for ending a telephone call
on the COMAND system.
i When a Tele Aid call has been initiated,
the COMAND system audio is muted. The
mobile phone is no longer connected to the
COMAND system. If you must use this
phone, we recommend that you use it only
with the vehicle at a standstill in a safe
location.
Search & Send
“Search & Send” is a navigation destination
address entry service. For more information
on “Search & Send”, refer to separate
COMAND system operating instructions.
Remote door unlock
In case you have locked your vehicle
unintentionally (e.g. SmartKey inside vehicle),
and the reserve SmartKey is not available:
XContact the Customer Assistance Center
at 1-800-FOR-MERCedes
(1-800-367-6372) (USA only) or
1-888-923-8367 (Canada only).
You will be asked to provide your password.XThen return to your vehicle at the time
arranged with the Customer Assistance
Center and pull the trunk lid handle for a
minimum of 20 seconds until the indicator
lamp in the SOS button is flashing.
The message Connecting Call appears in
the multifunction display.
As an alternative, you may unlock the vehicle
via Internet in the “My Tele Aid” section of
“Owner’s Online”, using your ID and password
(USA only).
Useful features211Controls in detail212_AKB; 2; 41, en-USd2ureepe,Version: 2.11.8.12009-07-17T09:14:21+02:00 - Seite 211Z
Page 215 of 372
When programming a garage door opener,
park vehicle outside the garage.
Do not run the engine while programming the
integrated remote control. Inhalation of
exhaust gas is hazardous to your health. All
exhaust gas contains carbon monoxide (CO),
and inhaling it can cause unconsciousness
and possible death.
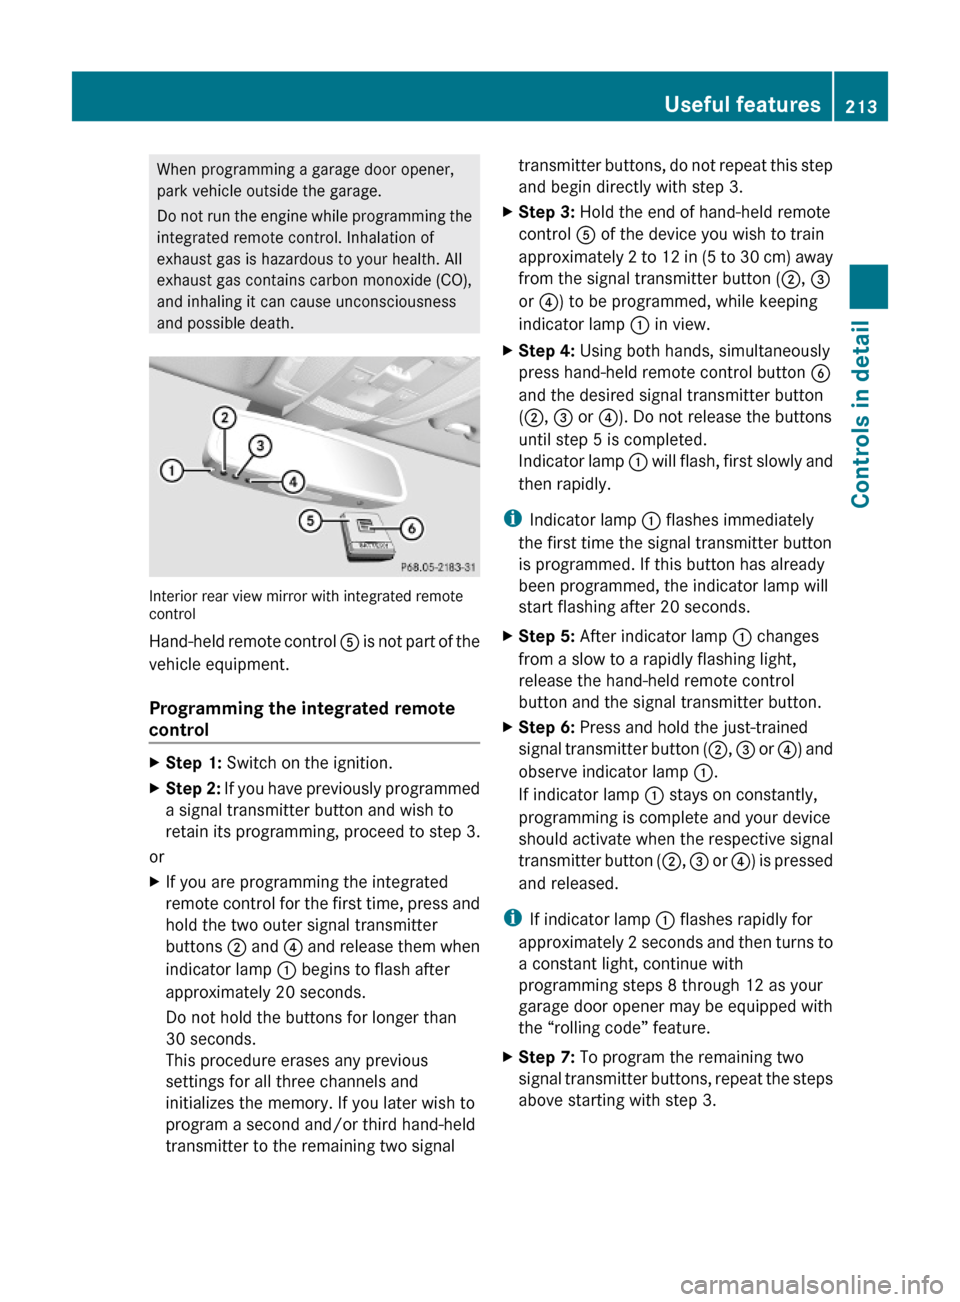
Interior rear view mirror with integrated remotecontrol
Hand-held remote control A is not part of the
vehicle equipment.
Programming the integrated remote
control
XStep 1: Switch on the ignition.XStep 2: If you have previously programmed
a signal transmitter button and wish to
retain its programming, proceed to step 3.
or
XIf you are programming the integrated
remote control for the first time, press and
hold the two outer signal transmitter
buttons ; and ? and release them when
indicator lamp : begins to flash after
approximately 20 seconds.
Do not hold the buttons for longer than
30 seconds.
This procedure erases any previous
settings for all three channels and
initializes the memory. If you later wish to
program a second and/or third hand-held
transmitter to the remaining two signal
transmitter buttons, do not repeat this step
and begin directly with step 3.
XStep 3: Hold the end of hand-held remote
control A of the device you wish to train
approximately 2 to 12 in (5 to 30 cm) away
from the signal transmitter button (;, =
or ?) to be programmed, while keeping
indicator lamp : in view.
XStep 4: Using both hands, simultaneously
press hand-held remote control button B
and the desired signal transmitter button
(;, = or ?). Do not release the buttons
until step 5 is completed.
Indicator lamp : will flash, first slowly and
then rapidly.
iIndicator lamp : flashes immediately
the first time the signal transmitter button
is programmed. If this button has already
been programmed, the indicator lamp will
start flashing after 20 seconds.
XStep 5: After indicator lamp : changes
from a slow to a rapidly flashing light,
release the hand-held remote control
button and the signal transmitter button.
XStep 6: Press and hold the just-trained
signal transmitter button (;, = or ?) and
observe indicator lamp :.
If indicator lamp : stays on constantly,
programming is complete and your device
should activate when the respective signal
transmitter button (;, = or ?) is pressed
and released.
iIf indicator lamp : flashes rapidly for
approximately 2 seconds and then turns to
a constant light, continue with
programming steps 8 through 12 as your
garage door opener may be equipped with
the “rolling code” feature.
XStep 7: To program the remaining two
signal transmitter buttons, repeat the steps
above starting with step 3.
Useful features213Controls in detail212_AKB; 2; 41, en-USd2ureepe,Version: 2.11.8.12009-07-17T09:14:21+02:00 - Seite 213Z
Page 222 of 372
Vehicle equipment
i This Operator’s Manual describes all
features, standard or optional, potentially
available for your vehicle at the time of
purchase. Please be aware that your
vehicle might not be equipped with all
features described in this manual.
The first 1000 miles (1500 km)
The more cautiously you treat your vehicle
during the break-in period, the more satisfied
you will be with its performance later on.
R Drive your vehicle during the first
1 000 miles (1 500 km) at varying but
moderate vehicle and engine speeds.
R During this period, avoid heavy loads (full
throttle driving) and excessive engine
speeds (no more than 2
/ 3 of maximum rpm
in each gear).
R Avoid accelerating by kickdown.
R Select gear ranges 3, 2 or 1 (Y page 120)
only when driving at moderate speeds (for
hill driving).
After 1 000 miles (1 500 km) you may
gradually increase vehicle and engine speeds
to the permissible maximum.
! Additional instructions for AMG vehicles:
R During the first 1 000 miles (1 500 km),
do not exceed a speed of 85 mph
(140 km/h).
R During this period, avoid engine speeds
above 4 500 rpm in each gear.
R Shift gears in a timely manner.
All of the above instructions, as may apply to
your vehicle type, also apply when driving the
first 1 000 miles (1 500 km) after the engine
or the rear differential has been replaced.
i Always obey applicable speed limits.
Notes on breaking-in the rear
differential (AMG vehicles only)
The vehicle is equipped with a self-locking
rear differential. For increased protection of
the rear differential, carry out an oil change
after a break-in phase of 2 000 miles
(3 000 km). This oil change will extend the
useful life of the differential. Have the oil
change carried out at a qualified specialist
workshop. Mercedes-Benz recommends you
have this work done at a authorized
Mercedes-Benz Center.
At the gas station
Refueling
GWarning!
Gasoline and diesel fuels are highly flammable
and poisonous. They burn violently and can
cause serious injury.
Never allow sparks, flames or smoking
materials near gasoline or diesel fuel!
Turn off the engine before refueling.
Whenever you are around gasoline or diesel
fuel, avoid inhaling fumes and any skin or
clothing contact. Extinguish all smoking
materials.
Direct skin contact with fuels and the
inhalation of fuel vapors are damaging your
health.
GWarning!
Overfilling of the fuel tank may create
pressure in the system which could cause a
gas discharge. This could cause the gas to
spray back out when removing the fuel pump
nozzle, which could cause personal injury.
GWarning!
Do not fill diesel tanks with gasoline. Do not
mix diesel fuel with gasoline. Otherwise the
fuel system and engine could be damaged. In
addition, the vehicle could catch fire.
220At the gas stationOperation
212_AKB; 2; 41, en-USd2ureepe,Version: 2.11.8.12009-07-17T09:14:21+02:00 - Seite 220
Page 267 of 372
Cleaning the panorama roof
The rear part of the tilt/sliding panel has a
protective layer on the inside.
XUse a soft, clean cloth and a mild window
cleaning solution.
An automotive glass cleaner is
recommended.
! Do not use a dry cloth, abrasives, solvents
or cleaners containing solvents. Do not
touch the protective layer with hard objects
such as an ice scraper or ring. Never apply
strong force and only use a soft, non-
scratching cloth when cleaning the rear
part of the tilt/sliding panel.
Otherwise you may scratch or damage the
protective layer.
Light alloy wheels
If possible, clean wheels once a week.
XUse Mercedes-Benz approved Wheel Care,
a soft bristle brush and a strong spray of
water for cleaning the light alloy wheels.
! Only use acid-free cleaning materials.
Acid may cause corrosion or damage the
clear coat.
! The vehicle should not be parked for an
extended period of time immediately after
it has been cleaned. This applies especially
after the wheel rims have been cleaned
with wheel rim cleaner. Wheel rim cleaners
can lead to increased corrosion of the
brake disks and brake pads. Non-approved
wheel cleaners may also damage the wheel
paint if the vehicle is not driven after
cleaning.
Therefore, the vehicle’s brake system
should always be warmed-up before it is
parked after cleaning. Drive your vehicle for
several minutes to allow the brakes to dry.
When applying Mercedes-Benz approved
Tire Care and Mercedes-Benz approved
Wheel Care products, take care not to
spray them on the brake disks.
Plastic and rubber partsXUse a gentle dishwashing detergent or mild
detergent for delicate fabrics as a washing
solution.XWipe with a cloth moistened in a lukewarm
solution.
The surface may temporarily change color.
If this is the case, wait for it to dry.GWarning!
Do not use cleaners or cockpit care sprays
containing solvents to clean the cockpit or the
steering wheel. Cleaners containing solvents
will make the surface porous and vehicle
occupants could suffer serious injuries from
plastic parts coming loose in the event of air
bag deployment.
! Do not use oil, wax or scouring agents.
Otherwise you may scratch or damage the
surface.
Hard plastic trim items
XUse Mercedes-Benz approved Interior Care
on a soft, lint-free cloth and apply with light
pressure.
COMAND display
! You must switch off the COMAND display
and allow it to cool prior to cleaning.
! Do not use any liquids or cleaning agents.
These can damage or even destroy the
COMAND display screen.
XUse a standard microfiber cloth and apply
with light pressure.
Steering wheel and gear selector lever
XWipe with a damp cloth and dry thoroughly
or clean with Mercedes-Benz approved
Leather Care.Vehicle care265Operation212_AKB; 2; 41, en-USd2ureepe,Version: 2.11.8.12009-07-17T09:14:21+02:00 - Seite 265Z
Page 270 of 372
Vehicle equipment
iThis Operator’s Manual describes all
features, standard or optional, potentially
available for your vehicle at the time of
purchase. Please be aware that your
vehicle might not be equipped with all
features described in this manual.
Where will I find ...?
First aid kit
iCheck expiration dates and contents for
completeness at least once a year and
replace missing/expired items.
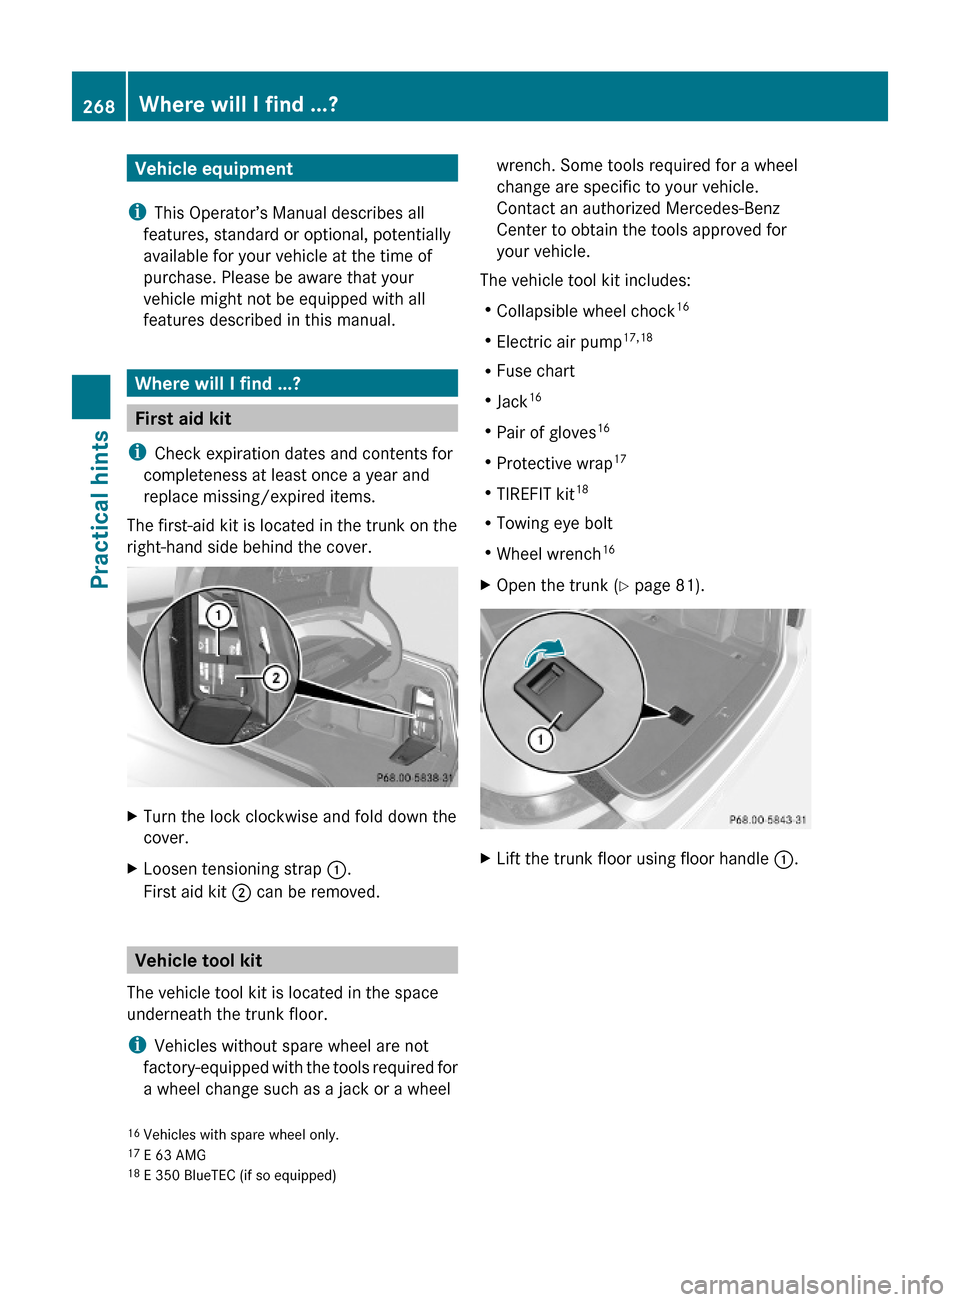
The first-aid kit is located in the trunk on the
right-hand side behind the cover.
XTurn the lock clockwise and fold down the
cover.
XLoosen tensioning strap :.
First aid kit ; can be removed.
Vehicle tool kit
The vehicle tool kit is located in the space
underneath the trunk floor.
iVehicles without spare wheel are not
factory-equipped with the tools required for
a wheel change such as a jack or a wheel
wrench. Some tools required for a wheel
change are specific to your vehicle.
Contact an authorized Mercedes-Benz
Center to obtain the tools approved for
your vehicle.
The vehicle tool kit includes:
RCollapsible wheel chock16
RElectric air pump17,18
RFuse chart
RJack16
RPair of gloves16
RProtective wrap17
RTIREFIT kit18
RTowing eye bolt
RWheel wrench16
XOpen the trunk (Y page 81).XLift the trunk floor using floor handle :.16Vehicles with spare wheel only.17E 63 AMG18E 350 BlueTEC (if so equipped)
268Where will I find ...?Practical hints
212_AKB; 2; 41, en-USd2ureepe,Version: 2.11.8.12009-07-17T09:14:21+02:00 - Seite 268
Page 348 of 372
Vehicle equipment
iThis Operator’s Manual describes all
features, standard or optional, potentially
available for your vehicle at the time of
purchase. Please be aware that your
vehicle might not be equipped with all
features described in this manual.
Parts service
All authorized Mercedes-Benz Centers
maintain a stock of Genuine Mercedes-Benz
Parts required for maintenance and repair
work. In addition, strategically located parts
distribution centers provide quick and
reliable parts service.
More than 300 000 different parts for
Mercedes-Benz models are available.
Genuine Mercedes-Benz Parts are subjected
to stringent quality inspections. Each part has
been specifically developed, manufactured or
selected for and adapted to Mercedes-Benz
vehicles.
Therefore, Genuine Mercedes-Benz Parts
should be installed.
! Do not use non-genuine Mercedes-Benz
parts and accessories not authorized by
Mercedes-Benz. Doing so could damage
the vehicle, which is not covered by the
Mercedes-Benz Limited Warranty. Also, it
could compromise the vehicle’s durability
or safety.
Warranty coverage
Your vehicle is covered under the terms of the
warranties printed in the Service and
Warranty Information booklet.
Your authorized Mercedes-Benz Center will
exchange or repair any defective parts
originally installed in the vehicle in
accordance with the terms of the following
warranties:
RNew Vehicle Limited Warranty
REmission System Warranty
REmission Performance Warranty
RCalifornia, Connecticut, Maine,
Massachusetts, New York, Pennsylvania,
Rhode Island, and Vermont Emission
Control Systems Warranty
RState Warranty Enforcement Laws (Lemon
Laws)
Replacement parts and accessories are
covered by the Mercedes-Benz Parts and
Accessories warranties, copies of which are
available at any authorized Mercedes-Benz
Center.
Loss of Service and Warranty
Information booklet
Should you lose your Service and Warranty
Information booklet, have an authorized
Mercedes-Benz Center arrange for a
replacement. It will be mailed to you.
Identification labels
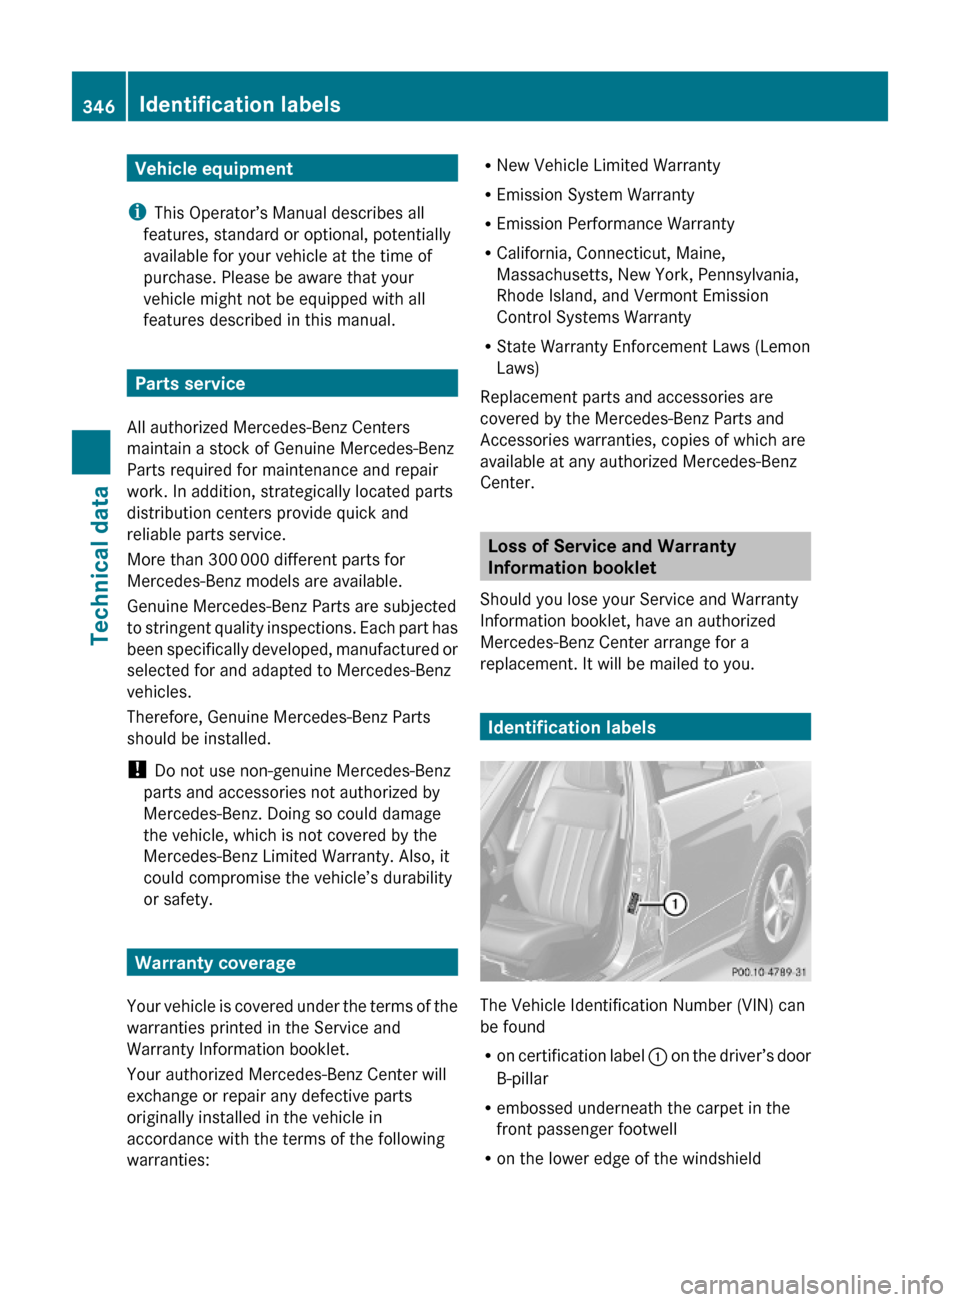
The Vehicle Identification Number (VIN) can
be found
Ron certification label : on the driver’s door
B-pillar
Rembossed underneath the carpet in the
front passenger footwell
Ron the lower edge of the windshield
346Identification labelsTechnical data
212_AKB; 2; 41, en-USd2ureepe,Version: 2.11.8.12009-07-17T09:14:21+02:00 - Seite 346
Page 371 of 372
Service and Literature
Your authorized Mercedes-Benz Center has
trained technicians and Genuine Mercedes-
Benz Parts to service your vehicle properly.
For expert advice and quality service, contact
an authorized Mercedes-Benz Center.
If you are interested in obtaining service
literature for your vehicle, please contact an
authorized Mercedes-Benz Center.
We consider this the best way for you to
obtain accurate information for your vehicle.
For further information you can find us on the
Mercedes-Benz web site www.mbusa.com
(USA only) or www.mercedes-benz.ca
(Canada only).GWarning!
To help avoid personal injury, be extremely
careful when performing any service work or
repairs. Improper or incomplete service or the
use of incorrect or inappropriate parts or
materials may damage the vehicle or its
equipment, which may in turn result in
personal injury.
If you have any questions about carrying out
any type of service, turn to the advice of an
authorized Mercedes-Benz Center.
We reserve the right to make changes in
design and equipment.
Therefore, information, illustrations and
descriptions in this Operator’s Manual might
differ from your vehicle.
Reprinting, translation and copying, even of
excerpts, is not permitted without our prior
authorization in writing.
Press time July 17, 2009
GSP/OIS
Printed in U. S. A.
212_AKB; 2; 41, en-USd2ureepe,Version: 2.11.8.12009-07-17T09:14:21+02:00 - Seite 369