2010 MERCEDES-BENZ E350 collision
[x] Cancel search: collisionPage 154 of 372

vehicle ahead and your vehicle’s current
speed indicate that the DISTRONIC PLUS will
not be capable of slowing the vehicle
sufficiently to maintain the preset following
distance, which creates a danger of a
collision.
Immediately brake the vehicle to increase
your distance to the preceding vehicle. The
warning sound is intended as a final caution
in which you should intercede with your own
braking inputs to avoid a potentially
dangerous situation. Do not wait for the
operation of the warning signal to intercede
with your own braking. This will result in
potentially dangerous emergency braking
which will not always result in an impact being
avoided.
Tailgating increases the risk of an accident.
GWarning!
The DISTRONIC PLUS brakes your vehicle
with a maximum deceleration of 13 ft/s2
(4 m/s2). This corresponds to approximately
40% of the maximum deceleration of your
vehicle.
You must also apply the brakes yourself to
avoid a collision. The DISTRONIC PLUS brakes
the vehicle in an effort to restore the preset
distance or to maintain the set speed.
GWarning!
If you do not receive visual or acoustic
warning signals during a critical traffic
situation, DISTRONIC PLUS has either not
recognized the collision risk, has been
deactivated or is malfunctioning.
Remember, whether or not DISTRONIC PLUS
is operating, it is ultimately always the drivers
responsibility to apply the brakes in order to
control the vehicle and avoid a collision.
Displaying the distance graphic
In the DriveAssist menu under Distance
Display you see the current settings for
DISTRONIC PLUS. The Information shown in
the multifunction display depends on whether
DISTRONIC PLUS is activated or deactivated.
For activating or deactivating the DISTRONIC
PLUS system, see “Activating DISTRONIC
PLUS” (Y page 153) or “Deactivating
DISTRONIC PLUS” (Y page 156).
The menu overview can be found on
(Y page 129).
XPress = or ; to select the
DriveAssist menu.
XPress : or 9 to select the
Distance Display function.
XPress a.
The DISTRONIC PLUS distance graphic
appears and you will see one of the
following displays in the multifunction
display.
DISTRONIC PLUS activated
If you switch on the DISTRONIC PLUS, you will
see the set speed in the multifunction display
for approximately 5 seconds. When the
DISTRONIC PLUS is activated the following
display appears in the multifunction display.
Example illustration
:DISTRONIC PLUS activated;Your vehicle=Preset distance threshold to the
preceding vehicle
?Preceding vehicle, if detected152Driving systemsControls in detail
212_AKB; 2; 41, en-USd2ureepe,Version: 2.11.8.12009-07-17T09:14:21+02:00 - Seite 152
Page 156 of 372
Switching on while driving
You can switch on the DISTRONIC PLUS when
the vehicle speed is above 20 mph
(30 km/h).
Below 20 mph (30 km/h), you can only switch
on the DISTRONIC PLUS if the preceding
vehicle has been detected and is shown in the
multifunction display. If you no longer see the
preceding vehicle in the multifunction display
and if it is no longer detected because it has
changed lanes, for example, the DISTRONIC
PLUS switches off and a signal sounds.
XPull the DISTRONIC PLUS lever briefly in
direction of arrow ? to call up the last set
speed, or if no speed is stored, to set and
store the current speed.
The DISTRONIC PLUS is switched on.
or
XTap the DISTRONIC PLUS lever up : or
down ; until desired speed is set.
The DISTRONIC PLUS is switched on.XRemove your foot from the accelerator
pedal.
Your vehicle adapts its speed to the
preceding vehicle, observing the set speed
as a maximum value.
If you do not completely remove your foot
from the accelerator pedal, the message
DISTRONIC PLUS Override appears in the
multifunction display. The distance to a
slower-driving vehicle will not be set. You will
drive at the speed you dictate by pressing the
accelerator pedal.
Switching on when approaching a
stationary vehicle
It is helpful to switch on the DISTRONIC PLUS
display in the multifunction display to see that
a preceding vehicle is detected
( Y page 152). You can only switch on the
DISTRONIC PLUS below a speed of 20 mph
(30 km/h) when a preceding vehicle is
detected.
If the preceding vehicle is stationary, you can
only switch on the DISTRONIC PLUS if your
vehicle is also at a standstill.XPull the DISTRONIC PLUS lever briefly in
direction of arrow ?.
The DISTRONIC PLUS is switched on.XTap the DISTRONIC PLUS lever up : or
down ; until desired speed is set.
You can adjust the set speed using the
DISTRONIC PLUS lever and the target
distance using the distance setting switch on
the DISTRONIC PLUS lever ( Y page 157).
i If the DISTRONIC PLUS is switched off,
the PRE-SAFE ®
Brake (Y page 69) will warn
of an impending collision if this function has
been activated with the instrument cluster
control system ( Y page 137).
Starting off
When the preceding vehicle starts off:
XRemove your foot from the brake pedal.XPull the DISTRONIC PLUS lever briefly in
direction of arrow ?.
or
XBriefly step on the accelerator pedal.
Your vehicle starts off and adapts its speed
to the preceding vehicle.
Driving
If there is no preceding vehicle, the
DISTRONIC PLUS functions like the cruise
control ( Y page 146).
When the DISTRONIC PLUS detects that the
preceding vehicle is driving more slowly, it
brakes the vehicle in order to keep the
distance specified by you.
When the DISTRONIC PLUS detects that the
preceding vehicle is driving faster, it
accelerates the vehicle up to the set speed.
GWarning!
When you step on the brake pedal, you switch
off the DISTRONIC PLUS except when the
vehicle is at a standstill. The DISTRONIC PLUS
154Driving systemsControls in detail
212_AKB; 2; 41, en-USd2ureepe,Version: 2.11.8.12009-07-17T09:14:21+02:00 - Seite 154
Page 171 of 372
GWarning!
The Parking Guidance is only an aid and may
display parking spaces that are not suitable
for parking such as
R no-parking zones
R parking space with unsuitable road/ground
surface
R driveways
R entrances/exits
The Parking Guidance scans for and measures
potential parking spaces when driving past.
Subsequent changes to the parking space are
not taken into account. This may be the case
if the position of the vehicle parked in front or
behind the space changes or obstacles in the
parking space are moved.
The Parking Guidance does not relieve you of
the responsibility to pay attention. If you only
rely on the Parking Guidance, you may cause
an accident and injure yourself and others.
You are always responsible for safety and
must continue to pay attention to your
immediate surroundings when parking and
maneuvering.
GWarning!
The system cannot detect objects located
above the area that the sensors scan. These
objects, e.g. protruding load, overhang, or
truck tail lifts, will be ignored when computing
the parking procedure. The Parking Guidance
might therefore provide untimely steering
instructions. This could cause a collision.
Thus, do not use the Parking Guidance in such
situations.
GWarning!
Make sure no persons or animals are in the
area in which you are maneuvering. You could
otherwise injure them.
! Special attention must be paid to objects
with smooth surfaces or low silhouettes
(e.g. trailer couplings, painted posts,
elevated crossbars or road curbs). Such
objects may not be detected by the system
and can damage the vehicle.
Use the Parking Guidance for parking spaces
that are
R parallel to the direction of travel
R located on straight streets, i.e. not in
curves
R on the same level as the street, i.e. not on
sidewalks, for example.
Parking instructions:
R On narrow streets, drive by the parking
space as close as possible.
R Parking spaces that are dirty, overgrown or
located in front of trailers may not be
detected correctly.
R Snowfall or heavy rain may cause imprecise
measurement of the parking space.
R Also observe the Parktronic system
warning indicator ( Y page 167) while the
Parking Guidance is active.
R You may not use the Parking Guidance
when transporting cargo that protrudes the
vehicle.
R Do not use the Parking Guidance when
driving with snow chains or when a spare
wheel is mounted.
R How well your vehicle will be parked after
completion of the Parking Guidance
depends on the position and shape of the
vehicles parked in front of and behind the
parking space as well as the conditions of
the immediate surroundings. In certain
cases, the Parking Guidance may guide you
too far into the parking space or not far
enough. If this is the case, cancel the
parking procedure with the Parking
Guidance and correct the vehicle position
yourself.
Detecting a parking space
The Parking Guidance is active when driving
forward. The system operates at a vehicle
Driving systems169Controls in detail212_AKB; 2; 41, en-USd2ureepe,Version: 2.11.8.12009-07-17T09:14:21+02:00 - Seite 169Z
Page 177 of 372
XCleaning inside of windshield: Use a soft,
non-scratching cloth ( Y page 263).
Blind Spot Assist
The Blind Spot Assist uses radar sensors to
monitor the area on both sides of your
vehicle. It will assist you when you change
lanes driving at speeds of above 20 mph
(30 km/h). A red warning lamp will come on
in the exterior rear view mirror as soon as
another vehicle is detected. If you then
activate the corresponding turn signals to
change lanes, the red warning lamp flashes
and warning sounds (collision warning). The
Blind Spot Assist operates using sensors in
the rear bumper.
GWarning!
The Blind Spot Assist is only a driving aid and
may not detect all vehicles.
The Blind Spot Assist may not be able to
detect narrow vehicles such as motorcycles
or bicycles, or it may not detect them until it
is too late.
The monitoring function may be impaired if
your sensors are dirty, subject to heavy spray,
or if visibility is poor due to e.g. snow, rain, or
fog. This can result in vehicles not being
detected or being detected too late.
The Blind Spot Assist cannot detect road,
traffic and weather conditions.
It is the driver’s responsibility at all times to
be attentive to road, weather and traffic
conditions and to provide the steering,
braking and other driving inputs necessary to
retain control of the vehicle. Failure to do so
could result in recognizing dangers too late,
possibly resulting in an accident and serious
injury to yourself and others.
In order for the Blind Spot Assist to function,
the radar sensors must be switched on and
operational.
When traveling in Canada in a vehicle not
registered in Canada, you must switch off the
radar sensor system ( Y page 144). Canadian
law does not permit the use of the radar
sensor system for vehicles from outside of
Canada. When you switch off the radar sensor
system, the following functions are
deactivated:
R Blind Spot Assist
R BAS PLUS ( Y page 63)
R PRE-SAFE ®
Brake ( Y page 69)
R DISTRONIC PLUS ( Y page 149)
i USA only:
This device has been approved by the FCC
as a “Vehicular Radar System”. The radar
sensor is intended for use in an automotive
radar system only. Removal, tampering, or
altering of the device will void any
warranties, and is not permitted by the
FCC. Do not tamper with, alter, or use in
any non-approved way.
Any unauthorized modification to this
device could void the user’s authority to
operate the equipment.
i Canada only:
This device complies with RSS-210 of
Industry Canada. Operation is subject to
the following two conditions:
1. This device may not cause interference,
and
2. this device must accept any interference received, including
interference that may cause undesired
operation of the device.
Removal, tampering, or altering of the
device will void any warranties, and is not
permitted. Do not tamper with, alter, or use
in any non-approved way.
Any unauthorized modification to this
device could void the user’s authority to
operate the equipment.
Sensor monitoring range
The Blind Spot Assist is able to monitor a
range up to 10 ft (3 m) to the rear and both
sides of the vehicle.
Driving systems175Controls in detail212_AKB; 2; 41, en-USd2ureepe,Version: 2.11.8.12009-07-17T09:14:21+02:00 - Seite 175Z
Page 179 of 372

When you shift the automatic transmission in
reverse gear R, yellow indicator lamps : in
the exterior rear view mirrors goes out after
approximately 3 seconds. The Blind Spot
Assist is then not active.
The brightness of indicator lamps/warning
lamps : is controlled automatically
depending on the brightness of the ambient
light.
GWarning!
The Blind Spot Assist is not active at speeds
below approximately 20 mph (30 km/h). The
yellow indicator lamps in the exterior rear
view mirrors are illuminated. You will not be
alerted to the presence of vehicles in the
monitored area at these speeds.
It is the driver’s responsibility at all times to
be attentive to road, weather and traffic
conditions and to provide the steering,
braking and other driving inputs necessary to
retain control of the vehicle. Failure to do so
could result in recognizing dangers too late,
possibly resulting in an accident and serious
injury to yourself and others.
Collision warning
If a vehicle is detected in the Blind Spot Assist
range and you activate the turn signal, a two-
tone warning will sound once. Red warning
lamp : on the corresponding side of the
vehicle will flash.
GWarning!
Do not change lanes or make turns, while red
warning lamp : is flashing. Doing so could
result in an accident and serious injury to
yourself and others.
XRemain on the lane that you are currently
on until traffic conditions permit to change.
If the turn signal remains on, red warning
lamp : will flash to indicate that vehicles
have been detected. No further audible
warnings will sound.
Lane Keeping Assist
The Lane Keeping Assist supports you at a
vehicle speed of above 40 mph when you
have set the display unit to miles in the
Display Unit Speed-/Odometer: menu in
the control system (Y page 141). When you
have set the display unit to km, the system
supports you at a vehicle speed of above
60 km/h. When the Lane Keeping Assist
detects lane markings, the system is
designed to alert you in case you leave your
lane unintentionally. A warning is usually
issued when a front wheel is on the lane
marking. An interval vibration in the steering
wheel that lasts for up to 1.5 seconds will
then alert you.
The Lane Keeping Assist monitors the area in
front of your vehicle via camera :.
The system can distinguish various
conditions in order to alert you early enough
and to avoid unnecessary warnings when
crossing lane markings.
The warning is issued sooner when
Rcutting a curve on the outside of the turn
Rdriving on very wide lanes such as highway
lanes
Rthe system recognizes dividing lines
because crossing them is often crucial due
to soft shoulders or guardrails behind for
example
The warning is issued later however when
Rdriving on narrow lanes
Rcutting a curve on the inside of the turn
Driving systems177Controls in detail212_AKB; 2; 41, en-USd2ureepe,Version: 2.11.8.12009-07-17T09:14:21+02:00 - Seite 177Z
Page 199 of 372
if the tilt/sliding panel does not open
smoothly.
! Do not attempt to open the tilt/sliding
panel before the tilt/sliding panel is
properly synchronized. The tilt/sliding
panel could otherwise lock-up in the open
position.
If the tilt/sliding panel cannot be closed or
synchronized, contact an authorized
Mercedes-Benz Center or call Roadside
Assistance.
XSwitch on the ignition.XPull the roof panel switch repeatedly in
direction of arrow = to the resistance
point until the tilt/sliding panel is closed
completely.
XPull and hold the roof panel switch in
direction of arrow = for 1 more second.
XPull the roof panel switch repeatedly in
direction of arrow = to the resistance
point until the roller sunblinds are closed
completely.
XPull and hold the roof panel switch in
direction of arrow = for 1 more second.
XCheck whether the tilt/sliding panel and
the roller sunblinds can be opened
completely (Y page 195).
Loading and storing
Loading instructions
GWarning!
Always fasten items being carried as securely
as possible. Use cargo tie-down rings and
fastening materials appropriate for the weight
and size of the load.
In an accident, during hard braking or sudden
maneuvers, loose items will be thrown around
inside the vehicle. This can cause injury to
vehicle occupants unless the items are
securely fastened in the vehicle.
To help avoid personal injury during a collision
or sudden maneuver, exercise care when
transporting cargo. Do not pile luggage or
cargo higher than the seat backrests.
The trunk is the preferred place to carry
objects.
Never drive a vehicle with the trunk open.
Deadly carbon monoxide (CO) gases may
enter vehicle interior resulting in
unconsciousness and death.
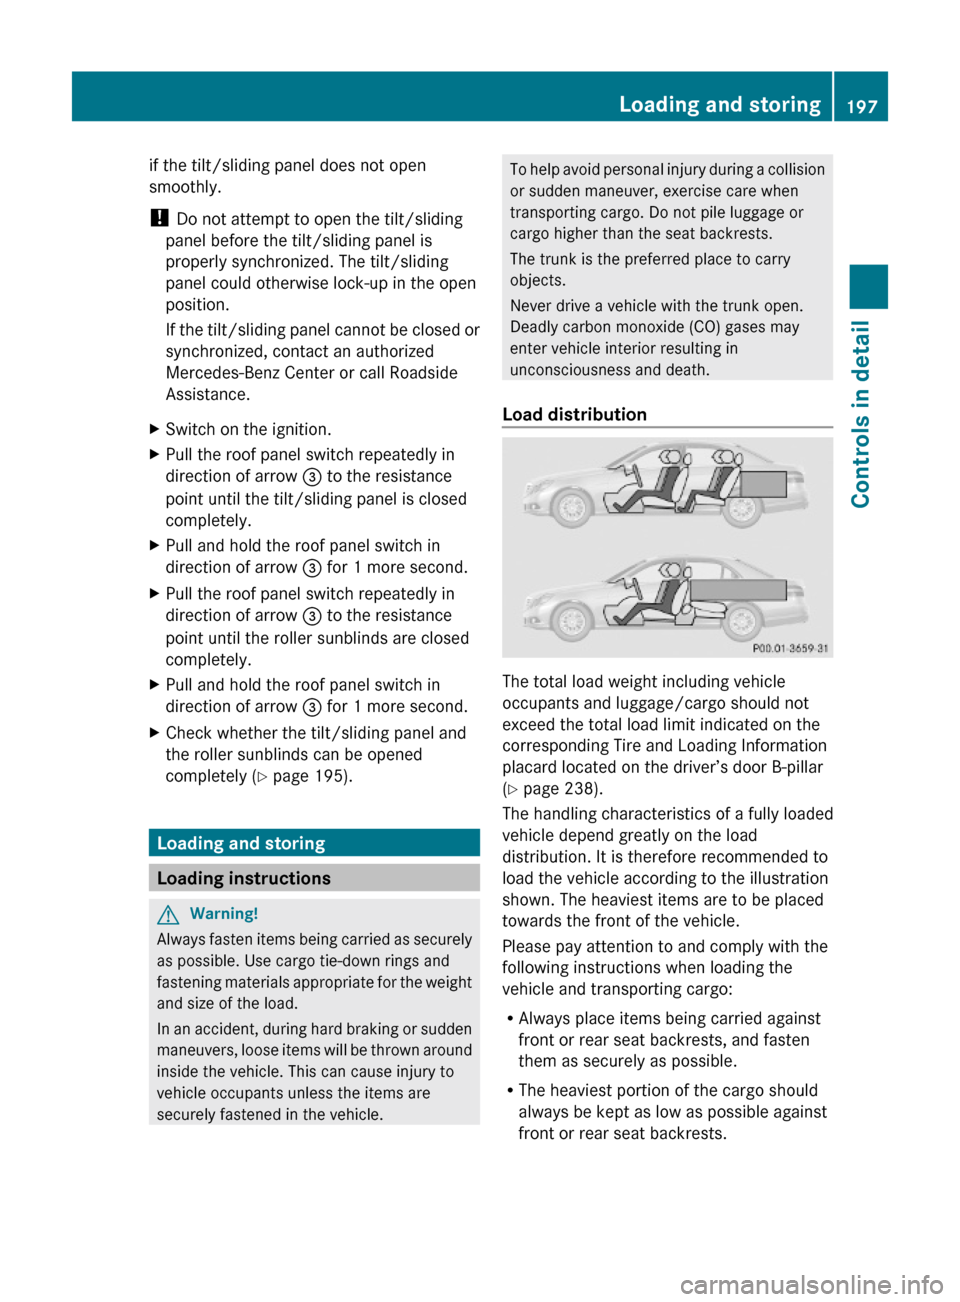
Load distribution
The total load weight including vehicle
occupants and luggage/cargo should not
exceed the total load limit indicated on the
corresponding Tire and Loading Information
placard located on the driver’s door B-pillar
(Y page 238).
The handling characteristics of a fully loaded
vehicle depend greatly on the load
distribution. It is therefore recommended to
load the vehicle according to the illustration
shown. The heaviest items are to be placed
towards the front of the vehicle.
Please pay attention to and comply with the
following instructions when loading the
vehicle and transporting cargo:
RAlways place items being carried against
front or rear seat backrests, and fasten
them as securely as possible.
RThe heaviest portion of the cargo should
always be kept as low as possible against
front or rear seat backrests.
Loading and storing197Controls in detail212_AKB; 2; 41, en-USd2ureepe,Version: 2.11.8.12009-07-17T09:14:21+02:00 - Seite 197Z
Page 202 of 372
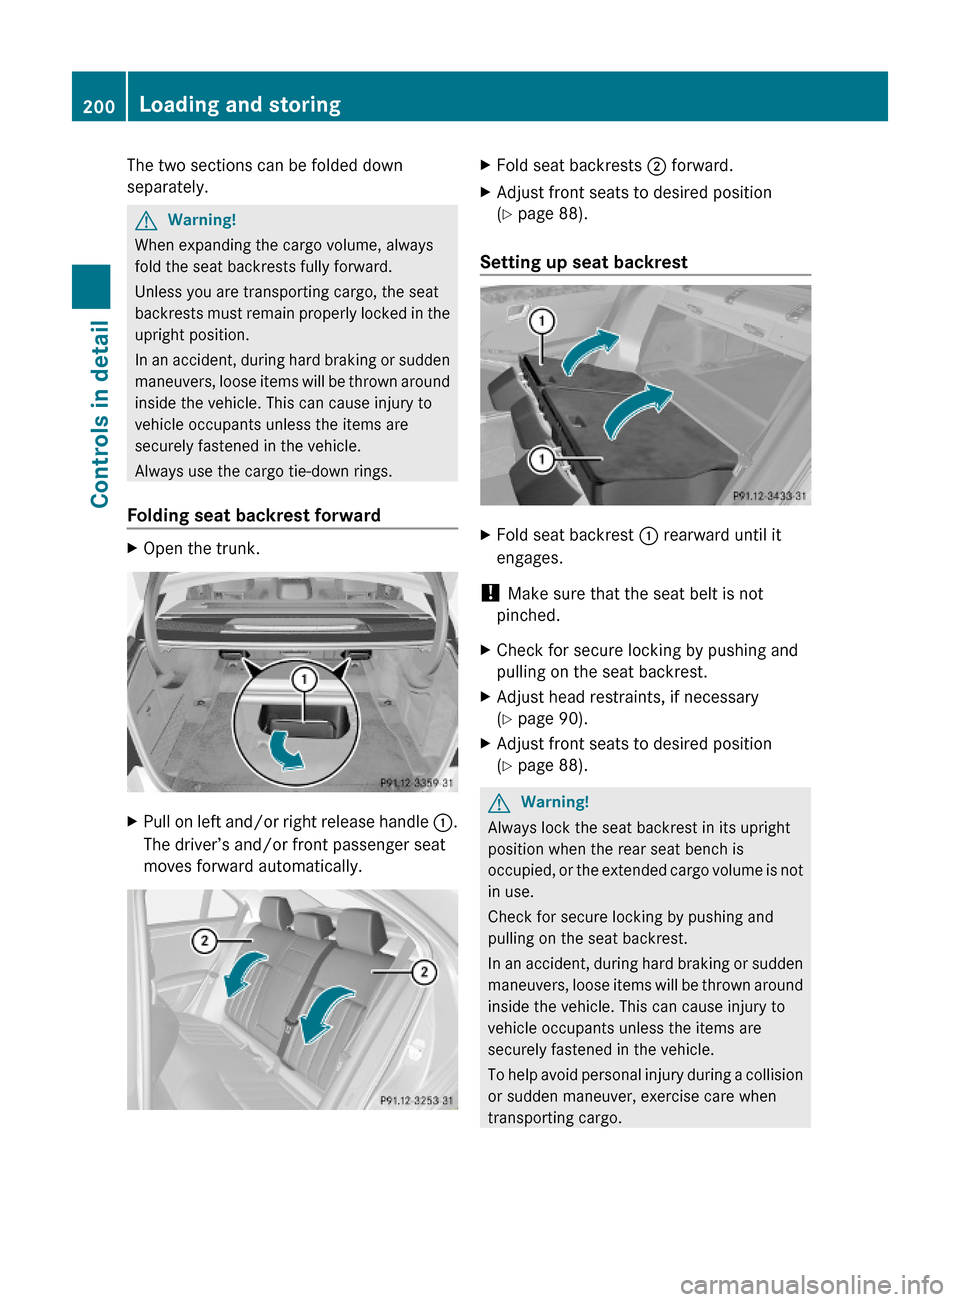
The two sections can be folded down
separately.
GWarning!
When expanding the cargo volume, always
fold the seat backrests fully forward.
Unless you are transporting cargo, the seat
backrests must remain properly locked in the
upright position.
In an accident, during hard braking or sudden
maneuvers, loose items will be thrown around
inside the vehicle. This can cause injury to
vehicle occupants unless the items are
securely fastened in the vehicle.
Always use the cargo tie-down rings.
Folding seat backrest forward
XOpen the trunk.XPull on left and/or right release handle :.
The driver’s and/or front passenger seat
moves forward automatically.
XFold seat backrests ; forward.XAdjust front seats to desired position
(Y page 88).
Setting up seat backrest
XFold seat backrest : rearward until it
engages.
! Make sure that the seat belt is not
pinched.
XCheck for secure locking by pushing and
pulling on the seat backrest.
XAdjust head restraints, if necessary
(Y page 90).
XAdjust front seats to desired position
(Y page 88).
GWarning!
Always lock the seat backrest in its upright
position when the rear seat bench is
occupied, or the extended cargo volume is not
in use.
Check for secure locking by pushing and
pulling on the seat backrest.
In an accident, during hard braking or sudden
maneuvers, loose items will be thrown around
inside the vehicle. This can cause injury to
vehicle occupants unless the items are
securely fastened in the vehicle.
To help avoid personal injury during a collision
or sudden maneuver, exercise care when
transporting cargo.
200Loading and storingControls in detail
212_AKB; 2; 41, en-USd2ureepe,Version: 2.11.8.12009-07-17T09:14:21+02:00 - Seite 200
Page 203 of 372
iTo prevent unauthorized persons from
access to the trunk, always lock the seat
backrests in its upright position.
Front storage compartments
GWarning!
To help avoid personal injury during a collision
or sudden maneuver, exercise care when
storing objects in the vehicle. Put luggage or
cargo in the trunk if possible.
Do not pile luggage or cargo higher than the
seat backrests.
Keep compartment lids closed. This will help
to prevent stored objects from being thrown
about and injuring vehicle occupants during
Rbraking
Rvehicle maneuvers
Ran accident
Glove box
Depending on vehicle equipment, an AUX
socket or a media interface is located in the
glove box. For information on Audio AUX
mode or on media interface, see separate
COMAND system operating instructions.
The glove box can be ventilated
(Y page 188).
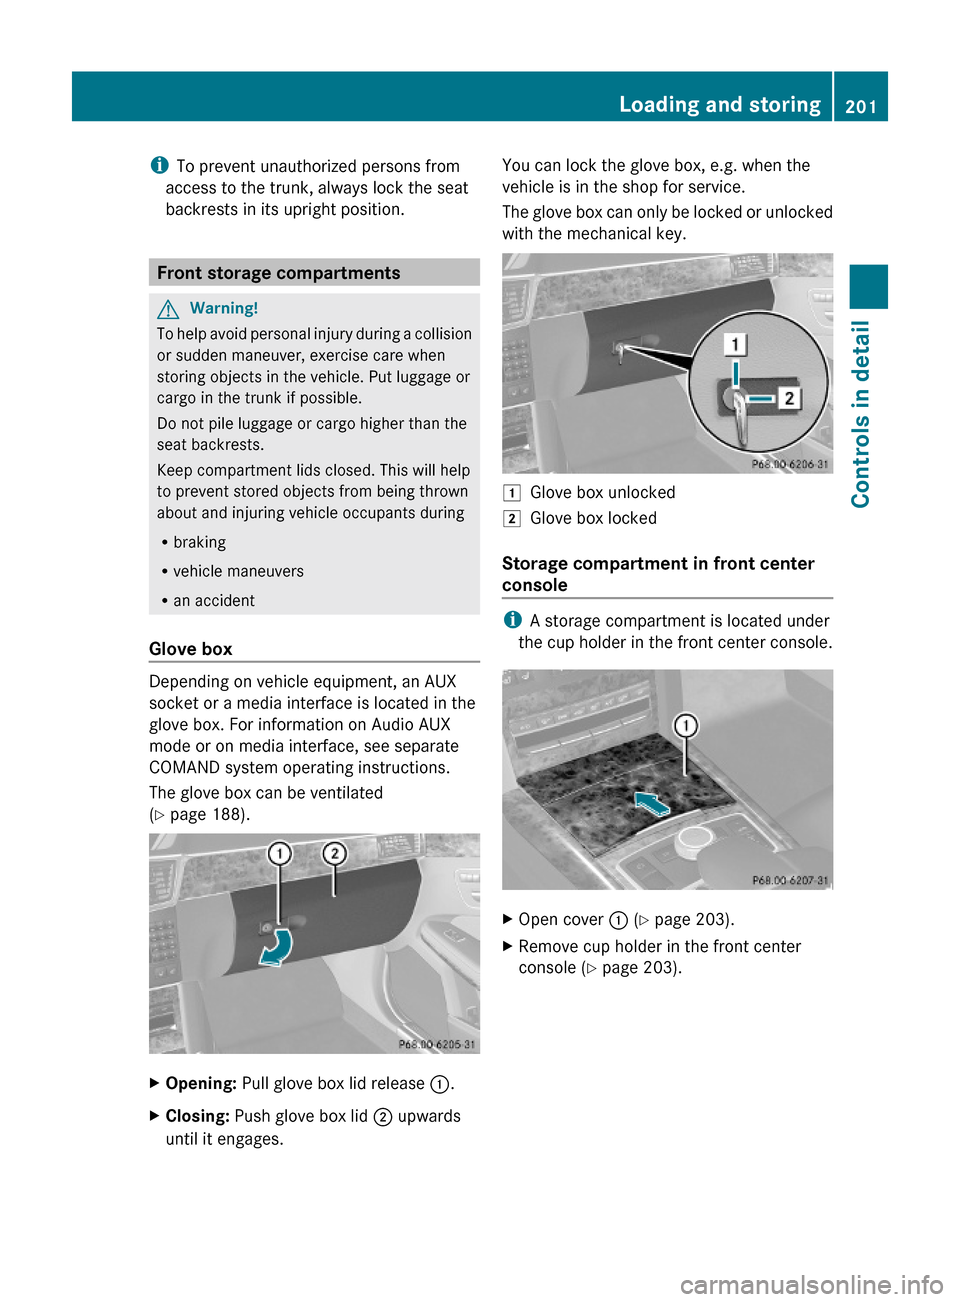
XOpening: Pull glove box lid release :.XClosing: Push glove box lid ; upwards
until it engages.
You can lock the glove box, e.g. when the
vehicle is in the shop for service.
The glove box can only be locked or unlocked
with the mechanical key.
1Glove box unlocked2Glove box locked
Storage compartment in front center
console
iA storage compartment is located under
the cup holder in the front center console.
XOpen cover : (Y page 203).XRemove cup holder in the front center
console (Y page 203).
Loading and storing201Controls in detail212_AKB; 2; 41, en-USd2ureepe,Version: 2.11.8.12009-07-17T09:14:21+02:00 - Seite 201Z