2010 MERCEDES-BENZ CLS63AMG wheel
[x] Cancel search: wheelPage 168 of 308

relevant cellular phone network is not
available).
The message
Call Failed appears in the
multifunction display for approximately
10 seconds.
Should this occur, assistance must be
summoned by other means.
i The “911” emergency call system is a
public service. Using it without due cause
is a criminal offense.
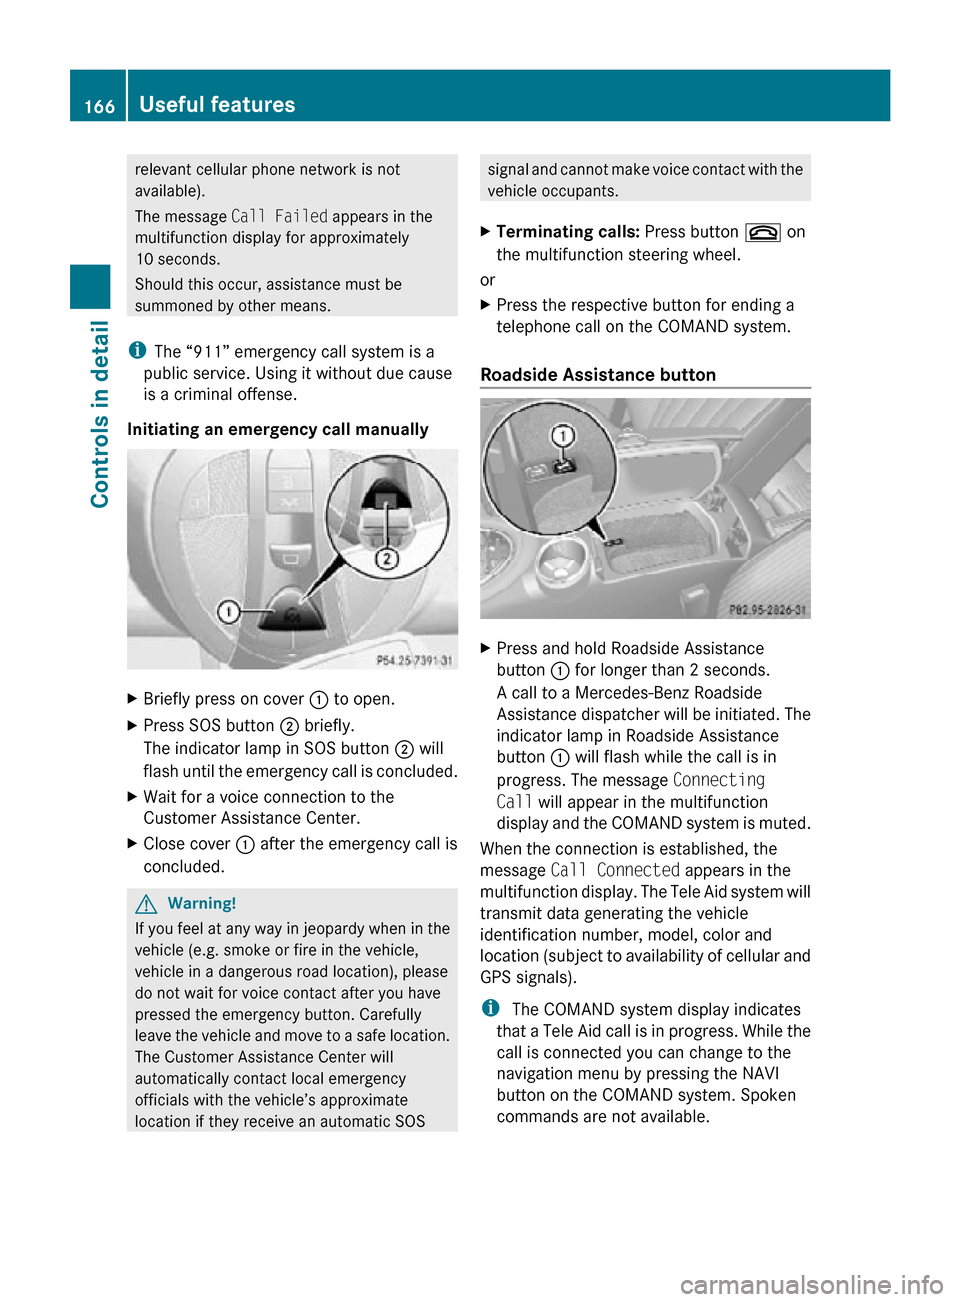
Initiating an emergency call manually X
Briefly press on cover : to open.
X Press SOS button ; briefly.
The indicator lamp in SOS button ; will
flash until the emergency call is concluded.
X Wait for a voice connection to the
Customer Assistance Center.
X Close cover : after the emergency call is
concluded. G
Warning!
If you feel at any way in jeopardy when in the
vehicle (e.g. smoke or fire in the vehicle,
vehicle in a dangerous road location), please
do not wait for voice contact after you have
pressed the emergency button. Carefully
leave the vehicle and move to a safe location.
The Customer Assistance Center will
automatically contact local emergency
officials with the vehicle’s approximate
location if they receive an automatic SOS signal and cannot make voice contact with the
vehicle occupants.
X Terminating calls: Press button ~ on
the multifunction steering wheel.
or
X Press the respective button for ending a
telephone call on the COMAND system.
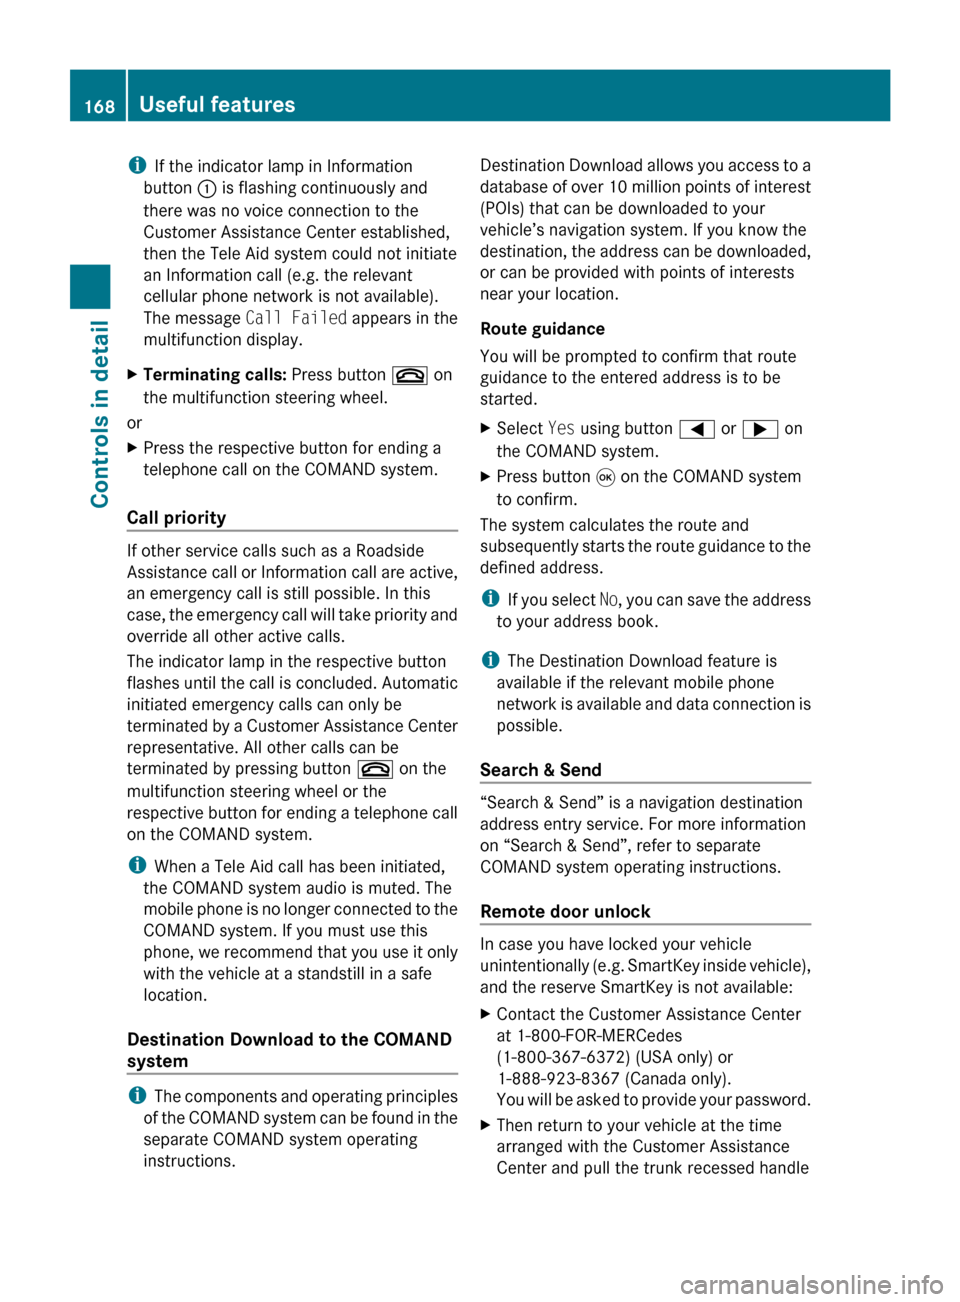
Roadside Assistance button X
Press and hold Roadside Assistance
button : for longer than 2 seconds.
A call to a Mercedes-Benz Roadside
Assistance dispatcher will be initiated. The
indicator lamp in Roadside Assistance
button : will flash while the call is in
progress. The message Connecting
Call will appear in the multifunction
display and the COMAND system is muted.
When the connection is established, the
message Call Connected appears in the
multifunction display. The Tele Aid system will
transmit data generating the vehicle
identification number, model, color and
location (subject to availability of cellular and
GPS signals).
i The COMAND system display indicates
that a Tele Aid call is in progress. While the
call is connected you can change to the
navigation menu by pressing the NAVI
button on the COMAND system. Spoken
commands are not available. 166
Useful featuresControls in detail
219_AKB; 4; 54, en-US
d2ureepe,
Version: 2.11.8.1 2009-05-11T16:21:02+02:00 - Seite 166
Page 169 of 308

A voice connection between the Roadside
Assistance dispatcher and the occupants of
the vehicle will be established.
X
Describe the nature of the need for
assistance.
The Mercedes-Benz Roadside Assistance
dispatcher will either dispatch a qualified
Mercedes-Benz technician or arrange to tow
your vehicle to the nearest authorized
Mercedes-Benz Center. For services such as
labor and/or towing, charges may apply.
Refer to the Roadside Assistance manual for
more information.
Sign and Drive services (USA only):
Services such as a jump start, a few gallons
of fuel or the replacement of a flat tire with
the vehicle spare wheel are obtainable at no
charge.
i If the indicator lamp in Roadside
Assistance button : is flashing
continuously and there was no voice
connection to the Customer Assistance
Center established, then the Tele Aid
system could not initiate a Roadside
Assistance call (e.g. the relevant cellular
phone network is not available). The
message Call Failed appears in the
multifunction display.
X Terminating calls: Press button ~ on
the multifunction steering wheel.
or
X Press the respective button for ending a
telephone call on the COMAND system. Information button X
Press and hold Information button : for
longer than 2 seconds.
A call to the Customer Assistance Center
will be initiated. The indicator lamp in
Information button : will flash while the
call is in progress. The message
Connecting Call will appear in the
multifunction display and the COMAND
system is muted.
When the connection is established, the
message Call Connected appears in the
multifunction display. The Tele Aid system will
transmit data generating the vehicle
identification number, model, color and
location (subject to availability of cellular and
GPS signals).
i The COMAND system display indicates
that a Tele Aid call is in progress. While the
call is connected you can change to the
navigation menu by pressing the NAVI
button on the COMAND system. Spoken
commands are not available.
A voice connection between the Customer
Assistance Center representative and the
occupants of the vehicle will be established.
Information regarding the operation of your
vehicle, the nearest authorized Mercedes-
Benz Center or Mercedes-Benz USA products
and services is available to you.
For more details concerning the Tele Aid
system, please visit www.mbusa.com (USA
only), log in to “Owner’s Online” and visit the
“My Tele Aid” section to learn more. Useful features
167Controls in detail
219_AKB; 4; 54, en-US
d2ureepe, Version: 2.11.8.1 2009-05-11T16:21:02+02:00 - Seite 167 Z
Page 170 of 308

i
If the indicator lamp in Information
button : is flashing continuously and
there was no voice connection to the
Customer Assistance Center established,
then the Tele Aid system could not initiate
an Information call (e.g. the relevant
cellular phone network is not available).
The message Call Failed appears in the
multifunction display.
X Terminating calls: Press button ~ on
the multifunction steering wheel.
or
X Press the respective button for ending a
telephone call on the COMAND system.
Call priority If other service calls such as a Roadside
Assistance
call or Information call are active,
an emergency call is still possible. In this
case, the emergency call will take priority and
override all other active calls.
The indicator lamp in the respective button
flashes until the call is concluded. Automatic
initiated emergency calls can only be
terminated by a Customer Assistance Center
representative. All other calls can be
terminated by pressing button ~ on the
multifunction steering wheel or the
respective button for ending a telephone call
on the COMAND system.
i When a Tele Aid call has been initiated,
the COMAND system audio is muted. The
mobile phone is no longer connected to the
COMAND system. If you must use this
phone, we recommend that you use it only
with the vehicle at a standstill in a safe
location.
Destination Download to the COMAND
system i
The
components and operating principles
of the COMAND system can be found in the
separate COMAND system operating
instructions. Destination Download allows you access to a
database
of over 10 million points of interest
(POIs) that can be downloaded to your
vehicle’s navigation system. If you know the
destination, the address can be downloaded,
or can be provided with points of interests
near your location.
Route guidance
You will be prompted to confirm that route
guidance to the entered address is to be
started.
X Select Yes using button = or ; on
the COMAND system.
X Press button 9 on the COMAND system
to confirm.
The system calculates the route and
subsequently
starts the route guidance to the
defined address.
i If you select No, you can save the address
to your address book.
i The Destination Download feature is
available if the relevant mobile phone
network is available and data connection is
possible.
Search & Send “Search & Send” is a navigation destination
address entry service. For more information
on “Search & Send”, refer to separate
COMAND system operating instructions.
Remote door unlock
In case you have locked your vehicle
unintentionally
(e.g. SmartKey inside vehicle),
and the reserve SmartKey is not available:
X Contact the Customer Assistance Center
at 1-800-FOR-MERCedes
(1-800-367-6372)
(USA only) or
1-888-923-8367 (Canada only).
You will be asked to provide your password.
X Then return to your vehicle at the time
arranged with the Customer Assistance
Center and pull the trunk recessed handle 168
Useful features
Controls in detail
219_AKB; 4; 54, en-US
d2ureepe,
Version: 2.11.8.1 2009-05-11T16:21:02+02:00 - Seite 168
Page 177 of 308

Vehicle equipment ............................
176
The first 1000 miles (1500 km) .......176
At the gas station ............................. 176
Engine compartment ........................ 178
Tires and wheels ............................... 182
Winter driving ................................... 208
Driving instructions ..........................210
Maintenance ...................................... 214
Vehicle care ....................................... 215 175Operation
219_AKB; 4; 54, en-US
d2ureepe,
Version: 2.11.8.1 2009-05-11T16:21:02+02:00 - Seite 175
Page 184 of 308

X
Opening washer fluid reservoir: Pull tab
of cap : upwards.
X Refill the washer fluid reservoir.
X Closing washer fluid reservoir: Press
cap : onto filler hole until it engages.
For more information, see “Washer system
and headlamp cleaning system”
(Y page 297). Brake fluid level
! If you find that the brake fluid in the brake
fluid reservoir has fallen to the minimum
mark or below, have the brake system
checked for brake pad thickness and leaks
immediately. Contact an authorized
Mercedes-Benz Center immediately. Do
not add brake fluid as this will not solve the
problem. For more information, see
“Practical hints”.
When checking the brake fluid level, the
vehicle must be parked on level ground. The brake fluid level is correct when it is
between lower mark (MIN)
; and upper
mark (MAX) : of the brake fluid reservoir. Tires and wheels
Safety notes
Contact an authorized Mercedes-Benz Center
for information on tested and recommended
rims and tires for summer and winter
operation. They can also offer advice
concerning tire service and purchase. G
Warning!
Replace rims or tires with the same
designation, manufacturer and type as shown
on the original part. For further information
contact an authorized Mercedes-Benz Center.
If incorrectly sized rims and tires are
mounted, the wheel brakes or suspension
components can be damaged. Also, the
operating clearance of the wheels and the
tires may no longer be correct. G
Warning!
Worn, old tires can cause accidents. If the tire
tread is worn to minimum tread depth, or if
the tires have sustained damage, replace
them.
When replacing rims, only use genuine
Mercedes-Benz wheel bolts specified for the
particular rim type. Failure to do so can result
in the bolts loosening and possibly an
accident.
Retreaded tires are not tested or
recommended by Mercedes-Benz, since
previous damage cannot always be
recognized on retreads. The operating safety
of the vehicle cannot be assured when such
tires are used. G
Warning!
If you feel a sudden significant vibration or
ride disturbance, or you suspect that possible
damage to your vehicle has occurred, you 182
Tires and wheelsOperation
219_AKB; 4; 54, en-US
d2ureepe,
Version: 2.11.8.1 2009-05-11T16:21:02+02:00 - Seite 182
Page 185 of 308

should turn on the hazard warning flashers,
carefully
slow down, and drive with caution to
an area which is a safe distance from the road.
Inspect the tires and the vehicle underbody
for possible damage. If the vehicle or tires
appear unsafe, have the vehicle towed to the
nearest authorized Mercedes-Benz Center or
tire dealer for repairs. G
Warning!
Do not drive with a flat tire. A flat tire affects
the ability to steer or brake the vehicle. You
could lose control of the vehicle. Continued
driving
with a flat tire or driving at high speed
with a flat tire will cause excessive heat build-
up and possibly a fire. Important guidelines
R Only
use sets of tires and rims of the same
type and make.
R Tires must be of the correct size for the rim.
R Break in new tires for approximately
60 miles (100 km) at moderate speeds.
R Regularly check the tires and rims for
damage. Dented or bent rims can cause tire
inflation pressure loss and damage to the
tire beads.
R If the vehicle is heavily loaded, check tire
inflation pressure and correct as required.
R Do not allow your tires to wear down too
far. Adhesion properties on wet roads are
sharply reduced at tread depths of less
than 1
/ 8 in (3 mm).
R When replacing individual tires, you should
mount new tires on the front wheels first
(on vehicles with same-sized wheels all
around). Recommended tire inflation pressure
G
Warning!
Follow recommended tire inflation pressures.
Do not underinflate tires. Underinflated tires
wear excessively and/or unevenly, adversely
affect handling and fuel economy, and are
more likely to fail from being overheated.
Do
not overinflate tires. Overinflated tires can
adversely affect handling and ride comfort,
wear unevenly, increase stopping distance,
and result in sudden deflation (blowout)
because they are more likely to become
punctured or damaged by road debris,
potholes etc.
Do not overload the tires by exceeding the
specified load limit as indicated on the Tire
and Loading Information placard on the
driver’s door B-pillar. Overloading the tires
can overheat them, possibly causing a
blowout. Overloading the tires can also result
in handling or steering problems, or brake
failure.
Your vehicle is equipped with the Tire and
Loading Information placard located on the
driver’s door B-pillar ( Y page 193).
The tire inflation pressure should be checked
regularly. Only adjust the tire inflation
pressure on cold tires. The tires can be
considered cold if the vehicle has been
parked for at least 3 hours or driven less than
1 mile (1.6 km). Depending on the ambient
temperature, the driving speed and the tire
load, the tire temperature changes. When the
tire temperature changes by 18‡ (10†), the
tire inflation pressure will change by
approximately 1.5 psi (0.1 bar). Keep this in
mind when checking tire inflation pressure on
warm tires and adjust the tire pressure only
if the tire inflation pressure is too low for the
current operating conditions. If you check the
tire inflation pressure when the tires are
warm, the reading will be higher than the cold
reading. This is normal. Do not let air out to
match the specified cold tire inflation Tires and wheels
183
Operation
219_AKB; 4; 54, en-US
d2ureepe, Version: 2.11.8.1 2009-05-11T16:21:02+02:00 - Seite 183 Z
Page 186 of 308

pressure. Otherwise, the tire will be
underinflated.
Follow recommended cold tire inflation
pressures listed on Tire and Loading
Information placard on the driver’s door
B-pillar.
Keeping the tires properly inflated provides
the best handling, tread life and riding
comfort.
In addition to the Tire and Loading
Information placard on the driver’s door
B-pillar, also consult the tire inflation
pressure label on the inside of the filler flap
for any additional information pertaining to
special driving situations. For more
information, see “Important notes on tire
inflation pressure” (
Y page 184).
i Data shown on Tire and Loading
Information placard example are for
illustration purposes only. Tire data are
specific to each vehicle and may vary from
data shown in the following illustration.
Refer to Tire and Loading Information
placard on vehicle for actual data specific
to your vehicle. The Tire and Loading Information placard lists
the recommended cold tire inflation
pressures
: for maximum loaded vehicle
weight. The tire inflation pressures listed
apply to the tires installed as original
equipment. Important notes on tire inflation
pressure G
Warning!
If the tire inflation pressure drops repeatedly,
check the tires for punctures from foreign
objects and/or whether air is leaking from the
valves or from around the rim.
Tire temperature and tire inflation pressure
are also increased while driving, depending
on the driving speed and the tire load.
If you will be driving your vehicle at high
speeds of 100 mph (160 km/h) or higher,
where it is legal and conditions allow, consult
the tire inflation pressure label on the inside
of the fuel filler flap on how to adjust the cold
tire inflation pressure. If you do not adjust the
tire inflation pressure, excessive heat can
build up and result in sudden tire failure.
If you are not sure about the proper tire
inflation, contact an authorized Mercedes-
Benz Center.
i Driving comfort may be reduced when the
tire inflation pressure is adjusted to the
value for speeds above 100 mph
(160 km/h) as specified on the tire inflation
pressure label located on the inside of the
fuel filler flap.
Make sure to readjust the tire inflation
pressure for normal driving speeds.
Supplemental tire inflation pressure
information for different loading conditions of
the vehicle can be found on the tire inflation
pressure label. The tire inflation pressure
label is located on the inside of the fuel filler
flap.
For the tire inflation pressure for spare
wheels such as Minispare wheels or spare
wheels with collapsible tire refer to
R the yellow label on the spare wheel rim
R the “Technical data” section of this
Operator’s Manual ( Y page 296)
R the Tire and Loading Information placard on
the driver’s door B-pillar 184
Tires and wheelsOperation
219_AKB; 4; 54, en-US
d2ureepe,
Version: 2.11.8.1 2009-05-11T16:21:02+02:00 - Seite 184
Page 187 of 308

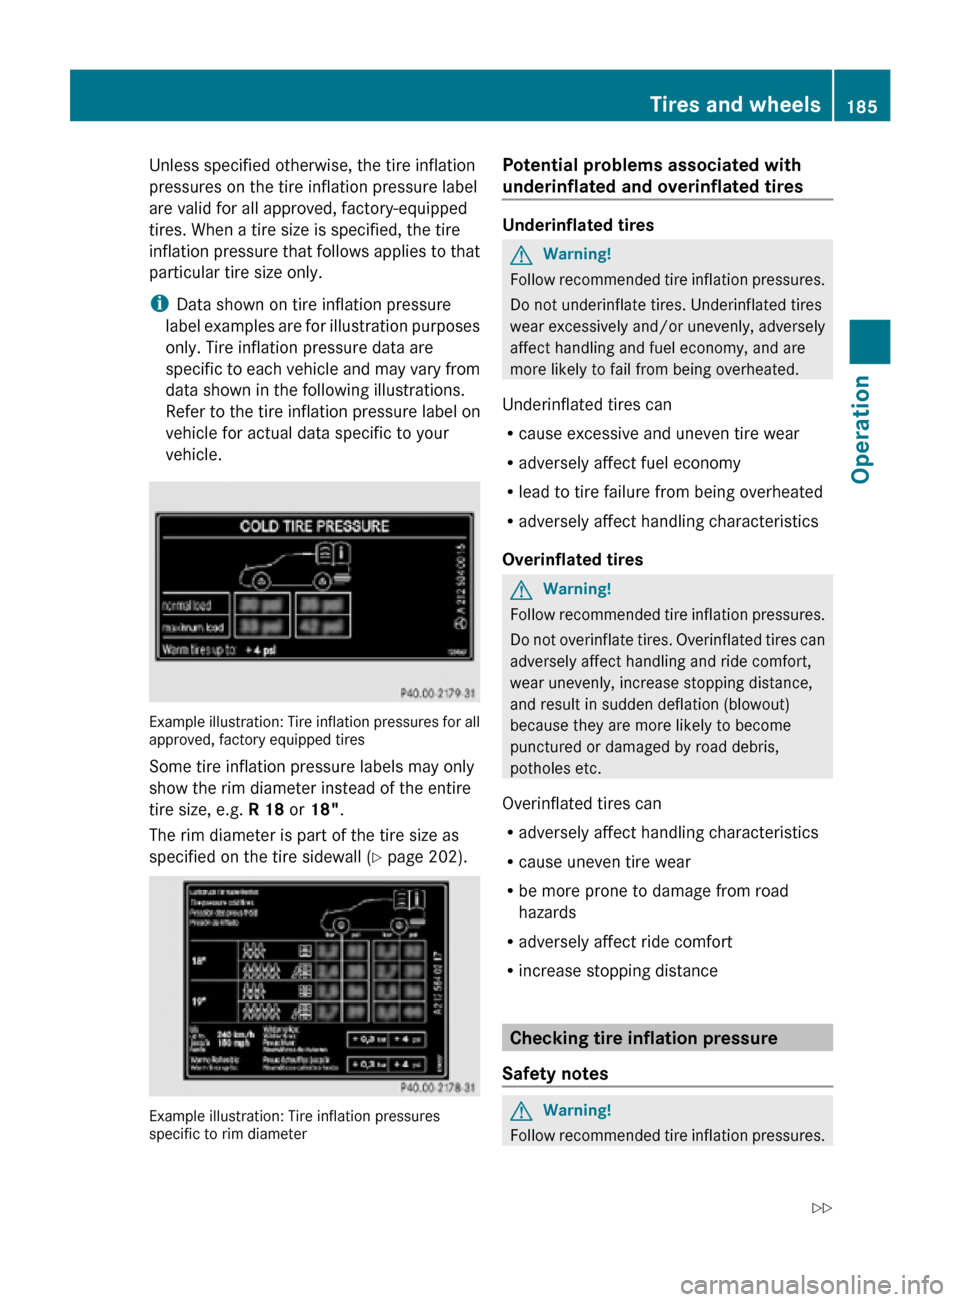
Unless specified otherwise, the tire inflation
pressures on the tire inflation pressure label
are valid for all approved, factory-equipped
tires. When a tire size is specified, the tire
inflation pressure that follows applies to that
particular tire size only.
i
Data shown on tire inflation pressure
label examples are for illustration purposes
only. Tire inflation pressure data are
specific to each vehicle and may vary from
data shown in the following illustrations.
Refer to the tire inflation pressure label on
vehicle for actual data specific to your
vehicle. Example illustration: Tire inflation pressures for all
approved, factory equipped tires
Some tire inflation pressure labels may only
show the rim diameter instead of the entire
tire size, e.g. R 18 or 18".
The rim diameter is part of the tire size as
specified on the tire sidewall (Y page 202).
Example illustration: Tire inflation pressures
specific to rim diameter Potential problems associated with
underinflated and overinflated tires Underinflated tires
G
Warning!
Follow recommended tire inflation pressures.
Do not underinflate tires. Underinflated tires
wear excessively and/or unevenly, adversely
affect handling and fuel economy, and are
more likely to fail from being overheated.
Underinflated tires can
R cause excessive and uneven tire wear
R adversely affect fuel economy
R lead to tire failure from being overheated
R adversely affect handling characteristics
Overinflated tires G
Warning!
Follow recommended tire inflation pressures.
Do not overinflate tires. Overinflated tires can
adversely affect handling and ride comfort,
wear unevenly, increase stopping distance,
and result in sudden deflation (blowout)
because they are more likely to become
punctured or damaged by road debris,
potholes etc.
Overinflated tires can
R adversely affect handling characteristics
R cause uneven tire wear
R be more prone to damage from road
hazards
R adversely affect ride comfort
R increase stopping distance Checking tire inflation pressure
Safety notes G
Warning!
Follow recommended tire inflation pressures. Tires and wheels
185Operation
219_AKB; 4; 54, en-US
d2ureepe, Version: 2.11.8.1 2009-05-11T16:21:02+02:00 - Seite 185 Z