2010 MERCEDES-BENZ CLS63AMG ESP
[x] Cancel search: ESPPage 137 of 308
R
the ESP ®
has switched off due to a
malfunction
R you shift the automatic transmission into
neutral position N while driving
The cruise control speed segments in the
multifunction display goes out and an
acoustic warning will sound. Observe
additional messages in the multifunction
display that may appear. G
Warning!
Distronic switches off and releases the brakes
when the vehicle decelerates below the
minimum speed of 20 mph (30 km/h) by
operation of the system. At that time the
driver must apply the brakes in order to
reduce vehicle speed further or bring it to a
stop.
Depressing the accelerator pedal does not
deactivate the Distronic. After a brief
acceleration (e.g. for passing), the Distronic
will resume the last set speed.
Setting the following distance in
Distronic You can set the specified following distance
for Distronic by varying the time setting
between 1.0 and 2.0 seconds. Using this time
setting and the current speed of your vehicle,
Distronic calculates and sets the required
following distance to the preceding vehicle.
The set distance will be shown in the
multifunction display.
G
Warning!
It is up to the driver to exercise discretion to
select the appropriate setting given road
conditions, traffic, driver’s preferred driving
style and applicable laws and driving
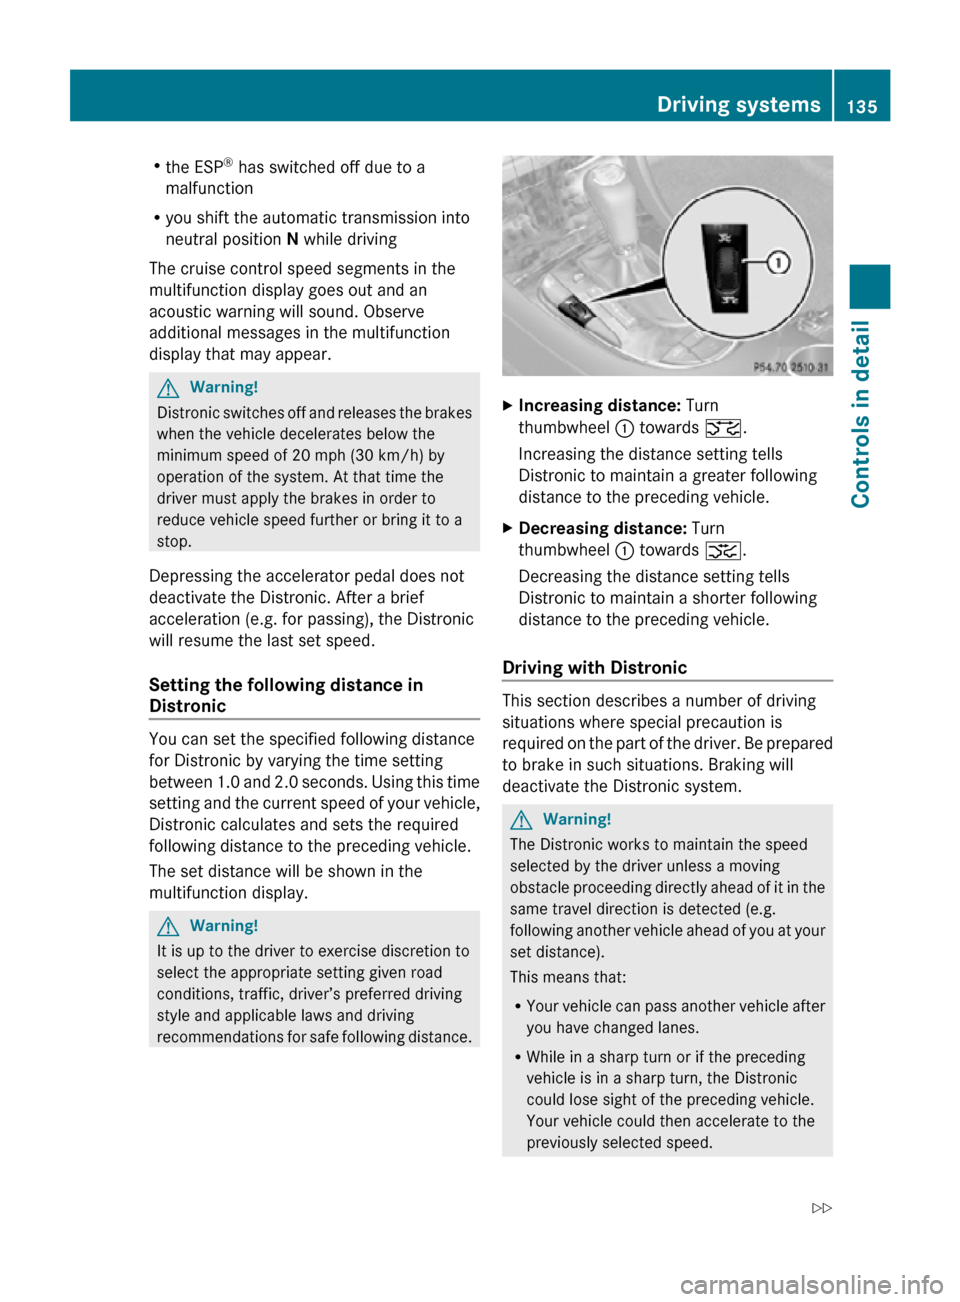
recommendations for safe following distance. X
Increasing distance: Turn
thumbwheel : towards ª.
Increasing the distance setting tells
Distronic to maintain a greater following
distance to the preceding vehicle.
X Decreasing distance: Turn
thumbwheel : towards ¥.
Decreasing the distance setting tells
Distronic to maintain a shorter following
distance to the preceding vehicle.
Driving with Distronic This section describes a number of driving
situations where special precaution is
required on the part of the driver. Be prepared
to brake in such situations. Braking will
deactivate the Distronic system.
G
Warning!
The Distronic works to maintain the speed
selected by the driver unless a moving
obstacle proceeding directly ahead of it in the
same travel direction is detected (e.g.
following another vehicle ahead of you at your
set distance).
This means that:
R Your vehicle can pass another vehicle after
you have changed lanes.
R While in a sharp turn or if the preceding
vehicle is in a sharp turn, the Distronic
could lose sight of the preceding vehicle.
Your vehicle could then accelerate to the
previously selected speed. Driving systems
135Controls in detail
219_AKB; 4; 54, en-US
d2ureepe, Version: 2.11.8.1 2009-05-11T16:21:02+02:00 - Seite 135 Z
Page 138 of 308
The Distronic regulates only the distance
between your vehicle and those directly
ahead of it, but does not register stationary
objects in the road, e.g.:
R
a stopped vehicle in a traffic jam
R a disabled vehicle
R an oncoming vehicle
The driver must always be alert, observe all
traffic and intercede as required by means of
steering or braking the vehicle. G
Warning!
The Distronic should not be used in snowy or
icy road conditions.
The most likely cause for a malfunctioning
system is a dirty Distronic system sensor
cover (located in the hood grille), especially
at times of snow and ice or heavy rain.
In such a case, the Distronic will switch off,
and the message DISTRONIC Currently
Unavailable – See Operator’s Manual
appears in the multifunction display.
For cleaning and care of the Distronic system
sensor cover, see (Y page 219).
i If the message DISTRONIC Currently
Unavailable – See Operator’s
Manual disappears during driving and the
last set speed flashes for approximately
5 seconds, the dirt (e.g. slush) has
dissolved; the Distronic works again.
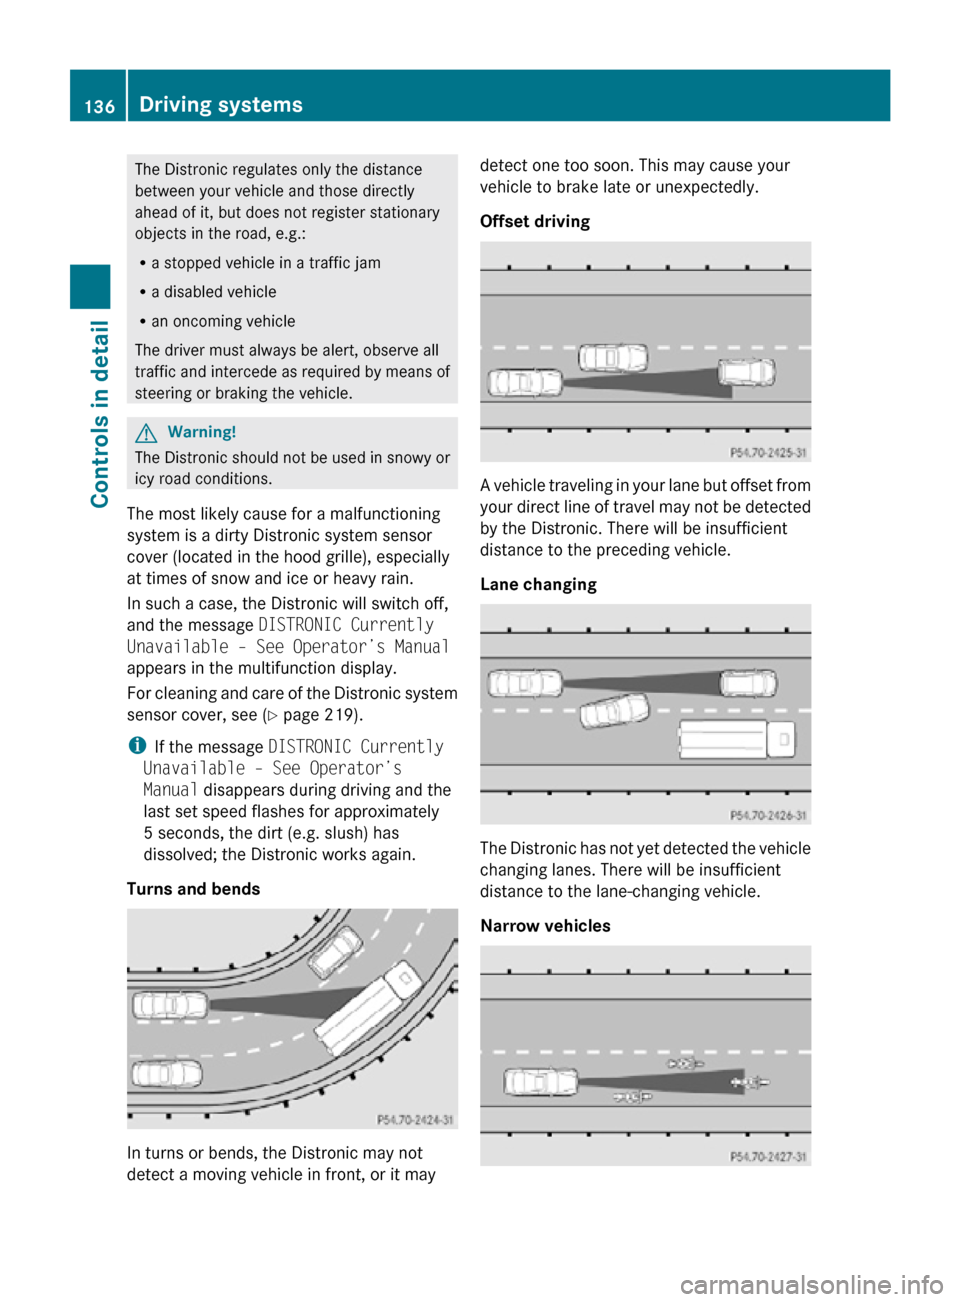
Turns and bends In turns or bends, the Distronic may not
detect a moving vehicle in front, or it may detect one too soon. This may cause your
vehicle to brake late or unexpectedly.
Offset driving
A vehicle traveling in your lane but offset from
your direct line of travel may not be detected
by the Distronic. There will be insufficient
distance to the preceding vehicle.
Lane changing
The Distronic has not yet detected the vehicle
changing lanes. There will be insufficient
distance to the lane-changing vehicle.
Narrow vehicles136
Driving systemsControls in detail
219_AKB; 4; 54, en-US
d2ureepe,
Version: 2.11.8.1 2009-05-11T16:21:02+02:00 - Seite 136
Page 139 of 308
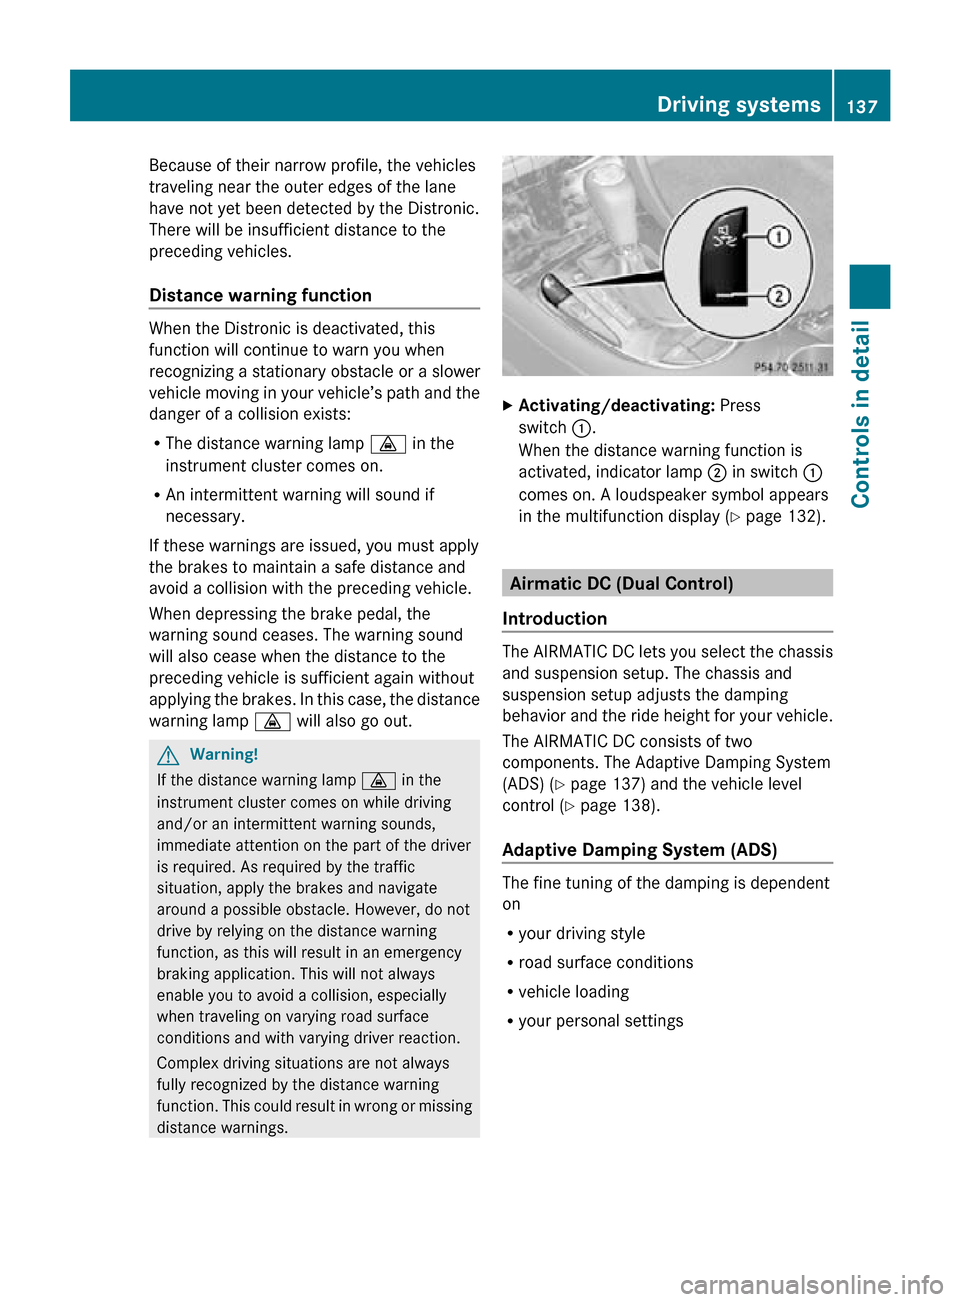
Because of their narrow profile, the vehicles
traveling near the outer edges of the lane
have not yet been detected by the Distronic.
There will be insufficient distance to the
preceding vehicles.
Distance warning function
When the Distronic is deactivated, this
function will continue to warn you when
recognizing a stationary obstacle or a slower
vehicle moving in your vehicle’s path and the
danger of a collision exists:
R
The distance warning lamp · in the
instrument cluster comes on.
R An intermittent warning will sound if
necessary.
If these warnings are issued, you must apply
the brakes to maintain a safe distance and
avoid a collision with the preceding vehicle.
When depressing the brake pedal, the
warning sound ceases. The warning sound
will also cease when the distance to the
preceding vehicle is sufficient again without
applying the brakes. In this case, the distance
warning lamp · will also go out. G
Warning!
If the distance warning lamp · in the
instrument cluster comes on while driving
and/or an intermittent warning sounds,
immediate attention on the part of the driver
is required. As required by the traffic
situation, apply the brakes and navigate
around a possible obstacle. However, do not
drive by relying on the distance warning
function, as this will result in an emergency
braking application. This will not always
enable you to avoid a collision, especially
when traveling on varying road surface
conditions and with varying driver reaction.
Complex driving situations are not always
fully recognized by the distance warning
function. This could result in wrong or missing
distance warnings. X
Activating/deactivating: Press
switch :.
When the distance warning function is
activated, indicator lamp ; in switch :
comes on. A loudspeaker symbol appears
in the multifunction display ( Y page 132). Airmatic DC (Dual Control)
Introduction The AIRMATIC DC lets you select the chassis
and suspension setup. The chassis and
suspension setup adjusts the damping
behavior and the ride height for your vehicle.
The AIRMATIC DC consists of two
components. The Adaptive Damping System
(ADS) (
Y page 137) and the vehicle level
control ( Y page 138).
Adaptive Damping System (ADS) The fine tuning of the damping is dependent
on
R
your driving style
R road surface conditions
R vehicle loading
R your personal settings Driving systems
137Controls in detail
219_AKB; 4; 54, en-US
d2ureepe, Version: 2.11.8.1 2009-05-11T16:21:02+02:00 - Seite 137 Z
Page 142 of 308
and
R the automatic transmission is in drive
position D, reverse gear R, or neutral
position N
The Parktronic system deactivates at speeds
above approximately 11 mph (18 km/h). At
lower speeds, the Parktronic system
activates again.
The Parktronic system also deactivates when
you shift the automatic transmission into
park position P or engage the parking brake.
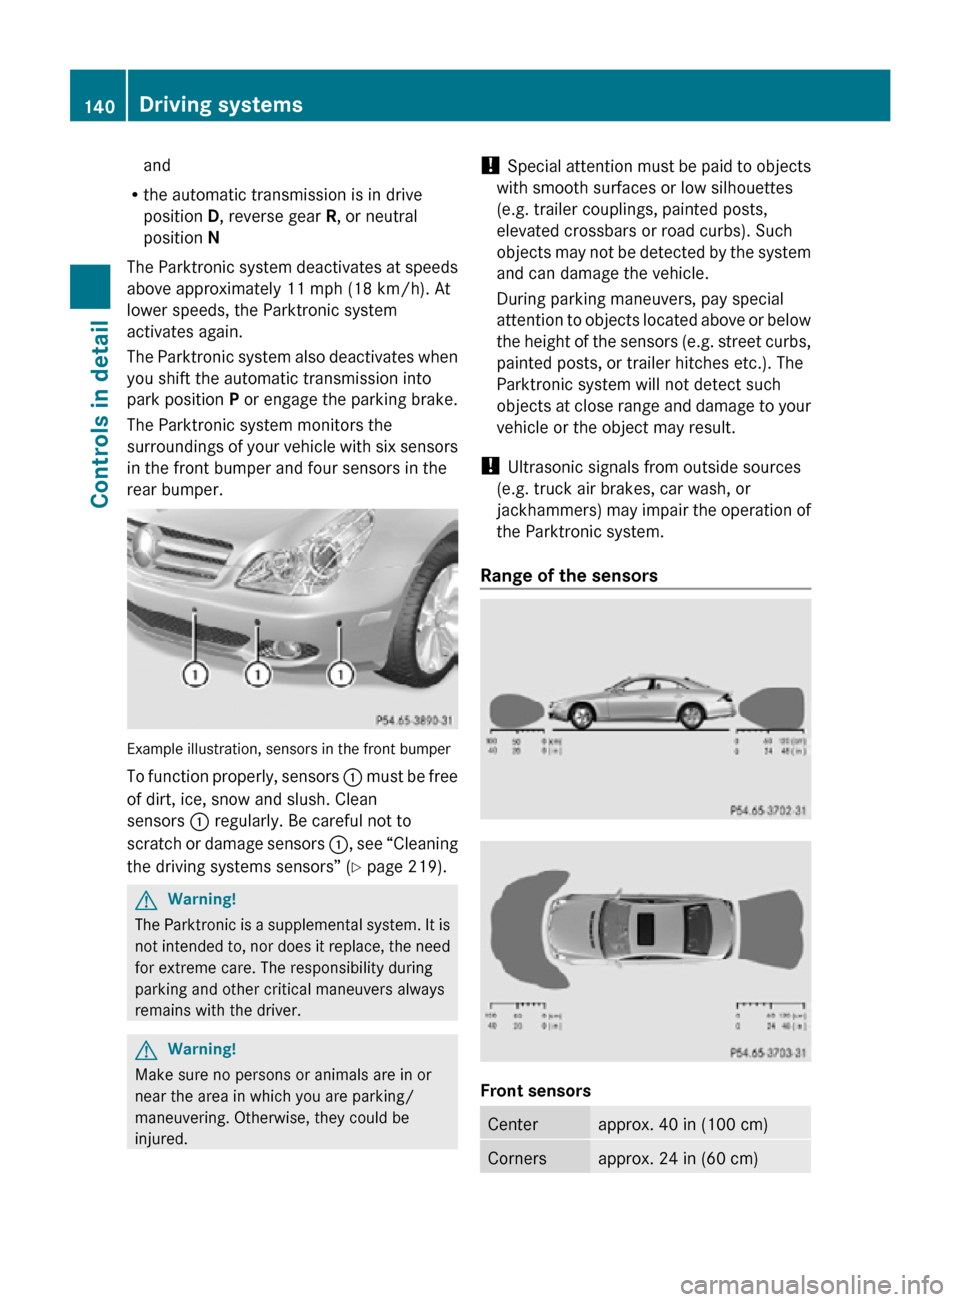
The Parktronic system monitors the
surroundings of your vehicle with six sensors
in the front bumper and four sensors in the
rear bumper. Example illustration, sensors in the front bumper
To function properly, sensors
: must be free
of dirt, ice, snow and slush. Clean
sensors : regularly. Be careful not to
scratch or damage sensors :, see “Cleaning
the driving systems sensors” (Y page 219). G
Warning!
The Parktronic is a supplemental system. It is
not intended to, nor does it replace, the need
for extreme care. The responsibility during
parking and other critical maneuvers always
remains with the driver. G
Warning!
Make sure no persons or animals are in or
near the area in which you are parking/
maneuvering. Otherwise, they could be
injured. !
Special attention must be paid to objects
with smooth surfaces or low silhouettes
(e.g. trailer couplings, painted posts,
elevated crossbars or road curbs). Such
objects may not be detected by the system
and can damage the vehicle.
During parking maneuvers, pay special
attention to objects located above or below
the height of the sensors (e.g. street curbs,
painted posts, or trailer hitches etc.). The
Parktronic system will not detect such
objects at close range and damage to your
vehicle or the object may result.
! Ultrasonic signals from outside sources
(e.g. truck air brakes, car wash, or
jackhammers) may impair the operation of
the Parktronic system.
Range of the sensors Front sensors
Center approx. 40 in (100 cm)
Corners approx. 24 in (60 cm)140
Driving systemsControls in detail
219_AKB; 4; 54, en-US
d2ureepe,
Version: 2.11.8.1 2009-05-11T16:21:02+02:00 - Seite 140
Page 149 of 308
automatic air distribution remains
switched on.
or
X Turn air distribution control : or C
(Y page 143) on each side of the passenger
compartment to the desired symbol.
The indicator lamp in button à goes out.
Automatic air distribution is switched off in
the corresponding zone, and air
distribution is controlled according to the
desired position. The automatic air volume
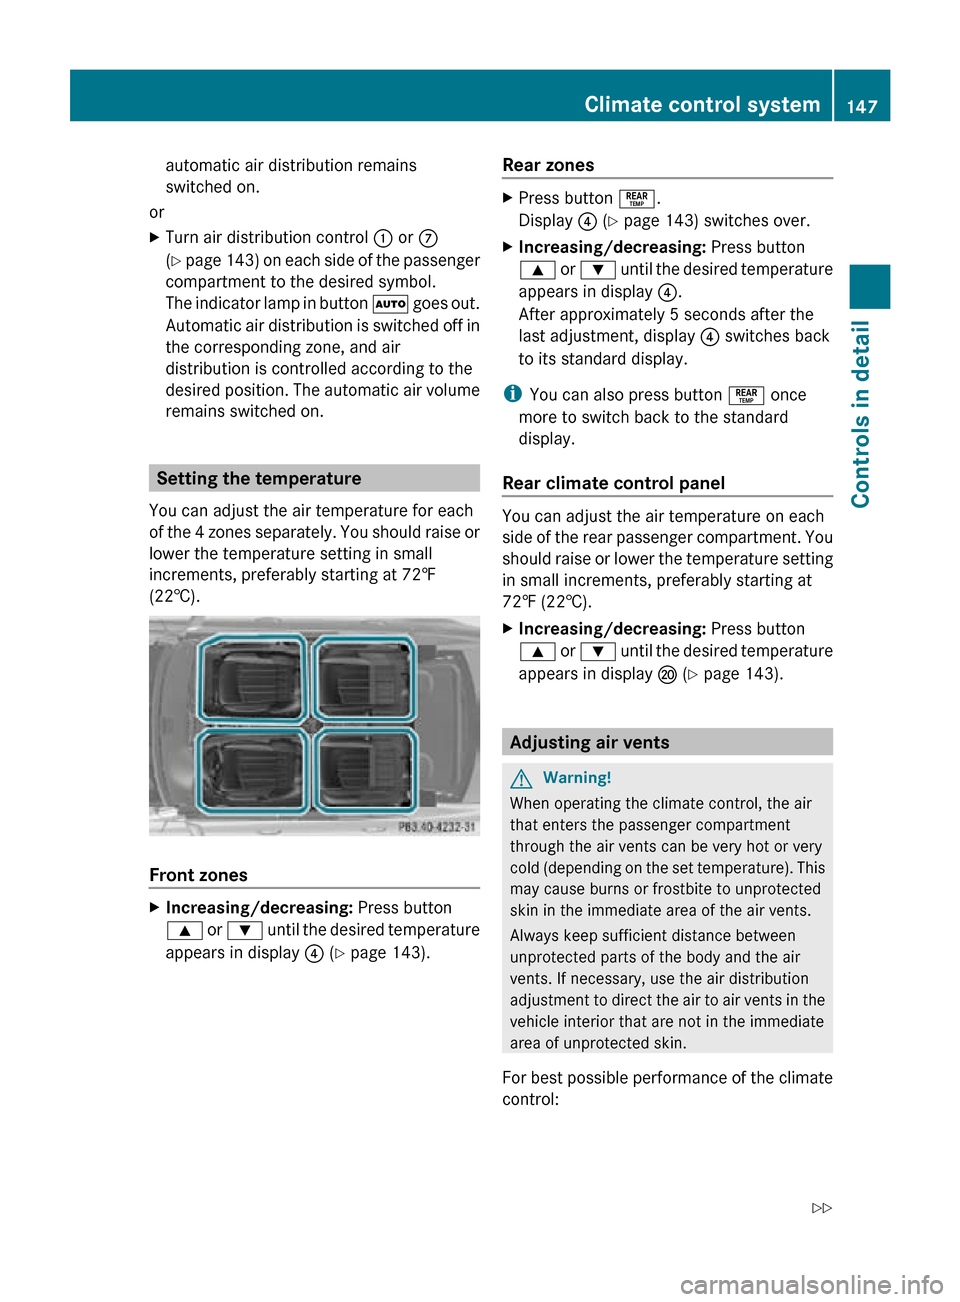
remains switched on. Setting the temperature
You can adjust the air temperature for each
of the 4 zones separately. You should raise or
lower the temperature setting in small
increments, preferably starting at 72‡
(22†). Front zones
X
Increasing/decreasing: Press button
9 or : until the desired temperature
appears in display ? (Y page 143). Rear zones X
Press button °.
Display ? (Y page 143) switches over.
X Increasing/decreasing: Press button
9 or : until the desired temperature
appears in display ?.
After approximately 5 seconds after the
last adjustment, display ? switches back
to its standard display.
i You can also press button ° once
more to switch back to the standard
display.
Rear climate control panel You can adjust the air temperature on each
side of the rear passenger compartment. You
should raise or lower the temperature setting
in small increments, preferably starting at
72‡ (22†).
X
Increasing/decreasing: Press button
9 or : until the desired temperature
appears in display P (Y page 143). Adjusting air vents
G
Warning!
When operating the climate control, the air
that enters the passenger compartment
through the air vents can be very hot or very
cold (depending on the set temperature). This
may cause burns or frostbite to unprotected
skin in the immediate area of the air vents.
Always keep sufficient distance between
unprotected parts of the body and the air
vents. If necessary, use the air distribution
adjustment to direct the air to air vents in the
vehicle interior that are not in the immediate
area of unprotected skin.
For best possible performance of the climate
control: Climate control system
147Controls in detail
219_AKB; 4; 54, en-US
d2ureepe, Version: 2.11.8.1 2009-05-11T16:21:02+02:00 - Seite 147 Z
Page 153 of 308
The indicator lamp in button
g is not lit
when the air recirculation mode is switched
on automatically.
A quantity of outside air is added after
approximately 30 minutes.
X Deactivating: Press button g again.
The indicator lamp in the button goes out.
i The manually selected air recirculation
mode is deactivated automatically:
R after 5 minutes if the outside
temperature is below approximately
41‡ (5†)
R after 5 minutes if the air conditioning is
turned off
R after 30 minutes if the outside
temperature is above approximately
41‡ (5†) Residual heat and ventilation
This feature is only available in Canada
vehicles.
With the engine turned off, it is possible to
continue to heat or ventilate the interior for
up to 30 minutes. This feature makes use of
the residual heat produced by the engine.
i If
you switch on the residual heat function
when outside temperatures are high, only
the ventilation will be switched on.
i Regardless of the selected air volume, the
blower operates at low speed.
i How long the system will provide heating
depends on the coolant temperature and
the selected temperature. The blower will
run at speed setting 1 regardless of the air
volume control setting.
X Activating: Switch off the ignition.
X Press button Ì.
The
indicator lamp in the button comes on. X
Deactivating: Press button Ì.
The indicator lamp in the button goes out.
The residual heat is deactivated
automatically:
R when the ignition is switched on
R after approximately 30 minutes
R if the battery voltage drops
R if the coolant temperature is too low Rear window defroster
G
Warning!
Any accumulation of snow and ice should be
removed
from the rear window before driving.
Visibility could otherwise be impaired,
endangering you and others.
The rear window defroster uses a large
amount of power. To keep the battery drain
to a minimum, switch off the defroster as
soon as the rear window is clear. The
defroster is switched off automatically after
some time of operation depending on the
outside temperature.
X Switch on the ignition.
X Switching on: Press button ¤ on the
respective climate control panel.
The
indicator lamp in the button comes on.
X Switching off: Press button ¤ again.
The rear window defroster switches off when
the battery voltage is too low. The indicator
lamp in button ¤ flashes. Too many
electrical consumers may be operating
simultaneously.
X Switch off consumers that are currently not
needed if required. Rear window defroster
151
Controls in detail
219_AKB; 4; 54, en-US
d2ureepe, Version: 2.11.8.1 2009-05-11T16:21:02+02:00 - Seite 151 Z
Page 157 of 308
enter vehicle interior resulting in
unconsciousness and death.
Load distribution The total load weight including vehicle
occupants and luggage/cargo should not
exceed the total load limit indicated on the
corresponding Tire and Loading Information
placard located on the driver’s door B-pillar
(Y page 194).
The handling characteristics of a fully loaded
vehicle depends greatly on the load
distribution. It is therefore recommended to
load the vehicle accordingly with the heaviest
items being placed towards the front of the
vehicle.
Please pay attention to and comply with the
following instructions when loading the
vehicle and transporting cargo:
R
Always place items being carried against
front or rear seat backrests, and fasten
them as securely as possible.
R The heaviest portion of the cargo should
always be kept as low as possible against
front or rear seat backrests. Roof rack
For information about further roof rack
equipment, contact an authorized Mercedes-
Benz Center. G
Warning!
Only use roof racks approved by Mercedes-
Benz for your vehicle model to avoid damage
to the vehicle.
Follow the manufacturer’s installation
instructions. Otherwise, an improperly
attached roof rack system or its load could
become detached from the vehicle.
Do not exceed the maximum roof load of
220 lb (100 kg).
Take into consideration that when the roof
rack is loaded, the handling characteristics are different from those when operating the
vehicle without the roof rack loaded.
Make sure
R you can raise the tilt/sliding sunroof
completely
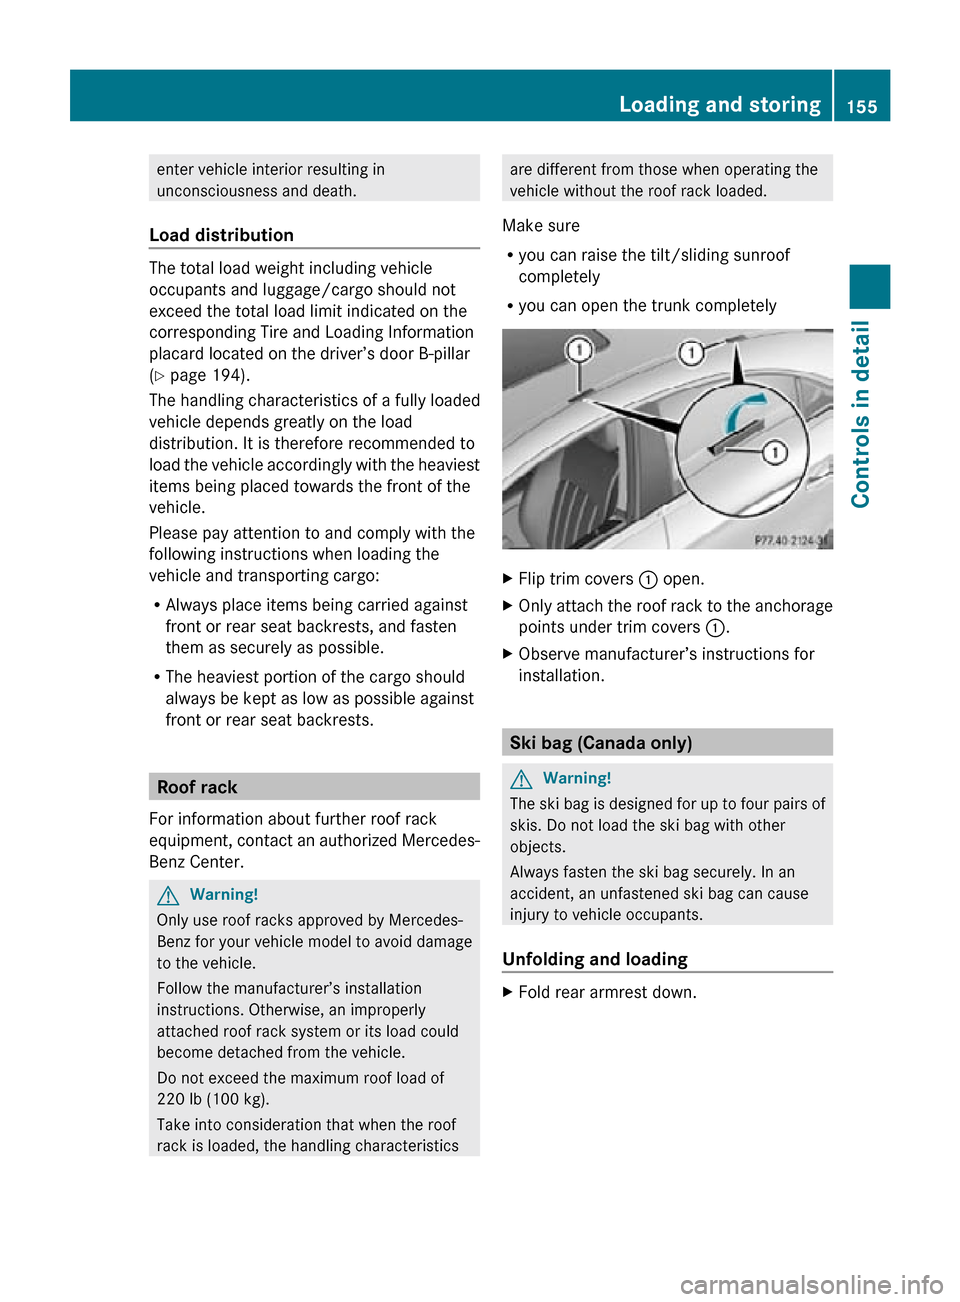
R you can open the trunk completely X
Flip trim covers : open.
X Only attach the roof rack to the anchorage
points under trim covers :.
X Observe manufacturer’s instructions for
installation. Ski bag (Canada only)
G
Warning!
The ski bag is designed for up to four pairs of
skis. Do not load the ski bag with other
objects.
Always fasten the ski bag securely. In an
accident, an unfastened ski bag can cause
injury to vehicle occupants.
Unfolding and loading X
Fold rear armrest down. Loading and storing
155Controls in detail
219_AKB; 4; 54, en-US
d2ureepe, Version: 2.11.8.1 2009-05-11T16:21:02+02:00 - Seite 155 Z
Page 162 of 308

X
Opening: Press the handle upwards and
fold the rear armrest lid up.
Storage bags G
Warning!
Do not place objects with a combined weight
of more than 4.4 lb (2 kg) into the storage bag.
Otherwise, the Occupant Classification
System (OCS) may not be able to properly
approximate the occupant weight category.
The storage bag is intended for storing light-
weight items only.
Heavy objects, objects with sharp edges or
fragile objects may not be transported in the
storage bag. In an accident, during hard
braking, or sudden maneuvers, they could be
thrown around inside the vehicle and cause
injury to vehicle occupants.
The storage bag cannot protect transported
goods in the event of an accident.
Storage bags are located on the back of the
front seats. Useful features
Cup holders
G
Warning!
In order to help prevent spilling liquids on
vehicle occupants and/or vehicle equipment,
only use containers that fit into the cup
holder. Use lids on open containers and do
not fill containers to a height where the
contents, especially hot liquids, could spill
during braking, vehicle maneuvers, or in an
accident. Liquids spilled on vehicle occupants
may cause serious personal injury. Liquids
spilled on vehicle equipment may cause
damage not covered by the Mercedes-Benz
Limited Warranty.
The cup holder must be extended when in use
with bottles. When not in use, keep the cup holder closed.
An open cup holder may cause injury to you
or others when contacted during braking,
vehicle maneuvers, or in an accident.
Keep in mind that objects placed in the cup
holder may come loose during braking,
vehicle maneuvers, or in an accident and be
thrown around in the vehicle interior. Objects
thrown around in the vehicle interior may
cause an accident and/or serious personal
injury.
Cup holder in front center console The cup holder can be removed for cleaning
purposes.
X
Extending: Briefly press mark on cup
holder.
The cup holder automatically extends
upward.
X Removing: Extend cup holder.
X Press mark on cup holder and remove cup
holder by pulling it upward.
X Reinstalling: Insert cup holder into
opening.
X Retracting: Press mark on cup holder and
push cup holder in until it engages.
! Make sure that the cup holder is correctly
positioned in the guide while you are
reinstalling it. Otherwise the cup holder can
be damaged.
X Press mark on cup holder and press cup
holder downward until it engages. 160
Useful featuresControls in detail
219_AKB; 4; 54, en-US
d2ureepe,
Version: 2.11.8.1 2009-05-11T16:21:02+02:00 - Seite 160