2010 MERCEDES-BENZ CLS550 door open
[x] Cancel search: door openPage 237 of 308
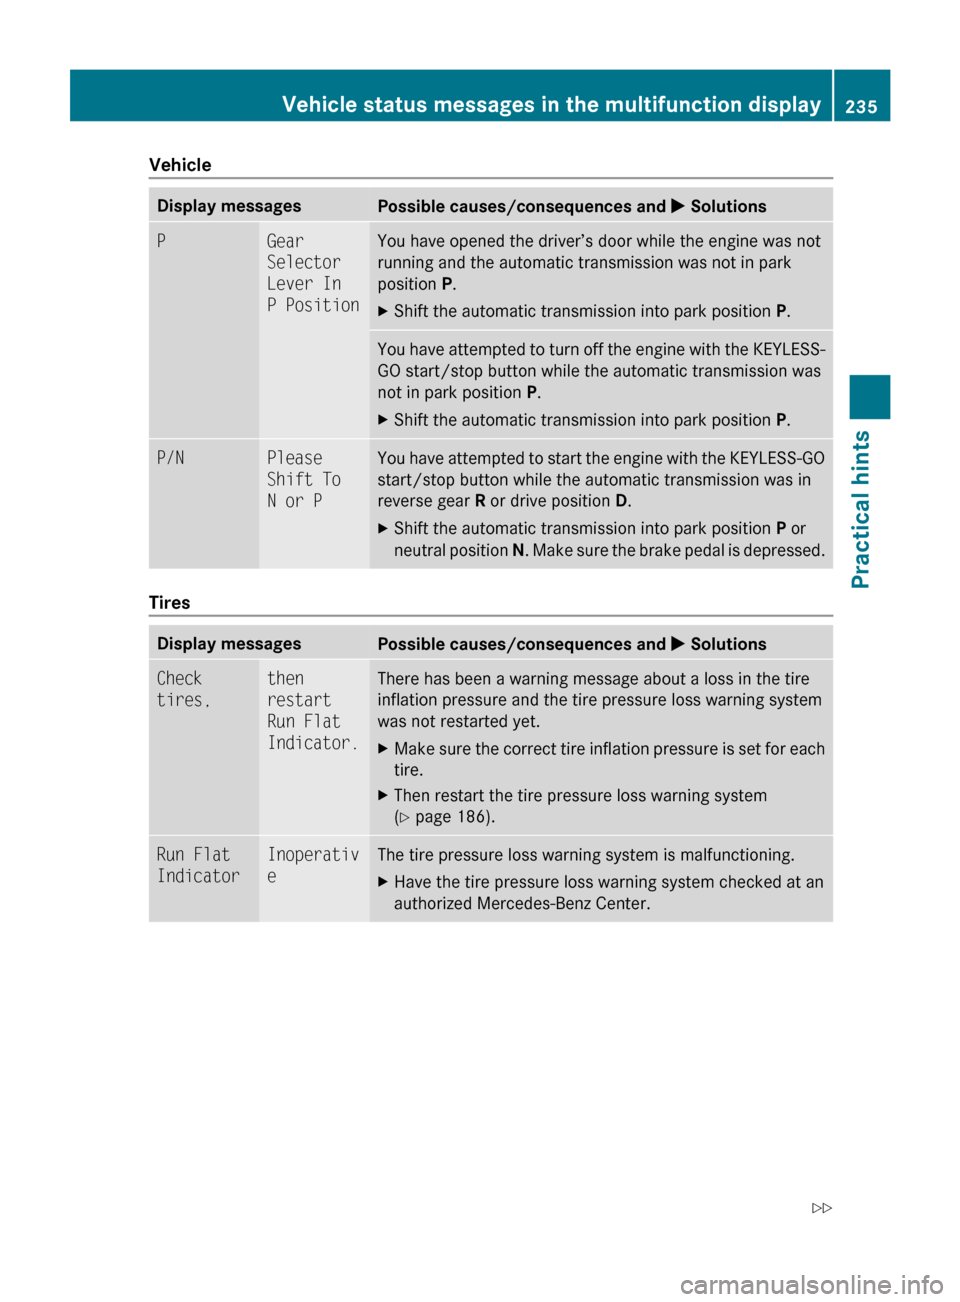
Vehicle
Display messages
Possible causes/consequences and
X SolutionsP Gear
Selector
Lever In
P Position You have opened the driver’s door while the engine was not
running and the automatic transmission was not in park
position P.
X
Shift the automatic transmission into park position P.You have attempted to turn off the engine with the KEYLESS-
GO start/stop button while the automatic transmission was
not in park position
P.
X Shift the automatic transmission into park position P.P/N Please
Shift To
N or P You have attempted to start the engine with the KEYLESS-GO
start/stop button while the automatic transmission was in
reverse gear
R or drive position D.
X Shift the automatic transmission into park position P or
neutral position N. Make sure the brake pedal is depressed. Tires
Display messages
Possible causes/consequences and
X SolutionsCheck
tires, then
restart
Run Flat
Indicator. There has been a warning message about a loss in the tire
inflation pressure and the tire pressure loss warning system
was not restarted yet.
X
Make sure the correct tire inflation pressure is set for each
tire.
X Then restart the tire pressure loss warning system
(Y page 186). Run Flat
Indicator Inoperativ
e The tire pressure loss warning system is malfunctioning.
X
Have the tire pressure loss warning system checked at an
authorized Mercedes-Benz Center. Vehicle status messages in the multifunction display
235
Practical hints
219_AKB; 4; 54, en-US
d2ureepe,Version: 2.11.8.1 2009-05-11T16:21:02+02:00 - Seite 235 Z
Page 243 of 308

Display messages
Possible causes/consequences and
X Solutions¨ Malfunctio
n The system is functional only to a limited extent.
The system display or the system is malfunctioning.
X
Do not drive faster than 50 mph (80 km/h).
X Have the vehicle checked at an authorized Mercedes-Benz
Center. Vehicle
Display messages
Possible causes/consequences and
X Solutions: The trunk is open.
X
Close the trunk (Y page 72). M You are driving with the hood open.
X
Stop the vehicle in a safe location as soon as it is safe to
do so.
X Close the hood ( Y page 179).
There is otherwise danger of an accident. ; You are driving with at least one door open.
X
Close all doors. + Key
Detected
In Vehicle A SmartKey with KEYLESS-GO left in the vehicle was
recognized while trying to lock the vehicle from the outside.
X
Take the SmartKey out of the vehicle. + Please
don’t
forget
your key. This message appears for a maximum of 60 seconds if the
driver’s door is opened with the engine turned off and no
SmartKey in the starter switch. This message is only a
reminder.
X
Take the SmartKey with you when leaving the vehicle. + Remove Key You have forgotten to remove the SmartKey.
X
Remove the SmartKey from the starter switch. + Please
get a new
key. The SmartKey is malfunctioning.
X
Contact an authorized Mercedes-Benz Center. + Change
Key
Batteries The batteries in the SmartKey with KEYLESS-GO are
discharged.
X
Replace the batteries ( Y page 264). Vehicle status messages in the multifunction display
241Practical hints
219_AKB; 4; 54, en-US
d2ureepe,Version: 2.11.8.1 2009-05-11T16:21:02+02:00 - Seite 241 Z
Page 251 of 308
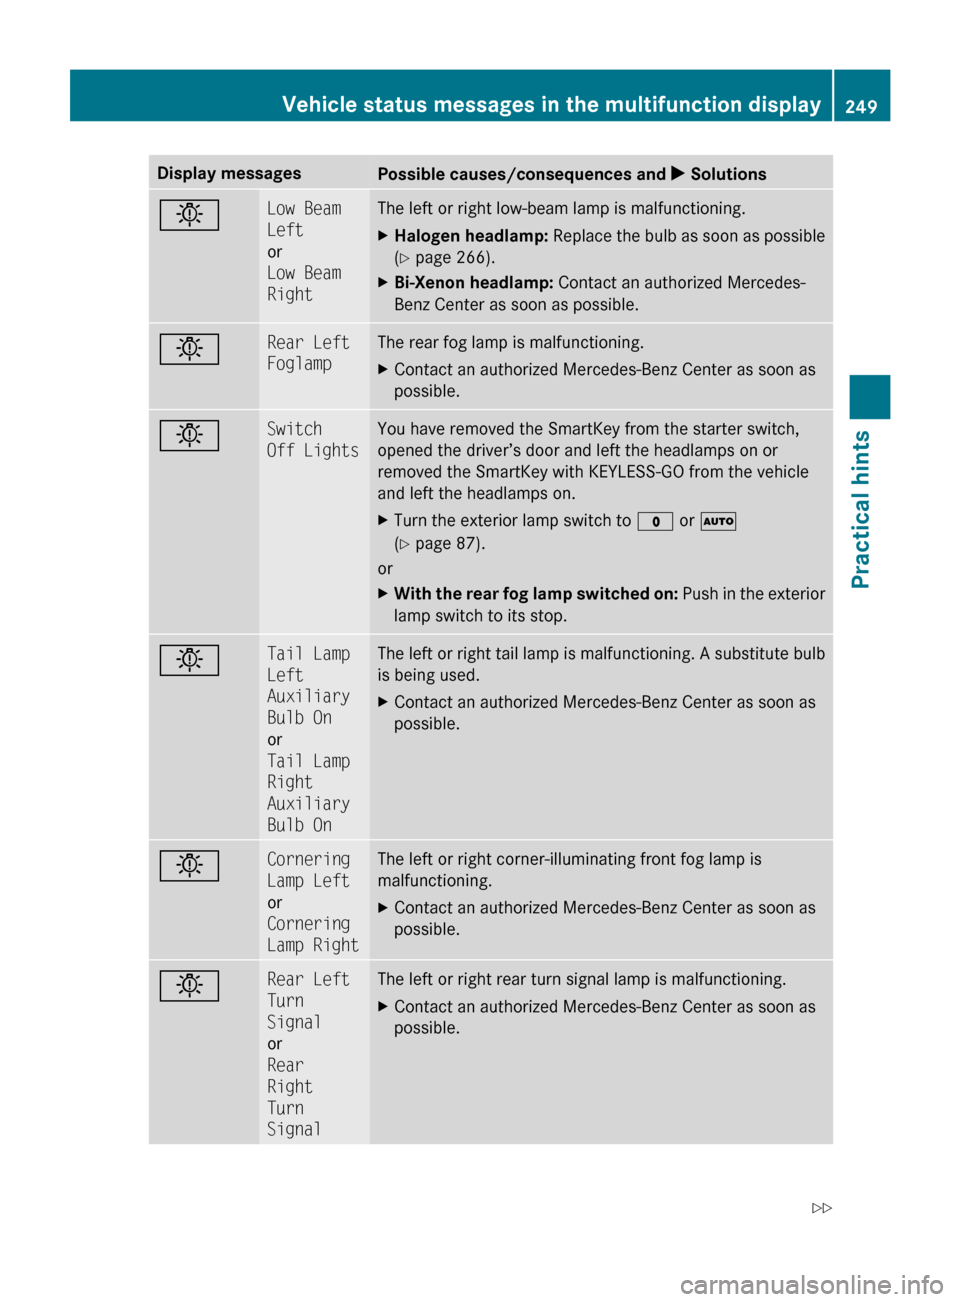
Display messages
Possible causes/consequences and
X Solutionsb Low Beam
Left
or
Low Beam
Right The left or right low-beam lamp is malfunctioning.
X
Halogen headlamp: Replace the bulb as soon as possible
(Y page 266).
X Bi-Xenon headlamp: Contact an authorized Mercedes-
Benz Center as soon as possible. b Rear Left
Foglamp The rear fog lamp is malfunctioning.
X
Contact an authorized Mercedes-Benz Center as soon as
possible. b Switch
Off Lights You have removed the SmartKey from the starter switch,
opened the driver’s door and left the headlamps on or
removed the SmartKey with KEYLESS-GO from the vehicle
and left the headlamps on.
X
Turn the exterior lamp switch to $ or Ã
(Y page 87).
or
X With the rear fog lamp switched on:
Push in the exterior
lamp switch to its stop. b Tail Lamp
Left
Auxiliary
Bulb On
or
Tail Lamp
Right
Auxiliary
Bulb On The left or right tail lamp is malfunctioning. A substitute bulb
is being used.
X
Contact an authorized Mercedes-Benz Center as soon as
possible. b Cornering
Lamp Left
or
Cornering
Lamp Right The left or right corner-illuminating front fog lamp is
malfunctioning.
X
Contact an authorized Mercedes-Benz Center as soon as
possible. b Rear Left
Turn
Signal
or
Rear
Right
Turn
Signal The left or right rear turn signal lamp is malfunctioning.
X
Contact an authorized Mercedes-Benz Center as soon as
possible. Vehicle status messages in the multifunction display
249Practical hints
219_AKB; 4; 54, en-US
d2ureepe,Version: 2.11.8.1 2009-05-11T16:21:02+02:00 - Seite 249 Z
Page 256 of 308
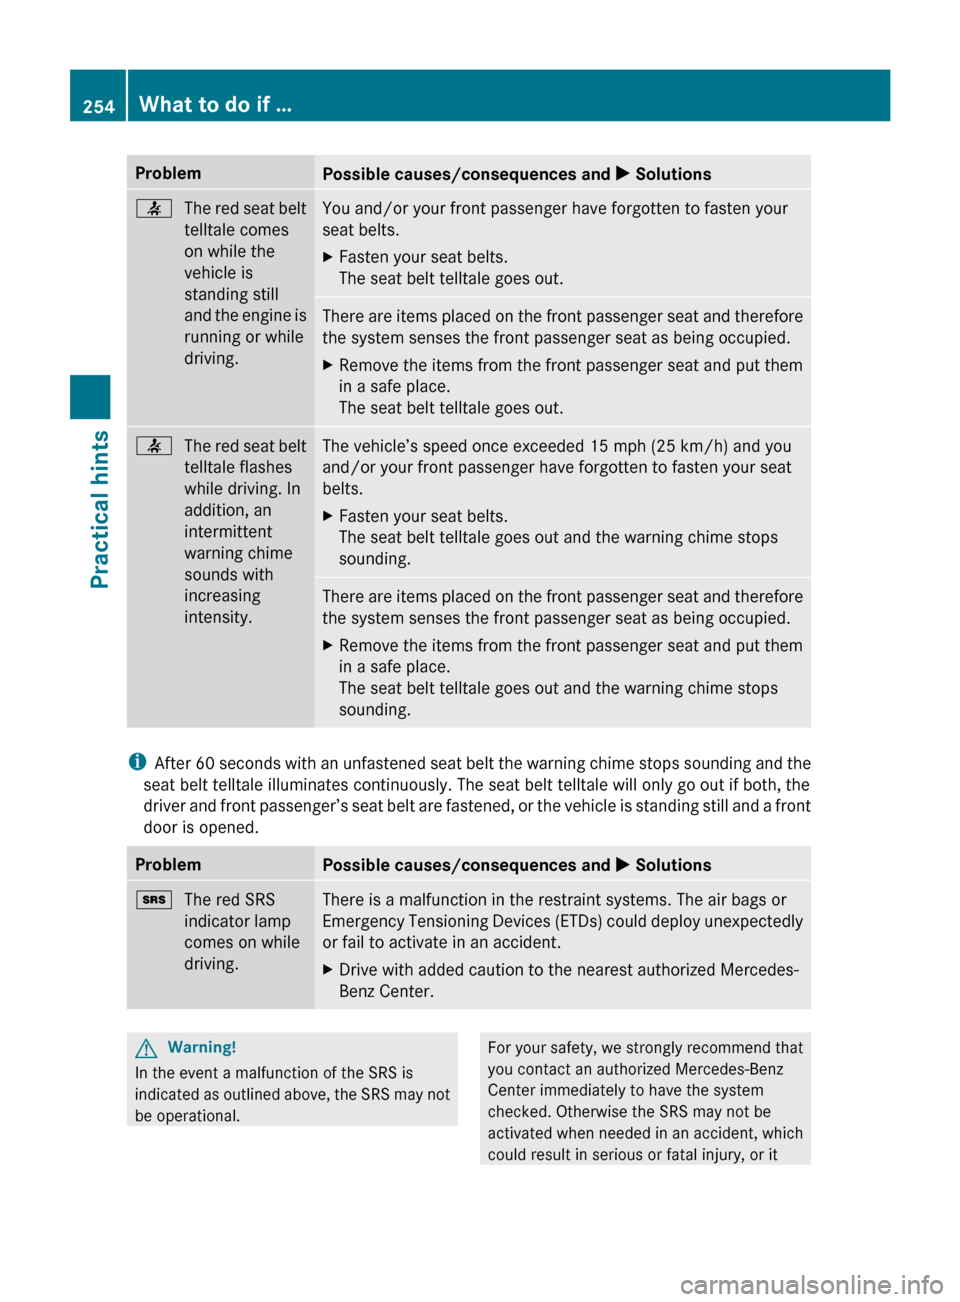
Problem
Possible causes/consequences and
X Solutions7
The red seat belt
telltale comes
on while the
vehicle is
standing still
and
the engine is
running or while
driving. You and/or your front passenger have forgotten to fasten your
seat belts.
X
Fasten your seat belts.
The seat belt telltale goes out. There are items placed on the front passenger seat and therefore
the system senses the front passenger seat as being occupied.
X
Remove the items from the front passenger seat and put them
in a safe place.
The seat belt telltale goes out. 7
The red seat belt
telltale flashes
while driving. In
addition, an
intermittent
warning chime
sounds with
increasing
intensity. The vehicle’s speed once exceeded 15 mph (25 km/h) and you
and/or your front passenger have forgotten to fasten your seat
belts.
X
Fasten your seat belts.
The seat belt telltale goes out and the warning chime stops
sounding. There are items placed on the front passenger seat and therefore
the system senses the front passenger seat as being occupied.
X
Remove the items from the front passenger seat and put them
in a safe place.
The seat belt telltale goes out and the warning chime stops
sounding. i
After
60 seconds with an unfastened seat belt the warning chime stops sounding and the
seat belt telltale illuminates continuously. The seat belt telltale will only go out if both, the
driver and front passenger’s seat belt are fastened, or the vehicle is standing still and a front
door is opened. Problem
Possible causes/consequences and
X Solutions+
The red SRS
indicator lamp
comes on while
driving. There is a malfunction in the restraint systems. The air bags or
Emergency
Tensioning Devices (ETDs) could deploy unexpectedly
or fail to activate in an accident.
X Drive with added caution to the nearest authorized Mercedes-
Benz Center. G
Warning!
In the event a malfunction of the SRS is
indicated
as outlined above, the SRS may not
be operational. For your safety, we strongly recommend that
you contact an authorized Mercedes-Benz
Center immediately to have the system
checked. Otherwise the SRS may not be
activated
when needed in an accident, which
could result in serious or fatal injury, or it 254
What to do if …
Practical hints
219_AKB; 4; 54, en-US
d2ureepe,
Version: 2.11.8.1 2009-05-11T16:21:02+02:00 - Seite 254
Page 263 of 308
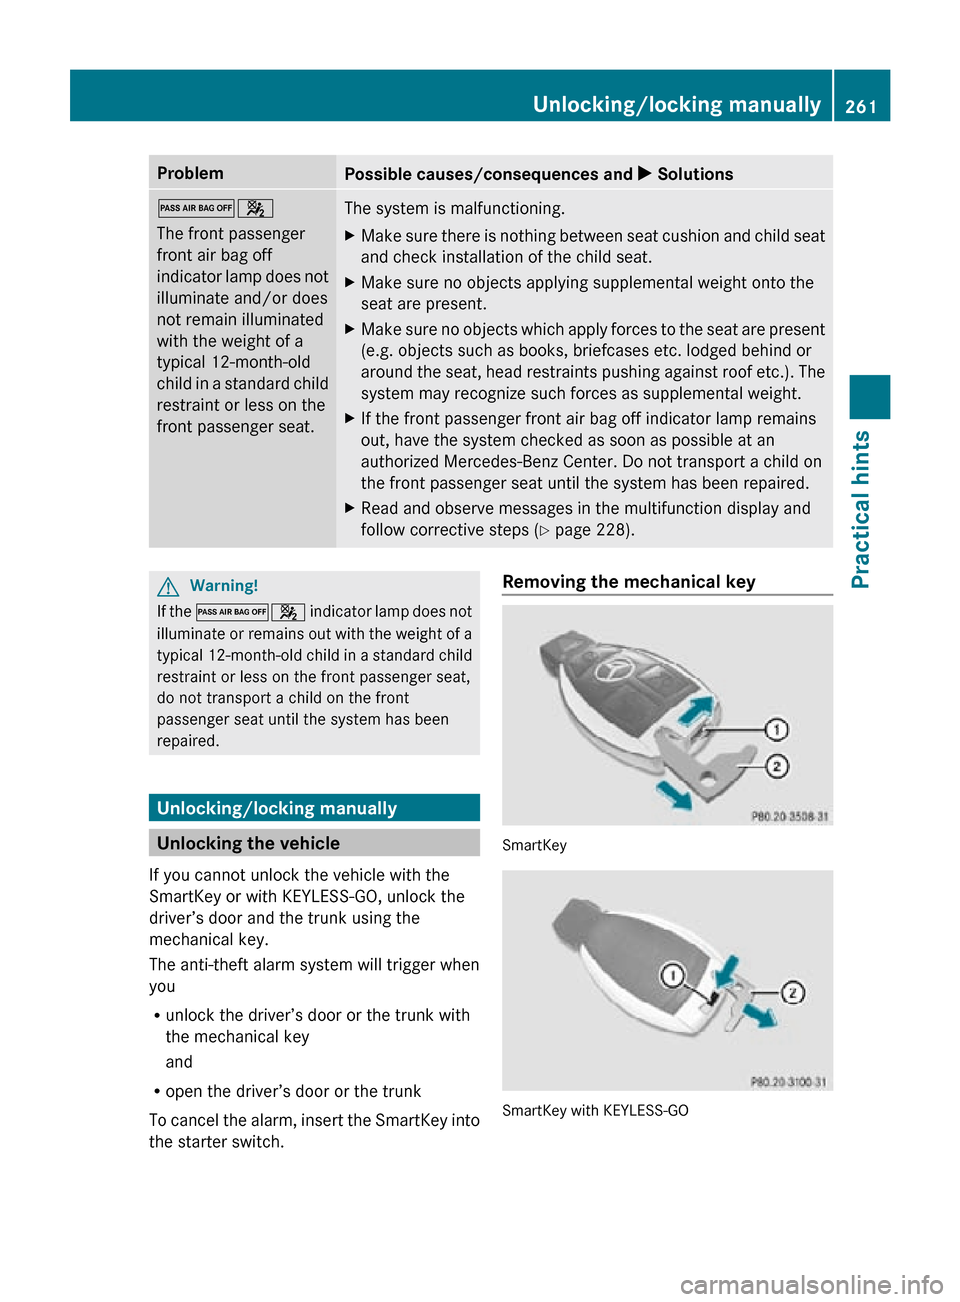
Problem
Possible causes/consequences and
X Solutions04
The front passenger
front air bag off
indicator lamp does not
illuminate and/or does
not remain illuminated
with the weight of a
typical 12-month-old
child in a standard child
restraint or less on the
front passenger seat.
The system is malfunctioning.
X
Make sure there is nothing between seat cushion and child seat
and check installation of the child seat.
X Make sure no objects applying supplemental weight onto the
seat are present.
X Make sure no objects which apply forces to the seat are present
(e.g. objects such as books, briefcases etc. lodged behind or
around the seat, head restraints pushing against roof etc.). The
system may recognize such forces as supplemental weight.
X If the front passenger front air bag off indicator lamp remains
out, have the system checked as soon as possible at an
authorized Mercedes-Benz Center. Do not transport a child on
the front passenger seat until the system has been repaired.
X Read and observe messages in the multifunction display and
follow corrective steps (Y page 228). G
Warning!
If the 04 indicator lamp does not
illuminate or remains out with the weight of a
typical 12-month-old child in a standard child
restraint or less on the front passenger seat,
do not transport a child on the front
passenger seat until the system has been
repaired. Unlocking/locking manually
Unlocking the vehicle
If you cannot unlock the vehicle with the
SmartKey or with KEYLESS-GO, unlock the
driver’s door and the trunk using the
mechanical key.
The anti-theft alarm system will trigger when
you
R unlock the driver’s door or the trunk with
the mechanical key
and
R open the driver’s door or the trunk
To cancel the alarm, insert the SmartKey into
the starter switch. Removing the mechanical key
SmartKey
SmartKey with KEYLESS-GO Unlocking/locking manually
261Practical hints
219_AKB; 4; 54, en-US
d2ureepe, Version: 2.11.8.1 2009-05-11T16:21:02+02:00 - Seite 261 Z
Page 264 of 308
X
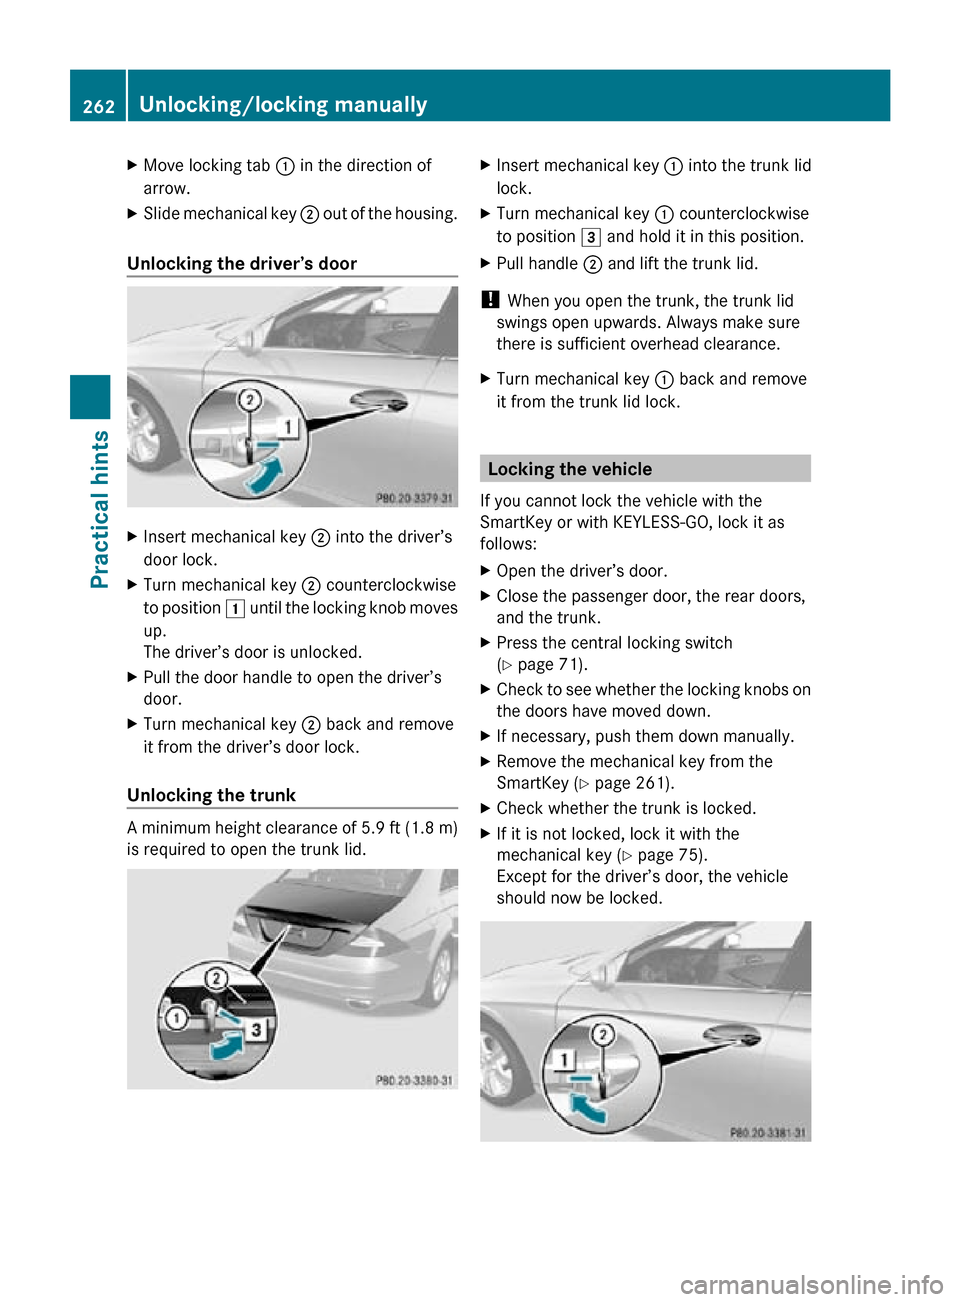
Move locking tab : in the direction of
arrow.
X Slide mechanical key ; out of the housing.
Unlocking the driver’s door X
Insert mechanical key ; into the driver’s
door lock.
X Turn mechanical key ; counterclockwise
to position 1 until the locking knob moves
up.
The driver’s door is unlocked.
X Pull the door handle to open the driver’s
door.
X Turn mechanical key ; back and remove
it from the driver’s door lock.
Unlocking the trunk A minimum height clearance of 5.9 ft (1.8 m)
is required to open the trunk lid. X
Insert mechanical key : into the trunk lid
lock.
X Turn mechanical key : counterclockwise
to position 3 and hold it in this position.
X Pull handle ; and lift the trunk lid.
! When you open the trunk, the trunk lid
swings open upwards. Always make sure
there is sufficient overhead clearance.
X Turn mechanical key : back and remove
it from the trunk lid lock. Locking the vehicle
If you cannot lock the vehicle with the
SmartKey or with KEYLESS-GO, lock it as
follows:
X Open the driver’s door.
X Close the passenger door, the rear doors,
and the trunk.
X Press the central locking switch
(Y page 71).
X Check to see whether the locking knobs on
the doors have moved down.
X If necessary, push them down manually.
X Remove the mechanical key from the
SmartKey (Y page 261).
X Check whether the trunk is locked.
X If it is not locked, lock it with the
mechanical key ( Y page 75).
Except for the driver’s door, the vehicle
should now be locked. 262
Unlocking/locking manuallyPractical hints
219_AKB; 4; 54, en-US
d2ureepe,
Version: 2.11.8.1 2009-05-11T16:21:02+02:00 - Seite 262
Page 265 of 308

X
Insert mechanical key ; into the driver’s
door lock.
X Turn mechanical key ; clockwise to
position 1.
The driver’s door is locked.
X Turn mechanical key ; back and remove
it from the driver’s door lock.
i This procedure does not arm the anti-
theft alarm system, nor does it lock the fuel
filler flap. Manually unlocking the gear selector
lever
If the vehicle’s electrical system is
malfunctioning, the gear selector lever could
remain locked in park position P. In this case
the gear selector lever can be unlocked
manually, e.g. to tow the vehicle.
X Engage the parking brake. !
Do not use sharp objects to loosen the
gear selector lever cover in the center
console, as this could damage the gear
selector lever cover or the center console.
X Insert a flat, blunt object into the left edge
of gear selector lever cover : at the
positions indicated by the arrows.
X Loosen gear selector lever cover : using
this object. X
Pull gear selector lever cover : out and
remove.
X Simultaneously push down release ; and
move the gear selector lever out of park
position P.
The gear selector lever is unlocked.
i The gear selector lever is locked again as
soon as you move it back to park position
P. Fuel filler flap
G
Warning!
Avoid contact with the vehicle walls as they
may contain sharp edges. Otherwise, you
could injure yourself while releasing the fuel
filler flap.
In case the central locking system does not
release the fuel filler flap, you can open it
manually.
The fuel filler flap release is located on the
passenger side in the trunk behind the side
trim panel.
X Open the trunk (Y page 71).
X Remove side trim panel.
i Removing the side trim panel is a
demanding process. We recommend that
you contact Roadside Assistance
(Y page 166) if you do not feel to have the
ability to perform this process. Unlocking/locking manually
263Practical hints
219_AKB; 4; 54, en-US
d2ureepe, Version: 2.11.8.1 2009-05-11T16:21:02+02:00 - Seite 263 Z
Page 272 of 308
Replacing wiper blades
Safety notes
G
Warning!
For safety reasons, switch off the wipers and
remove the SmartKey from the starter switch
(vehicles with KEYLESS-GO: Make sure the
vehicle’s on-board electronics have status 0)
before replacing a wiper blade. Otherwise, the
wiper motor could suddenly turn on and cause
injury. G
Warning!
Wiper blades are components that are subject
to wear and tear. Replace the wiper blades
twice a year, preferably in the spring and fall.
Otherwise the windshield will not be wiped
properly. As a result, you may not be able to
observe surrounding traffic conditions and
could cause an accident.
! To avoid damage to the hood, the wiper
arms should only be folded forward when
in the vertical position.
! Never open the hood when a wiper arm is
folded forward.
Hold on to the wiper when folding a wiper
arm back. If released, the force of the
impact from the tensioning spring could
crack the windshield.
Do not allow a wiper arm to contact the
windshield glass without a wiper blade
inserted.
Mercedes-Benz recommends that you have
this work carried out at an authorized
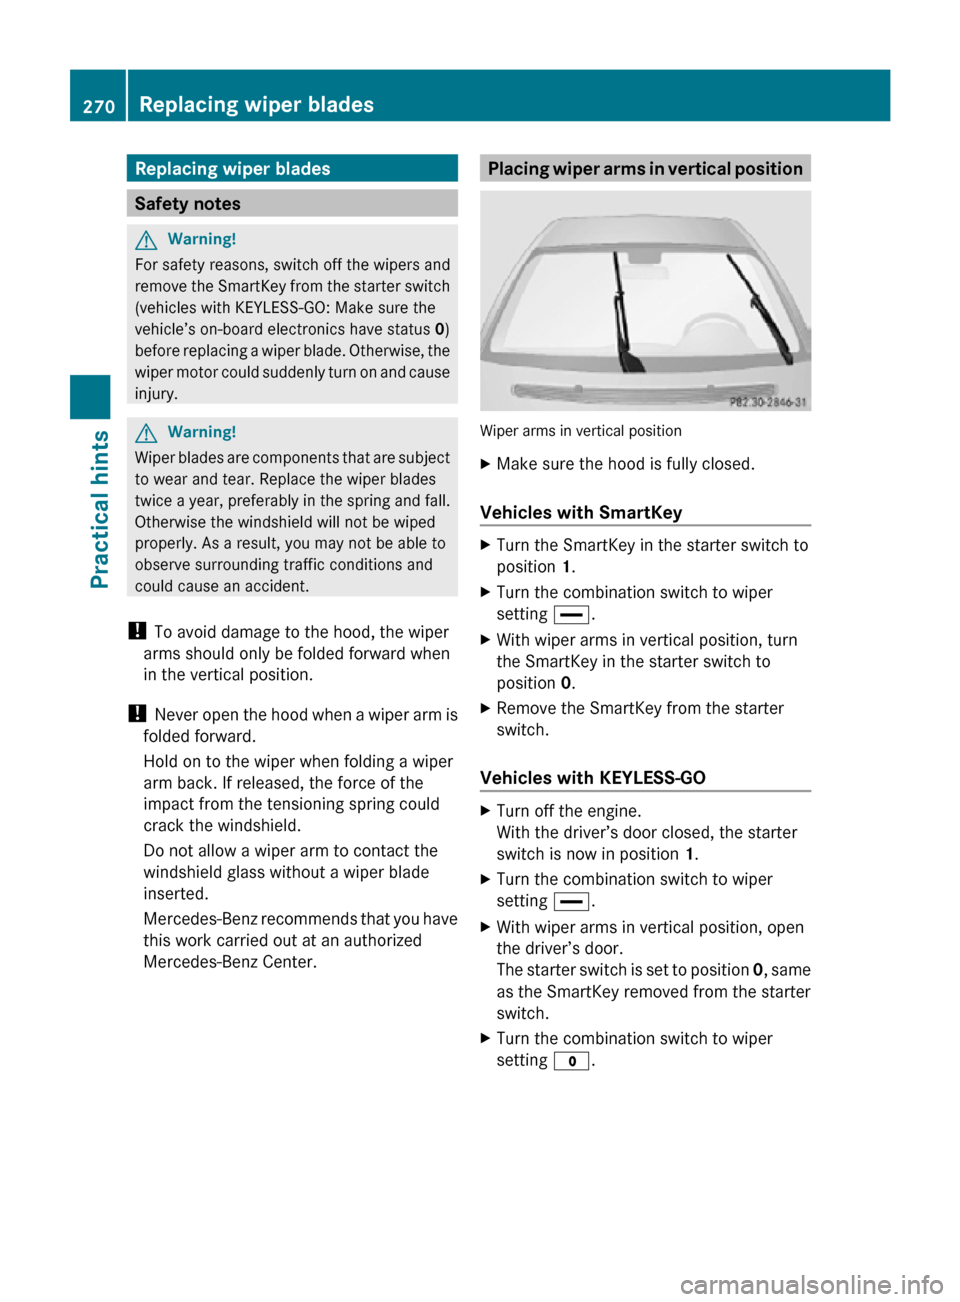
Mercedes-Benz Center. Placing wiper arms in vertical position
Wiper arms in vertical position
X
Make sure the hood is fully closed.
Vehicles with SmartKey X
Turn the SmartKey in the starter switch to
position 1.
X Turn the combination switch to wiper
setting °.
X With wiper arms in vertical position, turn
the SmartKey in the starter switch to
position 0.
X Remove the SmartKey from the starter
switch.
Vehicles with KEYLESS-GO X
Turn off the engine.
With the driver’s door closed, the starter
switch is now in position 1.
X Turn the combination switch to wiper
setting °.
X With wiper arms in vertical position, open
the driver’s door.
The starter switch is set to position 0, same
as the SmartKey removed from the starter
switch.
X Turn the combination switch to wiper
setting $. 270
Replacing wiper bladesPractical hints
219_AKB; 4; 54, en-US
d2ureepe,
Version: 2.11.8.1 2009-05-11T16:21:02+02:00 - Seite 270