2010 MERCEDES-BENZ CLS COUPE heating
[x] Cancel search: heatingPage 124 of 337
Switching off auxiliary heating/ventila-
tion
X
Press the ^button.
OFF is shown in the remote control display.
Checking the status of the auxiliary heat-
ing/ventilation
X Press the ,or. button.
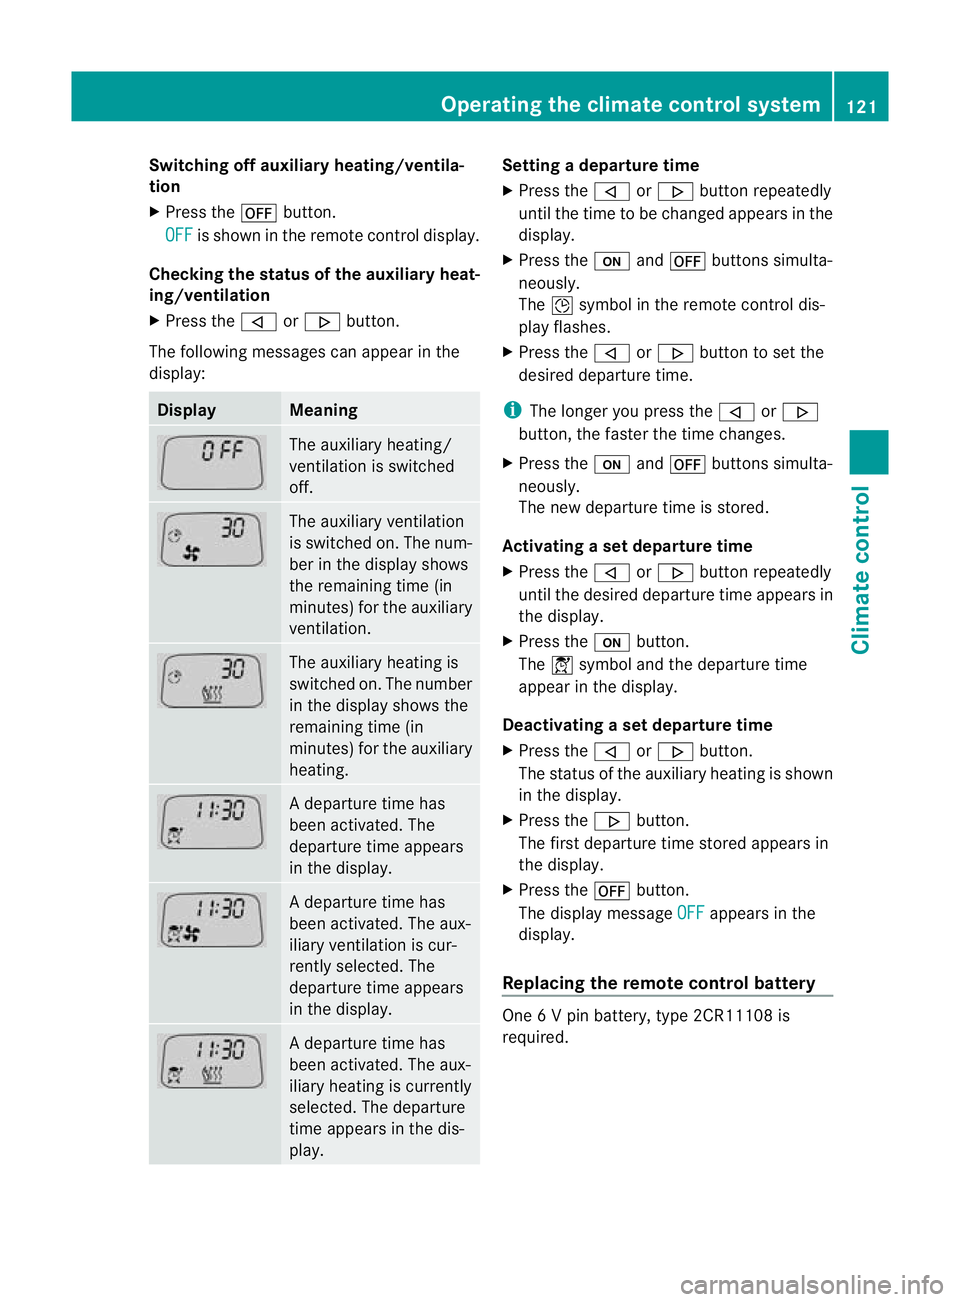
The following messages can appearint he
display: Display Meaning
The auxiliary heating/
ventilation is switched
off.
The auxiliary ventilation
is switched on. The num-
ber in the display shows
the remaining time (in
minutes) for the auxiliary
ventilation. The auxiliary heating is
switched on. The number
in the display shows the
remaining time (in
minutes) for the auxiliary
heating. Ad
eparture time has
been activated. The
departure time appears
in the display. Ad
eparture time has
been activated. The aux-
iliary ventilation is cur-
rently selected. The
departure time appears
in the display. Ad
eparture time has
been activated. The aux-
iliary heating is currently
selected. The departure
time appears in the dis-
play. Setting a departure time
X
Press the ,or. button repeatedly
until the time to be changed appears in the
display.
X Press the uand^ buttons simulta-
neously.
The Îsymbol in the remote control dis-
play flashes.
X Press the ,or. button to set the
desired departure time.
i The longer you press the ,or.
button, the faster the time changes.
X Press the uand^ buttons simulta-
neously.
The new departure time is stored.
Activating a set departure time
X Press the ,or. button repeatedly
until the desired departure time appears in
the display.
X Press the ubutton.
The Ísymbol and the departure time
appear in the display.
Deactivating a set departure time
X Press the ,or. button.
The status of the auxiliary heating is shown
in the display.
X Press the .button.
The first departure time stored appears in
the display.
X Press the ^button.
The display message OFF appears in the
display.
Replacing the remote control battery One 6 V pin battery, type 2CR11108 is
required.Operating the climate control system
121Climate control Z
Page 125 of 337
X
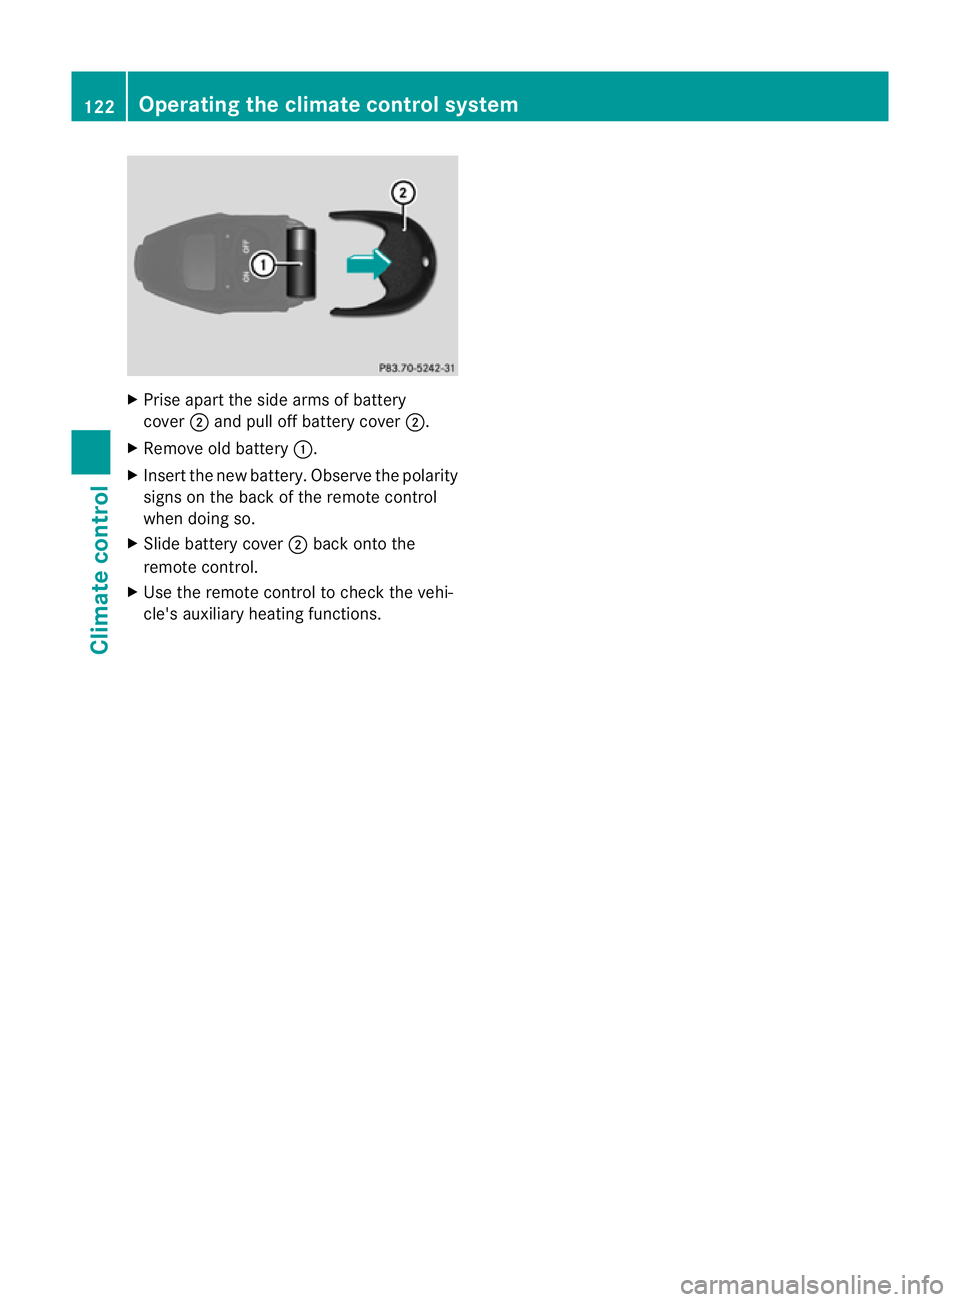
Prise apart the side arms of battery
cover ;and pull off battery cover ;.
X Remove old battery :.
X Inser tthe new battery. Observe the polarity
signs on the back of the remote control
when doing so.
X Slide battery cover ;back onto the
remote control.
X Use the remote control to check the vehi-
cle's auxiliary heating functions. 122
Operating the climate control systemClimate control
Page 126 of 337
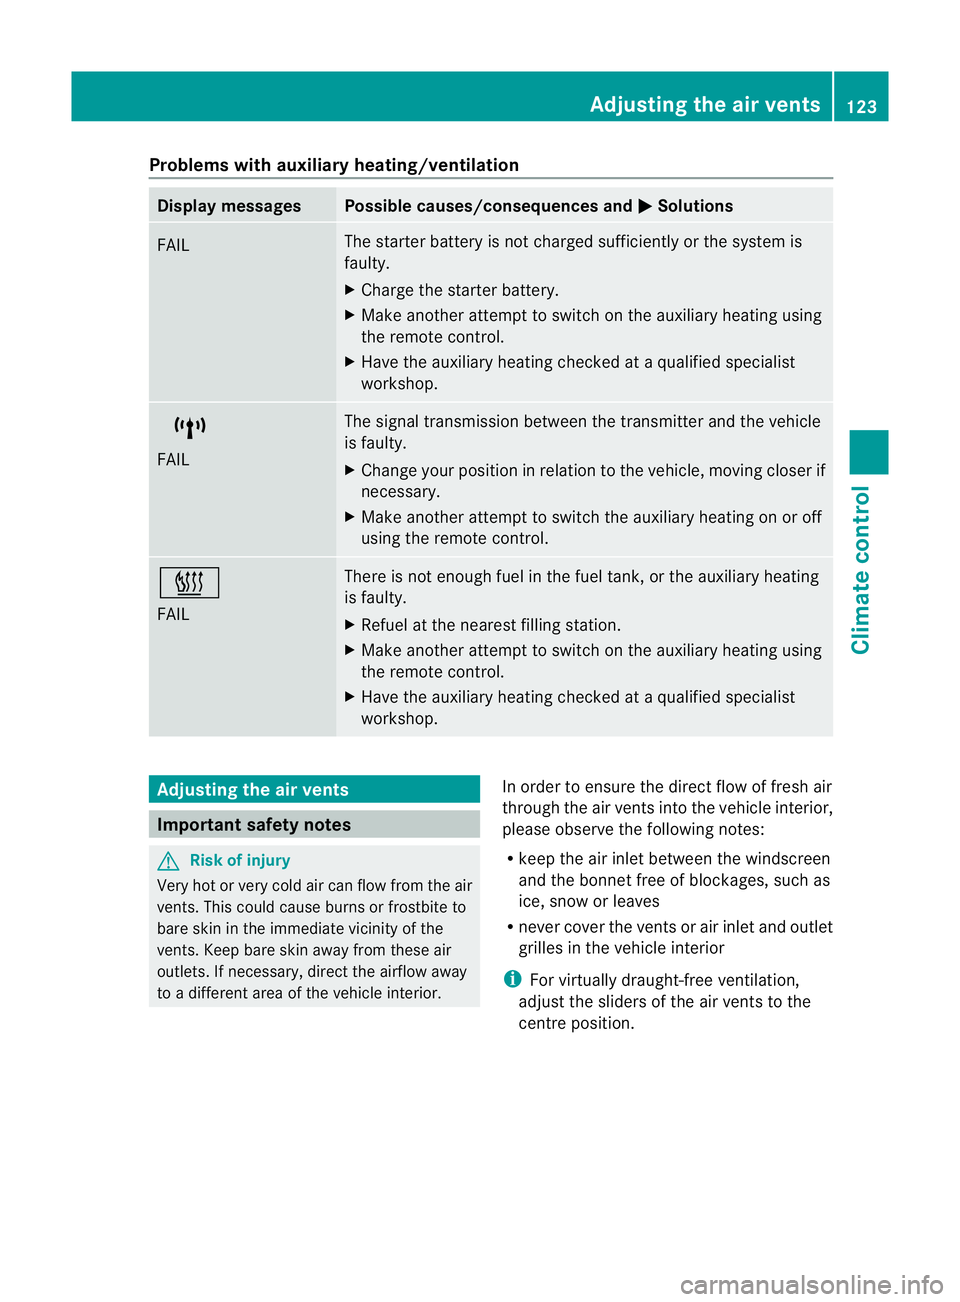
Problems with auxiliary heating/ventilation
Display messages Possible causes/consequences and
M Solutions
FAIL The starter battery is not charged sufficiently or the system is
faulty.
X
Charge the starter battery.
X Make another attempt to switch on the auxiliary heating using
the remote control.
X Have the auxiliary heating checked at a qualified specialist
workshop. $
FAIL The signal transmission between the transmitter and the vehicle
is faulty.
X Change your position in relation to the vehicle, moving closer if
necessary.
X Make another attempt to switch the auxiliary heating on or off
using the remote control. ©
FAIL There is not enough fuel in the fuel tank, or the auxiliary heating
is faulty.
X
Refuel at the nearest filling station.
X Make another attempt to switch on the auxiliary heating using
the remote control.
X Have the auxiliary heating checked at a qualified specialist
workshop. Adjusting the air vents
Important safety notes
G
Risk of injury
Very hot or very cold air can flow from the air
vents. This could cause burns or frostbite to
bare skin in the immediate vicinity of the
vents. Keep bare skin away from these air
outlets. If necessary, direct the airflow away
to a different area of the vehicle interior. In order to ensure the direct flow of fresh air
through the air vents into the vehicle interior,
please observe the following notes:
R
keep the air inlet between the windscreen
and the bonnet free of blockages, such as
ice, snow or leaves
R never cover the ventsora ir inlet and outlet
grilles in the vehicle interior
i For virtually draught-free ventilation,
adjust the sliders of the air vents to the
centre position. Adjusting the air vents
123Climate control Z
Page 127 of 337

Setting the centre air vents
:
Centre air vent, left
; Centre air vent, right
= Centre vent thumbwheel, right
? Centre vent thumbwheel, left
X To open/close: turn thumbwheels =
and ?up or down. Setting the side air vents
X
To open/close: turn thumbwheel =up or
down.
i Side window demister vent :is never
completely shut, even if side air vent ;is
shut. Setting the air vents in the glove com-
partment
When automatic climate control is activated,
the glove compartmen tcan be ventilated, for
instance to cool its contents .The level of air- flow depends on the airflow and air distribu-
tion settings.
!
Close the air vent when heating the vehi-
cle.
At high outside temperatures, open the air
vent and activate the "cooling with air dehu-
midification" function. Otherwise, temper-
ature-sensitive items stored in the glove
compartmentc ould be damaged. :
Air vent thumbwheel
; Air vent
X To open/close: turn thumbwheel :
clockwise or anti-clockwise. Setting the rear-compartment air
vents
Setting the centre vents in the rear com-
partment :
Rear-compartment air vent thumbwheel
; Rear-compartment air vent, right 124
Adjusting the air ventsClimate control
Page 145 of 337
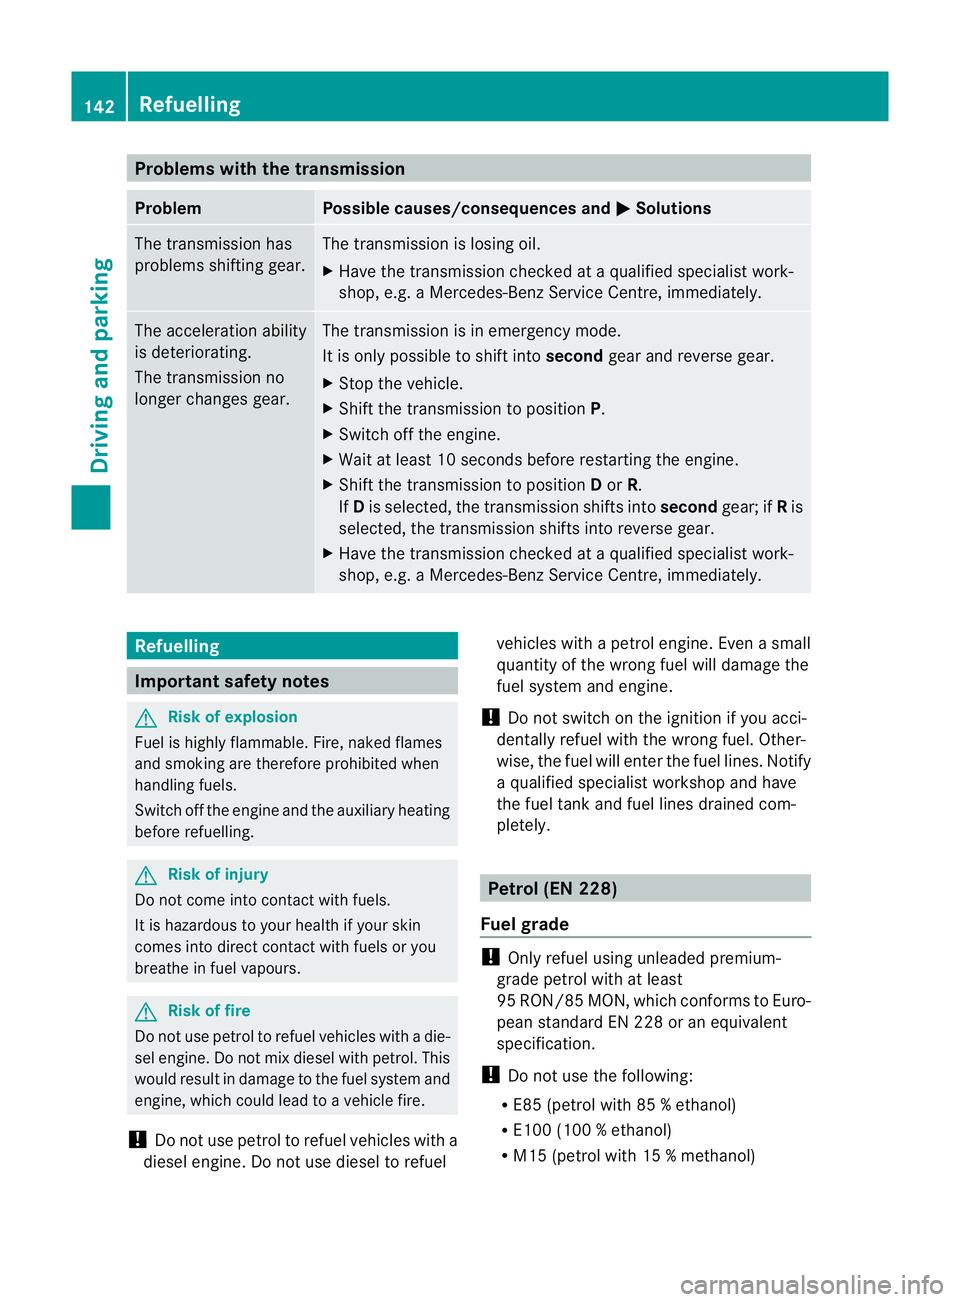
Problems with the transmission
Problem Possible causes/consequences and
M Solutions
The transmission has
problems shifting gear. The transmission is losing oil.
X
Have the transmission checked at a qualified specialist work-
shop, e.g. a Mercedes-Benz Service Centre, immediately. The acceleration ability
is deteriorating.
The transmission no
longer changes gear. The transmission is in emergency mode.
It is only possible to shift into
secondgear and reverse gear.
X Stop the vehicle.
X Shift the transmission to position P.
X Switch off the engine.
X Wait at least 10 seconds before restarting the engine.
X Shift the transmission to position Dor R.
If D is selected, the transmission shifts into secondgear; ifRis
selected, the transmission shifts into reverse gear.
X Have the transmission checked at a qualified specialist work-
shop, e.g. a Mercedes-Benz Service Centre, immediately. Refuelling
Important safety notes
G
Risk of explosion
Fuel is highly flammable. Fire, naked flames
and smoking are therefore prohibited when
handling fuels.
Switch off the engine and the auxiliary heating
before refuelling. G
Risk of injury
Do not come into contact with fuels.
It is hazardous to your health if your skin
comes into direct contact with fuels or you
breathe in fuel vapours. G
Risk of fire
Do not use petrol to refuel vehicles with a die-
sel engine. Do not mix diesel with petrol. This
would result in damage to the fuel system and
engine, which could lead to a vehicle fire.
! Do not use petrol to refuel vehicles with a
diesel engine. Do not use diesel to refuel vehicles with a petrol engine. Even a small
quantity of the wrong fuel will damage the
fuel system and engine.
! Do not switch on the ignition if you acci-
dentally refuel with the wrong fuel. Other-
wise, the fuel will enter the fuel lines. Notify
a qualified specialist workshop and have
the fuel tank and fuel lines drained com-
pletely. Petrol (EN 228)
Fuel grade !
Only refuel using unleaded premium-
grade petrol with at least
95 RON/85 MON, which conforms to Euro-
pean standard EN 228 or an equivalent
specification.
! Do not use the following:
R E85 (petrol with 85 % ethanol)
R E100 (100 % ethanol)
R M15 (petrol with 15 % methanol) 142
RefuellingDriving and parking
Page 147 of 337
under 50 ppm
.Otherwise, the emission
control syste mcould be damaged.
! Vehicles without adiesel particle fil-
ter: the engine oil should be changed more
frequently in countries in which diesel with
a higher sulphur conten tis available. More
information about intervals for changing
the engine oil can be obtained from any
Mercedes-Benz Service Centre.
! Using fuel that does not conform to Euro-
pean standard EN 590 or German standard
DIN 51628 can lead to increased wear,
engine damage and damage to the exhaust
system.
Do not use the following:
R marine diesel
R heating oil
R bio-diesel
R vegetable oil
R petrol
R paraffin
R kerosene
Do not mix these fuels with diesel fuels and
do not use any special additives. Other-
wise, this can lead to damage to the engine.
This excludes flow improver, see "Low out-
side temperatures".
! Use a filter when adding fuel from a fuel
can. Otherwise, the fuel lines and/or the
diesel injection system could be blocked by
particles from the fuel can.
For further information on "Fuel", see
(Y page 319).
Low outside temperatures Diesel fuel with improved cold flow qualities
is available during the winter months. In
Europe, various climate-dependent low-tem-
perature classes are defined in EN 590. Refu-
elling with diesel fuel which complies with the
climatic specifications of standard EN 590
can help to prevent operating problems. At
exceptionally low temperatures, it is possible that the flow properties of the fuel may be
inadequate. This also applies to fuel that has
not been adapted to suit the climatic condi-
tions, e.g. diesel fuel from warmer regions.
i
Further information about country-spe-
cific fuel properties can be obtained from
oil companies, e.g. at filling stations.
Flow improver Flow improvers can be added to improve the
cold resistance of diesel fuel. The effective-
ness of a flow improver is not guaranteed with
every fuel.
Correct dosage and thorough mixing are deci-
sive factors in ensuring improvement in low-
temperature resistance. Under certain cir-
cumstances, an excessive dosage may
actually decrease low-temperature resist-
ance and should therefore be avoided.F ollow
the manufacturer's dosing instructions.
Mix the additive with the diesel in good time,
before the flow properties of the diesel
become inadequate. Malfunctions can other-
wise only be rectified by heating the entire
fuel system, e.g. by parking the vehicle in a
heated garage.
Observe the information provided by the man-
ufacturer when using a flow improver. Only
use flow improvers that have been tested and
approved by Mercedes-Benz. You can obtain
further information from any Mercedes-Benz
Service Centre. Refuelling
Fuel filler flap The fuel filler flap is unlocked or locked auto-
matically when you open or close the vehicle
with the key or using KEYLESS-GO.
The fuel filler flap is located to the rear on the
right. The position of the fuel filler cap is dis-
played in the instrument cluster
8.The
arrow next to the filling pump indicates the
side of the vehicle. 144
RefuellingDriving and parking
Page 152 of 337
X
To apply: depress parking brake ;firmly.
The J indicator lamp in the instrument
cluster lights up if the engine is running.
X To release: depress the brake pedal and
keep it depressed.
X Pull release handle :.
The J indicator lamp in the instrument
cluster goes out. Parking up the vehicle
If you leave the vehicle parked up for longer
tha nfour weeks, the battery may be damaged
by exhaustive discharge.
X Disconnect the battery (Y page 292) or
connect it to a trickle charger.
i You can obtain information about trickle
chargers from a qualified specialist work-
shop, e.g. a Mercedes-Benz Service
Centre.
If you leave the vehicle parked up for longer
than six weeks, the vehicle may suffer dam-
age as a result of lack of use.
X Visit a qualified specialist workshop and
seek advice. Driving tips
General driving tips
Rolling with the engine switched off G
Risk of accident
Never switch the engine off while the vehicle
is in motion.
There is no power assistance for the steering
and the service brake when the engine is not
running.
You will require considerably more effort to
steer and brake, and you could therefore lose
control of the vehicle and cause an accident. Engine oil
! Vehicles with adiesel particle filter:
If the vehicle is mostly driven for short dis-
tances, it is possible that malfunctions may
occur during the automatic cleaning of the
diesel particle filter. This can lead to engine
damage. Therefore, if you frequently drive
short distances, make sure to drive on
motorways or country roads for 20 minutes
at least every 500 km. Brakes
Important safety notes G
Risk of accident
Do not change down for additional engine
braking on a slippery road surface. This could
cause the drive wheels to lose their grip and
the vehicle could skid. G
Risk of accident
Make sure that other road users are not
endangered by your braking.
Downhill gradients On long and steep downhill gradients, espe-
cially if the vehicle is laden, you must select
shift range
1,2or 3in good time.
i This also applies if you have activated
cruise control, SPEEDTRONIC or DIS-
TRONIC PLUS.
This will use the braking effect of the engine,
so less braking will be required to maintain
the speed. This relieves the load on the brake
system and prevents the brakes from over-
heating and wearing too quickly. If you need
additional braking, depress the brake pedal
repeatedly rather than continuously. Driving tips
149Driving and parking Z
Page 155 of 337
cause the drive wheels to los
etheir grip and
the vehicle could skid.
You should drive particularly carefully on slip-
pery road surfaces. Avoid sudden accelera-
tion, steering and braking manoeuvres.
If the vehicle threatens to skid or cannot be
stopped when moving at low speed:
X Shift the transmission to position N.
X Try to bring the vehicle under control by
using corrective steering.
i For more information on driving with
snow chains, see (Y page 304).Driving systems
Cruise control
Important safety notes Cruise control maintains a constant road
speed for you. It brakes automatically in order
to avoid exceeding the set speed. On long and
steep downhill gradients, especially if the
vehicle is laden, you must select shift range
1, 2or 3in good time. By doing so, you will
make use of the braking effect of the engine,
which relieves the load on the brake system
and prevents the brakes from overheating
and wearing too quickly. G
Risk of accident
Do not change down for additional engine
braking on a slippery road surface. This could
cause the drive wheels to lose their grip and
the vehicle could skid.
Use cruise control only if road and traffic con-
ditions make it appropriate to maintain a
steady speed for a prolonged period. You can
store any road speed above 30 km/h. G
Risk of accident
Cruise control cannot take account of road
and traffic conditions.
Always pay attention to traffic conditions
even when cruise control is activated. Cruise control is only an aid designed to assist
driving. You are responsible for the vehicle's
speed and for braking in good time.
G
Risk of accident
Do not use cruise control:
R in road and traffic conditions which do not
allow you to maintain a constant speed (e.g.
heavy traffic or winding roads). You could
otherwise cause an accident.
R on slippery roads. Braking or accelerating
could cause the drive wheels to lose trac-
tion and the vehicle could then skid.
R when there is poor visibility, e.g. due to fog,
heavy rain or snow
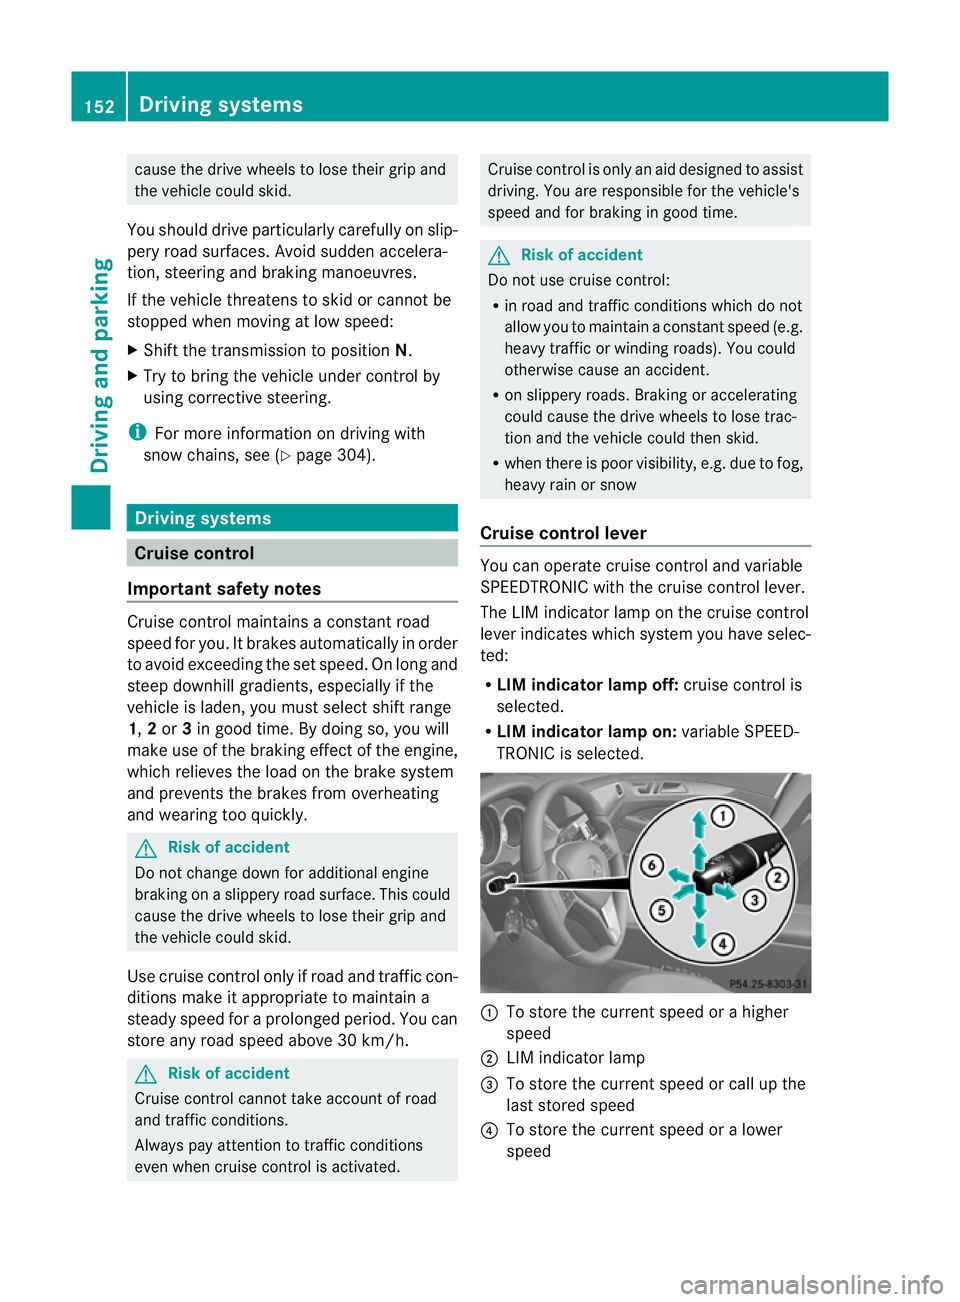
Cruise control lever You can operate cruise control and variable
SPEEDTRONIC with the cruise control lever.
The LIM indicator lamp on the cruise control
lever indicates which system you have selec-
ted:
R LIM indicator lamp off: cruise control is
selected.
R LIM indicator lamp on: variable SPEED-
TRONIC is selected. :
To store the current speed or a higher
speed
; LIM indicator lamp
= To store the current speed or call up the
last stored speed
? To store the current speed or a lower
speed 152
Driving systemsDriving and parking