2010 MERCEDES-BENZ CLS COUPE warning
[x] Cancel search: warningPage 286 of 337

i
First, TIREFIT is pumped into the tyre .The
pressure can briefly rise to approximately
500 kPa (5 bar/73 psi).
Do not switch off the tyre inflation com-
pressor during this phase.
X Allow the tyre inflation compressor to run
for five minutes. The tyre should then have
attained a pressure of at least 180 kPa
(1.8 bar/26 psi).
! Do not operate the tyre inflation com-
pressor for longer than eight minutes at a
time without a break. It may otherwise
overheat.
The tyre inflation compressor can be oper-
ated again once it has cooled down.
If a pressure of 180 kPa (1.8 bar/26 psi) has
been achieved after five minutes, see
(Y page 283).
If a pressure of 180 kPa (1.8 bar/26 psi) has
not been achieved after five minutes, see
(Y page 283).
Tyre pressure of 180 kPa (1.8 bar/
26 psi) is not reached If, after five minutes, a pressure of 180 kPa
(1.8 bar/26 psi) has not been achieved:
X Press the on/off switch on the tyre inflation
compressor to 0.
The tyre inflation compressor is switched
off.
X Unscrew the filler hose from the valve.
X Very slowly drive forwards or reverse
approximately 10 m.
X Pump up the tyre again. G
Risk of accident
If after five minutes apressure of 180 kPa
(1 8 bar/26 psi) cannot be achieved, the tyre
is too severely damaged.
Do not drive any further. Consult a qualified
specialist workshop which has the necessary
specialist knowledge and tools to carry out
the work required. Mercedes-Benz recom-
mends that you use a Mercedes-Benz Service Centre for this purpose. In particular, work
relevant to safety or on safety-related sys-
tems must be carried out at a qualified spe-
cialist workshop.
Tyre pressure of 180 kPa (1.8 bar/
26 psi) is reached X
Press the on/off switch on the tyre inflation
compresso rto0.
The tyre inflation compressor is switched
off.
X Remove the tyre sealant bottle from the
wheel.
! After use, excess TIREFIT may run out of
the filler hose. This may cause stains.
Therefore, place the filler hose in the plastic
bag which contained the TIREFIT kit.
X Stow the tyre sealant bottle, the tyre infla-
tion compressor and the warning triangle.
X Pull away immediately. G
Risk of accident
Do not exceed the maximum speed of
80 km/h.
The "max. 80 km/h" label must be affixed in
the driver's field of vision.
The vehicle's handling characteristics may be
affected.
X Stop after driving for approximately ten
minutes and check the tyre pressure with
the tyre inflation compressor. G
Risk of accident
If the tyre pressure is less than 130 kPa
(1.3 bar/20 psi), the tyre is too severely dam-
aged. Do not drive any further. Consult a
qualified specialist workshop which has the
necessary specialist knowledge and tools to
carry out the work required. Mercedes-Benz
recommends that you use aMercedes-Benz
Service Centre for this purpose. In particular,
work relevant to safety or on safety-related
systems must be carried out at a qualified
specialist workshop. Flat tyre
283Breakdown assistance Z.
Page 287 of 337
X
Correct the tyre pressure if it is still at least
130 kPa (1.3 bar/20 psi) (for the values,
see the fuel fille rflap).
X To increase the tyre pressure: switch on
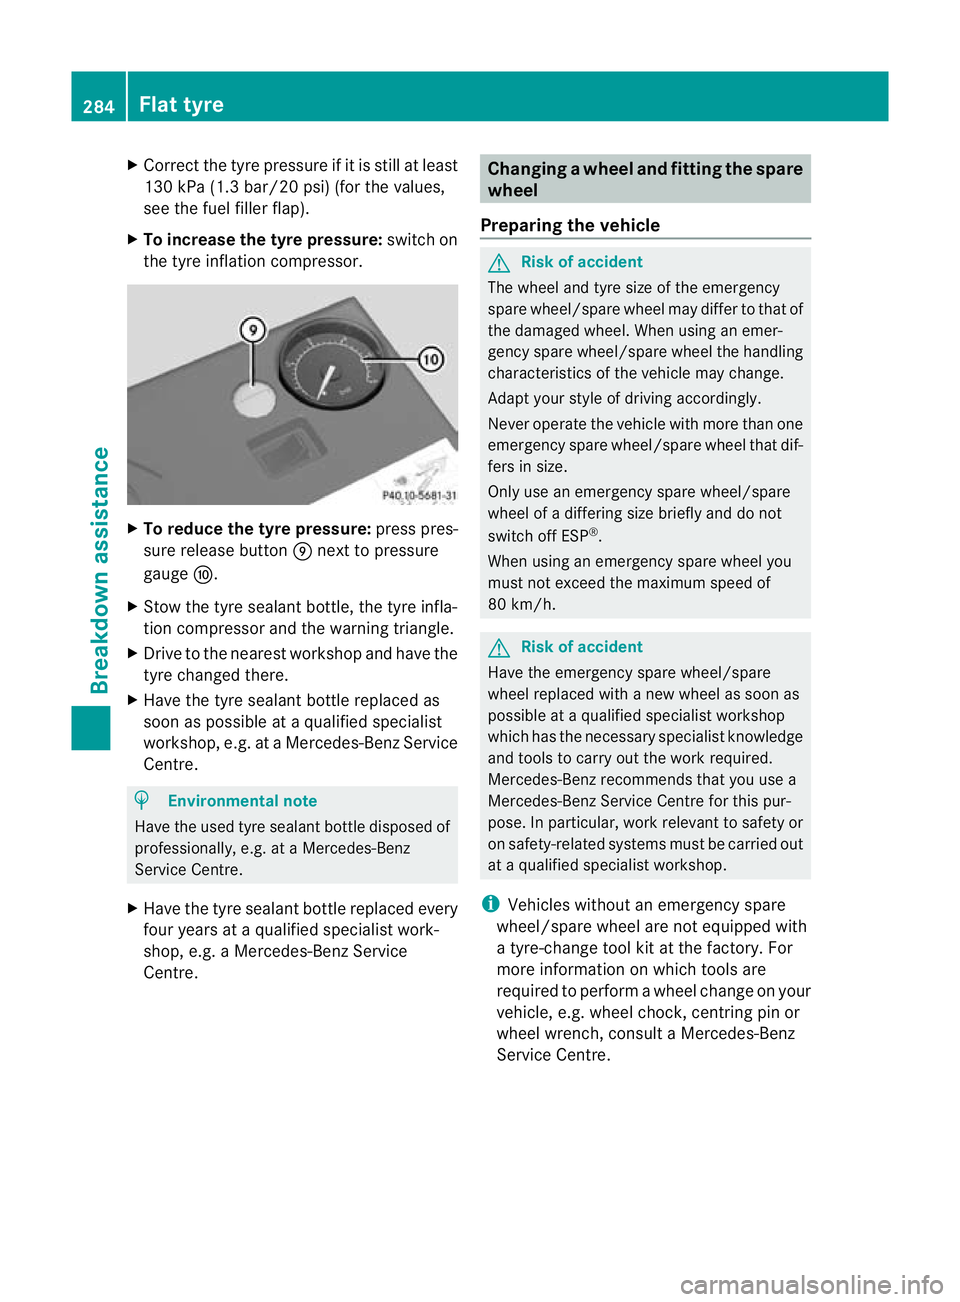
the tyre inflation compressor. X
To reduce the tyre pressure: press pres-
sure release button Enext to pressure
gauge F.
X Stow the tyre sealant bottle, the tyre infla-
tion compressor and the warning triangle.
X Drive to the nearest workshop and have the
tyre changed there.
X Have the tyre sealant bottle replaced as
soon as possible at a qualified specialist
workshop, e.g. at a Mercedes-Ben zService
Centre. H
Environmental note
Have the used tyre sealant bottle disposed of
professionally, e.g. at aMercedes-Benz
Service Centre.
X Have the tyre sealant bottle replaced every
four years at a qualified specialist work-
shop, e.g. a Mercedes-Benz Service
Centre. Changing
awheel and fitting the spare
wheel
Preparing the vehicle G
Risk of accident
The wheel and tyre size of the emergency
spare wheel/spare wheel may diffe rto that of
the damaged wheel. When using an emer-
gency spare wheel/spare wheel the handling
characteristics of the vehicle may change.
Adapt your style of driving accordingly.
Never operate the vehicle with more than one
emergency spare wheel/spare wheel that dif-
fers in size.
Only use an emergency spare wheel/spare
wheel of a differing size briefly and do not
switch off ESP ®
.
When using an emergency spare wheel you
must not exceed the maximum speed of
80 km/h. G
Risk of accident
Have the emergency spare wheel/spare
wheel replaced with a new wheel as soon as
possible at a qualified specialist workshop
which has the necessary specialist knowledge
and tools to carry out the work required.
Mercedes-Benz recommends that you use a
Mercedes-Benz Service Centre for this pur-
pose. In particular, work relevant to safety or
on safety-related systems must be carried out
at a qualified specialist workshop.
i Vehicles without an emergency spare
wheel/spare wheel are not equipped with
a tyre-change tool kit at the factory. For
more information on which tools are
required to perform a wheel change on your
vehicle, e.g. wheel chock, centring pin or
wheel wrench, consult a Mercedes-Benz
Service Centre. 284
Flat tyreBreakdown assistance
Page 292 of 337
X
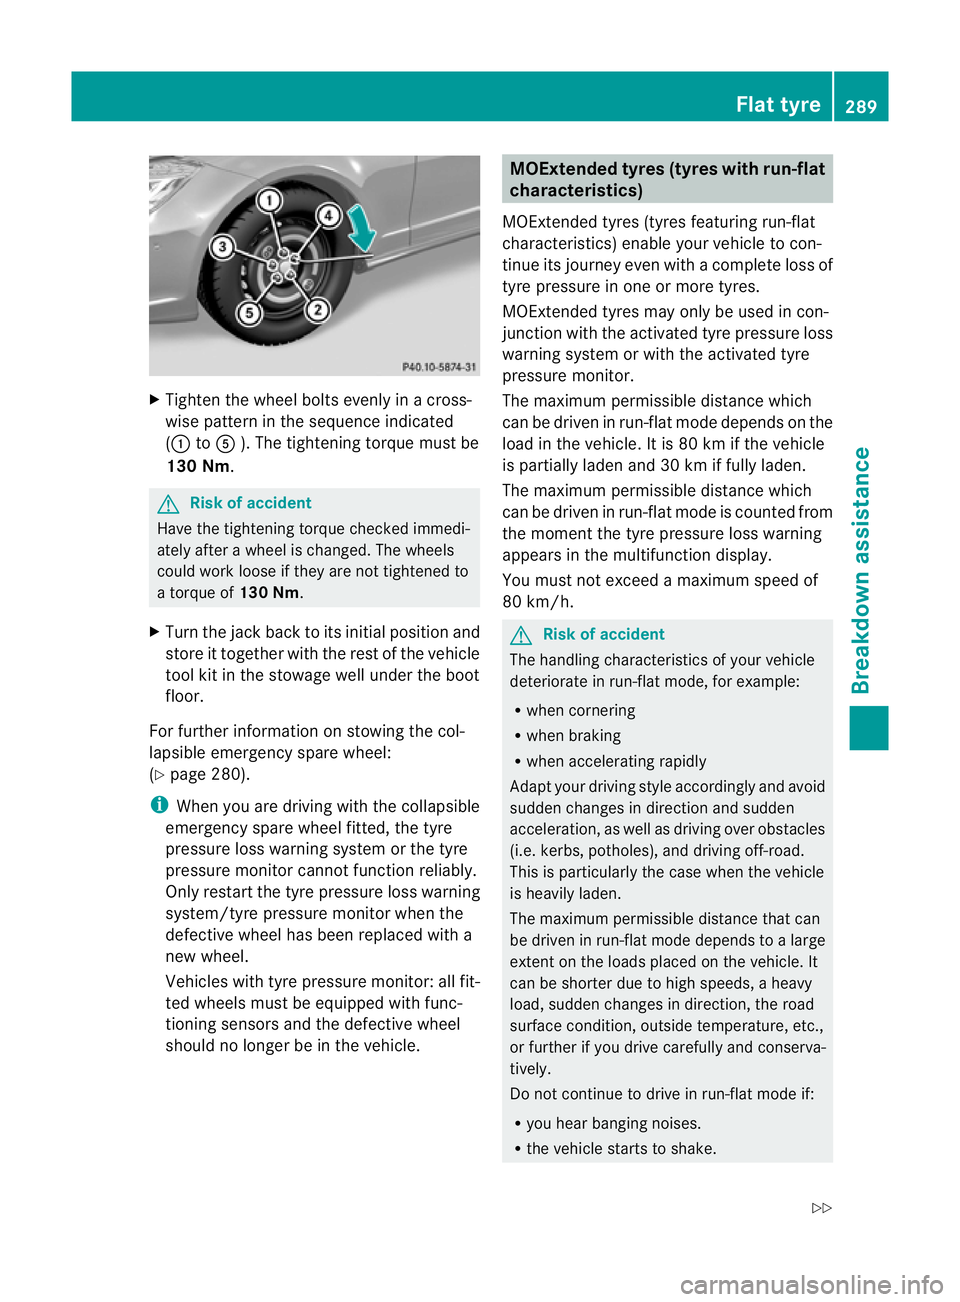
Tighten the wheel bolts evenly in a cross-
wise pattern in the sequence indicated
(: toA ). The tightening torque must be
130 Nm. G
Risk of accident
Have the tightening torque checked immedi-
ately after a wheel is changed. The wheels
could work loose if they are not tightened to
a torque of 130 Nm.
X Turn the jack back to its initial position and
store it together with the rest of the vehicle
tool kit in the stowage well under the boot
floor.
For further information on stowing the col-
lapsible emergency spare wheel:
(Y page 280).
i When you are driving with the collapsible
emergency spare wheel fitted, the tyre
pressure loss warning system or the tyre
pressure monitor cannot function reliably.
Only restart the tyre pressure loss warning
system/tyre pressure monitor when the
defective wheel has been replaced with a
new wheel.
Vehicles with tyre pressure monitor: all fit-
ted wheels must be equipped with func-
tioning sensors and the defective wheel
should no longer be in the vehicle. MOExtended tyres (tyres with run-flat
characteristics)
MOExtended tyres (tyres featuring run-flat
characteristics) enable your vehicle to con-
tinue its journey even with a complete loss of
tyre pressure in one or more tyres.
MOExtended tyres may only be used in con-
junction with the activated tyre pressure loss
warning system or with the activated tyre
pressure monitor.
The maximum permissible distance which
can be driven in run-flat mode depends on the
load in the vehicle. It is 80 km if the vehicle
is partially laden and 30 km if fully laden.
The maximum permissible distance which
can be driven in run-flat mode is counted from
the moment the tyre pressure loss warning
appears in the multifunction display.
You must not exceed a maximum speed of
80 km/h. G
Risk of accident
The handling characteristics of your vehicle
deteriorate in run-flat mode, for example:
R when cornering
R when braking
R when accelerating rapidly
Adapt your driving style accordingly and avoid
sudden changes in direction and sudden
acceleration, as well as driving over obstacles
(i.e. kerbs, potholes), and driving off-road.
This is particularly the case when the vehicle
is heavily laden.
The maximum permissible distance that can
be driven in run-flat mode depends to a large
exten tonthe loads placed on the vehicle. It
can be shorter due to high speeds, a heavy
load, sudden changes in direction, the road
surface condition, outside temperature, etc.,
or further if you drive carefully and conserva-
tively.
Do not continue to drive in run-flat mode if:
R you hear banging noises.
R the vehicle starts to shake. Flat tyre
289Breakdown assistance
Z
Page 300 of 337
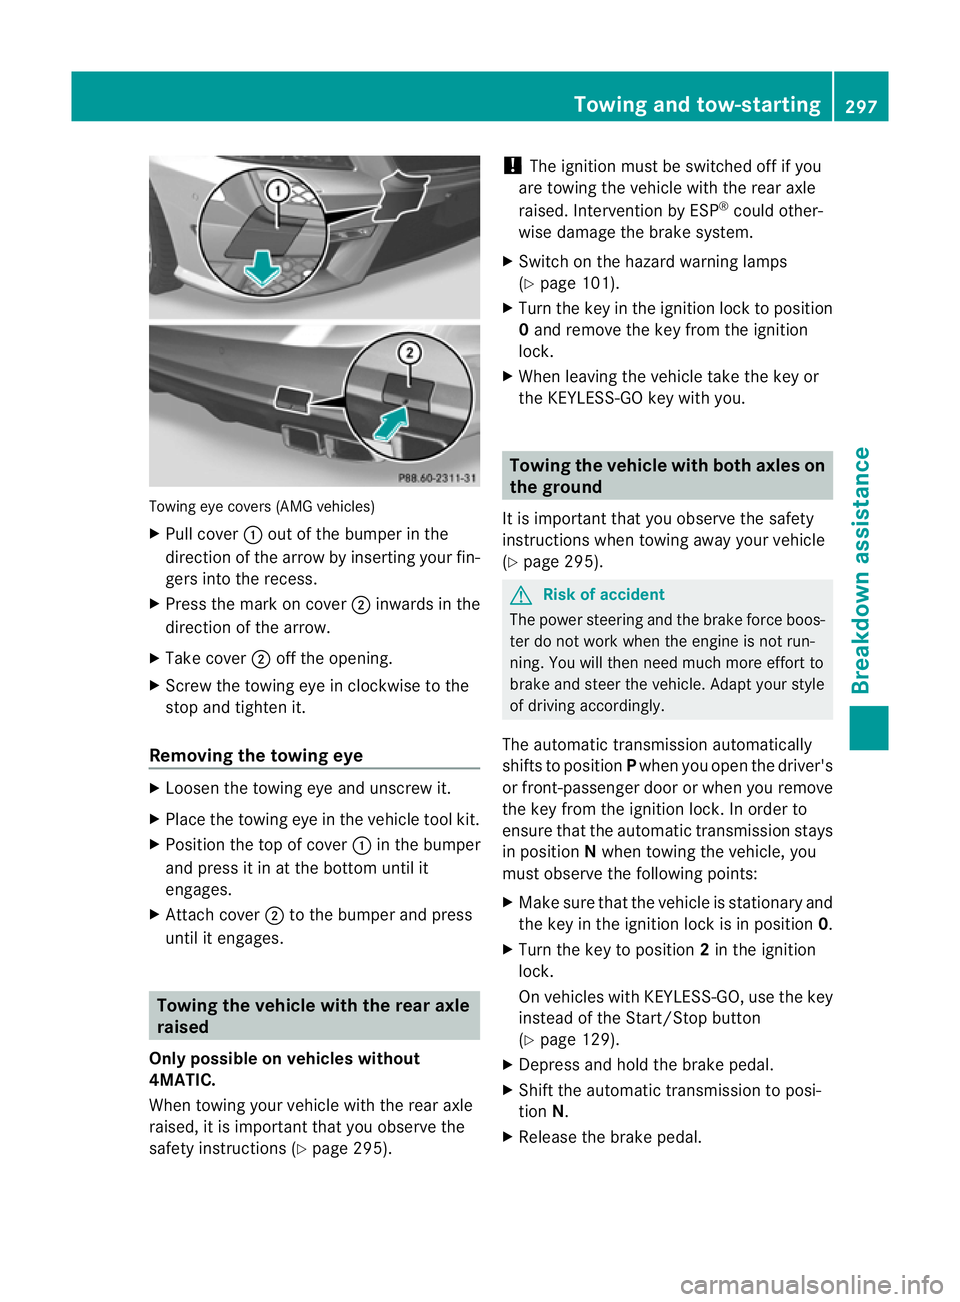
Towing eye covers (AMG vehicles)
X
Pull cover :out of the bumper in the
direction of the arrow by inserting your fin-
gers into the recess.
X Press the mark on cover ;inwards in the
direction of the arrow.
X Take cover ;off the opening.
X Screw the towing eye in clockwise to the
stop and tighten it.
Removing the towing eye X
Loosen the towing eye and unscrew it.
X Place the towing eye in the vehicle tool kit.
X Position the top of cover :in the bumper
and press it in at the bottom until it
engages.
X Attach cover ;to the bumper and press
until it engages. Towing the vehicle with the rear axle
raised
Only possible on vehicles without
4MATIC.
When towing your vehicle with the rear axle
raised, it is important that you observe the
safety instructions (Y page 295). !
The ignition must be switched off if you
are towing the vehicle with the rear axle
raised. Intervention by ESP ®
could other-
wise damage the brake system.
X Switch on the hazard warning lamps
(Y page 101).
X Turn the key in the ignition lock to position
0and remove the key from the ignition
lock.
X When leaving the vehicle take the key or
the KEYLESS-GO key with you. Towing the vehicle with both axles on
the ground
It is important that you observe the safety
instructions when towing away your vehicle
(Y page 295). G
Risk of accident
The power steering and the brake force boos-
ter do not work when the engine is not run-
ning. You will then need much more effort to
brake and steer the vehicle. Adapt your style
of driving accordingly.
The automatic transmission automatically
shifts to position Pwhen you open the driver's
or front-passenger door or when you remove
the key from the ignition lock. In order to
ensure that the automatic transmission stays
in position Nwhen towing the vehicle, you
must observe the following points:
X Make sure that the vehicle is stationary and
the key in the ignition lock is in position 0.
X Turn the key to position 2in the ignition
lock.
On vehicles with KEYLESS-GO, use the key
instead of the Start/Stop button
(Y page 129).
X Depress and hold the brake pedal.
X Shift the automatic transmission to posi-
tion N.
X Release the brake pedal. Towing and tow-starting
297Breakdown assistance Z
Page 301 of 337
X
Switch on the hazard warning lamps
(Y page 101).
X Leave the key in position 2in the ignition
lock.
i Whe ntowing with the hazard warning
lamps switched on, use the combination
switch as usual to signal achange of direc-
tion. In this case, only the turn signals for
the desired direction flash. When the com-
bination switch is reset, the hazard warning
lamps start flashing again. Transporting the vehicle
The towing eye can be used to pull the vehicle
onto a trailer or transporter for transporting
purposes.
X Vehicles with automatic transmission:
turn the key to position 2in the ignition
lock.
X Shift the automatic transmission to posi-
tion N.
As soon as the vehicle is loaded:
X Prevent the vehicle from rolling away by
applying the parking brake.
X Turn the key in the ignition lock to position
0and remove the key from the ignition
lock.
X Secure the vehicle.
! Only lash the vehicle down by the wheels
or wheel rims, not by parts of the vehicle
such as axle or steering components. Oth-
erwise, the vehicle could be damaged. Electrical fuses
Important safety notes
The fuses in your vehicle serve to close down
faulty circuits. If afuse blows, all the compo-
nents on the circuit and their functions will
fail. G
Risk of fire
Only use fuses that have been approved for
Mercedes-Ben zvehicles and which have the
correct fuse rating for the systems con-
cerned. Do not attempt to repair or bridge
faulty fuses. Otherwise, a circuit overload
could cause a fire. Have the cause traced and
rectified at a qualified specialist workshop,
e.g. a Mercedes-Benz Service Centre.
Blown fuses must be replaced with fuses of
the same rating, which you can recognise by
the colour and value. The fuse ratings are lis-
ted in the fuse allocation chart .AMercedes-
BenzS ervice Centre will be happy to advise
you.
If the newly inserted fuse also blows, have the
cause traced and rectified at a qualified spe-
cialist workshop, e.g. a Mercedes-Benz
Service Centre.
! Only use fuses that have been approved
for Mercedes-Benzv ehicles and which
have the correct fuse rating for the system
concerned. Otherwise, components or sys-
tems could be damaged. Before changing a fuse
X Park the vehicle and apply the parking
brake.
X Switch off all electrical consumers.
X Remove the key from the ignition lock.
The fuses are located in various fuse boxes:
R fuse box in the engine compartment on the
left-hand side of the vehicle, when viewed
in the direction of travel
R fuse box in the boot on the right when
viewed in the direction of travel
The fuse allocation chart is located in the
vehicle tool kit (Y page 279) in the stowage
compartment under the boot floor. 298
Electrical fusesBreakdown assistance
Page 306 of 337
Tyre tread
G
Ris
kofa ccident
Bear in mind that:
R tyre grip decreases rapidly on wet roads
when the tread depth is less than 3mm.
Thus, you should replace tyres that have
insufficient tread.
R winter tyres should be replaced when the
tread depth is 4mmorless as they no lon-
ger provide adequate grip.
R the tread on a tyre may not wear evenly.
Thus, you should regularly check the tread
depth and the condition of the tread across
the entire width of all tyres. If necessary,
turn the fron twheels to full lock in order to
inspect the tyre tread more easily.
Otherwise, you could lose control of the vehi-
cle and cause an accident due to the reduced
grip of the tyres on the road. Notes on selecting, fitting and replac-
ing tyres
R Only fit tyres and wheels of the same type
and make.
R Only fit tyres of the correct size onto the
wheels.
R After fittingn ew tyres, run them in at mod-
erate speeds for the first 100 km, as they
only reach their full performance after this
distance.
R Do not drive with tyres which have too little
tread depth, as this significantly reduces
the traction on wet roads (aquaplaning).
R Replace the tyres after six years at the lat-
est, regardless of wear. This also applies to
the emergency spare wheel/spare wheel. MOExtended tyres (tyres with run-flat
characteristics)
MOExtended tyres (tyres with run-flat char-
acteristics) allow you to continue driving the vehicle even when one or more tyres lose all
air pressure.
MOExtended tyres may only be used in con-
junction with the activated tyre pressure loss
warning system or with the activated tyre
pressure monitor and on wheels specifically
tested by Mercedes-Benz.
i Vehicles with MOExtended tyres are not
equipped with a TIREFIT kit at the factory.
It is therefore recommended that you addi-
tionally equip your vehicle with the TIREFIT
kit if you fit tyres that do not feature run-
flat properties, e.g. winter tyres. You can
obtain a TIREFIT kit from a Mercedes-Benz
Service Centre, for example.
You will find notes on driving with a flat tyre
in the "Breakdown assistance" section
(Y page 289). Winter operation
Please bear the following in mind
Have your vehicle winterproofed at a qualified
specialist workshop, e.g. at a Mercedes-Benz
Service Centre, at the onset of winter.
Observe the notes in the "Changing a wheel"
section (Y page 309). Driving with summer tyres
At temperatures below +7 †, summer tyres
lose elasticity and therefore traction and
braking power –change the tyres on your
vehicle to M+S tyres. Using summer tyres at
very cold temperatures could cause tears to
form, thereby damaging them permanently.
Mercedes-Ben zcannot accept responsibility
for this type of damage. M+S tyres
At temperatures below +7 †, use winter tyres
or all-season tyres. Both types of tyre are
identified by the M+S marking. Winter operation
303Wheels and tyres Z
Page 307 of 337
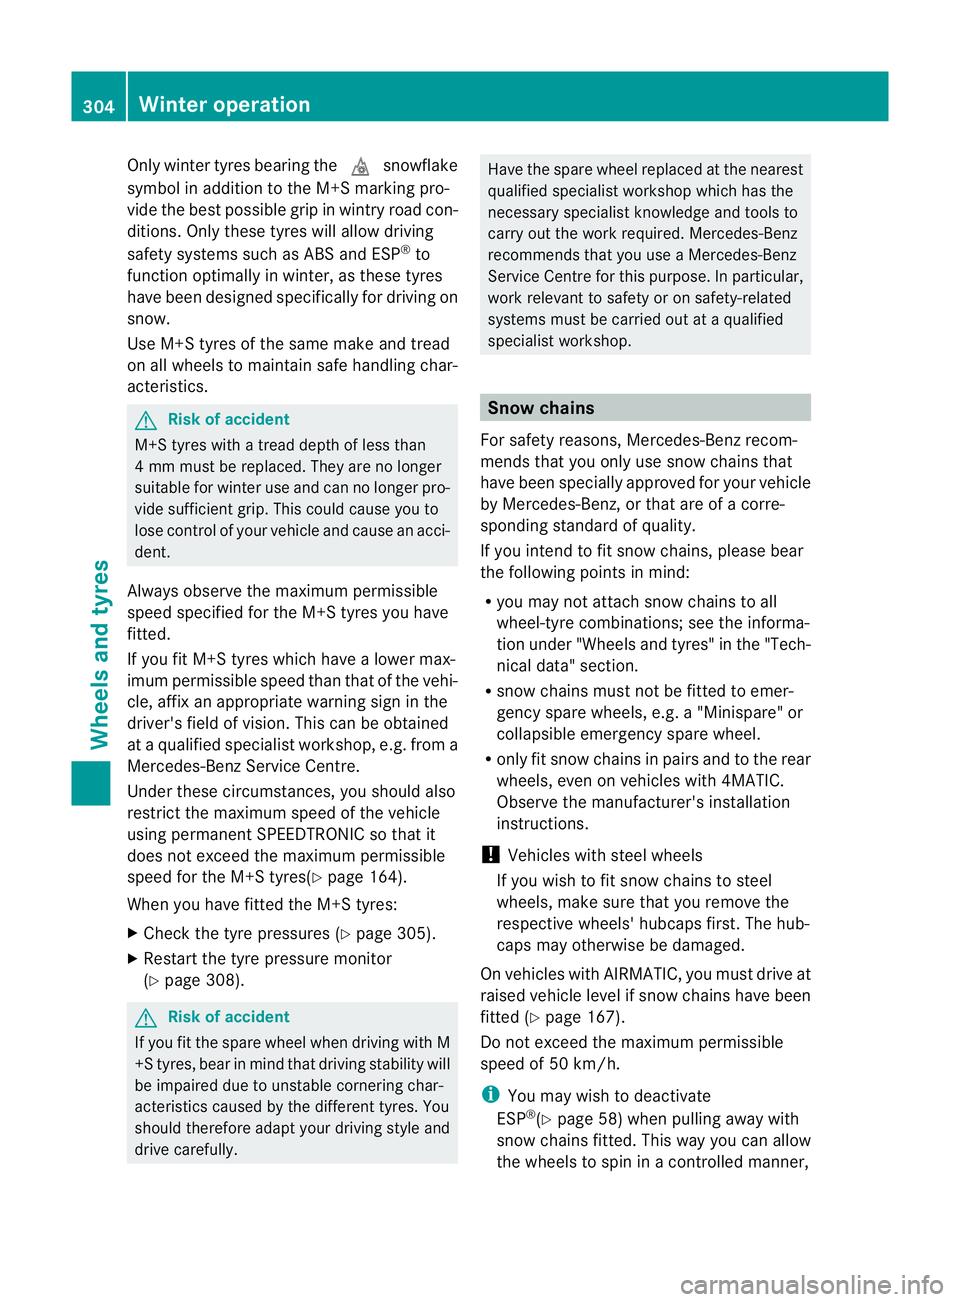
Only winter tyres bearing the
isnowflake
symbol in addition to the M+S marking pro-
vide the best possible grip in wintry road con-
ditions. Only these tyres will allow driving
safety systems such as ABS and ESP ®
to
function optimally in winter, as these tyres
have been designed specificallyf or driving on
snow.
Use M+S tyres of the same make and tread
on all wheels to maintain safe handling char-
acteristics. G
Risk of accident
M+S tyres with a tread depth of less than
4mmm ust be replaced. They are no longer
suitable for winter use and can no longer pro-
vide sufficient grip .This could cause you to
lose control of your vehicle and cause an acci-
dent.
Always observe the maximum permissible
speed specified for the M+S tyres you have
fitted.
If you fit M+S tyres which have a lower max-
imum permissible speed than that of the vehi-
cle, affix an appropriate warning sign in the
driver's field of vision. This can be obtained
at a qualified specialist workshop, e.g. from a
Mercedes-Benz Service Centre.
Under these circumstances, you should also
restrict the maximum speed of the vehicle
using permanent SPEEDTRONIC so that it
does not exceed the maximum permissible
speed for the M+S tyres(Y page 164).
When you have fitted the M+S tyres:
X Check the tyre pressures (Y page 305).
X Restart the tyre pressure monitor
(Y page 308). G
Risk of accident
If you fit the spare wheel when driving with M
+S tyres, bear in mind that driving stability will
be impaired due to unstable cornering char-
acteristics caused by the different tyres. You
should therefore adapt your driving style and
drive carefully. Have the spare wheel replaced at the nearest
qualified specialist workshop which has the
necessary specialist knowledge and tools to
carry out the work required. Mercedes-Benz
recommends that you use aMercedes-Benz
Service Centre for this purpose. In particular,
work relevant to safety or on safety-related
systems must be carried out at a qualified
specialist workshop. Snow chains
For safety reasons, Mercedes-Benz recom-
mends that you only use snow chains that
have been specially approved for your vehicle
by Mercedes-Benz, or that are of a corre-
sponding standard of quality.
If you intend to fit snow chains, please bear
the following points in mind:
R you may not attach snow chains to all
wheel-tyre combinations; see the informa-
tion under "Wheels and tyres" in the "Tech-
nical data" section.
R snow chains must not be fitted to emer-
gency spare wheels, e.g. a "Minispare" or
collapsible emergency spare wheel.
R only fit snow chains in pairs and to the rear
wheels, even on vehicles with 4MATIC.
Observe the manufacturer's installation
instructions.
! Vehicles with steel wheels
If you wish to fit snow chains to steel
wheels, make sure that you remove the
respective wheels' hubcaps first .The hub-
caps may otherwise be damaged.
On vehicles with AIRMATIC, you must drive at
raised vehicle level if snow chains have been
fitted (Y page 167).
Do not exceed the maximum permissible
speed of 50 km/h.
i You may wish to deactivate
ESP ®
(Y page 58) when pulling away with
snow chains fitted. This way you can allow
the wheels to spin in a controlled manner, 304
Winter operationWheels and tyres
Page 309 of 337
rofitted tyre pressure monitors which are
screwed on to the valve may overload it and
cause it to fail .Due to their design, the valve
is kept open continuously, which may lead to
air loss. G
Ris
kofa ccident
Should the tyre pressure drop repeatedly:
R check the tyre for foreign bodies.
R check whether the wheel is losing air or the
valve is leaking.
R make sure that only a valve cap approved
by Mercedes-Benz is fitted on the tyre
valve.
Tyre pressures that are to olow have a nega-
tive effect on vehicle safety, which could lead
you to cause an accident.
If possible, only correc ttyre pressures when
the tyres are cold. The tyres are cold when
the vehicle has been parked fo ratleast three
hours or has been driven less than 1.5 km.
Depending on the ambient temperature, the
speed you are driving at and the load on the
tyres, the tyre temperature and thus the tyre
pressure may change by approximately
10 kPa (0.1 bar, 1.5 psi) per 10 †. Take this
into accoun twhen checking the pressure of
warm tyres and only correct it if it is too low
for the current operating conditions.
Driving with tyre pressure that is too high or
too low can:
R shorten the service life of the tyres
R cause increased tyre damage
R have a negative effect on handling charac-
teristics and thus the driving safety (e.g. by
causing aquaplaning)
i The tyre pressure values given for low
loads are minimum values which offer you
good ride comfort characteristics.
However, you can also use the values given
for higher loads. These are permissible and
will not adversely affect the running of the
vehicle. H
Environmental note
Check the tyre pressure regularly, at least
every 14 days. Tyre pressure loss warning system
Important safety notes While the vehicle is in motion, the tyre pres-
sure loss warning system monitors the set
tyre pressure using the rotational speed of
the wheels. This enables the system to detect
significant pressure loss in a tyre. If the speed
of rotation of a wheel changes as a result of
a loss of pressure, a corresponding warning
message will appearint
he multifunction dis-
play. G
Risk of accident
The tyre pressure loss warning system does
not warn you of an incorrectly set tyre pres-
sure. The table on the inside of the fuel filler
flap will help you decide whether the tyre
pressures should be corrected.
The tyre pressure loss warning system does
not replace the need to regularly check your
vehicle's tyre pressures, since an even loss of
pressure on several tyres at the same time
cannot be detected by the tyre pressure loss
warning system.
The tyre pressure monitor is not able to warn
you of a sudden loss of pressure, e.g. if the
tyre is penetrated by a foreign object.
In the event of a sudden loss of pressure, bring
the vehicle to a halt by braking carefully. Do
not make any sudden steering movements
when doing so.
The function of the tyre pressure loss warning
system is limited or delayed if:
R snow chains are fitted to your vehicle's
tyres.
R road conditions are wintry.
R you are driving on sand or gravel. 306
Tyre pressureWheels and tyres