2010 MERCEDES-BENZ CL63AMG run flat
[x] Cancel search: run flatPage 416 of 500

lower the trunk floor before closing the
trunk.
X
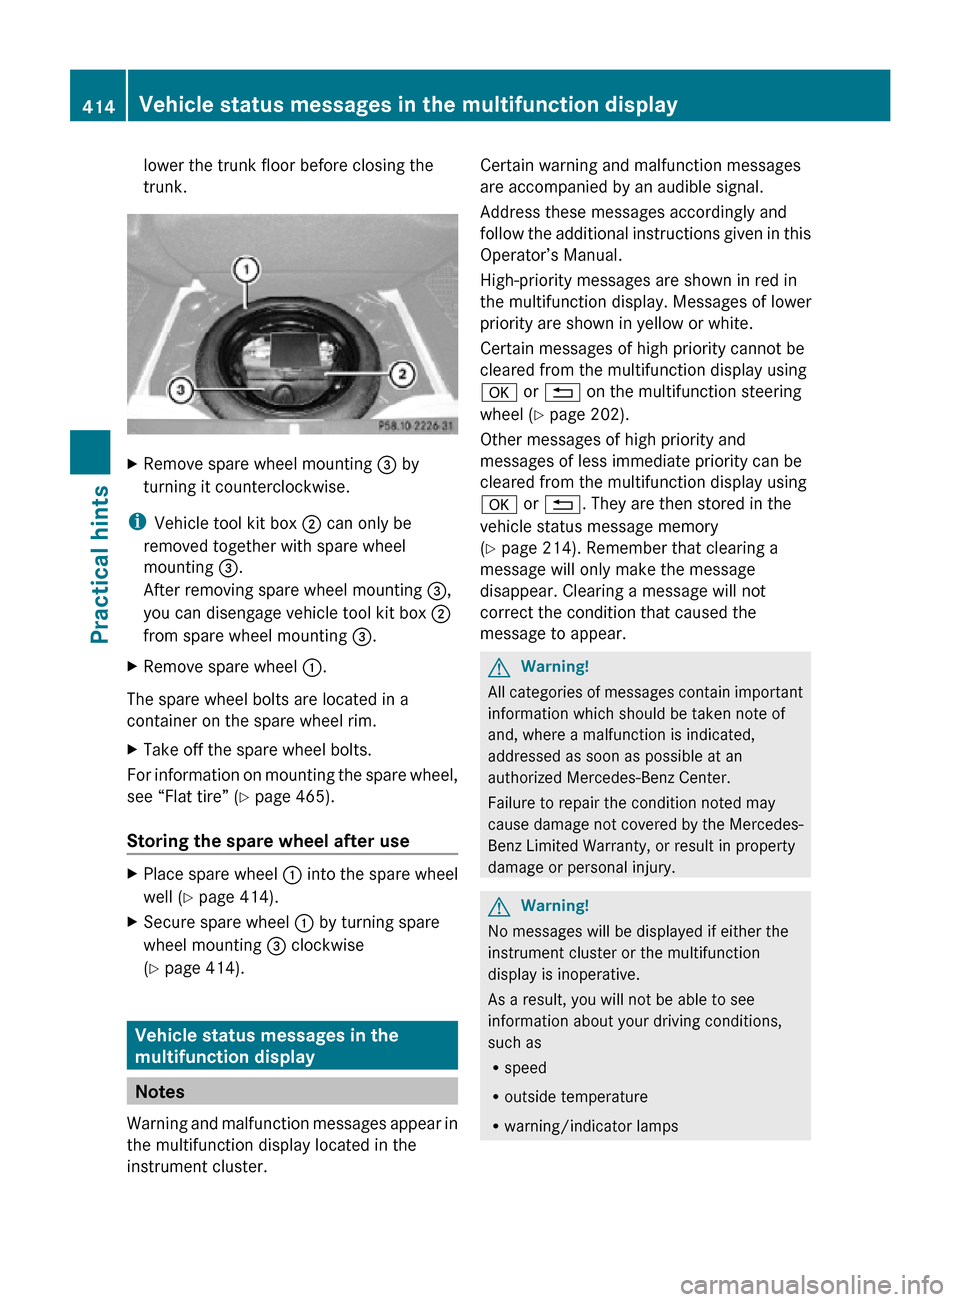
Remove spare wheel mounting = by
turning it counterclockwise.
i Vehicle tool kit box ; can only be
removed together with spare wheel
mounting =.
After removing spare wheel mounting =,
you can disengage vehicle tool kit box ;
from spare wheel mounting =.
X Remove spare wheel :.
The spare wheel bolts are located in a
container on the spare wheel rim.
X Take off the spare wheel bolts.
For information on mounting the spare wheel,
see “Flat tire” ( Y page 465).
Storing the spare wheel after use X
Place spare wheel : into the spare wheel
well (Y page 414).
X Secure spare wheel : by turning spare
wheel mounting = clockwise
(Y page 414). Vehicle status messages in the
multifunction display
Notes
Warning and malfunction messages appear in
the multifunction display located in the
instrument cluster. Certain warning and malfunction messages
are accompanied by an audible signal.
Address these messages accordingly and
follow the additional instructions given in this
Operator’s Manual.
High-priority messages are shown in red in
the multifunction display. Messages of lower
priority are shown in yellow or white.
Certain messages of high priority cannot be
cleared from the multifunction display using
a or % on the multifunction steering
wheel (Y page 202).
Other messages of high priority and
messages of less immediate priority can be
cleared from the multifunction display using
a or %. They are then stored in the
vehicle status message memory
(Y page 214). Remember that clearing a
message will only make the message
disappear. Clearing a message will not
correct the condition that caused the
message to appear.
G
Warning!
All categories of messages contain important
information which should be taken note of
and, where a malfunction is indicated,
addressed as soon as possible at an
authorized Mercedes-Benz Center.
Failure to repair the condition noted may
cause damage not covered by the Mercedes-
Benz Limited Warranty, or result in property
damage or personal injury. G
Warning!
No messages will be displayed if either the
instrument cluster or the multifunction
display is inoperative.
As a result, you will not be able to see
information about your driving conditions,
such as
R speed
R outside temperature
R warning/indicator lamps 414
Vehicle status messages in the multifunction displayPractical hints
216_AKB; 3; 90, en-US
d2ureepe,
Version: 2.11.8.1 2009-05-15T11:47:50+02:00 - Seite 414
Page 463 of 500

Unlocking the driver’s door
X
Insert mechanical key ; into the driver’s
door lock.
X Turn mechanical key ; counterclockwise
to position 1.
X Pull the door handle past the resistance
point until the locking knob moves up.
The driver’s door is unlocked.
X Pull the door handle once more to open the
driver’s door.
X Turn mechanical key ; back and remove
it from the driver’s door lock.
Unlocking the trunk A minimum height clearance of 5.9 ft (1.8 m)
is required to open the trunk lid.
X
Insert mechanical key ; into the trunk lid
lock.
X Turn mechanical key ; counterclockwise
to position 1. !
When you open the trunk, the trunk lid
swings open upwards. Always make sure
there is sufficient overhead clearance.
X Turn mechanical key ; back and remove
it from the trunk lid lock. Locking the vehicle
If you cannot lock the vehicle with the
SmartKey or with KEYLESS-GO, lock it as
follows:
X Open the passenger door.
X Close the driver’s door and the trunk.
i If you cannot close the trunk with the
remote trunk opening/closing switch,
lower the trunk lid manually and close it
with hands placed flat on the trunk lid until
it is engaged in its lock.
X Press down the locking knob of the driver’s
door.
X Press down the locking knob of the
passenger door.
! To prevent inadvertent lockout, make
sure to have the SmartKey with you before
proceeding with the next step. The next
step will lock the vehicle.
X Exit the vehicle.
X Lock the trunk with the mechanical key
(Y page 261).
X Close the passenger door.
i This procedure does not arm the anti-
theft alarm system, nor does it lock the fuel
filler flap. Replacing SmartKey batteries
If the batteries in the SmartKey are
discharged, the vehicle can no longer be
locked or unlocked. It is recommended to
have the batteries replaced at an authorized
Mercedes-Benz Center. Replacing SmartKey batteries
461Practical hints
216_AKB; 3; 90, en-US
d2ureepe, Version: 2.11.8.1 2009-05-15T11:47:50+02:00 - Seite 461 Z
Page 470 of 500

X
Unscrew the uppermost wheel bolt and
remove it.
X Replace this wheel bolt with alignment
bolt :.
X Remove the remaining bolts.
! Do not place wheel bolts in sand or dirt.
This could result in damage to the wheel
bolts and wheel hub threads.
X Remove the wheel.
Attaching the spare wheel G
Warning!
Always replace wheel bolts that are damaged
or rusted.
Never apply oil or grease to wheel bolts.
Damaged wheel hub threads should be
repaired immediately. Do not continue to
drive under these circumstances! Contact an
authorized Mercedes-Benz Center or call
Roadside Assistance.
Incorrect wheel bolts or improperly tightened
wheel bolts can cause the wheel to come off.
This could cause an accident. Make sure to
use the correct wheel bolts. G
Warning!
Only use genuine Mercedes-Benz wheel bolts.
Other wheel bolts may come loose.
Do not tighten the wheel bolts when the
vehicle is raised. Otherwise the vehicle could
fall off the jack. Wheel bolt
: must be used for light alloy
rims. Wheel bolt ; must be used for the
Minispare wheel. The wheel bolts for the
Minispare wheel are located in the trunk with
the Minispare wheel.
! Wheel bolts ; must be used when
mounting the Minispare wheel. The use of
any wheel bolts other than wheel bolts ;
for the Minispare wheel will damage the
vehicle’s brakes. G
Warning!
Make sure to use the original length wheel
bolts when remounting the original wheel
after it has been repaired.
X Clean contact surfaces of wheel and wheel
hub.
! To avoid paint damage, place wheel flat
against hub and hold it there while
installing first wheel bolt. X
Guide the spare wheel onto the alignment
bolt and push it on.
X Insert the wheel bolts and tighten them
slightly.
X Unscrew the alignment bolt.
X Install the last wheel bolt and tighten it
slightly. 468
Flat tirePractical hints
216_AKB; 3; 90, en-US
d2ureepe,
Version: 2.11.8.1 2009-05-15T11:47:50+02:00 - Seite 468
Page 475 of 500

X
Connect positive terminal : of charged
battery A with
positive terminal ; with a
jumper cable. Clamp the cable to positive
terminal : of charged battery A first.
X Start engine of the vehicle with charged
battery A and run at idle speed.
X Connect negative terminal = of charged
battery A with negative terminal ? with
a jumper cable. Clamp the cable to
negative terminal = of charged battery
A first.
X Start engine of the vehicle with the
discharged battery and run at idle speed.
You can now turn on the electrical
consumers. Do not switch on the
headlamps under any circumstances.
X Remove the jumper cables from negative
terminals = and ? first.
X Remove the jumper cables from positive
terminals : and ;.
You can now switch on the headlamps.
X Have the battery checked at the nearest
authorized Mercedes-Benz Center. Towing the vehicle
Safety notes
G
Warning!
The vehicle is braked when the HOLD function
or DISTRONIC PLUS is activated. Therefore,
deactivate the HOLD function or DISTRONIC
PLUS if the vehicle is to be towed.
Mercedes-Benz recommends
that the vehicle
be transported with all wheels off the ground
using flatbed or appropriate wheel lift/dolly
equipment. This method is preferable to other
types of towing.
! To prevent damage during transport, do
not tie down vehicle by its chassis or
suspension parts.
If circumstances do not permit the
recommended towing methods, the vehicle
may be towed with all wheels on the ground or front axle raised (except vehicles with
4MATIC) only
so far as necessary to have the
vehicle moved to a safe location where the
recommended towing methods can be
employed.
! Before towing the vehicle observe the
following instructions:
R Do not tow-start the vehicle. You could
otherwise seriously damage the
automatic transmission which is not
covered by the Mercedes-Benz Limited
Warranty.
R Do not tow with sling-type equipment.
Towing with sling-type equipment over
bumpy roads will damage radiator and
supports.
R Towing of the vehicle should only be
done using the properly installed towing
eye bolt. Never attach a tow cable, tow
rope or tow rod to the vehicle chassis,
frame or suspension parts. G
Warning!
With the engine not running, there is no power
assistance for the brake and steering
systems. In this case, it is important to keep
in mind that a considerably higher degree of
effort is necessary to brake and steer the
vehicle. Adapt your driving accordingly.
! Avoid pulling the vehicle abruptly or
diagonally, since it could result in damage
to the chassis alignment.
! Do not use the towing eye bolt for
recovery, as
this could damage the vehicle.
If in doubt, recover the vehicle with a crane.
i If the battery is disconnected or
discharged
R the SmartKey will not turn in the starter
switch
R the automatic transmission will remain in
park position P Towing the vehicle
473
Practical hints
216_AKB; 3; 90, en-US
d2ureepe, Version: 2.11.8.1 2009-05-15T11:47:50+02:00 - Seite 473 Z