2010 MERCEDES-BENZ CL63AMG ad blue
[x] Cancel search: ad bluePage 2 of 500

Symbols
Trademarks:
R Bluetooth ®
is a registered trademark of
Bluetooth SIG Inc.
R DTS is a registered trademark of DTS, Inc.
R Dolby and MLP are registered trademarks
of Dolby Laboratories.
R PRE-SAFE ®
is a registered trademarks of
Daimler.
R HomeLink ®
is a registered trademark of
Prince, a Johnson Controls Company.
R iPod ®
and iTunes ®
are registered
trademarks of Apple Inc., registered in the
U.S.A. and other countries.
R Logic 7 ®
is a registered trademark of
Harman International Industries,
Incorporated.
R Microsoft ®
is a registered trademark of
Microsoft Corporation in the U.S.A. and
other countries.
R SIRIUS and related marks are trademarks
of SIRIUS XM Radio Inc.
R HD Radio and related marks are
trademarks of iBiquity Digital Corporation.
R Windows media®
is a registered trademark
of Microsoft Corporation in the U.S.A. and
other countries.
R Gracenote ®
is a registered trademark of
Gracenote, Inc.
R ZagatSurvey ®
and related marks are
trademarks of Zagat.
The following symbols are found in this
Operator’s Manual: G
Warning!
Warning notices draw your attention to
hazards that
may endanger your health or life,
or the health or life of others.
! Highlights hazards that may result in
damage to your vehicle. i
Helpful hints or further information you
may find useful.
X This symbol points to instructions
for you to follow.
X A number of these symbols
appearing in succession indicates
a multiple-step procedure.
Y page This symbol tells you where to look
for further information on a topic.
YY This continuation symbol marks a
warning or procedure which is
continued on the next page.
Display Text in displays, such as the control
system, are printed in the type
shown here.
216_AKB; 3; 90, en-US
d2ureepe,
Version: 2.11.8.1 2009-05-15T11:47:50+02:00 - Seite 2
Page 7 of 500

Armrest, front
Storage compartment .................... 349
Storage tray/telephone
compartment
................................. 349
Armrest, rear
Storage compartment ....................349
Ashtray ............................................... 352
Aspect ratio (tires) ............................ 393
Assistance menu ............................... 212
Audio Aux ........................................... 172
Audio menu ........................................ 207
Auto-dimming rear view mirrors .....272
Automatic central locking ................257
Automatic headlamp mode ..............275
Automatic interior lighting control ..279
Automatic shift program ..................296
Automatic transmission ................... 291
Automatic shift program ................296
Gear range indicator ......................295
Gear ranges ................................... 295
Gear selector lever ........................291
Hill-start assist system .................. 315
Kickdown ....................................... 295
Kickdown (manual shift program) .. 299
Manual shift program ..................... 298
One-touch gearshifting ..................297
Program mode indicator ................ 296
Program mode selector switch
(automatic shift program) ..............296
Program mode selector switch
(manual shift program) ..................298
Shifting procedure ......................... 293
Steering wheel gearshift control .... 297
Transmission position indicator ..... 294
Transmission positions .................. 294
AUX
Audio ............................................. 172
Media interface .............................. 183
Sockets .......................................... 173
Video ............................................. 172
Axle oils .............................................. 491 B
Backrest see Seats
Backup lamps
Messages in the multifunction
display ........................................... 446
Bar (air pressure unit) ....................... 393
BAS (Brake Assist System) ................. 57
BAS PLUS (Brake Assist System
PLUS) .................................................... 57
Batteries, SmartKey
Checking condition ........................255
Replacing ....................................... 461
Battery, Vehicle ................................. 469
Charging ........................................ 471
Jump starting ................................. 471
Messages in the multifunction
display ................................... 425, 444
Bead (tire) .......................................... 393
Beverage holders see Cup holders
Blind Spot Assist ............................... 335
Messages in the multifunction
display ........................................... 423
Switching on or off ......................... 213
Bluetooth ®
interface ......................... 138
Brake Assist System see BAS
Brake Assist System PLUS
see BAS PLUS
Brake fluid
Checking level ............................... 373
Messages in the multifunction
display ........................................... 434
Brake lamps
Cleaning lenses ............................. 406
Brake pads
Messages in the multifunction
display ........................................... 428
Brakes ................................................ 398
High-performance brake system .... 400
Warning lamp ................................. 451
Break-in period .................................. 366
Bulbs see Replacing bulbs Index
5 216_AKB; 3; 90, en-US
d2ureepe,
Version: 2.11.8.1 2009-05-15T11:47:50+02:00 - Seite 5
Page 19 of 500

Tele Aid
............................................... 353
Automatic Maintenance Call ..........359
Emergency calls ............................. 354
Information button .........................357
Initiating an emergency call
manually ........................................ 355
Messages in the multifunction
display ........................................... 436
Remote door lock .......................... 359
Remote door unlock ...................... 359
Roadside Assistance button .......... 356
Search & Send ............................... 358
SOS button .................................... 355
Stolen Vehicle Recovery Services .. 360
System self-test ............................. 354
Telephone .......................................... 135
Answering/ending a call ................ 211
Bluetooth ®
interface ...................... 138
Call lists ......................................... 150
Call waiting, call holding, and
conference ..................................... 145
Emergency call “911” .................... 137
Functions during a single party
call ................................................. 144
Making calls ................................... 143
Menu ............................................. 211
Operation ....................................... 211
Phone book ........................... 146, 212
Redialing ........................................ 212
Telephone keypad ............................... 70
Temperature
Coolant .......................................... 300
Interior temperature ......................341
Outside .......................................... 301
Tether anchorage points
see Children in the vehicle
Tightening torque
Wheels ........................................... 469
Time settings ....................................... 79
TIN (Tire Identification Number) ...... 395
Tire and Loading Information
placard ............................................... 381
Tire and loading terminology ...........393
Tire Identification Number see TIN Tire inflation pressure
Checking ........................................ 377
Important notes on
........................375
Label on the inside of fuel filler
flap ................................................ 376
Placard on driver’s door B-pillar ..... 381
Tire labeling ....................................... 389
Tire load rating .................................. 394
Tire ply composition and material
used .................................................... 395
Tires ........................................... 373, 486
Advanced Tire Pressure
Monitoring System (Advanced
TPMS) ............................................ 377
Air pressure ................................... 374
Care and maintenance ................... 386
Cleaning ......................................... 387
Direction of rotation, spinning .......385
Important notes on tire inflation
pressure ........................................ 375
Inflation pressure .................. 376, 377
Information placard ....................... 381
Inspection ...................................... 386
Labeling ......................................... 389
Load index ............................. 389, 394
Load rating .................................... 394
Messages in the multifunction
display ................................... 426, 450
Ply composition and material
used ............................................... 395
Problems under-/overinflation ...... 376
Retreads ........................................ 373
Rims and tires (technical data) ...... 486
Rotation ......................................... 388
Service life ..................................... 386
Sizes .............................................. 486
Snow chains .................................. 396
Speed rating .......................... 390, 395
Storing ........................................... 387
Temperature .......................... 375, 388
Terminology ................................... 393
Tire Identification Number ............. 395
TPMS low tire pressure/
malfunction telltale ........................ 458
Traction ................................. 387, 395
Tread ............................................. 395
Tread depth ........................... 386, 395
Treadwear ...................................... 387 Index
17 216_AKB; 3; 90, en-US
d2ureepe,
Version: 2.11.8.1 2009-05-15T11:47:50+02:00 - Seite 17
Page 81 of 500

COMAND system settings
System settings submenu overview
i The components and operating principles
of COMAND can be found on ( Y page 68).
System settings can be made in the following
submenus:
R Display Q Day Mode, Night Mode,
Automatic
R Time Q Time, Date, Format, Time Zone
R Text Reader Q Speed Q Fast,
Medium or Slow:
Adjusts the reading speed of the Voice
Control System.
R Voice Control Q Help Window , Start
New Individualization, Delete
Individualization
R Language: Selecting system language
R Favorites Button *: Assigning the
favorite button
R Bluetooth Q Search for Bluetooth
Devices, Bluetooth activated. For
information on the Bluetooth ®
interface
see ( Y page 138).
R Upload/Download Data Q Copy Data
to Storage Medium, Import Data from
Storage Medium (Y page 82)
R Reset: Resetting the COMAND system to
factory settings Display settings
Switching the display on or off X
Switching off: Select Vehicle Q
Display OFF.
X Switching back on: Rotate cVd or slide
ZVÆ, XVY or press W.
or
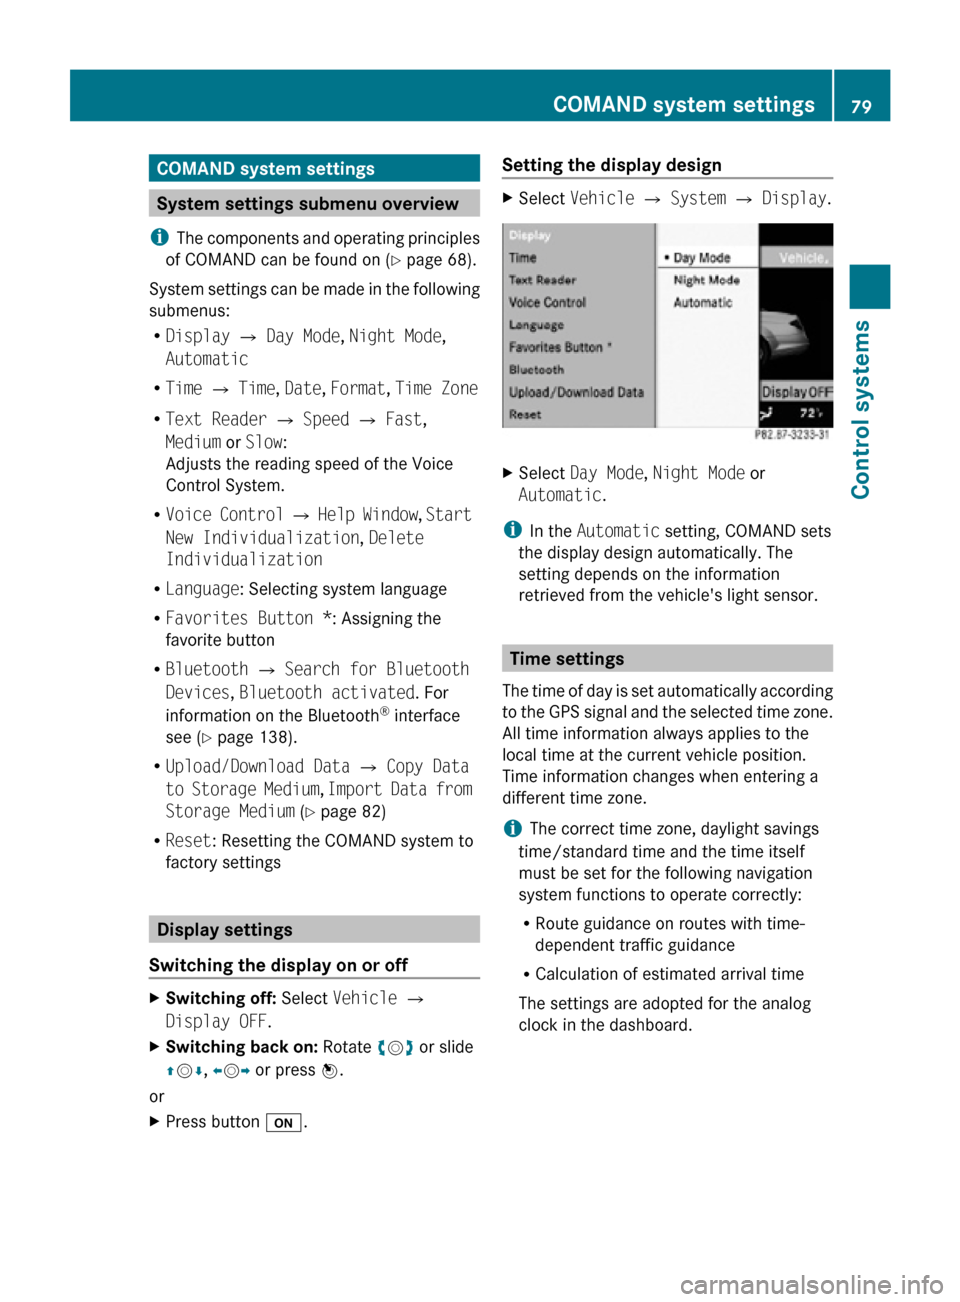
X Press button u. Setting the display design X
Select Vehicle Q System Q Display. X
Select Day Mode, Night Mode or
Automatic.
i In the Automatic setting, COMAND sets
the display design automatically. The
setting depends on the information
retrieved from the vehicle's light sensor. Time settings
The time of day is set automatically according
to the GPS signal and the selected time zone.
All time information always applies to the
local time at the current vehicle position.
Time information changes when entering a
different time zone.
i The correct time zone, daylight savings
time/standard time and the time itself
must be set for the following navigation
system functions to operate correctly:
R Route guidance on routes with time-
dependent traffic guidance
R Calculation of estimated arrival time
The settings are adopted for the analog
clock in the dashboard. COMAND system settings
79Control systems
216_AKB; 3; 90, en-US
d2ureepe, Version: 2.11.8.1 2009-05-15T11:47:50+02:00 - Seite 79 Z
Page 119 of 500

Examples of displays and
announcements for a driving
maneuver
Driving maneuvers have three phases:
R Preparation phase
R Announcement phase
R Maneuver phase
Preparation phase COMAND prepares you for the upcoming
driving maneuver. Based on the example
display below, the driving maneuver is
announced with the Prepare to turn
left message. The display is not split and
shows the map over the full screen.
:
Point at which the driving maneuver takes
place (light blue dot)
; Route (highlighted blue)
= Current vehicle position; the triangle
points in the vehicle’s direction of travel
Announcement phase COMAND announces the next driving
maneuver. Based on the example display
below, the driving maneuver is announced
700 feet in advance with the
Turn left in
700 feet to your destination message.
The display is divided in two. In the left half,
you see the normal map view. In the right half,
there is either an enlarged view of the area
surrounding the intersection (intersection
zoom) or simply a symbol for the next driving
maneuver. The following example illustration shows the
intersection zoom in the right half.
:
Next road
; Driving maneuver (turn left)
= Graphical representation of the distance
to the driving maneuver
? Point at which the driving maneuver takes
place (light blue dot, shown in both the left
and right displays)
A Information about distance to the next
driving maneuver
B Route (highlighted in blue; shown in both
the left and right displays)
C Current vehicle position; the triangle
indicates the vehicle’s direction of travel
(shown in both the left and right displays)
D Street on which you are currently driving,
if included on the digital map
E Destination flag
i The filled-in section of distance graphic
= gets shorter the nearer you get to the
announced driving maneuver.
Maneuver phase COMAND announces the next driving
maneuver. Based on the example display
below, the driving maneuver is announced
150 feet in advance with the
Now turn
left message. The display is also split into
two halves, as for the announcement phase.
i Once the maneuver is completed,
COMAND automatically switches back to
the non-split screen. COMAND navigation system (route guidance)
117Control systems
216_AKB; 3; 90, en-US
d2ureepe,Version: 2.11.8.1 2009-05-15T11:47:50+02:00 - Seite 117 Z
Page 121 of 500

Day mode Night mode
Recommended
lane E = deep blue Recommended
lane E = light blue
Possible lane
D =
light blue Possible lane
D =
deep blue Lane not
recommended
C: =
grey Lane not
recommended
C: =
grey Example of a display without driving
maneuvers
:
Main destination O
; Stopover P (only visible if a stopover has
been entered)
= Route (highlighted blue)
? Current vehicle position; the triangle
indicates the vehicle’s direction of travel
A Set map orientation – for an explanation
and settings, see (Y page 90)
B Set scale – for an explanation and
settings, see (Y page 89) Destination or destination area
reached
Once you have reached your destination, you
will hear the announcement You have
reached the destination. For certain
POIs (airports or highway junctions), you will
hear the announcement You have reached
the destination area . In addition, you willsee a corresponding display and route
guidance is automatically ended.
:
Destination on the map
; Destination flag
i An additional announcement may sound
for some destinations, for example
selected POIs or destination entries that
include the house number, telling you
whether the destination is on the left or
right side of the street. Partially digitized areas
i The digital map may contain areas that
are only partially attributed. G
Warning!
Due to incomplete digitization, the route
shown on the map may differ from the actual
road/traffic situation.
If you follow the route shown on the map, for
example, it is possible that you could drive the
wrong way down a one-way street or that a
street cannot be driven on.
When using route guidance in a partially
attributed area, you must therefore be sure to
observe all relevant traffic regulations and the
course of the road.
All relevant traffic regulations and the course
of the road always take priority over the route
shown on the map. COMAND navigation system (route guidance)
119Control systems
216_AKB; 3; 90, en-US
d2ureepe,Version: 2.11.8.1 2009-05-15T11:47:50+02:00 - Seite 119 Z
Page 122 of 500

If the destination is within a partially
digitized area
COMAND guides you through fully digitized
areas for as long as possible. Route guidance
is conducted in the usual manner, e.g. with
navigation announcements and route
guidance displays.
Before the vehicle reaches a partially digitized
area, COMAND notifies you of this with the
following announcements:
R
Be prepared to enter an area where
turn by turn guidance cannot be
provided.
R In 700 feet you will enter an area
where turn by turn guidance cannot
be provided.
i The indicated distance can be seen here
by way of example. In reality, it may be
different.
R You are about to enter an area
where turn by turn guidance cannot
be provided.
i When you call up the route info to this
type of destination, ( Y page 123) the
following data shown there may differ from
the actual situation:
R Distance to the destination
R Estimated driving time to the destination
R Estimated arrival time
Route guidance within a partially
digitized area If you start route guidance in this type of area,
you will hear the following announcement:
You are currently in an area where
turn by turn guidance cannot be
provided.
Route guidance is provided by means of a
direction arrow showing the compass
heading to the destination. COMAND will not
generate automatic navigation
announcements. If you try to call up an announcement
manually, (Y page 122) you will hear the
announcement
You are currently in an
area where turn by turn guidance
cannot be provided.
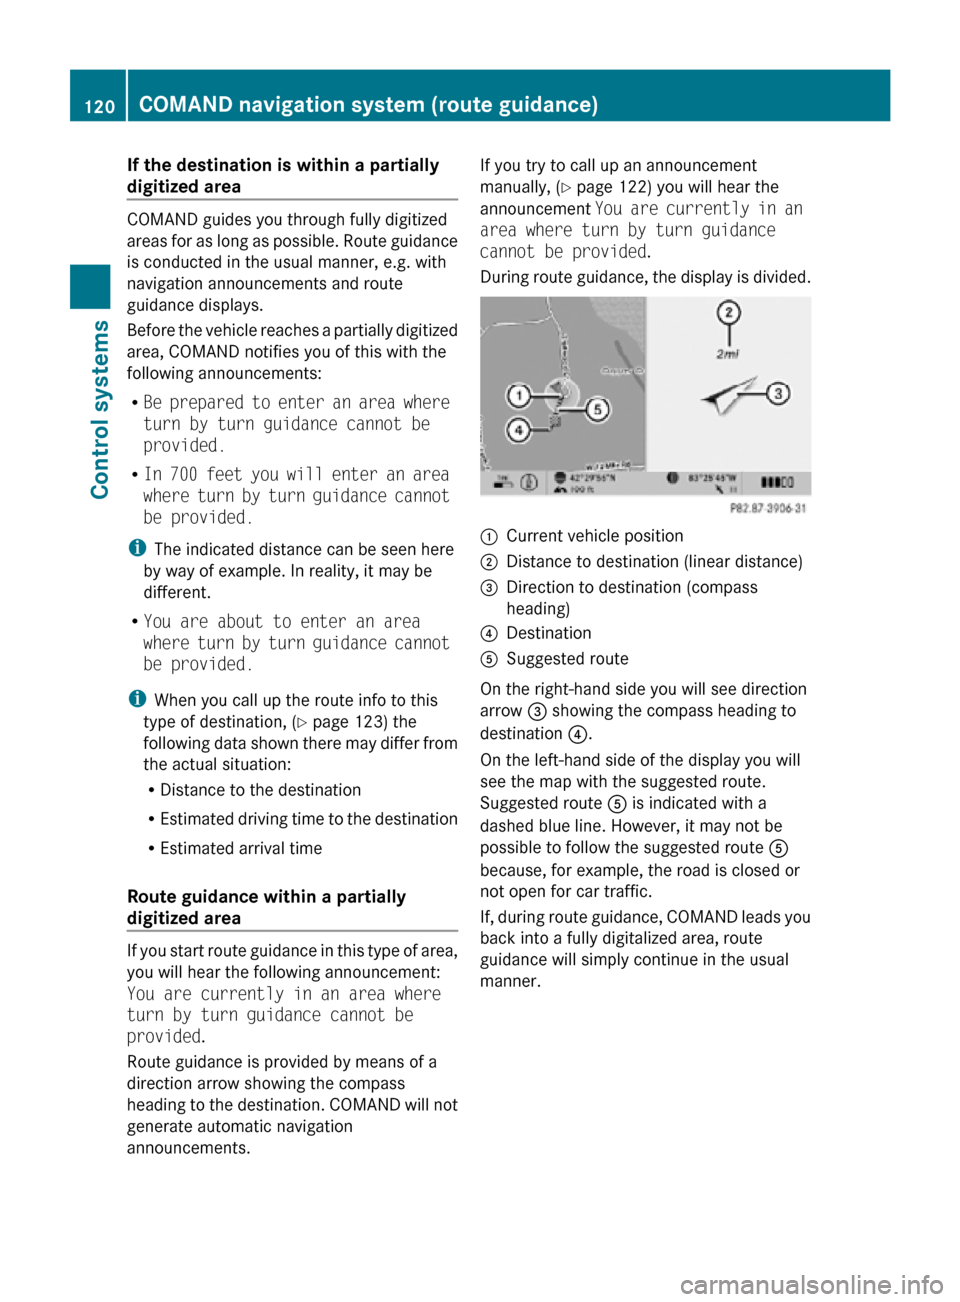
During route guidance, the display is divided. :
Current vehicle position
; Distance to destination (linear distance)
= Direction to destination (compass
heading)
? Destination
A Suggested route
On the right-hand side you will see direction
arrow = showing the compass heading to
destination ?.
On the left-hand side of the display you will
see the map with the suggested route.
Suggested route A is indicated with a
dashed blue line. However, it may not be
possible to follow the suggested route A
because, for example, the road is closed or
not open for car traffic.
If, during route guidance, COMAND leads you
back into a fully digitalized area, route
guidance will simply continue in the usual
manner. 120
COMAND navigation system (route guidance)Control systems
216_AKB; 3; 90, en-US
d2ureepe,
Version: 2.11.8.1 2009-05-15T11:47:50+02:00 - Seite 120
Page 123 of 500

Off-road and off-map
Route guidance to an off-road
destination G
Warning!
The COMAND navigation system may direct
you to off-road routes that your vehicle may
not be capable of traversing through without
damaging your tires, wheels or vehicle. It is
the driver’s sole responsibility to determine
the suitability of the route. Off-road routes
may be of varying conditions and their
appropriateness for use may be affected by
various factors such as time of day, time of
year and immediate weather conditions that
cannot be judged or taken into consideration
by the COMAND system.
COMAND can guide you to destinations
within the area covered by the digital map,
even if a destination is not located at a road
known to the system.
These destinations are shown as off-road
destinations, which you can enter using the
map, for example. In these cases, COMAND
guides you for as long as possible with
navigation announcements and displays on
roads known to the system.
Shortly before you reach the last known the
point to leave the digitized road network, you
will hear the announcement The
destination is nearby. Follow the
arrow on the display.
You will then see an arrow that indicates the
direction to the off-road destination. When
the off-road destination is close to the road,
Area of dest. reached appears in addition
below the arrow.
The section of the route from the last known
point on the map to the off-road destination
is indicated with a dashed line after a certain
length. It simply shows the direction to the
off-road destination without taking account of
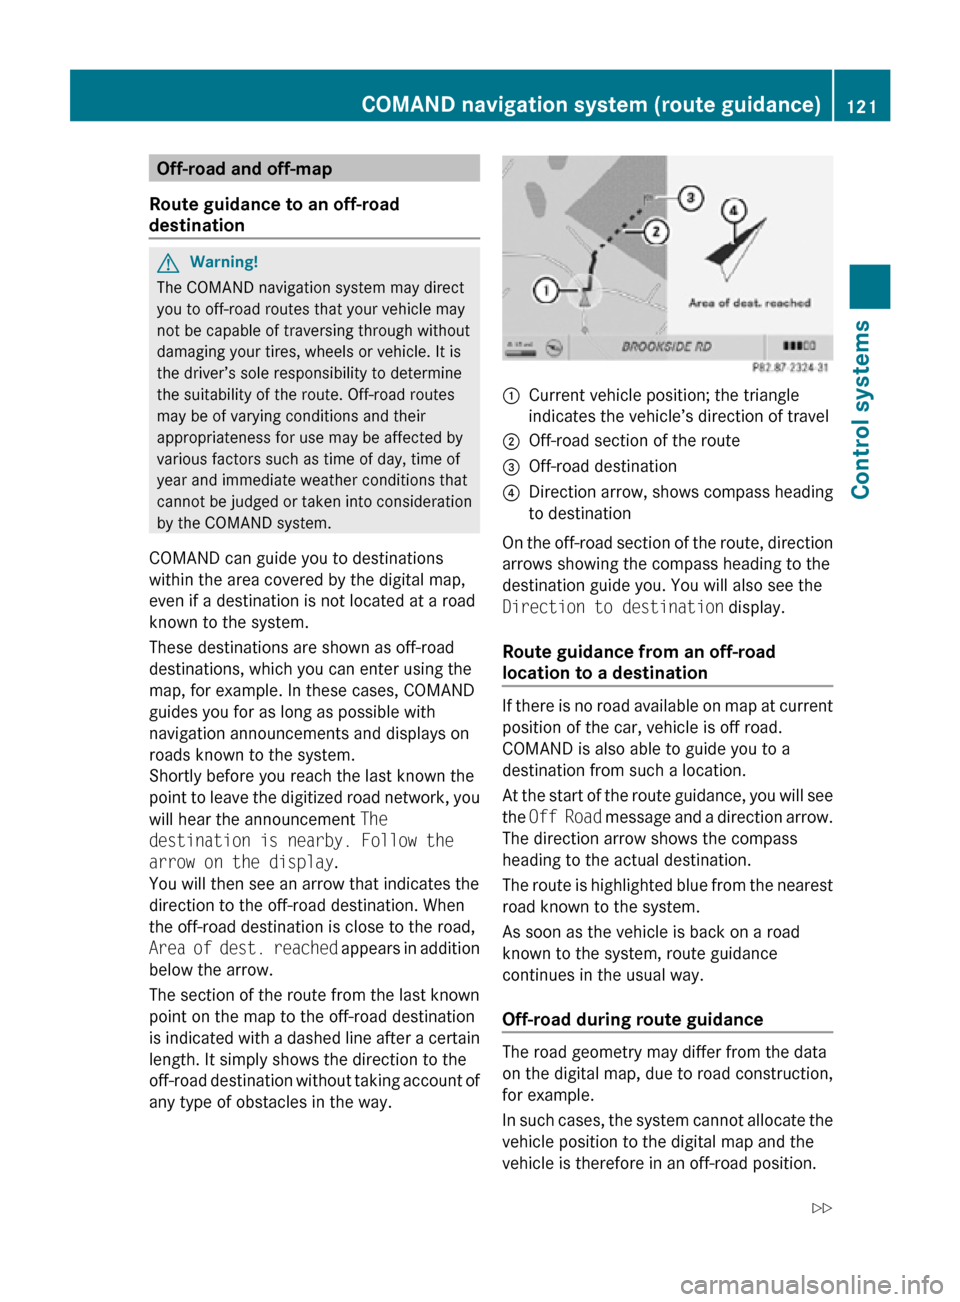
any type of obstacles in the way. :
Current vehicle position; the triangle
indicates the vehicle’s direction of travel
; Off-road section of the route
= Off-road destination
? Direction arrow, shows compass heading
to destination
On the off-road section of the route, direction
arrows showing the compass heading to the
destination guide you. You will also see the
Direction to destination display.
Route guidance from an off-road
location to a destination If there is no road available on map at current
position of the car, vehicle is off road.
COMAND is also able to guide you to a
destination from such a location.
At the start of the route guidance, you will see
the
Off Road message and a direction arrow.
The direction arrow shows the compass
heading to the actual destination.
The route is highlighted blue from the nearest
road known to the system.
As soon as the vehicle is back on a road
known to the system, route guidance
continues in the usual way.
Off-road during route guidance The road geometry may differ from the data
on the digital map, due to road construction,
for example.
In such cases, the system cannot allocate the
vehicle position to the digital map and the
vehicle is therefore in an off-road position.COMAND navigation system (route guidance)
121Control systems
216_AKB; 3; 90, en-US
d2ureepe,Version: 2.11.8.1 2009-05-15T11:47:50+02:00 - Seite 121 Z