2010 MERCEDES-BENZ CL63AMG clock
[x] Cancel search: clockPage 34 of 500

Function Page
Press button
W or X :to set the volume
to operate the RACETIMER
2A
Press button ?:
to activate Voice Control
System
218
to accept a call 143
B
Instrument cluster
illumination
300
C
Swiveling COMAND display 70
D
COMAND display
illumination
70
E
COMAND display 69
F
Clock 79
G
CD/DVD changer 165
H
SD card slot 166
I
Rear window sunshade
switch
352
J
Head restraint release
switch
268
K
Program mode selector
switch for automatic
transmission
296
L
Shortcut button for:
CD/DVD/SD card 168
Radio 153
M
Back button 75
N
Hazard warning flasher
switch
278
O
Seat menu button 198
P
Shortcut button for:
Telephone 137
Navigation
88 Function Page
Q
COMAND on/off button 68
R
Volume control 76
S
Favorite button 81
T
Telephone keypad 137
U
COMAND controller 71
2
AMG vehicles only 32
Control systems
At a glance
216_AKB; 3; 90, en-US
d2ureepe,
Version: 2.11.8.1 2009-05-15T11:47:50+02:00 - Seite 32
Page 72 of 500

The currently selected main function is
highlighted.
Once you have selected a main function, main
area
= is active.
i The layout of the menus may vary
depending on your vehicle’s equipment.
This manual shows the menus for a fully
equipped vehicle.
Adjusting COMAND display illumination X
Increasing the illumination: Turn
knob : clockwise.
X Dimming the illumination: Turn knob :
counterclockwise.
Swiveling COMAND display With button
: or ; you can swivel the
COMAND display to the left or right. Instrument cluster multifunction
display This section describes features and controls
via the COMAND controller, display and
shortcut buttons only.
Related COMAND features are described in
the “Instrument cluster control system”
section (
Y page 201). It contains function
descriptions and operation of the instrument
cluster multifunction display and the
multifunction steering wheel buttons.
Telephone keypad X
Flip up cover ;.
With telephone keypad : you can
R enter and clear numbers and special
characters
R reject, answer, connect and end calls
(Y page 135)
R select preset radio stations and enter the
frequency manually ( Y page 155)
R select preset satellite radio stations and
enter the channel number (Y page 161)
R select a storage medium from the DVD
changer (Y page 170)
R select a track directly in CD mode, DVD
audio mode or MP3 mode (Y page 170), or
from a device connected to the media
interface (Y page 187) 70
COMAND introductionControl systems
216_AKB; 3; 90, en-US
d2ureepe,
Version: 2.11.8.1 2009-05-15T11:47:50+02:00 - Seite 70
Page 81 of 500

COMAND system settings
System settings submenu overview
i The components and operating principles
of COMAND can be found on ( Y page 68).
System settings can be made in the following
submenus:
R Display Q Day Mode, Night Mode,
Automatic
R Time Q Time, Date, Format, Time Zone
R Text Reader Q Speed Q Fast,
Medium or Slow:
Adjusts the reading speed of the Voice
Control System.
R Voice Control Q Help Window , Start
New Individualization, Delete
Individualization
R Language: Selecting system language
R Favorites Button *: Assigning the
favorite button
R Bluetooth Q Search for Bluetooth
Devices, Bluetooth activated. For
information on the Bluetooth ®
interface
see ( Y page 138).
R Upload/Download Data Q Copy Data
to Storage Medium, Import Data from
Storage Medium (Y page 82)
R Reset: Resetting the COMAND system to
factory settings Display settings
Switching the display on or off X
Switching off: Select Vehicle Q
Display OFF.
X Switching back on: Rotate cVd or slide
ZVÆ, XVY or press W.
or
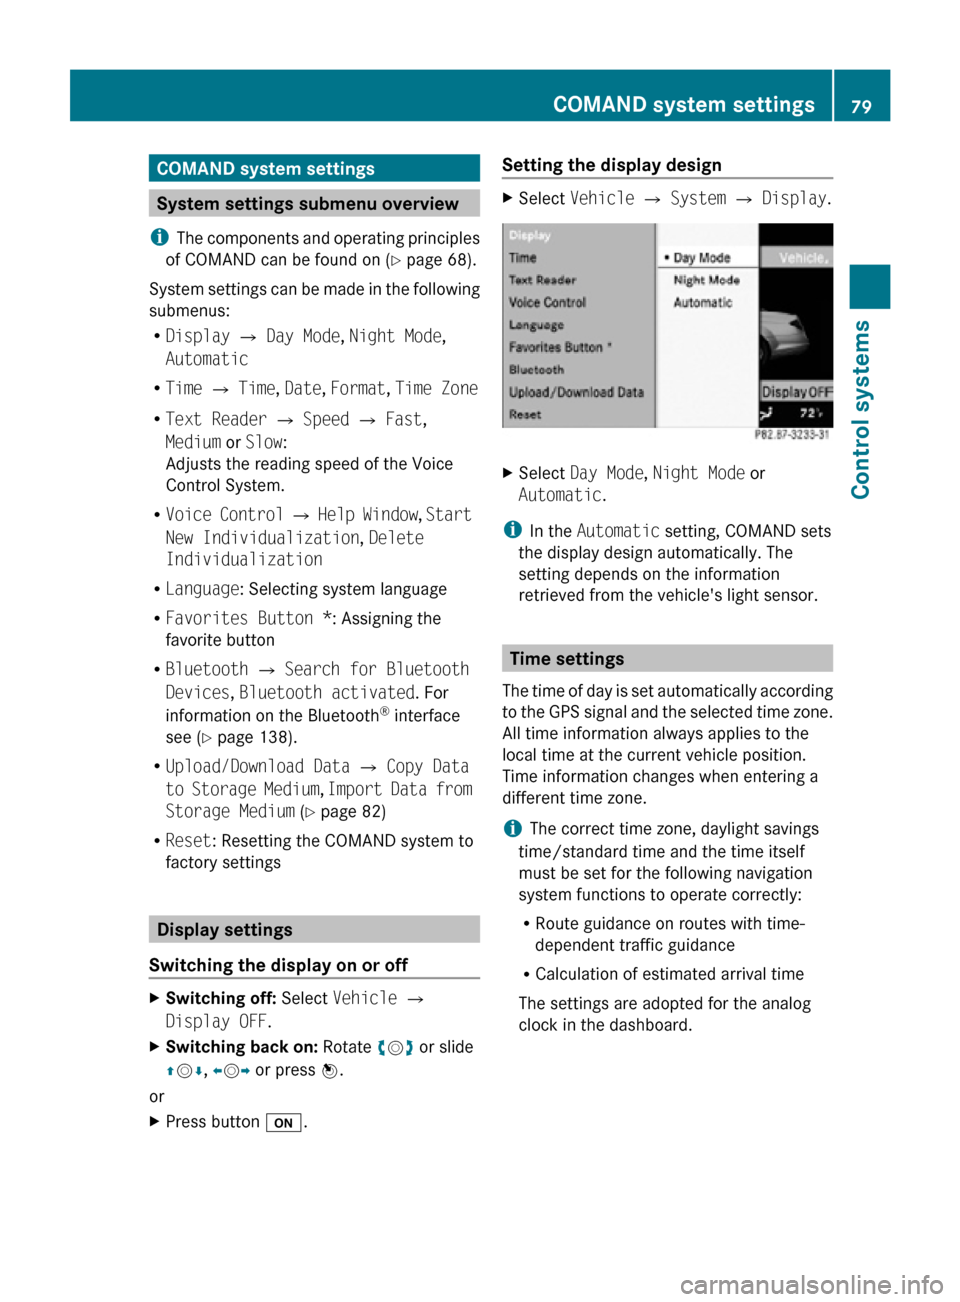
X Press button u. Setting the display design X
Select Vehicle Q System Q Display. X
Select Day Mode, Night Mode or
Automatic.
i In the Automatic setting, COMAND sets
the display design automatically. The
setting depends on the information
retrieved from the vehicle's light sensor. Time settings
The time of day is set automatically according
to the GPS signal and the selected time zone.
All time information always applies to the
local time at the current vehicle position.
Time information changes when entering a
different time zone.
i The correct time zone, daylight savings
time/standard time and the time itself
must be set for the following navigation
system functions to operate correctly:
R Route guidance on routes with time-
dependent traffic guidance
R Calculation of estimated arrival time
The settings are adopted for the analog
clock in the dashboard. COMAND system settings
79Control systems
216_AKB; 3; 90, en-US
d2ureepe, Version: 2.11.8.1 2009-05-15T11:47:50+02:00 - Seite 79 Z
Page 91 of 500

Example illustration: Map with route guidance
inactive and with the menu system hidden (full
screen map display)
:
Current vehicle position
; Map orientation (Y page 90)
= Map scale ( Y page 89)
Hiding or showing the menu system X
Hiding: Slide ZV.
The Full Screen menu item appears in
the main area of the display.
X Press W.
or
X Press and hold back button % in the
center console (Y page 75).
The menu system is hidden. The map can
be seen in the full screen.
X Showing: Press W in the full-screen map
display.
Adjusting the map scale i
It is only possible to adjust the map scale
with the menu system hidden (full-screen
map display).
X Rotate cVd until the desired map scale is
set. :
Currently set map scale as number
; Scale
= Pointer indicating the currently set map
scale
? Previously set value (only visible when the
setting has been changed)
As soon as you rotate cVd, scale ; appears.
Rotating clockwise zooms out, rotating
counterclockwise zooms in.
Saving current vehicle position as
destination in last destinations list X
Showing menu system, if necessary:
Press W.
X Saving: Select Position Q Store
Vehicle Position.
COMAND saves the current vehicle
position as a destination in the last
destinations (Y page 134).
i The cross hair may not be visible when
using this function. Otherwise the position
of the cross hair will be stored.
Moving the map i
It is only possible to move the map with
the menu system hidden (full-screen map
display).
X Slide ZVÆ, XVY or aVb.
A cross hair appears on the map. COMAND navigation (introduction)
89Control systems
216_AKB; 3; 90, en-US
d2ureepe, Version: 2.11.8.1 2009-05-15T11:47:50+02:00 - Seite 89 Z
Page 111 of 500

Entering a destination from the list of
last destinations
X Select Navi Q Destination Q From
Last Destinations.
The list of last destinations appears. The
most recent destination is at the top of the
list.
X Select desired destination.
X Starting route calculation: Select Start,
see also ( Y page 107). Entering a destination from the map
i Depending on the factory settings of the
vehicle, it may not be possible to enter a
destination while the vehicle exceeds a
preset speed. As soon as the vehicles
speed drops to below the preset speed, the
function is available again.
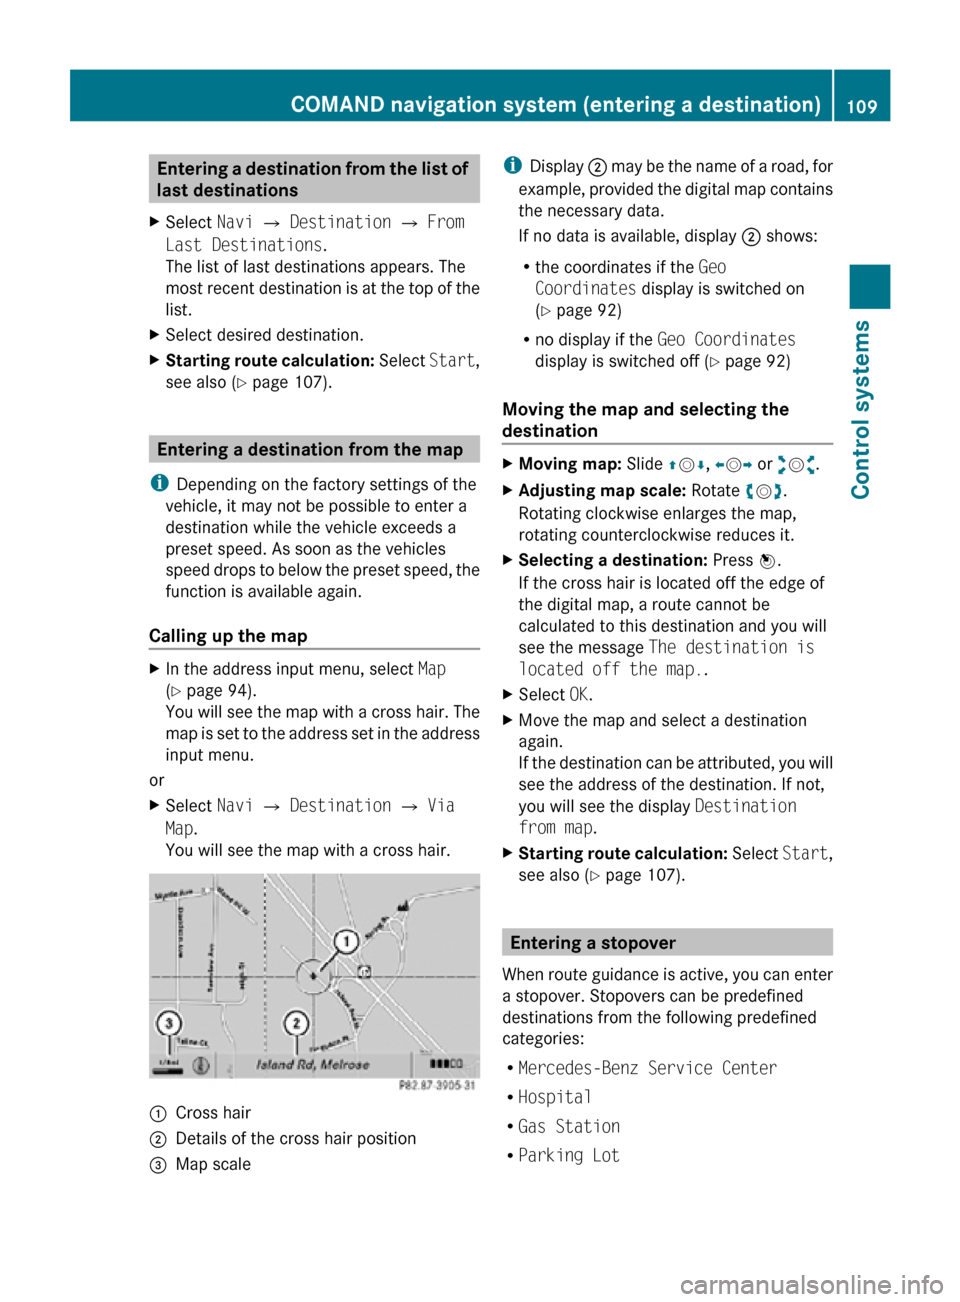
Calling up the map X
In the address input menu, select Map
(Y page 94).
You will see the map with a cross hair. The
map is set to the address set in the address
input menu.
or
X Select Navi Q Destination Q Via
Map.
You will see the map with a cross hair. :
Cross hair
; Details of the cross hair position
= Map scale i
Display ; may be the name of a road, for
example, provided the digital map contains
the necessary data.
If no data is available, display ; shows:
R the coordinates if the Geo
Coordinates display is switched on
(Y page 92)
R no display if the Geo Coordinates
display is switched off ( Y page 92)
Moving the map and selecting the
destination X
Moving map: Slide ZVÆ, XVY or aVb.
X Adjusting map scale: Rotate cVd.
Rotating clockwise enlarges the map,
rotating counterclockwise reduces it.
X Selecting a destination: Press W.
If the cross hair is located off the edge of
the digital map, a route cannot be
calculated to this destination and you will
see the message The destination is
located off the map..
X Select OK.
X Move the map and select a destination
again.
If the destination can be attributed, you will
see the address of the destination. If not,
you will see the display Destination
from map.
X Starting route calculation: Select Start,
see also ( Y page 107). Entering a stopover
When route guidance is active, you can enter
a stopover. Stopovers can be predefined
destinations from the following predefined
categories:
R Mercedes-Benz Service Center
R Hospital
R Gas Station
R Parking Lot COMAND navigation system (entering a destination)
109Control systems
216_AKB; 3; 90, en-US
d2ureepe,Version: 2.11.8.1 2009-05-15T11:47:50+02:00 - Seite 109 Z
Page 125 of 500

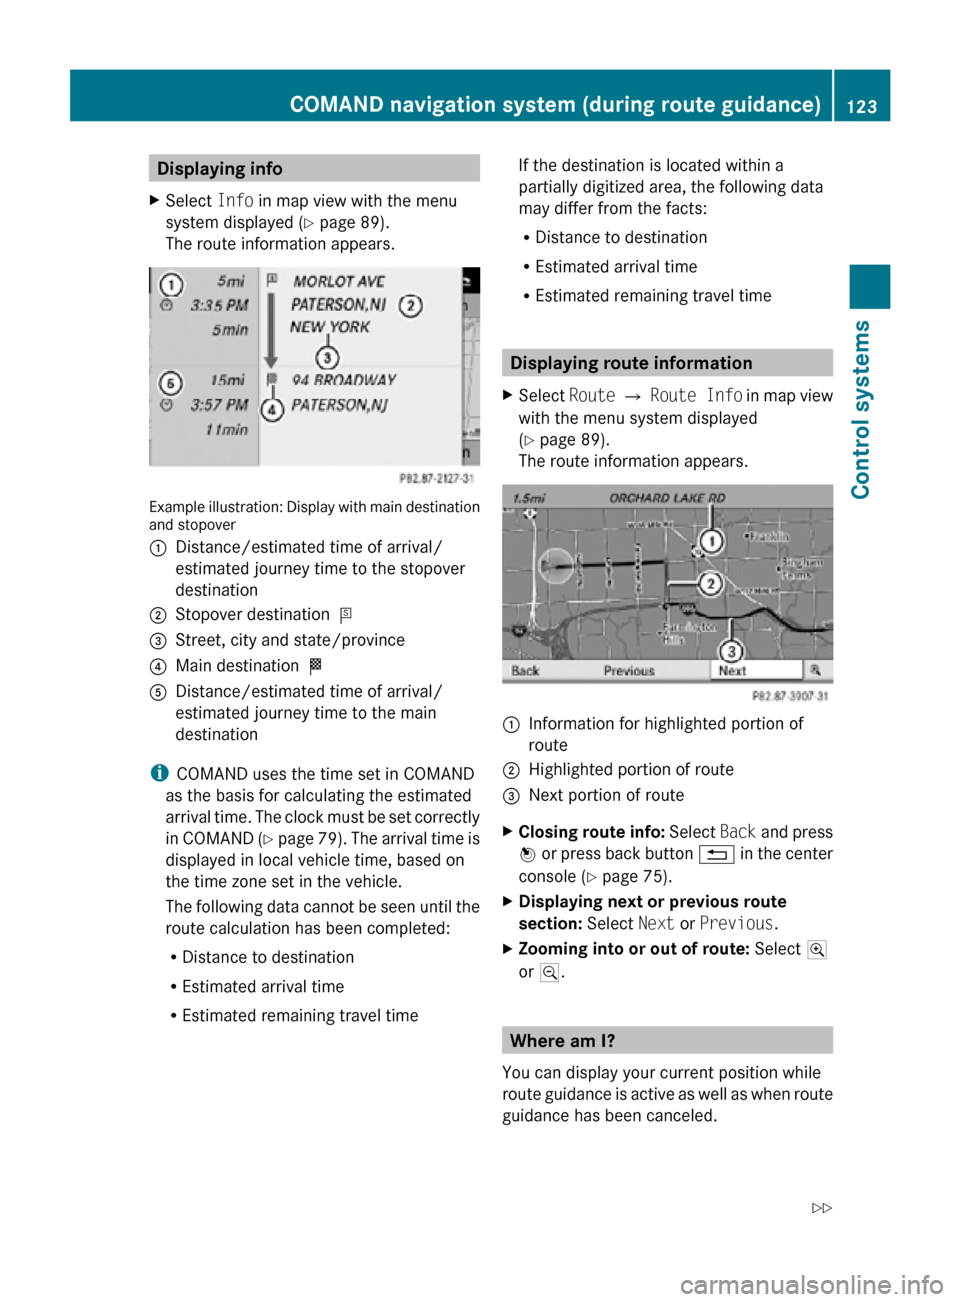
Displaying info
X Select Info in map view with the menu
system displayed ( Y page 89).
The route information appears. Example illustration: Display with main destination
and stopover
:
Distance/estimated time of arrival/
estimated journey time to the stopover
destination
; Stopover destination P
= Street, city and state/province
? Main destination O
A Distance/estimated time of arrival/
estimated journey time to the main
destination
i COMAND uses the time set in COMAND
as the basis for calculating the estimated
arrival time. The clock must be set correctly
in COMAND (Y page 79). The arrival time is
displayed in local vehicle time, based on
the time zone set in the vehicle.
The following data cannot be seen until the
route calculation has been completed:
R Distance to destination
R Estimated arrival time
R Estimated remaining travel time If the destination is located within a
partially digitized area, the following data
may differ from the facts:
R
Distance to destination
R Estimated arrival time
R Estimated remaining travel time Displaying route information
X Select Route Q Route Info in map view
with the menu system displayed
(Y page 89).
The route information appears. :
Information for highlighted portion of
route
; Highlighted portion of route
= Next portion of route
X Closing route info: Select Back and press
W or press back button % in the center
console (Y page 75).
X Displaying next or previous route
section: Select Next or Previous.
X Zooming into or out of route: Select N
or M. Where am I?
You can display your current position while
route guidance is active as well as when route
guidance has been canceled. COMAND navigation system (during route guidance)
123Control systems
216_AKB; 3; 90, en-US
d2ureepe,Version: 2.11.8.1 2009-05-15T11:47:50+02:00 - Seite 123 Z
Page 263 of 500

X
Briefly press emergency release
button :.
The emergency release button unlocks and
opens the trunk while the vehicle is standing
still or in motion.
Illumination of the emergency release button:
R The button flashes for 30 minutes after
opening the trunk.
R The button flashes for 60 minutes after
closing the trunk.
The emergency release button does not open
the trunk, if the vehicle battery is discharged
or disconnected. Valet locking
You can lock the trunk separately with the
mechanical key. This denies unauthorized
access to the trunk, e.g. when you valet park
the vehicle.
X Leave only the SmartKey less its
mechanical key with the vehicle. X
Valet locking: Close the trunk.
X Remove the mechanical key from the
SmartKey (Y page 460).
X Insert the mechanical key in the trunk lid
lock.
X Turn the mechanical key clockwise to
position 2 and remove the mechanical
key in that position to lock the trunk.
The trunk remains locked even when the
vehicle is centrally unlocked.
You can then only open the trunk with the
mechanical key.
X Canceling: Insert the mechanical key in
the trunk lid lock.
X Turn the mechanical key counterclockwise
to neutral position 1 and remove the
mechanical key in that position to unlock
the trunk.
You can now open the trunk. Power closing assist for doors and
trunk lid
It is not necessary to slam the door or trunk
lid closed. An electrical power-assisted
mechanism draws doors and trunk lid closed
quietly and automatically once door and trunk
lid has been latched. When the electrical
power-assisted mechanism has stopped,
doors and/or trunk can be reopend. G
Warning!
To prevent possible personal injury, always
keep hands and fingers away from the door or
trunk opening when closing a door or the
trunk lid. Be especially careful when small
children are around.
In case of danger, pull the inside or outside
door handle, or pull the trunk lid handle.
To prevent personal injury, never actuate the
closing assist mechanism by tampering with
the door or trunk lid latch. Locking and unlocking
261Controls in detail
216_AKB; 3; 90, en-US
d2ureepe, Version: 2.11.8.1 2009-05-15T11:47:50+02:00 - Seite 261 Z
Page 302 of 500

otherwise seriously damage the brake
system or the transfer case which is not
covered by the Mercedes-Benz Limited
Warranty.
! Because the ESC operates automatically,
the engine and ignition must be shut off
(SmartKey in starter switch position 0 or
1 or KEYLESS-GO start/stop button in
position 0 or 1) when the electronic parking
brake is being tested on a brake test
dynamometer or when the vehicle is being
towed with one axle raised.
Active braking action through the ESC may
otherwise seriously damage the brake
system which is not covered by the
Mercedes-Benz Limited Warranty. Instrument cluster
Introduction
For a full view illustration of the instrument
cluster, see “Instrument cluster”
(Y page 29). G
Warning!
No messages will be displayed if either the
instrument cluster or the multifunction
display is inoperative.
As a result, you will not be able to see
information about your driving conditions,
such as
R speed
R outside temperature
R warning/indicator lamps
R malfunction/warning messages
R failure of any systems
Driving characteristics may be impaired.
If you must continue to drive, do so with added
caution. Contact an authorized Mercedes-
Benz Center as soon as possible.
The language setting for the multifunction
display can be changed via COMAND
(Y page 81). Activating the instrument cluster
The instrument cluster is activated when you
R open a door
R switch on the ignition
R switch on the exterior lamps Adjusting the instrument cluster
illumination
X
To brighten illumination: Turn knob :
clockwise.
X To dim illumination: Turn knob :
counterclockwise.
i The instrument cluster illumination is
dimmed or brightened automatically to suit
ambient light conditions.
The instrument cluster illumination will also
be adjusted automatically when you switch
on the vehicle’s exterior lamps. Coolant temperature gauge
The coolant temperature gauge is located on
the left side in the instrument cluster
(Y page 29). G
Warning!
Driving when your engine is overheated can
cause some fluids which may have leaked into
the engine compartment to catch fire. You
could be seriously burned. 300
Instrument clusterControls in detail
216_AKB; 3; 90, en-US
d2ureepe,
Version: 2.11.8.1 2009-05-15T11:47:50+02:00 - Seite 300