2010 MERCEDES-BENZ CL63AMG reset
[x] Cancel search: resetPage 81 of 500

COMAND system settings
System settings submenu overview
i The components and operating principles
of COMAND can be found on ( Y page 68).
System settings can be made in the following
submenus:
R Display Q Day Mode, Night Mode,
Automatic
R Time Q Time, Date, Format, Time Zone
R Text Reader Q Speed Q Fast,
Medium or Slow:
Adjusts the reading speed of the Voice
Control System.
R Voice Control Q Help Window , Start
New Individualization, Delete
Individualization
R Language: Selecting system language
R Favorites Button *: Assigning the
favorite button
R Bluetooth Q Search for Bluetooth
Devices, Bluetooth activated. For
information on the Bluetooth ®
interface
see ( Y page 138).
R Upload/Download Data Q Copy Data
to Storage Medium, Import Data from
Storage Medium (Y page 82)
R Reset: Resetting the COMAND system to
factory settings Display settings
Switching the display on or off X
Switching off: Select Vehicle Q
Display OFF.
X Switching back on: Rotate cVd or slide
ZVÆ, XVY or press W.
or
X Press button u. Setting the display design X
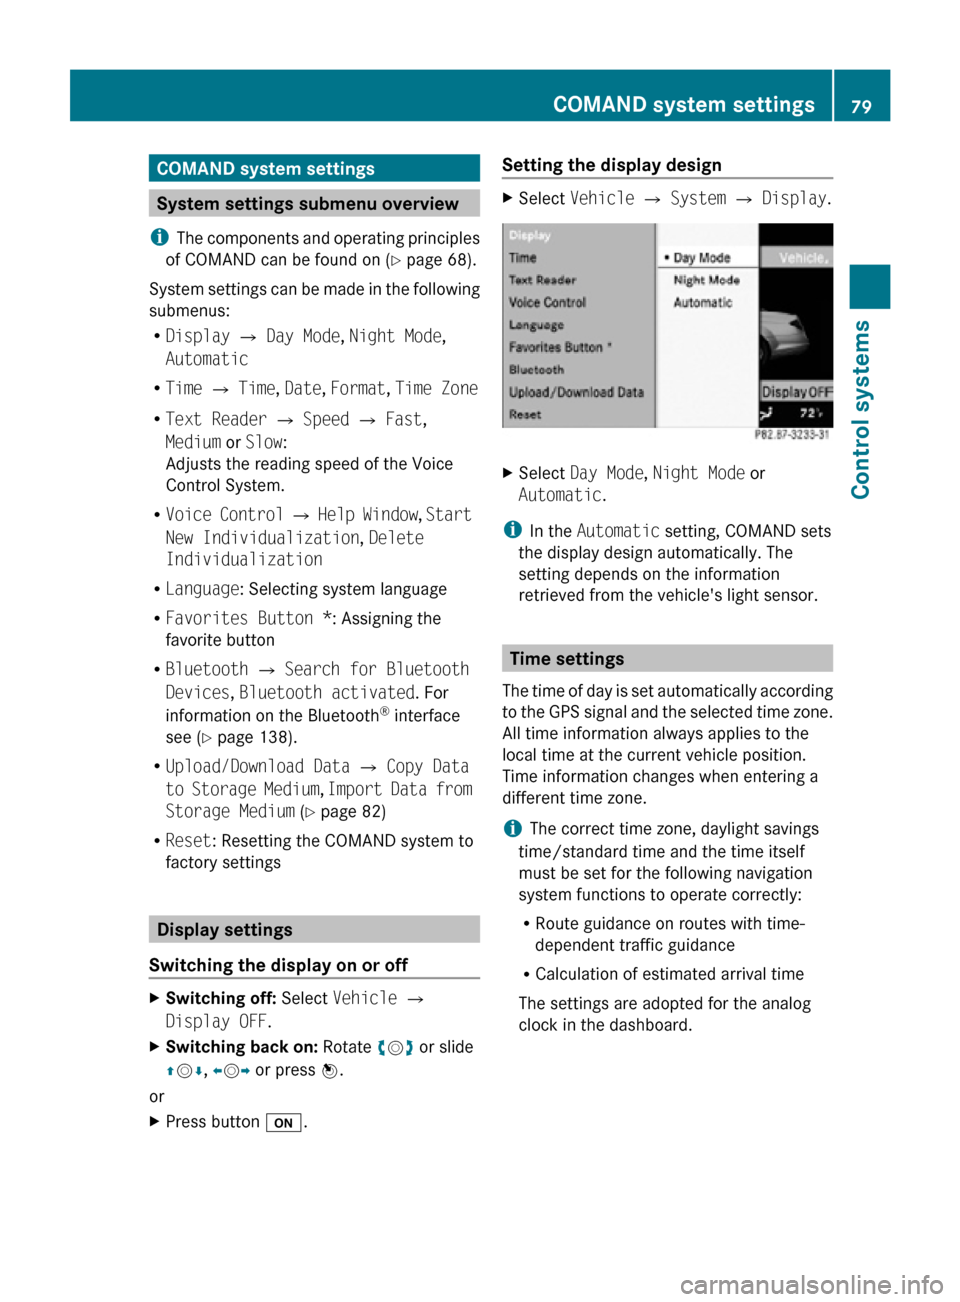
Select Vehicle Q System Q Display. X
Select Day Mode, Night Mode or
Automatic.
i In the Automatic setting, COMAND sets
the display design automatically. The
setting depends on the information
retrieved from the vehicle's light sensor. Time settings
The time of day is set automatically according
to the GPS signal and the selected time zone.
All time information always applies to the
local time at the current vehicle position.
Time information changes when entering a
different time zone.
i The correct time zone, daylight savings
time/standard time and the time itself
must be set for the following navigation
system functions to operate correctly:
R Route guidance on routes with time-
dependent traffic guidance
R Calculation of estimated arrival time
The settings are adopted for the analog
clock in the dashboard. COMAND system settings
79Control systems
216_AKB; 3; 90, en-US
d2ureepe, Version: 2.11.8.1 2009-05-15T11:47:50+02:00 - Seite 79 Z
Page 84 of 500

You can switch the massage function for
the driver’s seat on or off.
R Front Passenger Seat Massage
(Y page 199)
You can switch the massage function for
the passenger seat on or off.
R Driver and Front Passenger Seat
Massage (Y page 199)
You can switch the massage function for
the driver’s and passenger seat on or off.
R Display OFF (Y page 79)
You can use the favorite button to switch
the COMAND display on or off.
R Repeat Navigation Command
(Y page 122)
When route guidance is activated, you can
use the favorite button to generate or call
up a current navigation announcement.
X Select Vehicle Q System Q
Favorites Button *.
The list of predefined functions appears.
The dot
#
in front of the list entry indicates
the current setting.
X Changing setting: Rotate
c
Vd and select
desired function.
X Saving setting and exiting the menu:
Press W. Upload/Download of Data
This function
lets you transfer COMAND data
to a memory card or a USB storage device and
vice versa.
The following COMAND data can be
transferred:
R Navigation destination memory and last
destination
R Address book entries
R Audio/Video presets memory
R System settings i
You can
use this function, for example, to
save your COMAND data and transfer them
to another vehicle.
X Insert an SD card into the SD card slot
(Y page 166) or connect a USB storage
device to the built-in USB socket in the
glove box
(Y page 72). The USB jack of the
optional media interface is not intended for
this purpose.
X Select Vehicle Q System Q Upload/
Download Data.
X Download: Select Copy Data to
Storage Medium Q On the Memory
Card or On USB.
X Select Start Copying.
X Upload: Select Import Data from
Storage Medium Q From Memory Card
or From USB.
X Select Start Data Import.
X Exiting menu without data transfer:
Select Back. Reset
i You can reset COMAND back to its
factory settings.
Among other things, all personal data are
deleted, for example
R the address book entries
R the entries in the destination memory
R the list of last destinations of the
navigation system
X Select Vehicle Q System Q Reset.
A prompt appears asking whether you
really want to reset.
X Select Yes or No.
If you select Yes another prompt will
appear asking whether you really want to
reset.
X Select Yes or No.
If you select Yes, COMAND will be reset
and restarted. 82
COMAND system settings
Control systems
216_AKB; 3; 90, en-US
d2ureepe,
Version: 2.11.8.1 2009-05-15T11:47:50+02:00 - Seite 82
Page 111 of 500

Entering a destination from the list of
last destinations
X Select Navi Q Destination Q From
Last Destinations.
The list of last destinations appears. The
most recent destination is at the top of the
list.
X Select desired destination.
X Starting route calculation: Select Start,
see also ( Y page 107). Entering a destination from the map
i Depending on the factory settings of the
vehicle, it may not be possible to enter a
destination while the vehicle exceeds a
preset speed. As soon as the vehicles
speed drops to below the preset speed, the
function is available again.
Calling up the map X
In the address input menu, select Map
(Y page 94).
You will see the map with a cross hair. The
map is set to the address set in the address
input menu.
or
X Select Navi Q Destination Q Via
Map.
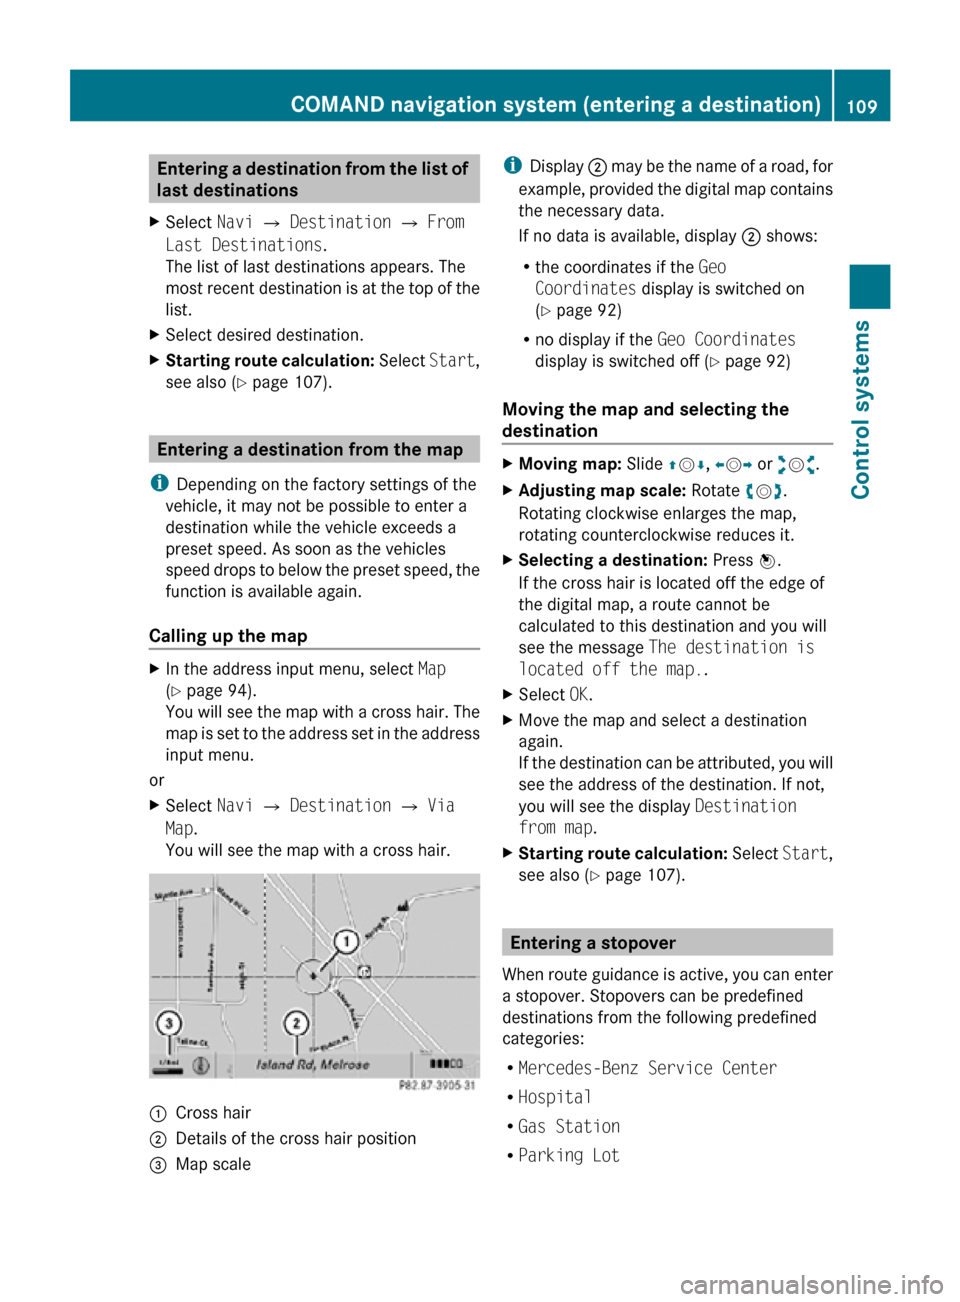
You will see the map with a cross hair. :
Cross hair
; Details of the cross hair position
= Map scale i
Display ; may be the name of a road, for
example, provided the digital map contains
the necessary data.
If no data is available, display ; shows:
R the coordinates if the Geo
Coordinates display is switched on
(Y page 92)
R no display if the Geo Coordinates
display is switched off ( Y page 92)
Moving the map and selecting the
destination X
Moving map: Slide ZVÆ, XVY or aVb.
X Adjusting map scale: Rotate cVd.
Rotating clockwise enlarges the map,
rotating counterclockwise reduces it.
X Selecting a destination: Press W.
If the cross hair is located off the edge of
the digital map, a route cannot be
calculated to this destination and you will
see the message The destination is
located off the map..
X Select OK.
X Move the map and select a destination
again.
If the destination can be attributed, you will
see the address of the destination. If not,
you will see the display Destination
from map.
X Starting route calculation: Select Start,
see also ( Y page 107). Entering a stopover
When route guidance is active, you can enter
a stopover. Stopovers can be predefined
destinations from the following predefined
categories:
R Mercedes-Benz Service Center
R Hospital
R Gas Station
R Parking Lot COMAND navigation system (entering a destination)
109Control systems
216_AKB; 3; 90, en-US
d2ureepe,Version: 2.11.8.1 2009-05-15T11:47:50+02:00 - Seite 109 Z
Page 151 of 500

:
Cursor
; Data field
= Two-row predictive speller
B Selecting language
p Changing character set
*/E Selecting upper or lower case
% Back
F Deleting selection
¬ Confirming selection
? Preset category
X Enter data into the data fields.
X Entering data into data field: Select the
respective characters in predictive speller
=.
X Moving the cursor: Select the respective
arrow YÆXZ in predictive speller =.
X Changing to other data field: Slide ZV
until the predictive speller disappears.
X Slide ZVÆ and press W.
or
X Select Æ in the predictive speller.
X Aborting data entry: Select Back.
When a data field contains data, you will be
asked whether you would like to save the
entry.
X Saving data: Select ¬.
The entry is created in the phone book and
the address book. Deleting contacts
X
Selecting contact: Select Data/
Connections Q Delete Contacts Q
Internal Contacts or Imported from
memory card. or Imported via
Bluetooth. or Delete All.
X Confirming selection: Press W.
You will be asked whether you want to
delete the data.
X Select Yes.
i Automatically imported contacts cannot
be deleted (Y page 146).
Calling a number saved in an entry Via phone book
X
Select Name.
X Select contact (Y page 147).
X Contact with multiple phone numbers
(entry with symbol G): Rotate cVd and
press W.
or
X Press 6 on the telephone keypad in the
center console.
X Contact with one phone number (entry
without symbol G): Press W.
or
X Press 6 on the telephone keypad in the
center console. COMAND telephone
149Control systems
216_AKB; 3; 90, en-US
d2ureepe, Version: 2.11.8.1 2009-05-15T11:47:50+02:00 - Seite 149 Z
Page 155 of 500

Radio
(except
Weather Band) Presets
(except
Weather
Band) Channel
(only
Weather
Band) Info FM or AM
or WB Sound
Save Station Autostore Channel list Program
Information Switch to
FM wave
band Treble
Frequency Entry Preset
station list Switch to
AM wave
band Bass
Show Station
Info Switch to
Weather
Band Balance/
Fader
ª¥Radio 3D Sound
Switching to radio mode
X Select Audio Q FM/AM Radio.
or
X Press shortcut button R (Y page 69)
once or twice.
The radio display appears once you have
switched to radio mode. You will hear the
last tuned station/channel in the
previously selected wave band, provided
that the station/channel can be received.
i The number of times you have to press
shortcut button R depends on the
operating mode currently selected. Example illustration: Radio mode in FM wave band
:
Main area with frequency display
; Preset position of selected station
= Frequency of selected station
? Name of selected station; HD Radio™
stations with additional HD Radio™
symbol and program number (HD1,
HD2...)
A Sound settings
B To switch to FM wave band, AM wave
band or Weather Band
C Additional information provided by radio
station or HD Radio™ program
information
D Artist and song title (when provided by the
radio station) COMAND FM/AM radio
153Control systems
216_AKB; 3; 90, en-US
d2ureepe, Version: 2.11.8.1 2009-05-15T11:47:50+02:00 - Seite 153 Z
Page 156 of 500

E
Preset options
F Radio options
i Station name display ? is available for
the AM/FM wave band and can only be
seen when it is switched on (Y page 156)
and if the station transmits a name.
HD Radio™ Important Notes
i
HD Radio™ features include
R digital broadcasts in the same wave band
as analog AM/FM; the analog AM/FM
stations remain at their current place on
the dial
R the ability to broadcast multiple program
streams over a single FM/AM frequency
(e.g. HD1, HD2, etc.)
R static-free, clear reception
R FM stations offer CD quality sound, AM
stations sound like analog FM stations
R a variety of data services, including text-
based information – artist name, song
title, etc. – shown on the display
More information on HD Radio™ you will
find at www.hdradio.com.
i Note that subprograms and program info
shown in illustrations are dependent on
program content delivered by the radio
stations. Program content is subject to
change. Therefore, subprograms and
program info shown in illustrations and
descriptions contained in this manual may
differ from the subprograms and program
info delivered by the radio station.
Switching to HD Radio™
i Since HD Radio™ stations are embedded
in the AM/FM wave band, HD Radio™
operation is very similar to analog AM/FM
radio operation. You will only hear HD Radio™ programs if the
HD Radio™ function is activated in the radio
submenu.
X
Select Radio £ HD Radio in the radio
display.
If the check box Ç is checked, HD Radio™
is activated. Switching wave bands
You can switch between the FM, AM and WB
(Weather Band) wave bands.
X Select Audio Q FM/AM Radio Q FM or
AM or WB.
You will hear the last tuned station on the
selected wave band. Selecting stations/channels
You have the following selection options:
R The search function
R The station presets
R The manual frequency entry
R The channel list (Weather band only)
Selecting stations/channels using the
search function X
Slide XVY or rotate cVd when the main
area is selected.
Depending on the direction in which the
controller is being slid or rotated, the 154
COMAND FM/AM radioControl systems
216_AKB; 3; 90, en-US
d2ureepe,
Version: 2.11.8.1 2009-05-15T11:47:50+02:00 - Seite 154
Page 157 of 500

system searches upward or downward and
stops at the next receivable station/
channel.
or
X Press and hold button 9 or : on the
multifunction steering wheel 18
.
Selecting stations using station presets i
This function is not available for Weather
Band.
X Select Audio Q FM/AM Radio Q FM or
AM.
X Select Presets.
or
X Press W when the main area is selected.
The preset menu appears. The dot # in
front of
a preset position indicates that the
currently selected station is saved there.
X Select station preset by rotating cVd or
sliding ZVÆ and press W.
or
X Enter a position number with the telephone
keypad using buttons ´ - Ã
(Y page 70).
or
X Press button 9 or : on the
multifunction steering wheel briefly 18
.
Selecting stations by entering the
frequency manually i
This function is not available for Weather
Band.
X Select Audio Q FM/AM Radio Q FM or
AM. Entering the frequency using the
COMAND controller
X
Select Radio Q Enter Frequency.
The menu for manual frequency entry
appears.
X Exiting menu without making an entry:
Press back button % in the center
console (Y page 75).
X Increasing or decreasing number: Slide
ZVÆ or rotate cVd.
i You can
only select available frequencies.
X Selecting the next number: Slide VY.
X Confirming frequency entry: Press W.
COMAND tunes in to the frequency
entered.
i If you enter a frequency which is outside
the frequency range, COMAND tunes in to
the next lowest frequency.
Entering the frequency using the
telephone keypad
X Press button à on the telephone
keypad (
Y page 70).
X Enter frequency using buttons Å -
Ã.
COMAND tunes in to the frequency
entered.
Selecting channels using the WB
channel i
This function
is only available for Weather
Band.
X Select Audio Q FM/AM Radio Q WB
Q Channel.
or
X Press W when the main area is selected.
The channel list appears. The dot # in
front of a list entry indicates the currently
selected channel.
18 Function is only available if the Audio menu is selected in the instrument cluster. COMAND FM/AM radio
155
Control systems
216_AKB; 3; 90, en-US
d2ureepe, Version: 2.11.8.1 2009-05-15T11:47:50+02:00 - Seite 155 Z
Page 158 of 500

X
Select channel by rotating cVd or sliding
ZVÆ and press W. Saving stations
i Twenty stations can be saved in each
wave band except for Weather Band.
You have the following options:
R Saving stations manually
R Saving stations using the autostore
function
Saving stations manually Option 1
X
Select Audio Q FM/AM Radio Q FM or
AM.
X Select Radio Q Save Station.
Option 2
X Press W when the main area is selected.
Option 3
X Select Audio Q FM/AM Radio Q FM or
AM.
X Select Presets.
All three of these will call up a station preset
screen. The dot # in front of a preset
position indicates that the currently selected
station is saved there. X
Selecting a preset position: Slide ZVÆ or
rotate cVd. Saving a station to a selected preset
position
If you have called up the station preset screen
using option 1:
X
Press W briefly.
In options 2 and 3:
X Press and hold W until you hear a signal.
The station is saved.
Saving using the autostore function i
This function is not available for Weather
Band. The autostore function saves
receivable stations as presets in order of
their reception quality. All stations saved
manually in the preset memory will be lost
if COMAND finds 20 stations. If COMAND
finds less than 20 stations, for example 9,
then the stations saved in preset
positions 1 – 9 will be overwritten.
Option 1
X Press W when the main area is selected.
X Select Autostore.
Option 2
X Select Audio Q FM/AM Radio Q FM or
AM.
X Select Presets Q Autostore.
Option 3
X Select Audio Q FM/AM Radio Q
Radio Q Save Station Q Autostore. Station name display
i In the FM wave band, COMAND can show
the name of the station currently tuned in.
Station name display : can only be seen
when it is switched on and if the station
transmits a name. 156
COMAND FM/AM radioControl systems
216_AKB; 3; 90, en-US
d2ureepe,
Version: 2.11.8.1 2009-05-15T11:47:50+02:00 - Seite 156