2010 MERCEDES-BENZ C300 4MATIC turn signal
[x] Cancel search: turn signalPage 265 of 364
After running the vehicle through an
automatic car wash, wipe any wax off of the
windshield and the wiper blade inserts. This
will prevent smears and reduce wiping noise
which can be caused by residual wax on the
windshield.
Ornamental moldings
XFor regular cleaning and care of ornamental
moldings, use a damp cloth.
! Do not use chrome cleaner on ornamental
moldings. Although ornamental moldings
may have chrome appearance, they could
be made of anodized aluminum that will be
damaged when cleaned with chrome
cleaner. Instead, use a damp cloth to clean
those ornamental moldings.
For very dirty ornamental moldings of
which you are sure are chrome-plated, use
a chrome cleaner. If in doubt whether an
ornamental molding is chrome-plated,
contact an authorized Mercedes-Benz
Center.
Headlamps, brake lamps, tail lamps,
side markers, turn signal lenses
XUse a mild vehicle wash detergent, such as
Mercedes-Benz approved Car Shampoo,
with plenty of water.
! Only use window cleaning solutions that
are suitable for plastic lamp lenses.
Window cleaning solutions which are not
suitable may damage the plastic lamp
lenses of the headlamps. Therefore, do not
use abrasives, solvents or cleaners that
contain solvents.
Cleaning the driving system sensors
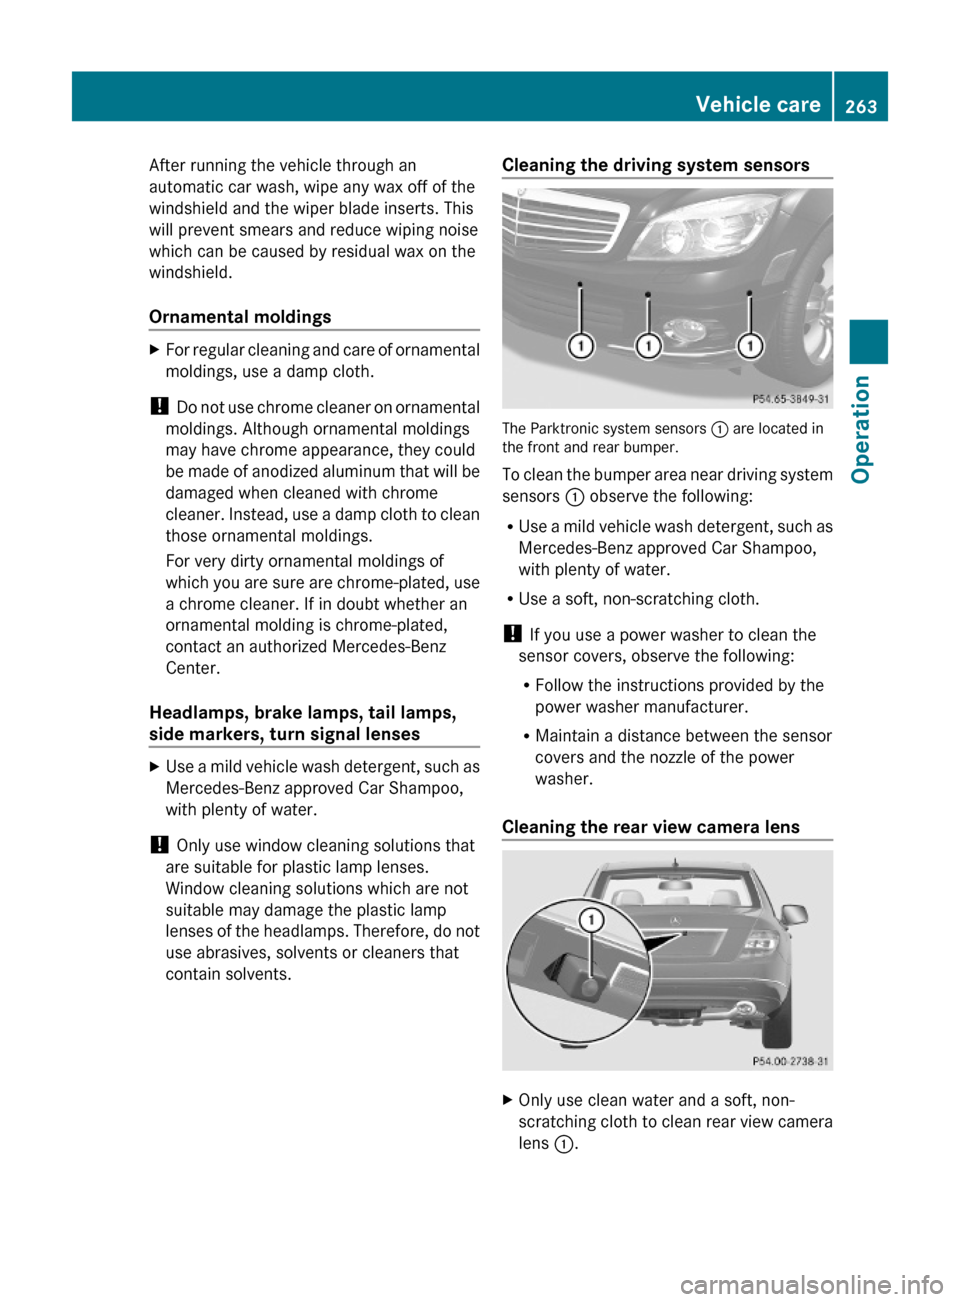
The Parktronic system sensors : are located inthe front and rear bumper.
To clean the bumper area near driving system
sensors : observe the following:
RUse a mild vehicle wash detergent, such as
Mercedes-Benz approved Car Shampoo,
with plenty of water.
RUse a soft, non-scratching cloth.
! If you use a power washer to clean the
sensor covers, observe the following:
RFollow the instructions provided by the
power washer manufacturer.
RMaintain a distance between the sensor
covers and the nozzle of the power
washer.
Cleaning the rear view camera lens
XOnly use clean water and a soft, non-
scratching cloth to clean rear view camera
lens :.
Vehicle care263Operation204_AKB; 5; 23, en-USd2ureepe,Version: 2.11.8.12009-07-16T17:54:06+02:00 - Seite 263Z
Page 272 of 364
Spare wheelGObserve Safety notes, see page 317.
The spare wheel is located in the space
underneath the trunk floor.
XRemoving: Open the trunk (Y page 75).XLift the trunk floor using the floor handle.XEngage the trunk floor handle on the upper
trunk lip.
! To prevent damage, always disengage the
floor handle from the upper trunk lip and
lower the trunk floor before closing the
trunk.
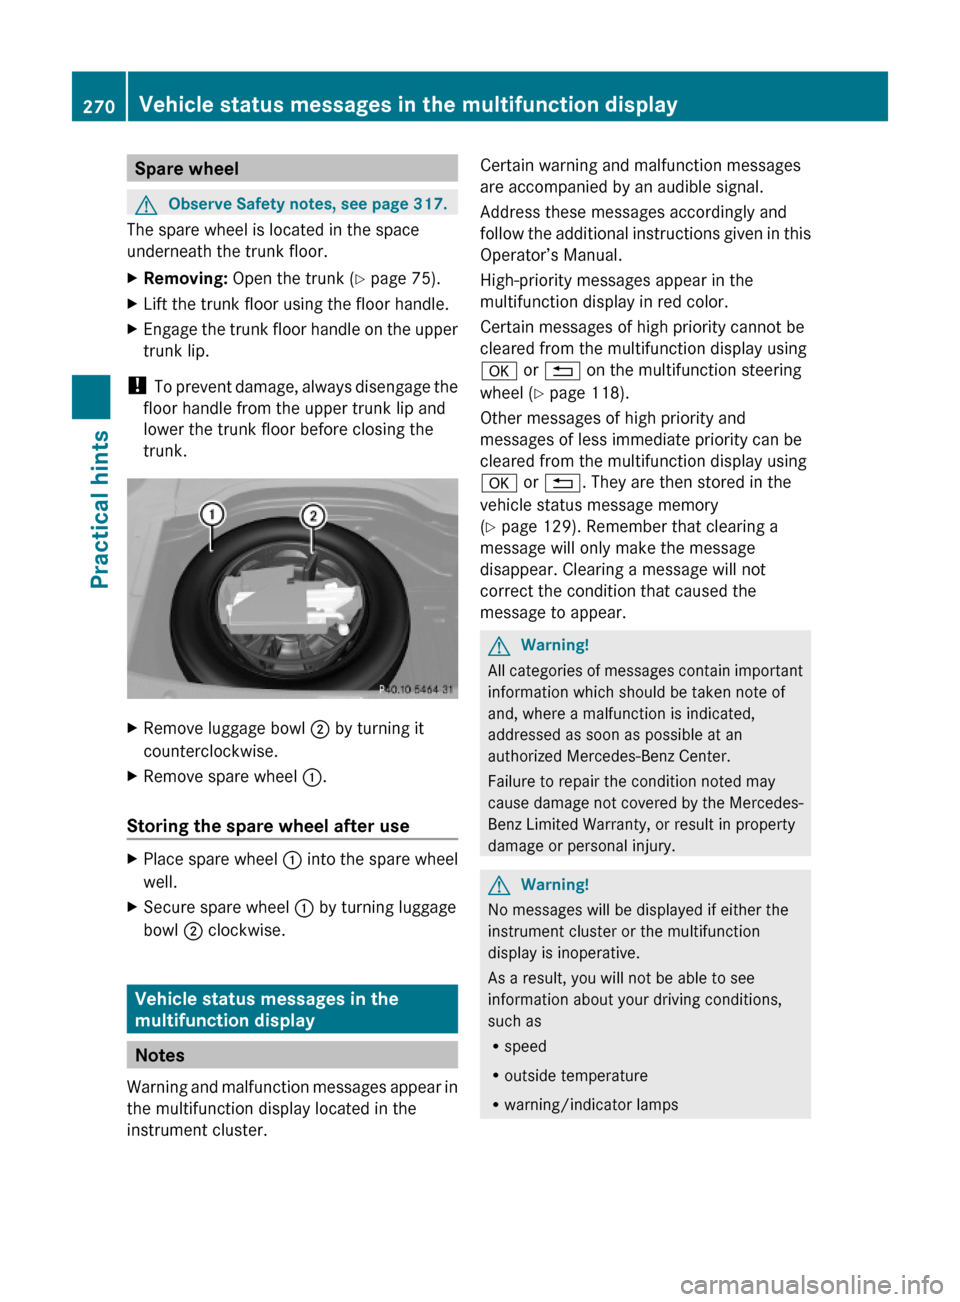
XRemove luggage bowl ; by turning it
counterclockwise.
XRemove spare wheel :.
Storing the spare wheel after use
XPlace spare wheel : into the spare wheel
well.
XSecure spare wheel : by turning luggage
bowl ; clockwise.
Vehicle status messages in the
multifunction display
Notes
Warning and malfunction messages appear in
the multifunction display located in the
instrument cluster.
Certain warning and malfunction messages
are accompanied by an audible signal.
Address these messages accordingly and
follow the additional instructions given in this
Operator’s Manual.
High-priority messages appear in the
multifunction display in red color.
Certain messages of high priority cannot be
cleared from the multifunction display using
a or % on the multifunction steering
wheel (Y page 118).
Other messages of high priority and
messages of less immediate priority can be
cleared from the multifunction display using
a or %. They are then stored in the
vehicle status message memory
(Y page 129). Remember that clearing a
message will only make the message
disappear. Clearing a message will not
correct the condition that caused the
message to appear.
GWarning!
All categories of messages contain important
information which should be taken note of
and, where a malfunction is indicated,
addressed as soon as possible at an
authorized Mercedes-Benz Center.
Failure to repair the condition noted may
cause damage not covered by the Mercedes-
Benz Limited Warranty, or result in property
damage or personal injury.
GWarning!
No messages will be displayed if either the
instrument cluster or the multifunction
display is inoperative.
As a result, you will not be able to see
information about your driving conditions,
such as
Rspeed
Routside temperature
Rwarning/indicator lamps
270Vehicle status messages in the multifunction displayPractical hints
204_AKB; 5; 23, en-USd2ureepe,Version: 2.11.8.12009-07-16T17:54:06+02:00 - Seite 270
Page 297 of 364

Display messagesPossible causes/consequences and M SolutionsbCheck
Left Tail
Lamp
or
Check
Right
Tail LampThe left or right tail lamp is malfunctioning.XReplace the bulb as soon as possible ( Y page 313).bCheck
Left Tail
and Brake
Lamps
or
Check
Right
Tail and
Brake
LampsThe left or right tail lamp/brake lamp is malfunctioning.XReplace the bulb as soon as possible ( Y page 313).bCheck
Left
Cornering
Light
or
Check
Right
Cornering
LightThe left or right corner-illuminating front fog lamp is
malfunctioning.XContact an authorized Mercedes-Benz Center as soon as
possible.bCheck
Rear Left
Turn
Signal
or
Check
Rear
Right
Turn
SignalThe left or right rear turn signal lamp is malfunctioning.XReplace the bulb as soon as possible ( Y page 313).Vehicle status messages in the multifunction display295Practical hints204_AKB; 5; 23, en-USd2ureepe,Version: 2.11.8.12009-07-16T17:54:06+02:00 - Seite 295Z
Page 298 of 364
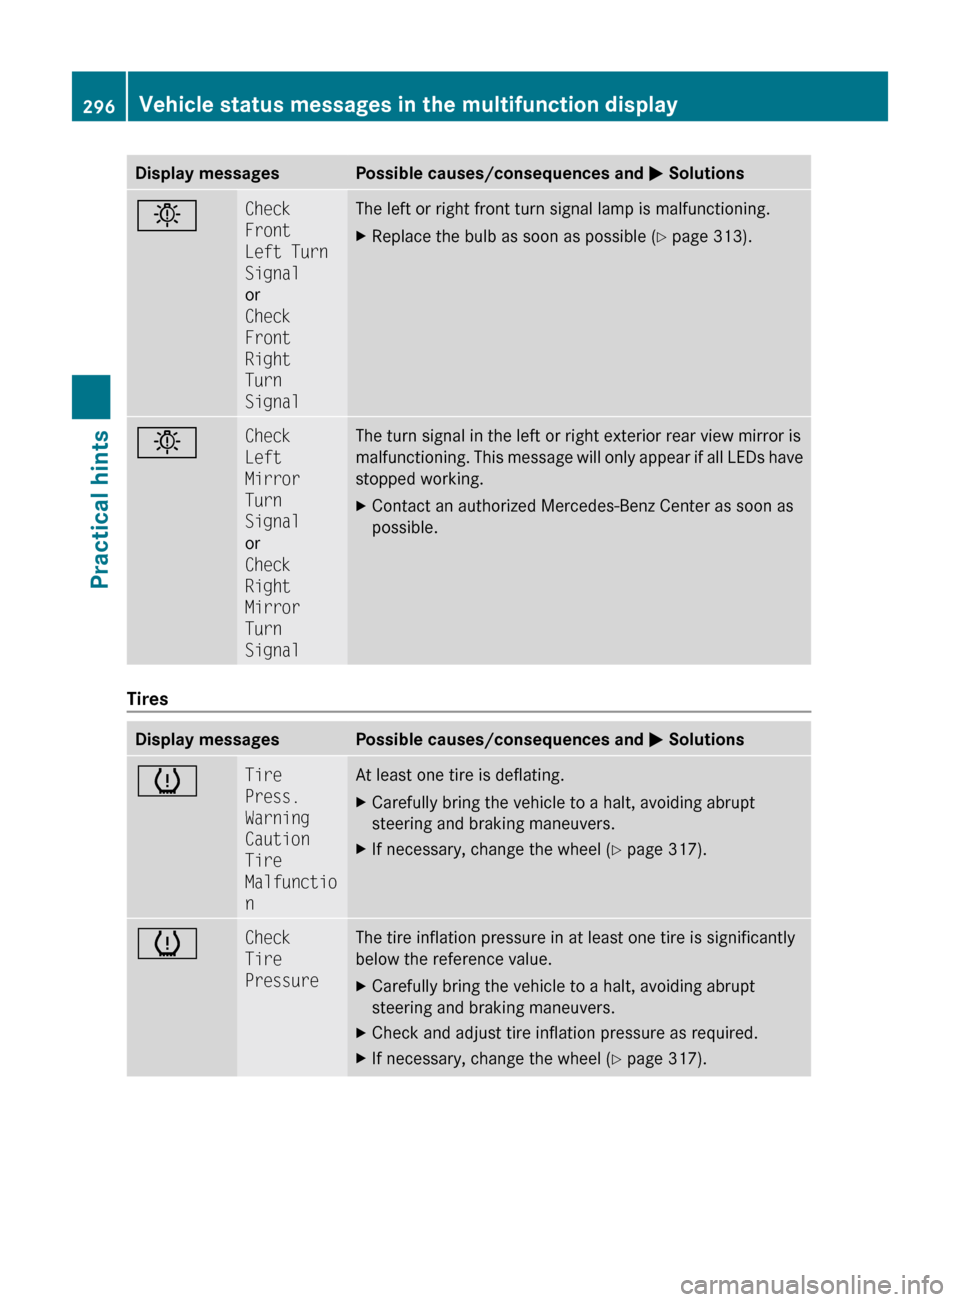
Display messagesPossible causes/consequences and M SolutionsbCheck
Front
Left Turn
Signal
or
Check
Front
Right
Turn
SignalThe left or right front turn signal lamp is malfunctioning.XReplace the bulb as soon as possible ( Y page 313).bCheck
Left
Mirror
Turn
Signal
or
Check
Right
Mirror
Turn
SignalThe turn signal in the left or right exterior rear view mirror is
malfunctioning. This message will only appear if all LEDs have
stopped working.XContact an authorized Mercedes-Benz Center as soon as
possible.
Tires
Display messagesPossible causes/consequences and M SolutionshTire
Press.
Warning
Caution
Tire
Malfunctio
nAt least one tire is deflating.XCarefully bring the vehicle to a halt, avoiding abrupt
steering and braking maneuvers.XIf necessary, change the wheel ( Y page 317).hCheck
Tire
PressureThe tire inflation pressure in at least one tire is significantly
below the reference value.XCarefully bring the vehicle to a halt, avoiding abrupt
steering and braking maneuvers.XCheck and adjust tire inflation pressure as required.XIf necessary, change the wheel ( Y page 317).296Vehicle status messages in the multifunction displayPractical hints
204_AKB; 5; 23, en-USd2ureepe,Version: 2.11.8.12009-07-16T17:54:06+02:00 - Seite 296
Page 299 of 364
GWarning!
Do not drive with a flat tire. A flat tire affects the ability to steer or brake the vehicle. You may
lose control of the vehicle. Continued driving with a flat tire will cause excessive heat build-up
and possibly a fire.
GWarning!
Follow recommended tire inflation pressures.
Do not underinflate tires. Underinflated tires wear excessively and/or unevenly, adversely affect
handling and fuel economy, and are more likely to fail from being overheated.
Do not overinflate tires. Overinflated tires can adversely affect handling and ride comfort, wear
unevenly, increase stopping distance, and result in sudden deflation (blowout) because they are
more likely to become punctured or damaged by road debris, potholes etc.
What to do if …
Lamps in instrument cluster
Notes
If any of the following lamps in the instrument
cluster fails to come on during the bulb self-
check when switching on the ignition, have
the respective bulb checked and replaced if
necessary.
When you switch on the ignition, all lamps in
the instrument cluster come on. The low-
beam headlamp indicator lamp, high-beam
headlamp indicator lamp, turn signal
indicator lamps, and the indicator lamps for
the fog lamps will only come on if activated.
If a lamp in the instrument cluster fails to
come on when the ignition is switched on,
have it checked and replaced if necessary.What to do if …297Practical hints204_AKB; 5; 23, en-USd2ureepe,Version: 2.11.8.12009-07-16T17:54:06+02:00 - Seite 297Z
Page 316 of 364
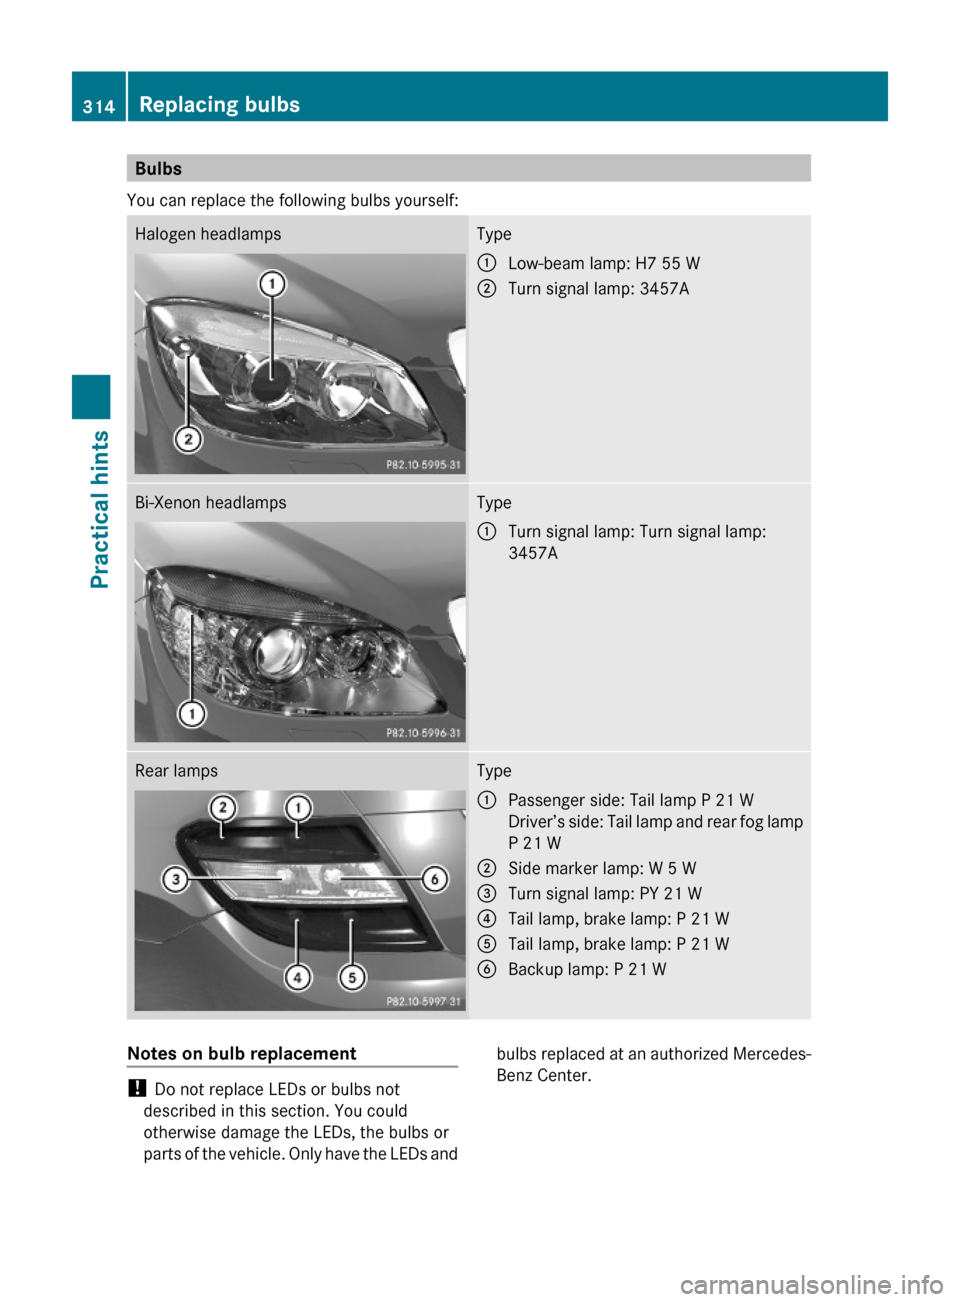
Bulbs
You can replace the following bulbs yourself:
Halogen headlampsType:Low-beam lamp: H7 55 W;Turn signal lamp: 3457ABi-Xenon headlampsType:Turn signal lamp: Turn signal lamp:
3457A
Rear lampsType:Passenger side: Tail lamp P 21 W
Driver’s side: Tail lamp and rear fog lamp
P 21 W
;Side marker lamp: W 5 W=Turn signal lamp: PY 21 W?Tail lamp, brake lamp: P 21 WATail lamp, brake lamp: P 21 WBBackup lamp: P 21 WNotes on bulb replacement
! Do not replace LEDs or bulbs not
described in this section. You could
otherwise damage the LEDs, the bulbs or
parts of the vehicle. Only have the LEDs and
bulbs replaced at an authorized Mercedes-
Benz Center.
314Replacing bulbsPractical hints
204_AKB; 5; 23, en-USd2ureepe,Version: 2.11.8.12009-07-16T17:54:06+02:00 - Seite 314
Page 317 of 364

GObserve Safety notes, see page 313.
ROnly use 12-volt bulbs of the same type and
with the specified watt rating.
RSwitch the lights off before changing a bulb
to prevent short circuits.
RAlways use a clean lint-free cloth when
handling bulbs.
RYour hands should be dry and free of oil and
grease.
RIf the newly installed bulb does not come
on, contact an authorized Mercedes-Benz
Center.
iMercedes-Benz recommends using
Longlife (LL) bulbs.
Replacing bulbs for front lamps
XSwitch off the ignition.XTurn the exterior lamp switch to position
$.
XOpen the hood (Y page 224).GWarning!
Do not remove the cover for the Bi-Xenon
headlamp. Because of high voltage in Xenon
lamps, it is dangerous to replace the bulb or
repair the lamp and its components. It is
recommended to have such work done by a
qualified technician.
Low-beam bulb (halogen headlamps
only)
XTurn housing cover : counterclockwise
and remove it.
XPull electric plug ; off the bulb ?.XRemove wire clip = from bulb holder by
pushing down and release from arrestor
hook.
XPull bulb ? at its socket out of bulb holder.XInsert the new bulb so that its socket
locates in the recess of bulb holder and is
level to it.
XFold wire clip = back and press it down on
bulb holder to engage it in the arrestor
hook.
XConnect electric plug ; on bulb ?.XAlign housing cover and turn it clockwise.
Front turn signal lamp bulb
XTurn bulb socket = with handle ;
counterclockwise and remove it.
XPull bulb out of bulb socket =.XGently press the new bulb into bulb socket
= until the bulb engages.
XPlace bulb socket = back into the housing.
Handle ; must be in a horizontal line and
mark : must be on the upper part (driver’s
side headlamp) or lower part (passenger-
side headlamp).
XTurn bulb socket = clockwise until it
engages.
Replacing bulbs315Practical hints204_AKB; 5; 23, en-USd2ureepe,Version: 2.11.8.12009-07-16T17:54:06+02:00 - Seite 315Z
Page 318 of 364
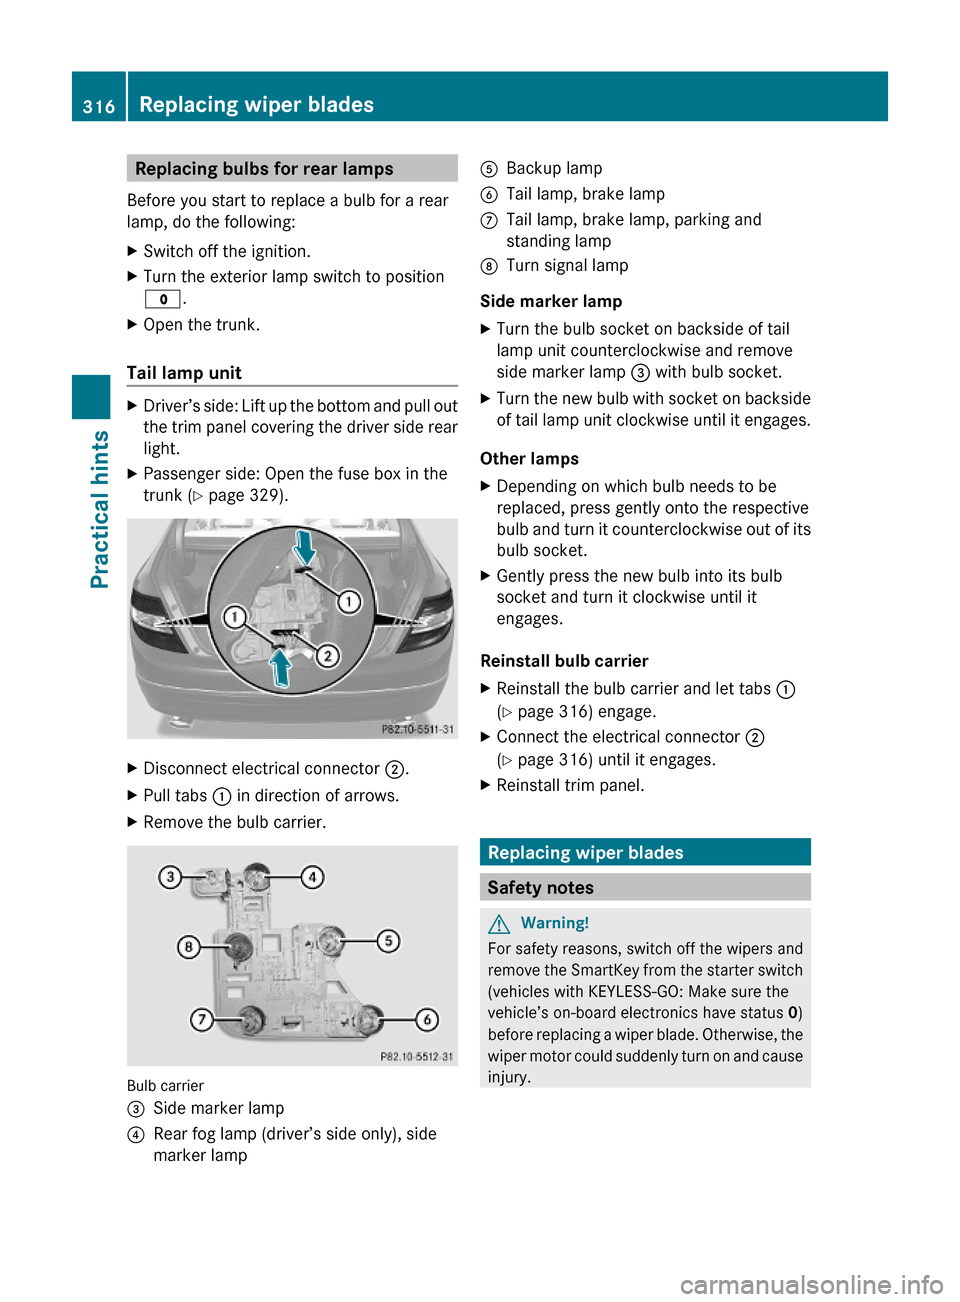
Replacing bulbs for rear lamps
Before you start to replace a bulb for a rear
lamp, do the following:
XSwitch off the ignition.XTurn the exterior lamp switch to position
$.
XOpen the trunk.
Tail lamp unit
XDriver’s side: Lift up the bottom and pull out
the trim panel covering the driver side rear
light.
XPassenger side: Open the fuse box in the
trunk (Y page 329).
XDisconnect electrical connector ;.XPull tabs : in direction of arrows.XRemove the bulb carrier.
Bulb carrier
=Side marker lamp?Rear fog lamp (driver’s side only), side
marker lamp
ABackup lampBTail lamp, brake lampCTail lamp, brake lamp, parking and
standing lamp
DTurn signal lamp
Side marker lamp
XTurn the bulb socket on backside of tail
lamp unit counterclockwise and remove
side marker lamp = with bulb socket.
XTurn the new bulb with socket on backside
of tail lamp unit clockwise until it engages.
Other lamps
XDepending on which bulb needs to be
replaced, press gently onto the respective
bulb and turn it counterclockwise out of its
bulb socket.
XGently press the new bulb into its bulb
socket and turn it clockwise until it
engages.
Reinstall bulb carrier
XReinstall the bulb carrier and let tabs :
(Y page 316) engage.
XConnect the electrical connector ;
(Y page 316) until it engages.
XReinstall trim panel.
Replacing wiper blades
Safety notes
GWarning!
For safety reasons, switch off the wipers and
remove the SmartKey from the starter switch
(vehicles with KEYLESS-GO: Make sure the
vehicle’s on-board electronics have status 0)
before replacing a wiper blade. Otherwise, the
wiper motor could suddenly turn on and cause
injury.
316Replacing wiper bladesPractical hints
204_AKB; 5; 23, en-USd2ureepe,Version: 2.11.8.12009-07-16T17:54:06+02:00 - Seite 316