2010 MERCEDES-BENZ C300 4MATIC turn signal
[x] Cancel search: turn signalPage 78 of 364
A minimum height clearance of 5.9 ft (1.80 m)
is required to open the trunk lid.
Opening the trunk from the outside
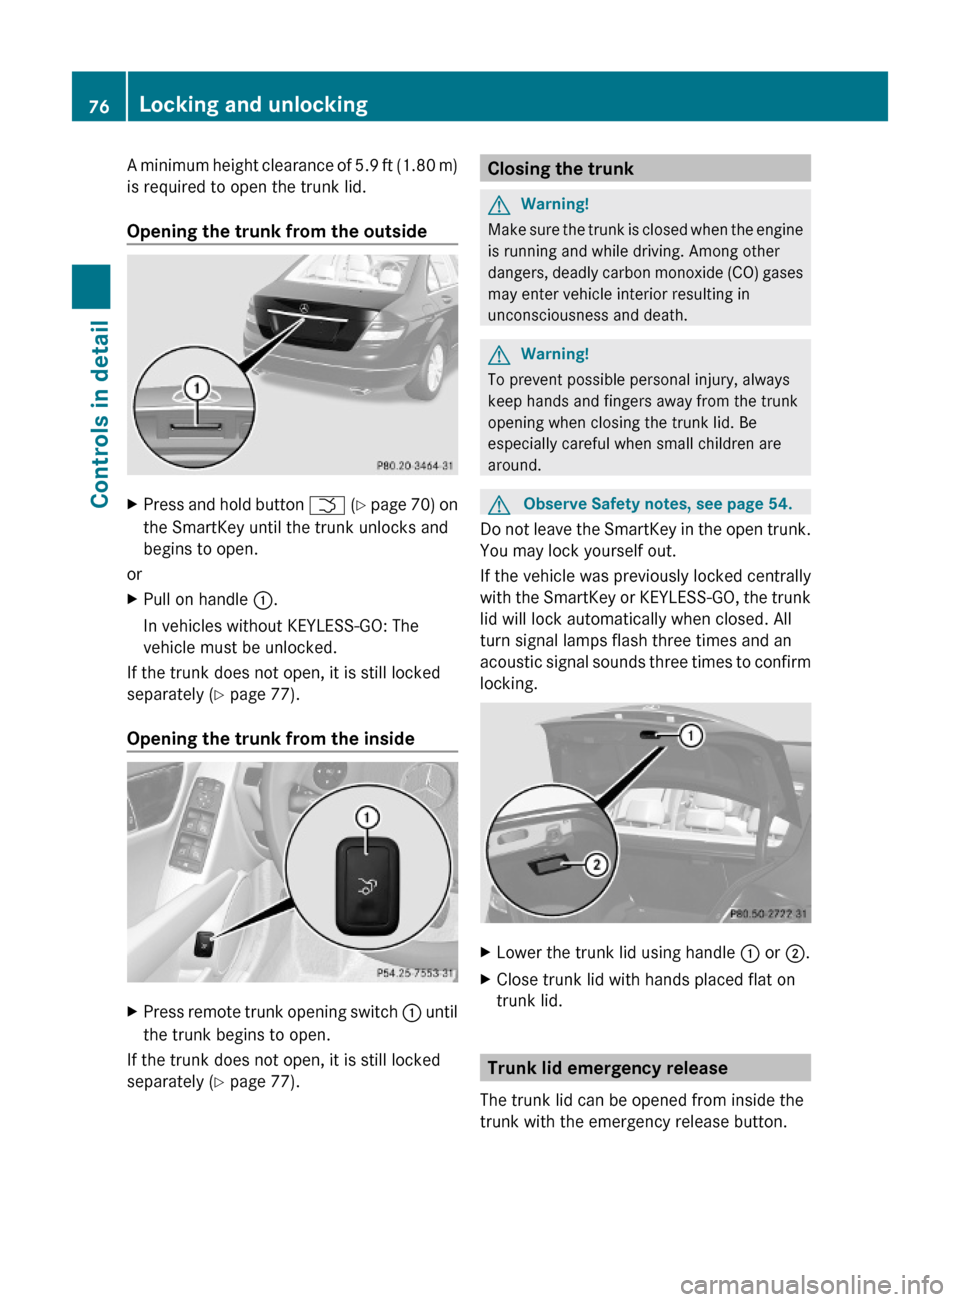
XPress and hold button F (Y page 70) on
the SmartKey until the trunk unlocks and
begins to open.
or
XPull on handle :.
In vehicles without KEYLESS-GO: The
vehicle must be unlocked.
If the trunk does not open, it is still locked
separately (Y page 77).
Opening the trunk from the inside
XPress remote trunk opening switch : until
the trunk begins to open.
If the trunk does not open, it is still locked
separately (Y page 77).
Closing the trunkGWarning!
Make sure the trunk is closed when the engine
is running and while driving. Among other
dangers, deadly carbon monoxide (CO) gases
may enter vehicle interior resulting in
unconsciousness and death.
GWarning!
To prevent possible personal injury, always
keep hands and fingers away from the trunk
opening when closing the trunk lid. Be
especially careful when small children are
around.
GObserve Safety notes, see page 54.
Do not leave the SmartKey in the open trunk.
You may lock yourself out.
If the vehicle was previously locked centrally
with the SmartKey or KEYLESS-GO, the trunk
lid will lock automatically when closed. All
turn signal lamps flash three times and an
acoustic signal sounds three times to confirm
locking.
XLower the trunk lid using handle : or ;.XClose trunk lid with hands placed flat on
trunk lid.
Trunk lid emergency release
The trunk lid can be opened from inside the
trunk with the emergency release button.
76Locking and unlockingControls in detail
204_AKB; 5; 23, en-USd2ureepe,Version: 2.11.8.12009-07-16T17:54:06+02:00 - Seite 76
Page 80 of 364
2Ignition (power supply for all electrical
consumers) and driving position
3Starting position
When you switch on the ignition, all lamps in
the instrument cluster come on. The low-
beam headlamp indicator lamp, high-beam
headlamp indicator lamp, turn signal
indicator lamps, and the indicator lamps for
the fog lamps will only come on if activated.
If a lamp in the instrument cluster fails to
come on when the ignition is switched on,
have it checked and replaced if necessary. If
a lamp in the instrument cluster remains on
after starting the engine or comes on while
driving, refer to “Lamps in instrument cluster”
(Y page 297).
If the SmartKey is left in starter switch
position 0 for an extended period of time, it
can no longer be turned in the starter switch.
In this case, the steering is locked. To unlock,
remove SmartKey from the starter switch and
reinsert.
The steering is locked when the SmartKey is
removed from the starter switch.
XAlways remove the SmartKey from the
starter switch when the engine is not in
operation.
This will help to prevent accelerated vehicle
battery discharge or a completely
discharged vehicle battery.
If the SmartKey cannot be turned in the
starter switch, the vehicle battery may not be
sufficiently charged.
XCheck the vehicle battery and charge it if
necessary (Y page 323).
or
XGet a jump start (Y page 323).
iIf the SmartKey does not belong to the
vehicle, the SmartKey can be turned in the
starter switch. However, the ignition does
not switch on and the engine does not start.
KEYLESS-GOGObserve Safety notes, see page 54.
Vehicles equipped with the KEYLESS-GO
feature are supplied with a SmartKey with
integrated KEYLESS-GO function and a
removable KEYLESS-GO start/stop button.
The KEYLESS-GO start/stop button must be
inserted in the starter switch and the
SmartKey present in the vehicle.
Pressing the KEYLESS-GO start/stop button
without depressing the brake pedal
corresponds to the various starter switch
positions (Y page 77).
Pressing the KEYLESS-GO start/stop button
with the brake pedal firmly depressed will
start the engine (Y page 101).
The KEYLESS-GO start/stop button can be
pulled out of the starter switch easily. You can
then insert the SmartKey into the starter
switch.
iThe KEYLESS-GO start/stop button does
not need to be removed from the starter
switch when you leave the vehicle.
However, always take the SmartKey with
you when you leave the vehicle. As long as
the SmartKey is in the vehicle, the vehicle’s
electrical systems can be switched on or
the engine can be started using the
KEYLESS-GO start/stop button.
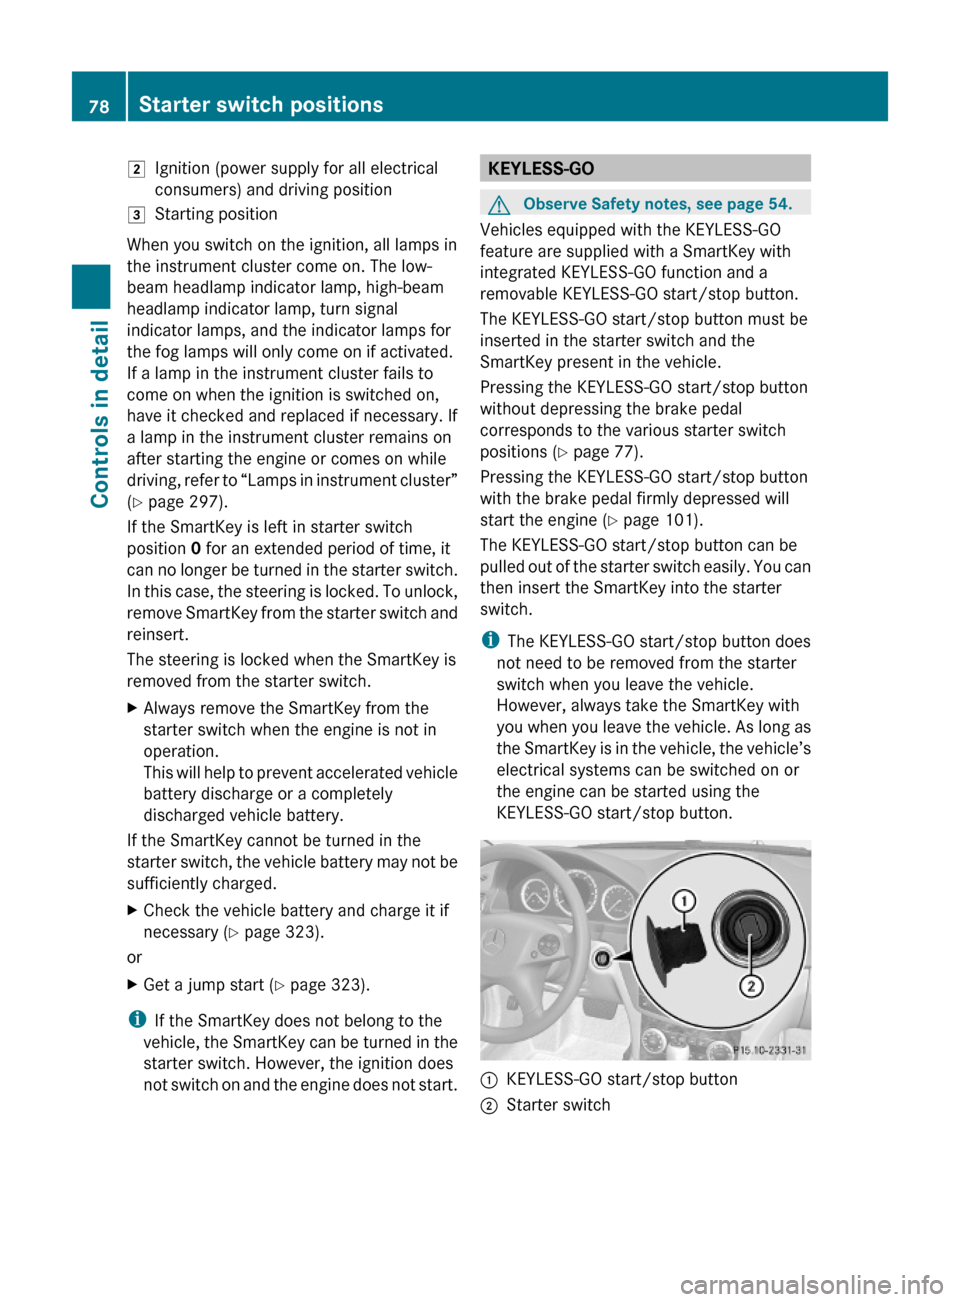
:KEYLESS-GO start/stop button;Starter switch78Starter switch positionsControls in detail
204_AKB; 5; 23, en-USd2ureepe,Version: 2.11.8.12009-07-16T17:54:06+02:00 - Seite 78
Page 81 of 364
XInsert the KEYLESS-GO start/stop button
into the starter switch (if not inserted
already).
iAllow for 2 seconds until the system has
detected the KEYLESS-GO start/stop
button.
XVehicles with manual transmission: Shift
the manual transmission into the neutral
position (no gear selected).
or
XVehicles with automatic transmission: Shift
the automatic transmission into neutral
position N.
XDo not depress the brake pedal.
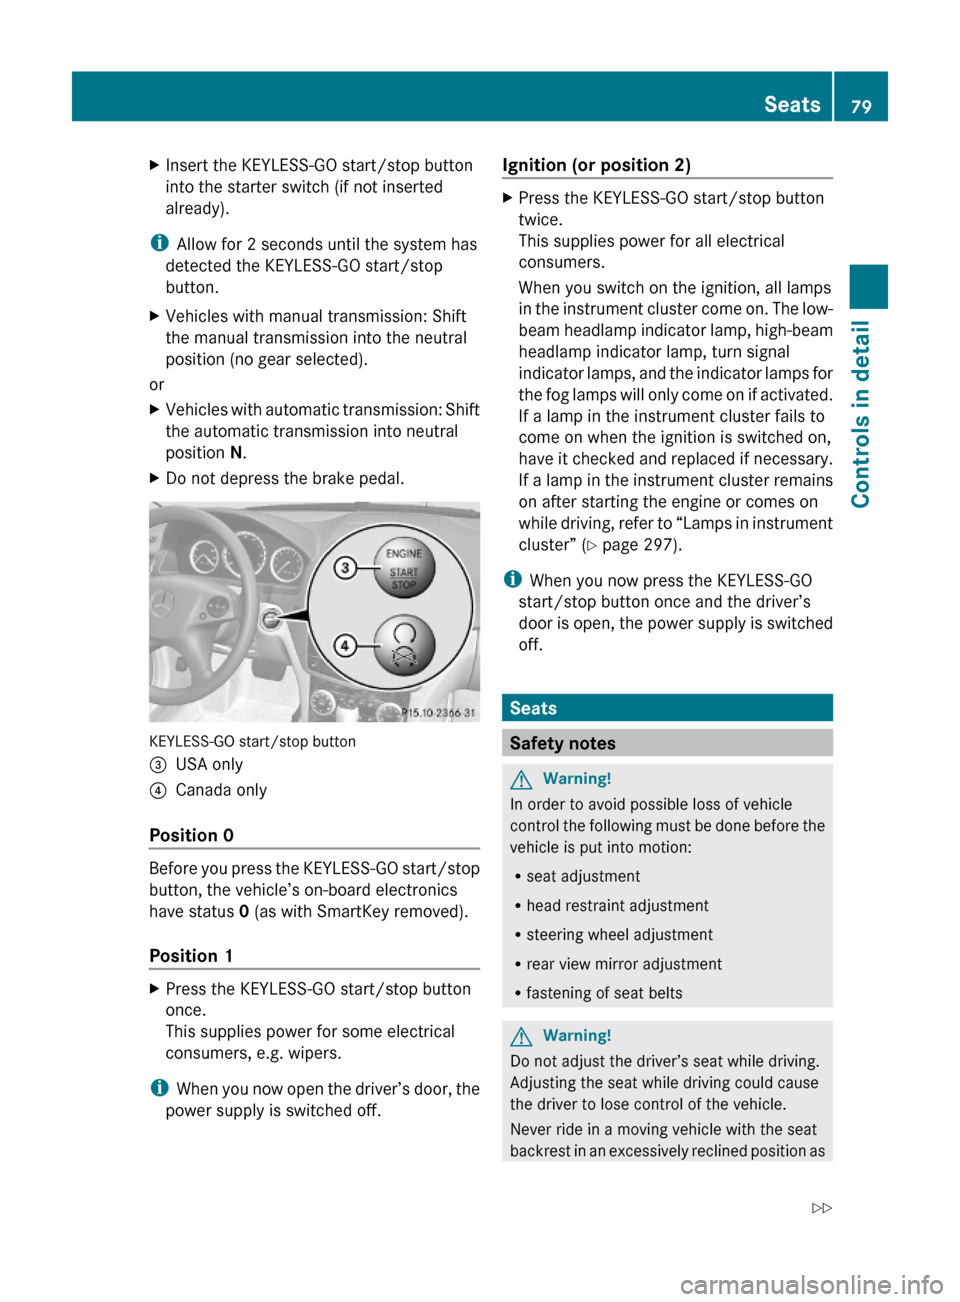
KEYLESS-GO start/stop button
=USA only?Canada only
Position 0
Before you press the KEYLESS-GO start/stop
button, the vehicle’s on-board electronics
have status 0 (as with SmartKey removed).
Position 1
XPress the KEYLESS-GO start/stop button
once.
This supplies power for some electrical
consumers, e.g. wipers.
iWhen you now open the driver’s door, the
power supply is switched off.
Ignition (or position 2) XPress the KEYLESS-GO start/stop button
twice.
This supplies power for all electrical
consumers.
When you switch on the ignition, all lamps
in the instrument cluster come on. The low-
beam headlamp indicator lamp, high-beam
headlamp indicator lamp, turn signal
indicator lamps, and the indicator lamps for
the fog lamps will only come on if activated.
If a lamp in the instrument cluster fails to
come on when the ignition is switched on,
have it checked and replaced if necessary.
If a lamp in the instrument cluster remains
on after starting the engine or comes on
while driving, refer to “Lamps in instrument
cluster” (Y page 297).
iWhen you now press the KEYLESS-GO
start/stop button once and the driver’s
door is open, the power supply is switched
off.
Seats
Safety notes
GWarning!
In order to avoid possible loss of vehicle
control the following must be done before the
vehicle is put into motion:
Rseat adjustment
Rhead restraint adjustment
Rsteering wheel adjustment
Rrear view mirror adjustment
Rfastening of seat belts
GWarning!
Do not adjust the driver’s seat while driving.
Adjusting the seat while driving could cause
the driver to lose control of the vehicle.
Never ride in a moving vehicle with the seat
backrest in an excessively reclined position as
Seats79Controls in detail204_AKB; 5; 23, en-USd2ureepe,Version: 2.11.8.12009-07-16T17:54:06+02:00 - Seite 79Z
Page 95 of 364
Combination switch
Turn signals
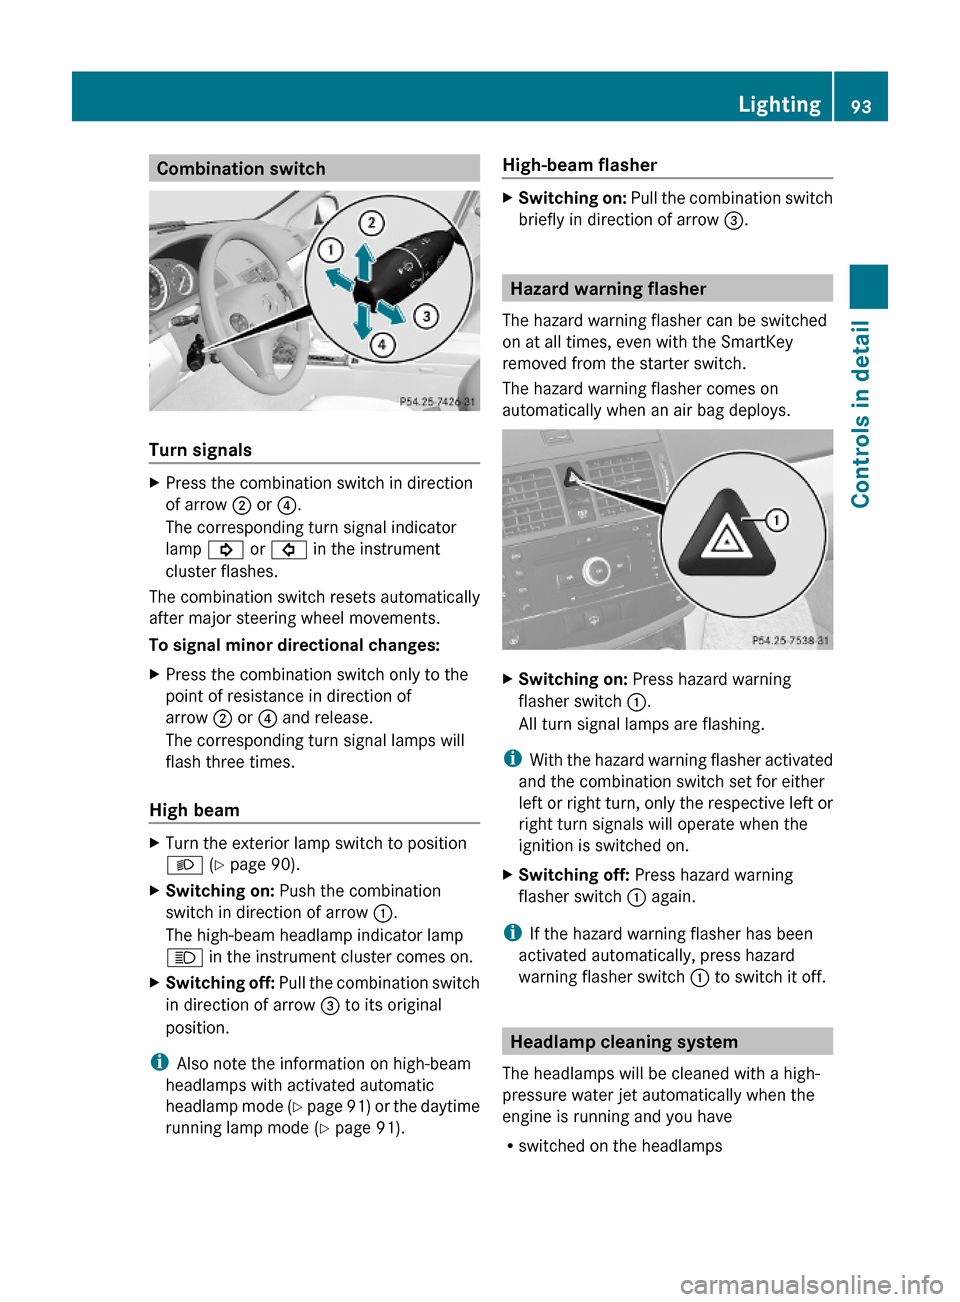
XPress the combination switch in direction
of arrow ; or ?.
The corresponding turn signal indicator
lamp ! or # in the instrument
cluster flashes.
The combination switch resets automatically
after major steering wheel movements.
To signal minor directional changes:
XPress the combination switch only to the
point of resistance in direction of
arrow ; or ? and release.
The corresponding turn signal lamps will
flash three times.
High beam
XTurn the exterior lamp switch to position
L (Y page 90).
XSwitching on: Push the combination
switch in direction of arrow :.
The high-beam headlamp indicator lamp
K in the instrument cluster comes on.
XSwitching off: Pull the combination switch
in direction of arrow = to its original
position.
iAlso note the information on high-beam
headlamps with activated automatic
headlamp mode (Y page 91) or the daytime
running lamp mode (Y page 91).
High-beam flasher XSwitching on: Pull the combination switch
briefly in direction of arrow =.
Hazard warning flasher
The hazard warning flasher can be switched
on at all times, even with the SmartKey
removed from the starter switch.
The hazard warning flasher comes on
automatically when an air bag deploys.
XSwitching on: Press hazard warning
flasher switch :.
All turn signal lamps are flashing.
iWith the hazard warning flasher activated
and the combination switch set for either
left or right turn, only the respective left or
right turn signals will operate when the
ignition is switched on.
XSwitching off: Press hazard warning
flasher switch : again.
iIf the hazard warning flasher has been
activated automatically, press hazard
warning flasher switch : to switch it off.
Headlamp cleaning system
The headlamps will be cleaned with a high-
pressure water jet automatically when the
engine is running and you have
Rswitched on the headlamps
Lighting93Controls in detail204_AKB; 5; 23, en-USd2ureepe,Version: 2.11.8.12009-07-16T17:54:06+02:00 - Seite 93Z
Page 96 of 364
and
R the windshield wipers have wiped the
windshield with washer fluid for the first
time
The headlamps are cleaned every tenth time
the windshield is washed with washer fluid.
The counter resets when you switch off the
ignition.
For information on filling up the washer
reservoir, see “Washer system and headlamp
cleaning system” ( Y page 228).
Corner-illuminating front fog lamps
The corner-illuminating front fog lamps
improve illumination of the area in the
direction into which you are turning.
The corner-illuminating front fog lamps will
only operate
R in low ambient lighting conditions
R at vehicle speeds below 25 mph
(40 km/h)
R with the front fog lamps switched off
R when the engine is running
Switching on
XTurn the exterior lamp switch to position
L or c .
or
XActivate the daytime running lamp mode
( Y page 91).XSwitch on the left or right turn signal,
depending on whether you are turning left
or right.
The respective front fog lamp comes on. If
you have switched on the turn signal for
one side but turn the steering wheel in the
other direction, the corner-illuminatingfront fog lamp on the side of the turn signal
comes on.
or
XTurn the steering wheel in the desired
direction.
Driving forward: The front fog lamp on the
side of your steering direction comes on.
Driving in reverse: The front fog lamp
opposite to your steering direction comes
on.
The corner-illuminating front fog lamps will
come on automatically depending on the
steering angle, even if you did not switch on
either turn signal. If the corner-illuminating
front fog lamps came on automatically, they
will also go out automatically depending on
the steering angle and vehicle speed.
The corner-illuminating front fog lamps
temporarily come on on both sides of the
vehicle if you turn the steering wheel in one
direction and then again in the other direction
shortly thereafter.
The corner-illuminating front fog lamp
remains lit for a short time only. It then goes
out automatically.
Switching off
XSwitch off the left or right turn signal.
or
XSteer straight ahead.
i There may be a brief delay before the
corner-illuminating front fog lamps go out.
94LightingControls in detail
204_AKB; 5; 23, en-USd2ureepe,Version: 2.11.8.12009-07-16T17:54:06+02:00 - Seite 94
Page 105 of 364
Carry out the following steps:XIf you are starting the engine with the
SmartKey: Turn the SmartKey in the starter
switch to position 0 and repeat the starting
procedure.XIf you are starting the engine with KEYLESS-
GO: Close any doors that may be open to
allow for better detection of the SmartKey.
or
XRemove the KEYLESS-GO start/stop
button from the starter switch.XStart the engine with the SmartKey as radio
signals from another source may be
interfering with the KEYLESS-GO function.XRepeat the starting procedure.
If the engine does not start after several
starting attempts:
XContact an authorized Mercedes-Benz
Center or call Roadside Assistance.
The engine does not start. You cannot
hear the starter.
The battery may not be charged sufficiently.
XGet a jump start ( Y page 323).
If the engine will not start despite a jump
start:
XContact an authorized Mercedes-Benz
Center or call Roadside Assistance.
The starter has been exposed to excessive
temperatures.
XLet the starter cool for about 2 minutes.XRepeat the starting procedure.
If the engine does not start after several
starting attempts:
XContact an authorized Mercedes-Benz
Center or call Roadside Assistance.Driving offGWarning!
On slippery road surfaces, never downshift in
order to obtain braking action. This could
result in drive wheel slip and reduced vehicle
control. Your vehicle’s ABS will not prevent
this type of loss of control.
! Do not run a cold engine at high engine
speeds. Running a cold engine at high
engine speeds may shorten the service life
of the engine. This is not covered by the
Mercedes-Benz Limited Warranty.
C 63 AMG: At engine temperatures below
68‡ (20†), the engine’s maximum speed
is restricted in order to protect it from
damage. Avoid driving your vehicle at full
speed when the engine is cold to prevent
premature engine wear and/or diminished
comfort.
! If an acoustic warning sounds and the
message Release Parking Brake
appears in the multifunction display when
driving off, you have forgotten to release
the parking brake.
Release the parking brake.
! Avoid spinning of a drive wheel. This may
cause serious damage to the drivetrain
which is not covered by the Mercedes-Benz
Limited Warranty.
! Simultaneously depressing the
accelerator pedal and applying the brakes
reduces engine performance and causes
premature brake and drivetrain wear which
is not covered by the Mercedes-Benz
Limited Warranty.
i Once the vehicle is in motion, the
automatic central locking function engages
and the locking knobs in the doors move
down.
Driving and parking103Controls in detail204_AKB; 5; 23, en-USd2ureepe,Version: 2.11.8.12009-07-16T17:54:06+02:00 - Seite 103Z
Page 219 of 364
and reverse features as required by U.S.
federal safety standards (this includes any
garage door opener model manufactured
before April 1, 1982). A garage door that
cannot detect an object - signaling the door
to stop and reverse - does not meet current
U.S. federal safety standards.
When programming a garage door opener,
park vehicle outside the garage.
Do not run the engine while programming the
integrated remote control. Inhalation of
exhaust gas is hazardous to your health. All
exhaust gas contains carbon monoxide (CO),
and inhaling it can cause unconsciousness
and possible death.
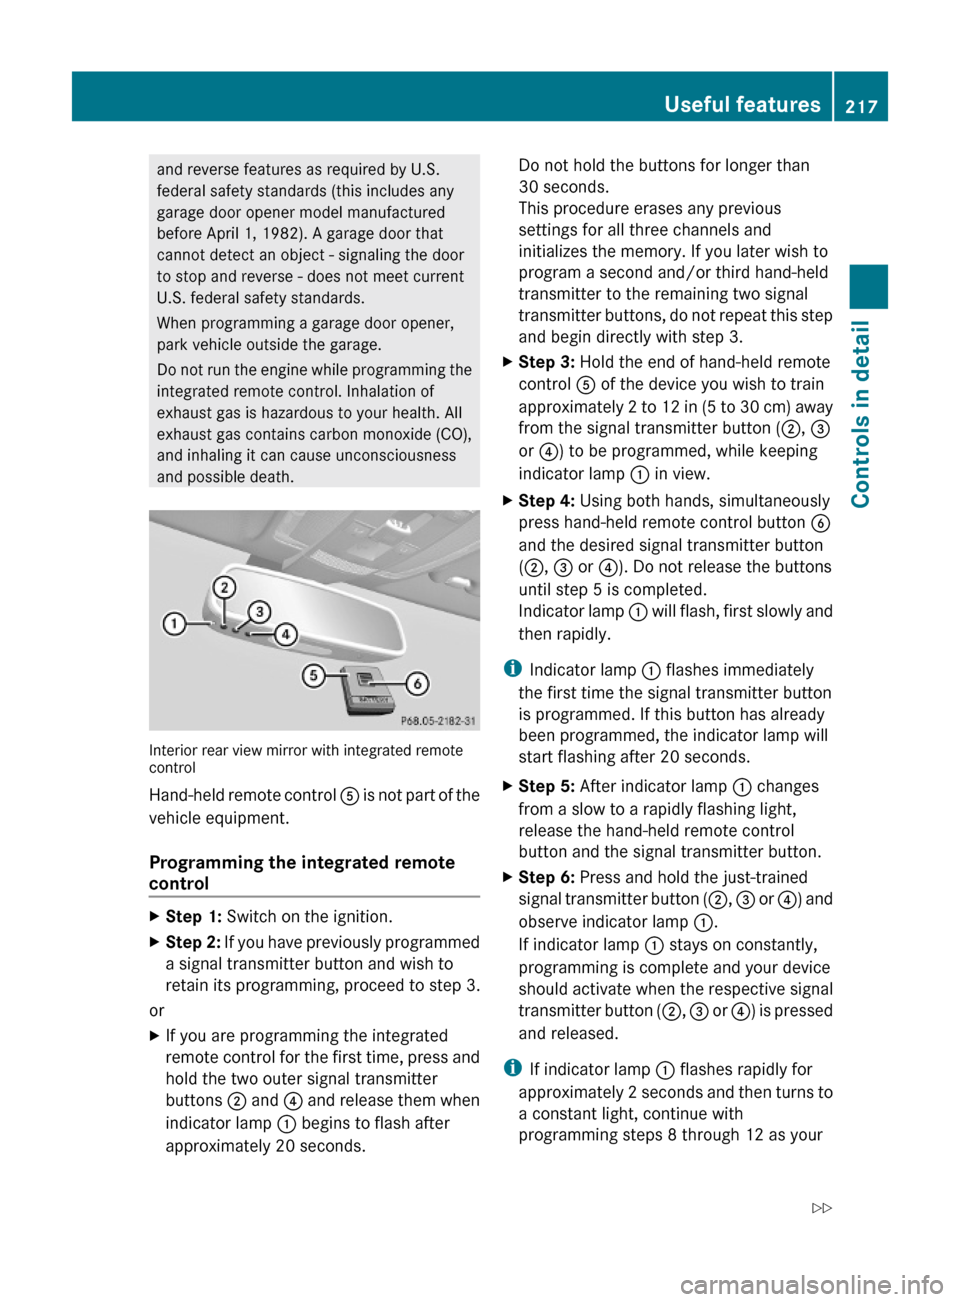
Interior rear view mirror with integrated remotecontrol
Hand-held remote control A is not part of the
vehicle equipment.
Programming the integrated remote
control
XStep 1: Switch on the ignition.XStep 2: If you have previously programmed
a signal transmitter button and wish to
retain its programming, proceed to step 3.
or
XIf you are programming the integrated
remote control for the first time, press and
hold the two outer signal transmitter
buttons ; and ? and release them when
indicator lamp : begins to flash after
approximately 20 seconds.
Do not hold the buttons for longer than
30 seconds.
This procedure erases any previous
settings for all three channels and
initializes the memory. If you later wish to
program a second and/or third hand-held
transmitter to the remaining two signal
transmitter buttons, do not repeat this step
and begin directly with step 3.
XStep 3: Hold the end of hand-held remote
control A of the device you wish to train
approximately 2 to 12 in (5 to 30 cm) away
from the signal transmitter button (;, =
or ?) to be programmed, while keeping
indicator lamp : in view.
XStep 4: Using both hands, simultaneously
press hand-held remote control button B
and the desired signal transmitter button
(;, = or ?). Do not release the buttons
until step 5 is completed.
Indicator lamp : will flash, first slowly and
then rapidly.
iIndicator lamp : flashes immediately
the first time the signal transmitter button
is programmed. If this button has already
been programmed, the indicator lamp will
start flashing after 20 seconds.
XStep 5: After indicator lamp : changes
from a slow to a rapidly flashing light,
release the hand-held remote control
button and the signal transmitter button.
XStep 6: Press and hold the just-trained
signal transmitter button (;, = or ?) and
observe indicator lamp :.
If indicator lamp : stays on constantly,
programming is complete and your device
should activate when the respective signal
transmitter button (;, = or ?) is pressed
and released.
iIf indicator lamp : flashes rapidly for
approximately 2 seconds and then turns to
a constant light, continue with
programming steps 8 through 12 as your
Useful features217Controls in detail204_AKB; 5; 23, en-USd2ureepe,Version: 2.11.8.12009-07-16T17:54:06+02:00 - Seite 217Z
Page 220 of 364
garage door opener may be equipped with
the “rolling code” feature.XStep 7: To program the remaining two
signal transmitter buttons, repeat the steps
above starting with step 3.
Rolling code programming
To train a garage door opener (or other rolling
code devices) with the rolling code feature,
follow these instructions after completing the
“Programming” portion (steps 1 through 6) of
this text. For your convenience and to
complete the procedure faster, you might
want to have someone assist you.
XStep 8: Locate the “training” button on the
garage door opener motor head unit.
i Exact location and color of the button may
vary by garage door opener brand.
Depending on manufacturer, the “training”
button may also be referred to as “learn” or
“smart” button. If there is difficulty locating
the transmitting button, refer to the garage
door opener Operator’s Manual.
XStep 9: Press the “training” button on the
garage door opener motor head unit.
The “training light” is activated.
You have 30 seconds to initiate the
following two steps.XStep 10: Return to the vehicle and firmly
press, hold for 2 seconds and release the
programmed signal transmitter button ( ;,
= or ?).XStep 11: Press, hold for 2 seconds and
release same signal transmitter button a
second time to complete the training
process.
i Some garage door openers (or other
rolling code equipped devices) may require
you to press, hold for 2 seconds and
release the same signal transmitter button
a third time to complete the training
process.
XStep 12: Confirm the garage door
operation by pressing the programmed
signal transmitter button ( ;, = or ?).XStep 13: To program the remaining two
signal transmitter buttons, repeat the steps
above starting with step 3.
Gate operator/Canadian programming
Canadian radio-frequency laws require
transmitter signals to “time-out” (or quit)
after several seconds of transmission which
may not be long enough for the integrated
signal transmitter to pick up the signal during
programming. Similar to this Canadian law,
some U.S. gate operators are designed to
“time-out” in the same manner.
If you live in Canada or if you are having
difficulties programming a gate operator
(regardless of where you live) by using the
programming procedures, replace step 4 with
the following:
XStep 4: Press and hold the signal
transmitter button ( ;, = or ?). Do not
release this button until it has been
successfully trained.XWhile still holding down the signal
transmitter button ( ;, = or ?), “cycle”
your hand-held remote control button B
as follows: Press and hold button B for
2 seconds, then release it for 2 seconds,
and again press and hold it for 2 seconds.
Repeat this sequence on the hand-held
remote control until the frequency signal
has been learned.
Upon successful training, indicator
lamp : will flash slowly and then rapidly
after several seconds.XProceed with programming step 5 and
step 6 to complete.
i Upon completion of programming the
integrated remote control, make sure you
retain the hand-held remote control that
came with the garage door opener, gate
operator or other device. You may need it
for use in other vehicles, for future
programming of an integrated remote
218Useful featuresControls in detail
204_AKB; 5; 23, en-USd2ureepe,Version: 2.11.8.12009-07-16T17:54:06+02:00 - Seite 218