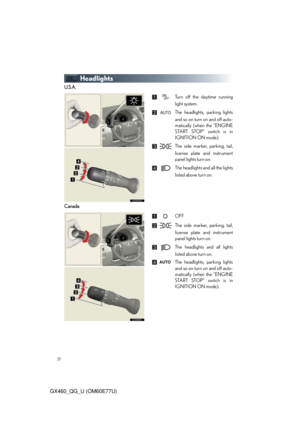
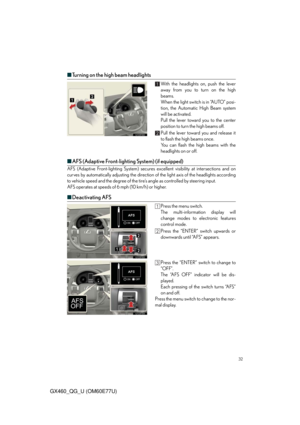
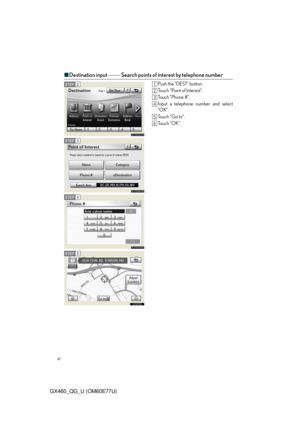
Page 49 of 94
49
GX460_QG_U (OM60E77U)
■Radio
Display the audio control screen
Station presets
Scanning radio stations
Radio tune
Station select
Seek
■Entering station presets
Select the desired station by using the tune, seek or scan function.
Touch one of the touch-screen buttons (1-6) you want and hold it until a beep is heard.
Page 50 of 94
50
GX460_QG_U (OM60E77U)
■DVD player/CD player
■
Playing an audio CD
Display the audio control screen
Disc select
Repeat play
Random playback
Search playback
Disc load
Track select/rewind/fast-forward
Eject
■Playing a CD with MP3/WMA files
Display the audio control screen
Disc select
Repeat play
Random playback
Search playback
Folder select
File select
Disc load
Eject
Page 51 of 94

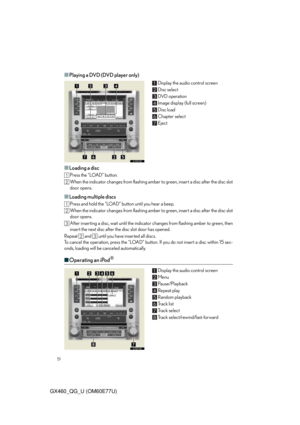
■Playing a DVD (DVD player only)
Display the audio control screen
Disc select
DVD operation
Image display (full screen)
Disc load
Chapter select
Eject
■Loading a disc
Pres")
51
GX460_QG_U (OM60E77U)
■Playing a DVD (DVD player only)
Display the audio control screen
Disc select
DVD operation
Image display (full screen)
Disc load
Chapter select
Eject
■Loading a disc
Press the “LOAD” button.
When the indicator changes from flashing amber to green, insert a disc after the disc slot
door opens.
■Loading multiple discs
Press and hold the “LOAD” button until you hear a beep.
When the indicator changes from flashing amber to green, insert a disc after the disc slot
door opens.
After inserting a disc, wait until the indicator changes from flashing amber to green, then
insert the next disc after the disc slot door has opened.
Repeat and until you have inserted all discs.
To cancel the operation, press the “LOAD” button. If you do not insert a disc within 15 sec-
onds, loading will be canceled automatically.
■Operating an iPod®
Display the audio control screen
Menu
Pause/Playback
Repeat play
Random playback
Track list
Track select
Track select/rewind/fast-forward
Page 52 of 94
52
GX460_QG_U (OM60E77U)
■Remote control (steering wheel switches)
The audio system can be operated using the remote control located on the steering wheel.
Vo l u m e
Radio mode: radio tuner
DVD mode: track/chapter/disc select
CD mode: disc/track/file (MP3/
WMA) select
iPod
mode (if equipped): track select
Power on/change mode: press
Power off: press and hold
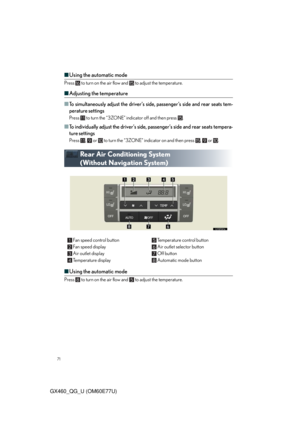
Rear Seat Entertainment System
(If Equipped)
The rear seat entertainment system is designed for the rear passengers to enjoy audio
and DVD video.
Front audio system
Displays
Rear seat entertainment system controller
A/V input adapter
Headphone volume control dials and headphone jacks
Page 53 of 94
53
GX460_QG_U (OM60E77U)
■Headphone jacks
To listen to the rear audio, use headphones.
Headphone jacks
Volume: Turn the knob clockwise to
increase.
Turn the knob counterclockwise
to decrease.
■Changing the source
Turning on the audio source selection
screen
Inputting the selected icon
Selecting an icon
Push “SOURCE” to display the audio
source selection screen.
■Radio
Selecting a preset station
Tu r n i n g t h e s t a t i o n
Select radio mode on the source screen to
display the control screen.
Page 54 of 94
54
GX460_QG_U (OM60E77U)
■DVD changer
Turning on DVD changer mode
Selecting a disc
Push “” or “” of “DISC•CH” until the
desired disc number appears on the screen.
■CD player
Push “” or “” of “TUNE” until the desired
track number appears on the screen.
Page 55 of 94
55
GX460_QG_U (OM60E77U)
■WMA/MP3 discs
Selecting a file
Selecting a folder
■Selecting a file
Push “” or “” of “TUNE” until the desired file number appears on the screen.
■Selecting a folder
Push “” or “” of “FOLDER” until the desired folder number appears on the screen.
Page 56 of 94
56
GX460_QG_U (OM60E77U)
■DVD video/audio
Turning on the DVD mode
Inputting the selected icon
Selecting an icon
Turning on the menu screen
Playing/pausing a disc
Fast forwarding a disc
Turning on the control icon screen
Push to select a chapter/track
Push and hold to fast forwarding or
rewinding a chapter/track
Turning on the title selection screen
Rewinding a disc
■Video mode
Press “VIDEO” to select the video mode.
Before switching to the video mode, connect the audio-video equipment to the A/V input
adapter.


■Radio
Display the audio control screen
Station presets
Scanning radio stations
Radio tune
Station select
Seek
■Entering station presets
Select the desired station by usin")

■DVD player/CD player
■
Playing an audio CD
Display the audio control screen
Disc select
Repeat play
Random playback
Search playback
Disc load
Track select/rewind/fast-for")

■Remote control (steering wheel switches)
The audio system can be operated using the remote control located on the steering wheel.
Vo l u m e
Radio mode: radio tuner
DVD mod")

■Headphone jacks
To listen to the rear audio, use headphones.
Headphone jacks
Volume: Turn the knob clockwise to
increase.
Turn the knob counterclockwise
to decrease.
■Cha")

■DVD changer
Turning on DVD changer mode
Selecting a disc
Push “” or “” of “DISC•CH” until the
desired disc number appears on the screen.
■CD player
Pu")

■WMA/MP3 discs
Selecting a file
Selecting a folder
■Selecting a file
Push “” or “” of “TUNE” until the desired file number appears on the screen.
■Sele")

■DVD video/audio
Turning on the DVD mode
Inputting the selected icon
Selecting an icon
Turning on the menu screen
Playing/pausing a disc
Fast forwarding a disc
Turning on th")