Page 9 of 428
8
7 Audio/video System
Quick reference184
..........................................
Using your audio/video system 187
...........................
Some basics 187 ..........................................
Radio operation 196 .......................................
Radio operation (XM rSatellite Radio broadcast) 200 ...........
CD changer operation 206 ..................................
DVD changer operation 220 .................................
Bluetooth raudio operation 245 .............................
USB memory/iPod roperation 253 ...........................
Audio/video remote controls (steering switches) 261 ..............
Rear seat entertainment system features 263
..................
Using the radio 269 ........................................
Using the DVD changer 270 ................................
Playing an audio CD/CD text 270 ............................
Playing MP3/WMA discs 271 ................................
Playing DVD video/audio 271 ...............................
Using the video mode 284 ..................................
Changing other settings 285 ................................
Audio/video system operating hints 287 .........................
8 Air Conditioning
Automatic air conditioning controls 296
.........................
9 Wide View Front & Side Monitor
Wide view front & side monitor 314
.............................
10 Intuitive Parking Assist
Intuitive parking assist 322
....................................
GX460 Navi (U)
OM60E73U
09.09.24
Page 32 of 428
NAVIGATION SYSTEM: BASIC FUNCTIONS
31
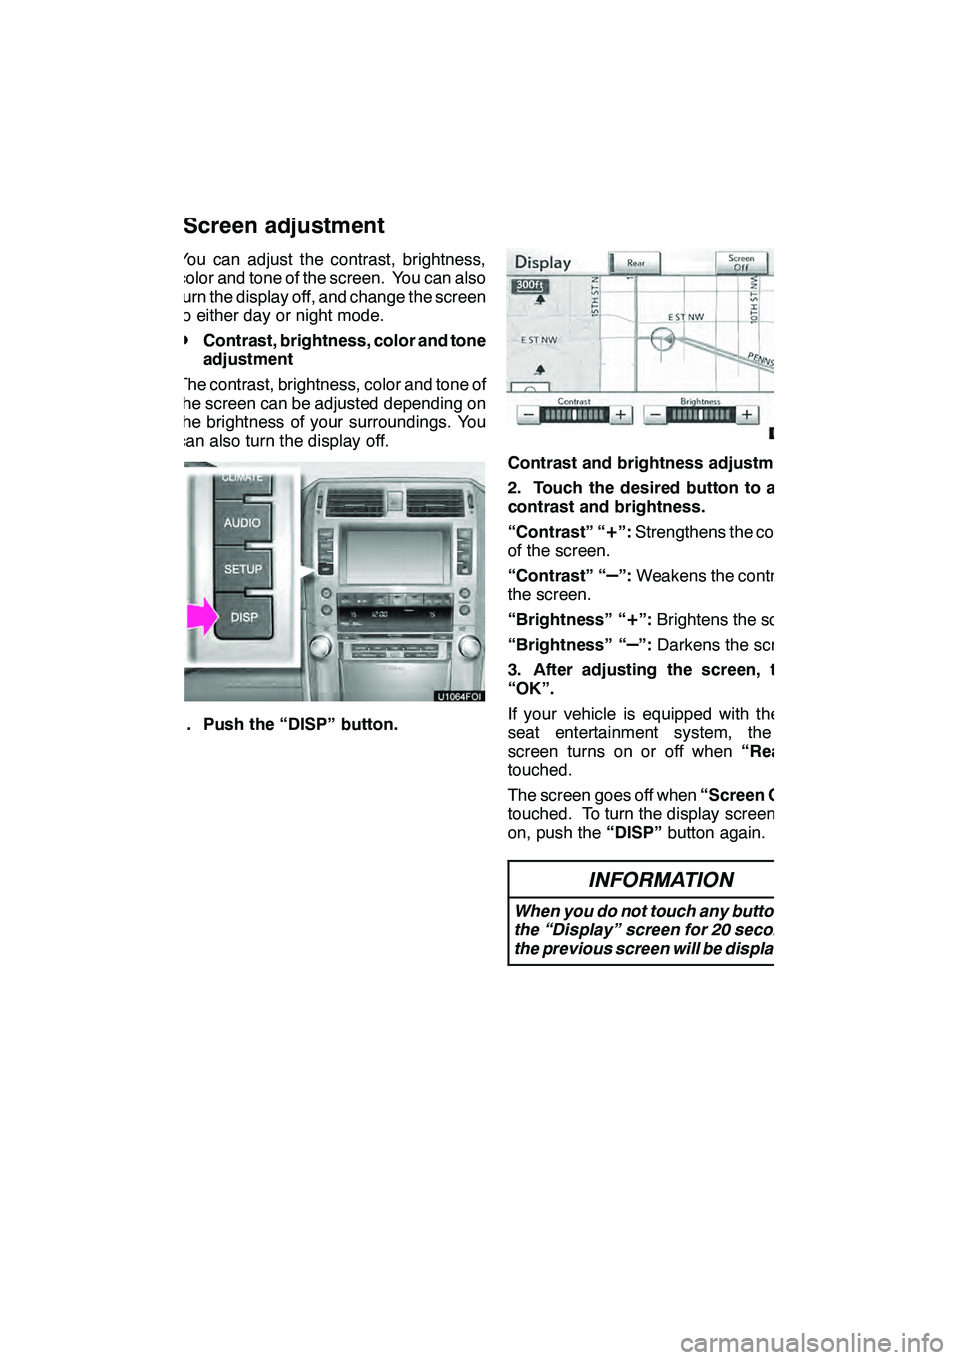
You can adjust the contrast, brightness,
color and tone of the screen. You can also
turn the display off, and change the screen
to either day or night mode.
DContrast, brightness, color and tone
adjustment
The contrast, brightness, color and tone of
the screen can be adjusted depending on
the brightness of your surroundings. You
can also turn the display off.
1. Push the “DISP” button.
Contrast and brightness adjustment
2. Touch the desired button to adjust
contrast and brightness.
“Contrast” “
+”: Strengthens the contrast
of the screen.
“Contrast” “
–”: Weakens the contrast of
the screen.
“Brightness” “
+”: Brightens the screen.
“Brightness” “
–”: Darkens the screen.
3. After adjusting the screen, touch
“OK”.
If your vehicle is equipped with the rear
seat entertainment system, the rear
screen turns on or off when “Rear”is
touched.
The screen goes off when “Screen Off”is
touched. To turn the display screen back
on, push the “DISP”button again.
INFORMATION
When you do not touch any button on
the “Display” screen for 20 seconds,
the previous screen will be displayed.
GX460 Navi (U)
OM60E73U
Finish
09.09.24
Screen adjustment
1
Page 33 of 428
NAVIGATION SYSTEM: BASIC FUNCTIONS
32
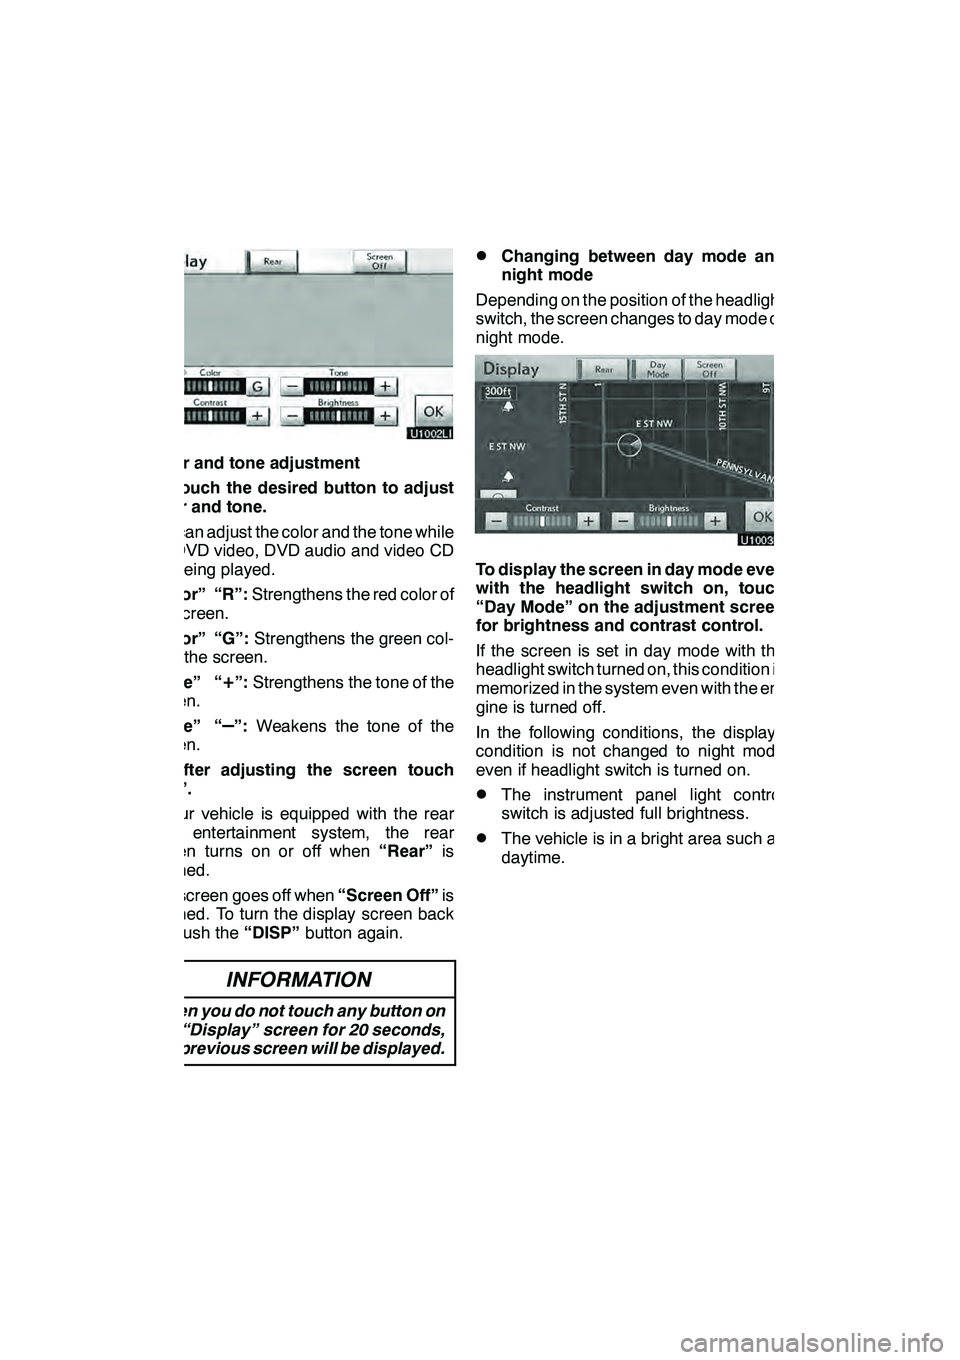
Color and tone adjustment
1. Touch the desired button to adjust
color and tone.
You can adjust the color and the tone while
the DVD video, DVD audio and video CD
are being played.
“Color” “R”:Strengthens the red color of
the screen.
“Color” “G”: Strengthens the green col-
or of the screen.
“Tone” “
+”: Strengthens the tone of the
screen.
“Tone” “
–”: Weakens the tone of the
screen.
2. After adjusting the screen touch
“OK”.
If your vehicle is equipped with the rear
seat entertainment system, the rear
screen turns on or off when “Rear”is
touched.
The screen goes off when “Screen Off”is
touched. To turn the display screen back
on, push the “DISP”button again.
INFORMATION
When you do not touch any button on
the “Display” screen for 20 seconds,
the previous screen will be displayed.
DChanging between day mode and
night mode
Depending on the position of the headlight
switch, the screen changes to day mode or
night mode.
To display the screen in day mode even
with the headlight switch on, touch
“Day Mode” on the adjustment screen
for brightness and contrast control.
If the screen is set in day mode with the
headlight switch turned on, this condition is
memorized in the system even with the en-
gine is turned off.
In the following conditions, the displays
condition is not changed to night mode
even if headlight switch is turned on.
DThe instrument panel light control
switch is adjusted full brightness.
DThe vehicle is in a bright area such as
daytime.
GX460 Navi (U)
OM60E73U
Finish
09.09.24
Page 184 of 428
SECTION7
AUDIO/VIDEO SYSTEM
183
AUDIO/VIDEO SYSTEM
DQuick reference 184 .......................................
D Using your audio/video system 187
........................
Some basics 187 .......................................
Radio operation 196 .....................................
Radio operation (XMr Satellite Radio broadcast) 200 .........
CD changer operation 206 ...............................
DVD changer operation 220 ..............................
Bluetooth raudio operation 245 ...........................
USB memory/iPod roperation 253 .........................
D Audio/video remote controls (steering switches) 261 ............
D Rear seat entertainment system features 263
...............
Using the radio 269 ......................................
Using the DVD changer 270 ..............................
Playing an audio CD/CD text 270 ..........................
Playing MP3/WMA discs 271 .............................
Playing DVD video/audio 271 .............................
Using the video mode 284 ................................
Changing other settings 285 ..............................
D Audio/video system operating hints 287 ......................
GX460 Navi (U)
OM60E73U
Finish
09.09.24
7
Page 264 of 428
AUDIO/VIDEO SYSTEM
263
The rear seat entertainment system is designed for the rear passengers to enjoy audio
and DVD video.
1Front audio system
2Displays
3Rear seat entertainment system con-
troller
4A/V input adapter
5Headphone volume control dials and
headphone jacks
GX460 Navi (U)
OM60E73U
Finish
09.09.24Rear seat entertainment system features (if equipped) —
7
Page 265 of 428
AUDIO/VIDEO SYSTEM
264
The rear seat entertainment system can
be used when the “ENGINE START
STOP” switch is in ACCESSORY or IGNI-
TION ON mode.
DDisplays
A display is installed in the back of each
front seat. When audio−video equipment
is connected to the A/V input adapter, rear
passengers can enjoy different audio
sources on each display. See “—Using the
video mode” on page 284.
DRear seat entertainment system
controller
Use the controller to operate both the left
and right side displays. Some controller
buttons are shared between the left and
right side displays. When operating those
buttons, first select the desired display us-
ing the select display switch.
To operate, aim the controller at the de-
sired display.
1Controller buttons for the left side dis-
play
2Controller buttons for the right side
display
3Turns display off
4Selects the display to be operated
(for some controller buttons only)
GX460 Navi (U)
OM60E73U
Finish
09.09.24
Page 267 of 428
AUDIO/VIDEO SYSTEM
266
If the batteries are discharged, the fol-
lowing symptoms may occur.
DThe rear seat entertainment system
controller will not function properly.
DThe operational range is reduced.
When using 3 AA batteries
DBatteries can be purchased at your
Lexus dealer, electric appliance shop,
or camera stores.
DReplace only with the same or equiva-
lent type recommended by a Lexus
dealer.
DDispose of used batteries according to
the local laws.
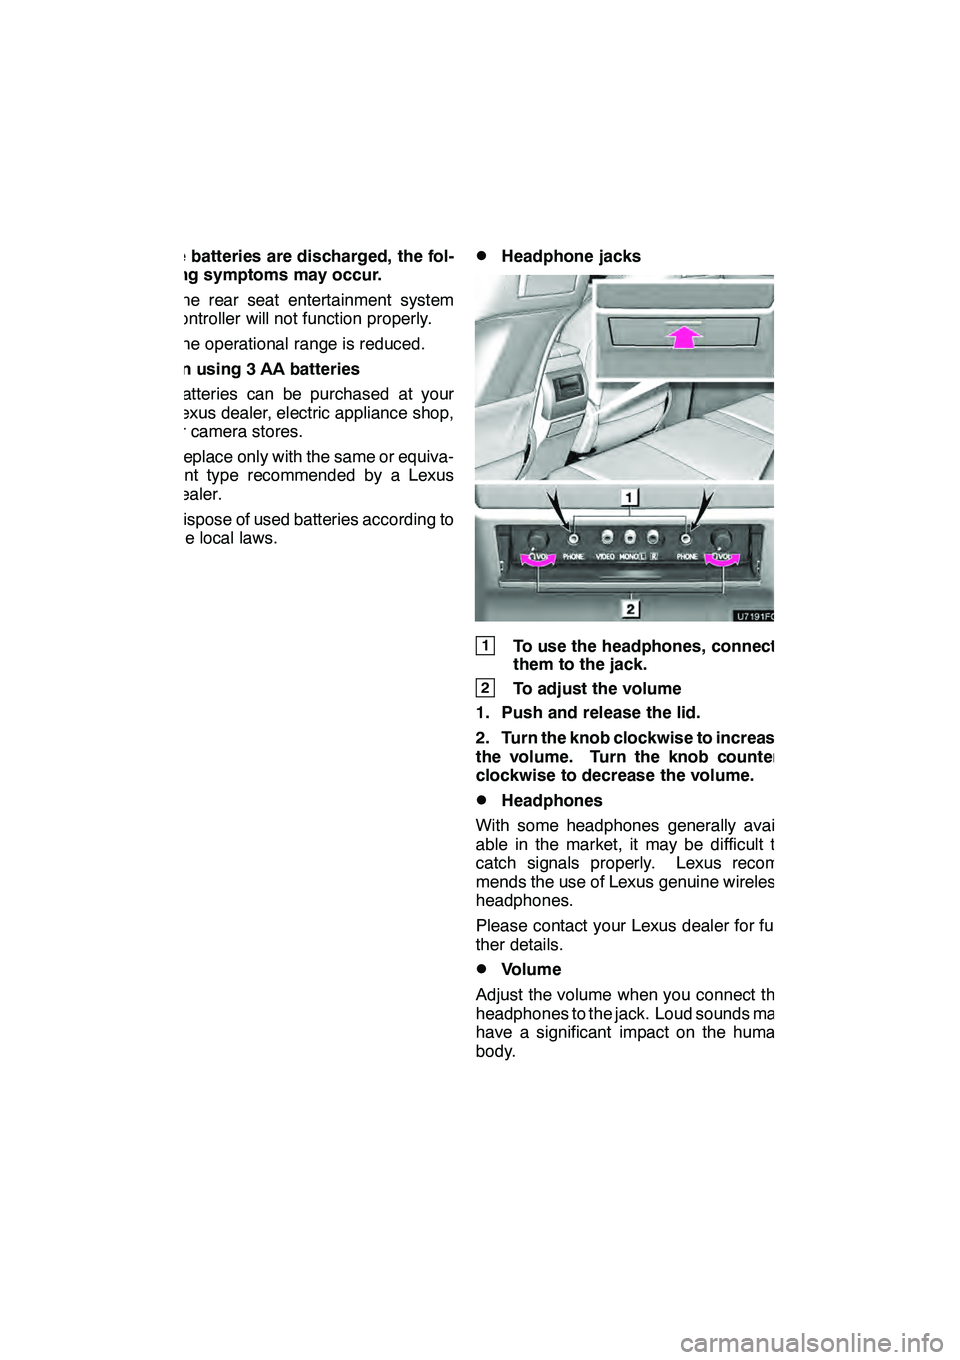
DHeadphone jacks
1To use the headphones, connect
them to the jack.
2To adjust the volume
1. Push and release the lid.
2. Turn the knob clockwise to increase
the volume. Turn the knob counter-
clockwise to decrease the volume.
DHeadphones
With some headphones generally avail-
able in the market, it may be difficult to
catch signals properly. Lexus recom-
mends the use of Lexus genuine wireless
headphones.
Please contact your Lexus dealer for fur-
ther details.
DVolume
Adjust the volume when you connect the
headphones to the jack. Loud sounds may
have a significant impact on the human
body.
GX460 Navi (U)
OM60E73U
Finish
09.09.24
Page 270 of 428
AUDIO/VIDEO SYSTEM
269
NOTICE
DCleaning the displayWipe the display with a dry soft
cloth.
If the screen is wiped with a rough
cloth, the surface of the screen
may be scratched.
DTo prevent damage to the remote
controlKeep the remote control away from
direct sunlight, temperature heat
and high humidity.
Do not drop or knock the remote
control against hard objects.
Do not sit on or place heavy ob-
jects on the remote control.
DFor normal operation after replac-
ing the battery, observe the follow-
ing precautions to prevent acci-
dents:
DAlways work with dry hands.
Moisture may cause the battery
to rust.
DDo not touch or move any other
components inside the remote
control.
DDo not bend either of the battery
terminals.
INFORMATION
Rear seat entertainment system can
be locked to prevent rear passengers
from operating the entertainment
system. (See “ DRear system lock”
on page 332.)
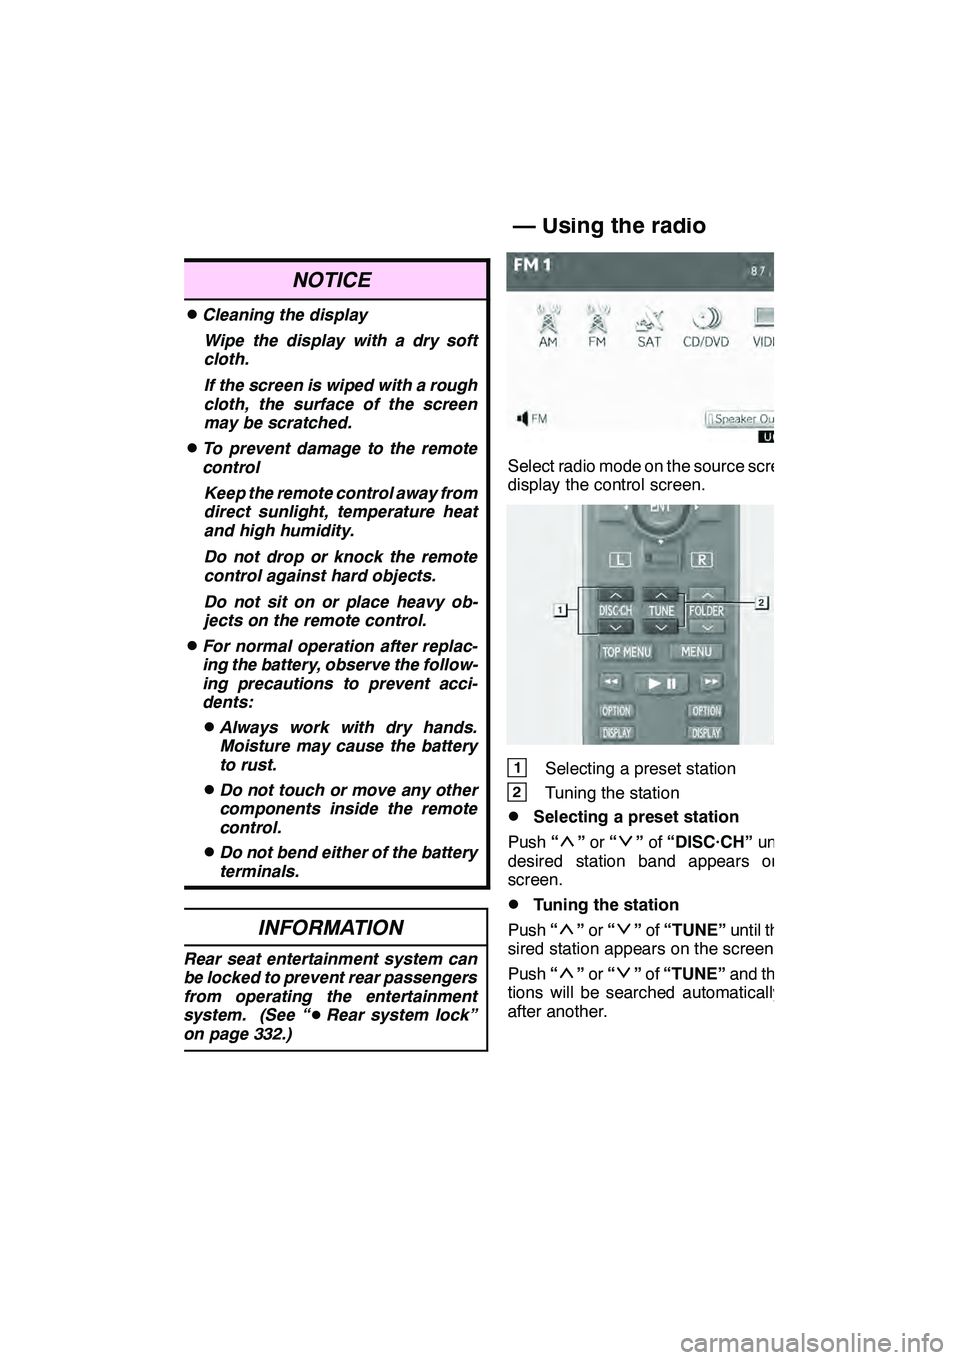
Select radio mode on the source screen to
display the control screen.
1Selecting a preset station
2Tuning the station
DSelecting a preset station
Push “
”or “”of “DISC·CH” until the
desired station band appears on the
screen.
DTuning the station
Push “
”or “”of “TUNE” until the de-
sired station appears on the screen.
Push “
”or “”of “TUNE” and the sta-
tions will be searched automatically one
after another.
GX460 Navi (U)
OM60E73U
Finish
09.09.24
— Using the radio
7