Page 261 of 371
529
Driving tips
1
2
3
4
5
6
7
8
9
Driving in mud, sand, snow, or
ice
When you drive in mud, sand, snow,
or ice, your wheels won’t get good
traction. You can’t accelerate as
quickly, turning is more difficult, and
you’ll need longer braking distances.
It’s best to use a low gear when
you’re in mud, the deeper the mud,
the lower the gear. In extremely deep
mud, the idea is to keep your vehicle
moving so you don’t get stuck.
When you drive on sand, you’ll
sense a change in wheel traction.
But it will depend upon how loosely
packed the sand is. On loosely
packed sand (as on beaches or sand
dunes) your tires will tend to sink into
the sand. This has an effect on steer-
ing, accelerating, and braking. You
may want to reduce the air pressure
in your tires slightly when driving on
sand. This will improve traction.
Remember to re-inflate them the first
chance that you have after you leave
the loosely packed sand.
✽ ✽NOTICE
• In case of loss of traction in mud,
loose soil, or sand, turn the steer-
ing wheel rapidly from side-to-
side. This can help generate addi-
tional traction.
• Do not gun the engine. This will cause the tires to spin and dig
down, not forward, and could
bury the vehicle to the frame.
Smooth, easy power is better than
too much power.WARNING- Exiting vehi-
cle
Getting out on the downhill
(low) side of a vehicle stopped
across an incline is dangerous.
If the vehicle rolls over, you
could be crushed or fatally
injured. Always get out on the
uphill (high) side of the vehicle
and stay well clear of the
rollover path.
Page 273 of 371
541
Driving tips
1
2
3
4
5
6
7
8
9
VEHICLE LOAD LIMIT
Tire and loading information
label
The tire label located on the driver's
door sill gives the original tire size,
cold tire pressures recommended for
your vehicle, the number of people
that can be in your vehicle and vehi-
cle capacity weight.
Steps for determining correct
load limit
1. Locate the statement "The com-bined weight of occupants and
cargo should never exceed XXX
kg or XXX lbs.'' on your vehicle's
placard.
2. Determine the combined weight of the driver and passengers that will
be riding in your vehicle.
3. Subtract the combined weight of the driver and passengers from
XXX kg or XXX lbs.
4. The resulting figure equals the available amount of cargo and lug-
gage load capacity. For example, if
the "XXX" amount equals 635 kg
(1400 lbs), and there will be five
68 kg (150 lbs) passengers in your
vehicle, the amount of available
cargo and luggage load capacity
is 295 kg (650 lbs).
635-340 (5 x 68) = 650 kg) or
(1400-750 (5 x 150) = 295 lbs. 5. Determine the combined weight of
luggage and cargo being loaded
on the vehicle. That weight may
not safely exceed the available
cargo and luggage load capacity
calculated in Step 4.
6. If your vehicle will be towing a trail- er, load from your trailer will be
transferred to your vehicle. Consult
this manual to determine how this
reduces the available cargo and
luggage load capacity of your
vehicle.
OKM050300L
Page 275 of 371
543
Driving tips
1
2
3
4
5
6
7
8
9
Refer to your vehicle's tire and load-
ing information label for specific
information about your vehicle's
capacity weight and seating posi-
tions. The combined weight of the
driver, passengers and cargo should
never exceed your vehicle's capacity
weight.Compliance label
The compliance label is located on
the driver's door sill.
The label shows the size of your orig-
inal tires and the inflation pressures
needed to obtain the gross weight
capacity of your vehicle. This is
called the GVWR (Gross Vehicle
Weight Rating). The GVWR includes
the weight of the vehicle, all occu-
pants, fuel and cargo.
This label also tells you the maxi-
mum weights that can be supported
by the front and rear axles, called
Gross Axle Weight Rating (GAWR).
To find out the actual loads on your
front and rear axles, you need to go
to a weigh station and weigh your
vehicle. Your dealer can help you with
this. Be sure to spread out your load
equally on both sides of the center-
line.WARNING - Over loading
Never exceed the GVWR for your vehicle, or the GAWR for
either the front or rear axle.
Do not load your vehicle any heavier than the GVWR, or
either the maximum front or
rear GAWR. If you do, parts on
your vehicle can break, and it
can change the way your vehi-
cle handles. This could cause
you to lose control and crash.
Also, overloading can shorten
the life of your vehicle.
Page 284 of 371
Driving tips
52
5
1
2
3
4
5
6
7
8
9
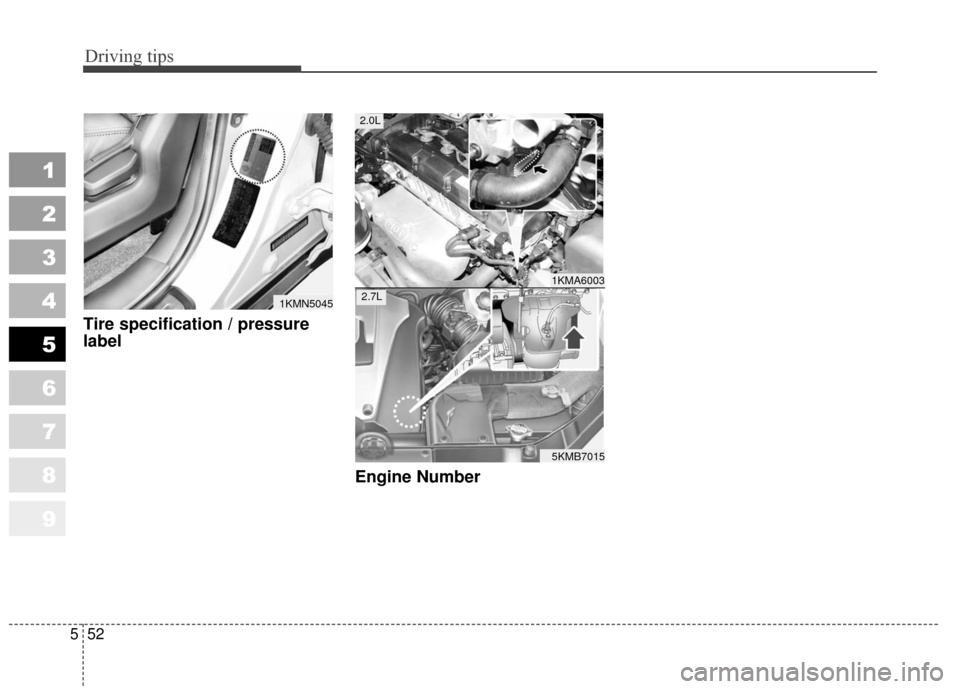
Tire specification / pressure
label
Engine Number
1KMN5045
1KMA6003
5KMB7015
2.0L
2.7L
Page 287 of 371

63
In case of an emergency
2. When the car is stopped, turn onyour emergency hazard flashers,
set the parking brake and put the
transaxle in P (automatic transaxle)
or reverse (manual transaxle).
3. Have all passengers get out of the car. Be sure they all get out on the
side of the car that is away from traf-
fic.
4. When changing a flat tire, follow the instruction provided later in
this section.
If engine stalls while driving
1. Reduce your speed gradually,keeping a straight line. Move cau-
tiously off the road to a safe place.
2. Turn on your emergency flashers.
3. Try to start the engine again. If your vehicle will not start, contact
an authorised Kia dealer or seek
other qualified assistance. If your temperature gauge indicates
overheating, if you experience a loss
of power, or if you hear a loud knock-
ing or pinging noise, the engine has
probably overheated. Should any of
these symptoms occur, use the fol-
lowing procedure:
1. Turn on the hazard warning flash-
er, then drive to the nearest safe
location and stop your vehicle; set
the automatic transaxle in P
(Park), or shift the manual
transaxle to N (Neutral) and apply
the parking brake.
2. Make sure the air conditioner is off.
3. If coolant or steam is boiling out of the radiator, stop the engine and
call an Authorized Kia Dealer for
assistance.
If coolant is not boiling out, allow
the engine to idle and open the
hood to permit the engine to cool
gradually.
If the temperature does not go
down with the engine idling, stop
the engine and allow sufficient
time for it to cool. 4. The coolant level should then be
checked. If the level in the reser-
voir is low, look for leaks at the
radiator hoses and connections,
heater hoses and connections,
radiator, and water pump. If you
find a major leak or another prob-
lem that may have caused the
engine to overheat, do not operate
the engine until it has been cor-
rected. Call an Authorized Kia
Dealer for assistance. If you do not
find a leak or other problem, care-
fully add coolant to the reservoir.
If the engine frequently overheats,have the cooling system checkedand repaired by an Authorized KiaDealer.
1
2
3
4
5
6
7
8
9
WARNING- Removing
radiator cap
Do not remove the radiator cap
when the engine and radiator
are hot. Scalding hot coolant
and steam may blow out under
pressure. This could cause seri-
ous injury.
OVERHEATING
Page 304 of 371
In case of an emergency
20
6
The compact spare should be inflat-
ed to 420 kPa (60 psi).
✽ ✽
NOTICE
Check the inflation pressure after
installing the spare tire. Adjust it to
the specified pressure, as necessary.
When using a compact spare tire,
observe the following precautions:
Under no circumstances should
you exceed 80 km/h (50 mph); a
higher speed could damage the
tire.
Ensure that you drive slowly enough for the road conditions to
avoid all hazards. Any road hazard,
such as a pothole or debris, could
seriously damage the compact
spare.
Any continuous road use of this tire could result in tire failure, loss of
vehicle control, and possible per-
sonal injury.
Do not exceed the vehicle’s maxi- mum load rating or the load-carry-
ing capacity shown on the sidewall
of the compact spare tire.
Avoid driving over obstacles. The compact spare tire diameter is
smaller than the diameter of a con-
ventional tire and reduces the
ground clearance approximately
25 mm (1 inch), which could result
in damage to the vehicle. Do not take this vehicle through an
automatic car wash.
This tire should not be installed on the front axle if the vehicle must be
driven in snow or on ice.
Do not use the compact spare tire on any other vehicle because this
tire has been designed especially
for your vehicle.
The compact spare tire’s tread life is shorter than a regular tire.
Inspect your compact spare tire
regularly and replace worn com-
pact spare tires with the same size
and design, mounted on the same
wheel.
1
2
3
4
5
6
7
8
9
CAUTION
This spare tire should be usedonly for VERY short distances.Compact spares should NEVERbe used for long drives orextended distances.
Page 309 of 371
625
In case of an emergency
1
2
3
4
5
6
7
8
9
To prevent the jack, jack handle,
wheel lug nut wrench and spare tire
from rattling while the vehicle is in
motion, store them properly.
WARNING- Wheel studs
If the studs are damaged, they
may lose their ability to retain
the wheel. This could lead to the
loss of the wheel and a collision
resulting in serious injuries.
WARNING - Inadequate
spare tire pressure
Check the inflation pressures as
soon as possible after installing
the spare tire. Adjust it to the
specified pressure, if necessary.
Refer to Section 8, Specifications.
Page 315 of 371
Maintenance
67
1
2
3
4
5
6
7
8
9
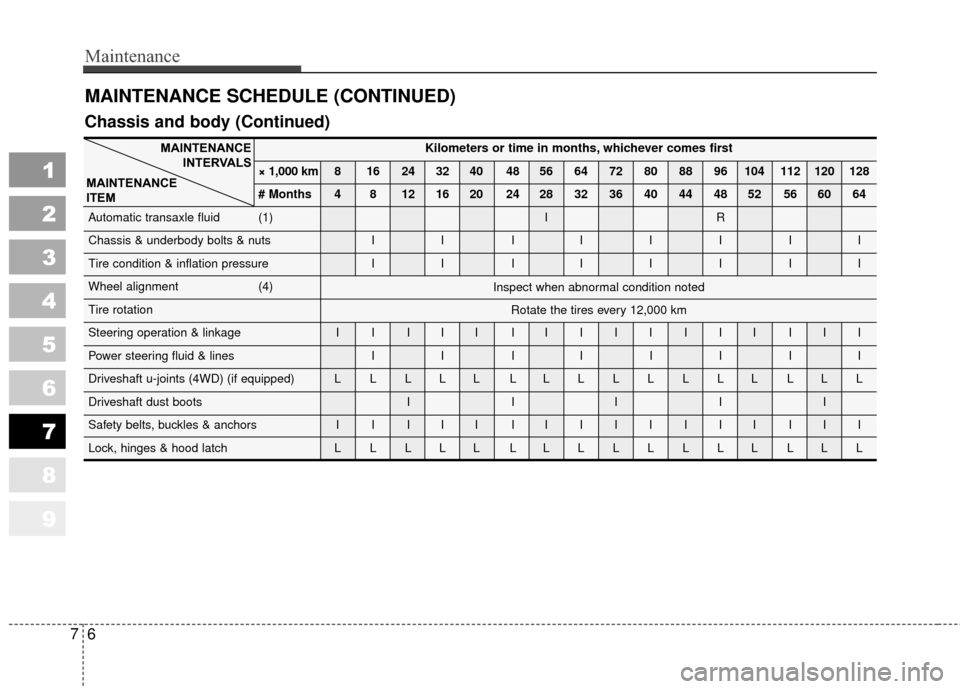
MAINTENANCE SCHEDULE (CONTINUED)
Kilometers or time in months, whichever comes first
× 1,000 km 8 16 24 32 40 48 56 64 72 80 88 96 104 112 120 128
# Months 4 8 12 16 20 24 28 32 36 40 44 48 52 56 60 64
Automatic transaxle fluid (1) I R
Chassis & underbody bolts & nuts I I I I I I IIIIIII III
Tire condition & inflation pressure I I I I I I IIIIIII III
Wheel alignment (4)
Tire rotation
Steering operation & linkage I I I I I I IIIIIII III
Power steering fluid & lines I I I IIIII
Driveshaft u-joints (4WD) (if equipped) L L L L L L LLLLLLL LLL
Driveshaft dust boots I I I I I
Safety belts, buckles & anchors I I I I I I IIIIIII III
Lock, hinges & hood latch L L L L L L LLLLLLL LLL
MAINTENANCE
INTERVALS
MAINTENANCE
ITEM
Inspect when abnormal condition noted
Rotate the tires every 12,000 km
Chassis and body (Continued)