Page 295 of 371
611
In case of an emergency
1
2
3
4
5
6
7
8
9
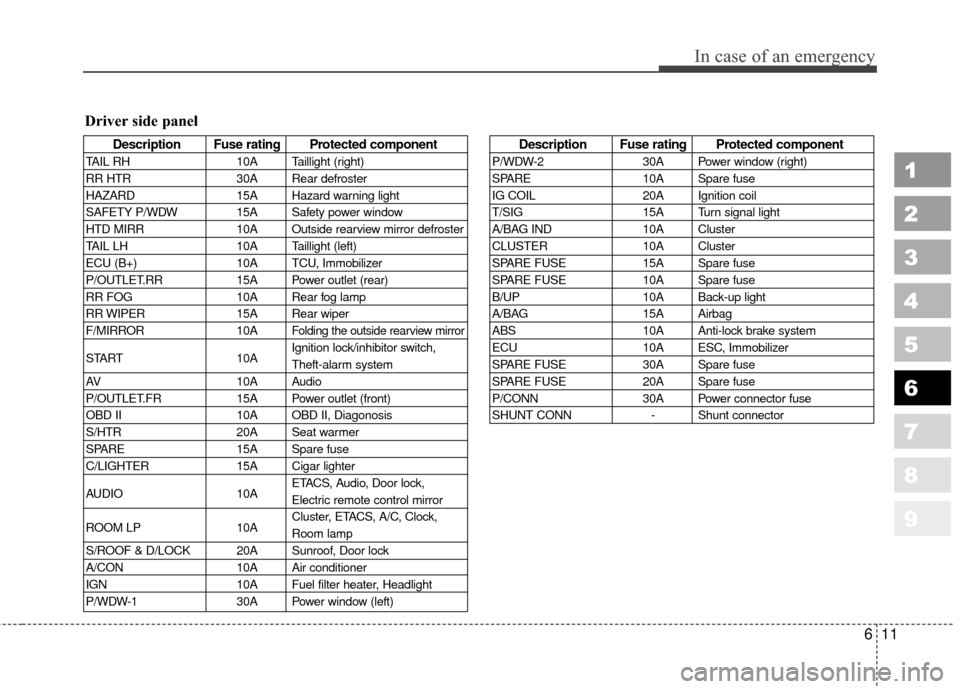
Description Fuse rating Protected component
TAIL RH10A Taillight (right)
RR HTR 30A Rear defroster
HAZARD 15A Hazard warning light
SAFETY P/WDW 15A Safety power window
HTD MIRR 10A Outside rearview mirror defroster
TAIL LH 10A Taillight (left)
ECU (B+) 10A TCU, Immobilizer
P/OUTLET.RR 15A Power outlet (rear)
RR FOG 10A Rear fog lamp
RR WIPER 15A Rear wiper
F/MIRROR 10A
Folding the outside rearview mirror
START10AIgnition lock/inhibitor switch,
Theft-alarm system
AV 10A Audio
P/OUTLET.FR 15A Power outlet (front)
OBD II 10A OBD II, Diagonosis
S/HTR 20A Seat warmer
SPARE 15A Spare fuse
C/LIGHTER 15A Cigar lighter
AUDIO 10AETACS, Audio, Door lock,
Electric remote control mirror
ROOM LP 10ACluster, ETACS, A/C, Clock,
Room lamp
S/ROOF & D/LOCK 20A Sunroof, Door lock
A/CON 10A Air conditioner
IGN 10A Fuel filter heater, Headlight
P/WDW-1 30A Power window (left)
Description Fuse rating Protected component
P/WDW-230A Power window (right)
SPARE 10A Spare fuse
IG COIL 20A Ignition coil
T/SIG 15A Turn signal light
A/BAG IND 10A Cluster
CLUSTER 10A Cluster
SPARE FUSE 15A Spare fuse
SPARE FUSE 10A Spare fuse
B/UP 10A Back-up light
A/BAG 15A Airbag
ABS 10A Anti-lock brake system
ECU 10A ESC, Immobilizer
SPARE FUSE 30A Spare fuse
SPARE FUSE 20A Spare fuse
P/CONN 30A Power connector fuse
SHUNT CONN - Shunt connector
Driver side panel
Page 296 of 371
In case of an emergency
12
6
1
2
3
4
5
6
7
8
9
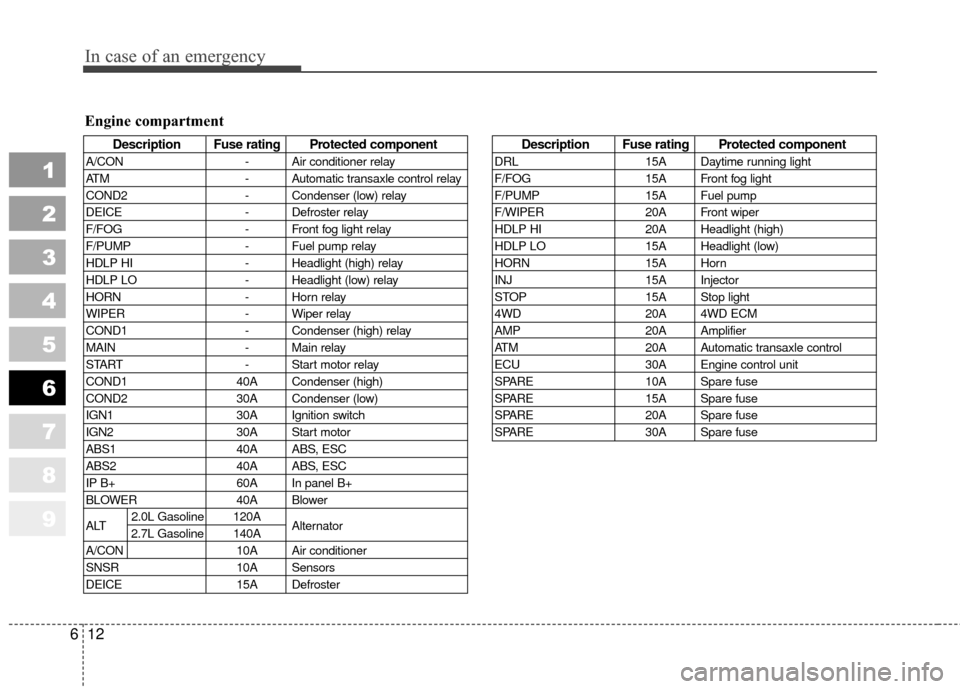
Engine compartment
Description Fuse rating Protected component
A/CON - Air conditioner relay
ATM - Automatic transaxle control relay
COND2 - Condenser (low) relay
DEICE - Defroster relay
F/FOG - Front fog light relay
F/PUMP - Fuel pump relay
HDLP HI - Headlight (high) relay
HDLP LO - Headlight (low) relay
HORN - Horn relay
WIPER - Wiper relay
COND1 - Condenser (high) relay
MAIN - Main relay
START - Start motor relay
COND1 40A Condenser (high)
COND2 30A Condenser (low)
IGN1 30A Ignition switch
IGN2 30A Start motor
ABS1 40A ABS, ESC
ABS2 40A ABS, ESC
IP B+ 60A In panel B+
BLOWER 40A Blower
ALT 2.0L Gasoline 120A
Alternator
2.7L Gasoline 140A
A/CON 10A Air conditioner
SNSR 10A Sensors
DEICE 15A Defroster
Description Fuse rating Protected component
DRL15A Daytime running light
F/FOG 15A Front fog light
F/PUMP 15A Fuel pump
F/WIPER 20A Front wiper
HDLP HI 20A Headlight (high)
HDLP LO 15A Headlight (low)
HORN 15A Horn
INJ 15A Injector
STOP 15A Stop light
4WD 20A 4WD ECM
AMP 20A Amplifier
ATM 20A Automatic transaxle control
ECU 30A Engine control unit
SPARE 10A Spare fuse
SPARE 15A Spare fuse
SPARE 20A Spare fuse
SPARE 30A Spare fuse
Page 314 of 371
75
Maintenance
1
2
3
4
5
6
7
8
9
MAINTENANCE SCHEDULE (CONTINUED)
Kilometers or time in months, whichever comes first
× 1,000 km 8 16 24 32 40 48 56 64 72 80 88 96 104 112 120 128
# Months 4 8 12 16 20 24 28 32 36 40 44 48 52 56 60 64
Air conditioner compressor operation & IIIII
refrigerant amount (if equipped)
Exhaust pipes, heat shield & mountings I I IIIIII
Transfer case fluid (4WD) I R
Rear differential fluid (4WD) I R
Front suspension ball joints I I I I
Brakes/clutch fluid (1) I I I I I I I R IIIII IIR
Front brake pads & discs (3) I I I I I I IIIIIII III
Rear brake pads & discs/drums (3) I I I I I I IIIIIII III
Parking brake I I I IIIII
Brake lines & connections IIIII
(including booster)
Manual transaxle oil (1) I R
Clutch & brake pedal free play I I I I I I IIIIIII III
MAINTENANCE
INTERVALS
MAINTENANCE
ITEM
Chassis and body
Page 320 of 371
711
Maintenance
Steering gear box, linkage &
boots/lower arm ball joint
With the vehicle stopped and engine
off, check for excessive free-play in
the steering wheel.
Check the linkage for bends or dam-
age. Check the dust boots and ball
joints for deterioration, cracks, or
damage. Replace any damaged
parts.
Power steering pump, belt and
hoses
Check the power steering pump and
hoses for leakage and damage.
Replace any damaged or leaking
parts immediately. Inspect the power
steering belt for evidence of cuts,
cracks, excessive wear, oiliness and
proper tension. Replace or adjust it if
necessary.
Drive shafts and boots
Check the drive shafts, boots and
clamps for cracks, deterioration, or
damage. Replace any damaged
parts and, if necessary, repack the
grease.
Air conditioning refrigerant
(if equipped)
Check the air conditioning lines and
connections for leakage and dam-
age.
1
2
3
4
5
6
7
8
9
Page 321 of 371
Maintenance
12
7
1
2
3
4
5
6
7
8
9
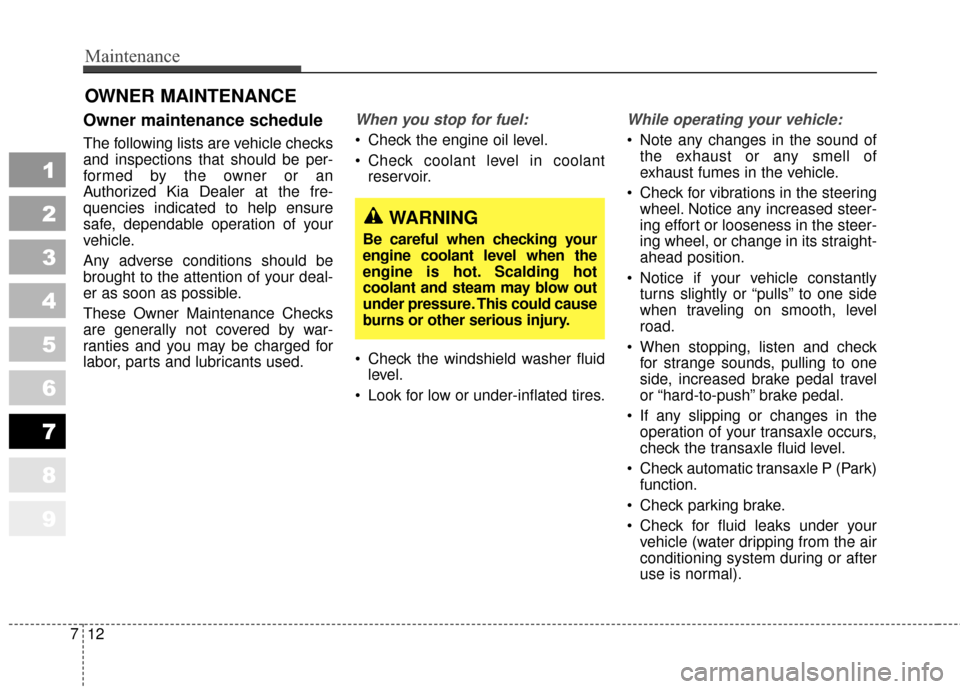
OWNER MAINTENANCE
Owner maintenance schedule
The following lists are vehicle checks
and inspections that should be per-
formed by the owner or an
Authorized Kia Dealer at the fre-
quencies indicated to help ensure
safe, dependable operation of your
vehicle.
Any adverse conditions should be
brought to the attention of your deal-
er as soon as possible.
These Owner Maintenance Checks
are generally not covered by war-
ranties and you may be charged for
labor, parts and lubricants used.
When you stop for fuel:
Check the engine oil level.
Check coolant level in coolant
reservoir.
Check the windshield washer fluid level.
Look for low or under-inflated tires.
While operating your vehicle:
Note any changes in the sound of the exhaust or any smell of
exhaust fumes in the vehicle.
Check for vibrations in the steering wheel. Notice any increased steer-
ing effort or looseness in the steer-
ing wheel, or change in its straight-
ahead position.
Notice if your vehicle constantly turns slightly or “pulls” to one side
when traveling on smooth, level
road.
When stopping, listen and check for strange sounds, pulling to one
side, increased brake pedal travel
or “hard-to-push” brake pedal.
If any slipping or changes in the operation of your transaxle occurs,
check the transaxle fluid level.
Check automatic transaxle P (Park) function.
Check parking brake.
Check for fluid leaks under your vehicle (water dripping from the air
conditioning system during or after
use is normal).
WARNING
Be careful when checking your
engine coolant level when the
engine is hot. Scalding hot
coolant and steam may blow out
under pressure. This could cause
burns or other serious injury.
Page 322 of 371
713
Maintenance
1
2
3
4
5
6
7
8
9
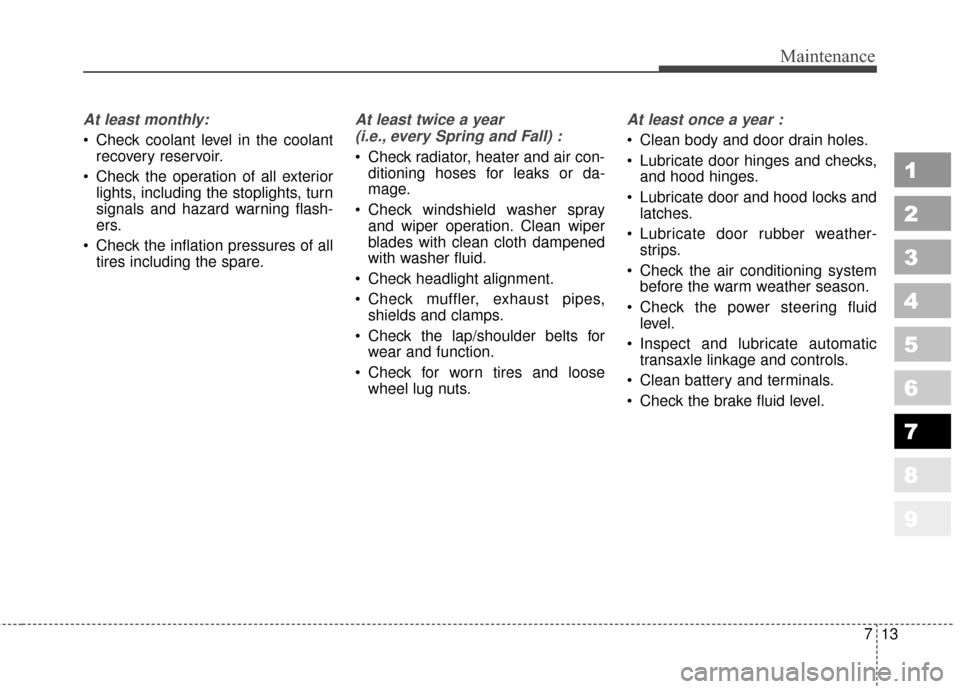
At least monthly:
Check coolant level in the coolantrecovery reservoir.
Check the operation of all exterior lights, including the stoplights, turn
signals and hazard warning flash-
ers.
Check the inflation pressures of all tires including the spare.
At least twice a year
(i.e., every Spring and Fall) :
Check radiator, heater and air con- ditioning hoses for leaks or da-
mage.
Check windshield washer spray and wiper operation. Clean wiper
blades with clean cloth dampened
with washer fluid.
Check headlight alignment.
Check muffler, exhaust pipes, shields and clamps.
Check the lap/shoulder belts for wear and function.
Check for worn tires and loose wheel lug nuts.
At least once a year :
Clean body and door drain holes.
Lubricate door hinges and checks,and hood hinges.
Lubricate door and hood locks and latches.
Lubricate door rubber weather- strips.
Check the air conditioning system before the warm weather season.
Check the power steering fluid level.
Inspect and lubricate automatic transaxle linkage and controls.
Clean battery and terminals.
Check the brake fluid level.
Page 339 of 371
Maintenance
30
7
1
2
3
4
5
6
7
8
9
CLIMATE CONTROL AIR FILTER (IF EQUIPPED)
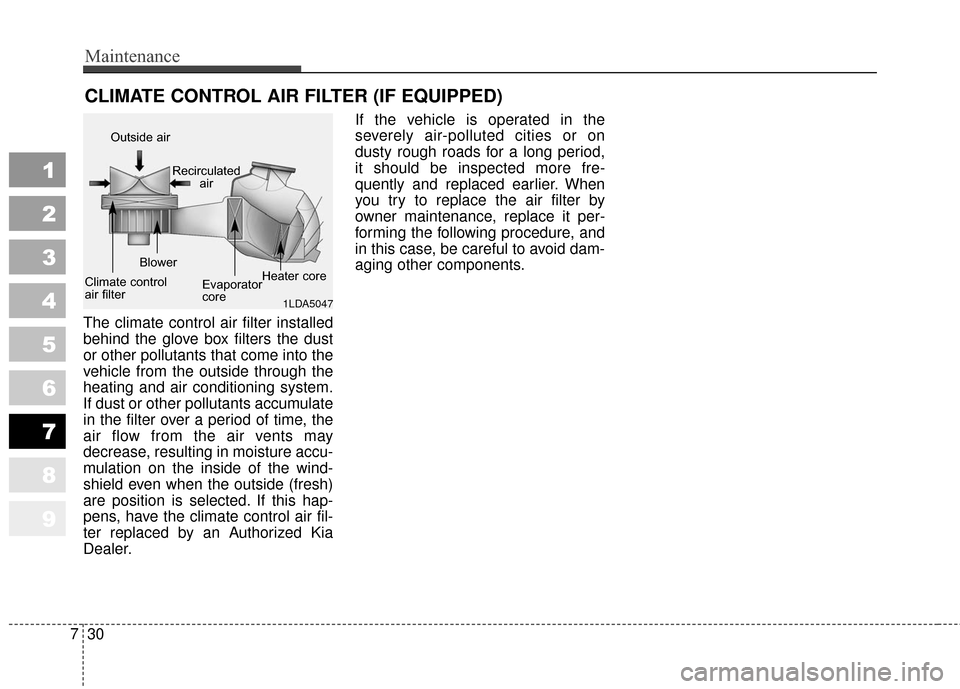
The climate control air filter installed
behind the glove box filters the dust
or other pollutants that come into the
vehicle from the outside through the
heating and air conditioning system.
If dust or other pollutants accumulate
in the filter over a period of time, the
air flow from the air vents may
decrease, resulting in moisture accu-
mulation on the inside of the wind-
shield even when the outside (fresh)
are position is selected. If this hap-
pens, have the climate control air fil-
ter replaced by an Authorized Kia
Dealer. If the vehicle is operated in the
severely air-polluted cities or on
dusty rough roads for a long period,
it should be inspected more fre-
quently and replaced earlier. When
you try to replace the air filter by
owner maintenance, replace it per-
forming the following procedure, and
in this case, be careful to avoid dam-
aging other components.
1LDA5047
Outside air
Recirculatedair
Climate control
air filter Blower
Evaporator
coreHeater core
Page 347 of 371
Maintenance
38
7
1
2
3
4
5
6
7
8
9
Remove the valve cap from the tire
valve stem. Press the tire gage firm-
ly onto the valve to get a pressure
measurement. If the cold tire inflation
pressure matches the recommended
pressure on the tire and loading
information label, no further adjust-
ment is necessary. If the pressure is
low, add air until you reach the rec-
ommended amount.
If you overfill the tire, release air by
pushing on the metal stem in the
center of the tire valve. Recheck the
tire pressure with the tire gage. Be
sure to put the valve caps back on
the valve stems. They help prevent
leaks by keeping out dirt and mois-
ture.Tire rotation
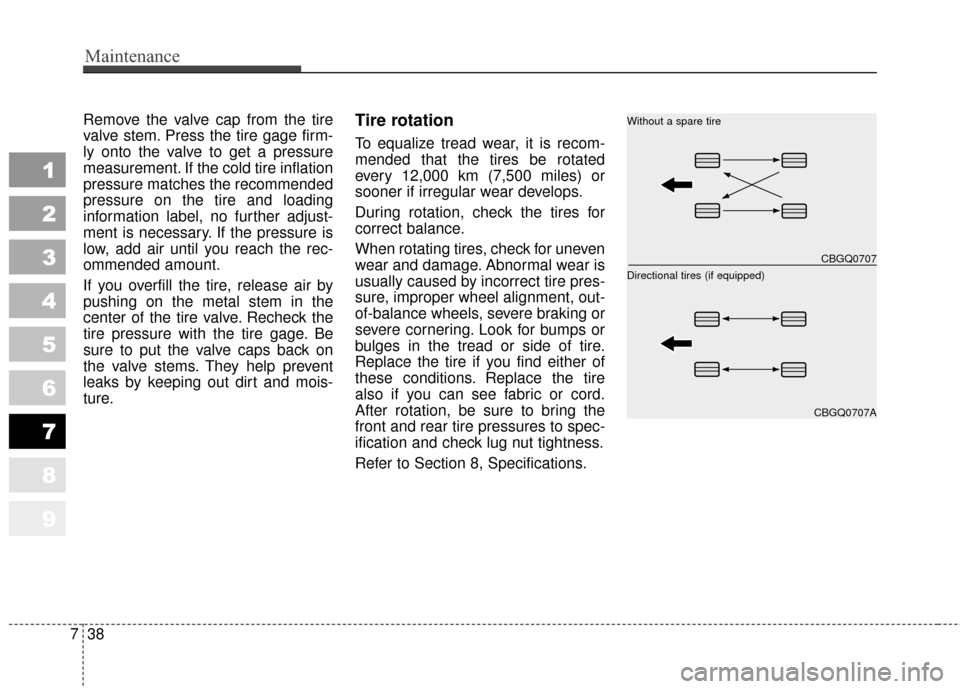
To equalize tread wear, it is recom-
mended that the tires be rotated
every 12,000 km (7,500 miles) or
sooner if irregular wear develops.
During rotation, check the tires for
correct balance.
When rotating tires, check for uneven
wear and damage. Abnormal wear is
usually caused by incorrect tire pres-
sure, improper wheel alignment, out-
of-balance wheels, severe braking or
severe cornering. Look for bumps or
bulges in the tread or side of tire.
Replace the tire if you find either of
these conditions. Replace the tire
also if you can see fabric or cord.
After rotation, be sure to bring the
front and rear tire pressures to spec-
ification and check lug nut tightness.
Refer to Section 8, Specifications.
CBGQ0707
CBGQ0707A
Without a spare tire
Directional tires (if equipped)