2010 KIA Sportage roof
[x] Cancel search: roofPage 109 of 371

Knowing your vehicle
100
3
1
2
3
4
5
6
7
8
9
Resetting the sunroof
Whenever the vehicle battery is dis-
connected or discharged, you have
to reset your sunroof system as fol-
lows:
1. Turn the ignition key to the ON
position.
2. According to the position of the sunroof, do as follows.
1) in case that the sunroof hasclosed completely or been tilt-
ed :
Press the TILT UP button until
the sunroof has tilted upward
completely.
2) in case that the sunroof has slide-opened:
Press and hold the CLOSE
button for more than 5 seconds
until the sunroof has closed
completely. Press the TILT UP
button until the sunroof has tilt-
ed upward completely. 3. Release the TILT UP button.
4. Press and hold the TILT UP button
once again until the sunroof has
returned to the original position of
TILT UP after it is raised a little
higher than the maximum TILT UP
position.
When this is complete, the sunroof
system is reset.
Page 113 of 371

Knowing your vehicle
104
3
1
2
3
4
5
6
7
8
9
If the vehicle has a roof rack, you can
load things on top of your vehicle.
Crossrails and fixing components to
adapt the roof rack on your vehicle
may be obtained from an authorized
Kia dealer.
✽ ✽
NOTICE
If the vehicle is equipped with a sun-
roof, be sure not to position cargo
onto the roof rack in such a way that
it could interfere with sunroof oper-
ation.
ROOF RACK (IF EQUIPPED)
1KMA2177
CAUTION
When carrying cargo on the
roof rack, take the necessaryprecautions to make sure thecargo does not damage theroof of the vehicle.
When carrying large objects on the roof rack, make surethey do not exceed the overallroof length or width.
WARNING
The following specification is the maximum weight that can
be loaded onto the roof rack.
Distribute the load as evenly as
possible across the roof rack
and secure the load firmly.
Loading cargo or luggage
above specification on the roof
rack may damage your vehicle.
(Continued)
(Continued)
The vehicle center of gravitywill be higher when items are
loaded onto the roof rack.
Avoid sudden starts, braking,
sharp turns, abrupt maneuvers
or high speeds that may result
in loss of vehicle control or
rollover causing an accident.
Always drive slowly and turn corners carefully when carrying
items on the roof rack. Severe
wind updrafts, caused by pass-
ing vehicles or natural causes,
can cause sudden upward
pressure on items loaded on
the roof rack. This is especially
true when carrying large, flat
items such as wood panels or
mattresses. This could cause
the items to fall off the roof rack
and cause damage to your vehi-
cle or others around you.
To prevent damage or loss of cargo while driving, check fre-
quently before or while driving
to make sure the items on the
roof rack are securely fastened.
ROOF 45 kg (100 lbs.)
RACK EVENLY DISTRIBUTED
Page 114 of 371

3105
Knowing your vehicle
1
2
3
4
5
6
7
8
9
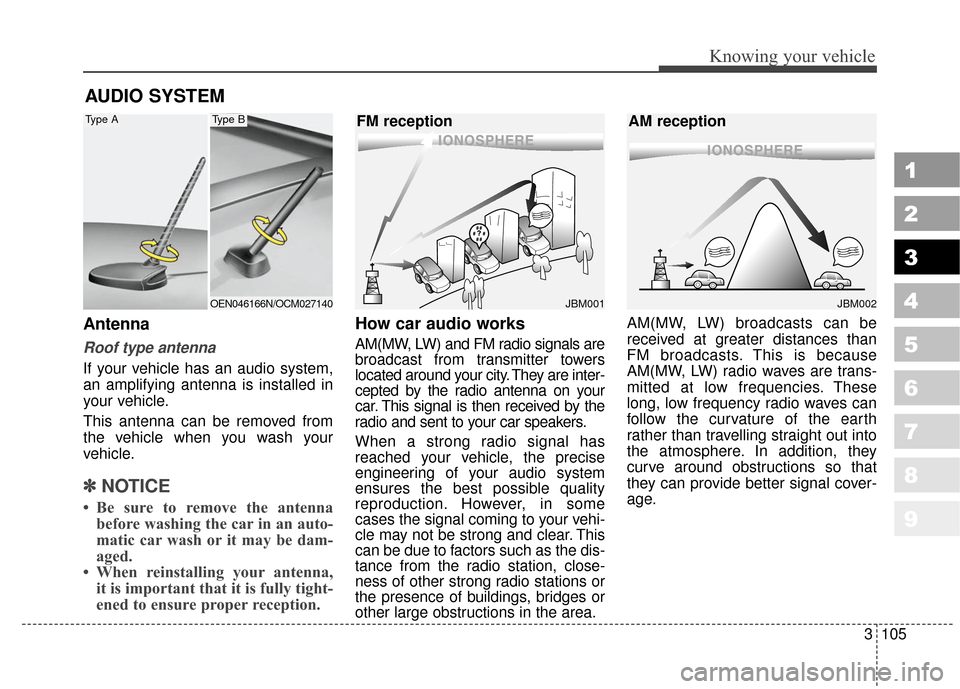
Antenna
Roof type antenna
If your vehicle has an audio system,
an amplifying antenna is installed in
your vehicle.
This antenna can be removed from
the vehicle when you wash your
vehicle.
✽ ✽NOTICE
• Be sure to remove the antenna
before washing the car in an auto-
matic car wash or it may be dam-
aged.
• When reinstalling your antenna, it is important that it is fully tight-
ened to ensure proper reception.
How car audio works
AM(MW, LW) and FM radio signals are
broadcast from transmitter towers
located around your city. They are inter-
cepted by the radio antenna on your
car. This signal is then received by the
radio and sent to your car speakers.
When a strong radio signal has
reached your vehicle, the precise
engineering of your audio system
ensures the best possible quality
reproduction. However, in some
cases the signal coming to your vehi-
cle may not be strong and clear. This
can be due to factors such as the dis-
tance from the radio station, close-
ness of other strong radio stations or
the presence of buildings, bridges or
other large obstructions in the area. AM(MW, LW) broadcasts can be
received at greater distances than
FM broadcasts. This is because
AM(MW, LW) radio waves are trans-
mitted at low frequencies. These
long, low frequency radio waves can
follow the curvature of the earth
rather than travelling straight out into
the atmosphere. In addition, they
curve around obstructions so that
they can provide better signal cover-
age.
AUDIO SYSTEM
OEN046166N/OCM027140
Type AType B
¢¢¢
JBM001
¢¢¢¢¢¢
JBM002
FM reception
AM reception
Page 144 of 371

3135
Knowing your vehicle
1
2
3
4
5
6
7
8
9
Satellite radio channels:
SIRIUS Satellite Radio has over 130
channels, including 69 channels of
100% commercial-free music, plus
sports, news, talk and entertainment
available nationwide in your vehicle.
For more information and a complete
list of SIRIUS Satellite Radio chan-
nels, visit sirius.com in the United
States, sirius-canada.ca in Canada, or
call SIRIUS at 1-888-539-7474.
Satellite radio reception fac-
tors:
To receive the satellite signal, your
vehicle has been equipped with a
satellite radio antenna located on the
roof of your vehicle. The vehicle roof
provides the best location for an
unobstructed, open view of the sky, a
requirement of a satellite radio sys-
tem. Like AM/FM, there are several
factors that can affect satellite
radio reception performance:
Antenna obstructions: For optimalreception performance, keep the
antenna clear of snow and ice
build-up and keep luggage and
other material as far away from the
antenna as possible. Terrain: Hills, mountains, tall build-
ings, bridges, tunnels, freeway
overpasses, parking garages,
dense tree foliage and thunder-
storms can interfere with your
reception.
SIRIUS Satellite Radio service:
SIRIUS Satellite Radio is a subscrip-
tionbased satellite radio service that
broadcasts music, sports, news and
entertainment programming to radio
receivers, which are available for
installation in motor vehicles or facto-
ry installed, as well as for the home,
portable and wireless devices, and
through an Internet connection on
personal computer.
Vehicles that are equipped with a
factory installed SIRIUS Satellite
Radio system include:
Hardware and an introductory trialsubscription term, which begins on
the date of sale or lease of the
vehicle.
For a small upgrade fee, access to SIRIUS music channels, and other
select channels over the Internet
using any computer connected to
the Internet (U.S. customers only). For information on extended sub-
scription terms, contact SIRIUS at
1-888-539-7474.
✽ ✽
NOTICE
Satellite Radio requires SIRIUS®
compatible receiver and a subscrip-
tion service fee after trial period.
Vehicles without a factory-installed
radio receiver require hardware pur-
chase and installation. Please see your
dealer for further details. All fees and
programming subject to change.
Subscriptions governed by the SIR-
IUS Terms & Conditions available at
www
.sirius.com/ serviceterms.
Available only in the 48 contiguous
United States and the District of
Columbia. Service available in
Canada;
see www
.siriuscanada.ca
Chrysler LLC shall not be responsi-
ble for any such programming
changes.
Satellite Radio Electronic Serial
Number (ESN): This 12-digit
Satellite Serial Number is needed to
re-activate, modify or track your
satellite radio account. You will need
this number when communicating
with SIRIUS.
SIRIUS SATELLITE RADIO INFORMATION (IF EQUIPPED)
Page 199 of 371

Driving your vehicle
52
4
1
2
3
4
5
6
7
8
9
4) Make sure the vehicle windshield
wipers are turned off.
5) Drive your vehicle in at least 2 complete (either clockwise or
counter-clockwise) circles at less
than 8 km/h (5 mph) until the com-
pass heading appears. Driving in
a circle in right-handed direction
and opposite direction is possible
and if possible, stop the wiper
operation.
6) If the vehicle's compass headings become inaccurate again, repeat
steps 1 through 6 above.
✽ ✽NOTICE
If new vehicle is first driven or if the
battery has been disconnected, do
the calibration procedure as above.
Setting the compass zone
This compass must be set to com-
pensate for the variation between
true north and magnetic north. To set
variation:
1. Find your current location and
variance zone number on the zone
map.
2. Press and hold the ON/OFF but- ton for 6~9 seconds. The current
zone number will appear in the
display.
3. Release and press the ON/OFF button until the new zone number
appears in the display. After you
stop pressing the button in, the
display will show a compass direc-
tion within a few seconds.
✽ ✽NOTICE
1. Do not install a ski rack, antenna,
etc. that are attached to the vehi-
cle using a magnet as anything
attached to the roof of the vehicle
with a magnet will effect compass
operation.
2. If the compass deviates from the correct indication soon after
repeated adjustment, have the
compass checked at an authorized
dealer.
3. The compass may not indicate the correct compass point in tunnels
or while driving up or down a
steep hill.
(The compass returns to the cor-
rect compass point when the vehi-
cle moves to an area where the
geomagnetism is stabilized.)
Page 244 of 371

Driving tips
12
5
1
2
3
4
5
6
7
8
9
Driving in flooded areas
Avoid driving through flooded areas
unless you are sure the water is no
higher than the bottom of the wheel
hub. Drive through any water slowly.
Allow adequate stopping distance
because brake performance may be
affected.
After driving through water, dry the
brakes by gently applying them sev-
eral times while the vehicle is moving
slowly.
Reducing the risk of a rollover
This multi-purpose passenger vehi-
cle is defined as a Sports Utility
Vehicle (SUV). SUV’s have higher
ground clearance and a narrower
track to make them capable of per-
forming in a wide variety of off-road
applications. Specific design charac-
teristics give them a higher center of
gravity than ordinary cars. An advan-
tage of the higher ground clearance
is a better view of the road, which
allows you to anticipate problems.
They are not designed for cornering
at the same speeds as conventional
passenger drive vehicles, any more
than low-slung sports cars are
designed to perform satisfactorily in
off-road conditions. Due to this risk,
driver and passengers are strongly
recommended to buckle their seat-
belts. In a rollover crash, an unbelt-
ed person is more likely to die than a
person wearing a seatbelt. There
are steps that a driver can make to
reduce the risk of a rollover. If at all
possible, avoid sharp turns or abrupt
maneuvers, do not load your roof
rack with heavy cargo, and never
modify your vehicle in any way.
Rollover warning label
To remind you of the danger of the
rollover, a rollover warning label
which is now required by the Federal
Safety regulations is adhered to the
driver’s sunvisor.
Page 249 of 371

517
Driving tips
1
2
3
4
5
6
7
8
9
Traveling to remote areas
It makes sense to plan your trip,
especially when going to a remote
area. Know the terrain and plan your
route. You are much less likely to
encounter unwanted surprises. Get
accurate maps of trails.
It’s also a good idea to travel with at
least one other vehicle. If something
happens to one of them, the other
can quickly help.WARNING - Cargo
Cargo piled close to the height of (or higher than) the seat
backs can be thrown forward
during a sudden stop or on
downhill slopes. You or your
passengers could be severely
injured. Keep cargo below the
top of the seat backs and, if
possible, do not pile separate
items.
Unsecured cargo in the cargo area can be tossed about
when driving on the highways
or over rough terrain. You or
your passengers can be
struck by flying objects and
severely injured. Secure the
cargo properly.
(Continued)(Continued)
Cargo should not be carriedon the roof without a proper
roof rack installed. The roof
rack will hold a maximum of
45 kg (100 lbs.). Heavy loads
in a roof rack raise the vehi-
cle’s center of gravity, making
it more likely to roll over. You
can be seriously or fatally
injured if the vehicle rolls
over. Do not load cargo on the
roof while driving off-road, if
at all possible. Put heavy
loads inside the cargo area,
not on the roof or in a roof
rack. Keep cargo in the cargo
area as far forward and low as
possible.
Page 295 of 371

611
In case of an emergency
1
2
3
4
5
6
7
8
9
Description Fuse rating Protected component
TAIL RH10A Taillight (right)
RR HTR 30A Rear defroster
HAZARD 15A Hazard warning light
SAFETY P/WDW 15A Safety power window
HTD MIRR 10A Outside rearview mirror defroster
TAIL LH 10A Taillight (left)
ECU (B+) 10A TCU, Immobilizer
P/OUTLET.RR 15A Power outlet (rear)
RR FOG 10A Rear fog lamp
RR WIPER 15A Rear wiper
F/MIRROR 10A
Folding the outside rearview mirror
START10AIgnition lock/inhibitor switch,
Theft-alarm system
AV 10A Audio
P/OUTLET.FR 15A Power outlet (front)
OBD II 10A OBD II, Diagonosis
S/HTR 20A Seat warmer
SPARE 15A Spare fuse
C/LIGHTER 15A Cigar lighter
AUDIO 10AETACS, Audio, Door lock,
Electric remote control mirror
ROOM LP 10ACluster, ETACS, A/C, Clock,
Room lamp
S/ROOF & D/LOCK 20A Sunroof, Door lock
A/CON 10A Air conditioner
IGN 10A Fuel filter heater, Headlight
P/WDW-1 30A Power window (left)
Description Fuse rating Protected component
P/WDW-230A Power window (right)
SPARE 10A Spare fuse
IG COIL 20A Ignition coil
T/SIG 15A Turn signal light
A/BAG IND 10A Cluster
CLUSTER 10A Cluster
SPARE FUSE 15A Spare fuse
SPARE FUSE 10A Spare fuse
B/UP 10A Back-up light
A/BAG 15A Airbag
ABS 10A Anti-lock brake system
ECU 10A ESC, Immobilizer
SPARE FUSE 30A Spare fuse
SPARE FUSE 20A Spare fuse
P/CONN 30A Power connector fuse
SHUNT CONN - Shunt connector
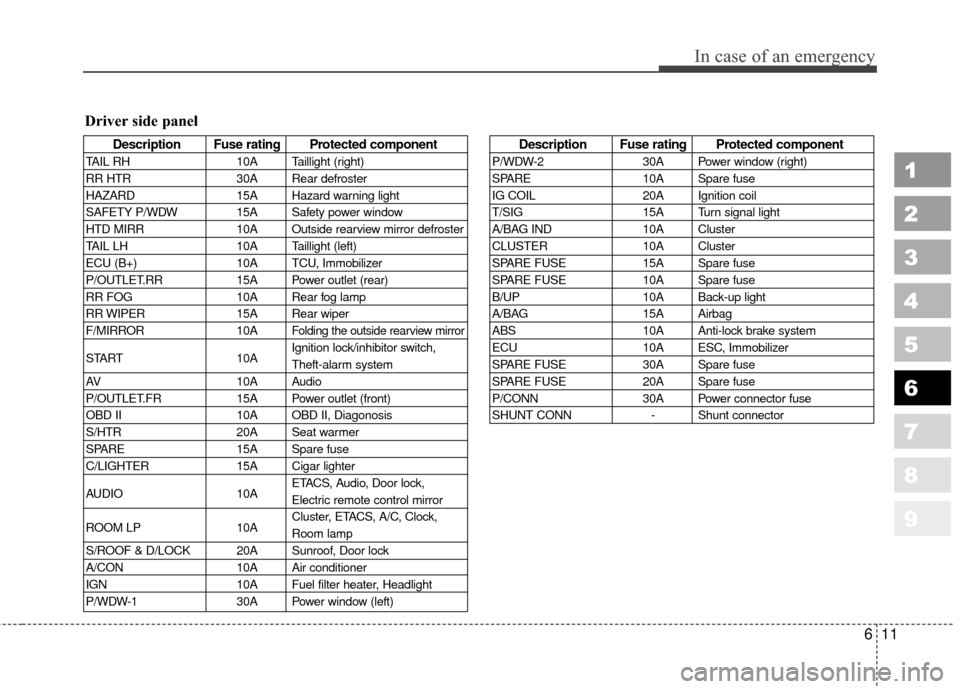
Driver side panel