2010 KIA Sportage mirror
[x] Cancel search: mirrorPage 198 of 371
451
Driving your vehicle
1
2
3
4
5
6
7
8
9
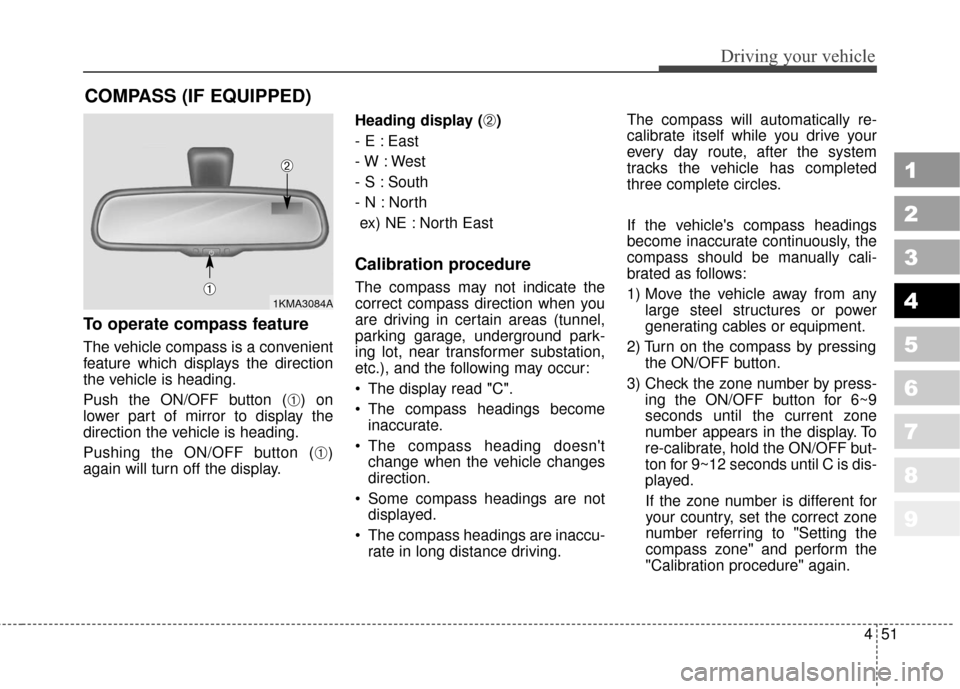
To operate compass feature
The vehicle compass is a convenient
feature which displays the direction
the vehicle is heading.
Push the ON/OFF button (
➀) on
lower part of mirror to display the
direction the vehicle is heading.
Pushing the ON/OFF button (
➀)
again will turn off the display. Heading display (
➁)
- E : East
- W : West
- S : South
- N : North ex) NE : North East
Calibration procedure
The compass may not indicate the
correct compass direction when you
are driving in certain areas (tunnel,
parking garage, underground park-
ing lot, near transformer substation,
etc.), and the following may occur:
The display read "C".
The compass headings become inaccurate.
The compass heading doesn't change when the vehicle changes
direction.
Some compass headings are not displayed.
The compass headings are inaccu- rate in long distance driving. The compass will automatically re-
calibrate itself while you drive your
every day route, after the system
tracks the vehicle has completed
three complete circles.
If the vehicle's compass headings
become inaccurate continuously, the
compass should be manually cali-
brated as follows:
1) Move the vehicle away from any
large steel structures or power
generating cables or equipment.
2) Turn on the compass by pressing the ON/OFF button.
3) Check the zone number by press- ing the ON/OFF button for 6~9
seconds until the current zone
number appears in the display. To
re-calibrate, hold the ON/OFF but-
ton for 9~12 seconds until C is dis-
played.
If the zone number is different for
your country, set the correct zone
number referring to "Setting the
compass zone" and perform the
"Calibration procedure" again.
COMPASS (IF EQUIPPED)
1KMA3084A➀
➁
Page 209 of 371
Driving your vehicle
62
4
1
2
3
4
5
6
7
8
9
The rear window defroster automati-
cally turns off after 20 minutes or
when the ignition switch is turned off.
To turn off the defroster, press the
rear window defroster button again.
Outside mirror heater
(if equipped)
There is no control button for the out-
side mirror heater, instead the out-
side mirror heater automatically
turns on when the rear window
defroster is turned on.
Front windshield deicer(if equipped)
There is no control button for the
front windshield deicer, instead the
front windshield deicer automatically
turns on when the rear window
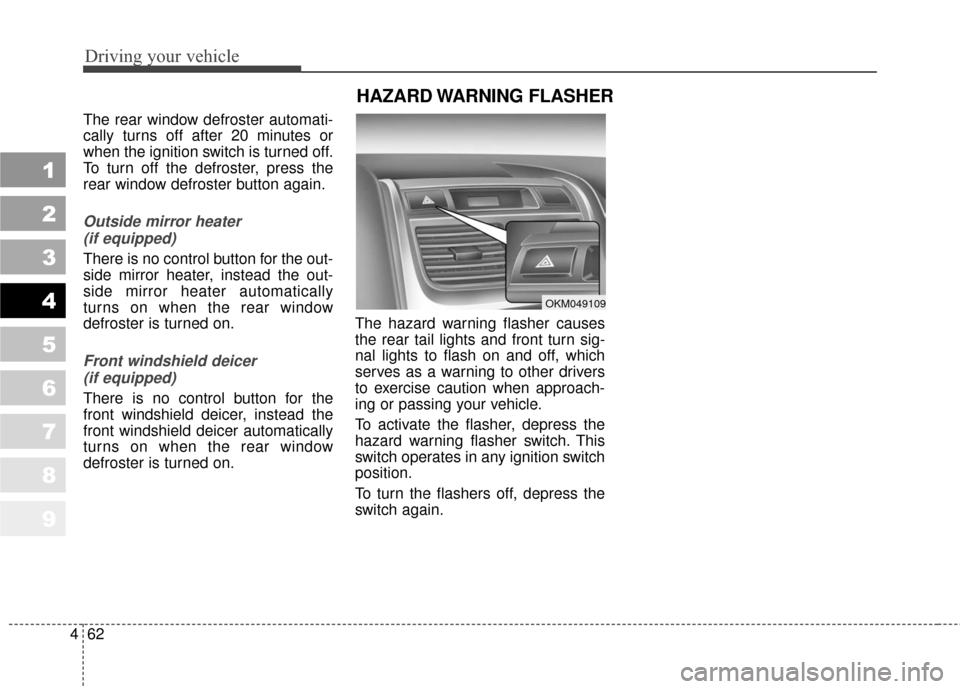
defroster is turned on. The hazard warning flasher causes
the rear tail lights and front turn sig-
nal lights to flash on and off, which
serves as a warning to other drivers
to exercise caution when approach-
ing or passing your vehicle.
To activate the flasher, depress the
hazard warning flasher switch. This
switch operates in any ignition switch
position.
To turn the flashers off, depress the
switch again.
HAZARD WARNING FLASHER
OKM049109
Page 230 of 371
483
Driving your vehicle
1
2
3
4
5
6
7
8
9
For maximum defrosting, set thetemperature control to the extreme
right/hot position and the fan speed
control to the highest speed.
If warm air to the floor is desired while defrosting or defogging, set
the mode to the floor-defrost posi-
tion.
Before driving, clear all snow and ice from the windshield, rear win-
dow, outside rear view mirrors, and
all side windows.
Clear all snow and ice from the hood and air inlet in the cowl grill to
improve heater and defroster effi-
ciency and to reduce the probabili-
ty of fogging up inside of the wind-
shield.Defogging logic
Manual climate control system
To reduce the probability of fogging
up the inside of the windshield, the
air intake control is set to the outside
(fresh) air position automatically if
any of following occur.
The mode is selected to the , or while the system is
activated.
The ignition switch is turned on while the mode is selected to the ,or .
The ignition switch is turned off.
The fan is off.
The fan begins to be operated.
Press the air intake control button to
select the recirculated air position
while the ignition switch is on.
CAUTION
Do not use the or posi- tion during cooling operation inextremely humid weather. Thedifference between the tempera-ture of the outside air and thatof the windshield could causethe outer surface of the wind-shield to fog up, causing loss ofvisibility. In this case, set themode selection knob to the position and fan speed controlknob to the lower speed.
Page 237 of 371

55
Driving tips
BEFORE DRIVING
Before entering vehicle:
Be sure that all windows, outsidemirror(s), and outside lights are
clean.
Check the condition of the tires.
Check under the vehicle for any sign of leaks.
Be sure there are no obstacles behind you if you intend to back up.
Necessary inspections
Fluid levels, such as engine oil,
engine coolant, brake fluid, and
washer fluid should be checked on a
regular basis, with the exact interval
depending on the fluid. Further
details are provided in Section 7,
Maintenance.
Before starting
Close and lock all doors.
Position the seat so that all con-trols are easily reached.
Adjust the inside and outside rearview mirrors.
Be sure that all lights work.
Check all gauges.
Check the operation of warning lights when the ignition switch is
turned to the ON position.
Release the parking brake and make sure the brake warning light
goes out.
For safe operation, be sure you are
familiar with your vehicle and its
equipment.
1
2
3
4
5
6
7
8
9
WARNING- Driving under
the influence of alcohol or
drugs
Drinking and driving is danger-
ous. Drunk driving is the num-
ber one contributor to the high-
way death toll each year. Even a
small amount of alcohol will
affect your reflexes, perceptions
and judgement. Driving while
under the influence of drugs is
as dangerous or more danger-
ous than driving drunk.
You are much more likely to
have a serious accident if you
drink or take drugs and drive.
If you are drinking or taking
drugs, don’t drive. Do not ride
with a driver who has been
drinking or taking drugs.
Choose a designated driver or
call a cab.
Page 241 of 371
59
Driving tips
1
2
3
4
5
6
7
8
9
Driving at night
Because night driving presents more
hazards than driving in the daylight,
here are some important tips to
remember:
Slow down and keep more dis-tance between you and other vehi-
cles, as it may be more difficult to
see at night, especially in areas
where there may not be any street
lights.
Adjust your mirrors to reduce the glare from other driver's head-
lights. Keep your headlights clean and
properly aimed on vehicles not
equipped with the automatic head-
light aiming feature. Dirty or
improperly aimed headlights will
make it much more difficult to see
at night.
Avoid staring directly at the head- lights of oncoming vehicles. You
could be temporarily blinded, and it
will take several seconds for your
eyes to readjust to the darkness.WARNING- Spinning tires
Do not spin the wheels, espe-
cially at speeds more than 56
km/h (35 mph). Spinning the
wheels at high speeds when the
vehicle is stationary could
cause a tire to overheat, explode
and injure bystanders.
Page 266 of 371
Driving tips
34
5
1
2
3
4
5
6
7
8
9
If you do decide to pull a trailer
Here are some important points if
you decide to pull a trailer:
State, provincial, county and
municipal government have vary-
ing trailering laws. Make sure your
hitch, mirrors, lights and wiring
arrangements are legal, not only
where you live, but also where
you’ll be driving. A good source for
this information is provincial or
local law enforcement agencies.
Consider using a sway control. You can ask a hitch dealer about sway
control.
After your odometer indicates 800 km (500 miles) or more, you can
tow a trailer. For the first 800 km
(500 miles) that you tow a trailer,
don’t drive over 80 km/h (50 mph)
and don’t make starts at full throt-
tle. This helps your engine and
other parts of your vehicle “wear” in
at the heavier loads. Always drive at a safe speed (less
than 100 km/h) commensurate
with road conditions.
On a long uphill grade, do not exceed 70 km/h (45 mph) or the
posted towing speed limit,
whichever is lower.
The important considerations have to do with weight: Weight of the trailer
How heavy can a trailer safely be? It
should never weigh more than the
maximum trailer weight with trailer
brakes. But even that can be too
heavy.
It depends on how you plan to use
your trailer. For example, speed, alti-
tude, road grades, outside tempera-
ture and how much your vehicle is
used to pull a trailer are all important.
The ideal trailer weight can also
depend on any special equipment
that you have on your vehicle.
Page 268 of 371
Driving tips
36
5
1
2
3
4
5
6
7
8
9
Safety chains
You should always attach chains
between your vehicle and your trail-
er. Cross the safety chains under the
tongue of the trailer so that the
tongue will not drop to the road if it
becomes separated from the hitch.
Instructions about safety chains may
be provided by the hitch manufactur-
er or by the trailer manufacturer.
Follow the manufacturer’s recom-
mendation for attaching safety
chains. Always leave just enough
slack so you can turn with your trail-
er. And, never allow safety chains to
drag on the ground.
Trailer brakes
If your trailer weighs more than the
maximum trailer weight without trail-
er brakes loaded, then it needs its
own brakes and they must be ade-
quate. Be sure to read and follow the
instructions for the trailer brakes so
you’ll be able to install, adjust and
maintain them properly.
Don’t tap into your vehicle's brake
system.
Driving with a trailer
Towing a trailer requires a certain
amount of experience. Before setting
out for the open road, you must get
to know your trailer. Acquaint your-
self with the feel of handling and
braking with the added weight of the
trailer. And always keep in mind that
the vehicle you are driving is now a
good deal longer and not nearly so
responsive as your vehicle is by
itself.
Before you start, check the trailer
hitch and platform, safety chains,
electrical connector(s), lights, tires
and mirror adjustment. If the trailer
has electric brakes, start your vehicle
and trailer moving and then apply the
trailer brake controller by hand to be
sure the brakes are working. This lets
you check your electrical connection
at the same time.
During your trip, check occasionally
to be sure that the load is secure,
and that the lights and any trailer
brakes are still working.
WARNING - Trailer brakes
Do not use a trailer with its own
brakes unless you are absolute-
ly certain that you have properly
set up the brake system. This is
not a task for amateurs. Use an
experienced, competent trailer
shop for this work.
Page 277 of 371

545
Driving tips
1
2
3
4
5
6
7
8
9
HOMELINK® WIRELESS CONTROL SYSTEM (IF EQUIPPED)
Your new mirror comes with an inte-
grated HomeLink Universal
Transceiver, which allows you to pro-
gram the mirror to activate your
garage door(s), estate gate, home
lighting, etc. The mirror actually
learns the codes from your various
existing transmitters.
CAUTION
When programming theHomeLink® Wireless ControlSystem, you may be operatinga garage door or gate opera-tor. Make sure that people andobjects are out of the way ofthe moving door or gate toprevent potential harm ordamage.
Do not use HomeLink with any garage door opener that lacksthe safety stop and reversefeature as required by federalsafety standards. (Thisincludes any garage dooropener model manufacturedbefore April 1, 1982.) A garagedoor opener which cannotdetect an object, signaling thedoor to stop and reverse, doesnot meet current federal safe-ty standards. Using a garagedoor opener without thesefeatures increases risk of seri-ous injury or death. For moreinformation, call 1-800-355-3515 or on the internet atwww.homelink.com.
(Continued)
(Continued) Retain the original transmitter for future programming proce-dures (i.e., new vehicle pur-chase). It is also suggestedthat upon the sale of the vehi-cle, the programmedHomeLink buttons be erasedfor security purposes (followstep 1 in the “Programming”portion of this text).
MMSA5007
Homelink buttons Glare detection sensor
Indicator light