2010 KIA SORENTO ESP
[x] Cancel search: ESPPage 137 of 399
Features of your vehicle
62
4
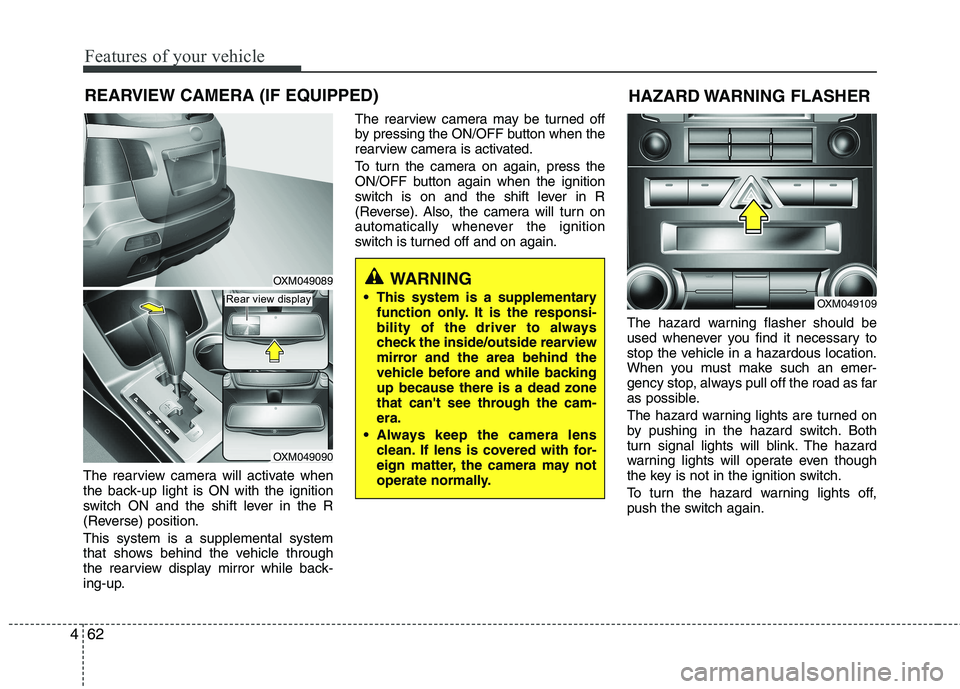
The rearview camera will activate when
the back-up light is ON with the ignition
switch ON and the shift lever in the R
(Reverse) position. This system is a supplemental system
that shows behind the vehicle through
the rearview display mirror while back-
ing-up. The rearview camera may be turned off
by pressing the ON/OFF button when the
rearview camera is activated.
To turn the camera on again, press the
ON/OFF button again when the ignition
switch is on and the shift lever in R
(Reverse). Also, the camera will turn on
automatically whenever the ignition
switch is turned off and on again.
The hazard warning flasher should be
used whenever you find it necessary to
stop the vehicle in a hazardous location.
When you must make such an emer-
gency stop, always pull off the road as far
as possible.
The hazard warning lights are turned on
by pushing in the hazard switch. Both
turn signal lights will blink. The hazard
warning lights will operate even though
the key is not in the ignition switch.
To turn the hazard warning lights off,
push the switch again.
OXM049109
HAZARD WARNING FLASHER
WARNING
This system is a supplementary function only. It is the responsi-
bility of the driver to always
check the inside/outside rearview
mirror and the area behind the
vehicle before and while backingup because there is a dead zone
that can't see through the cam-era.
Always keep the camera lens clean. If lens is covered with for-
eign matter, the camera may not
operate normally.OXM049089
OXM049090
REARVIEW CAMERA (IF EQUIPPED)
Rear view display
Page 142 of 399
467
Features of your vehicle
Daytime running light (if equipped)
Daytime Running Lights (DRL) can make
it easier for others to see the front of your
vehicle during the day. DRL can be help-
ful in many different driving conditions,
and it is especially helpful after dawn and
before sunset.
The DRL system will make the head-
lights turn OFF when:
1. The parklight switch is ON.
2. Engine stops.Headlight leveling device (if equipped)
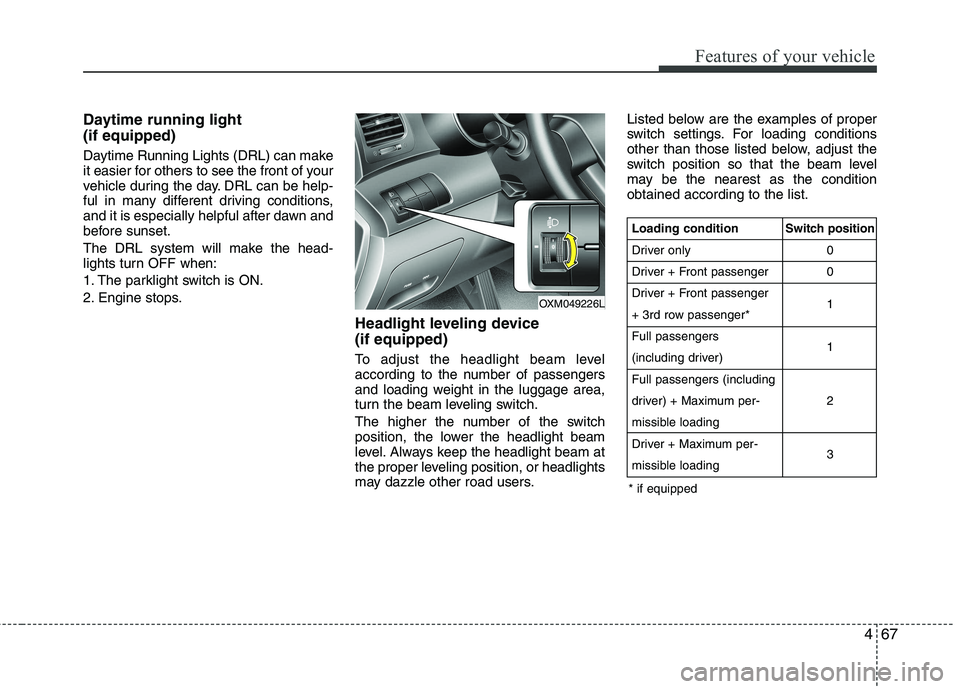
To adjust the headlight beam level
according to the number of passengers
and loading weight in the luggage area,
turn the beam leveling switch.
The higher the number of the switch
position, the lower the headlight beam
level. Always keep the headlight beam at
the proper leveling position, or headlights
may dazzle other road users.Listed below are the examples of proper
switch settings. For loading conditions
other than those listed below, adjust the
switch position so that the beam level
may be the nearest as the conditionobtained according to the list.
OXM049226L
Loading condition
Driver only
Driver + Front passenger
Driver + Front passenger
+ 3rd row passenger*Full passengers
(including driver)Full passengers (including
driver) + Maximum per-
missible loading
Driver + Maximum per-
missible loading
Switch position
00 1 1 2 3
* if equipped
Page 169 of 399
Features of your vehicle
94
4
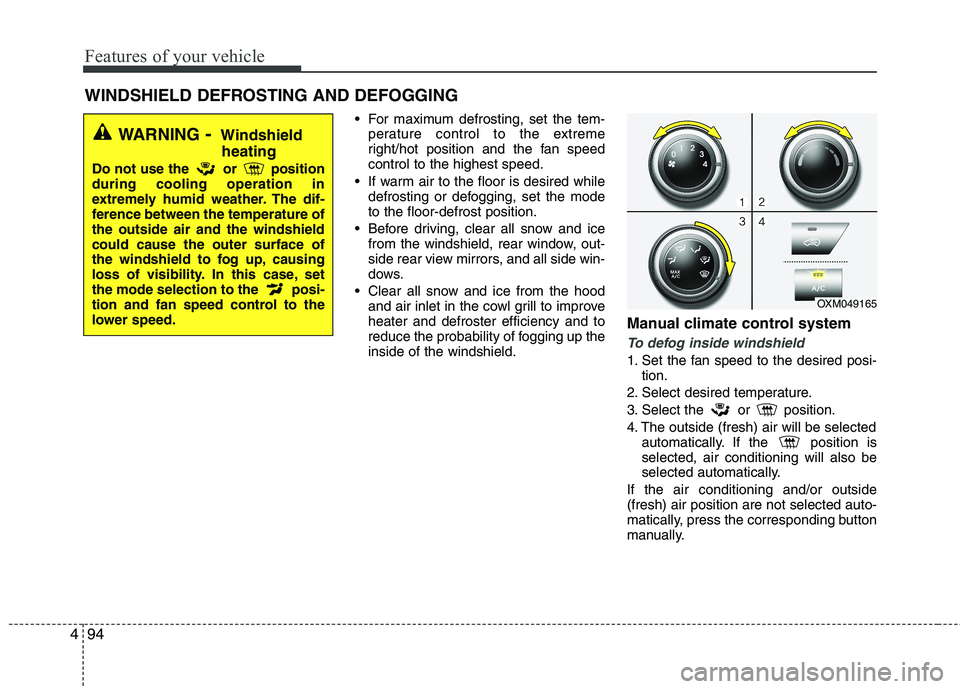
For maximum defrosting, set the tem-
perature control to the extreme
right/hot position and the fan speedcontrol to the highest speed.
If warm air to the floor is desired while defrosting or defogging, set the modeto the floor-defrost position.
Before driving, clear all snow and ice from the windshield, rear window, out-
side rear view mirrors, and all side win-
dows.
Clear all snow and ice from the hood and air inlet in the cowl grill to improveheater and defroster efficiency and to
reduce the probability of fogging up theinside of the windshield. Manual climate control system
To defog inside windshield
1. Set the fan speed to the desired posi-
tion.
2. Select desired temperature.
3. Select the or position.
4. The outside (fresh) air will be selected automatically. If the position is selected, air conditioning will also be
selected automatically.
If the air conditioning and/or outside(fresh) air position are not selected auto-
matically, press the corresponding button
manually.
WINDSHIELD DEFROSTING AND DEFOGGING
OXM049165
WARNING - Windshield
heating
Do not use the or position during cooling operation in
extremely humid weather. The dif-
ference between the temperature ofthe outside air and the windshieldcould cause the outer surface of
the windshield to fog up, causing
loss of visibility. In this case, set
the mode selection to the posi-
tion and fan speed control to the
lower speed.
Page 170 of 399
495
Features of your vehicle
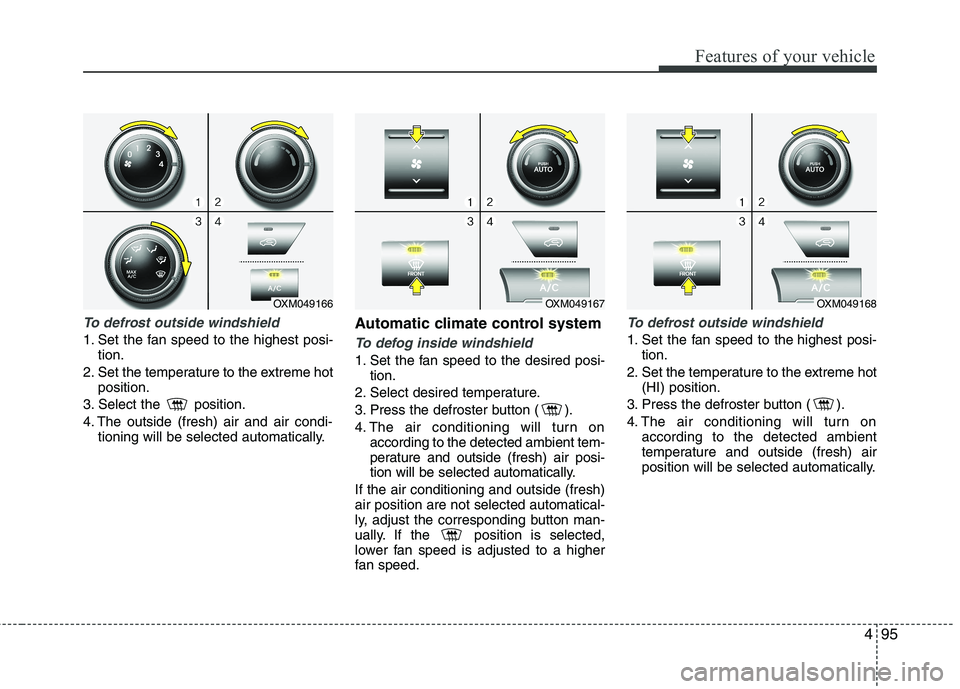
To defrost outside windshield
1. Set the fan speed to the highest posi-tion.
2. Set the temperature to the extreme hot position.
3. Select the position.
4. The outside (fresh) air and air condi- tioning will be selected automatically. Automatic climate control systemTo defog inside windshield
1. Set the fan speed to the desired posi-
tion.
2. Select desired temperature.
3. Press the defroster button ( ).
4. The air conditioning will turn on according to the detected ambient tem-
perature and outside (fresh) air posi-
tion will be selected automatically.
If the air conditioning and outside (fresh)air position are not selected automatical-
ly, adjust the corresponding button man-
ually. If the position is selected,
lower fan speed is adjusted to a higher
fan speed.
To defrost outside windshield
1. Set the fan speed to the highest posi- tion.
2. Set the temperature to the extreme hot (HI) position.
3. Press the defroster button ( ).
4. The air conditioning will turn on according to the detected ambient
temperature and outside (fresh) air
position will be selected automatically.
OXM049167OXM049168OXM049166
Page 181 of 399
Features of your vehicle
106
4
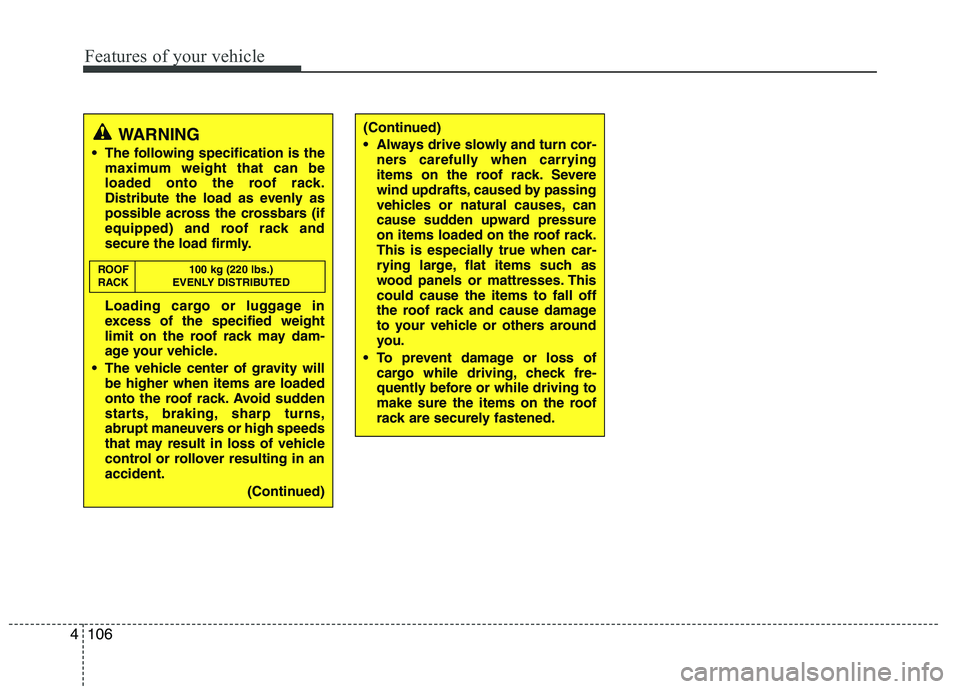
(Continued)
Always drive slowly and turn cor-
ners carefully when carrying
items on the roof rack. Severe
wind updrafts, caused by passing
vehicles or natural causes, can
cause sudden upward pressure
on items loaded on the roof rack.
This is especially true when car-
rying large, flat items such as
wood panels or mattresses. Thiscould cause the items to fall off
the roof rack and cause damage
to your vehicle or others around
you.
To prevent damage or loss of cargo while driving, check fre-
quently before or while driving to
make sure the items on the roof
rack are securely fastened.WARNING
The following specification is the maximum weight that can be
loaded onto the roof rack.
Distribute the load as evenly as
possible across the crossbars (if
equipped) and roof rack and
secure the load firmly.
Loading cargo or luggage in
excess of the specified weight
limit on the roof rack may dam-
age your vehicle.
The vehicle center of gravity will be higher when items are loaded
onto the roof rack. Avoid sudden
starts, braking, sharp turns,
abrupt maneuvers or high speeds
that may result in loss of vehicle
control or rollover resulting in anaccident.
(Continued)
ROOF 100 kg (220 lbs.)
RACK EVENLY DISTRIBUTED
Page 188 of 399
4113
Features of your vehicle
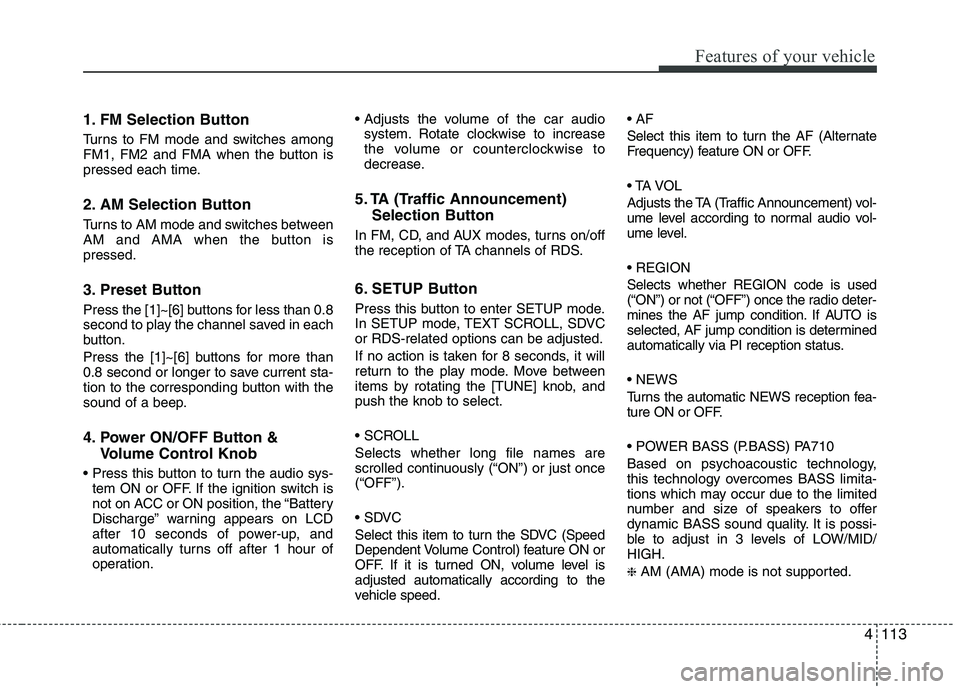
1. FM Selection Button
Turns to FM mode and switches among
FM1, FM2 and FMA when the button is
pressed each time.
2. AM Selection Button
Turns to AM mode and switches between
AM and AMA when the button ispressed.
3. Preset Button
Press the [1]~[6] buttons for less than 0.8
second to play the channel saved in each
button.
Press the [1]~[6] buttons for more than
0.8 second or longer to save current sta-
tion to the corresponding button with the
sound of a beep.
4. Power ON/OFF Button &Volume Control Knob
tem ON or OFF. If the ignition switch is
not on ACC or ON position, the “Battery
Discharge” warning appears on LCD
after 10 seconds of power-up, and
automatically turns off after 1 hour of
operation.
system. Rotate clockwise to increase
the volume or counterclockwise to
decrease.
5. TA (Traffic Announcement) Selection Button
In FM, CD, and AUX modes, turns on/off
the reception of TA channels of RDS.
6. SETUP Button
Press this button to enter SETUP mode.
In SETUP mode, TEXT SCROLL, SDVCor RDS-related options can be adjusted.
If no action is taken for 8 seconds, it will
return to the play mode. Move between
items by rotating the [TUNE] knob, andpush the knob to select.
Selects whether long file names are
scrolled continuously (“ON”) or just once(“OFF”).
Select this item to turn the SDVC (Speed
Dependent Volume Control) feature ON or
OFF. If it is turned ON, volume level isadjusted automatically according to the
vehicle speed.
Select this item to turn the AF (Alternate
Frequency) feature ON or OFF.
Adjusts the TA (Traffic Announcement) vol-
ume level according to normal audio vol-
ume level. Selects whether REGION code is used
(“ON”) or not (“OFF”) once the radio deter-
mines the AF jump condition. If AUTO is
selected, AF jump condition is determined
automatically via PI reception status.
Turns the automatic NEWS reception fea-
ture ON or OFF.
Based on psychoacoustic technology,
this technology overcomes BASS limita-
tions which may occur due to the limited
number and size of speakers to offer
dynamic BASS sound quality. It is possi-
ble to adjust in 3 levels of LOW/MID/HIGH. ❈
AM (AMA) mode is not supported.
Page 201 of 399
![KIA SORENTO 2010 Owners Manual Features of your vehicle
126
4
1. FM Selection Button
Turns to FM mode and toggles FM1 and
FM2 when the button is pressed each
time.
2. AM Selection Button
Pressing the [AM] button selects the A KIA SORENTO 2010 Owners Manual Features of your vehicle
126
4
1. FM Selection Button
Turns to FM mode and toggles FM1 and
FM2 when the button is pressed each
time.
2. AM Selection Button
Pressing the [AM] button selects the A](/manual-img/2/40478/w960_40478-200.png)
Features of your vehicle
126
4
1. FM Selection Button
Turns to FM mode and toggles FM1 and
FM2 when the button is pressed each
time.
2. AM Selection Button
Pressing the [AM] button selects the AM
band. AM Mode is displayed on the LCD.
3. Preset Button
Press the [1]~[6] buttons for less than 0.8
second to play the channel saved in each
button.
Press the [1]~[6] buttons for more than
0.8 second or longer to save current sta-
tion to the respective button with a beep.
4. Power ON/OFF Button &
Volume Control Knob
Press this button to turn the audio sys-
tem ON or OFF if the ignition switch is on
ACC or ON position.
Adjusts the volume of car audio. Rotate
clockwise to increase the volume, or
counterclockwise to decrease. 5. SETUP Button
Press this button to enter the TEXT
SCROLL, SDVC and P.BASS adjustment
mode. If no action is taken for 8 seconds
after pressing the button, it will return to
the play mode. (After entering SETUP
mode, move between items using the
left, right and PUSH functions of the
[TUNE] button.)
The setup items changes from TEXT
SCROLL
↔
SDVC ↔ P.BASS...
Select whether long file names are
scrolled continuously (“ON”) or just once(“OFF”).
Select this item to turn the SDVC(Speed
Dependent Volume Control) feature ON
or OFF. If it is turned ON, volume level isadjusted automatically according to the
vehicle speed.
This function creates virtual sound
effects and allows adjustments to the
BASS level. HIGH
➟
MID ➟LOW ➟OFF
Page 215 of 399

53
Driving your vehicle
Before entering vehicle
• Be sure that all windows, outside mir-ror(s), and outside lights are clean.
Check the condition of the tires.
Check under the vehicle for any sign of leaks.
Be sure there are no obstacles behind you if you intend to back up.
Necessary inspections
Fluid levels, such as engine oil, engine
coolant, brake fluid, and washer fluid
should be checked on a regular basis,
with the exact interval depending on the
fluid. Further details are provided in sec-
tion 7, “Maintenance”. Before starting
Close and lock all doors.
Position the seat so that all controls are
easily reached.
Adjust the inside and outside rearview mirrors.
Be sure that all lights work.
Check all gauges.
Check the operation of warning lights when the ignition switch is turned to the ON position.
Release the parking brake and make sure the brake warning light goes out.
For safe operation, be sure you are famil-
iar with your vehicle and its equipment.
BEFORE DRIVING
WARNING
All passengers must be properly
belted whenever the vehicle is mov-
ing. Refer to “Seat belts” in section
3 for more information on their
proper use.
WARNING
Always check the surrounding
areas near your vehicle for people,
especially children, before putting a
vehicle into D (Drive) or R (Reverse).
WARNING - Driving under
the influence of alcohol or drugs
Drinking and driving is dangerous.
Drunk driving is the number one
contributor to the highway death
toll each year. Even a small amount
of alcohol will affect your reflexes,
perceptions and judgment. Drivingwhile under the influence of drugs
is as dangerous or more dangerousthan driving drunk.
You are much more likely to have a
serious accident if you drink or
take drugs and drive.
If you are drinking or taking drugs,
don’t drive. Do not ride with a driv-er who has been drinking or taking
drugs. Choose a designated driveror call a cab.
WARNING
When you intend to park or stop the
vehicle with the engine on, be care-ful not to depress the accelerator
pedal for a long period of time. It
may overheat the engine or exhaust
system and cause fire.