2010 KIA Rio engine
[x] Cancel search: enginePage 5 of 236

Introduction
21
We want to help you get the greatest
possible driving pleasure from your vehi-
cle. Your Owner’s Manual can assist you
in many ways. We strongly recommend
that you read the entire manual.
Especially, in order to minimize the
chance of death or injury, you must read
the WARNING and CAUTION sections
spread throughout the manual.
Illustrations complement the words in this
manual to best explain how to enjoy your
vehicle. By reading your manual, you will
learn about features, important safety
information, and driving tips under vari-
ous road conditions.
The general layout of the manual is pro-
vided in the Table of Contents. A good
place to start is the index; it has an alpha-
betical listing of all information in your
manual.
Sections: This manual has eight sections
plus an index. Each section begins with a
brief list of contents so you can tell at a
glance if that section has the information
you want.You’ll find various WARNING’s,
CAUTION’s, and NOTICE’s in this manu-
al. These were prepared to enhance your
personal safety. You should carefully read
and follow ALL procedures and recom-
mendations provided in these WARN-
INGS, CAUTIONS and NOTICES.
✽ ✽
NOTICE
A NOTICE indicates a situation in
which damage to your vehicle could
result if the notice is ignored.
No special break-in period is needed. By
following a few simple precautions for the
first 1,000 km (600 miles) you may add to
the performance, economy and life of
your vehicle.
Do not race the engine.
Do not maintain a single speed for long
periods of time, either fast or slow.
Varying engine speed is needed to
properly break-in the engine.
Avoid hard stops, except in emergen- cies, to allow the brakes to seat prop-
erly.
Avoid full-throttle starts.
HOW TO USE THIS MANUAL
WARNING
A WARNING indicates a situation in
which serious bodily injury or death
could result if the warning is ignored.
CAUTION
A CAUTION indicates a situation in which personal injury, perhapssevere, could result if the caution isignored.
VEHICLE BREAK-IN PROCESS
Page 6 of 236

2
Interior overview / 2-2
Instrument panel overview / 2-3
Engine compartment / 2-4
Your vehicle at a glance
Page 9 of 236

Your vehicle at a glance
42
ENGINE COMPARTMENT
OJB050002
1. Engine coolant reservoir ...................7-12
2. Engine oil filler cap............................7-11
3. Brake fluid reservoir ..........................7-14
4. Air cleaner .........................................7-18
5. Fuse box ...........................................6- 6
6. Negative battery terminal ...........6-4/7-21
7. Positive battery terminal .............6-4/7-21
8. Auto transaxle oil dipstick* ................7-16
9. Radiator cap......................................7-14
10. Engine oil dipstick ...........................7-11
11. Power steering fluid reservoir* ........7-15
12. Windshield washer fluid reservoir ...7-17
* : if equipped
Page 11 of 236

Knowing your vehicle
23
The key code number is stamped on the
plate attached to the key set. Should you
lose your keys, this number will enable
an authorized Kia dealer to duplicate the
keys easily. Remove the plate and store it
in a safe place. Also, record the code
number and keep it in a safe and handy
place, but not in the vehicle. Use only
Kia-approved key blanks.Key operations
(1) Master keyUsed to start the engine, lock andunlock the doors, and open the trunk
(if equipped).
(2) Transmitter (if equipped) Used to lock and unlock the doors.
KEYS
OJB040006
WARNING - Ignition key
Leaving children unattended in a
vehicle with the ignition key is dan-
gerous even if the key is not in the
ignition. Children copy adults and
they could place the key in the igni-
tion. The ignition key would enable
children to operate power windows
or other controls, or even make the
vehicle move, which could result in
serious bodily injury or even death.
Never leave the keys in your vehicle
with unsupervised children.
OJB040005N
CAUTION
Use only Kia original parts for theignition key in your vehicle. If an aftermarket key is used, the ignitionswitch may not return to ON afterSTART. If this happens, the starter will continue to operate causingdamage to the starter motor and possible fire due to excessive cur-rent in the wiring.
Page 14 of 236

35
Knowing your vehicle
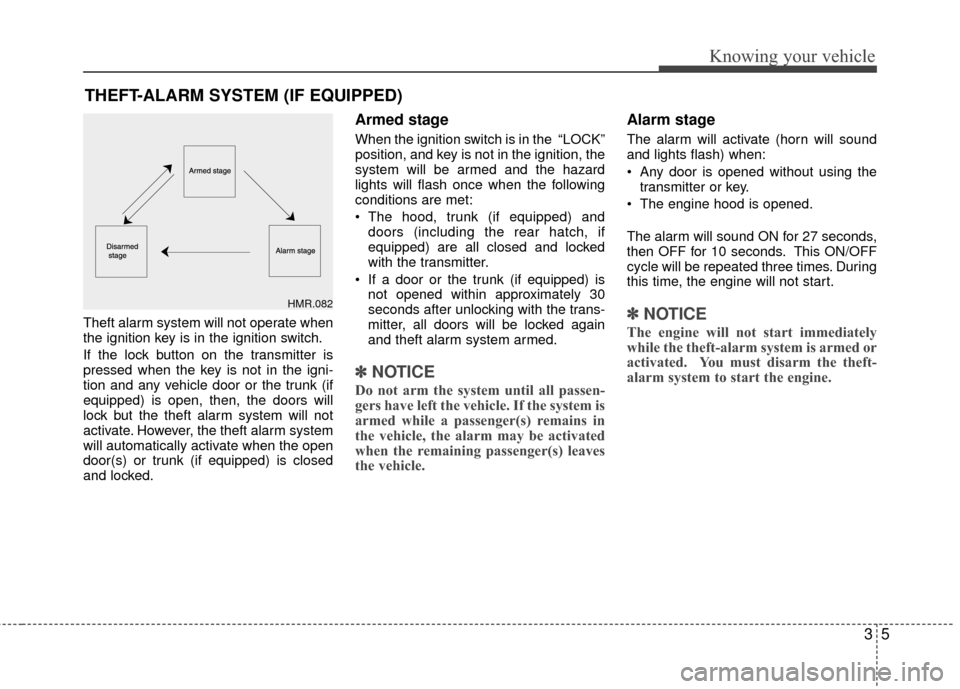
Theft alarm system will not operate when
the ignition key is in the ignition switch.
If the lock button on the transmitter is
pressed when the key is not in the igni-
tion and any vehicle door or the trunk (if
equipped) is open, then, the doors will
lock but the theft alarm system will not
activate. However, the theft alarm system
will automatically activate when the open
door(s) or trunk (if equipped) is closed
and locked.
Armed stage
When the ignition switch is in the “LOCK”
position, and key is not in the ignition, the
system will be armed and the hazard
lights will flash once when the following
conditions are met:
The hood, trunk (if equipped) anddoors (including the rear hatch, if
equipped) are all closed and locked
with the transmitter.
If a door or the trunk (if equipped) is not opened within approximately 30
seconds after unlocking with the trans-
mitter, all doors will be locked again
and theft alarm system armed.
✽ ✽ NOTICE
Do not arm the system until all passen-
gers have left the vehicle. If the system is
armed while a passenger(s) remains in
the vehicle, the alarm may be activated
when the remaining passenger(s) leaves
the vehicle.
Alarm stage
The alarm will activate (horn will sound
and lights flash) when:
Any door is opened without using the
transmitter or key.
The engine hood is opened.
The alarm will sound ON for 27 seconds,
then OFF for 10 seconds. This ON/OFF
cycle will be repeated three times. During
this time, the engine will not start.
✽ ✽ NOTICE
The engine will not start immediately
while the theft-alarm system is armed or
activated. You must disarm the theft-
alarm system to start the engine.
THEFT-ALARM SYSTEM (IF EQUIPPED)
HMR.082
Page 16 of 236

37
Knowing your vehicle
Your vehicle is equipped with an elec-
tronic engine immobilizer system to
reduce the risk of unauthorized vehicle
use.
Your immobilizer system is comprised of
a small transponder in the ignition key,
and antenna coil in the key cylinder and
Immobilizer Control Unit (or Smartra
Unit).
With this system, whenever you insert
your ignition key into the ignition switch
and turn it to ON, the antenna coil in the
ignition switch receives a signal from the
transponder in the ignition key and then
sends the signal to the ECU (Engine
Control Unit).
The ECU checks the signal whether the
ignition key is valid.
If the key is determined to be valid, the
engine will start.
If the key is determined to be invalid, the
engine will not start.
To deactivate the immobilizer
system:
Insert the ignition key into the key cylin-
der and turn it to the ON position.
To activate the immobilizer sys-
tem:
Turn the ignition key to the OFF position.
The immobilizer system activates auto-
matically. Without a valid ignition key for
your vehicle, the engine will not start.
✽ ✽NOTICE
When starting the engine, do not use the
key with other immobilizer keys around.
Otherwise the engine may not start or
may stop soon after it starts. Keep each
key separately not to have any malfunc-
tion after you receive your new vehicle.
Limp home (override) procedure
When you turn the ignition key to the ON
position, if the IMMO indicator goes off
after blinking 5 times, your transponder
equipped in the ignition key is out of order.
You cannot start the engine without the
lime home procedure. To start the engine,
you have to input your password by using
the ignition switch.
The following procedure is how to input
your password of “2345” as an example.
1. Turn the ignition key to the ON position.
The IMMO indicator ( ) will blink 5
times and go off indicating the begin-
ning of the limp home procedure.
2. Turn the ignition key to the ACC posi- tion.
IMMOBILIZER SYSTEM (IF EQUIPPED)
CAUTION
Do not put metal accessories nearthe key or ignition key.
The engine may not start for themetal accessories may interrupt thetransponder signal from normally transmitting.
WARNING
In order to prevent theft of your
vehicle, do not leave spare keys
anywhere in your vehicle. Your
Immobilizer password is a cus-
tomer unique password and should
be kept confidential. Do not leave
this number anywhere in your vehi-
cle.
Page 17 of 236

Knowing your vehicle
83
3. To enter the first digit (in this example“2”), turn the ignition key to the ON and
ACC position twice. Perform the same
procedure for the next digits between 3
seconds and 10 seconds (for example,
for “3”, turn the ignition ON and ACC 3
times).
4. If all of the digits have been input suc- cessfully, you have to start the engine
within 30 seconds. If you attempt to
start the engine after 30 seconds, the
engine will not start and you will have
to input your password again.
After performing the limp home proce-
dure, you have to see an authorized Kia
dealer immediately to inspect and repair
your ignition key or immobilizer system.
✽ ✽ NOTICE
If you cannot start your engine in spite
of limp home procedure, have your vehi-
cle towed by an authorized Kia dealer
for inspection and necessary repairs.
✽ ✽NOTICE
The transponder in your ignition key is
an important part of the immobilizer
system. It is designed to give years of
troublefree service, however you should
avoid exposure to moisture, static elec-
tricity and rough handling.
Immobilizer system malfunction could
occur.
✽ ✽NOTICE
Do not change, alter or adjust the immo-
bilizer system because it could cause the
immobilizer system to malfunction and
should only be serviced by an author-
ized Kia dealer.
Malfunctions caused by improper alter-
ations, adjustments or modifications to
the immobilizer system are not covered
by your vehicle manufacturer warranty.
This device complies with Industry
Canada Standard RSS-210.
Operation is subject to the following two
conditions:
1. This device may not cause interfer-
ence received, and
2. This device must accept any interfer- ence received, including interference
that may cause undesired operation.
WARNING
Changes or modifications not
expressly approved by the party
responsible for compliance could
void the user's authority to operate
the equipment.
Page 22 of 236

313
Knowing your vehicle
Cargo area lamp (if equipped)
The cargo area lamp turns on when the
rear hatch is opened. It remains on until
the rear hatch is securely closed.
✽ ✽NOTICE
Make sure to close the rear hatch
securely. If it remains open while engine
is not running, it may cause battery dis-
charge because cargo area lamp
remains on.
CAUTION - Rear hatch
The rear hatch swings upward.
Make sure no objects or people arenear the rear of the vehicle whenopening the rear hatch.
WARNING- Exhaust
fumes
If you drive with the rear hatch
open, you will draw dangerous
exhaust fumes into your vehicle
which can cause serious injury or
death to vehicle occupants.
If you must drive with the rear hatch
open, keep the air vents and all win-
dows open so that additional out-
side air comes into the vehicle.
WARNING- Rear cargo
area
Occupants should never ride in the
rear cargo area where no restraints
are available. To avoid injury in the
event of an accident or sudden
stops, occupants should always be
properly restrained.
1JBA3520